Theme Installation
Like any other child theme, Cuisine can also be installed using three ways.
1) Easy Install (Recommended)
2) Traditional Install
3) Installing Cuisine with FTP
Method 1 : Easy Install
The easy install is the simplest and recommended way to install and activate the theme. You can install the theme with just few clicks.
- Download the Cuisine Easy Install file from the member’s area by logging into your account.
- From your WordPress dashboard, navigate to Appearance ⇒ Themes ⇒ Add New ⇒Upload. Upload the .zip file you just downloaded.
- Activate the Cuisine theme and NOT the directory theme once the installation process is done.
Activating the theme
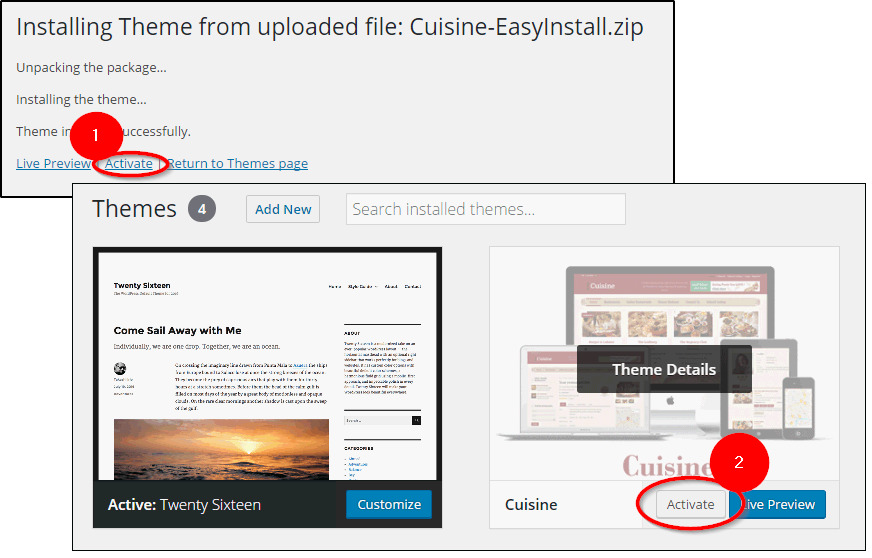
- You can activate the theme directly after installing it. Remember : For using the child theme you don’t have to activate the Directory theme. Just install it. Activate only the child theme “Cuisine”.
- Or you can navigate to Appearance ⇒ Themes and Activate the Cuisine theme.
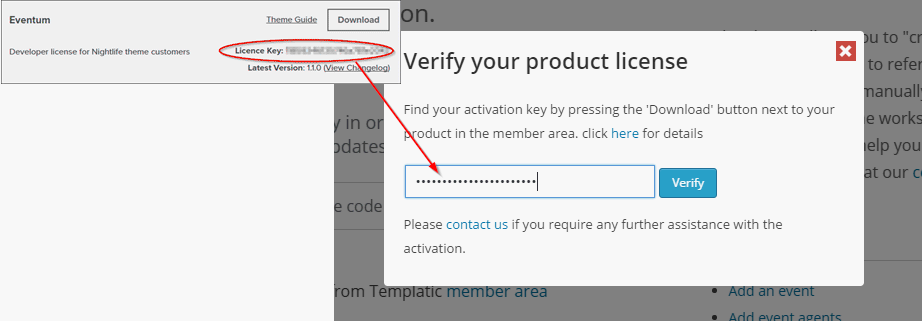
- Once the theme is activated, you will be asked for the verification key. The verification key can be found from the members’ area from where you download the theme. screenshot.
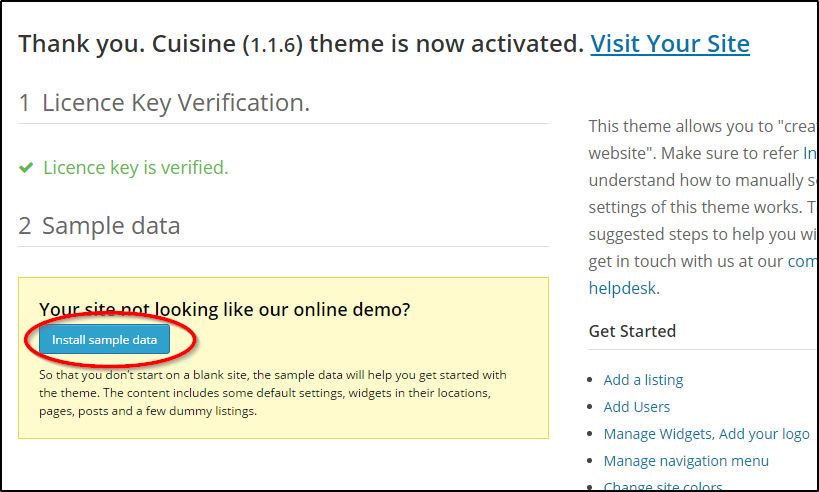
Installing Dummy data
Dummy data is the sample data that is available with the theme file. On getting the theme activated, you will be asked whether you want to populate the site with the dummy data. This data will populate the theme with sample data to make it appear just like the Theme Demo.
Deleting the sample data
The sample data that you install on the theme activation can be deleted. Do not edit the dummy data because in case you delete it, your modifications will be lost. Always insert fresh data.
Method 2: Traditional Install
Installing Cuisine Child Theme
Because the Cuisine child theme is powered by Directory, you will have to install Directory in order to use the child theme. For Directory installation instructions watch the video below.
Quick note: The video will instruct you to activate Directory as the last step of installation process. Feel free to skip that part (just install Directory, don’t activate it).
Installing Cuisine
With Directory installed you’re ready to move onto the Cuisine child theme. Follow these steps to load the child theme and complete the installation process
- Login to Templatic member area and download the Cuisine child theme. You’ll find it inside the Directory Downloads ⇨ Directory Child Themes section. Click on the section to reveal the download links.
- Open your WordPress dashboard and navigate to Appearance ⇨ Themes ⇨ Add Themes ⇨ Upload. Load the .zip file you downloaded a few moments ago.
- Activate the theme once the installation process is done.
- Click on the Insert Sample Data button to quickly populate your site with relevant content. We highly recommend doing this as it makes getting to know the theme much easier.
Method 3: FTP install
To install the Cuisine using FTP, follow the steps given below:
Note: If you do not have idea about the use of FTP, Please refer this FTP guide before proceeding.
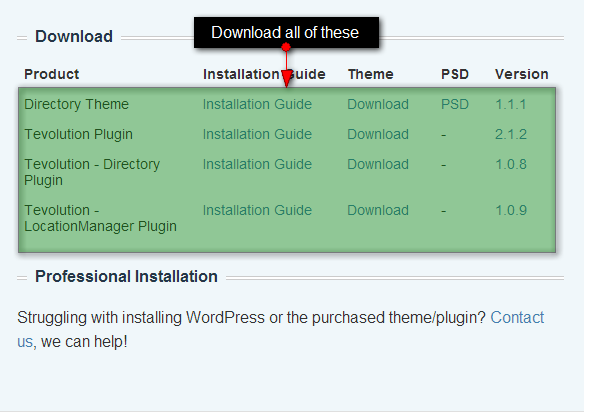
- Download all files available under “Traditional Installation” in “Cuisine” section inside member area and extract them using software like 7-Zip. Use the “Extract here” option; don’t extract into a new folder.
- Assuming you read the above linked FTP tutorial, navigate to /wp-content/plugins/ on your server and upload all the plugin folders (Tevolution, Tevolution-Directory and Tevolution-LocationManager)
- Navigate to /wp-content/themes/ and upload the Directory folder and Cuisine folder.
- Login to your WordPress dashboard and go to Plugins. Activate Tevolution and enter the license key available inside our member area.
- Go to the Plugins section again and activate Tevolution – Directory and then Tevolution – Location Manager.
- Navigate to Appearance ⇨ Themes and activate the Cuisine theme.
- While in the Appearance ⇨ Themes section, click on the blue “Install sample data” button to populate your site with dummy data and make it look like our demo.
Following one of the three methods mentioned above, the theme can be easily installed. Once the theme is activated, you can proceed with basic settings.
Setting up permalinks
Permalinks are the permanent URLs for your webpages. With Directory theme, you can easily manage the permalink structure of your web-pages. In this section, steps for setting up permalinks are shown.
- Navigate to WP-admin ⇨ Settings ⇨ Permalinks.
- Choose the “Common Settings” tab choose the Post name option.
- Press “Save Changes”.
With Post name permalinks active, you can tweak permalinks further by navigating to Tevolution ⇨ Settings ⇨ Permalinks (tab). Inside this section you either remove or edit slugs for: Categories, Tags, Individual listings, Authors, Cities and even your custom post types.
For example, listing category pages in Directory contain the “listingcategory” slug. To remove that just disable the “listing Categories Base” option inside the Permalinks section.
Old URL: example.com/listingcategory/places
Users Management
For any website, user registration is one of the main modules. In this section we will see how we can manage the registration and users on our website. The registered users will be the ones to post listings on your website. So let’s see how you can manage them.
Enable disable registration
To allow or disallow registration, Navigate to Wp-admin ⇨ Settings ⇨ General settings ⇨ Membership. Checkmark “Anyone can register” to enable front-end registration on your website. If unchecked, the website will not allow users to register on the frontend.
Add users
From the back-end you can manage users from WP-admin ⇨ Users ⇨ Add user. Fill the required details in the form and register the users. The users can also register themselves from the front end.
Manage existing users
The existing users will be shown at WP-admin ⇨ Users ⇨ All users. From here, you can change the role of the users, add, update or delete the existing profiles. This page also shows the number of posts of the each user in each post type. From here bulk delete of users is possible.
Registration form and User profile fields
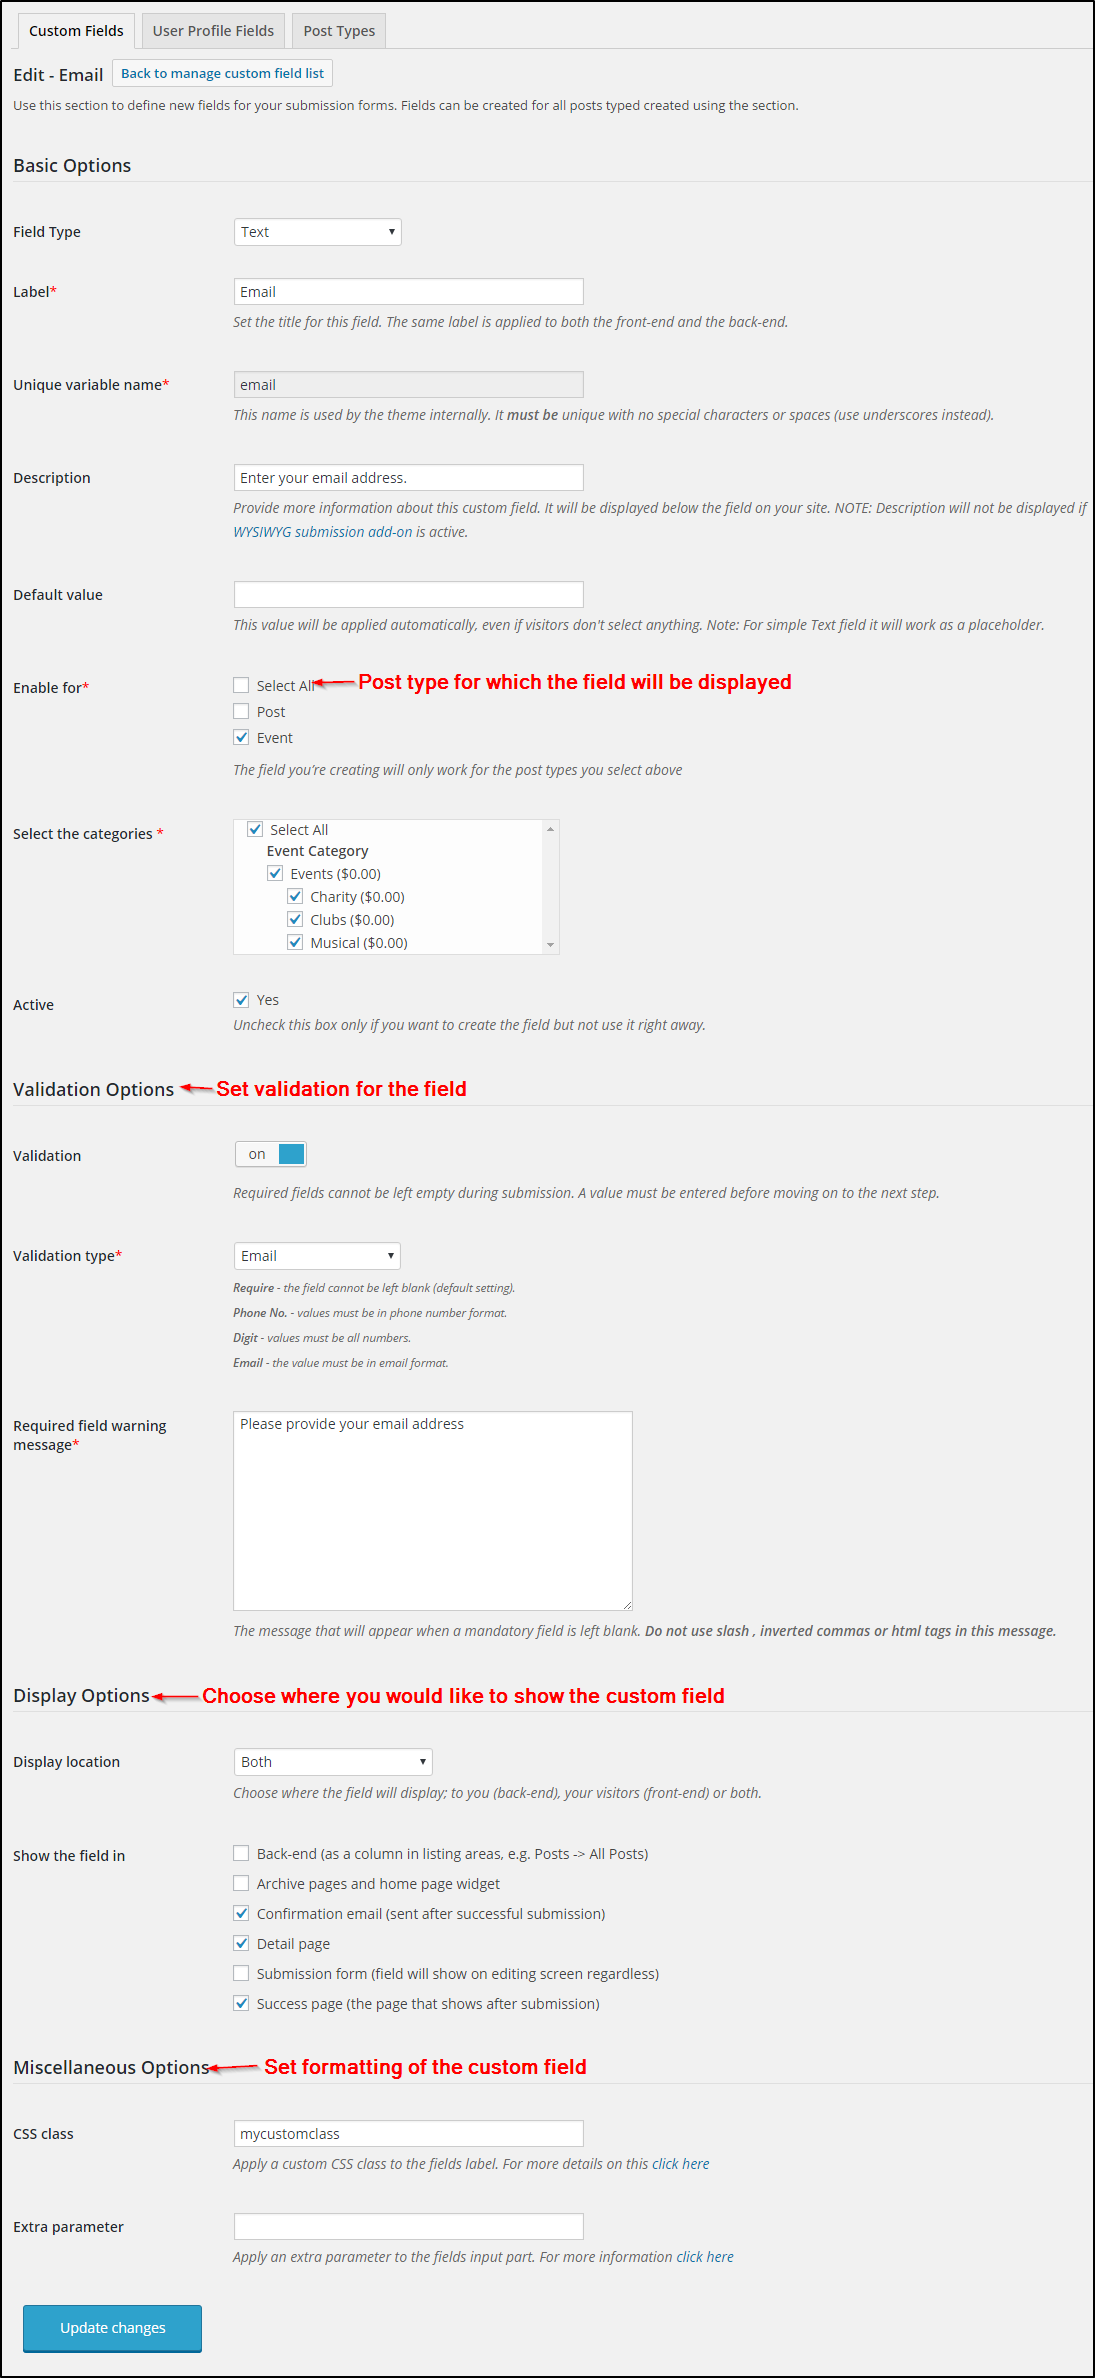
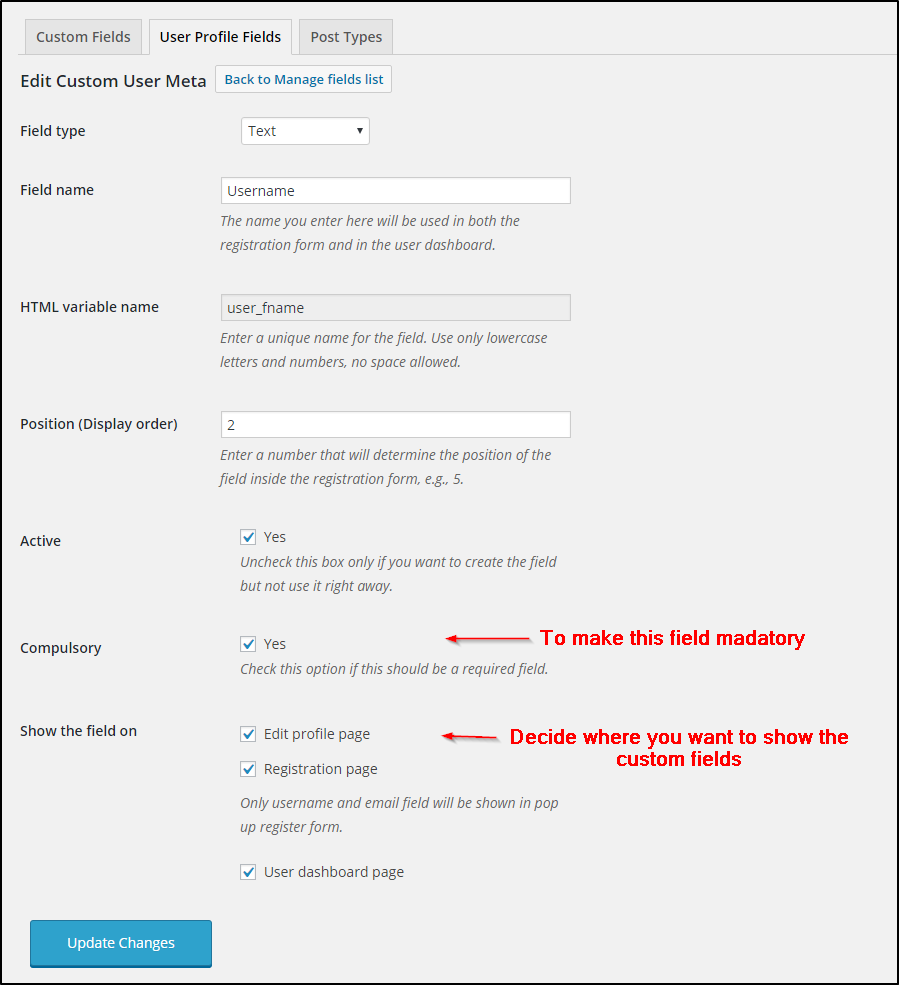
For the front end submission the user registration is already available at wp-admin ⇨ Pages ⇨ register. When the registration link is clicked, a pop-up will appear that will show the fields to enter the username and the email address. the password to login will be sent to the submitted username. To manage the User profile custom fields, navigate to Tevolution ⇨ Custom fields ⇨ User Profile fields.
Click here to know how you can setup individual custom fields.
Location Management
The listings added to the Cuisine website will be based on the location. Therefore, before we proceed with adding and managing listings, these are few location related settings.
Countries and States
To add and manage countries and states, navigate to “Countries” and “States” tabs inside the Tevolution ⇨ Manage Locations section. Probably, you’ll find the country in the preloaded countries but if you don’t you can create a new country easily. Similarly at Tevolution ⇨ Manage Locations ⇨ States, you can add the states to the country.
Add a city
Unless you add the cities, the listings won’t be submitted. Therefore, before we proceed on how to add and manage listings, we need to add the cities. Three default cities are provided with the Location Manager, but you can add as many cities as you want. To add cities navigate to Tevolution ⇨ Manage Locations ⇨ Cities. Before adding cities, don’t miss adding the Country and the state to which the city belongs. Click here to set up the cities.
Manage Locations
From here, you can set the general options for managing the locations of the website. The options are available at Tevolution >> Manage locations.
City selector style – To select the way the cities are shown on the homepage header.
City Selector levels – Control the level of selection offered to the users on the homepage.
Location Tracking Method – Select the location tracking method for the tracking location for the pinpoint functionality. Only change this if you are experiencing problems with the default service, i.e Freegeoip.
Homepage displays – Through this you can decide what the homepage will display. The “default city” option will show the listings of the default city. Default city can be set from the cities tab. With the “Ask to show nearest city” will show a strip at the top asking them to share their location. And the “Nearest city” will show the city nearest to them without the ability to stop the process.
Activate location Manager for – You can disable or enable location manager for each post type from here.
Track city visits (city logs) – To keep the track of visits of the users in each city. This will be useful in deciding the most popular cities of the site.
The country, state and cities tab will allow you to add and manage the countries, state and cities respectively. The City logs tab will allow you to track the visits on each city of the website.
The city logs
The city log will show how many times a city is selected and its listings are viewed. The report will show the city, state and the country name with the Total Count and view details. On clicking on views – the details of the city views will be shown. This includes the IP address and number of times the city is viewed from the IP address.
To turn on or off the city logs, navigate to Tevolution ⇨ Manage locations ⇨ and enable or disable the option Track city visits (city logs).
Map Shortcode
Use the below shortcode to display content (one or most post types) within a specific city. To create a page using this shortcode navigate to Pages ⇨ Add New and paste in the code.
[TCITY-DIRECTORYMAP cityid='1' post_type='listing' height='500'][/TCITY-DIRECTORYMAP] |
cityid – the ID of the city you want to show. The city ID is displayed when hovering over a city inside Manage Locations ⇨ Cities (tab). Screenshot.
post_type – enter the post type you want to show (e.g. listings). To display multiple post types separate them with a comma. For example, to display listings and properties, enter the value like this: ‘listings,events,posts’.
height –set map height in pixels.
Bulk upload cities
If you do not wish to add the cities one by one, use the bulk upload option. Using the bulk upload feature, you will be able to insert a number of cities together using a CSV file.
Single-city mode
If you plan on using Cuisine for a single city only, deactivate the location manager plugin from wp-admin ⇨ plugins ⇨ Installed plugins. Don’t forget to replace your map widgets with “single city” map widgets. Without the Tevolution – Location Manager plugin, your URLs won’t have the /city/city_name slug within them.
If you do not require to display the listings of multiple cities and only want to maintain a single city listings guide, then disable the Location Manager plugin. This will enhance the performance and fetch noticeably faster results.
Managing Custom fields
With Directory theme you can add innumerable custom fields and manage them. These fields can be added to your forms and associated with the custom post types. To add/manage the custom field Navigate to Tevolution ⇨ Custom fields.
Custom fields
First of all, you will need to select the post type in this tab. This will show a list of all the custom fields pertaining to that post type on the page. Hovering the custom field name will display an “edit” option. You can manage each custom field from here.
Refer this link for a detailed explaination on how to add or manage the custom fields.
User Profile fields
The user profile fields you can manage the fields a user will see on the registration and user profile management pages. These fields can be managed from here and new fields can be added as per the requirements. Refer this link for step by step setting up of user profile fields.
Post type
With this you can add and manage custom post types in your website.
When you create a new post type, the settings and configurations of the existing post type. Click here to know how you can create a custom post type
These are the articles to show how you can setup a custom submission form or a custom registration form with the Directory theme.
Monetization Options
The main characteristic of Directory and all of its child themes is its monetization facilities. With these options, you can charge your users for the listings they post on your website. With these ,you can set currency, create desired number of price packages, configure payment options. Navigate to Tevolution ⇨ Monetization, to set up the pricing options in your website.
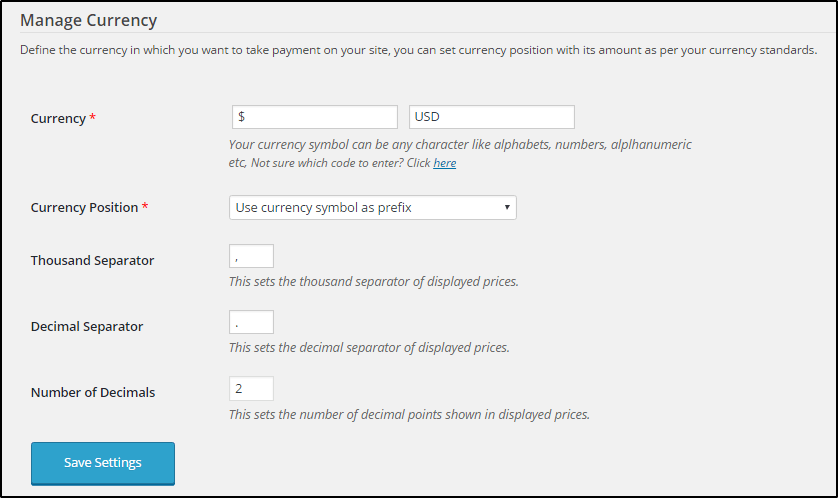
Currency
From here you can manage the currency of the website. Select a currency, that you want your users to make payment in. Enter the currency symbol and the currency code. Also set the basic currency settings, like position of currency symbol (prefix/suffix) and the specify the thousand and decimal separator and the number of decimals.
Price packages
With this option, you can create and configure number of price packages. You can offer different schemes for each package. These price packages will be shown to the users on the front end while submitting event. They can select the price package that suits them the best.

Free and multi-listing price options are available pre-installed with the Tevolution plugin. Click on Add a price package to create a new price package.
Clicking on the settings, will allow you to configure the payment package for use in your website.
Click here to learn how to configure the price package.
Payment gateways
To accept payment from the registered users, you will need to integrate payment gateways through which they can pay and you can receive the sum. This can be configured from this page.
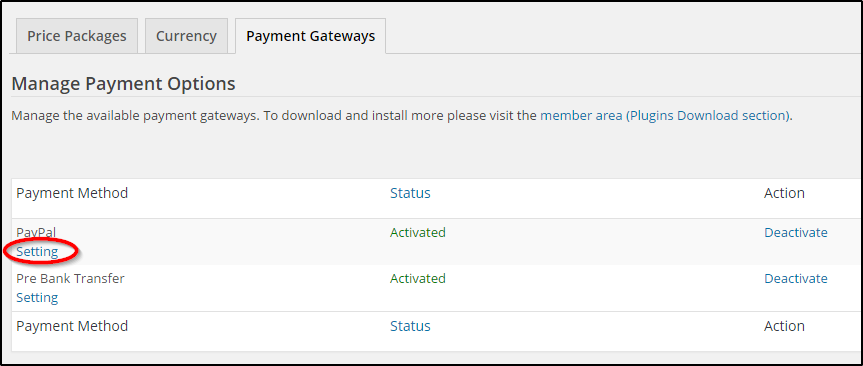
The paypal and the pre bank transfer methods come pre-installed. Besides this, there are number of payment gateways compatible with Directory that you can integrate and use into your Cuisine website. All the payment gateways you integrate in your website will be listed into this page.
Clicking on the setting will open a page that allows you to configure the integrated payment option.
Managing transactions
With the user payments, it’s sure that you will have transactions in your website. This transactions can be managed at Tevolution ⇨ Transactions.
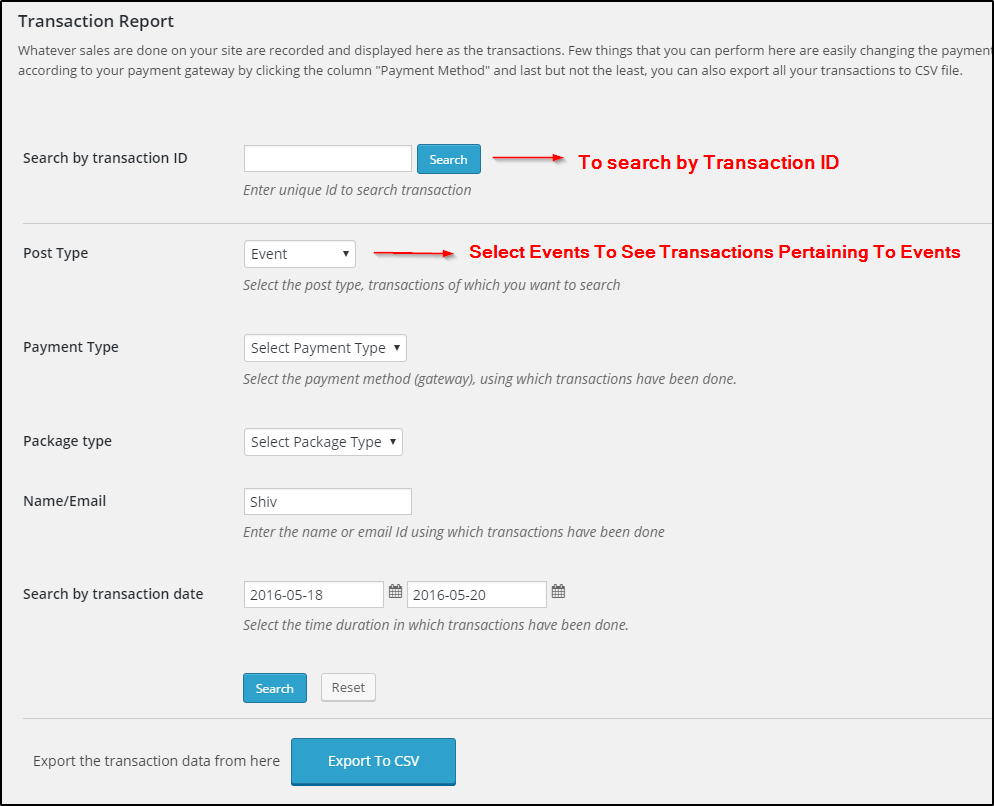
Click here to know more about Directory Transactions Management.
Listings in Cuisine
Listing Categories and tags
Listing categories, are the categories in which the users can post the listings. If you do not add any categories, all the listings will be added to “uncategorized” category bydefault. So before you get started with your Cuisine website to get the listings, it is vital to decide the categories. Create categories at Dashboard >> Listings >> Listing Categories. These categories are the ones for which listings will be accepted.
Categories are a great way for the users to filter the listings according to their choices. The categories can have sub-categories and subcategories too can have subcategories.
Lastly, at Dashboard >> Listings >> Listing tags, you can add the tags for the listings.
Add a listing in Cuisine
Listing is one of the most important post types in the Cuisine theme. The “spots” in Cuisine are nothing but the listings. These spots can be added by the admin from the backend. Allowing front end submission is optional. With front end submission, the registered users will be empowered to submit listings on the website. Let’s see how this works:
Front end submission:
For front end submission, a form appears when the users clicks on the “Add Listing” button. This button will be automatically added to the homepage with the sample data install. The link to the button will lead to the submit listing page at Pages >> Submit listing. This page is already existent in the theme, but if it’s not, you can easily create a new page, name it as “Submit Listing” and add the short code “[submit_form post_type=’listing’]” to the page. The fields that appear in this submission form can be managed at Tevolution ⇨ Custom Fields ⇨ Listings.
Back end submission:
For the back end submission, navigate to Dashboard ⇨ Listings ⇨ Add new listing. Just fill up the required fields, set a featured image for your listing and specify the location. Press publish.
Manage Listings
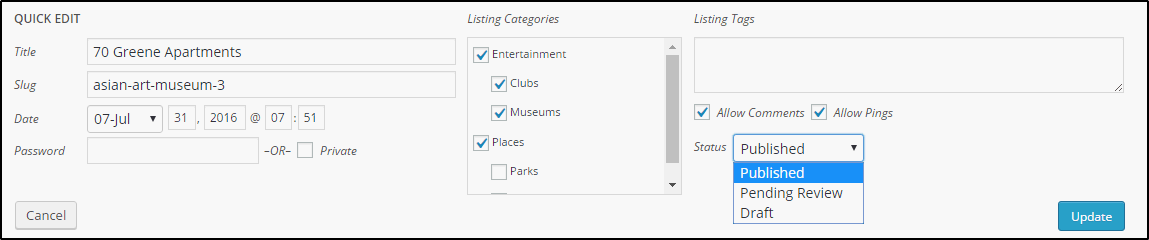
You can edit the listings that are already published and make changes to its properties and contents at wp-admin ⇨ Listings. Hover over the listing name and you will see the options to Edit, Quick edit, Trash and View. To make changes in the content of the post edit it, to make changes in the basic properties of the listing, choose the quick edit option. The following is a glimpse of the quick edit window:
Moderate the user submitted listings
To moderate the user submitted listings, navigate to wp-admin ⇨ Listings section. Here, all the listings posted from the back end as well as the front end will be shown. From there you can draft, publish or edit them. Another place from where you can manage them is Tevolution ⇨ Transactions. Use that section to bulk confirm or bulk reject transactions/listings. For more information about Transactions click here.
To set the default status for submitted listings (publish/draft) navigate to Tevolution ⇨ Settings ⇨ Submission page settings ⇨ Default status for free/paid submissions.
With the claim ownership feature, visitors of your site can claim a listing on your Directory website as their own. is claim will be visible at the backend and after proper verification, you, as an admin can decide whether you want to grant the ownership of the claimed listing or not.
The claim ownership feature can be enabled at Tevolution ⇨ Settings ⇨ General settings ⇨ Claim ownership. Enable claim ownership for listing by checking the checkbox and a “Claim ownership” button will appear on the front end to the visitors. They can click the button and fill up a simple form to claim the ownership of the listing. you can manage the claims and grant or deny them from Tevolution ⇨ Submitted claims.
Manage Pages
Setting up the Homepage
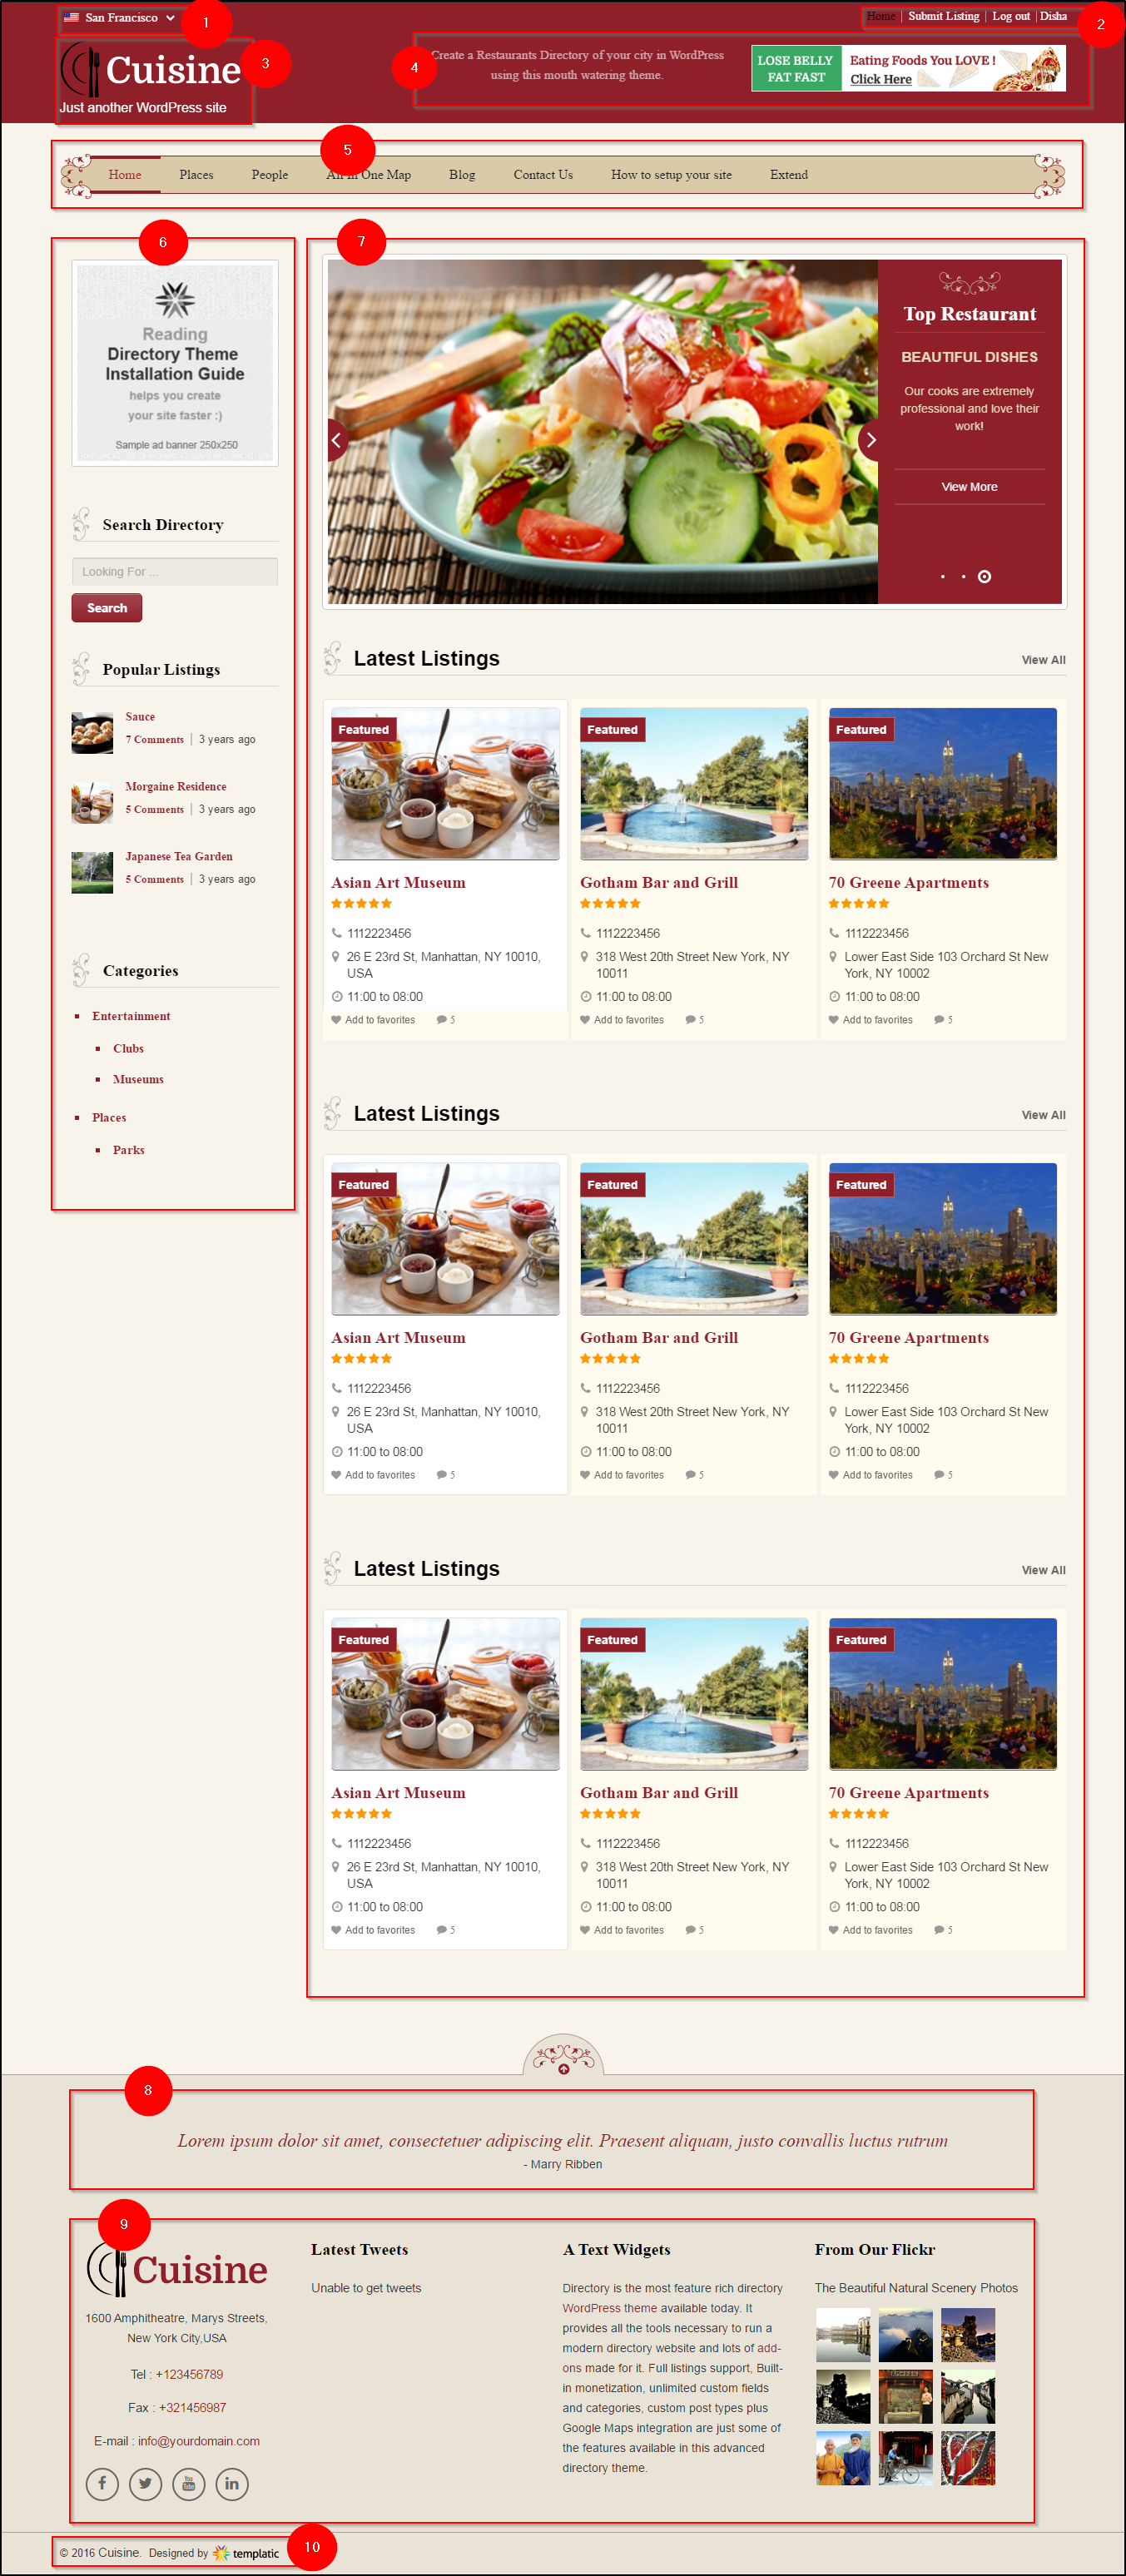
1) Location selector
The location selector will appear automatically if you are using the Tevolution Location Manager plugin and allowing multi-city mode. The Location selector does not appear if Tevolution Location Manager plugin is deactive and the theme is running in single city mode with all the listings belonging to just one city.
2) Primary menu
The menu that appears here is the primary menu and it can be managed at Dashboard ⇨ Appearance ⇨ Menus.
3) Site title and Tagline
The site title and the Tagline displays the branding of the website. You can change it from Appearance ⇨ Customize ⇨ Site Identity. To set a logo instead navigate to Appearance ⇨ Customize ⇨ Site logo.
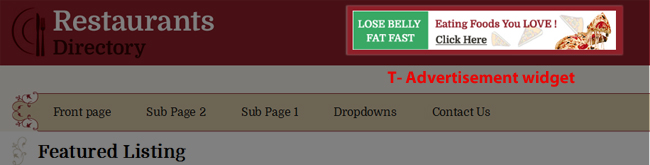
4) Advertisement or Text widget
The text and the image placed on the header are rendered by two different text widget placed in the header widget area.
5) Secondary menu
The secondary menu is the main menu below the header. It can be changed from Dashboard ⇨ Appearance ⇨ Menus and selecting the secondary menu.
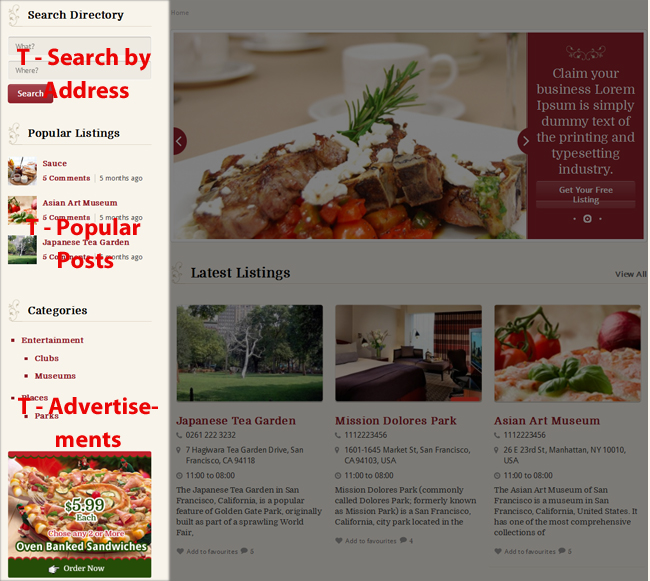
6) Homepage sidebar
The sidebar can be used as the secondary means of navigation, it can also be used to display semi-important information. The widgets placed in the sidebar are Text widget for displaying advertisement, T – Instant search for search and the T – Popular post widget to show the popular listings and the Categories widget to show all the categories in the sidebar. However, you can re-configure the sidebar to hold any sidebar compatible widget.
7) Homepage main content area
This is the main content area of the homepage. The first widget placed here is the T – Homepage banner for the homepage banner and the next is the T – Homepage display posts placed multiple times with different configurations to show different posts.
8) Testimonials
The testimonial widget provided by the Cuisine theme is the T – Testimonials. This widget is placed in the above footer widget area.
9) The Footer
The content shown in the footer is displayed by the before footer 1 column and the footer widget area. The widgets that compose the footer in the image are
The before footer 1 column widget area
- Text widget to hold the logo and the following text
- T – social media
The Footer widget area
- T – Twitter feeds
- Text widget area
- T – Flickr photos
9) The Footer credits
To change or remove the footer credits navigate to Appearance ⇨ Customize ⇨ Footer.
Category Page
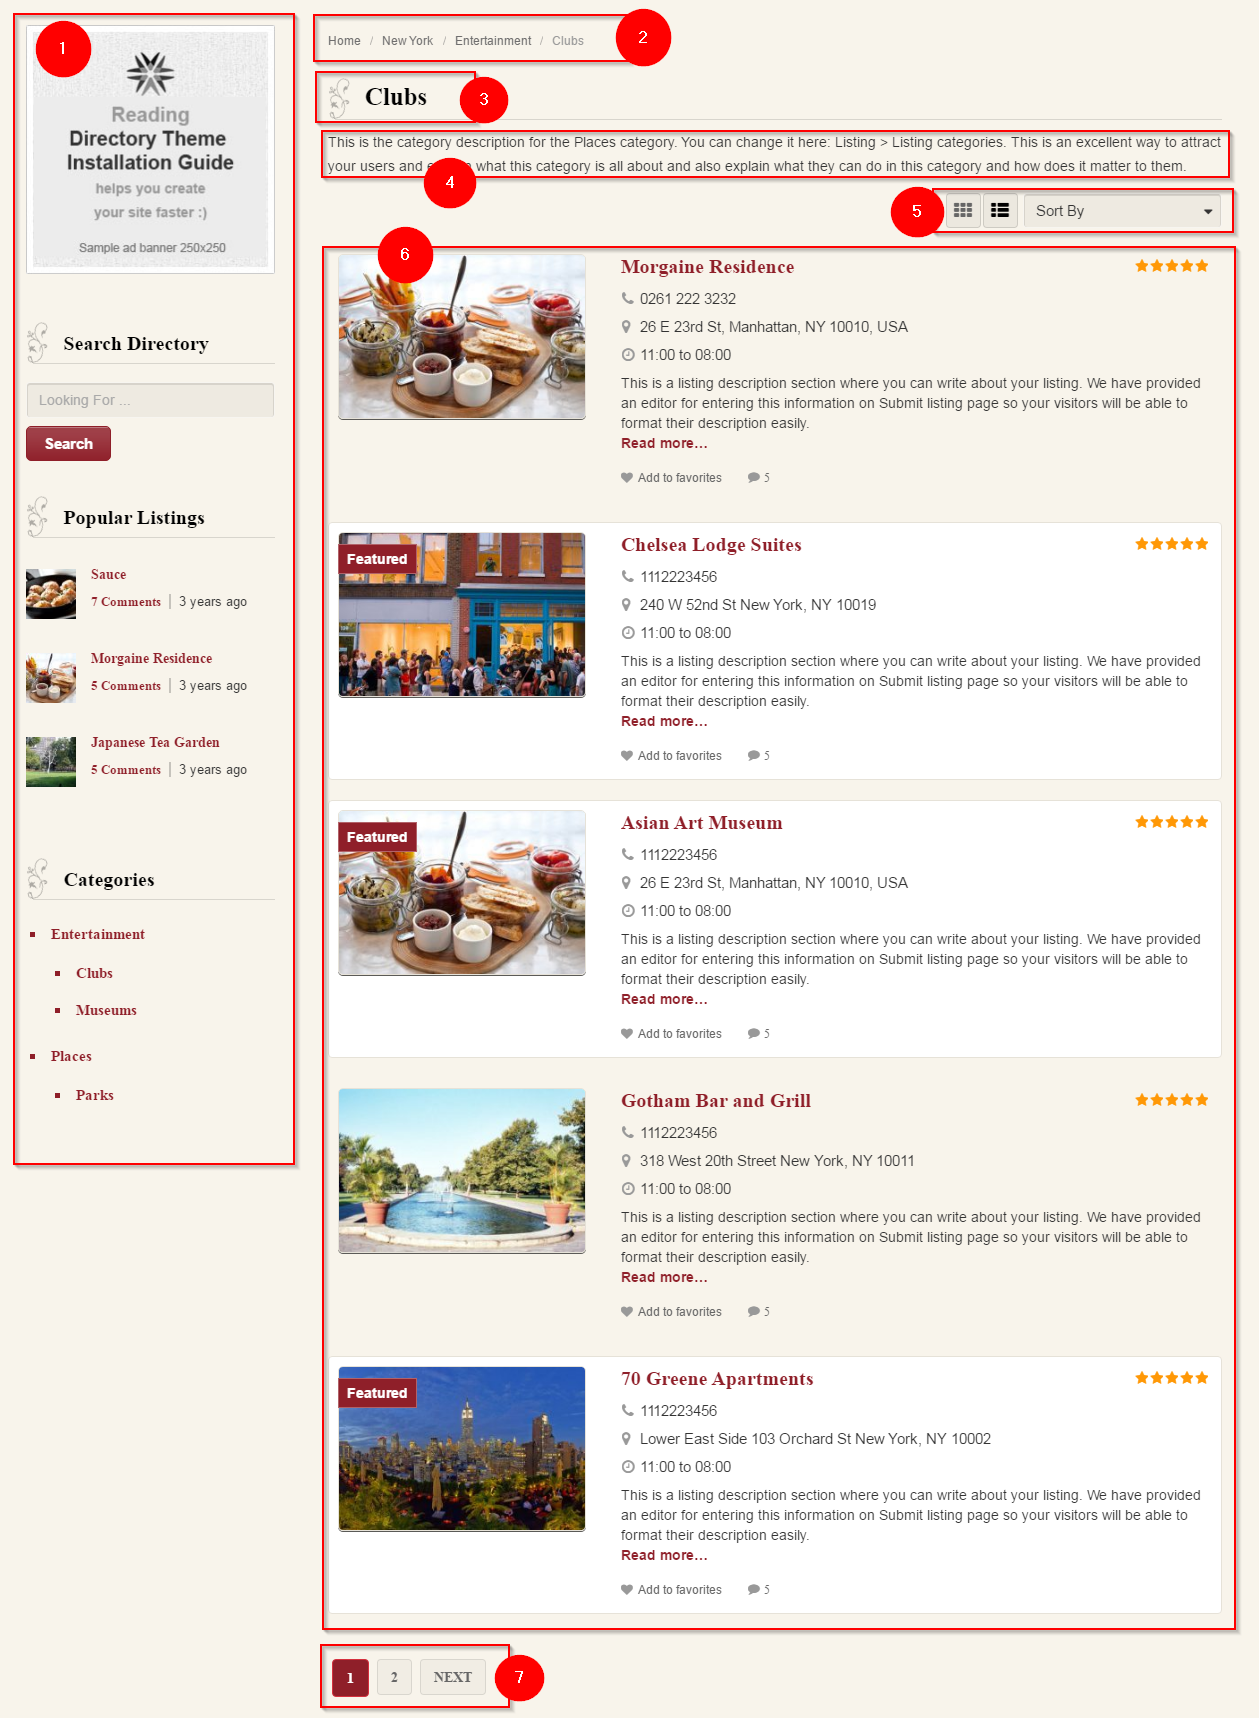
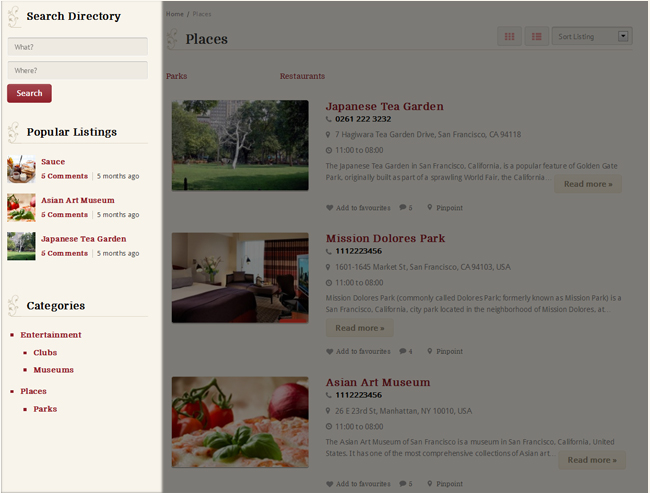
1) Category page sidebar
The category page sidebar runs along the main content area of the category page. The content of the category page sidebar are displayed according to the widgets placed in the Category page sidebar widget area. In the screen shot, the widgets in the category page sidebar are :
1) T- text widget to hold the adverrtisement.
2) T – Instant search to search nearby listings
3) T- Popular posts and
4) T – Browse by Categories/Tags
2) Breadcrumbs
The breadcrumbs are a form of navigation that lets you keep the track of where you are in the hierarchy of webpages in the website. To Turn the breadcrumbs off or on, navigate to Dashboard ⇨ Theme settings ⇨ Breadcrumbs.
3) Category Title
This is the title of the category. This is to let the visitors know, what catergory results they are viewing
4) Category Description
The category description is the text that is added with a particular category explaining what the category is about. Each post type has unique categories. So when adding the categories, make sure that you add the category to the desired post type, and not some other post type.
5) Display type and sort by options
The Display type allows the visitors on the front end to choose how the results are displayed on the category page. In list view or in Grid view. The default view can be set at Tevolution ⇨ Settings ⇨ General Settings ⇨ Category Page ⇨ Default page view.
The Sort by options will be shown beside the view switchers, This will allow the visitors to sort the results shown on the category page. Navigate to Tevolution ⇨ Settings ⇨ General Settings ⇨ Category Page ⇨ Sorting options, and check-mark the options you want to provide your visitors to sort the results.
6)The results
Here the results will be shown for the chosen category. The number of results to be displayed here can be set at Dashboard ⇨ Settings ⇨ Reading ⇨ Blog pages show at most. The category page will then show the specified number of results on one page and others will be carried forward to another page.
7) Pagination
The pagination will allow the users to navigate to another page which will show more results for the relevant categories. If you do not want the results to be divided among pages and want to see all the listings of a category on one page, simply provide a greater number at Dashboard ⇨ Settings ⇨ Reading ⇨ Blog pages show at most.
Detail Page

1) Detail page sidebar
The detail page sidebar can be used as a secondary means of navigation. This place can be used to accommodate any sidebar widget you want to show the visitors on the detail page. In the detail page shown in the image, the sidebar widget area is configured to display content of the following widgets:
1) Text widget – To show the advertisement.
2) Categories
3) T- Popular posts
2) Breadcrumbs
The breadcrumbs are a form of navigation that lets you keep the track of where you are in the hierarchy of webpages in the website. To Turn the breadcrumbs off or on, navigate to Dashboard ⇨ Theme settings ⇨ Breadcrumbs.
3) Listing title
This will show the name or the title of the current listing.
4) View counter
The counter will show how many times the page has been visited, on the day and since it has been published. If you do not wish to show the visit counter , go at Tevolution ⇨ Settings ⇨ General Settings ⇨ Detail Page ⇨ view counter, and turn off the counter.
5) Basic Information
The basic information about the listings will be shown on the top of the detail page. These are those information that the users need to find as soon as they reach the detail page. It includes the Title of the listing, address, basic contact information and the ratings of the Listings.
6) Images
The listing images added by the listing owner will be shown here. All the images will be visible to the users from here.
7) Map
The detail page map will show the listing location with a map marker on the exact location of the listing. The map will allow the visitors to get directions from their location to the listings location, very easily. To turn off this map, go to Tevolution ⇨ Settings ⇨ General Settings ⇨ Detail Page ⇨ Show map tab and turn off the toggle button.
8) Listing description
This section shows the description added by the listing owner. It gives a detail explanation to the visitor about what the listing is about.
9) The buttons
The buttons “Send inquiry”, Send to a friend and Add to favorites are the buttons provided on the detail page.
1) Send inquiry – using this button the visitor can send an inquiry to the listing owner to know more about the listing.
2) Send to a friend – This is a way to recommend or suggest a friend to have a look at the listing. The suggestion will be sent to the friend in form of an email with a link to the listing detail page.
3) Add to favorites – The logged in users can mark a listing as their favorite. The next time they login, they won’t have to search for the listing again. The listing will be shown in favorites tab in their Dashboard.
10) Social Sharing
These buttons on the detail page will let the visitors directly share the listing detail page to their social networks. To specify what sharing options you want to show on the detail page, navigate to Tevolution ⇨ Settings ⇨ General Settings ⇨ Detail Page ⇨ Show sharing buttons.
11) Related listings
The detail page of a listing will also show some related listings (Posted in same category or having similar tags,tec). The criteria of filtering the related listings can be set at Tevolution ⇨ Settings ⇨ General Settings ⇨ Detail Page ⇨ Filter related listing by option. It is followed by the Number of related posts option, that lets you specify the number of related posts to be shown at once.
12) Next and previous listings
These buttons will allow the visitors to directly navigate to the next or the previous listings.
13) Add a Review
Will allow the users to post a comment on the listing. To allow or disallow user comments can be managed for each individual listing. If you want to disallow the comments on a listing, Navigate to Listings at back end and quick edit window for the individual listing will show the option to “Allow comments”. You can enable or disable the comments from here. Other comments settings can be managed from Dashboard ⇨ Setting ⇨ Discussion settings.
From Tevolution ⇨ Settings ⇨ General Settings ⇨ Detail Page, you can also set, if you want the users to allow ratings.
14) Users comments
These section will display all the user comments on the page. if you do not wish to show the comments, navigate to Appearance ⇨ Theme settings ⇨ Comments settings ⇨ Display comments on posts.
Directory Resources Page
We have an “all-in-one resource page” that will assist you to set up your Directory site. This page contains all the resources and information that you will possibly need while setting up the website. Click here to go to the resources page.
Cuisine specific options/features
1) Number of navigation menus available
Following any of the menu creation process mentioned in its parent guide theme you can create menus for your site.
There are totally 2 menu locations available with the theme where you can setup your menus as mentioned below, to set it go to wp-admin -> Appearance -> Menus -> Manage Locations (For WordPress version 3.6 and higher)
- Secondary – Appears right above the homepage main content and can have sub menus in it. In fact, this is the best place to set up your main things for navigation.
- Footer – Appears at the bottom right of your screen but cannot have sub menus in it.
These menus will be visible through out your site i.e. on every page. You can also use Mega menu for your website.
Widget area that affects secondary menu
Theme provides you a widget area using which you can show any widget besides your secondary menu on the right side. The most suitable widget for this area is “Search”. However you can use any of the widget as per your need but you must also give importance to design accuracy of the theme (it may not look so perfect).
2) Change various colors on your website
Using customize option, you can change some of the needed colors on your website as mentioned here.
To change the colors go to wp-admin -> Appearance -> Customize -> Color Settings. Colors that you can change are,
- Body background
- Button background, Headings, links, Button hover text, Pagination button hover bg, Footer Links hover
- Sidebar background, Pagination button background, Button hover background
- Page Content Color, Pagination button text
- Sub-texts
- Content area background, Form text field background, Button text, Pagination button hover text
All the above said sections and areas grouped together will have the same color effect. e.g. If I change Body background color to Red, it will also change Menu links as well as Button text into red color (said in step 1)
3) Cuisine widgets
As mentioned earlier that Cuisine is a child theme and so most of its widgets are handled in Directory theme and Tevolution – Directory plugin. Read in detail to know about the Directory parent theme widgets
4) Cuisine widget areas
Most of the widget areas are same as of directory parent theme but still there are some inclusion and exclusion of few widget areas. Lets understand them in the way they appear on various pages.
A) Common widget areas
Widgets placed in these areas will be visible on all the pages of your website and so we can call them common areas.
Header – Whatever widgets you place here are visible on the top right side of your website between the primary and secondary navigation.
Suitable widgets: One of the most suitable widget here is T – Advertisement.
Secondary Navigation – Widgets placed inside this area will appear on the right side of your secondary navigation bar
Suitable widgets: T – Social Media widget works best here.
Primary sidebar – This is the sidebar that shows widgets on those page that do not have unique sidebars. Basically acts like back-up sidebar.
Suitable widgets: T – Flickr Photos, T – Browse By Categories, T – About Us etc
Above Footer – It is a single column area that shows the placed widgets above the footer.
Suitable widgets: T – Testimonial etc
Footer Left – 1 column – A single column area that shows placed widgets in the left side at the footer of the website.
Suitable widgets: Text, T – Social Media
Footer Right – 3 column – A 3 column area that shows placed widgets in the right side at the footer of the website which means that the 4th widget placed here will be visible straight below the first one.
Suitable widgets: T – Twitter Feed, Text, T – Flickr Photos
B) Homepage widget areas
The best part of this theme is that you can show both map and slider at a time on your home page.
Homepage Slider – Specially built for Map or slider. Here placed widget(s) are visible between the secondary navigation bar and homepage main content area.
Suitable widgets: T – Homepage Slider, Homepage Featured posts (sample data uses this one)
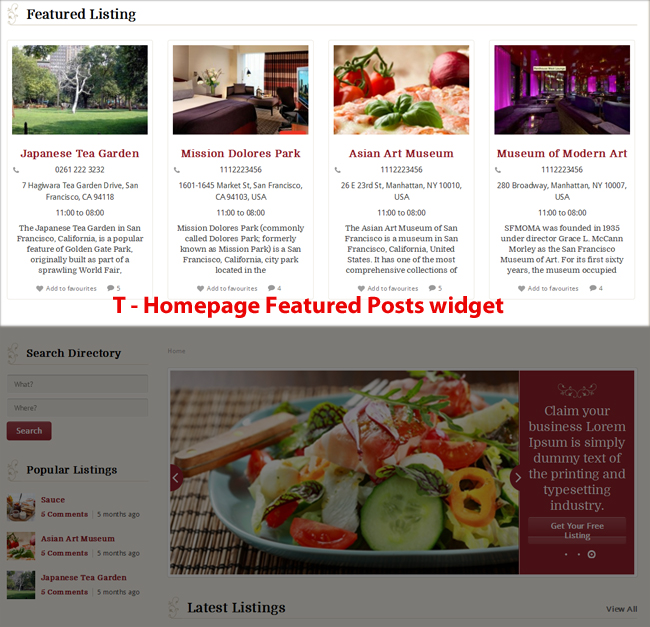
Homepage – Main Content – Widgets placed here are treated as the main content of your website and so covers the greater part of your website.
Suitable widgets: T – Homepage Slider, T – Homepage Map – multi city or T- Homepage Map – single city, Homepage Featured posts etc

Homepage Sidebar – It is a sidebar for your homepage, whatever widgets you place here will be visible on your homepage.
Suitable widgets: T – Advertisements, T – Popular Posts, T – About Us etc
Extra: Default layout is Two columns, Left which means content will appear left to the sidebar. However you can change layout from wp-admin -> Appearance -> Theme Settings -> Global Layout.
C) Listings page
All the widget areas affecting your Listings (the default post type) on the website.
Listings Category Page Sidebar – Here placed widgets are shown as the sidebar items on the category page of your Listings.
Suitable widgets: T – Search by Miles Range, T – In The Neighborhood, T – Popular Posts etc
Listings Detail Page Sidebar – Here placed widgets are shown as the sidebar items on the detail page of your Listings.
Suitable widgets: T – In The Neighborhood, T – Popular Posts etc
Listings Add- Sidebar – Widgets placed here are shown as sidebar items on your submit listing form.
Suitable widgets: T – Popular Posts etc
Listings Tag Page Sidebar – Widget placed here are shown on the Tag page of your listings means when you click on any of the tag given to a particular listing, it will redirect you to its detail page which is the “Tag Page” (the one that we are talking about).
Suitable widgets: T – Recent Reviews etc
Listing Category Pages – Below Header – Shows widgets between the secondary navigation bar and main content area on listing category page.
Suitable widgets: T – Category Page Map – multi city or T – Category Page Map – single city (if you are operating with single city)
D) Author page
The only widget area that affects the author page on your website.
Author Page Sidebar – This is the sidebar that appears on the author page on your website. Whenever anyone registers with you, they get their own page where their profile information, their added listings, their favorites etc are mentioned and stored.
Suitable widgets: T – Popular Posts, T – Recent Reviews etc
E) Contact page
You can create contact form using contact page template from wp-admin -> Pages -> Add New, there select the “contact page” template located under “Page Attributes” read more about it in Directory guide.
Two widget areas that affects the contact page on your website.
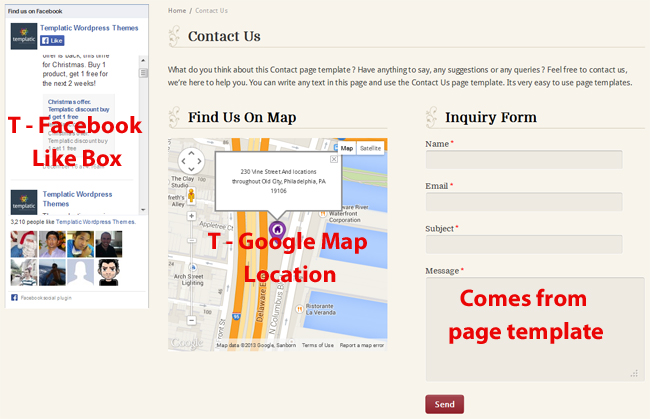
Contact Page – Main Content – Widgets placed here are treated as the main content of your contact page. However, if you use contact page template to show a contact form on your side, here placed widget(s) will be shown above it.
Suitable widgets: T – Google Map Location
Contact Page Sidebar – Here placed widgets are shown as the sidebar items on your contact page.
Suitable widgets: T – Facebook Like Box
F) Posts
Widget areas that affect WordPress posts and pages.
Post Category Page Sidebar – Sidebar area that appears on the category page of your posts.
Suitable widgets: T – About Us, Search, T – Flickr Photos etc
Post Detail Page Sidebar – Sidebar area that appears on the detail page of your posts.
Suitable widgets: T – About Us, Search, T – Flickr Photos etc
Detail Pages – Below Content – Appears below the main content of WordPress posts and pages
Suitable widgets: T – Advertisement etc
Post Detail Page – Before Description – Widgets placed here are visible between the post title and description on the post detail page.
Suitable widgets: T – Advertisement etc
5) Cuisine author page
Like the parent theme Directory, author page will be functioning the same way just there will be change in its look.
The links towards direct author’s various social accounts will be just for “Facebook”, “LinkedIn” and “Twitter” they will appear with their icons below the user profile picture. These are the default profile fields added by Tevolution plugin to your site at wp-admin -> Tevolution -> Profile fields Setup. However if you want to add more profile fields then you can, which will be then shown in the profile page of any author but as shown in the above screenshot, they will not appear as the separate social icons. Adding more icons will require custom coding.
6) New default price pack
When you activate the theme, it adds two default price package to your site, “Free” and “Multi Listing Special” which you can either modify as per your need or can totally disable it. These are added to give you an idea that how price packages works and how you can create it. “Free” pack is per post pack and has no charges to demonstrates how anyone can list without paying charge on your site. It will be visible on your submit page at the last but if you don’t want it to appear there then simply uncheck the option “Enable Package” from wp-admin -> Tevolution -> Monetization -> Price Packages -> Free (click edit).
Now, let’s talk about the “Multi Listing Special” price pack. It works on per subscription and has the limit of 10 listings in it. The main point that needs to be discussed here is that when any user has subscribed to this one then if admin cancels his first submitted listing then the whole subscription gets canceled. You can modify this price pack as per your requirement and save it or you can create all new pack for your site.
To know more about the monetization, Read Tevolution guide.
7. Ideal sizes of images and other stuffs that you must know
- Map size – Default width is 500 pixels, you can set its size as per your need. Or you can make it full width by check marking an option “Show map in full width” given at wp-admin -> Tevolution -> Map Settings (under the Other map Settings section).
- Slider size – Ideal size for images of post as well as custom images is 893 X 392 pixels. You must use the ideal sized images to maintain the design accuracy.
- Site Logo – Sample data inserts the rectangular logo of size 286 X 72 pixels but as logos can be of different shapes and sizes, there is no ideal width and height for it. Whatever image you upload as logo, it will display the same exact way. Depending on the size of your logo other widgets and page design will appear accordingly.
8. Add button and description to your homepage slider
You can easily add description as well as button to your homepage slider following below steps,
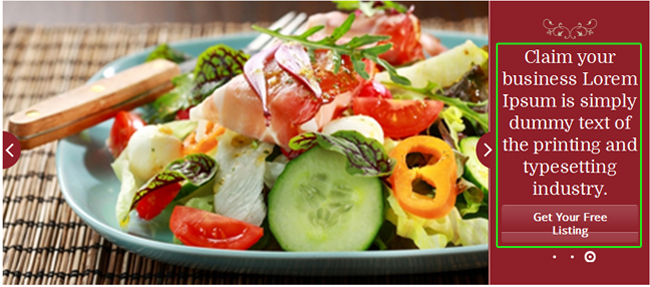
- Go to wp-admin -> Appearance -> Widgets
- Place T – Homepage Slider widget in Homepage – Main Content area
- Expand the widget (if it is not by default)
- Check mark “Use Custom Images?” option and enter your description in “Banner Slider Title” fields along with
<span></span>tags andclass="button". Follow this example to understand better,
Claim your business <span>Lorem Ipsum is simply dummy text of the printing and typesetting industry. Lorem Ipsum has been the industry's standard dummy text ever since the 1500s, when an unknown printer took a galley. make a type specimen book. It has survived not only five centuries, but also the lea</span><a href="#" class='button'>Get Your Free Listing</a>
Note: “button” class has been specially designed for this purpose here. If you want to apply any other kind of shape instead of button you will have to do some customization in the code which is out of our support policy.
9. How to change/remove the images used as design in the theme?
There are some images used in the Cuisne design which you can change with yours or completely delete them if you do not want them. It is also advisable to change the color of these images when you are changing the background of your site. Let’s see what and where images are used,
- These images are located under the theme root folder at ../wp-content/themes/Restaurants/images
- You can replace this image with yours by renaming the existing image to something else (e.g. footer-graphics-old) and moving your desired image with the same name and extension (e.g. footer-graphics.jpg)
- To display the above said image, a code has been written in style.css file which you can modify if you require. read below given example to understand it better,
You can use Firebug to know that at what lines exactly what css code has been applied in the file style.css.
Example:
Suppose I want to change the height of the image that appears with the widget T – Homepage Featured Posts. So, I’ll do
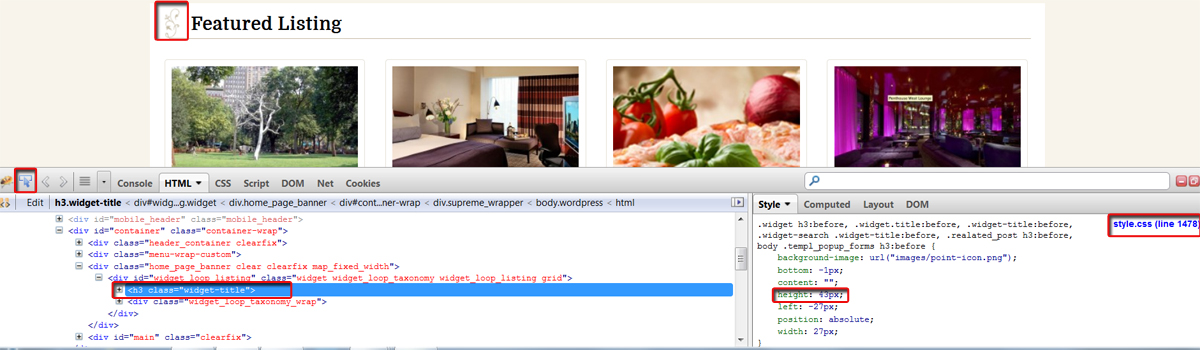
Click image to view large
- Inspect the element on my website whose code I want to know using Firebug tool i.e. that image
- To change the image height using css code, I’ll head over to the style.css file located under the theme root folder at ../wp-content/themes/Restaurants/ (I got to know that using Firebug tool)
- Open the style.css file and go to the line that I saw while inspecting using Firebug which is 1478
- Change the height and save it. (This is just an example, changing height of existing image may bring you design issue)
- Refresh the browser to see the effect.
How many such images are included in the theme?
To increase the beauty of the theme, some small designer images are included with the theme. The main reason why these designs are kept in the form of images is to let you easily change, modify or delete them from your website.
1. Image that appears along with secondary navigation menu at “right” and “left” side
Image Name: menu-bg-left and menu-bg-right
![]() and
and ![]()
2. Image that comes along with various widgets like T – Homepage Featured Posts, T – Search by Address etc
Image Name: point-icon
![]()
3. Image that comes above the footer area
Image Name: footer-graphics

Go to your theme root folder in your active WordPress directory and locate the folder “images”. (../wp-content/themes/restaurants/images). You will also find some more images used through out the theme.
10. Change the footer credit line
To apply your own credit or copy right line at the footer, follow these steps,

- Go to wp-admin -> Appearance -> Customize
- Expand the section “Footer” and change the line there according to the example given.
11. How to change the custom post type detail page layout to look like the Cuisine detail page?
By default, Directory will load the parent theme’s layout for all new custom post types (more specifically, their detail pages). To change this behavior, i.e. to use the layout of your child theme follow these steps:
- Connect to your server and navigate to /wp-content/themes/Cuisine
- From that folder download these two files to your hard drive: single-listing.php and directory-listing-single-content.php.
- On your hard drive rename the files to single-SLUG.php and directory-SLUG-single-content.php.SLUG = the slug you set while creating the new post type. Screenshot.
For example, if you set the post type slug to be testimonial, the file names should be single-testimonial.php and directory-testimonial-single-content.php. - Upload the two renamed files to the same folder where you downloaded them from – /wp-content/themes/Cuisine. Do not delete the existing single-listing.php and directory-listing-single-content.php files.
Any Queries? Contact us and we’ll help you out.