Installation
- Download the plugin from Templatic member area.
- Navigate to wp-admin ⇨ Plugins ⇨ Add New ⇨ Upload. Use the “Browse” button to load the previously downloaded .zip file. Click on “Install Now” to confirm.
- Once the plugin is finished installing click on the “Activate” button.
Using the plugin
The purpose of Access Manager is to enable membership-type functionality inside your site. In other words, with this plugin you can place specific parts of listings behind a paywall. Let’s imagine you want visitors to pay extra in order to the listing address or phone number… you can do that with this plugin.
Do not activate the plugin until you’re ready to charge for access privileges.
Creating access packages
To create a membership/access package navigate to Tevolution ⇨ Monetization ⇨ Membership Packages (tab). Click on the “Add New Package” button to start the process. The form will contain the following options…
Package name: Enter the name you want for this package (e.g. Silver, Gold, etc)
Package description: Explain what this package includes. Try to “sell” the package to the visitor.
Restrict listing types: Choose the post types for which this package will be active. You can have different packages for different post types.
Price: The asking price of the package.
Membership period: The length of time the visitor will have access to restricted content on your site.
Enable package: Check this to activate the package.
Allowed to view max no. of listing: Choose how many listings (with restricted content) the visitor can view. Leaving the field empty or entering 0 will allow visitor to view an unlimited number of listings.
Recurring package: Check this if you want visitors to be periodically billed for this package.
Number of cycles: Enter how many times should the process repeat. Insert 0 for unlimited cycles.
Free trial period: Enable this if you want the first membership period to be free.
Creating the membership purchase page
Once you’ve created your membership packages you need a way to present them to your visitors. A page containing this content should have been created during the plugin activation. Navigate to Pages ⇨ All Pages and look for the “Subscribe Membership” page. If this page is available on your site all you must do is provide a link to it to your visitors. For example, you can add it to your main menu.
Don’t have a “Subscribe Membership” page? Follow these steps to create one…
- Navigate to wp-admin ⇨ Pages ⇨ Add New.
- Insert the following shortcode inside the body (main area) of the page
[membership_page]
- Publish the page and provide a link to it to your visitors.
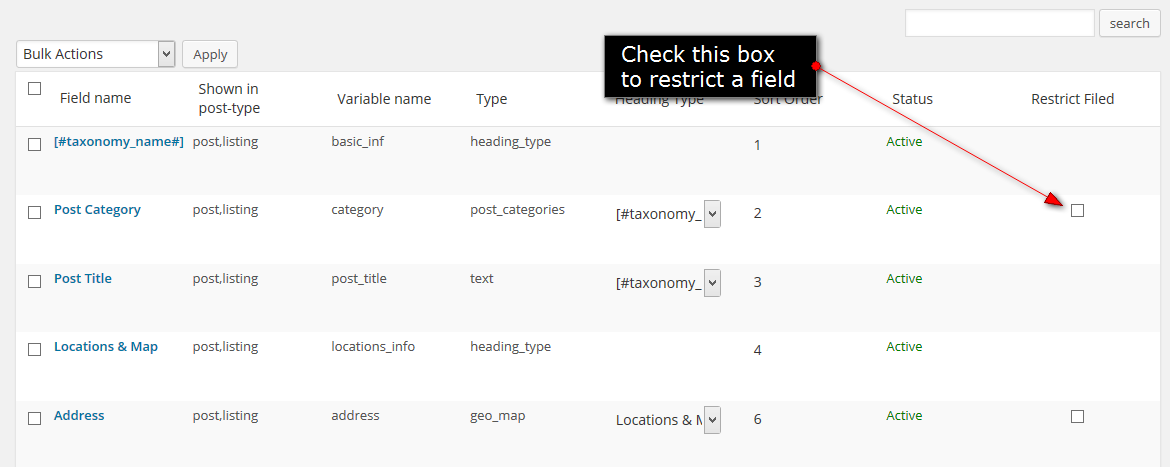
Restricting custom fields
To make a specific custom field restricted navigate to Tevolution ⇨ Custom Fields. Now simply click on the checkbox under the “Restrict Field” column.
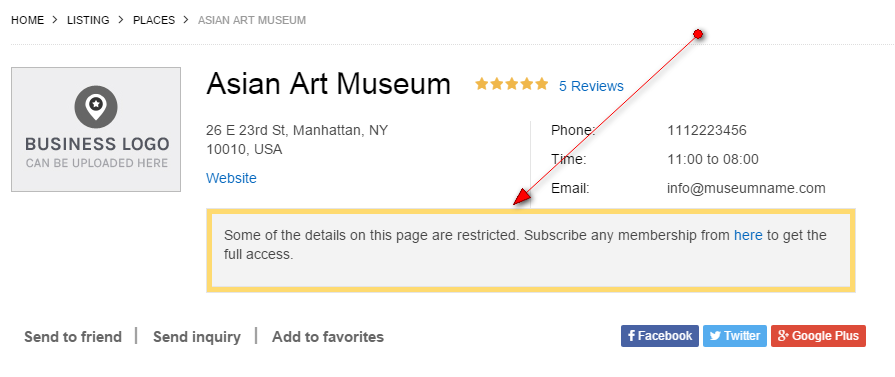
Once you restrict a field the following message will start showing inside listings on your site to all guests and members that haven’t purchased a membership package.
Approving transactions
In cases where the “Pre Bank Transfer” payment method is used you’ll have to verify the transaction before the customers membership kicks in. To verify a transaction follow these steps:
- Navigate to Tevolution ⇨ Transactions.
- Checkmark the transactions you want to approve.
- Click on the “Bulk Actions” dropdown and choose “Approve”.
- Click on “Apply” to confirm the change.
Video Tutorail
Frequently Asked Questions
Can I restrict access to regular WordPress posts and pages?
No, unfortunately you can’t. The Access Manager plugin is designed to work only with Tevolution-controlled post types such as listings, events*, properties*, etc.
* – add-ons are required to enable this functionality.
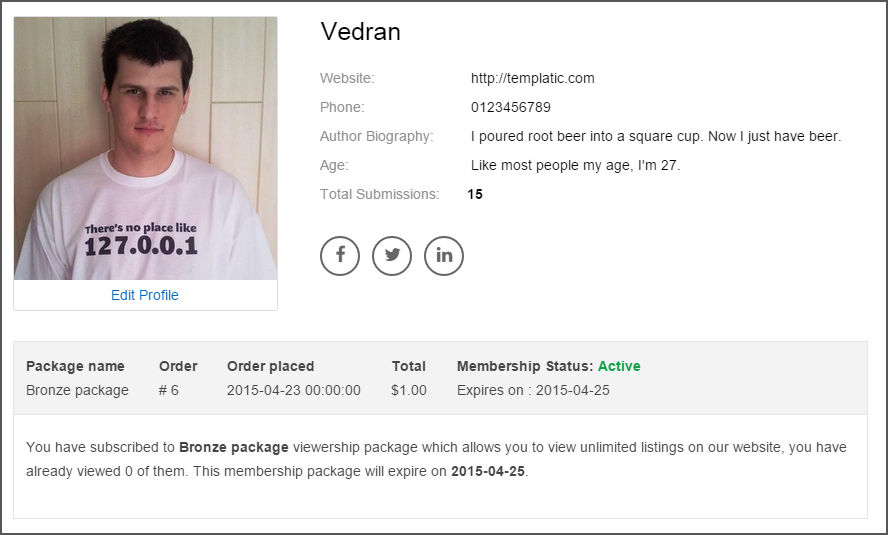
Where can subscribed members see their membership details?
Members who purchase one of your membership/access packages can see the details inside their front-end user dashboard. This is how the page should look like with a purchased membership package
How to add more payment gateways?
The Access Manager plugin utilizes the payment methods/gateways you have available inside the Tevolution ⇨ Monetization ⇨ Payment Gateways section. New gateways can be added by purchasing premium extensions.
https://templatic.com/plugins/payment-gateways
Can I restrict access to a whole listing?
No, you can only restrict access to specific fields within that listing. Good news is that you can hide pretty much any field, including the address, description, time, phone number, email, etc. If you hide all fields you’ve essentially restricted access to the whole listing.
How to translate the plugin?
You can translate the plugin by using the language file located inside the /languages folder. For instructions on handling PO and POT files open the following article
https://templatic.com/docs/how-to-localize-templatics-wordpress-themes/