Theme Installation
Installing Apex using the WordPress dashboard
- Connect to the member area, expand the Apex theme section and download the Apex.zip file.
- Inside your WordPress dashboard, navigate to Appearance ⇨ Themes ⇨ Add New ⇨ Upload ⇨ and load the .zip file you just downloaded.
- Once the upload is finished click on “Activate”. With that done choose to “Install sample data”.
Installing with FTP
Installing via FTP is necessary on servers that aren’t optimized for WordPress and can often interrupt the installation process because of the long execution time. Good news is that this type of install isn’t particularly hard, just longer compared to installing from the back-end.
For general instructions about using FTP please open this tutorial.
- Connect to the member area and download the Apex.zip file.
- Extract the file using software like 7-Zip. Use the Extract Here option.
- Assuming you read the above linked FTP tutorial, navigate to /wp-content/themes/ on your server and upload the extracted theme folder
- Login to your WordPress dashboard and go to Appearance ⇨ Themes. Activate the Apex theme
- While in the Appearance ⇨ Themes section, click on the blue “Install sample data” button to populate your site with dummy data and make it look like our demo.
Manage Apex pages
The homepage
When you load your sites homepage you should see widgets; most of the homepage is totally widgetized. The homepage itself is a regular WordPress page created with the Home Page page template. This page (with the “Home Page” page template) is normally created during theme activation and automatically assigned as the sites front page. However, if it’s not, i.e., if your homepage is not showing widgets follow these steps to fix it:
- Go to Pages ⇨ Add New. Enter the page title as “Home” (for consistency sake, this isn’t really important) and on the right side, under Page Attributes ⇨ Template choose the “Home Page” template. Publish the page.
- Navigate to Settings ⇨ Reading and under “Front page displays” choose “A static page”. In the “Front page” dropdown choose “Home”.
- Go to Appearance ⇨ Widgets to populate the homepage with widgets. The widget areas that appear on the homepage are: Header Right, Navigation Right, Front Banner, Home Page Content – Column 1, Home Page Content – Column 2, Home Page Content – Fully Width, Home Page After Content – 2 Columns, Home Page After Content – Full Width and Footer.
To learn more about the homepage and each of its elements, study the image displayed below.

1 – The logo section
To change your logo go to Appearance ⇨ Customize ⇨ Site Logo ⇨ Upload image for logo.
To remove the tagline shown below the logo expand the “Site Title & Tagline” option (while in the Customize section). Uncheck the “Display Tagline” option. In case you want to remove the logo altogether and display your site title instead, expand the Site Logo section again and click on the current logo image. Now click on the “Remove Image” link.
2 – Header Right widget area
To add content in this area go to Appearance ⇨ Widgets and place a widget inside the Header Right area. In the screenshot above the widget located in this area is Text (default WordPress widget). Here’s the content within that widget:
<div class="call-us">Call us now! <span> 123456789</span></div>
3 – Primary menu area
You can assign a menu here by going to Appearance ⇨ Menus and creating a menu. When you’re done select “Primary Menu” under Menu Settings ⇨ Theme Locations. For details on how to create custom menus watch the following video…
4 – Navigation Right widget area
To add content in this area go to Appearance ⇨ Widgets and place a widget inside the Navigation Right area. In the screenshot above the widget located in this area is Search (default WordPress widget). Leave the title field empty after adding the widget.
5 – Front Banner widget area
This is the area that holds the giant slider you see above. To activate the slider, go to Appearance ⇨ Widgets and place the “T – Slider Widget” inside the “Front Banner” widget area. Check out the image below to see how the widget options correspond with the actual front-end slider.
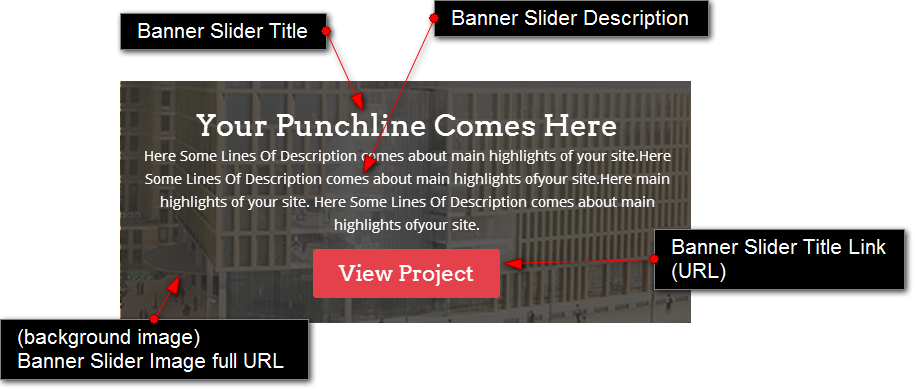
Since the slider spans across the entire width of your homepage, use large images. They should be at least 1920x1080px in size.
6 – Home Page Content (right)
To add content in this area go to Appearance ⇨ Widgets and place a widget inside the Home Page Content – Column 2 area. In the screenshot above the widget located in this area is T – Latest Property Slider. The slider will display your latest properties first. In other words, you can control the property order by tweaking their publish dates.
7 – Home Page Content (left)
To add content in this area go to Appearance ⇨ Widgets and place a widget inside the Home Page Content – Column 1 area. In the screenshot above the widget located in this area is the native Text widget.
8 – Home Page Content Full Width area
To add content in this area go to Appearance ⇨ Widgets and place a widget inside the Home Page Content – Full Width area. In the screenshot above the widget located in this area is the native native Text widget. The code inside the widget is as follows:
  <div class="row full-width-promo block-margin">
    	<div class="large-12 columns">
          <div class="large-2 columns">
            <span class="promo-circle"><span>20%</span> OFF</span>
          </div>
          <div class="large-6 columns">
            <h2>Online Booking Now !</h2>
            <p>Hurry up to  Get a Offer for booking and get some other gifts! some other text </p>
          </div>
          <div class="large-4 columns">
            <a href="#" class="large button">Book Now!</a>
          </div>
      </div>
  </div>
9 – Home Page After Content area
To make content display in this section go to Appearance ⇨ Widgets and place a widget inside the Home Page After Content – 2 Columns area. In the image above, the widgets located in this area are:
- T – Latest News
- T – Testimonials
10 – Home Page After Content Full Width area
To re-create the area as on the image above, go to Appearance ⇨ Widgets and place the “T – Featured Video” widget inside the Home Page After Content – Full Width area. The code inside the widget is as follows…
Description
<h6 class='subheader'>Contrary to popular belief, Lorem Ipsum is not simply random text</h6>
	<p>Lorem Ipsum is simply dummy text of the printing and typesetting industry. Lorem Ipsum has been the industry's standard dummy text ever since the 1500s, when an unknown printer took a galley of type and scrambled it to make a type specimen book.It has survived not only five centuries, but also the leap into electronic typesetting, remaining essentially unchanged. It was popularised in the 1960s with the release of Letraset sheets containing Lorem Ipsum passages, and more recently with desktop publishing software like Aldus PageMaker including versions of Lorem Ipsum.</p>
<a href='#' class='large button'>View Project</a>
Video Embed Code
<iframe width="420" height="315" src="//www.youtube.com/embed/aiBt44rrslw" frameborder="0" allowfullscreen></iframe>
11 – Before Footer full width area
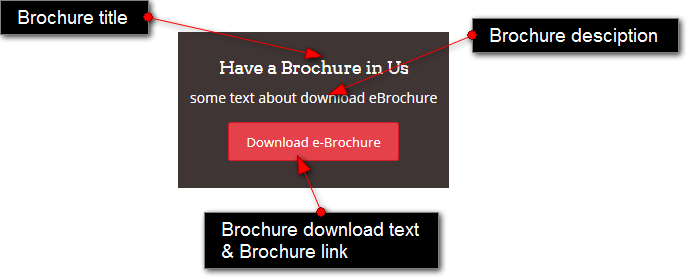
To re-create the area as on the image above, go to Appearance ⇨ Widgets and place the “T – Download Brochure” widget inside the Before Footer Full Width area.
12 – Before Footer (left)
To re-create the area as on the image above, go to Appearance ⇨ Widgets and place the following widgets inside the Before Footer – Column 1 area.
- T – Contact Details
- T – Social Media
To re-create the Social Media widget as depicted in the screenshot use font awesome icon codes. Each social media entry requires three pieces of info: Social Link, Social Icon and Social Class.
Example
Social Link: http://facebook.com/templatic
Social Icon:
<i class="fa fa-facebook"></i>
Social Class: facebook
Here’s a list of social icons/classes available in Apex
<i class="fa fa-facebook"></i>
<i class="fa fa-twitter"></i>
<i class="fa fa-linkedin"></i>
<i class="fa fa-youtube"></i>
<i class="fa fa-google-plus"></i>
<i class="fa fa-pinterest"></i>
The “Social Class” value is always the same as the key from the social icon. In other words, the social class for the Google Plus icon is google-plus
13 – Before Footer (right)
To re-create the area as on the image above, go to Appearance ⇨ Widgets and place the “T – Contact Us” widget inside the Before Footer – Column 2 area.
14 – The Footer
To re-create the area as on the image above, go to Appearance ⇨ Widgets and place the following widgets inside the Footer widget area.
- Text
- Categories
- Meta
- Archives
- T – Newsletter
15 – The credits (left)
If you want to edit this area go to Appearance ⇨ Editor and open the footer.php file. The code you want to change is located around line 40 and looks like this
<p class="source-org copyright left">© <?php echo date('Y'); ?> <?php bloginfo('name'); ?>.</p>
16 – The credits (right)
To remove this section go to Appearance ⇨ Customize ⇨ Footer. Now just delete all the code inside that box.
Property detail page
A property detail page is what you get after creating a property from wp-admin ⇨ Property ⇨ Add Property. The image below will outline key areas of the detail page and how you can edit (or even remove) them.

1 – Image slider
This section will display the images that you’ve added to the properties image gallery. Images are added to the gallery by clicking on the “Add Media” button available in wp-admin ⇨ Property ⇨ Add Property. For the image to work here it must be uploaded. For more details on this open this article.
2 – Property custom fields
When creating a new property (from Property ⇨ Add Property) you’ll find options below the content box for adding additional info about the property. These fields generate three sections on the front-end:
- Property video (on the left)
- Property location (the map in the middle)
- Property brochure (displayed on the right)
Property video
You can display the video in two ways, either using the “Video Embed Code” field or the “Video URL” (oEmbed) field. For a list of supported sites for the Video URL field click here. Check out this image to see how to get the video URL and embed code from YouTube.
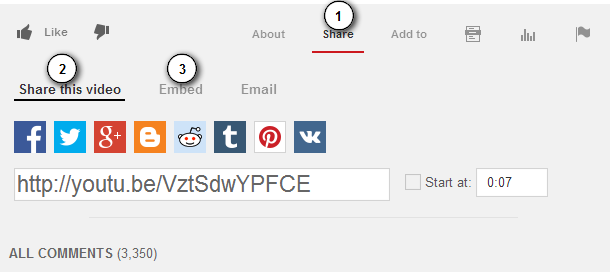
Go through steps 1 and 2 if you just need the URL. Click on 3 if you want the embed code.
Property location
To assign a location to your property use the “Address” field available while creating/editing a property. Just enter the address and hit the “Set address on map” button. The map on the detail page is used more as a link than a functional map; when clicked it will take the visitor to the Google Maps website.
The brochure
The brochure is a simple image or PDF file you can provide to visitors as a source of additional content about the property. Here’s how the front-end brochure matches the back-end brochure-related custom fields.
3 – The property title
This is the title you enter while creating the property post (at the top of the page).
4 – The property address
This is the same address you used to generate the property location earlier. In case you want to show this information add the following code to Appearance ⇨ Custom CSS Editor
#container #content #main .medium-10 h6.subheader {
display: none;
}
5 – Byline
The byline is a short line with information about the author and categories associated with the property. You can delete it by connecting to your server and opening /themes/Apex/partials/content-single-property.php and locating the following code around line 116.
echo $post_byline;
Change it to this
//echo $post_byline;
6 – The property description
This is the information you enter inside the main content area when creating the property. Feel free to style the content with HTML and inline CSS. If you need some inspiration, check out the Kitchen Sink page on our demo site. You can get the contents of that page by downloading this file.
7 – Property Detail Page Sidebar area
To populate this area with widgets head over to Appearance ⇨ Widgets and add some widgets to the “Property Detail Page – Sidebar” area. The widgets included in the screenshot above are:
- T – Contact Details
- T – Social Media
For details on setting up the Social Media widget check out the Homepage section of this guide.
Property category pages
Category pages in Apex are entirely dynamic, meaning they’ll be constructed automatically based on available content. Apart from actually creating the category, you don’t need to do much else.
To get started head over to wp-admin ⇨ Property ⇨ Property Category and use the section on the left to create a new category. Since empty categories won’t impress anyone, head over to Property ⇨ Add Property and create a new property.
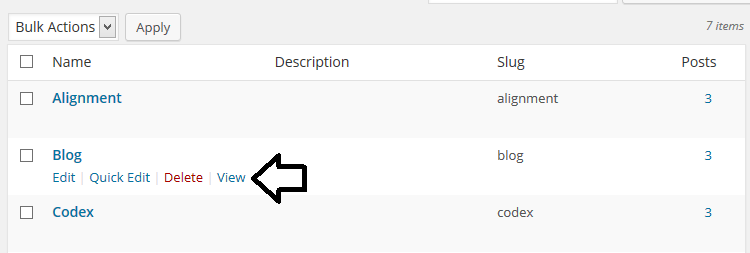
You can open a category in the front-end by going to Property ⇨ Property Category and hovering over the category you want to open. Now just hit the “View” link.
Property categories can also be added to navigation menus in order to make them more accessible. While creating a menu in Appearance ⇨ Menus, click on the “Screen Options” button in the top right corner and enable “Property Category”. You can now add property categories to the menu by checking them on the left side and clicking “Add to menu”. For details on creating custom menus watch our Custom Menus Video.
Quick tip: To increase the number of entries available per-page on category pages (default is 5), go to wp-admin ⇨ Settings ⇨ Reading and change the value associated with the “Blog pages show at most” option.
Setting up a Blog page
Along with the ability to showcase properties, the Apex theme also allows you to run and manage a blog. You can create individual posts by going to wp-admin ⇨ Posts ⇨ Add New. The Blog is essentially just a category holding those individual posts. So… follow these steps to create a Blog
- Create a new category in Posts ⇨ Categories and name it Blog.
- Add posts to that category by going to Posts ⇨ Add New.
- By adding the posts our Blog page was automatically created. You can see it by going to Posts ⇨ Categories and clicking on the “View” link
I also recommend adding this Blog category to your navigation menu. Do that by going to Appearance ⇨ Menus and creating a new menu. Expand the categories dropdown, choose blog and hit “Add to menu”. For details on creating custom menus watch our video tutorial.
Customization options
Changing colors
Changing colors in Apex doesn’t require your to touch any code, you can do it from the Appearance ⇨ Customize ⇨ Colors section.The available options are…
- Body Background Color – Changing this will change the background of the whole theme. This includes the stuff inside and outside of the main content area (the container).
- Content Color – Tweaking this option will change the paragraph color on your site (property description). It will also change meta descriptions, title borders (in widgets), the comments section, etc.
- Primary Color – Use this option to change the color of some links and buttons inside the theme. For example, changing this color will change the action button inside the slider.
- Secondary Color – Changes the background of your header and the color of some links (read more button).
- Title Color – Changes the title color for all pages, properties, posts and widgets.
Setting a background image
Navigate to Appearance ⇨ Customize ⇨ Background Images to set a fancy new background for your theme. Upload either a header image or a body background image, depending on what you want to change. It’s worth noting that the header background image will be displayed on top if you set both.
When it comes to setting a custom body background image, keep these guidelines in mind:
- The image should be very large, around 1920×1080 pixels.
- The image is tiled (repeated) by default. Hide this effect by uploading large images as mentioned earlier.
- The uploaded image will affect the whole page, including the content section (i.e., the container). I recommend editing the image before uploading it and carving out the area in which the content should be displayed. The width of the content area inside Apex is 1200 pixels. Here’s an example of what your background should look like.
- Using a background image increases page load and might diminish the site experience for mobile users. If you can avoid using it, then avoid it.
General customization tips
If you’re looking to drastically customize the theme then the above mentioned options won’t be enough. In case most of your changes are design-related, check out the Appearance ⇨ Custom CSS Editor section. It allows you quickly overwrite any CSS code. You’ll find more details on how to perform these overwrites in this article.
If however you plan on changing both design and functionality, consider creating a child theme. You’ll find good instructions on this subject in this WPengine post.
If you’re looking to tweak the Apex detail page, check out that portion of this theme guide.
Third-party plugin compatibility
SEO plugins
To optimize your content for search engines I highly recommend installing one of these two SEO plugins.
These plugins will work with Apex in pretty much the same way as with other WordPress themes (there are no theme-specific features). For instructions on setting up each plugin just click on “detailed instructions” in the list above.
Contact form plugins
For setting up contact page (so visitors can get in touch) we’ve provided support for two plugins
- Contact Form 7 (free)
- Gravity Forms (premium)
Once you create the contact form (using one of the plugins) simply insert the provided shortcode inside any page, post or property entry inside the theme.
Frequently Asked Questions
How to translate Apex in a different language?
For details instructions on how to translate Apex (or any other Templatic theme) open this translation tutorial.
How to change header background color?
You can place this code in your WP-admin > Appearance > Customizer to change the background color of the Header: .header {background-color: rgba(64, 53, 53, 0.9); }
The numbers are the default values(highlighted). You can try by changing highlighted according to your needs.