Getting Started
Need help with installing the theme? Hire us!
For more details on this service, please click here!
1) Install plugin using WordPress back-end
- Connect to member area ,under My Downloads section, expand the Appointment-system plugin section and download the Zip files given there. which includes Tevolution plugin, Appointment-system plugin (as Appointment-system works on the base of Tevolution plugin).
- Connect to your WordPress dashboard (wp-admin) and navigate to Plugins -> Add New -> Upload.
- Choose the downloaded zip file of Tevolution plugin from your respective hard drive and click Install Now tab.
- Repeat the same process to install Appointment-system plugin.
In case, WordPress rejects it then,
- After downloading the zip file of plugin as mentioned in above steps, Extract the files.
- Move that extracted folder to your active WordPress directory in ../wp-content/Plugins/
Activate Tevolution first and then Appointment plugin otherwise it may result into any unexpected error as Appointment plugin runs on the base of Tevolution.
2) Install sample data
Appointment system plugin facilitates you with the sample data to demonstrate its working. To add its sample data, follow these steps,
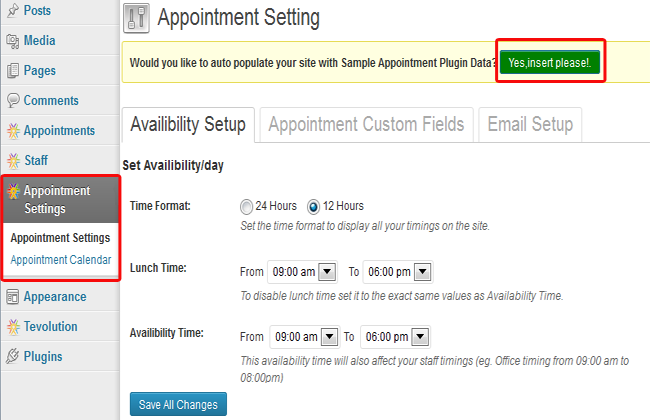
- Go to wp-admin -> Appointment Settings
- At the top of the screen, there will be a strip asking to add sample data, just Click on the “Yes, Insert please” button.
It will populate sample staff members, some sample services and notification emails in wp-admin -> Appointments-> Add Services, wp-admin -> Staff -> All Staff and wp-admin-> Appointment Settings -> Email Setup respectively.
Appointment Settings
1) Setup Your Business Timings
- Go to wp-admin -> Appointment Setting -> Appointment Setting -> Availability Setup
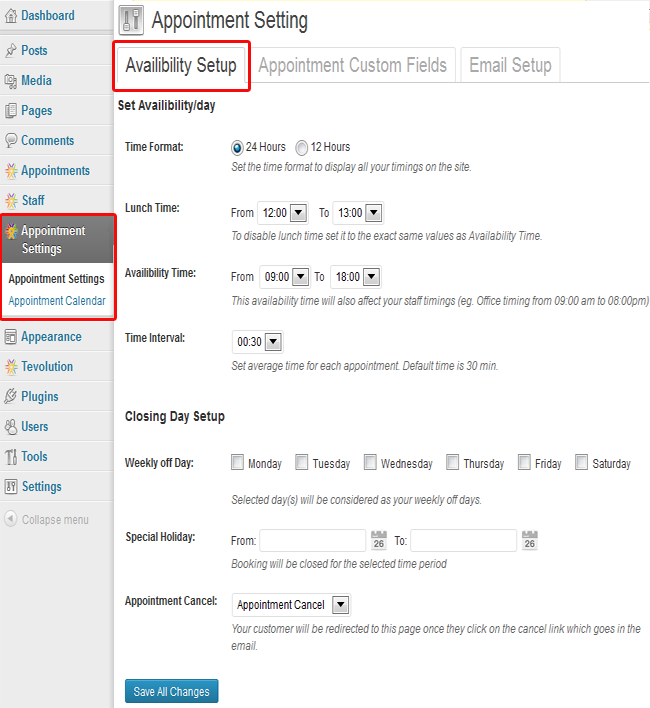
- Time Format – There you can setup the time format that you want to follow. Selecting 12 hrs will show am/pm along with the time.
- Set Lunch Time – Then set up your Lunch Time (Break Time). This will automatically won’t let the user book an appointment during your break time
- If you do not want it, you can also disable the lunch time by just selecting its time to the exact same values as Availability Time.
- Availability Time – Select the Availability time as per your bussiness hours that you want to show in a booking form to your users.
- Time Interval – The value selected in Time Interval field shows that much of gap between the timings displayed on your booking form for user selection.
- Closing Day Setup – Select your closing days i.e. holiday on which you won’t be available for your service. Users will not be able to book an appoint during this date.
- “Weekly Off Day” – check mark your weekly off days here and it will not let your users book appointment on that day for every week
- “Special Holiday” – You can specify the holidays for any particular period (say Christmas vacation).
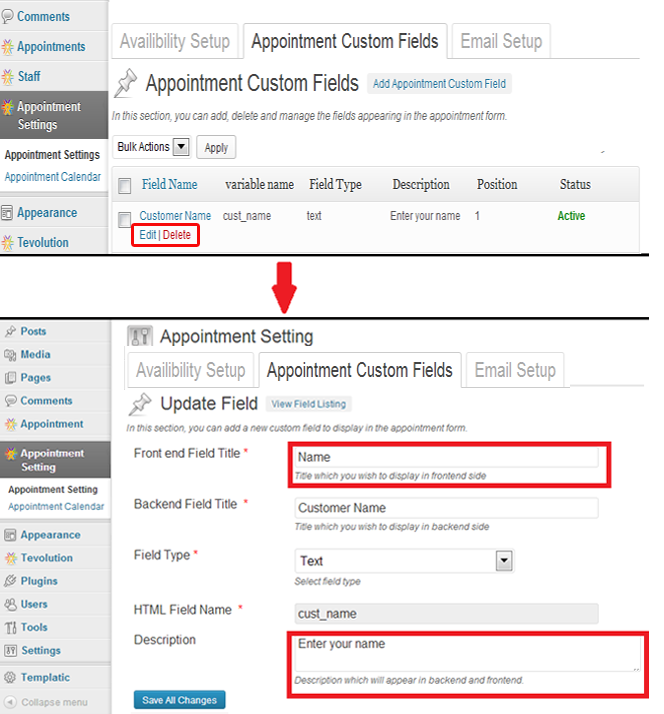
2) Create and manage Appointment custom fields
These fields appear on the booking form on your site. So, there are by default few obvious fields existing in the section which you cannot delete otherwise it may cause something unexpected!
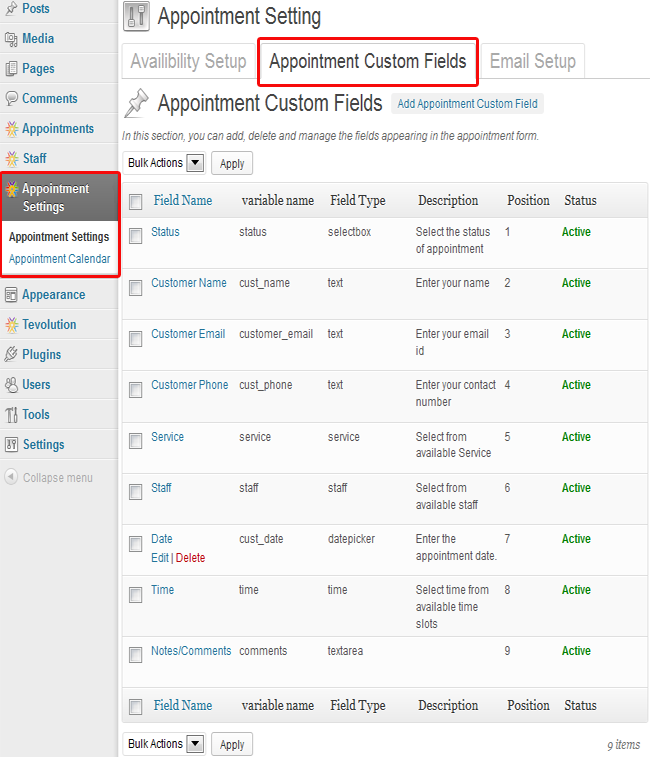
- Go to wp-admin -> Appointment Settings -> Appointment Settings -> Appointment Custom Fields
- To Edit the existing fields click edit option (that comes when you hover on any field)
There will be no delete option for those default fields whom you cannot(should not) delete.
- To add new field to your booking form click “Add Appointment Custom Field“
- Fill up all the necessary fields.
3) Set your Emails for online Appointment process
Appointment sections holds the power to fire 3 kind of emails. 1) Appointment request received email 2) Appointment approval confirmation and 3) Appointment rejected email.
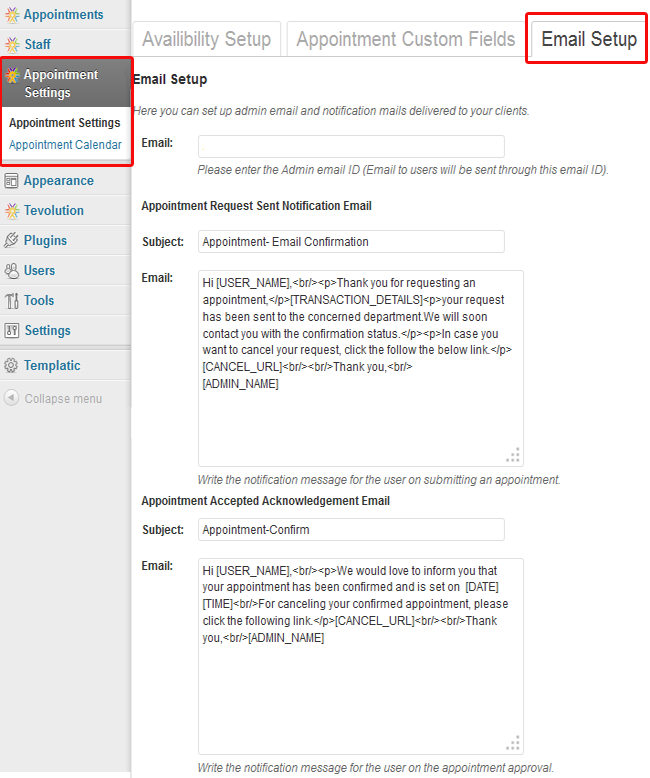
To edit the content of all these emails, follow these steps,
- Go to wp-admin -> Apponitment Settings-> Appointment Setttings -> Email Setup
- Modify your messages as per your requirement.
- These emails will be sent with the email-Id mentioned on the top of the “Email” field in this section. (You can read the description below the fields there.)
4) Set your Emails for payment process
Some of the acknowledgment emails are in Appointment section but all the emails for the payment process will be fired from Tevolution section. To setup them follow these steps,
- Go to wp-admin -. Tevolution -> General Settings -> Email Setup
- Edit only payment related messages as only they will be used. (and rest will be sent from the appointment section as described in above point.)
5) Add your business service
Before adding a staff member, you need to add the service i.e. the type of the business for which you would like to have an appointment.
- Go to wp-admin -> Appointment -> Add Service
- Add all the required fields there. (it is like adding a normal WordPress category)
- Define your Service Fees in “Service Price” field.
6) Add and Mange your Staff members
A) Add Staff
Adding staff member is compulsory to let your users book an appointment from your site.
- Go to wp-admin -> Staff -> Add a Staff
- Enter the name of your staff member like you give title to any regular WordPress page
- Fill up all the employee details asked there.
- Select the Service that (s)he will be giving.
- Select the time on which that particular employee will be available.
- You can also show your staff’s photo by clicking on “Set Feature Image”
- Publish it .
These details will be used in the booking form on your site and your users will be able to see it.
B) View/Edit all Staff
- Go to wp-admin -> Staff ->All Staff (All your staff members will be listed)
- To edit existing staff, hover on the staff member name and you will see an edit option, click on it and start editing.
- Don’t forget to click update to save your changes.
C) Show your Staff Page on your Site
You can show all the details with description and photograph of your staff members on your site.
After adding all the staff and required information as mentioned above,
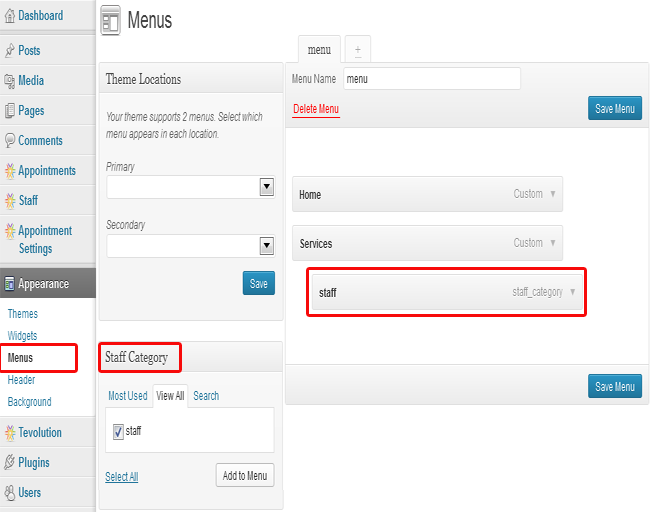
- There will be a staff category in, wp-admin -> Staff -> Staff Category
- Now, go to wp-admin -> Appearance ->Menu
- Check mark the “Staff category” option in Screen Options given at the top right corner of your screen.(If you do not see the staff category by default.)
- Setup the “Staff Category” into your menu bar and save it
It will now show you the staff listing page and on clicking any particular staff name, it will take the user to staff detail page.
8) Approve or reject the appointment
Once the user requests you an appointment from your site using the booking form, an email is sent to him to notify that his request has been sent for the processing and also shows a notification message on his screen(on your site), content of which you can modify from here.
To approve or reject appointment, follow these steps,
- Go to Appointments -> All Appointments -> Action
- Green “Tick mark” represents approval and Red Cross march represents rejection.
- Any of these actions will fire an automated email to the user. You can edit its content from here.
[templ_msg_box type=”success”] Tip:
You should check the payment status from the Tevolution -> Transactions -> Status before approving or rejecting an appointment.
9) View your appointment calendar
You can view all the appointment status in your calendar day/week and month wise.
- Go to Appointment Settings -> Appointment Calendar
- Green marked appointments are confirmed one
- Whereas Red marked appointments are yet to be confirm.
This way you can check out your busy days and figure out the number of appointments per day/week/month.
10) Make new custom post type for your business
Apart from just appointment, you can also make your own custom post type, For example – Events or anything else and can use it for your site. To do that, follow these steps,
- Create custom post type
- Set price for it
- Create its submit page using Tevolution shortcodes.
- Manage payment gateways
- View all transactions done from Transaction section.
- Manage Email and notification content
Frequently Asked Questions
1. How can I change the labels and the field descriptions on my site?
There are 2 ways for doing this!
A) Change Booking Form field labels and descriptions
- Go to wp-admin > Appointment Setting -> Appointment Setting -> Appointment Custom Fields -> Edit
- Change the fields names and description as per your requirement.
B) Other Words
To change other words, you need to use poEdit tool. Please read this…
2. How to change the notification message that comes after booking an appointment on the computer screen?
As it is an appointment plugin, so the core words refer to appointment only but as it can be used for various types of business, you can change this message. It comes from the coding file, so you need to change from there.
- Simply locate “appointment_widgets.php” in ../wp-content/plugins/appointment-system/
- Search for the word from the message that is displaying on the screen and replace it with your message.
- Just be sure that you have not violated any php syntax rule otherwise it may result into unexpected error! Simply add your text between the single quotes (‘…’)
Tip (For Dreamweaver)
Be cautious while writing “apostrophe (‘s) or double inverted commas (“..”) in the code line for adding your content, it breaks the line from there on your website. So, follow the php syntax to show these punctuations.
- For apostrophe(‘s) – Write
´ - For double inverted commas (“….”) –
"e;
3. How can I tweak the relevant PHP files in plugin (For Developers)?
Plugin Widgets – \wp-content\plugins\appointment-system\appointment_widgets
Email-Settings – \wp-content\plugins\appointment-system\appointment_email_setting
Appointment Settings – \wp-content\plugins\appointment-system\appointment_setting
The settings that are visible at the back-end from wp-admin -> Appointment Settings -> Appointment Settings, come from this above mentioned PHP file.
If you have followed this tutorial and still facing any difficulty, Feel free to create a new ticket at Contact us and we’ll help you out.