Automotive is a Tevolution-powered theme. To learn more about it please visit the Tevolution guide
1. Install Automotive
- Connect to member area and expand the Automotive section under My Downloads. Download all available files
- Connect to your WordPress dashboard (wp-admin) and then navigate to Plugins -> Add New. Now click on Upload and then on Browse. Load the tevolution.zip file you downloaded earlier and then click on Install Now
- Once the install process is done click on Activate Plugin
- Navigate to Appearance -> Themes. Click on the Install Themes tab and then on Upload. Use the Browse option to locate the supreme zip file on your hard drive – then click on Install Now. After the installation process is finished do not activate supreme.
- Navigate again to Appearance -> Themes -> Install Themes -> Upload but this time load/install the automotive zip file. Once it’s installed activate the theme.
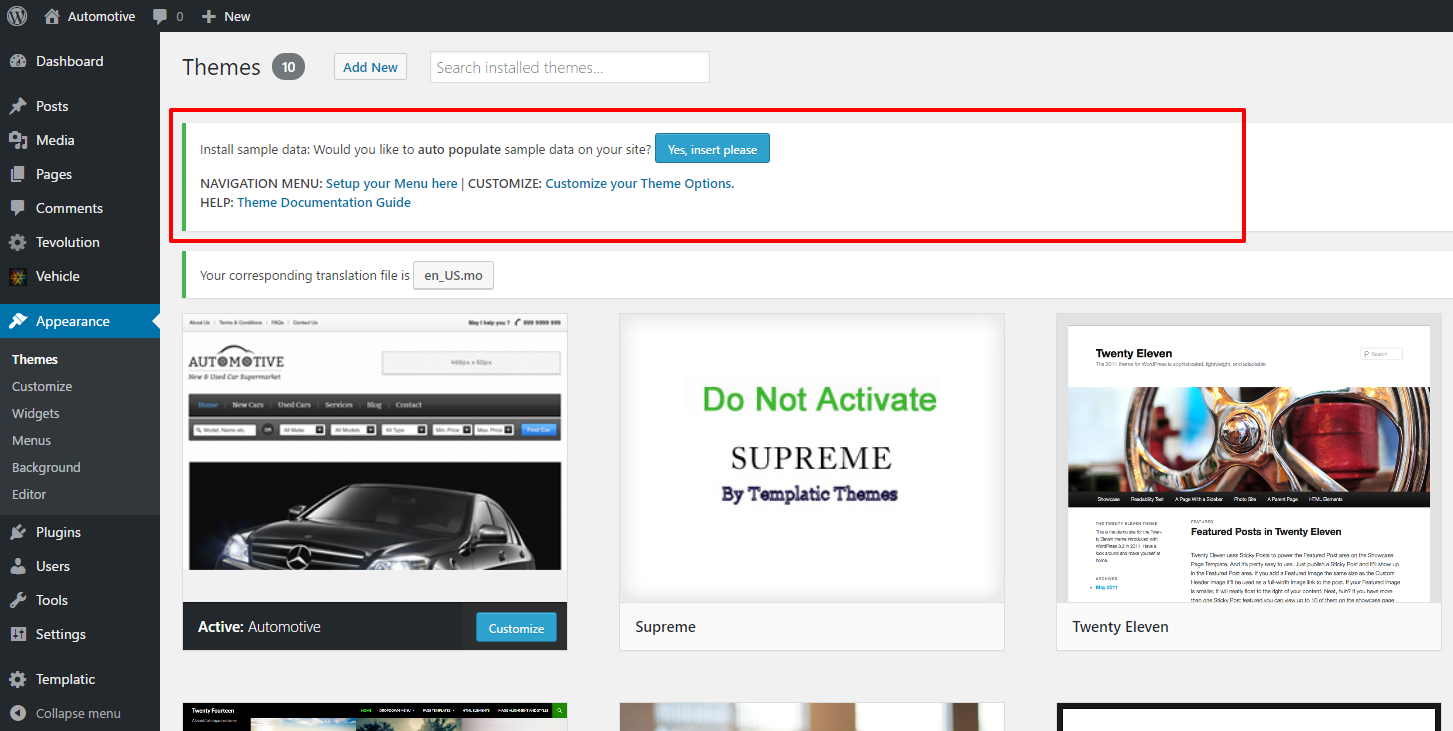
- To load sample data navigate to Appearance -> Themes and click on the blue “Yes, insert please” button
In case WordPress rejects the .zip files use FTP to install the theme
For detailed instructions on using FTP please click here
- Extract tevolution.zip then upload to /wp-content/plugins directory
- Extract supreme.zip and automotive.zip then upload to /wp-content/themes directory
- Once uploading is done connect to the WordPress dashboard and activate them in this order:
1. Tevolution, 2. Automotive - If you run into more problems during installation please visit our Installation Guide
Need help with installing the theme? Hire us!
Facing Problems in installing the theme? Don’t worry, we’ll do that for you, just click here!
| Back to Top |
2. Insert Sample Data
Inserting Sample data is not compulsory but is advisable to do so. Why you should insert sample data?
After installing the Automotive theme,
- Go to Appearance >Themes > Manage Themes > Yes Insert Please
- Refresh your site in the browser to see the effect.
- By following the above said steps, the “Yes Insert Please!” button will change into “Yes Delete Please!” to let you delete all the sample data from your site (If you want!)
- But, if you delete the sample data, your modifications done with those sample data will also be lost.
Inserting Sample Data
| Back to Top |
More about Automotive
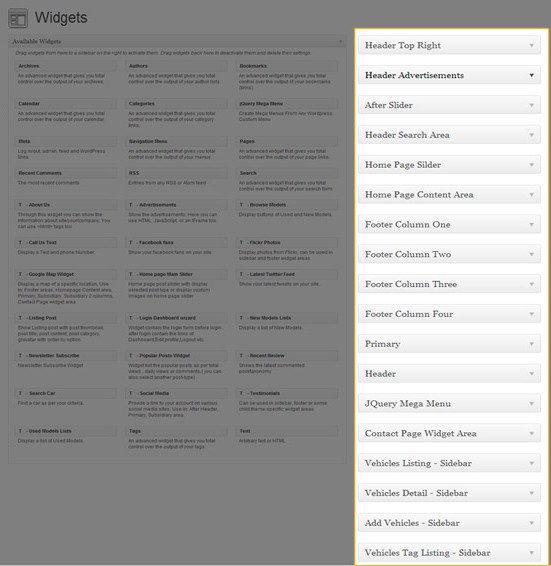
1. Widget Areas
These areas are the main holders of your widgets that actually let you show your desired things on your website by placing the suitable widgets in these areas.
- Widget Areas on backend
1) Login to your WordPress dashboard
2) Go to Appearance > Widgets.
The vertical area visible to your screen’s right most side is holding all the automotive widget areas!
- Widget Areas on front end with their meaning & explanation
Generally, websites are divided into certain widget sections as you saw in the backend. According to this theme, here is how those back end widget areas will appear on the front end.
Home Page Widget areas
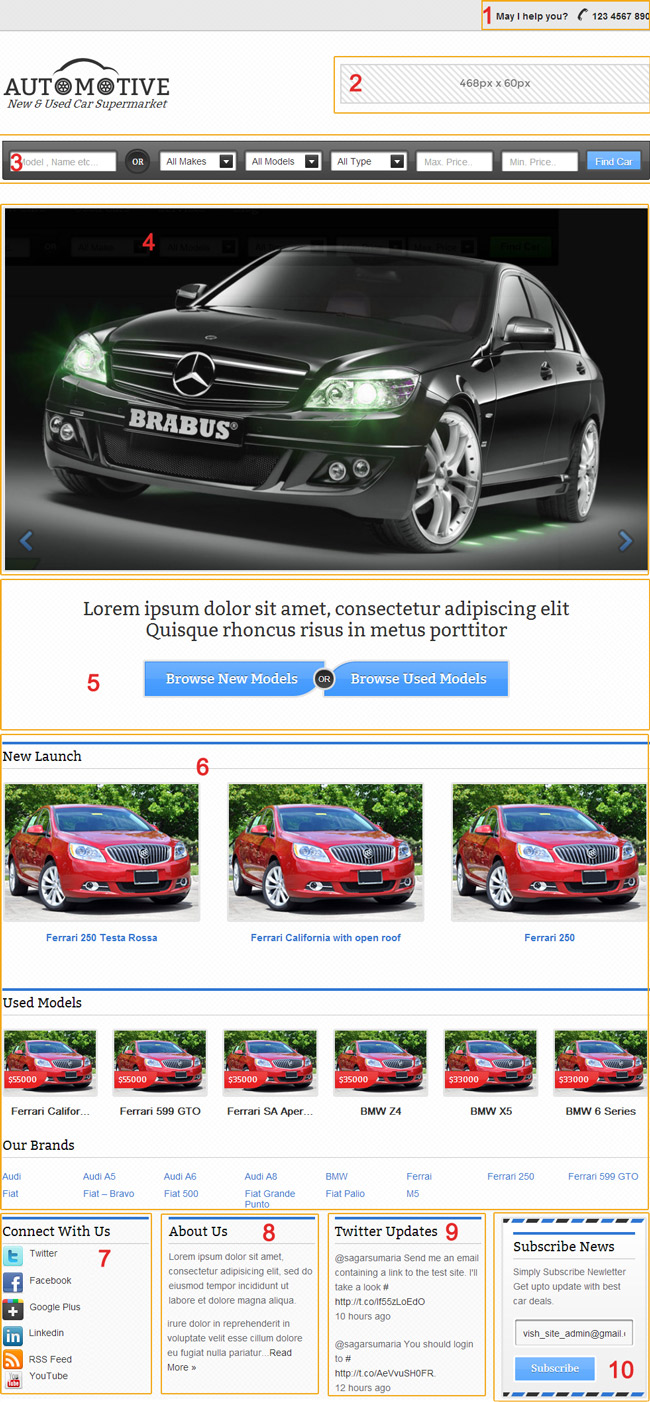
The meaning explained here are for the default widget areas. If you add any custom post type as per your choice then the related widget areas will be added here.
1) Header Top Right – Widgets placed here are visible to the top right corner of the header. Widgets like “T- Call Us Text” can be used here.
2) Header Advertisements – This widget area is specially designed to let you show your advertisement that will appear just after the “header top right”.
“T-Adverstisment” widget is the most suitable for this area. Just add the title to this widget & set your ad using the html <tags>.
3) Header Search Area – It appears between the “Header Advertisment” & “Home Page Slider” widget areas. “T- Search Car” widget is a best option for this area.
4) Home Page Slider – It appears just below the “Header Search Area”. It lets you display either images or posts.
“T – Home Page Main Slider” widget is specially designed for this area
5) After Slider – It is displayed after the Home Page Slider. Widgets like “T-Browse Models” can be placed here.
6) Home Page Content Area – It helps you to display the content for your homepage. Widgets like “T- New Model Lists”, “T- Used Model Lists” etc can be placed here.
7) Footer Column One – It is listed to the leftmost bottom area of your web page & it remains same for home page as well as other inner pages. Widgets like “T- Social Media” is quite suitable here.
8) Footer Column Two – It is the second column of the same footer & appears adjacent to the Footer Column One. you may use “T-About Us” widget here.
9) Footer Column Three – It is the third column of the footer appearing adjacent to its second column. you may place “T-Latest Twitter Feed” widget here, it is quite suitable.
10) Footer Column Four – Last but not the least; it’s the last & fourth column of the footer that appears at the rightmost side. Using here a widget like “T – Newsletter Subscribe” is a good idea.
11) Primary – It is a sidebar area applied to the inner pages other than home page, vehicle listing & detail pages and other custom post type pages. Widgets like “T – Popular Posts Widget”, “T – Advertisments” etc can be used here.See Here
12) JQuery Mega Menu – Generally JQuery Mega Menu concept is related to the visiual effects of your menu.So, placing the “JQuery Mega menu” widget here is the only option, if you want to use this area for your website. Instead of your menu(Navigation Menu widget), just place the menu here by using jQuery Mega Menu widget.
12) Contact Page Widget Area – It appears on your “Contact Us” page just after your content/description. “T – Google Map Widget” is one of the suitable widget for this area. See Here
13) Vehicles Listing –Sidebar – It is a sidebar area for the category page or listing page. Example widget to be placed here would be “ T – About Us” etc. See Here
14) Vehicles Detail – Sidebar – It is visible on the detail page of the specific taxonomy where the full content of that particular page is viewable. In this case it is for vehicles specially. You may use “T – About Us”, ” T – Advertisments” etc See Here
15) Add Vehicles – Sidebar – With the help of “Tevolution”, we provide you to add new vehicle from the front end itself via Short Code. This area is for that particular page (Submit Vehicle Page). You can use widgets as per your requirement here such as “T – Advertisment” etc See Here
16) Vehicles Tag Listing – Sidebar – This sidebar area is for the page on which the list of Vehicles is displayed according to their tags. You can use here any of the widgets like ” T – Popular Posts Widget” etc See Here
You may use WooCommerce widgets in the footer area but as they are not meant for this area, they won’t look ideal with the theme design. Templatic’s Widgets and WordPress default widgets should be used for this area.
| Back to Top |
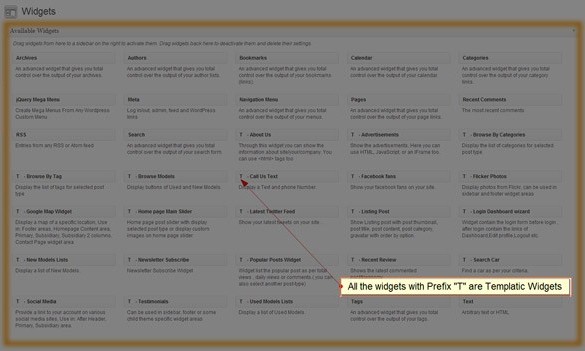
2. Automotive Widgets:
We provide you the following widgets that make your site impressive & powerful.
Automotive Widgets
1) T – Advertisement – In this widget, you just need to add the title & the code of your ad in html <tags> in the given code area & you are done!
2) T – Browse by Model – This widget gives you two option buttons to display the available vehicles. First is “New Model” & second is “Used Models” along with the description.
These buttons work with the help of page templates called “New Model Template” & “Used Model Template”. See here to know what page templates do?
3) T – Call Us Text – This widget allows you to show simple text with phone number specially designed to emphasis business contact information.
4) T – Facebook fans – It is a widget that lets you show your facebook fans anywhere on your site. You can also decide its width in Pixels by specify a particular numeric value in the given field “Width”.
5) T – Flickr Photos – By adding your flickr Id in this widget, you can feature those photos on your website.
6) T – Google Map Widget
- It displays the Google map according to the address given in this widget. Generally useful for ‘contact us’ page.
- You can set its height in pixels, control zoom and can select the map type.
7) T – Home Page Slider – This widget works as a slider at your homepage. But, you can decide whether you want to display images or posts in this slider. Read In Detail
8) T – Latest Twitter Feed – With the help of this widget, you can feature your twitter feeds on your website.
9) T – Listing Post – Using it, you can list your posts in some of the sidebar or such area on your website. Read In Detail
10) T – New Model Lists – This widget shows the new vehicles out of the total available. Is vehicle new or not is decided by the custom setting field given in “Add new vehicle” in the back end.
11) T – Newsletter Subscribe – It let you show the subscription form using feed burner from where user can subscribe your newsletter.
12) T – Popular Posts Widgets – It shows the most popular posts according to the daily & total views & comments. This can make you aware what people like in your website.
13) T – Recent Reviews – It shows the comments on your post taxonomies/categories.
14) T – Search Car – With this widget, you can search your cars from ‘Name’, ‘Models’, ‘Fuel Type’, ‘Maximum’ & ‘Minimum’ prices. The base for this search is taken from the Add a Vehicle > Custom Settings Fields (Respective fields).
15) T – Social Media – It lets you show your social media icons & link on your website from where your users can connect you. Read In Detail
16) T – Testimonials – A Widget specially designed to keep the track record of the comments given by your users.
17) T – Used Model Lists – A widget that shows the used model out of the total available models.
Model is used or not is decide from the option selected in the custom setting field in the backend.
| Back to Top |
3. Customize your Site
Customizing is something which gives some additional options to make your site look more beautiful.
- Go to Appearance > Themes > Current Theme > Customize

Customize Your Theme
It is very easy to customize your theme. We give you the following options to set your choice.
1) Site Logo
- From here you can upload your company’s or any desired logo for your site.
- If you want to have favicon icon for your site, you can do that as well! Just upload it by simple file selection process. What is Favicon Icon?
2) Site Title & Tagline
- You can give a title to your site from here by just entering the simple text in the given field.
- Taglines to the site add the additional information about it. To do that, just give your desired text in the tagline field given here.
- If you want to hide the tagline of your site but don’t want to remove it completely in the backend, you can check mark “Hide Site Description” box.
3) Templatic Theme Settings
- Use custom css – Check marking it, will apply the style settings coded in the custom.css file residing in your wp-admin/Themes/automotive/custom.css. But before that you need to apply your style code in the custom.css file. Know more about custom.css
- Hide autoinstall – To hide the “Insert Sample Data” option from Appearance > Themes, activate it.
- Enable comments on pages and posts – Shows the comments given to your posts or on any pages along with the comment box on your website. To activate, check mark it.
- Show author biography on posts – Choosing this option, you can show the details of the Post author besides his own post such as who has wrote it, profile picture of the author etc.
- Show author biography on pages – The same thing happens like ‘Show author biography on posts’. But here, Author’s information will be displayed on the page instead of the post.
- Show Breadcrumb – It is basically a navigation check strip which shows you that you are viewing which page & from where you have come to that page.
4) Excerpts Settings
- Display excerpt on archive page – This shows your post excerpts on the archive page, if you check mark it.
- Excerpt Length – By entering the numeric value to this field, you can limit the number of characters to be shown in the excerpt of any content.
- Text for Continue reading – From here, you can give the name to the excerpt text like “Read More” where user can click to continue the reading from where he is directed to that actual post or page. Know More about Excerpts
5) Layouts – Here you can decide a look for your your sidebars & main content area that where it should appear or should not appear at all?
- Two Columns, Right – Choosing “Two Columns Right” will shift your sidebars to the left of your screen & the main content area will be in the right side of it.
- Two Columns, Left – Whereas “Two Columns Left” & “Default Layout” will show the sidebars at the left side of the screen & main content area will be left to it.
- One column – Similarly, if you do not want the sidebars at all, select “One Column”
6) Captcha – This one will let you show & set the captcha to your contact us page, if you check mark it.
7) 404 Page Settings – By giving the slug name for any page/category/Tags, you can display it on your error page. Slug name is asked when you create any Post Type/Category/Tags. If we leave this field blank then it will be same as the “Name” of that particular post type.
8) Colors – Set the colors for various things on your website as mentioned below:
- Headings, Titles and Pagination – Color set here will affect your site’s headings, titles & displayed pagination (page numbers).
- Change color of Navigation background – Selected color will be displayed as a background color for the navigation menu.
- Change color of Content text, Input text – You will be seeing this color on the entire content text & on those texts as well where you have been asked to input on the website.
- Change color of Button Hover – This color is applied to the buttons at the time of hover. So, basically you will see it when you hover any button on your site.
- Change color of Body Background – This will work as a main background color of your website.
9) Background Image – Like color, you can also set the image as a background to your site by just selecting your image file.
10) Navigation – Using this option, you can apply your navigation menus at the top (Primary), after the header area (Secondary) or at the bottom of the website (Footer). Or even can apply all these three places at a time.
But footer navigation will not have any sub navigation. So, if you are choosing to set your navigation at the footer then do not add the sub navigations (sub menus) there.
11) Static Front Page – This option is concerned with your homepage that what should be displayed as your home content.
- Your latest posts – Choosing this will show respective widgets placed in the widgets areas (in back end) on your home page.
- A static page – You can set any available page as your home page by selecting it from the drop down “Front Page”.
And also can choose the page from another dropdown “Posts Page” to display your posts on that page.
12) Footer – With this one, you can upload your logo at this place & can also use the html<tags> to display your desired thing here (example: Copy right, trademark etc)
After Finishing all the settings, click the button “Save & Publish” to save & apply your settings.
| Back to Top |
4. Menus
Generally menu is a very important thing for a particular site as it helps the users to navigate through out your site easily.
Process for creating a menu is generally same in most of the WordPress themes and so in Automotive. Let’s have a look at its video. Click Here
| Back to Top |
5. JQuery Mega Menu
Generally, this menu is used to add some visual effect which is not possible with the regular menus. Let’s have a look to set up it.
- Its first requirement is that you should have at least one menu created
- It appears on the primary area of the menu in the front end, so you should keep the primary area empty in Appearance > Menus > Theme Locations.
- Now, go to Appearance > Widgets
- Place the JQuery Mega menu widget in the JQuery Mega menu widget area.
- Give the title to your menu (not compulsory)
- Select your menu name from the drop down given in this widget.
- Set the other options like click/hover, Number of items per row, Animation effect & Speed etc as per your requirement.
- Save it & refresh your site in the browser to see the effect
| Back to Top |
6. Creating Page with Short Codes & Templates
Short Codes
Short Codes are the part of our Tevolution plugin that supports the Automotive theme. With the help of these Short Codes, you can create & display many important pages on your front end like Login Page, Registration Page, Submit Vehicle (Submit Post Page) etc.
So, Click here to get the Short Codes.
| Back to Top |
Page Templates
Template pages are ready to use pages where you do not have to design & define the whole page instead just enter some texts that you want to show at your page & select the “Template” from the drop down given at the right side of the “Add new Page” option & you are done! let’s have a look at some of such automotive templates.
- New Models Template – This template helps in creating a page that lists all the available new “car/vehicle” at your website & that too without any much efforts.
- Page – Used Models Template – Like new model, this one list out all the used models at your site.
- Template – Archives – It lists out your website’s posts according to its publishing date. the latest one would be given the first preference in the listing (reverse chronological).
- Template – Contact Us – This template is used to display a contact us form on any of your page but obviously it is for your Contact Us page.
- Template – Sitemap – This template is designed to map your whole site on the single page. So, it will list all the pages/categories/tags etc whatever your site has, on that particular page.
7. Shortcodes Plugin
The easiest way to add buttons or columns into a post is to use shortcodes. Click here to download the Shortcodes plugin and then follow the same instructions you used to install the theme, but instead of placing the folder inside /wp-content/themes, place it inside /wp-content/plugins. For detailed FTP instructions open this article:
https://templatic.com/docs/how-to-upload-and-edit-files-on-your-server-ftp-tutorial/
To see what are the actual shortcodes available to you click on the link below:
https://templatic.com/demos/catalog/shortcodes-guide/
| Back to Top |
8. Compatibility to other plugins
We know that various plugins are very important to enhance the richness of a particular website! So, we provide you compatibility with certain other plugins too.
a) WooCommerce:
- You can click here to download wooCommerce.
- See the “Getting Started” Tutorial for installation and setting up WooCommerce plugin.
- WooCommerce’s Documentation/guide is available here.
b) bbPress:
Let’s see how this plugin works.
- First, download, install and activate bbPress just like you activate any other plugin. You can get it from here.
- When we activate the plugin, three taxonomies are added – Forums, Topics, and Replies. Replied depends on its Topic. Topic depends on its forum.
- For Example, In Templatic Forums, there are different forums: Catalog theme forums, GeoPlaces Theme Forums, etc… This Catalog theme forum is a “Forum” in bbPress.
- Now, under Catalog theme forums there will be many forums. These are treated as “Topics”.
- And a Topic can have many replies. Each of them is known as “Replies” in bbPress.
- Forums can only be added from backend. Topics & Replies can be added from Front-end & back-end.
- If you are adding a Topic from back-end, then you must select Forum for that topic from WP-admin -> Forums -> New Forum -> Forum Attributes -> Type field.
- If you are adding a Reply from back-end, then you must select its respective forum and topic from WP-admin -> Replies -> New Reply -> Reply Attributes section.
- bbPress’s other settings are placed in WP-admin -> Settings -> Forums.
c) WPML Plugin
This plugin is useful when you are willing to translate your theme in multiple language. Get the Plugin and detailed explanation on it
10 Have the “Submit Vehicle” Button like the Demo site
Automotive comes with a feature of letting your users submit their vehicles direct from your site itself! And to highlight that you can show a reasonable big button on your home page saying “Submit Vehicle” like the one shown in its demo site (https://templatic.com/demos/automotive/).

Follow these steps for it,
- When you insert the sample data, you will have a sample page named as “Submit Vehicle” in wp-admin > Pages ( You have to use its URL)
- You can also create this page yourself, if you do not have inserted sample data using this shortcode
[submit_form post_type='vehicle']. Create new page and just paste this in it
- You can also create this page yourself, if you do not have inserted sample data using this shortcode
- Now, Go to wp-admin > Appearance > Widgets
- Place the “Text” widget in “Header Advertisments” widget area
- Write the below mentioned sample code in “Text” widget and in “href =” paste the URL of your submit vehicle page
- Click save in “Text” widget to save your work.
- Refresh your site to see the effect
Sample Code
<a href=”http://…../…../……/submitvehicle/” class=”button submit-vehicle”><span>Submit A Vehicle</span></a>
| Back to Top |
Detail Explanations
1. Default Custom Post Type “Vehicle” In Automotive
As we said that this theme & our plugin “Tevolution” go hand in hand, from here you can know it why?
When you activate “Tevolution” in your wp-admin, you can see in your WordPress menu just before the “Appearance” an item named as “Vehicle”. This is a custom post type created from the Tevolution > Custom post types > Add Custom Post type (By default). Know more how to create custom post type & fields
This particular “Vehicle” custom post type has 4 main items:
1) Vehicles
- Go to wp-admin > Vehicle
- It will list you all the available vehicles (if any)
- Also at the top of the page it will show an option to “Add a Vehicle”
2) Add a Vehicle
- Go to wp-admin >Vehicle > Add a Vehicle
- Adding new vehicle is just like adding a new page.
- Add your desired Title, content, image & other custom fields.
- Select the category for the page which it belongs to
- May or may not give the Vehicle Tags. Tagging your vehicle will help in searching it through all the vehicles
3) Makes
- Go to wp-admin > Vehicle > Makes
- ‘Makes’ is the name of the taxonomy but actually it is just like a WordPress category.
- Add the various categories for your vehicle to apply them to the vehicle adding page, from where you can select the category for your vehicle (as mentioned above).
4) Vehicle Tags
- Go to wp-admin > Vehicle > Vehicle tags
- Add/edit the tags for your vehicle to apply & select them on the vehicle adding page.
| Back to Top |
2. Why you should insert sample data?
Inserting the sample data will thoroughly give you an idea that how this theme can be helpful in setting your website. It will make you aware of the usage of many things like widgets, widget areas, custom post types, pages & posts etc
So, though you want to design your site your way but having glanced to sample data will make you more creative for your site.
| Back to Top |
3. Detail Explanation on Listing Posts Widget
You can set your choice as below:
- Title – Give the main Title to your list of posts.
- Select Post – Choose from the available taxonomies
- Select Category – Choose from the post category
- Number of Posts: – Limit the number of post to be displayed in this particular widget in numeric value.
- Order By: – You can display them using their attributes like title, Id, Parent etc.
- Sort Order – This option takes post date as a base & lets you display them in either ascending order or descending order.
- Show Author gravtar – Helps in displaying the Author’s picture & other profile details
- Show featured image – Displays the image that is featured in that particular post.
- Show post Title – It displays the title of the post individually.
- Content Type – It helps to select if you want to show excerpts or want to limit the content or completely avoid the limit i.e display full content.
- Limit Content to – Here, you can specify the exact number of characters up to which you want to limit your content.
- More Text (If applicable) – When you select excerpts, you need to define the text for the link like “Read More” or any of your choice. That you can define here.
| Back to Top |
4. Detail Explanation on Social Media Widget
It asks for very simple settings like:
- Title – Give the title for this widget
- Description – May or may not add the description for your social media accounts.
- Social Link – Place the full URL of your social media account.
- Social Text – Write the text on which the above URL will be applied.
You can add or remove the number of such social media accounts by using the “+Add New” & “Remove” options.
| Back to Top |
5. What is Favicon Icon?
The small icon before the site name in the browser bar is nothing but the “Favicon Icon”. This icon is quite small but does a very big impact on the users mind. It is a symbol of your site or say trade mark. By just seeing it, user can have an idea that it symbolizes which site! However it also depends on the popularity of a site. Know more about Favicon
Favicon Icon
| Back to Top |
6. What are Excerpts?
Excerpts are the starting words of some content which you want to display as a highlight text of that post or article etc. This option is very useful when you want to show some part of your post on some page but not the full content & then if the user wants to read more (s)he can click on the Excerpt text link (example: Read More) & then he will be redirected to that page to continue the reading. Know more about Excerpts
Excerpts on front end
7. Can I show the pop up for my image gallery in normal WordPress pages?
Yes you can, but the condition is, if you have activated Templatic-Shortcodes plugin.
Need help with installing the theme? Hire us!
Facing Problems in installing the theme? Don’t worry, we’ll do that for you, just click here!
| Back to Top |