Theme installation
- To install the theme, login to your WordPress dashboard and navigate to Appearance ⇒ Themes.
- Click add new ⇒ Upload Theme.
- Using the file upload dialog, upload the Zip file you have downloaded from Templatic’s member area, and click install now.
- When the theme installation is complete, click activate to activate the theme. This will take you to the setup wizard.
Installing your theme through FTP
- Download the Church theme Installation file from the member area and extract them using software like 7-Zip. Use the “Extract here” option; don’t extract into a new folder.
- Navigate to /wp-content/themes/ and upload this folder.
- Now
- Login to your WordPress dashboard, navigate to Appearance ⇒ Themes. You will find the Church theme in the list. Activate it.
- Upon activation, you will be redirected to the setup wizard and it will install and activate the required plugins, and update your site with the sample data too. (Skip to the setup wizard)
- When asked to, enter the license key available inside our member area.
The theme setup wizard will help you initialize your theme by setting up plugins, sample data, etc. Even though it is optional, we highly recommend you follow these steps to set up your site easily.
The setup wizard
To quit the setup, you can use the “return to dashboard option”, but it is not recommended. The following are the steps of the setup wizard to help you prepare your website:

- Pressing “Start” will initiate the setup processing.
- Install child theme: This will install the child theme that will save all the customizations, so you can easily update the parent theme without losing the customizations. Click “Install” to proceed.
- Install Plugins: This step will configure your website with the required plugins for your site. Again click “Install”. You can remove the plugins you don’t need at a later stage.
- Import content: This will import the sample data. Sample data makes your website building process easier with the dummy data, images, and widgets in the places. With the sample data installed, your website will start looking like the theme demo and you can edit the parts you want to change to customize your site. Click import and wait till the dummy data is imported.
- At the end of the setup wizard, you can choose to “View the website” or “return to the dashboard” for further editing.
Setting up the Homepage-Image Banner
The homepage of the Church theme is built of many strategically designed sections. Most of these can be edited through the Elementor drag and drop options.
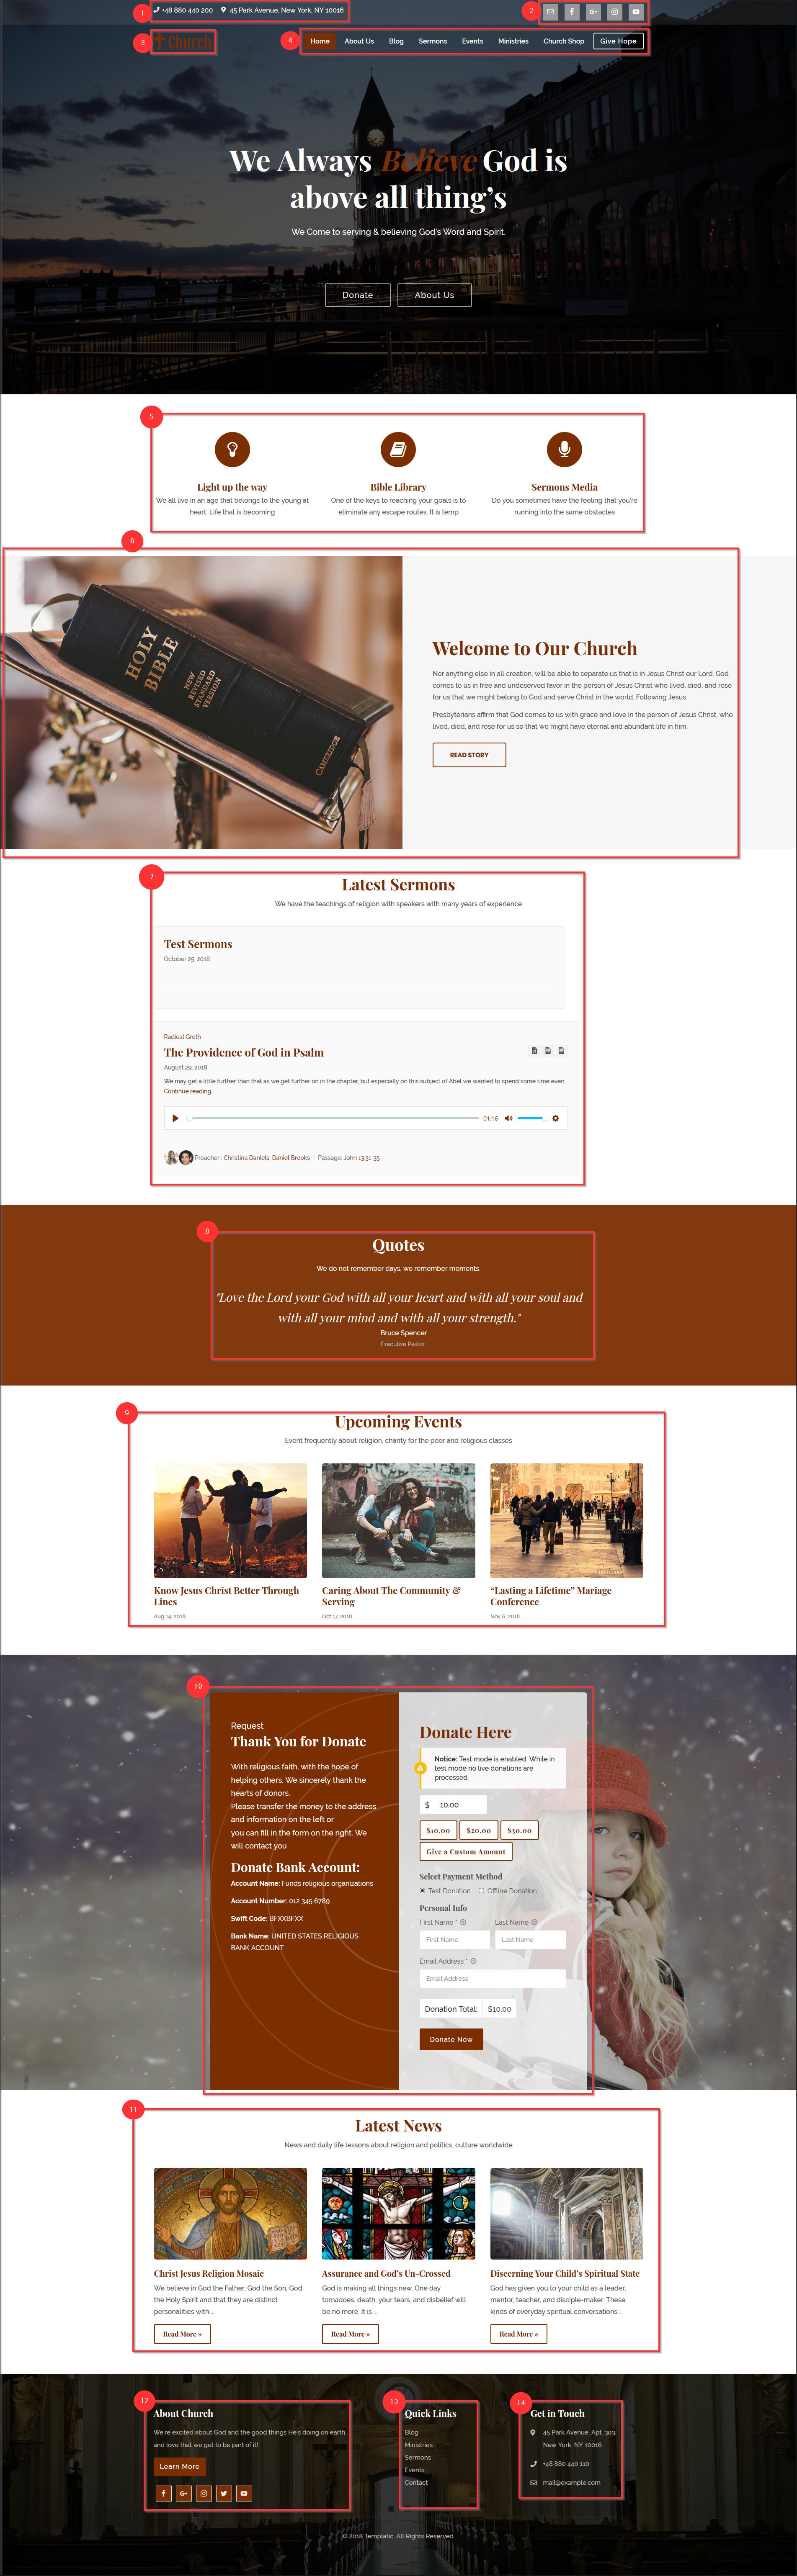
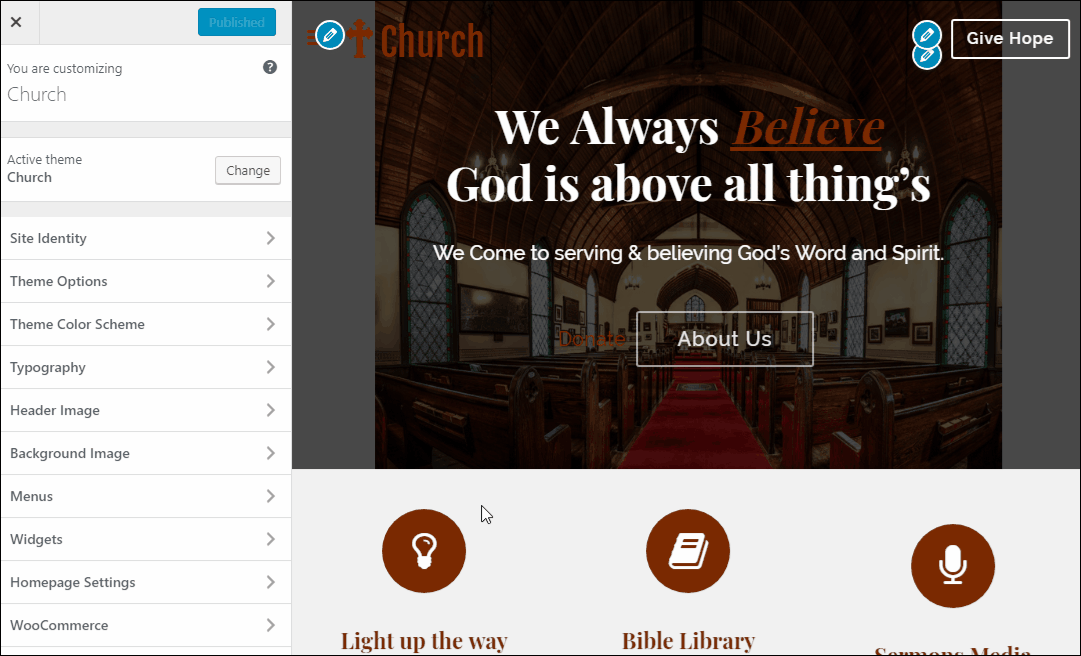
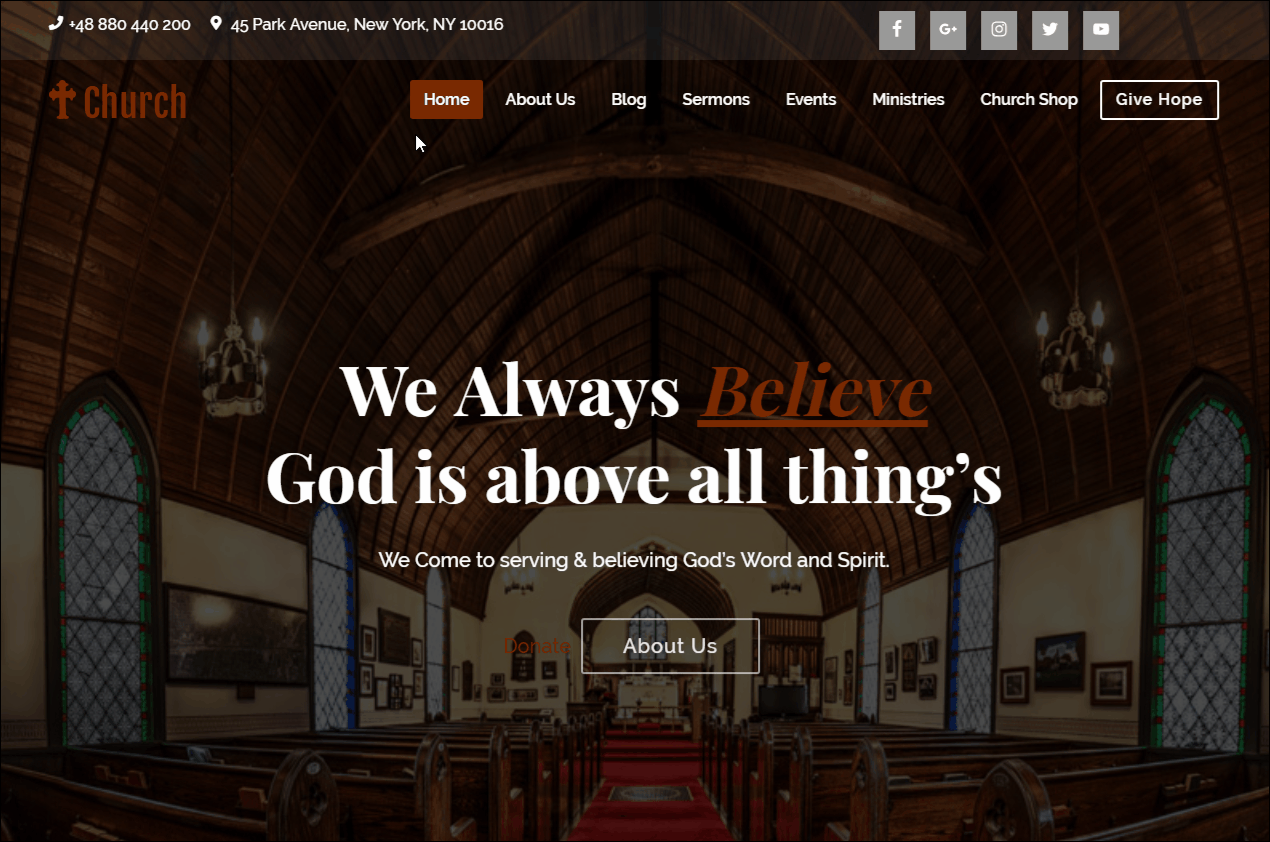
Changing the Header image
While in Elementor Page Builder you can modify the banner image and the Content written of your website to make it more personalized. Refer the following GIF for the understanding.

You will not be able to see the changes in the Elementor itself but you can update in Elementor and then refresh the site page, there you can see the changes you have made.
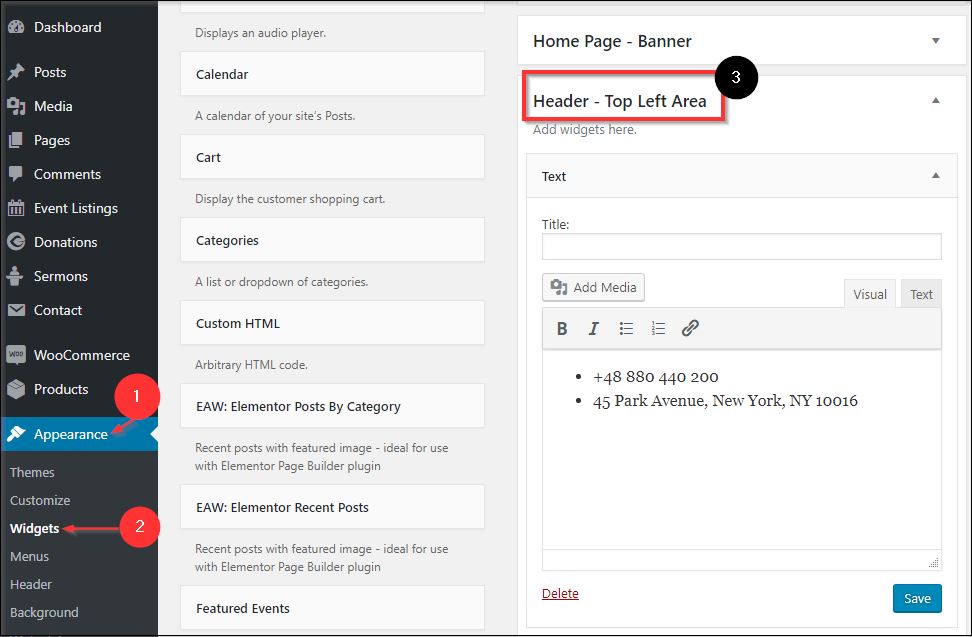
1) Contact text
In order to change the text given here;navigate to the backend of your site Appearance >> Widget >> Header – Top Left Area.
Change the Contact number and Address here.
2) Simple Social Icons
To give the urls of your own website’s pages navigate to Appearance >> Widgets >> Header – Top Right Area. Give the URLs of your blog or website on different social media platforms.
Refer the below GIF for more understanding.
![]()
3) Site Identity
You can easily customize the site logo by navigating to Appearance >> Customize >> Site Identity and uploading logo of your choice.
If you don’t have a logo to upload, you can use the site title instead. As shown in the theme demo, the site name will be highlighted as the logo. You can even manage the site Title and tagline easily.
4) Menus
You can create menus on your website with all the menu items you need in a matter of minutes. It is important to properly plan the menu items and place the links of all the important pages into the menu.
To create a new menu and set it as a primary menu, you can navigate to Appearance ⇒ Menu ⇒ Create a new menu.
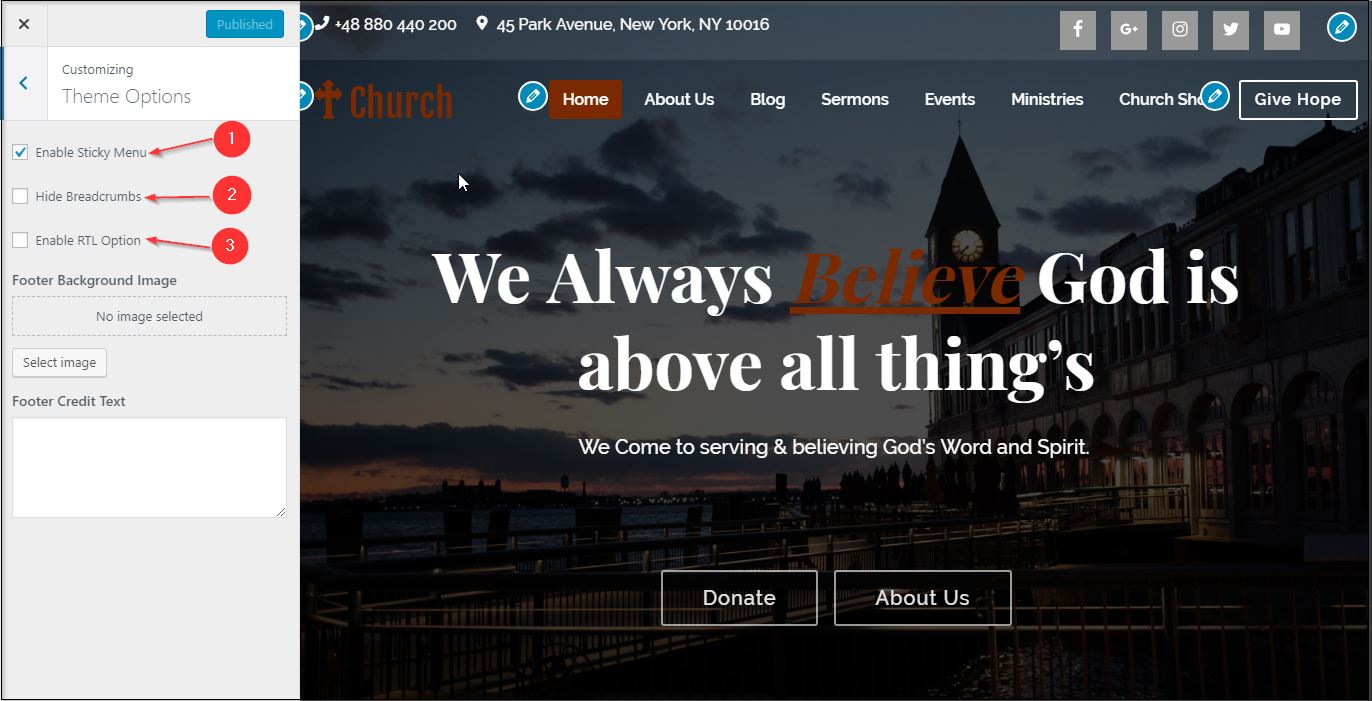
– You can make your header sticky or non-sticky (1), to display or not to display breadcrumbs on your site (2), if you are planning to use this site as any language that has orientation from Right to Left (3) then we have that option available too. To change this settings navigate to Appearance >> Customize >> Theme Options.
5) Icons
You can easily modify the content here by opening the page in the Elementor Page builder and just Clicking on the icon or text you want to change.
You can change the icon from the icon dropdown as well as change the content from the Title and Description part.
![]()
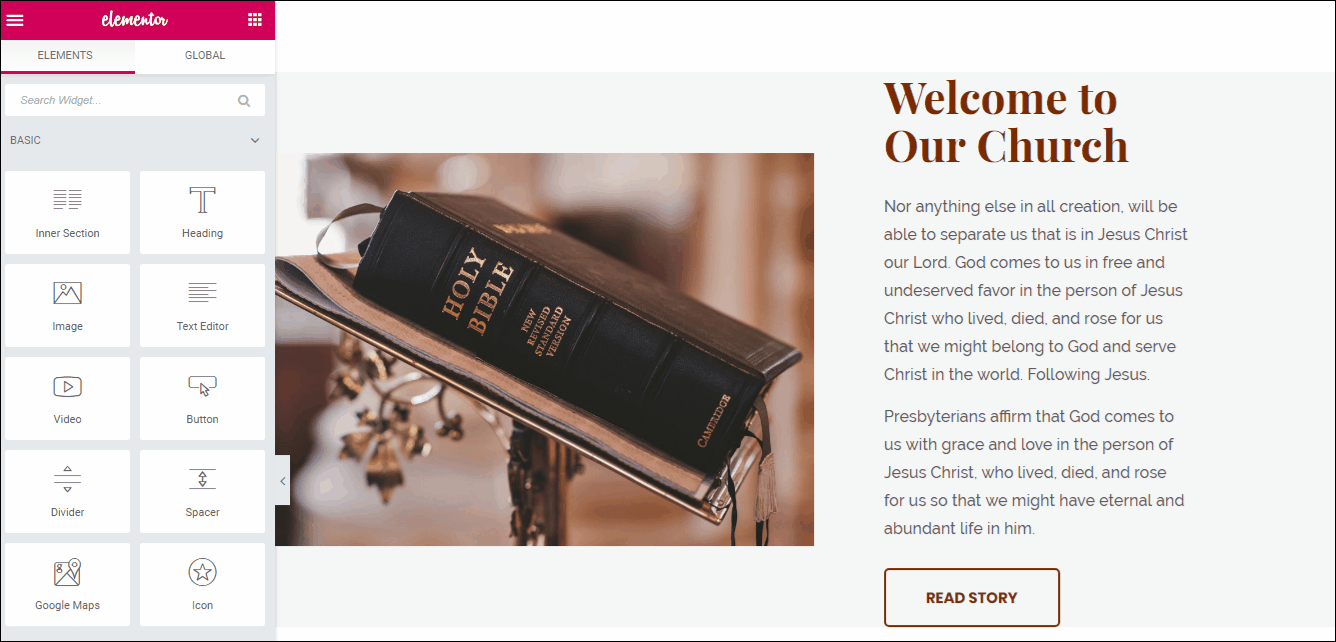
6) Welcome to our church
You can easily edit the page with the help of Elementor Page builder.
– Just open the page using ‘Edit in Elementor’ option. Select the image and change it with your desired one.
– To change the Title and the description that is by default there, just click on it and you can easily change it.
– You can change the text of the button by clicking on it and redirect it to the page you want the users to redirect after clicking the button.
– Do not forget to update the Elementor after making the changes.
7) Latest Sermons
You can click and edit the Title and Sub-Title easily. Just click on the element you want to edit while editing the page using the elementor and update the section as per your requirement.
– Just click on the text and change it according to your need.
– The Sermons displayed below are due to a shortcode and it will display the latest sermons that you add.
– To add the shortcode you can add a new ‘Inner Section’ or just duplicate the existing section containing sermon and drag and drop to your desired place.
– If you add a new Inner section then you need to add ‘Shortcode’ widget from the left sidebar by dragging it and dropping it in the newly created inner section.
– For more information on how to create shortcode refer here
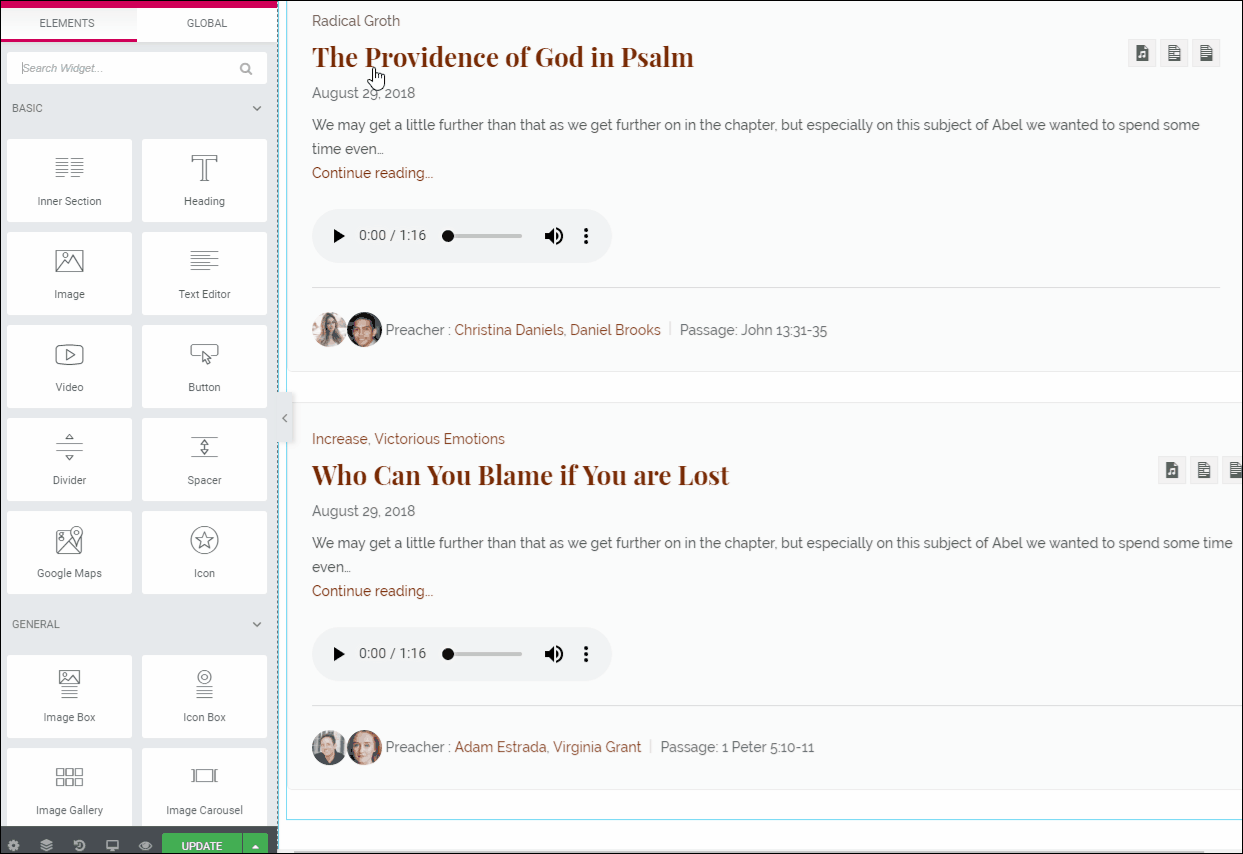
The shortcode that is given in the theme by default is for the Sermons to be displayed. Latest 2 sermons will be displayed here. You can edit the shortcode of the Sermons to display however sermons you like by editing the value of ‘sermons_per_page=’ argument.
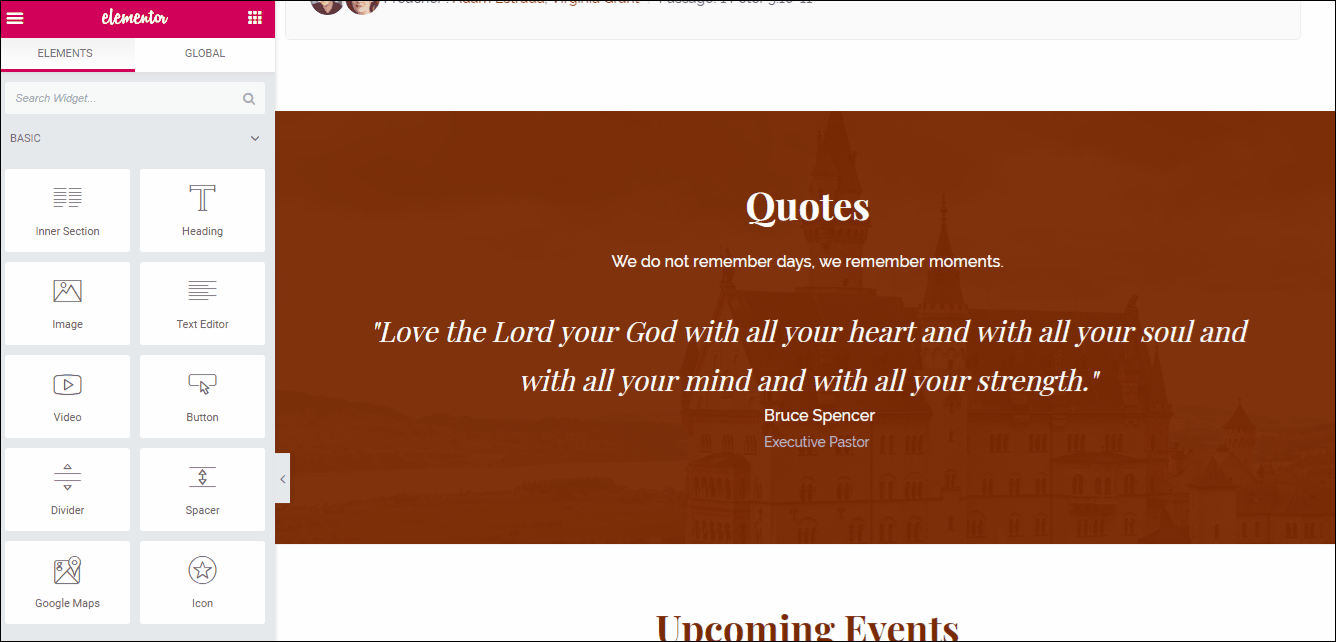
8) Quotes
You can use the Elementor Page Builder option to easily edit. Click on the text and just Edit the text up to your requirement.
9) Upcoming events
You can click and edit this section easily. Just click on the element you want to edit while editing the page using the elementor and update the section as per your requirement.
Just click on the text and change it according to your need.
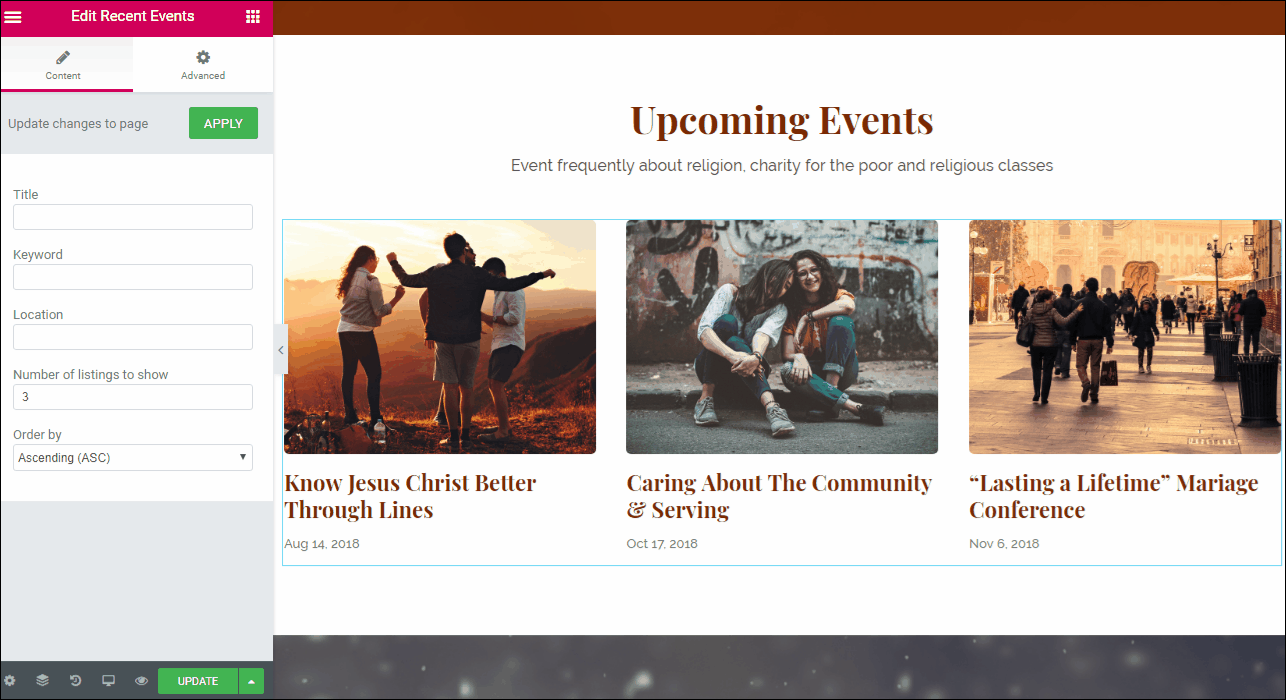
You can choose on how many recent events you want to display by choosing ‘Number of listings to show’ in the Left sidebar of Elementor.
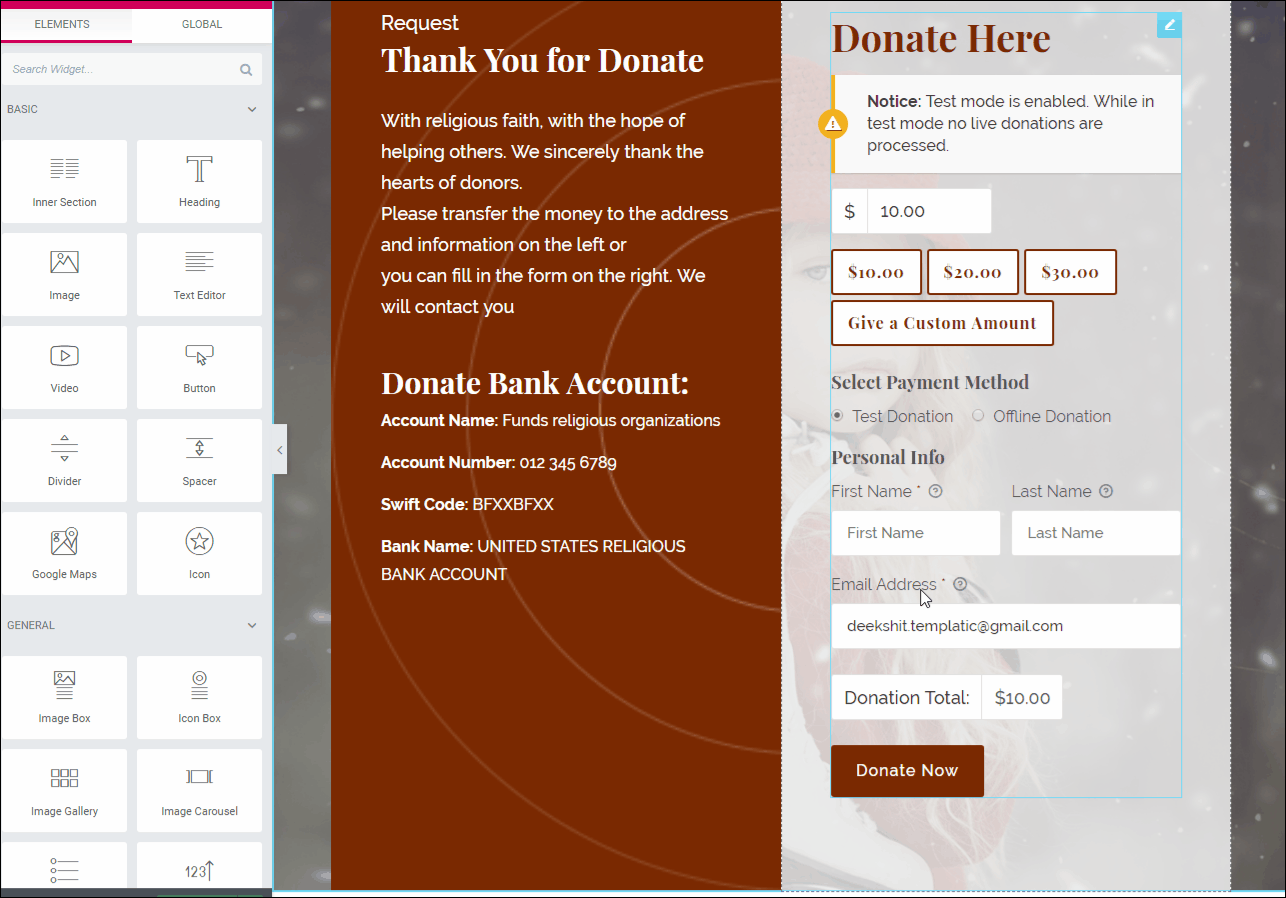
10) Give Form
You can click and edit this section easily as they are both different columns; one only text and other option containing the Give Form.
– Just click on the element you want to edit while editing the page using the elementor and update the section as per your requirement. Just click on the text and change it according to your need.
– The Give form comes from the shortcut retrieved from the backend while creating the form by navigating to Donations >> Add Form.
– When you add a form it generates its shortcode to be inserted in a page or in an Elementor Text widget.
– Take a look at the attached gif on how to create a Give form and Shortcode.
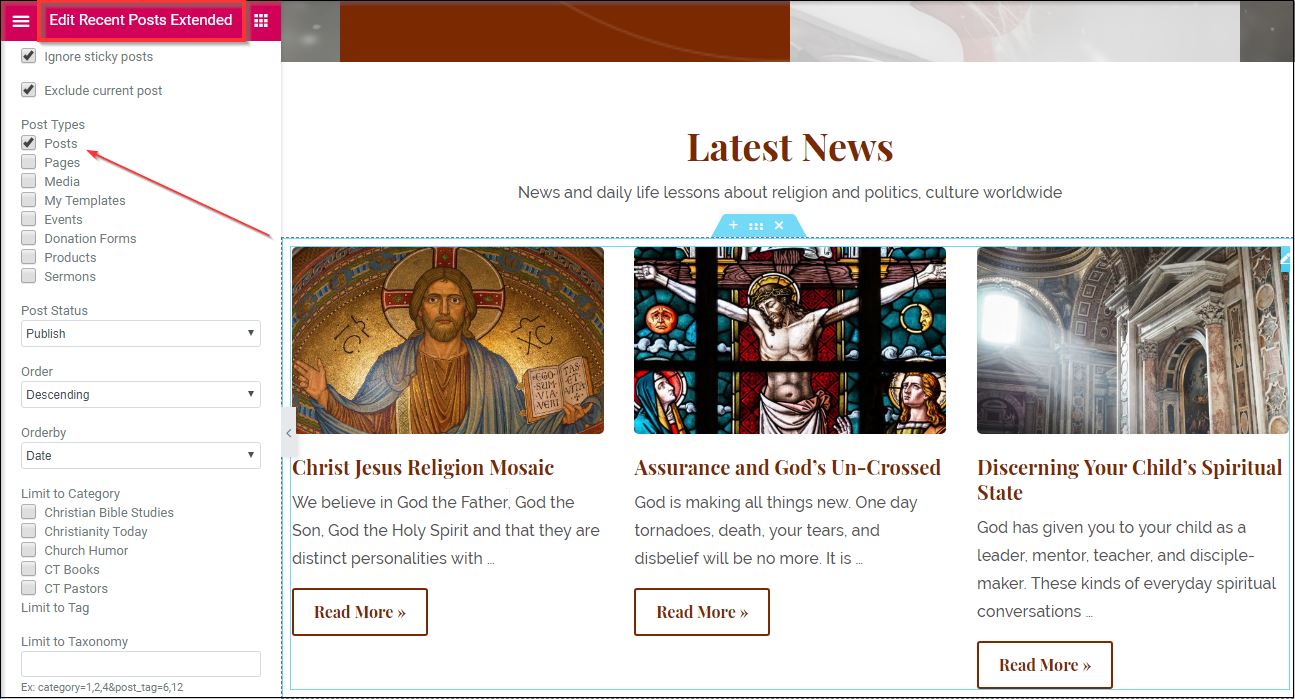
11) Latest News
Click on the title and you can easily change the text from Latest News to something you wish.
The posts come from the Recent Post Extended widget, in that you can select the type of post to be displayed, Post status, Order by, to display thumbnail or not, etc.
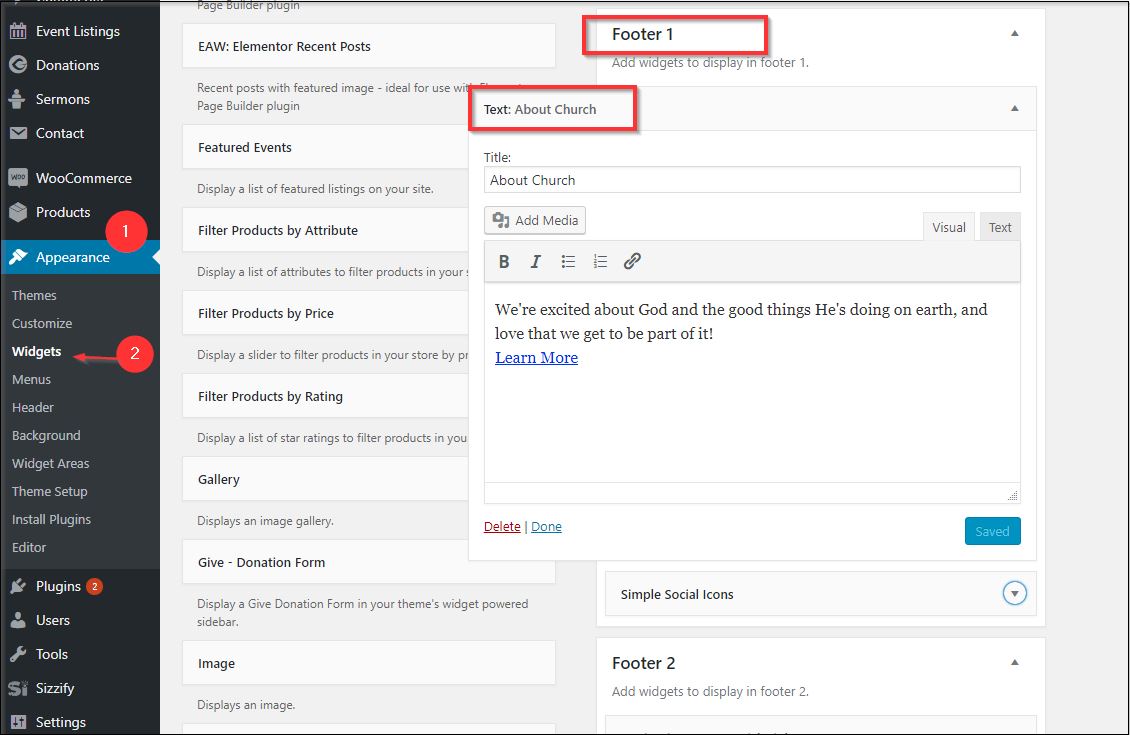
12) About Church
You can edit this section by navigating to Appearance >> Widgets >> Footer1, expanding the Text widget and you can edit it.
The social icons can also be edited by giving the URL of whichever site you want. For more details on how to do it refer here.
13) Quick links
You can edit this section by navigating to Appearance >> Widgets >> Footer2, you can select which menu you want to display here.
To know how to create the custom menu refer point 4.

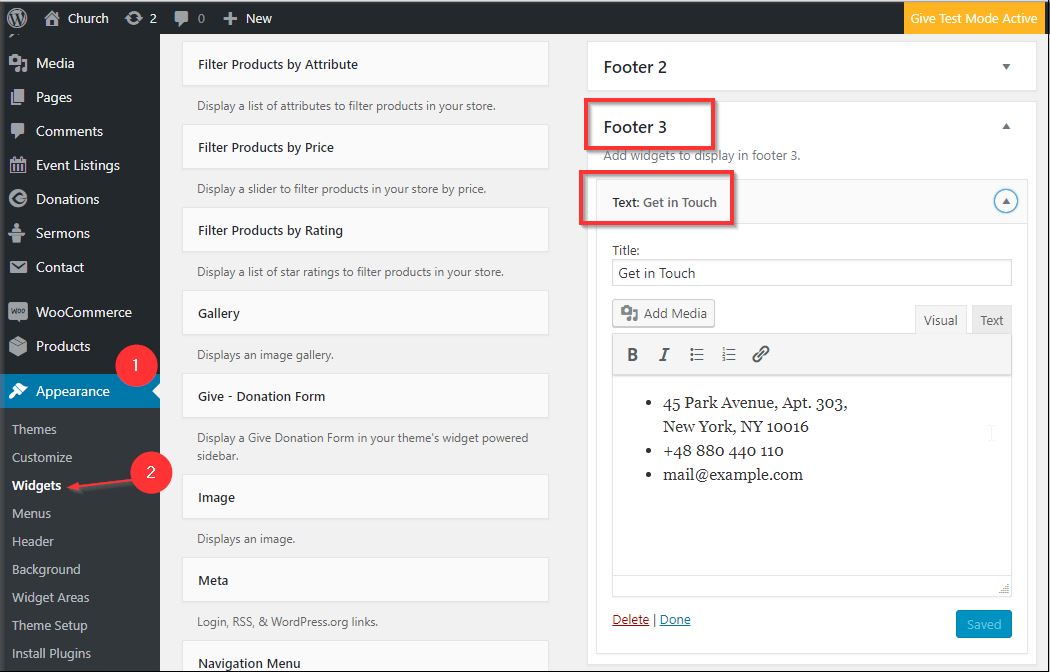
14) Get in touch
You can edit this section by navigating to Appearance >> Widgets >> Footer3, edit the Get in touch text widget and change the information as per need.
Homepage – Image Slider
Changing the Header Image Slider
While in Elementor Page Builder you can modify the Image Gallery and the Content written of your website to make it more personalized. Refer the GIF for the understanding.
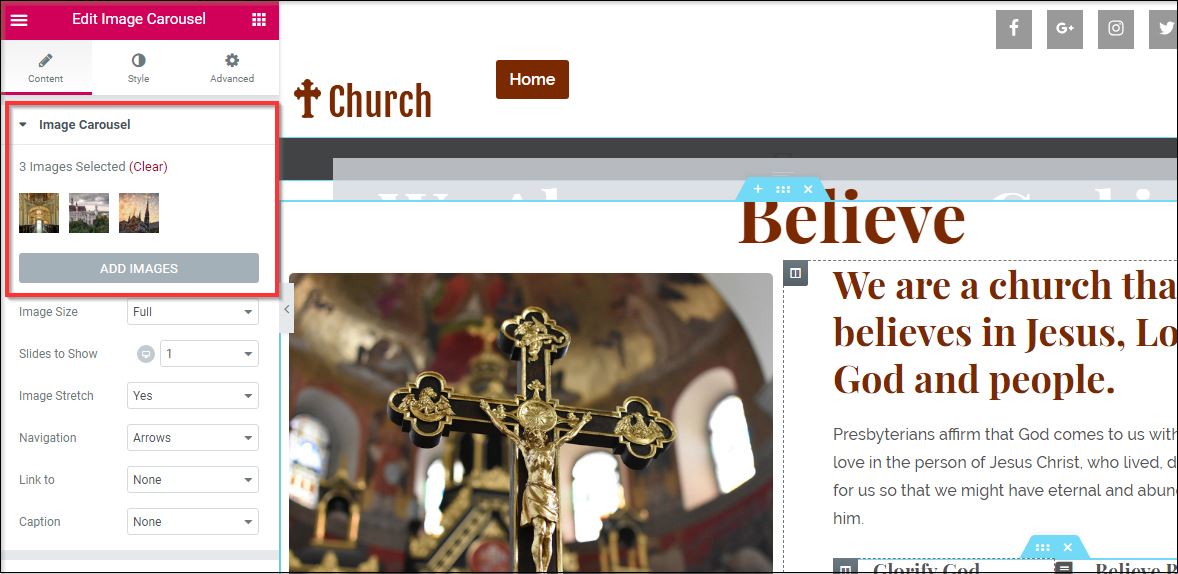
Instead of selecting only one image select multiple images for the Image Slider to show different images.
1) About Church
You can easily edit this section by just opening the page into the Elementor Page builder and then just clicking where you want to edit and make changes as per your need.
The icons you see are taken from the website called Font Awesome
2) Upcoming events
Refer to point 9 of Home – Image Banner.
3) Quotes
Refer to point 8 of Home – Image Banner.
4) Our Gallery
Refer to point 12 of Home – Image Banner.
5) Give Form
Refer to point 10 of Home – Image Banner.
6) Latest News
Refer to point 11 of Home – Image Banner.
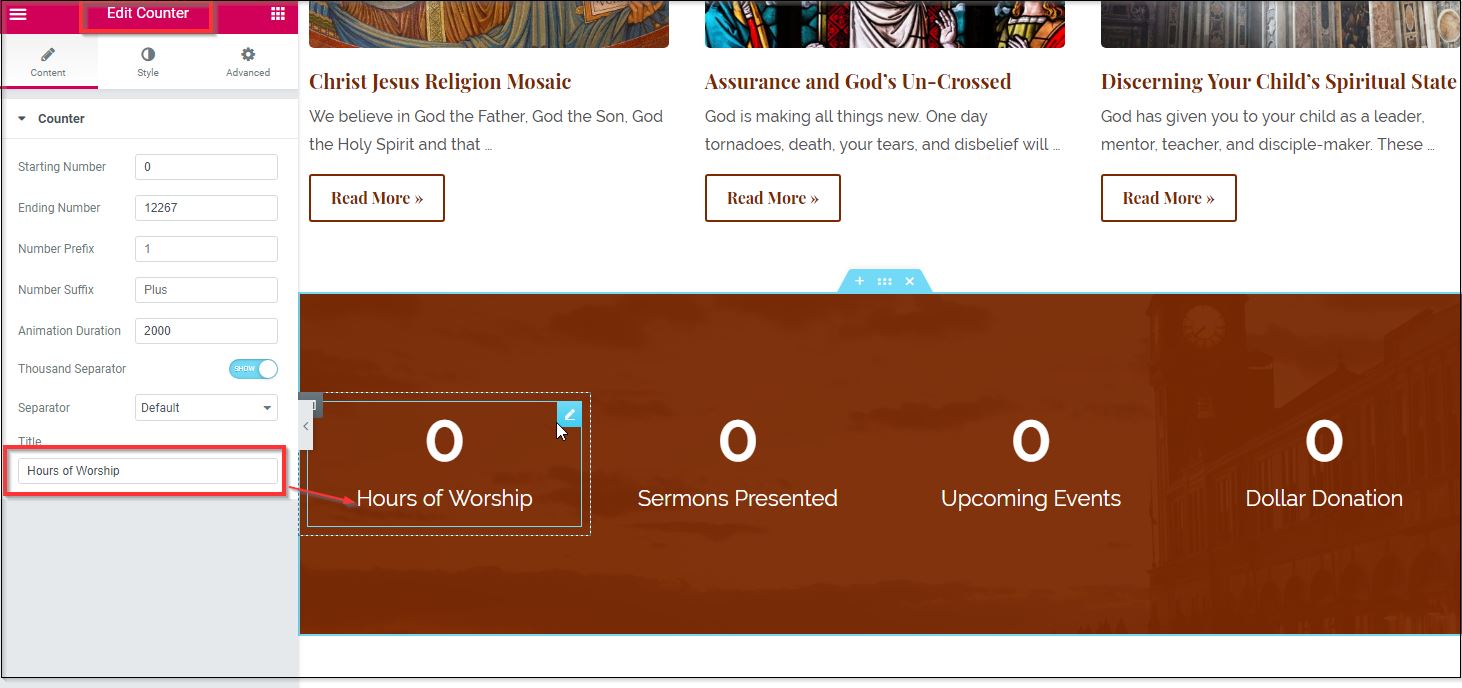
7) Counter
You can set the value you want to show on the counters easily. While being in the Elementor Page Editor just click on the counter individually and you can see at the left side a bar named ‘counter’.
– From the widget opened in the sidebar, you can select the Starting Number, Ending Number, Number suffix, Title of that particular counter, etc.
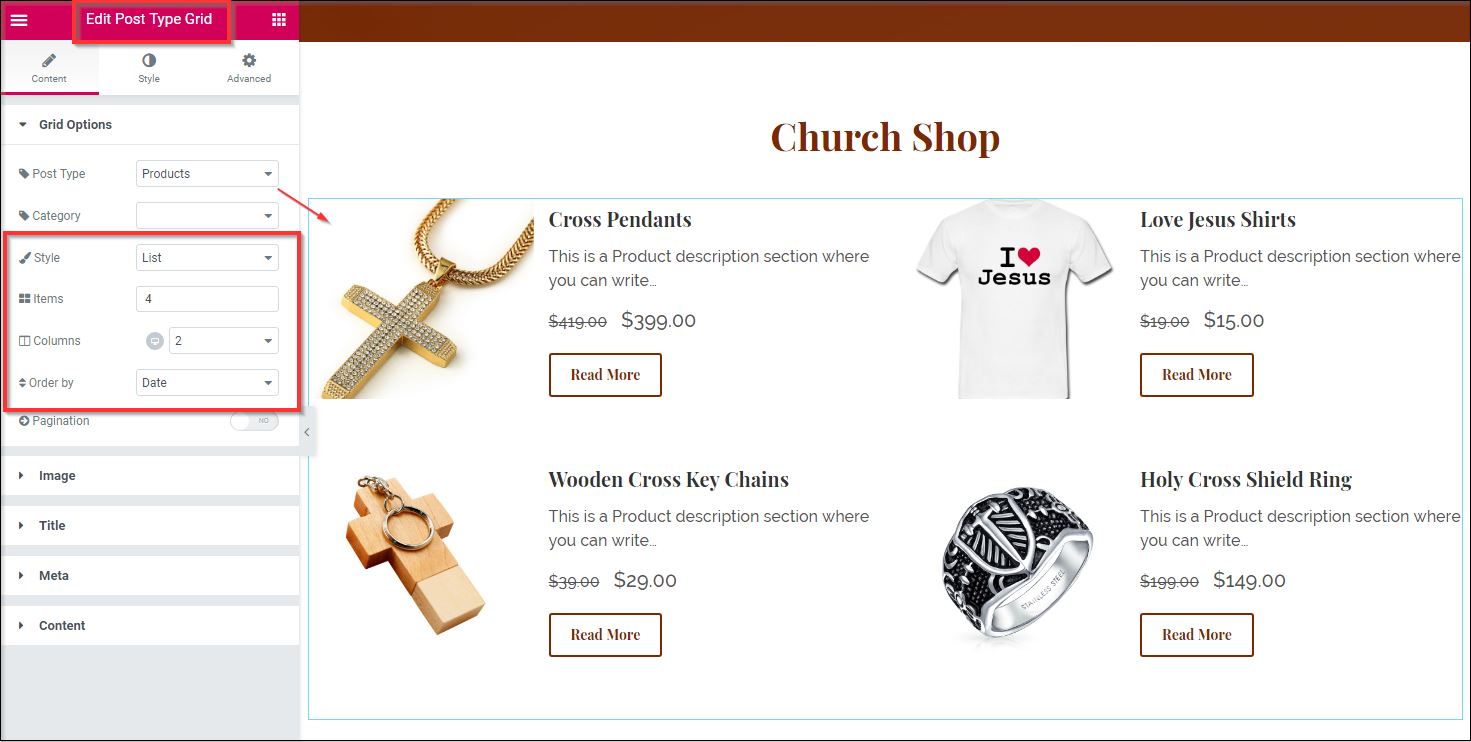
8) Church Shop
While still being in the Elementor Page Editor, you can edit the title by clicking on the Church shop and change it to your purpose.
– The shop is displayed by the Edit Post Type Grid widget, to change the post type from product to something else such as events or sermons. Change the Post type from the left side-bar and select whichever you want.
– You can choose how many items to be displayed, into how many columns as well as how to sort them.
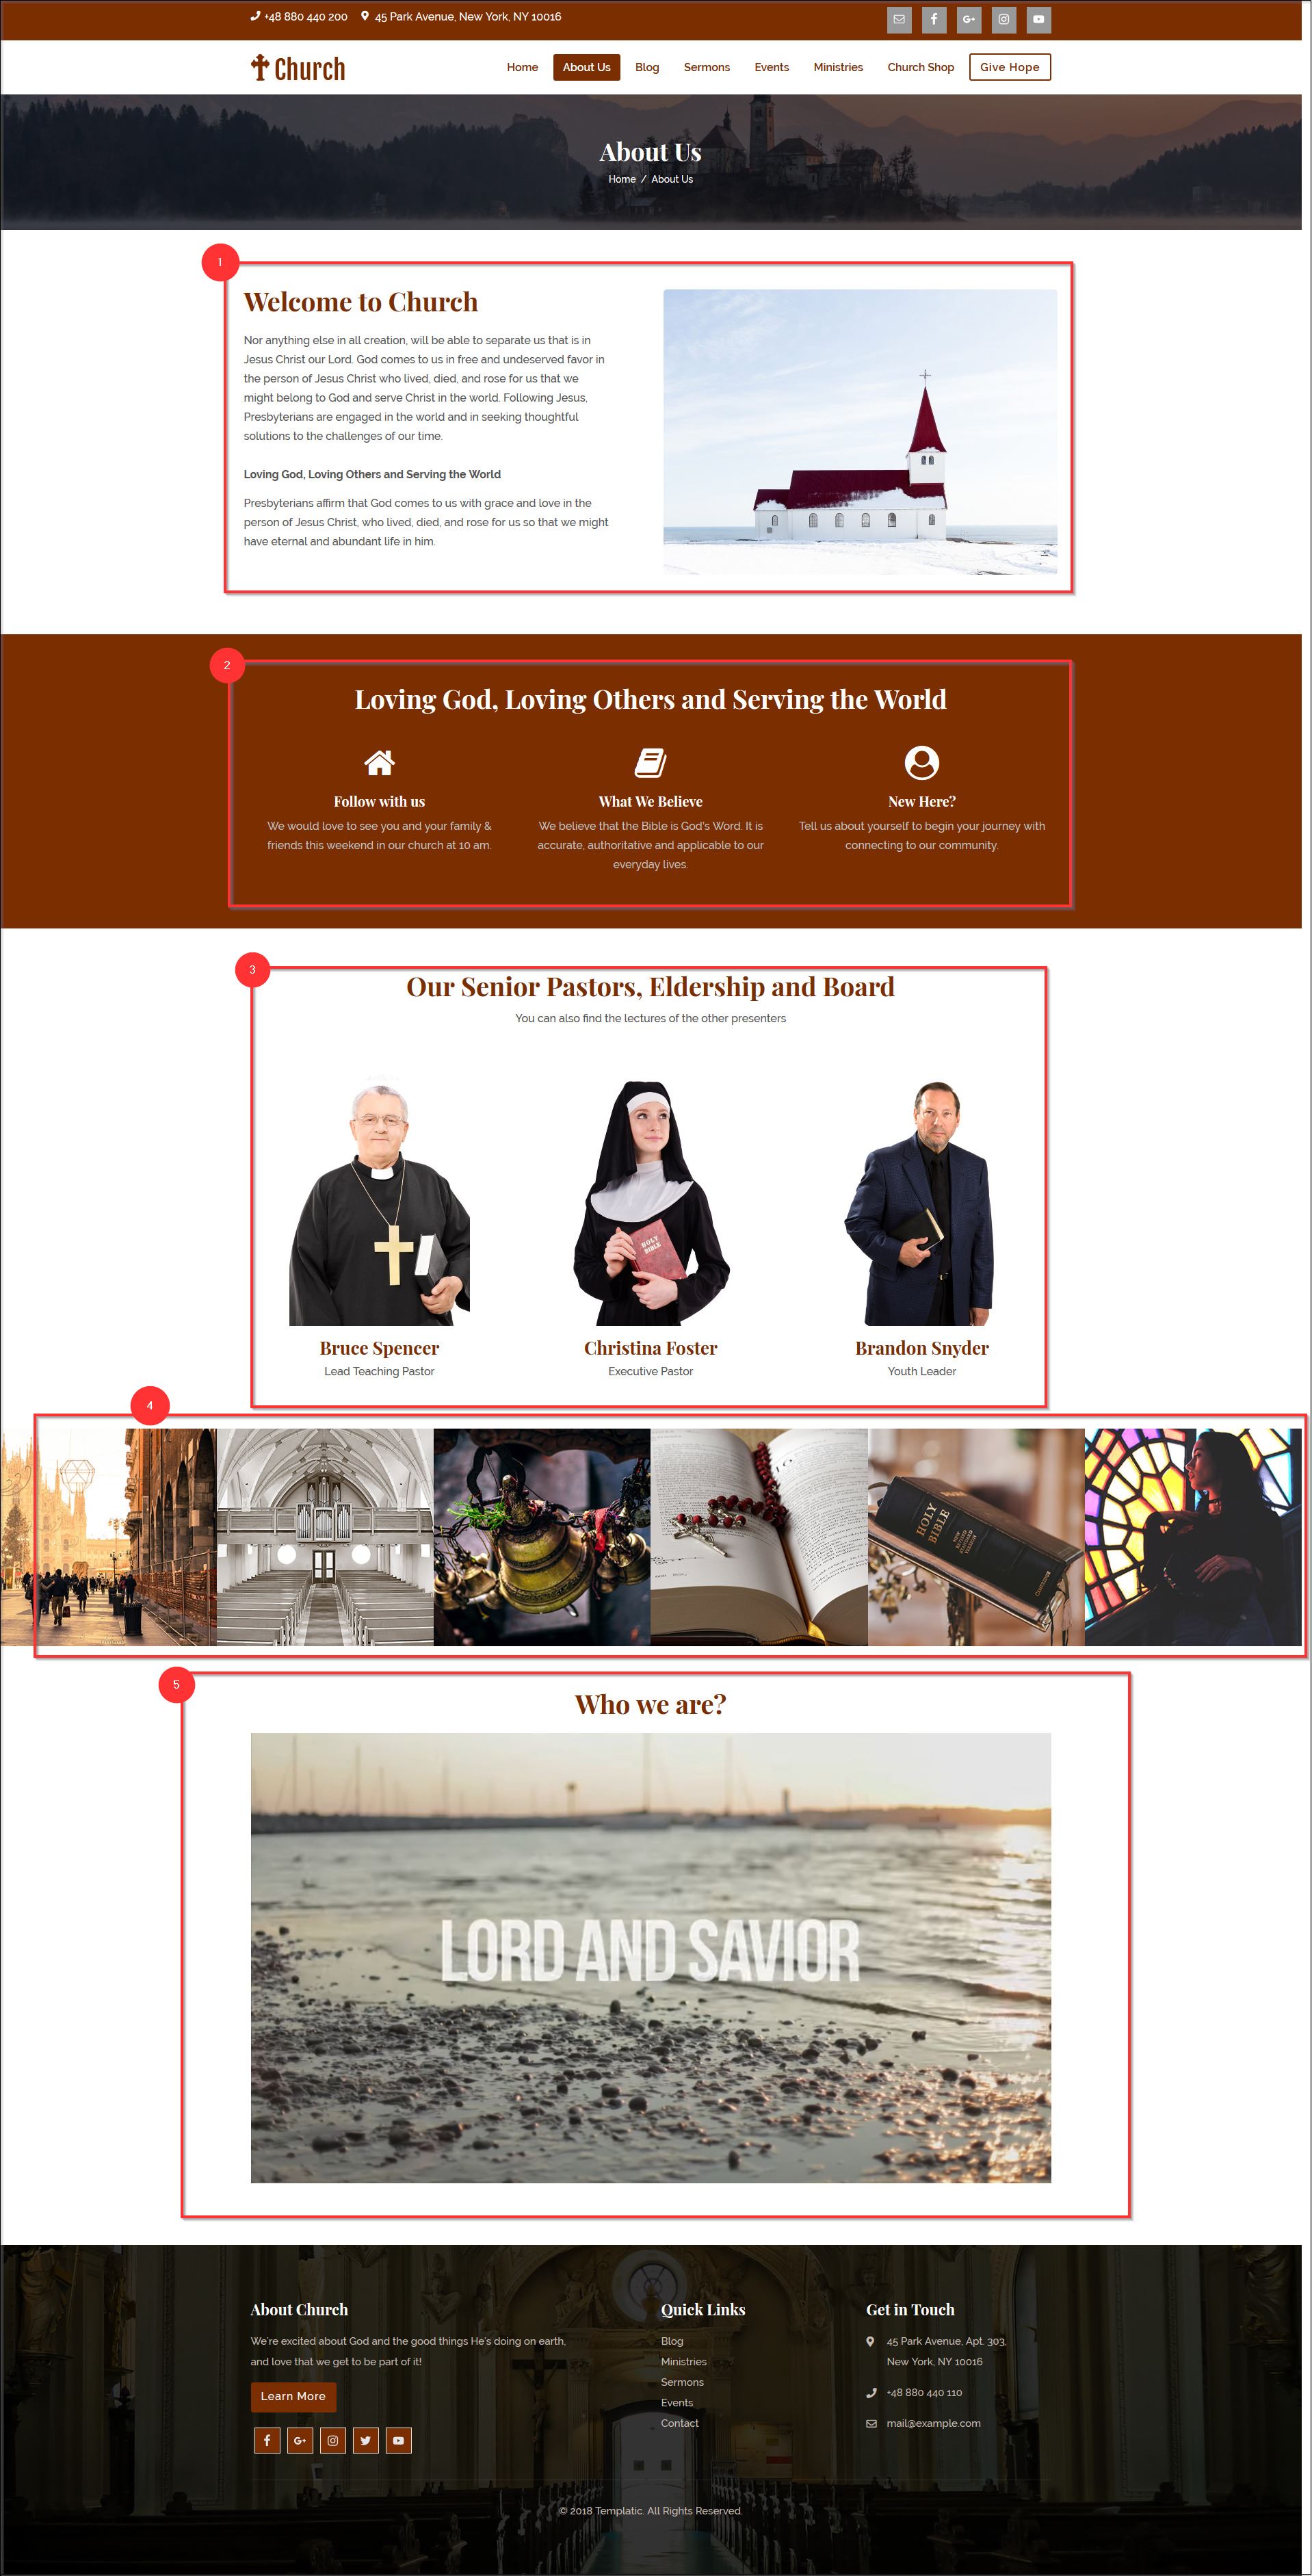
About Us
Church theme comes with easy to edit About Us page. You can add the Image, a small introduction, Senior Pastors and Eldership images, images, and video by editing the page using elementor.
1) Welcome to Church
While logged in, you can edit the page by just opening it in the Elementor page builder. To change the title from Welcome to church to something else, you can just click on the text and edit it in the same box only.
– To change the description below the title, like we did for the title, just click on the text and we can change the description too.
– On the image box section, Choose an image of your choice as well as in Style section ⇒ Hover Animation drop-down box you can change the hover effects too.
– To have a reference on how to do it, refer Point 6 of Homepage- Banner Image.
2) Icon Box
To change the Title you just need to click on the title and you can write it in your way.
– To change the icon from home to something else you can change it from the side-bar that opens up when you click on the icon, and change it.
– Change the title of icon and description from the Title and Description section respectively. Click on the column containing the description and change the contents to suit your image.
– To have a reference on how to do it, refer Point 5 of Homepage- Banner Image.
3) Pastors and Board members
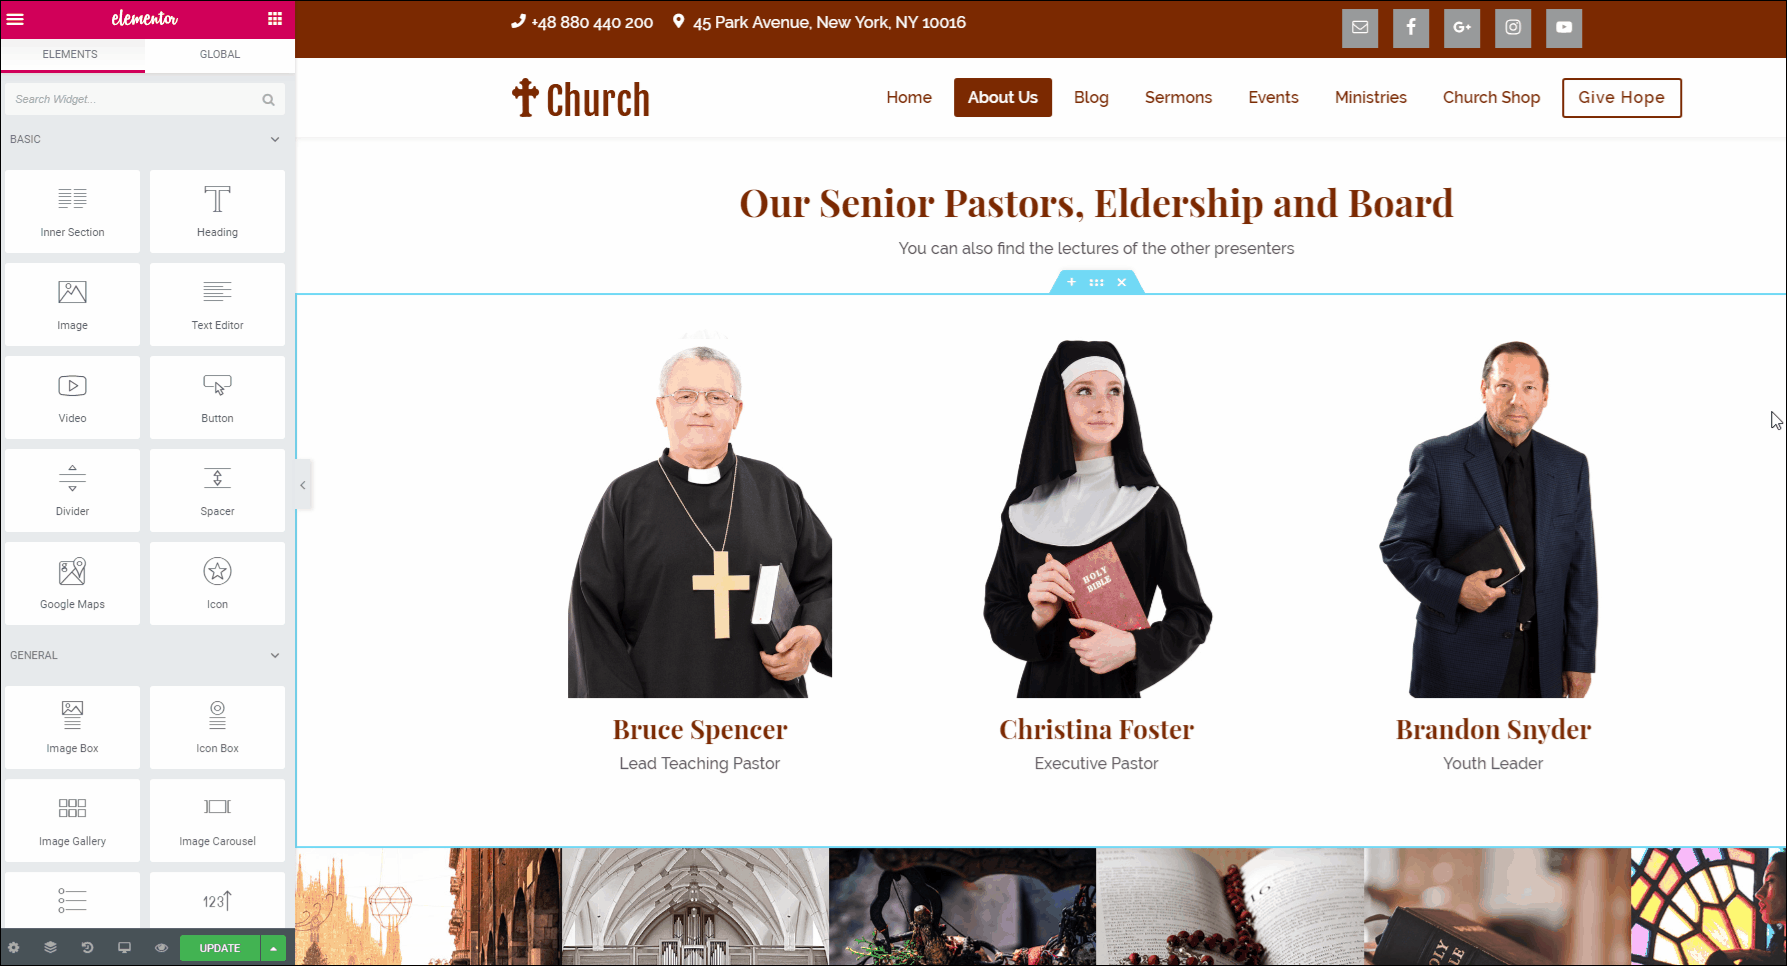
While in Elementor mode, you can just click on the title to change the title as well as sub-title from there.
– To change the image of the pastors, you can click on the image and on the left side-bar the image box will open. From the box, you can change the image, Title, and description for the image too.
– To change the layout click on the six dots that appear on the top of the box when you have selected an image. You can change the structure of the layout as well, you can find it in the more layout options.
– To copy the same layout for more members you can duplicate the structure by right-clicking the six dots on top and choosing the option of ‘Duplicate’.
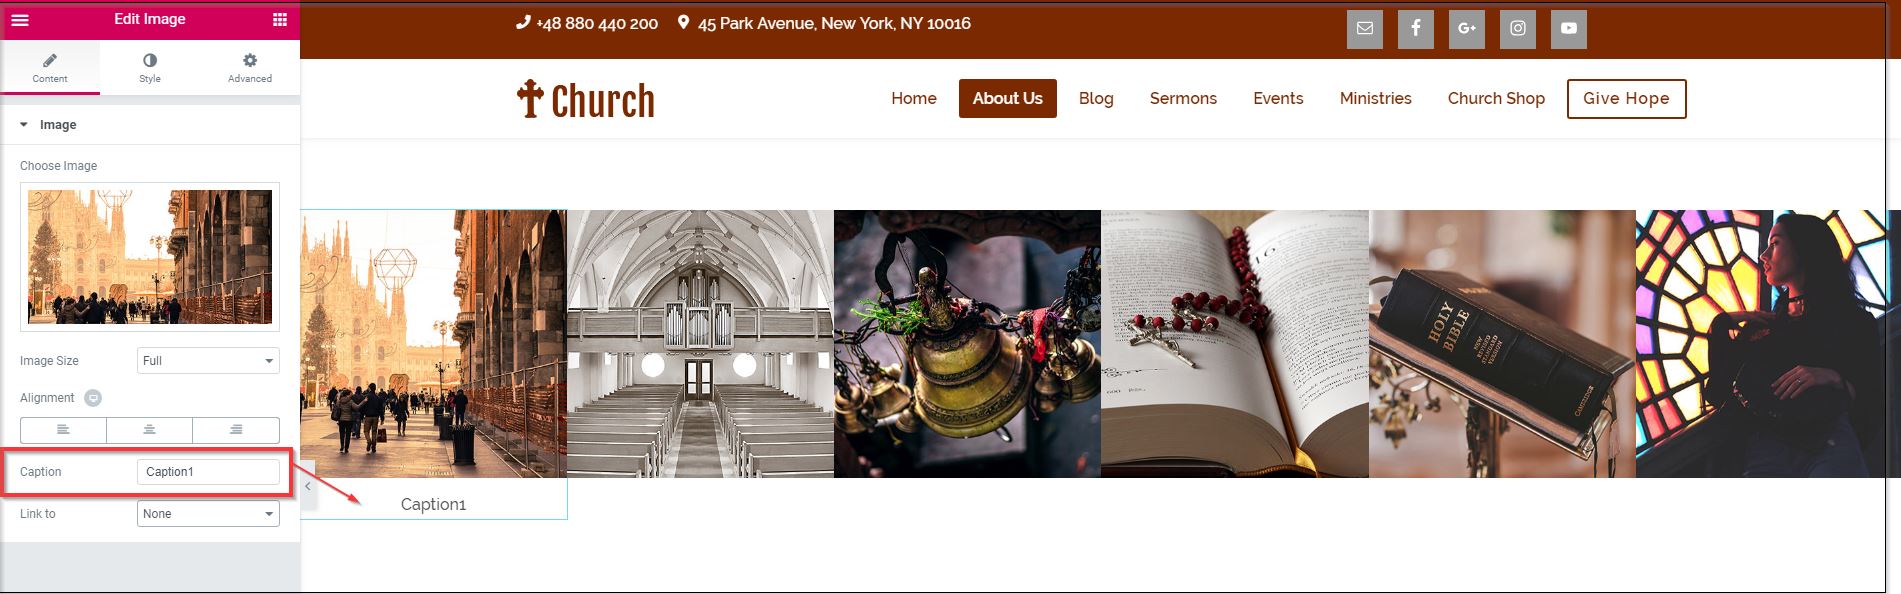
4) Images
With the help of Elementor Page Builder, you will be able to modify this section easily.
– If you want to change any image you can just change it by selecting the image you want to change and then on the left side-bar you can delete the current image and then upload an image of your choice.
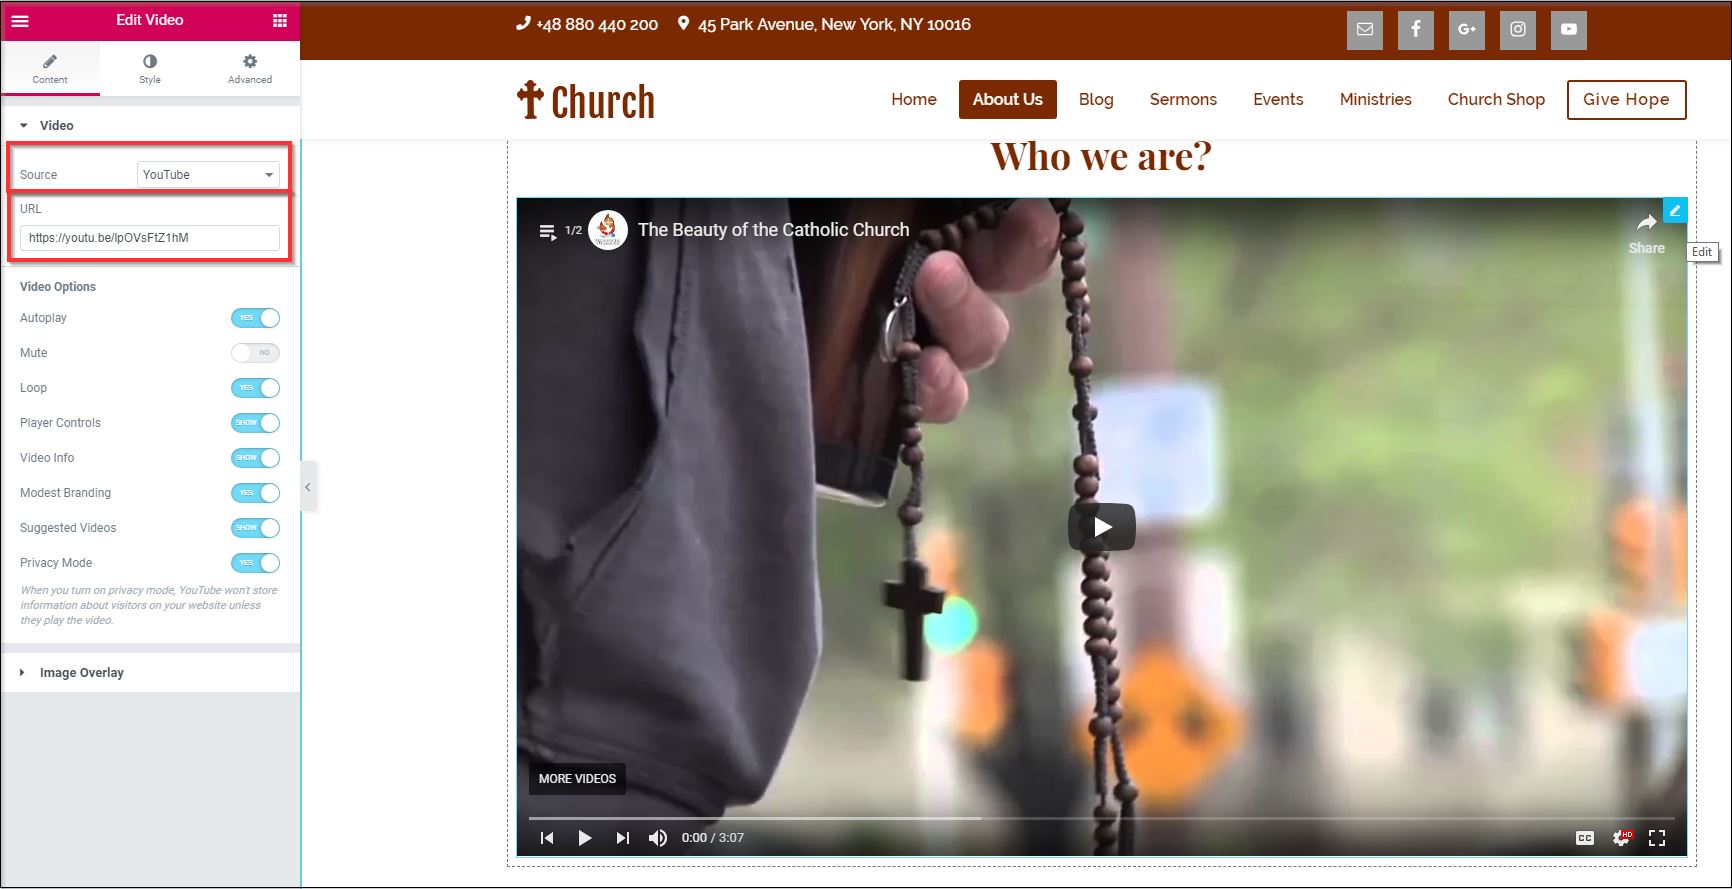
5) Who we are?
To change the title from ‘Who we are?’ to something you want, just click on the title while still being in Elementor Page Builder and change it.
– To change the video, just hover over the video by still being in Elementor editor when you see the blue icon at the top-right corner just click on it and on the left side-bar you will then be given options to change the video of your choice.
– You can choose the source from where you want to get video, you need to provide URL too from the source that you are selecting and different Video Options are there to select from.
Gallery Page
The page display type of Gallery you want to use for your site.
Open the Page and edit the page with Elementor Page Builder. You can change the title of the gallery display by just clicking on it.
– 3 different options are given to select from. You can either keep all of the three styles or delete any style you don’t want, to do so hover over the style and then click on the ‘Delete Section’ beside the 6 dots to remove it from your site.
– To duplicate the section you wish to put just right-click on the 6 dots (Edit section) and then ‘Duplicate Section’.
– To change the images from the section, hover over the section and then on the top right side click the Edit Menu section and then you can choose images of your choice and create a gallery.
Sermons page
The Sermons page is generated whenever the plugin ‘Sermons Manager’ is installed. You can then edit or add the pages from the Dashboard >> Sermons. They will appear as a post on the Sermons page.
Sermons detail page
The details will be fetched from the page created in the Sermons manager.
– The sidebar displayed on the sidebar of the page can be customized by navigation to Dashboard >> Appearance >> Customize and you can then find the edit icons over the sidebar.
Click on it and from left side-bar, you can add new widgets or delete the one that is already there.
To insert gif of adding and deleting widgets.
Events Page
The Events page is getting created from the shortcode on the Event page.
[events]
For further information on how to use the plugin,shortcodes, etc. you can follow here.
Post Event page
This page is generated from the shortcode [submit_event_form].
– The widgets on the left side can be edited by navigating to Appearance >> Widgets >> WooSidebar – Event Submission.
Ministries Page
– You can change the title by opening the page into the Elementor editor and then clicking on the title.
– To edit the images and the description you just need to click on it to change the image and description from the left sidebar.
Contact Page
For your website, the contact form will play a very important role.
With the setup wizard, all the necessary plugins will be installed automatically including the contact form. With this plugin, you can create all the contact forms you want by navigating to the wp-admin dashboard ⇒ Contact. To create a contact form, you can click on the “Add new contact form” button, while to view the existing form templates, you can click the first option – “contact forms”.
However, if you need more fields, you can refer to the contact form 7 documentation and create a custom contact form for your website.
Creating a contact form
With the contact form 7 plugin, you can easily create a custom contact form to collect the data that you want from the users using the form. Here’s the contact form 7 guide on how to edit the form fields to create a contact form. Moreover, there are other tabs to set up the mail, and for advanced settings. Moreover, you can also change the messages to be displayed at certain events like successful form submission, validation errors, wrong email address, etc.
Contact form short code
Once you have created a contact form, you can use it on the different pages through the shortcode.
The shortcode will look something like:
[contact-form-7 id=”6″ title=”Contact form 1″]
You can create a text block wherever you want to insert the contact form and then paste the contact form shortcode there to insert the contact form.
Using Blogs on your Church website
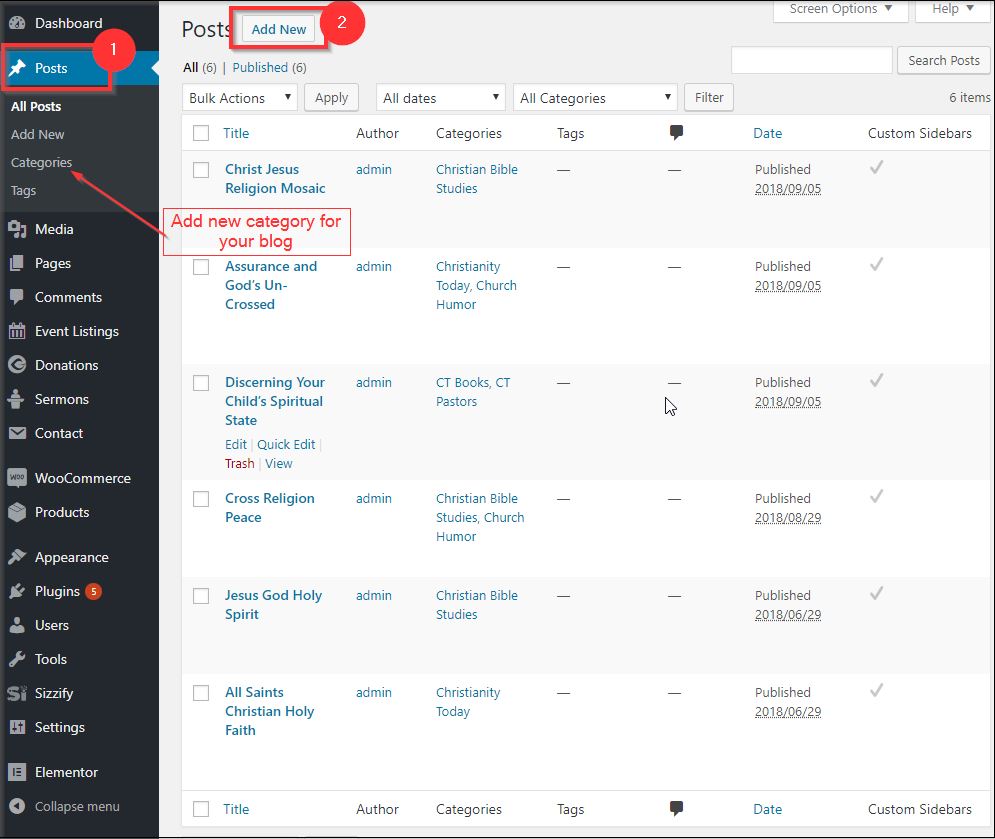
You can use your Church website as your blogging platform. To start blogging, you can navigate to wp-admin ⇒ posts ⇒ Categories and set the categories for your blogs.
Categories can be anything like for Events there is Children, Classes, etc.
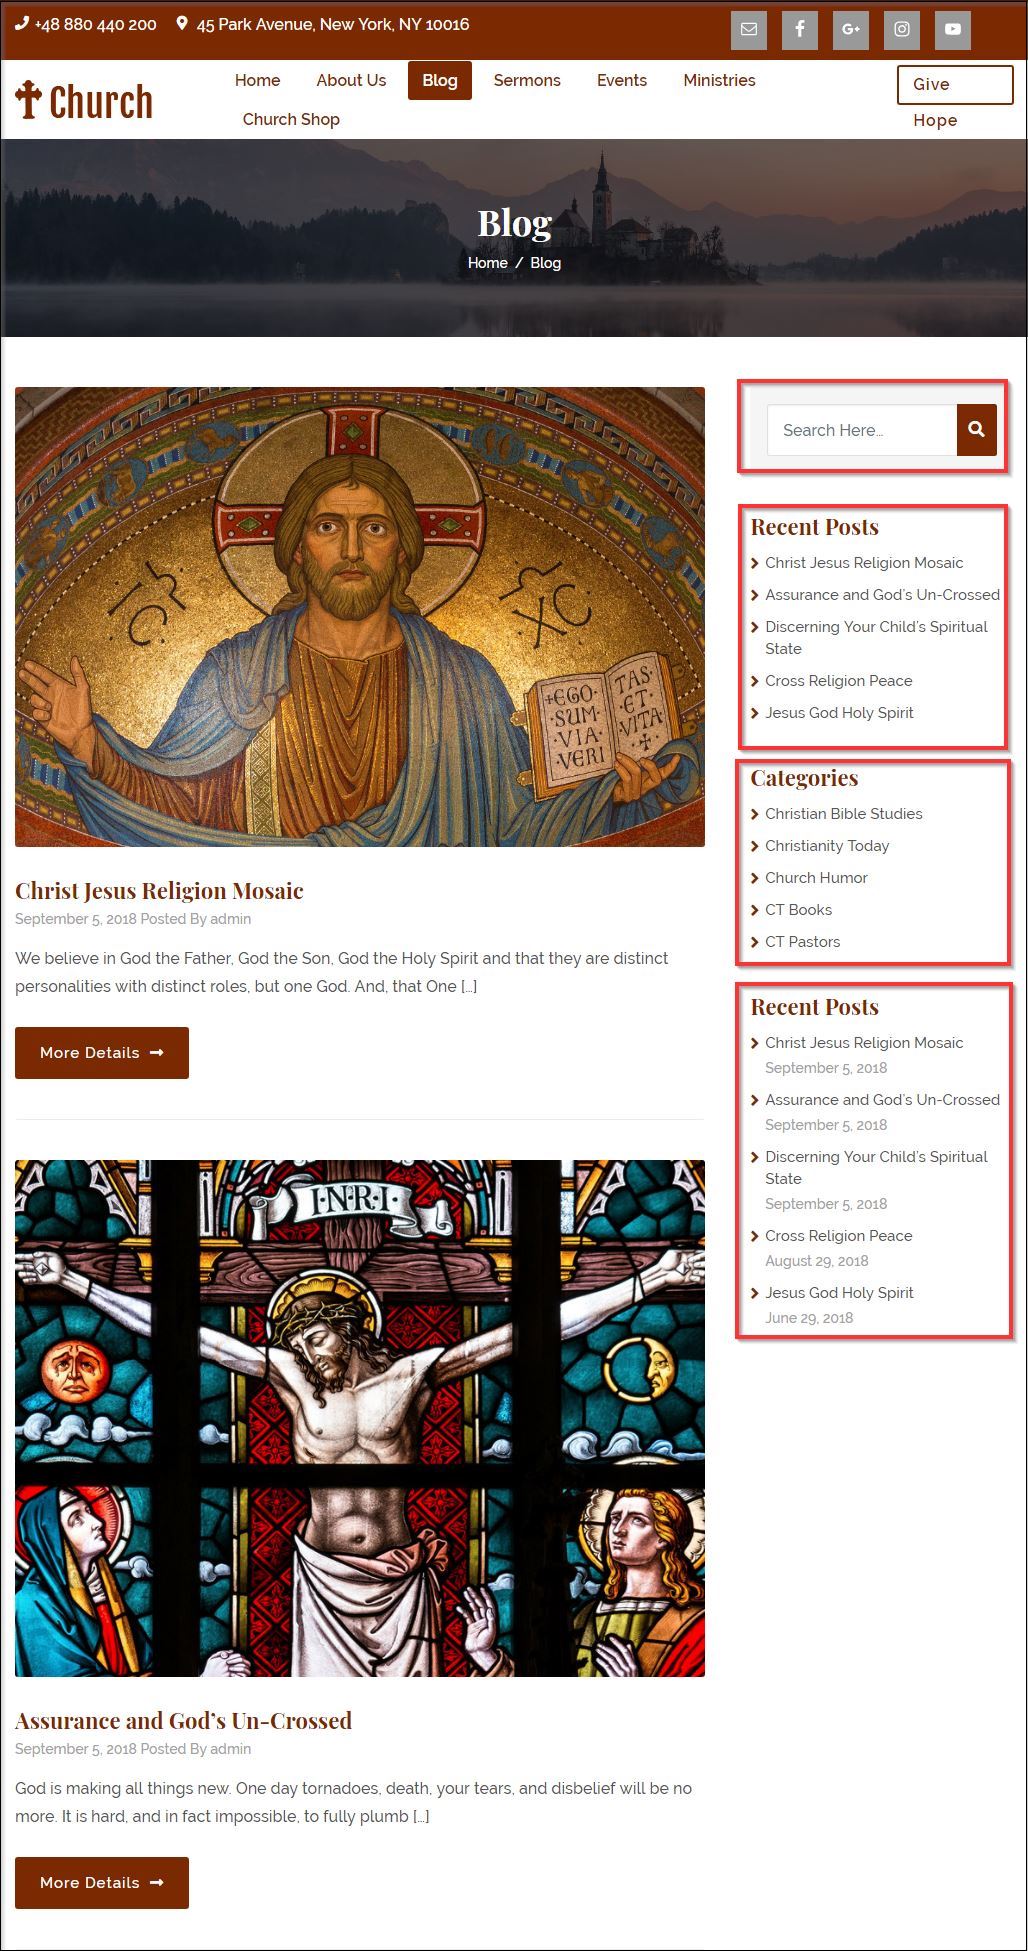
1)Adding New Blog
Creating new blog is easy as other pages and post. Navigate to wp-admin ⇒ Posts ⇒ Add New and start writing your new blog.
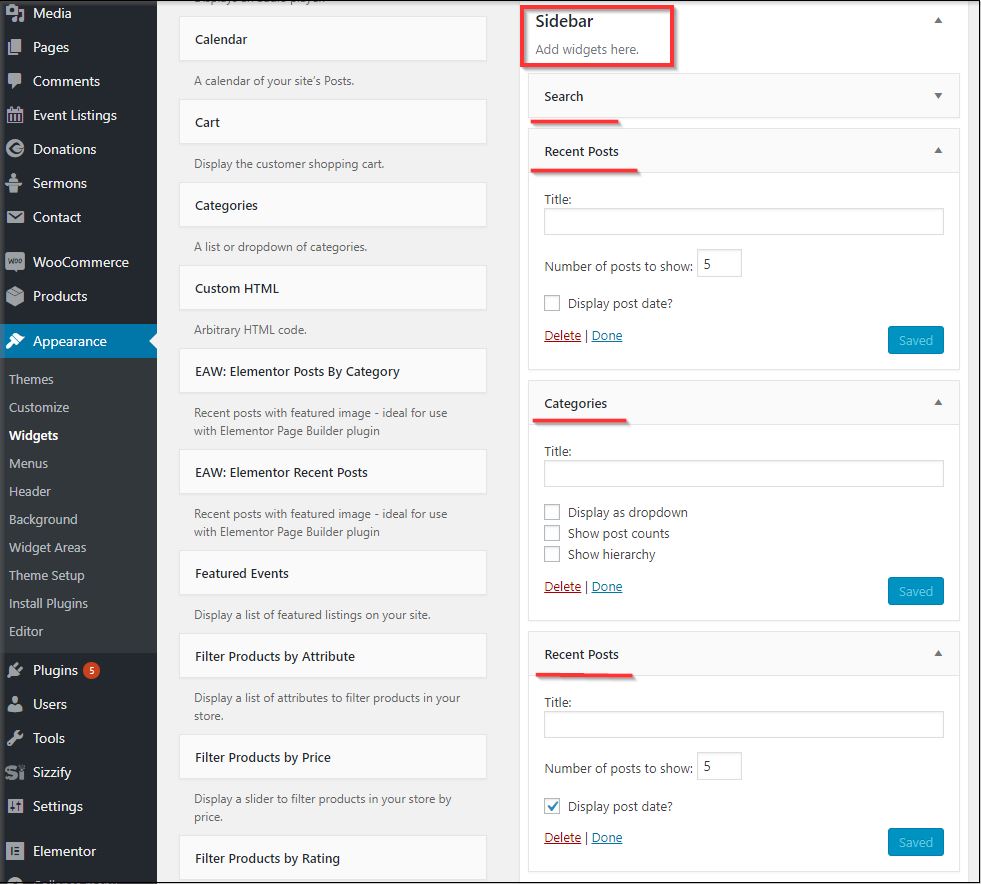
2)Blog page sidebar
You can manage the widgets of blog page at Appearance ⇒ Widgets ⇒ Sidebar. There are many widgets placed by default in the sidebar, you can remove the one you don’t like. Besides, you can rearrange them and also add new widgets too.
 “
“
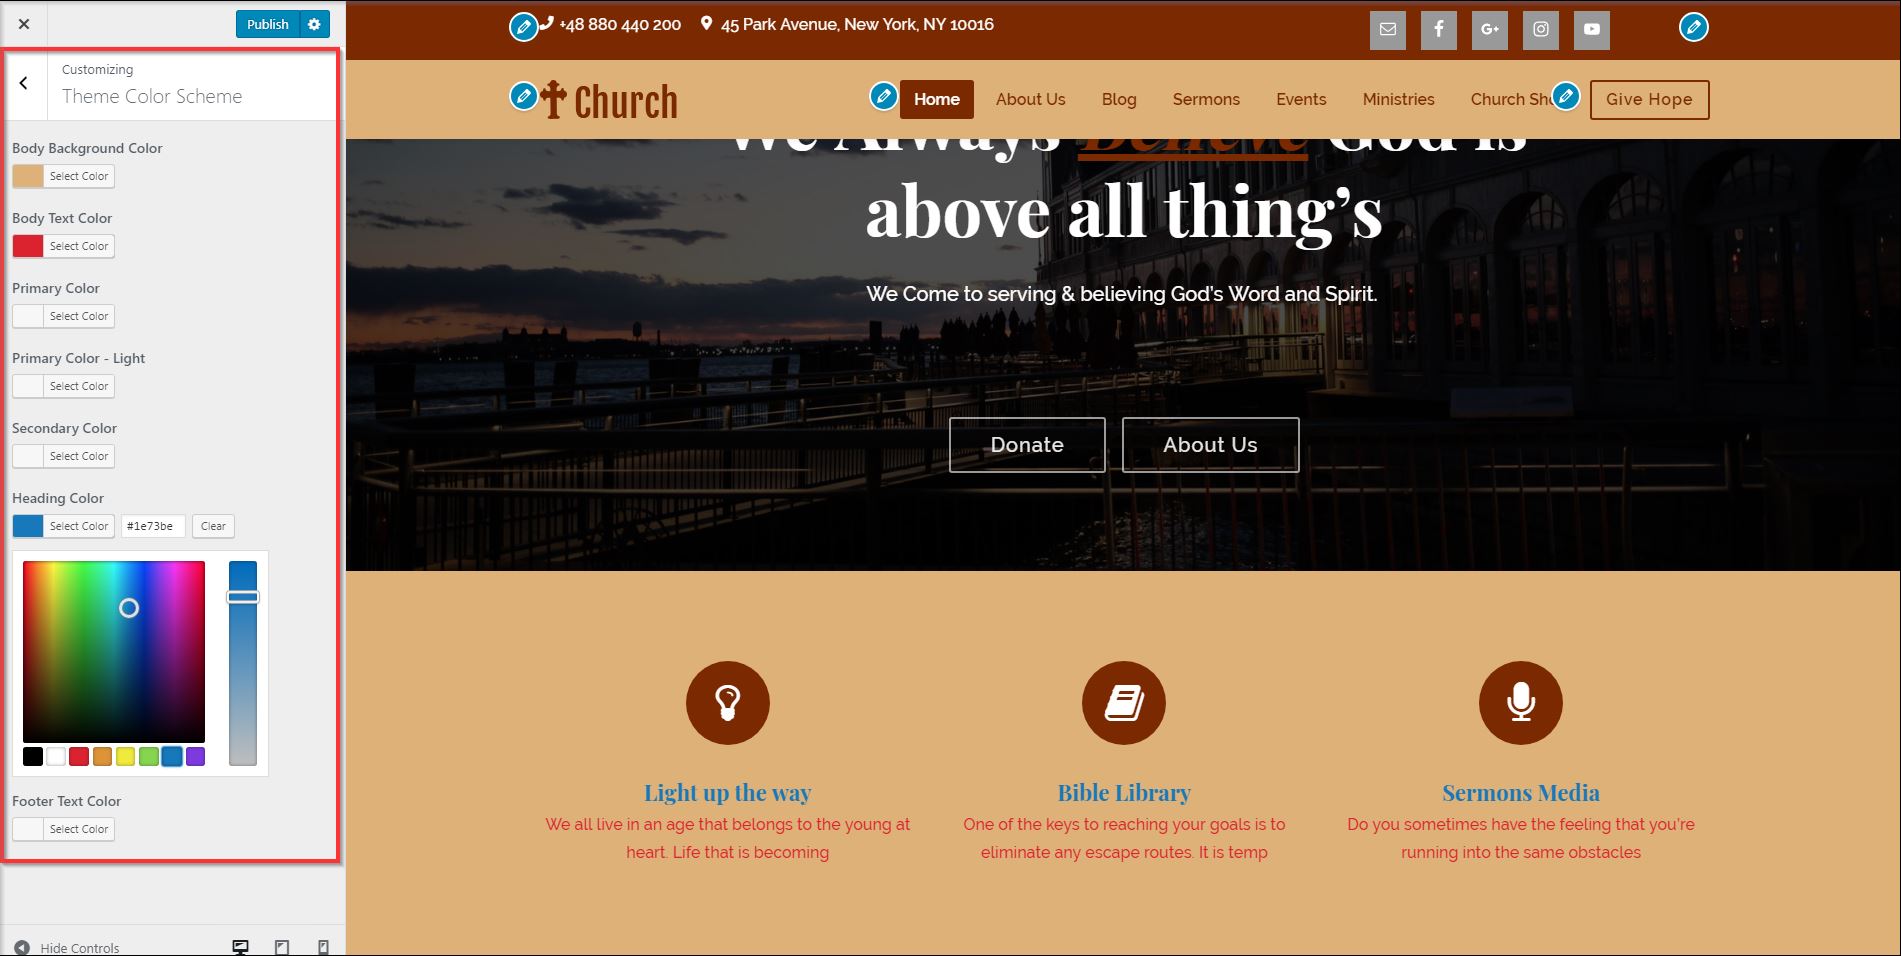
Set colors and image background
You can change the color and background of individual sections through the Elementor editor. However, you can also change the colors of your site at Appearance ⇒ Customize ⇒ Theme colors.
The following color options are available.
You can also set background to your website using the background image option.
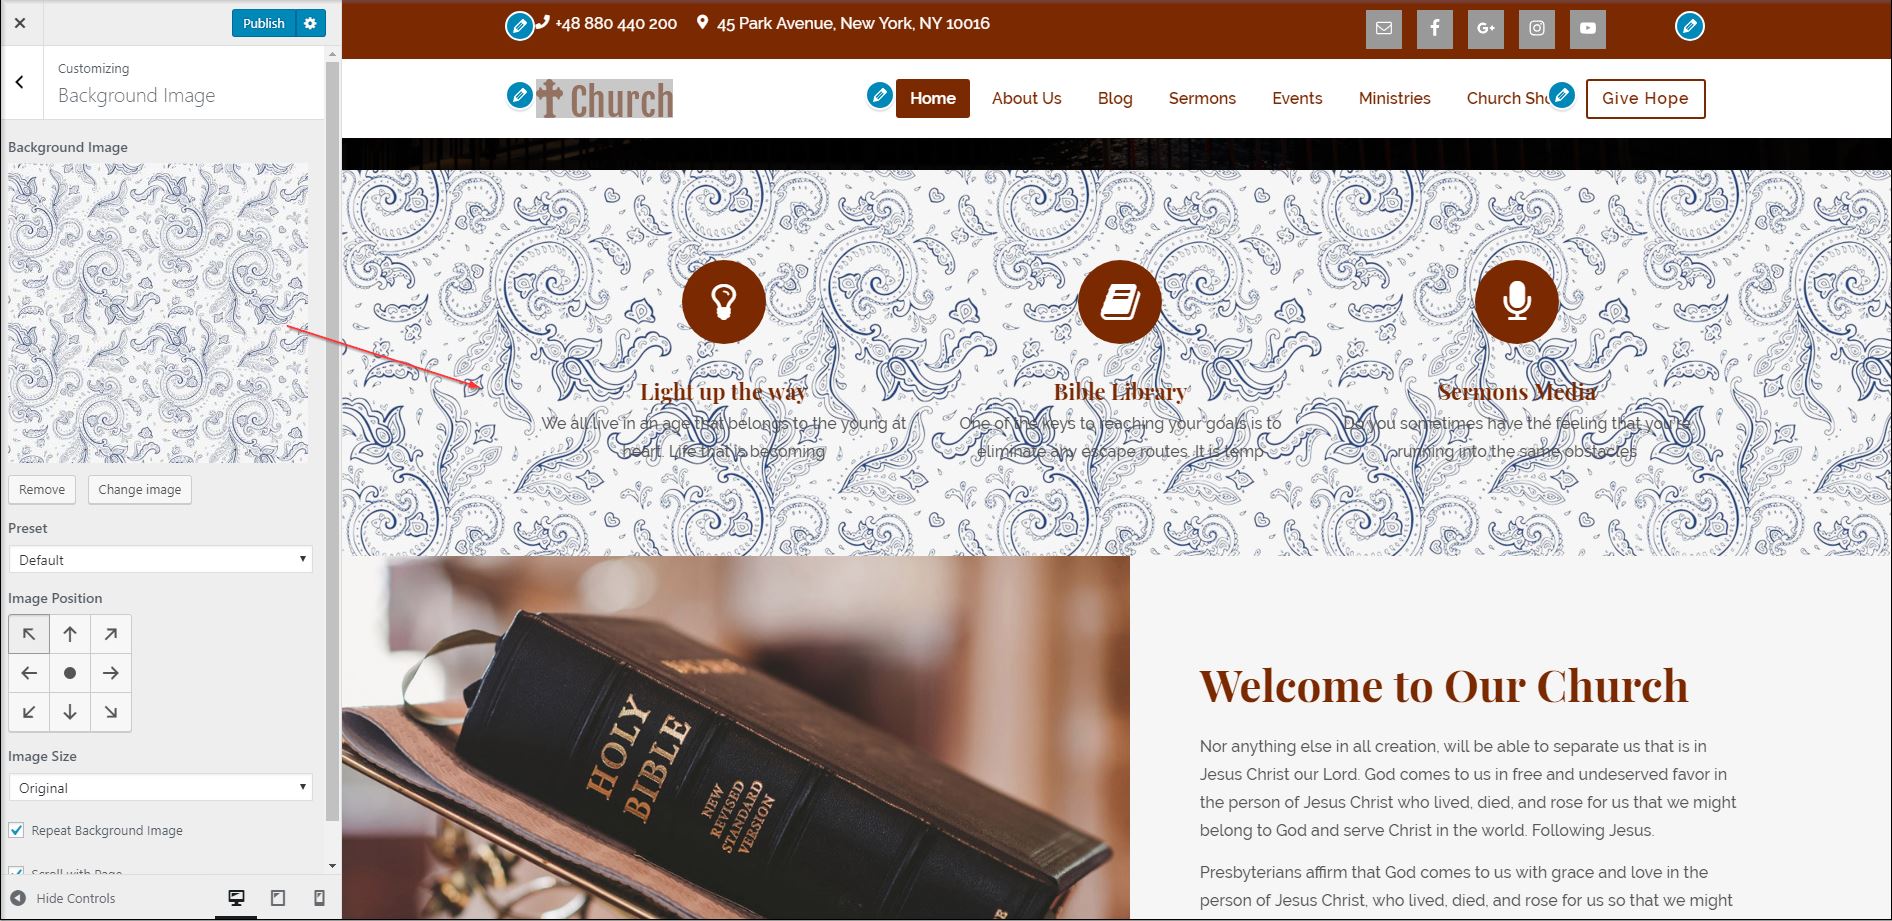
Your site with an image background will look something like this.
Woo Commerce Compatibility and configuration
In order to sell your food online, you can also configure the Woo Commerce plugin. The plugin is fully compatible with the Church theme.
You can create a shop page for your Church site.
For more detail about elementor plugin and it’s use you may refer this guide