Digital Download plugin helps you to sell and manage your online products. It runs on the base of our Tevolution plugin.So, please refer Tevolution guide as well to use this plugin easily. Here is the chronologically given steps to setup this plugin and use it with your theme.
1) Install Digital Downloads add on using WordPress back-end
- Connect to member area ,under Plugin Downloads section, expand the Tevolution plugin section and download tevolution.zip file
- Repeat the same process for Digital Downloads plugin (it works on the base of Tevolution plugin).
- Connect to your WordPress dashboard (wp-admin) and navigate to Plugins -> Add New -> Upload.
- Choose the downloaded zip file of Tevolution plugin from your respective hard drive and click Install Now tab.
- Repeat the same process to install Digital Downloads plugin.
- Activate Tevolution plugin first and then Digital Downloads from wp-admin -> Plugins
In case, WordPress rejects it then,
- After downloading the zip file of plugin as mentioned in above steps, Extract the files.
- Move that extracted folder to your active WordPress directory in ../wp-content/Plugins/. You can use FTP too for this process.
Enter your licence code
With the upgrade in Tevolution, now it will be verified before actually using it with an exclusive licence code provided to you. Here are the steps, what you have to do,
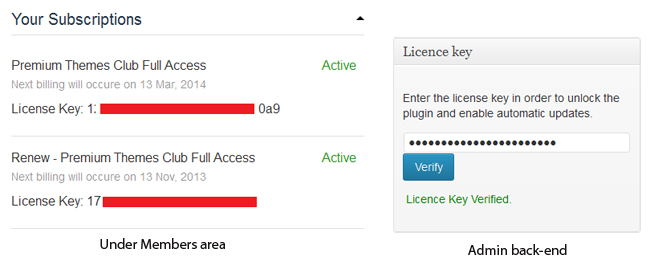
- Connect to your member area and get your licence key (simply copy it) for using the theme. You can locate it under “Your Subscriptions” area in your account.
- Then, go to wp-admin -> Tevolution -> Overview
- You will see a section called “License Key”, just paste your copied license key there.
- Click “Verify” button. On successful verification it will show you a green colored message “License Key Verified.”. If your key does not match then report us via our contact form
2) Activate Digital Download Module
After activating the Digital Download plugin from wp-admin -> Plugins, you need to activate its module too from Tevolution. Follow these steps,
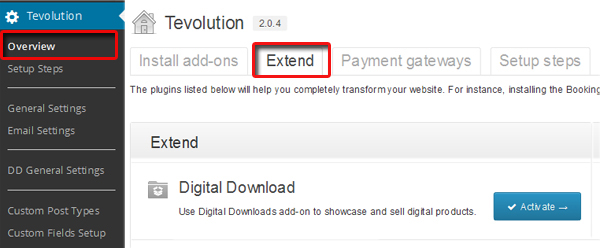
- Go to wp-admin -> Tevolution -> Overview
- Go to the “Extend” tab there
- Click “Activate” button given for Digital Download module
- As soon as you activate it, one extra option will get added in Tevolution options named as “DD General Settings” and along with that 2 more options will be there on the vertical wp-admin panel menu namely Products and Orders.
3) Setup Shopping Option
Either you can use the inbuilt shopping cart and handle your purchases at your back-end only or you can use E-junkie to handle your purchases. Let’s see, how to set it up step by step,
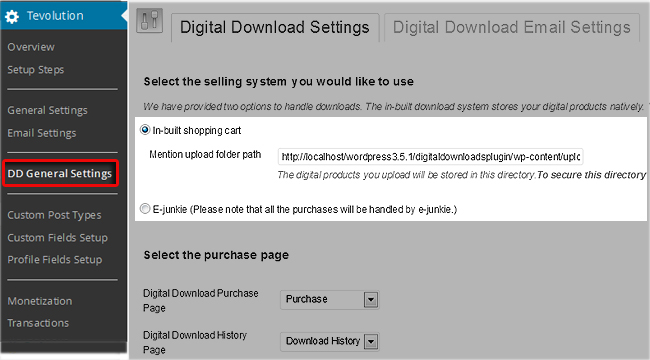
Inbuilt Shopping Cart
By default, this option is selected which shows you the “Buy Now” button and other payment processing steps such as paypal, pre-bank transfer etc. on your website. To locate and set it, follow these steps,
- Go to wp-admin -> Tevolution -> DD general Settings
- There will be radio buttons under the section “Select the selling system you would like to use” , select the first one i.e. “In-built shopping cart” and save your settings.
- Refresh your browser to see the effect.
E-junkie
If you do not want to use the in built shopping cart, you can use E-junkie option but then all your purchases will be handled by E-junkie.
- Go to wp-admin -> Tevolution -> DD general Settings
- There will be radio buttons under the section “Select the selling system you would like to use” , select the second option i.e. E-junkie under the section “Select the selling system you would like to use”.
- As soon as you select it, it will ask two things
- Show E-junkie cart in the header? – To show E-junkie cart in the header area i.e. top of your website, check mark this option
- Your vendor ID at e-junkie – To use your E-Junkie account, you need to provide your vendor id here. Know how to get vendor Id
4) Enable catalog Mode
If you do not want to sell your products directly online but actually want to just exhibit them and then want to handle the purchases manually, you can use this Catalog Mode option.
- Go to wp-admin -> Tevolution -> DD General Settings
- Check mark the option “Enable Catalog Mode” under the section “Other settings”
- Save the settings and refresh your browser to see the effect.
This mode will not show any payment or purchase related functionality on your website including the “Buy Now” button.
5) Inbuilt pages
When you activate the plugin, there are certain necessary pages that gets included automatically in wp-admin -> Pages. These pages are made using the plugin short codes.
Digital Download Plugin Page short codes
- Purchase –
[dd_purchase_page], clicking “Buy Now” button for any product, it will redirect you to this page which shows the product details such as its image and price etc with the final “Buy Now” product button. - Download History –
[dd_download_history], With this plugin, user login is necessary to buy any product from your website. So, when any user logs in his account and buys any product, this page (download history) will show all the download history with the product download link that he has purchased till date.
Tevolution Plugin Page Shortcodes
- Login –
[tevolution_login][tevolution_register] - Register –
[tevolution_register] - Profile –
[tevolution_profile]Know more about it
Setup these Pages
- Now, to setup the “Purchase Page” simply put that page in your menu bar from wp-admin -> Appearance -> Menu OR you can also place its link in your menu bar.
- Same can be done with other above listed pages as well.
6) Setup the product download emails
Emails are handled from the two sections as both the plugins Digital Download and Tevolution are involved
A) Payment Success Notification email
To change the content of this email, follow these steps,
- Go to wp-admin -> Tevolution -> DD General Settings -> Digital Download Email Settings
- Change the content and save the settings.
There are two emails, one that will be fired to client on successful payment receipt and second will go to admin of the site notifying him/her about the sale occurrence with the order details.
B) Other than Payment Success emails and notifications
Some emails and notification messages that comes on your website after performing certain actions like registering on your website etc,these will be handled from Tevolution -> General Settings. Follow these steps,
- Go to wp-admin -> Tevolution -> General Settings -> Email Settings
- There are different sections for different purposes, follow them and edit the content as per your requirement.
- Save your settings
7) Setup Payment Gateways
Payment gateways are important to accept the payments online. By default, you will have two kinds of payment methods 1) Pre bank transfer and 2) Paypal. You can set it up from here,
- Go to wp-admin -> Tevolution -> Monetize -> Payment Gateways
- To edit the settings, hover on gateway name and click on edit option given below there to start the settings
- You can activate/deactivate it from the column named “Action“.
Whenever any user click on “Buy Now” button to purchase your product, all the activated payment gateways will be listed amongst which your user can choose his choice and process the payment. We also have some payment extensions which may help to get your required method.
Add/Manage Products
1) Add Product Categories
Before adding the products, it is good to group them, so that you and your users can find the products easily and quickly.
- Go to wp-admin -> Products -> Product Categories
- Add categories as per your requirement like you add normal WordPress categories.
2) Add Products
After adding the product categories, start adding products with these steps,
- Go to wp-admin -> Products -> Add a Product
- Add Product Title like a normal WordPress Page Title
- Add Product Image. Click on the regular “Add Media” button, upload an image and just close that window. You don’t need to click on “Insert into Post” button.
- Add Product Description using WordPress Visual/Text editor.
- Choose the product categories given at the right side of the screen.
- Add tags to your product. (Not compulsory but helps in searching products on the website.)
- Fill up all the product information given in “Digital Download Settings” and “Product Information”. Here is the detailed meaning of each field asked in these sections,
Digital Download Settings
Here are some of the fields that are needed to be understood properly(few common fields are not included in it),
For Native Settings
- Type – Enter the type of your digital product. This type will be displayed in front end in the drop down box (If you have more than 1 type).
- Price – Enter price of your product.
- Upload product file – Click on “Browse” to upload your digital product.We recommend you zip your digital product and then upload it. This will have an effect as soon as you (being an admin) approve any order, the user will be able to download (the product that you uploaded here) that product from his profile page.
For off-site selling:
Unlike the native settings, you can directly provide the product download page link here like amazon.com etc.
- Type – Enter the type of your digital product. This type will be displayed in front end in the drop down box along with the types defined for the native settings above (if any).
- Price – Enter price of your product.
- Link to the product page – Enter link to the product page E.g. link to Amazon or any other site. (Tip: You can also use affiliate links in this field)
Other Fields
- Upload Icon – You can upload your icon image here which will show as an icon on your product download link on your website.
- Upload product sample – You can directly paste the path link of your product sample file or simply use the “Browse’ button and select it from your hard drive. This will act as a sample of your product viewing which your users can think of purchasing your product.
- Download Sample Button Text – Whatever text you apply here, will be visible as a text on the download button of your sample product. e.g. “Download Sample”
- Author / Owner / Artist – Mention the name of the author or the artist of the product. It will be visible on your website above the product name with the prefix “By”.
- Link to author’s bio – You can add the URL of the author / owner / artist’s biography page. This link will be applied to the Author/Owner/Artist name visible above the product name with the prefix “By”
- Product publish date – Enter publish/release date of your product, visible below the product name.
- Buy now button text – Text applied here will be visible on your buy now button (Purchase action button)
Product Information
- Product dimensions – You can define your product dimensions here. e.g. 9.1 x 6.2 x 1.5 inches
- Languages – Enter languages in which the product is available
- ISBN No – If you are selling book, then enter its ISBN number.
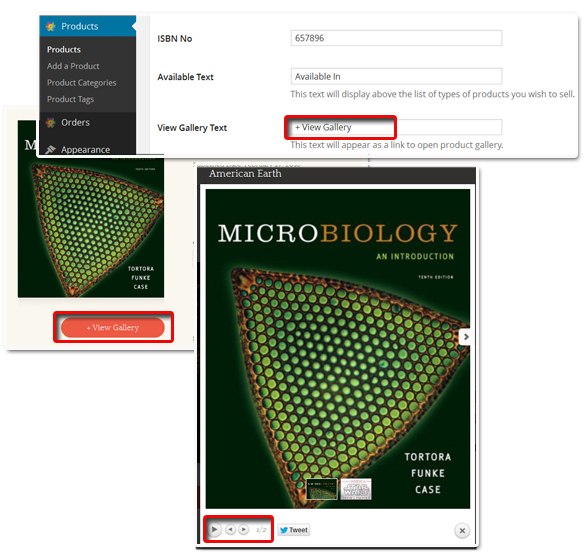
- View Gallery Text – Text applied in this field will be act as a link clicking which it will open your product gallery images. Know how to create product image gallery.
- Download Description – This description will be visible above the Download sample button as its description on your site.
- Special offer text – If want to show a special offer, you might want to say a bit about it. So, the text applied here will be visible along with the product price on your website. (You can also use the html <tags> here. e.g. <a href =”https://templatic.com”>Read More…</a>
- Download Expiration Days – Number of days applied here suggests that your product will only be downloadable for this specified period of time after it gets published (works on the base of publish date). You can simply write the numeric value like 15, it will consider it as 15 days. This will not show anything on your website but will work as a part of the functionality.
Apart from the above said custom fields, if you want to have some more custom fields then you can have them very easily by adding your own custom field from wp-admin -> Tevolution -> Custom Fields Setup.
3) Create tabs in product page
After adding all the required product information as said above, if you want to provide more information on your product, you should follow here given method,
Create tabs and divide your product description in horizontal sections using our shortcode as mentioned below.
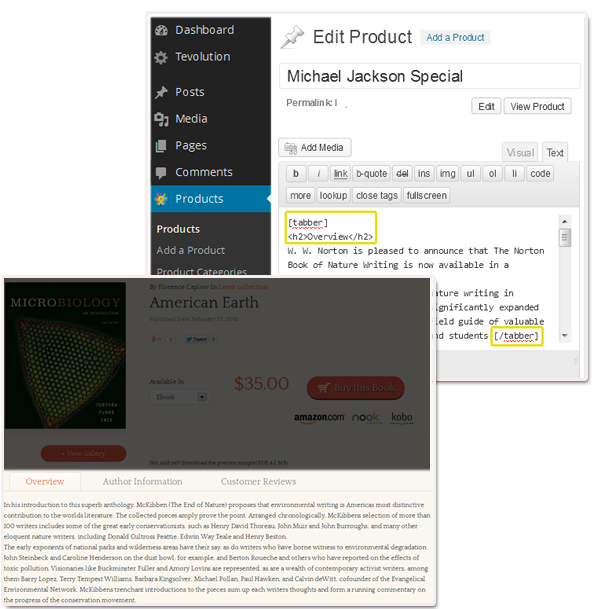
- Go to wp-admin -> Products -> Add a Product
- Switch to text editor and write your content between
[tabber]and[/tabber](it is like html tags, so needs the closing braces too). you can use multiple tabs by repeating this same short code as many time as you want. - the tittle given in
<"h2"><"/h2">tags will be taken as the tab heading.
4) View all products
To view all the products on your website,
- Go to wp-admin -> Products -> Products (It will list you all the added products)
- To edit the existing products, just click the edit option given below it and start editing.
5) Setup Products in navigation bar
After adding the products to your site, setup them in the navigation bar to let your users access them and view them.
- Go to wp-admin -> Appearance -> Menus
- Create the menu (if you don’t have) Watch video on how to create the custom menu
- Select its position from “Theme Location” area given at the left side of the menu section. If you are using it with default theme i.e. Twenty Twelve then, this location would be “Primary Menu”. save it.
- Now, add Product categories (as many as you want and have) to the menu, this will show all your products category wise on your site.
- Save all the settings done in the menu section and refresh your browser to see the effect.
Add/Manage Orders
1) Add New Order
Generally order will be added from the front end of your site which means that whenever any user purchases a product from your site, its entry will be stored in the orders section but in case, if admin wants to add any order manually (practically happens sometimes) from the back-end then it is possible too.
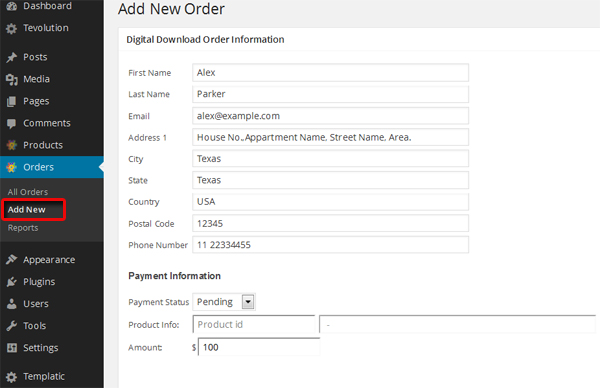
- Go to wp-admin -> Orders -> Add New
- Fill up all the information asked there and publish it. Get the product Id
- If you select the payment status as “Approved” then on publishing this order, a mail will be fired to admin notifying about the purchase and product details.
- Otherwise it will store the entry in wp-admin -> Orders -> All orders in pending payment status. Whenever you change that pending payment status in approved one, it will fire a notification email as said above.
2) View all order
Whenever any purchase request is made on your site, its entry will be stored in the orders.
- Go to wp-admin -> Orders -> All Orders
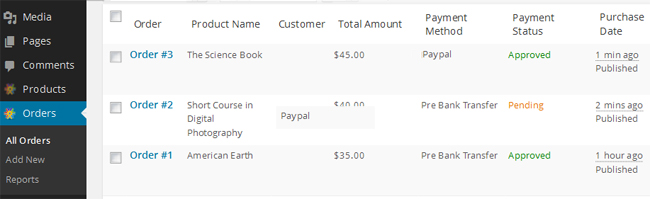
So, all the orders received by you till date will be listed here. If your client has made the payment (using any of your listed payment method) then the status will show “approved” automatically and admin will also receive the notification email. And if the payment is yet to be received then it will show the pending status. However, if you (being an admin) want to change the order status anytime, you can. Read the below steps,
To manipulate the payment status manually,
- Go to wp-admin -> Orders -> All Orders
- Hover the particular order which you want to manipulate and click the edit option
- Now, under the “Payment Information” section, change the status from there given drop down “payment status”
- Changing this status will allow user to download this particular product from his profile page. Till then it will show “Your order is pending”.
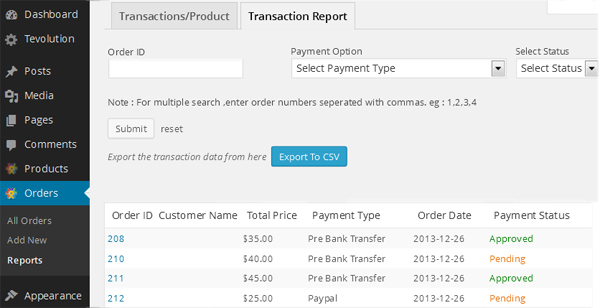
3) View Reports
Reports will show you total downloads, transactions and sales amount, per product. Means if you have a product called xyz having the price $100 and 3 purchase has been done for this same product then it will show you 3 downloads, 3 transactions and $300 amount with its Product id.
To view your sales report,
- Go to wp-admin -> Orders -> Reports
FAQ
1. How to get vendor Id for my E-Junkie account?
To get the vendor Id, follow these steps
- Login to your E-Junkie account
- Enter product name, price, currency and configure other settings and click on “Submit”.
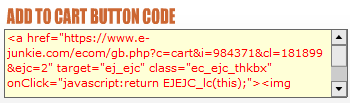
- Time to get the Product ID and Vendor ID. Observe that link carefully. E.g.

- Notice 984371 in this link – that’s your product ID and notice 181899 in this link – that’s your vendor ID. Vendor ID will remain same all the time and in all products (but only if you are adding products from the same Ejunkie account), and only this product ID will change. So inshort, i=984371 is product ID and &cl=181899 that’s vendor ID
- Now that you know your vendor ID, paste it in “Vendor Id” field in wp-admin -> Tevolution -> DD General Settings -> Your vendor ID at e-junkie
- To add a new product, go to wp-admin -> Products -> Add a Product and fill up all the information about your product. And also don’t forget to enter EJunkie product ID, which in above example is 984371. So just enter 984371 in that product ID field. Finally click on Publish
Here’s a detailed tutorial on using EJunkie.
3. How to get product Id?
It is same as you get the id for any particular WordPress post or page. Follow these steps for it,
- Go to wp-admin -> Products -> Products
- Hover on the edit option of the product whose id you want and you will see something like this “wp-admin/post.php?=38&action=edit” at the bottom left of your computer screen
- it means the number shown after the “post=” is your product Id. for above example, the product Id is “38“
6. How to setup a product image gallery?
It is quite simple, follow these steps
- Go to wp-admin -> Products -> Products
- Click the “Add Media” button given above the visual/text editor on left most side
- Click “Create Gallery” and upload your product images using “Upload Image” button from your hard drive
- As soon as uploading process gets over, click the button “Create New Gallery” and close the window. DO NOT click “Inset into Post” button at all otherwise it will show your images in product description on your website.
- To show the link of product gallery images on your site, you need to add the text for this link in Custom Settings -> View Gallery Text field given in the same product page where you just added the image gallery.
- Update/Publish your product page
- Refresh your browser to see the effect.
7. Can I create new custom post type other than products?
Yes, of-course you can. All the things related to custom posts will be managed under Tevolution alone. Please, follow these steps to create and manage custom posts,
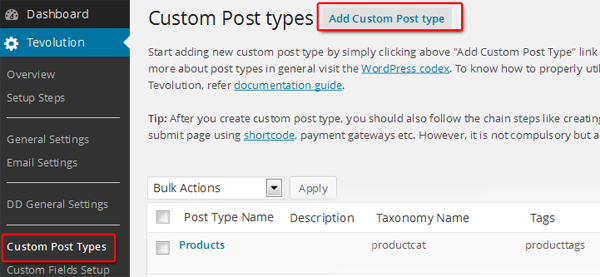
- Create custom post type
- Add your custom fields
- Setup the submission page using short code
- Setup Login, Regitration and Profile pages
- Manage price pacakes
- Manage payments gateways
- Setup Emails
As the whole process of custom post type creation and management is handled under the Tevolution, the Digital Downloads plugin functionality and settings will not affect your new Tevolution post type.
Queries? Report us at Contact Us. We’ll help you out.