KidzStore has been built around our eCommerce framework. So before going through this guide, you should also read its main framework guide to know about installation, setup basic options and settings etc. The core features remain the same as mentioned there in the framework guide. Here we will discuss how you can set up KidzStore theme for your website including the widgets that we have used for our demo site. Install and activate
1. Home page
To set up home page, you will have to follow some chain steps like setting up options given at wp-admin -> Theme options -> Theme options and setting up widgets. To read about the back-end options, read the framework guide, it explains each options in detail. Let’s talk about the widgets here,
- Go to wp-admin -> Appearance -> Widgets,
- You will find 4 widget areas that affect Home page and they are “Front Page Slider”, “Front Page Sidebar Left”, “Front page Middle Content” and “Front Page Sidebar Right”.
- Whereas some of the widget areas which will not just affect home page but also rest of the pages on the website (common for all pages). Those areas are header areas such as “Header Top Navigation”, “Header Main Navigation”, “Header Sub Navigation” and “Header Right Settings”.
- Other such common areas are Footer areas such as “Footer 1″,”Footer 2” and “Footer 3”
- Placing suitable widgets in all such said widget areas, you can easily setup your homepage.
On our demo site we have set the following widgets in the said areas (We have selected “With Left Sidebar” layouts for our demo site),
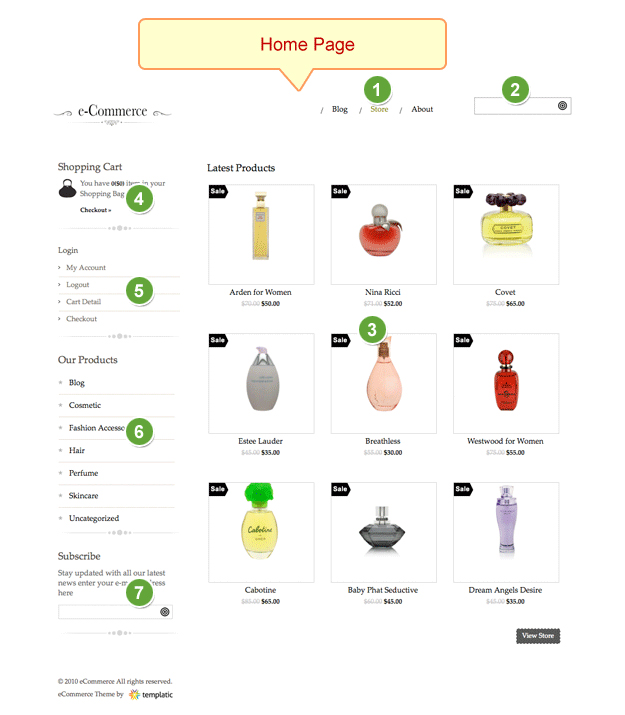
Header Right Settings
1. Custom Menu – Create a custom menu by going to Appearance > Menus and then insert the widget here
2. Search – Places a Search bar to search the website
Front Page Middle Content
3. T – Latest Products: Display’s the latest products
Front Page Sidebar Left
4. T – Shopping cart information: Display’s shopping cart information. You can write any Title in it, like “Shopping cart”
5. T – Login Information: Display’s the login information
6. T – Browse by Categories: Display’s categories. To exclude a certain category, simply write down the category ID of that category
7. T – Newsletter Subscribe: Enter the Feedburner ID. You can also show your Twitter, facebook, digg, youtube, etc URLs here
Note: Appearance of the widgets placed under the widget areas like right and left sidebars for the home page depends on your selected layout. You can select your desired layout from the wp-admin -> Theme options -> Theme options, expand the section “Site Pages Layout Settings” to start setting layout for your site pages. Read more about
layouts.
2. Product Listing Page
Setting up product listing page has 3 main steps as mentioned below, let’s take a look,
A) Create and place product listing page
The page where your products belonging to certain category(ies) are listed is your product listing page. Now this page gets created automatically in the theme as soon as you add some categories and products. The need here is to place that page on your website. Here are the steps for that,
- Create your required product categories from wp-admin -> Products -> Product Categories
- Start adding products from wp-admin -> Products -> Add New Product
- Select the relevant category(ies) and publish your products. (The whole process is just like adding a WordPress page)
- Now, create a menu from wp-admin -> Appearance -> Menus and place your product categories and other required things there and save it
- Place a widget “Custom Menu” in any of the header widget area (the most suitable one is Header Main Navigation ) and refresh your browser to see the effect.
We did the above said process just to make it easy for your users to locate your product range and actually reaching the product listing page.
B) Product Listing page settings
To apply some settings like list/grid view, number of products per page, display product price there or not etc,
- Go to wp-admin -> Theme options -> Theme options
- Expand the section named “Product Listing Settings -> For ‘Archive’ or ‘Category’ Page to do the settings.
Read more about it in its framework guide
C) Setup widgets for product listing page
Product listing page has basically 2 widget areas and those are “Product Listing Sidebar Left” and “Product Listing Sidebar Right”. But there visibility depends on your selected layouts. On our demo, we have used the left sidebar layout so the widgets that we used are,

Product Listing Sidebar Left
- T – Shopping cart information: Display’s shopping cart information. You can write any Title in it, like “Shopping cart”
- T – Login Information: Display’s the login information
- T – Browse by Categories: Display’s categories. To exclude a certain category, simply write down the category ID of that category
- T – Newsletter Subscribe: Enter the Feedburner ID. You can also show your Twitter, facebook, digg, youtube, etc URLs here
3. Product Detail page
Product detail page is the page from where you can actually purchase the product and see all the detailed information about it. To set it up some of the options available for it are at wp-admin -> Theme options -> Theme options, expand the section “Product Details Page Settings” to setup these options. Read more about it in its framework guide Other information such as variety of product pictures and other detailed information comes from the product that you added from the back-end from wp-admin -> Products-> Add New by filling up all the product information given there.
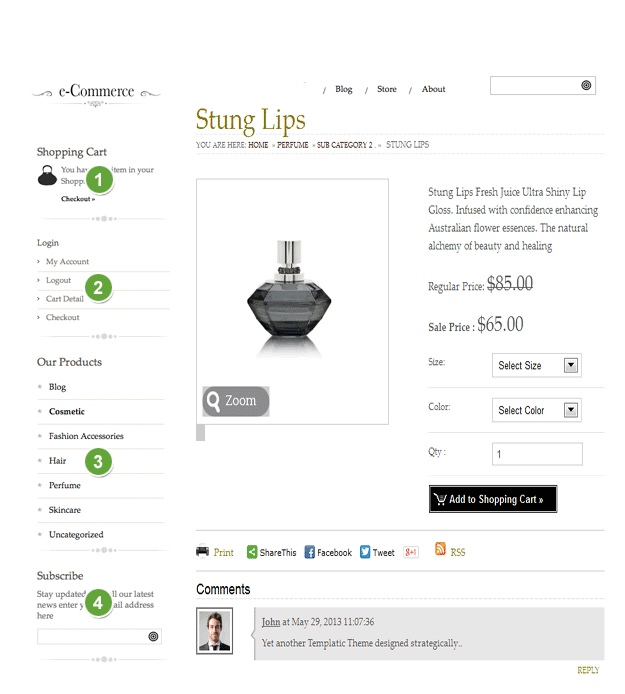
Product Detail Sidebar Left
- T – Shopping cart information – Display’s shopping cart information. You can write any Title in it, like “Shopping cart”
- T – Login Information – Display’s the login information
- T – Browse by Categories – Display’s categories. To exclude a certain category, simply write down the category ID of that category
- T – Newsletter Subscribe – Enter the Feedburner ID. You can also show your Twitter, facebook, digg, youtube, etc URLs here
4. Inner Page
Inner pages or say content pages like About Us page etc. The main widget areas in effect are “Inner Page Sidebar Left” and “Inner Page Sidebar Right”. For our demo site, we have selected the left sidebar layout so the widgets that we placed for it are,
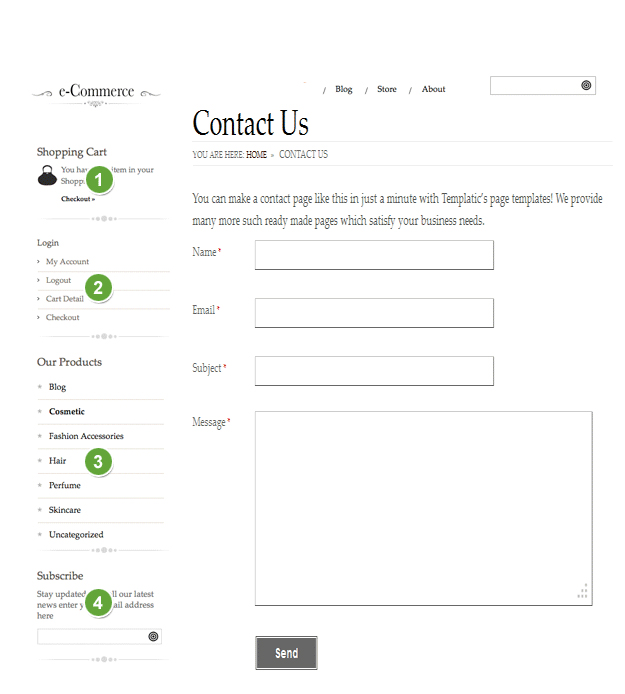
Inner Page Sidebar Left
- T – Shopping cart information – Display’s shopping cart information. You can write any Title in it, like “Shopping cart”
- T – Login Information – Display’s the login information
- T – Browse by Categories – Display’s categories. To exclude a certain category, simply write down the category ID of that category
- T – Newsletter Subscribe – Enter the Feedburner ID. You can also show your Twitter, facebook, digg, youtube, etc URLs here
Some other settings that you would like to do are located at wp-admin -> Theme options -> Theme options. Read more about it here
* Create pages using theme page template
Using page templates you use the ready made page made for a specific purpose like contact us page having a form with all required fields. With this theme, we provide you 4 page templates as mentioned below,
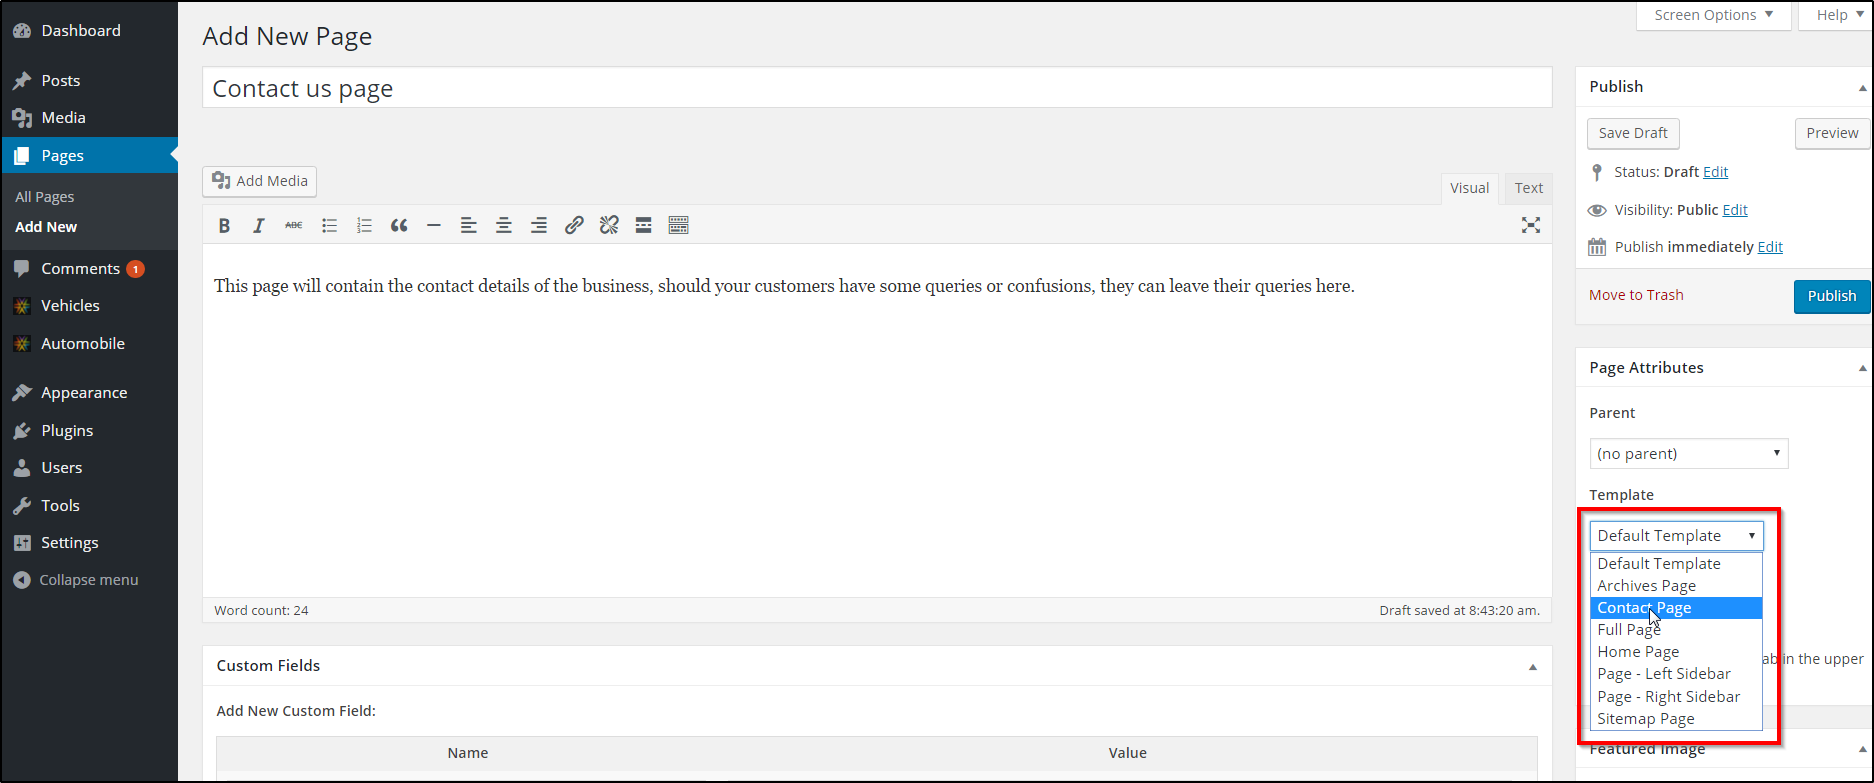
- Archives Page – Shows the posts Month wise
- Contact page – Shows a contact us form (Inquires sent using such form goes to the admin email Id as described in WP-admin -> Settings -> General)
- Page Left Sidebar – Creates page with the left sidebar (to place widgets there you will have to place any widget in the widget area “Inner Page Sidebar Left”)
- Sitemap page – Lists the total posts,custom posts, pages of the site on the single page.
5. Store Page
This is the page that lists all the products available on your site irrespective of the categories. It gets created automatically by the theme and to use it or to see it you can append ?ptype=store to your site URL. For example, http://example.com/?ptype=store. So, you can use such custom link in your navigation menu as well. For our demo site, we placed the link of store page as said above in the navigation menu and then placed widgets in the store page widget areas at wp-admin -> Appearance -> Widgets. This page only has two widget areas that has effect on it “Store Page Sidebar Left” and “Store Page Sidebar Right”. Having selected left sidebar area, we placed widgets in,
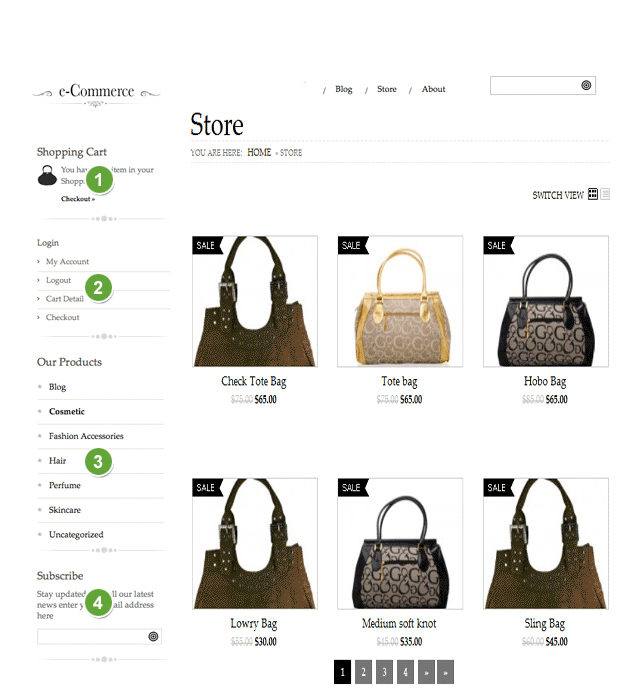
Store Page Sidebar Left
- T – Shopping cart information – Display’s shopping cart information. You can write any Title in it, like “Shopping cart”
- T – Login Information – Display’s the login information
- T – Browse by Categories – Display’s categories. To exclude a certain category, simply write down the category ID of that category
- T – Newsletter Subscribe – Enter the Feedburner ID. You can also show your Twitter, facebook, digg, youtube, etc URLs here
6. My Cart Page
It is also known as shopping cart page. When user selects any product from the product detail page on your site and adds it to the cart, it shows a link “View Cart Detail” which redirects to this “Cart” page. Basically it lists all the items that user has added there while viewing the available products on your site. It has all product detail like price, quantity and if user is a registered one then shows his profile information as well. Some of the settings that a My Cart page requires are,
- There is a whole section given for shopping cart at the back-end which you can setup according to your requirement.
- Locate it at wp-admin -> Theme options -> General Setting, Shopping Cart tab
- Add widgets to its sidebar area as mentioned below,
It has two widget areas “My Cart Sidebar Left” and “My Cart Sidebar Right” where you can place your required widgets like we did for our demo site,
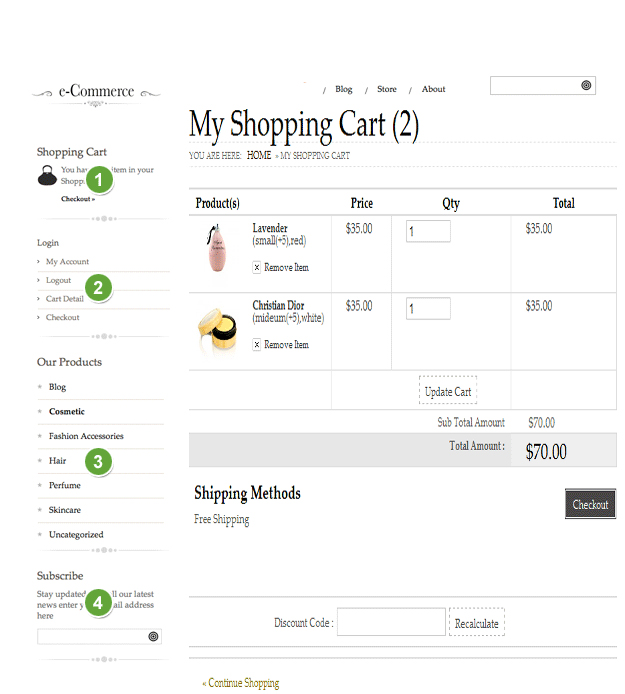
My Cart Sidebar Right
- T – Shopping cart information – Display’s shopping cart information. You can write any Title in it, like “Shopping cart”
- T – Login Information – Display’s the login information
- T – Browse by Categories – Display’s categories. To exclude a certain category, simply write down the category ID of that category
- T – Newsletter Subscribe – Enter the Feedburner ID. You can also show your Twitter, facebook, digg, youtube, etc URLs here
7. Blog pages
Blog is nothing but a normal WordPress post and so major operations with it remain the same. Two blog related pages that you will be having with this theme are blog listing and blog detail pages, lets understand them in detail but before understanding them just have a look at the basic blog creation process,
- Go to wp-admin -> Posts -> Categories
- Create your required categories. (As soon as you insert sample data to your site, theme auto installs a post category “Blog”)
- Create your posts from wp-admin -> Posts -> Add New and check mark the post category(ies) to apply your post to those categories
- Publish your post.
A) Blog Listing Page
The page where your posts based on categories are listed is known as blog listing page. To set up blog listing page using this theme, you need to undertake two main things, “settings” and “placing widgets”
i) Blog Listing Settings
- Go to wp-admin -> Theme options -> Theme options
- Expand the Blog section settings section
- Setup your required options and save them
To read more, refer the main framework guide.
ii) Setup widgets
Two widget areas have effect on the blog listing page and those are “Blog Listing Sidebar Left” and “Blog Listing Sidebar Right”. Let’s see which widgets we have placed on our demo site,
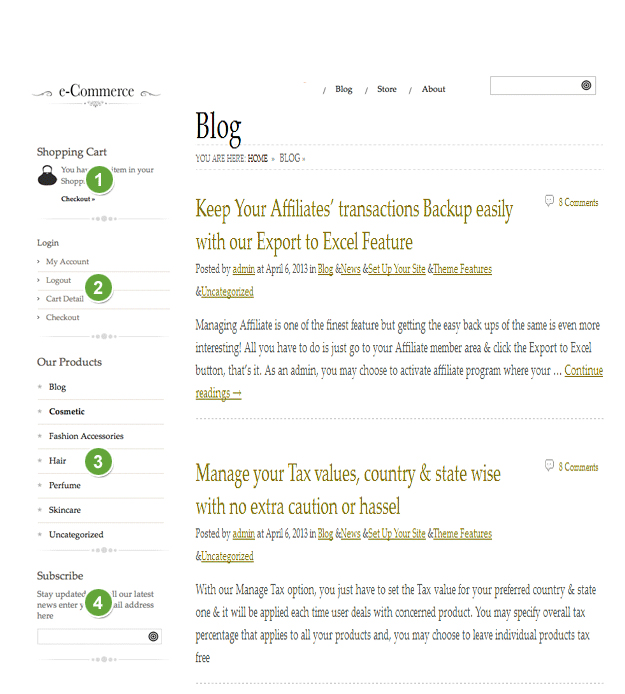
Blog Listing Sidebar Left
- T – Shopping cart information – Display’s shopping cart information. You can write any Title in it, like “Shopping cart”
- T – Login Information – Display’s the login information
- T – Browse by Categories – Display’s categories. To exclude a certain category, simply write down the category ID of that category
- T – Newsletter Subscribe – Enter the Feedburner ID. You can also show your Twitter, facebook, digg, youtube, etc URLs here
B) Blog Detail Page
The page that shows only one post along with its whole content is known as blog detail page. Alike the blog listing page, blog detail page too has 2 main things for setting up a perfect blog detail page,
i) Blog detail settings
- Go to wp-admin -> Theme options -> Theme options
- Expand the Blog section settings section
- Setup your required options and save them
To read more, refer the main framework guide.
ii) Placing widgets
Two widget areas have effect on the blog detail page and those are “Blog Detail Sidebar Left” and “Blog Detail Sidebar Right”. Let’s see which widgets we have placed on our demo site,
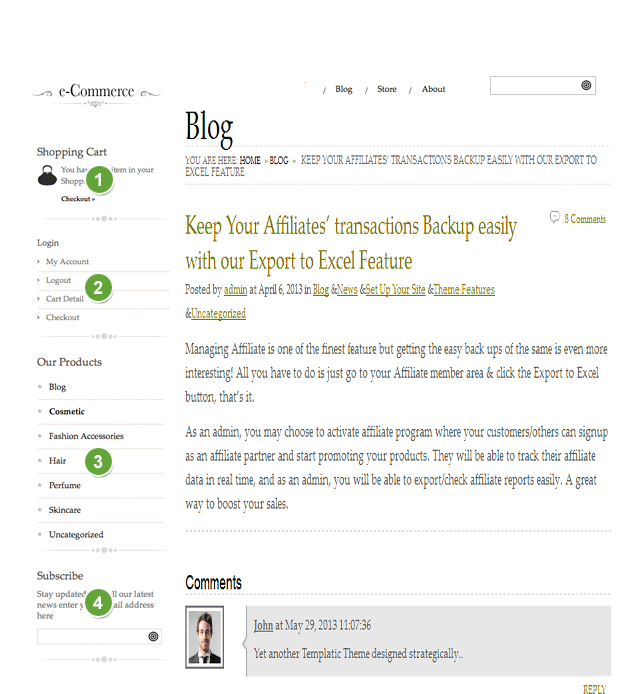
Blog Detail Sidebar Left
- T – Shopping cart information – Display’s shopping cart information. You can write any Title in it, like “Shopping cart”
- T – Login Information – Display’s the login information
- T – Browse by Categories – Display’s categories. To exclude a certain category, simply write down the category ID of that category
- T – Newsletter Subscribe – Enter the Feedburner ID. You can also show your Twitter, facebook, digg, youtube, etc URLs here
8. Remove the footer credit line
![]()
To remove the footer credit lines…
- Go to Theme options ⇨ Theme options ⇨ General Settings ⇨ Customize your design. Enable the “Use custom stylesheet” option.
- Navigate to Appearance ⇨ Editor. Under “Styles” (on the right side) choose the custom.css file.
- Insert the following code inside the file:
.copyright {
display: none;
}
To edit the contents of the footer area connect to your server and edit the following file: \wp-content\themes\framework\library\includes\footer.php. The code you’re looking for will be around line number 35.
Any Queries? Contact us and we’ll help you out.