Installing Foodilicious
- Connect to member area and expand the Foodilicious section under My Downloads. Download the theme to your hard drive.
- Connect to your WordPress dashboard (wp-admin) and navigate to Appearance -> Themes. Click on the Install Themes tab and then on Upload. Use the Browse option to locate the foodilicious zip file on your hard drive – then click on Install Now. After the installation process is finished activate the theme.
In case WordPress rejects the .zip file use FTP to install the theme:
- Extract foodilicious.zip then upload to /wp-content/themes directory
- Once uploading is done connect to the WordPress dashboard and activate the theme
- If you run into more problems during installation please visit our Installation Guide
For detailed instructions on using FTP please click here
Need help with installing the theme? Hire us!
Facing Problems in installing the theme? Don’t worry, we’ll do that for you, just click here!
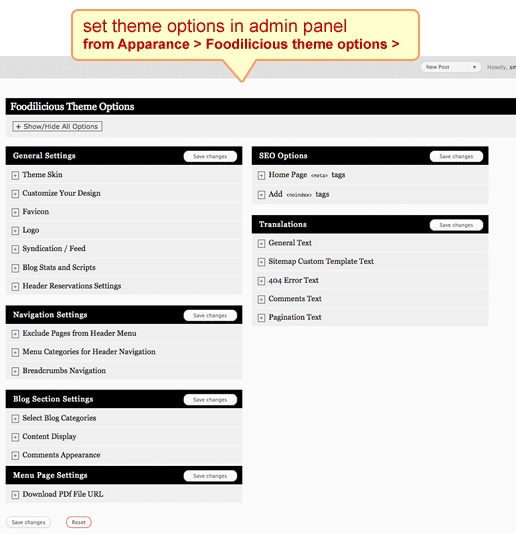
Foodilicious Theme Options
Go to wp-admin > Appearance > Foodilicious Theme Options page and take a thorough look at all the flexible options available to you. Do the settings as per your wish and then save them.
Homepage
Now lets setup the Homepage. The whole Homepage is widget ready, just go to Appearance > Widgets and setup the widgets as shown in the below image, and also some settings are controlled from Appearance > Foodilicious Theme Options

1) Header Reservation settings
2) Exclude Pages from Header
3) Menu categories for Header Navigation
4) Select Blog Categories
5) Home Page Top Banner
6) Latest Menus
7) Hours and Reviews
8) Text
9) Location with Google Map
10) Contact Info
Adding a new item/post
Now, lets learn how to add a new item or post
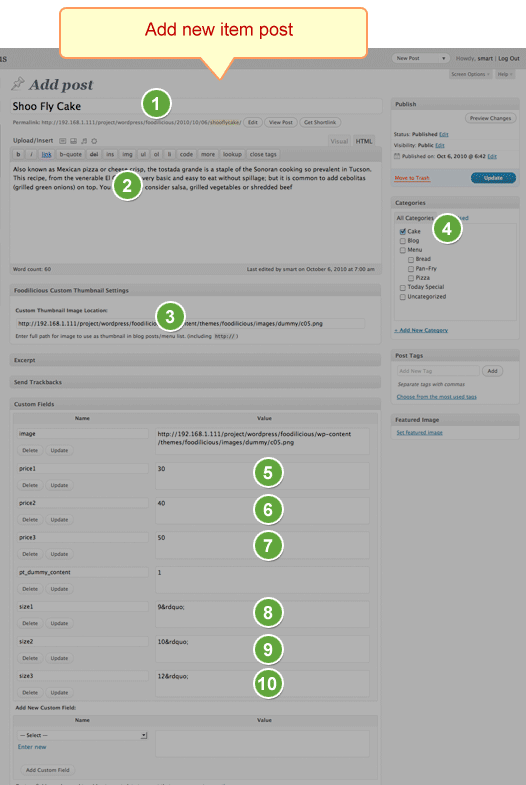
1) Post Title
2) Description
3) Full URL of Image file: Click on “Add an Image” button and upload the image and then copy the image URL from there and paste it in this field
4) Select a Category
5) In the “Add New Custom Field”, select “Price1”. Now enter its price, E.g. 30
6) Select “Price2” and enter its Price, E.g. 40
7) Select “Price3” and enter its Price, E.g. 50
8) In the “Add New Custom Field”, select “size1”. Now enter its price, E.g. 9
9) Select “size2” and enter its size, E.g. 10
10) Select “size3” and enter its size, E.g. 20
11) From “Foodilicious Theme Options” select the categories which you wish to show in Header navigation
Note: The above example is of a Pizza. You can enter any item as per this example. Also keep in mind that to create a Menu, you’ll need to make “Menu” category and then pizza would be a sub category in it.
Download PDF Link
Upload the PDF of the Menu file and then enter its full URL by going to “Foodilicious Theme Options”. You can use a FTP client like FileZilla to upload the PDF.

Blog Listing Page

Blog Detail Page

Inner Page Sidebar

Go to Widgets and insert these widgets in “Page Sidebar” section:
1) PT > Restaurant Hours
2) PT > Testimonials
Adding a new Page
Now lets add a new page. Go to Pages > Add New.
1) Enter the page title
2) Enter the page description
3) And finally select the template. In this case, we have selected “Contact page” template. Click on “Publish”.
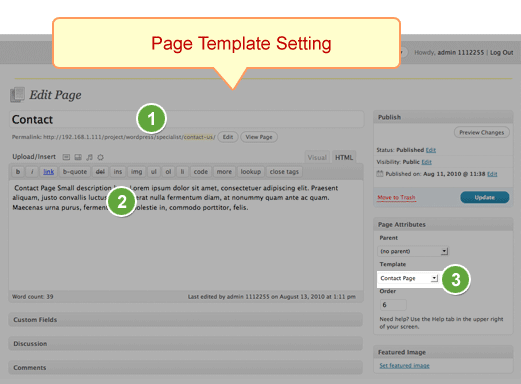
This is the preview of the “Contact page” template and how will it look like in frontend.

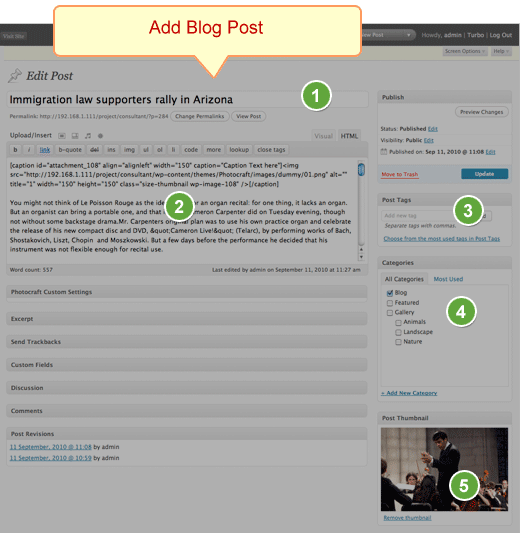
Creating Blog post
Let’s create a blog page as well. First go to Post -> Categories and create or rename Category where your blog posts will be. After you choose your main blog category make sure you make all other blog categories as child of main Blog category.
Go to Posts > Add New
1) Blog Post Title
2) Description
3) Tags
4) Categories: Select the category of Blog post.
5) Featured Image: Click on “Set Featured Image” and select the image and upload it.
Note: You must select the Blog category, if its a Blog post. To select a Blog category, go to Foodilicious Theme Options > Blog section settings > Select Blog Categories.
Note: Upload “wp-postratings” plugin to wp-content/plugins
Upload the wp-postratings plugin to wp-content/plugins. So the final structure will look like:
wp-content/themes/foodilicious
wp-content/plugins/wp-postratings
Now go to plugins and just activate the wp-postratings plugins, you don’t need to do any other settings.
Any Queries? Contact us and we’ll help you out.
Need help with installing the theme? Hire us!
Facing Problems in installing the theme? Don’t worry, we’ll do that for you, just click here!