Theme installation
You can either install the theme using the easy install(setup wizard) or use FTP to upload theme files manually. The easy install method is highly recommended for effortless installation of the GeoPlaces theme.
Easy Install
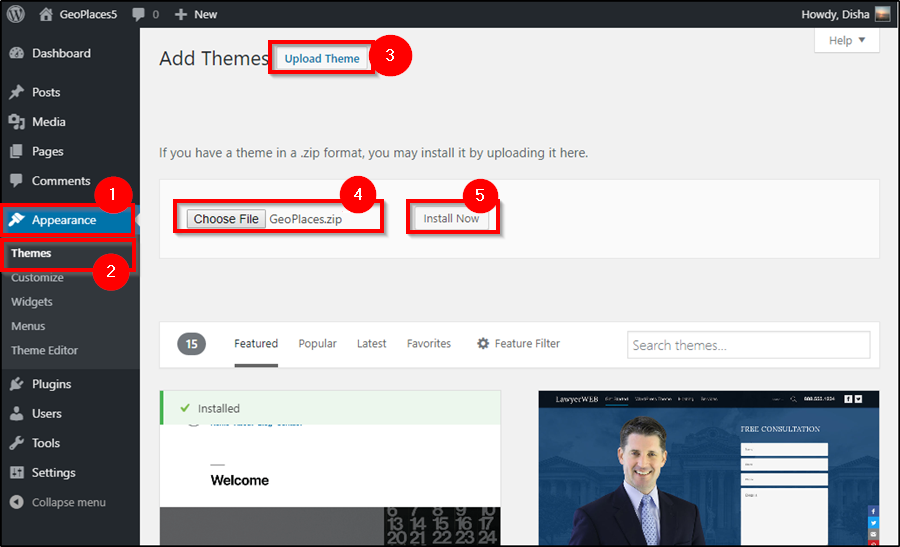
- To install the theme, login to your WordPress dashboard and navigate to Appearance ⇒ Themes.
- Click add new ⇒ Upload Theme.
- Using the file upload dialog, upload the Zip file you have downloaded from and click install now.
- When the theme installation is complete, click activate to activate the theme. This will take you to the setup wizard.

The setup wizard
- To quit the setup, you can use the “return to dashboard option”, but it is not recommended. The following are the steps of the setup wizard to help you prepare your website:
- Pressing “Start” will initiate the setup processing.
- When asked to, enter the license key available inside our member area.
- Install Plugins: This step will configure your website with the required plugins for your site. Again click “Install”. You can remove the plugins you don’t need at a later stage.
- Import content: This will import the sample data. Sample data makes your website building process easier with the dummy data, images, and widgets in the places. With the sample data installed, your website will start looking like the theme demo and you can edit the parts you want to change to customize your site. Click import and wait till the dummy data is imported.
- At the end of the setup wizard, you can choose to “View the website” or “return to the dashboard” for further editing.

FTP Install
- Download the GeoPlaces theme Installation file from the member area and extract them using software like 7-Zip. Use the “Extract here” option; don’t extract into a new folder.
- Navigate to /wp-content/themes/ and upload this folder.
- Now you can navigate to /wp-content/themes/ and upload the unzipped folder of any compatible plugin you want to use with Geoplaces. The theme doesn’t require any plugin to run, so you can skip this step if there isn’t any plugin you want to use with the theme.
- Login to your WordPress dashboard, navigate to Appearance ⇒ Themes. You will find the the GeoPlaces theme in the list. Activate it.
- Upon activation, you will be redirected to the setup wizard and it will install and activate the required plugins, and update your site with the sample data too. (Skip to the setup wizard)
- When asked to, enter the license key.
The theme setup wizard will help you initialize your theme by setting up plugins, sample data, etc. Even though it is optional, we highly recommend you follow these steps to set up your site easily.
Homepage
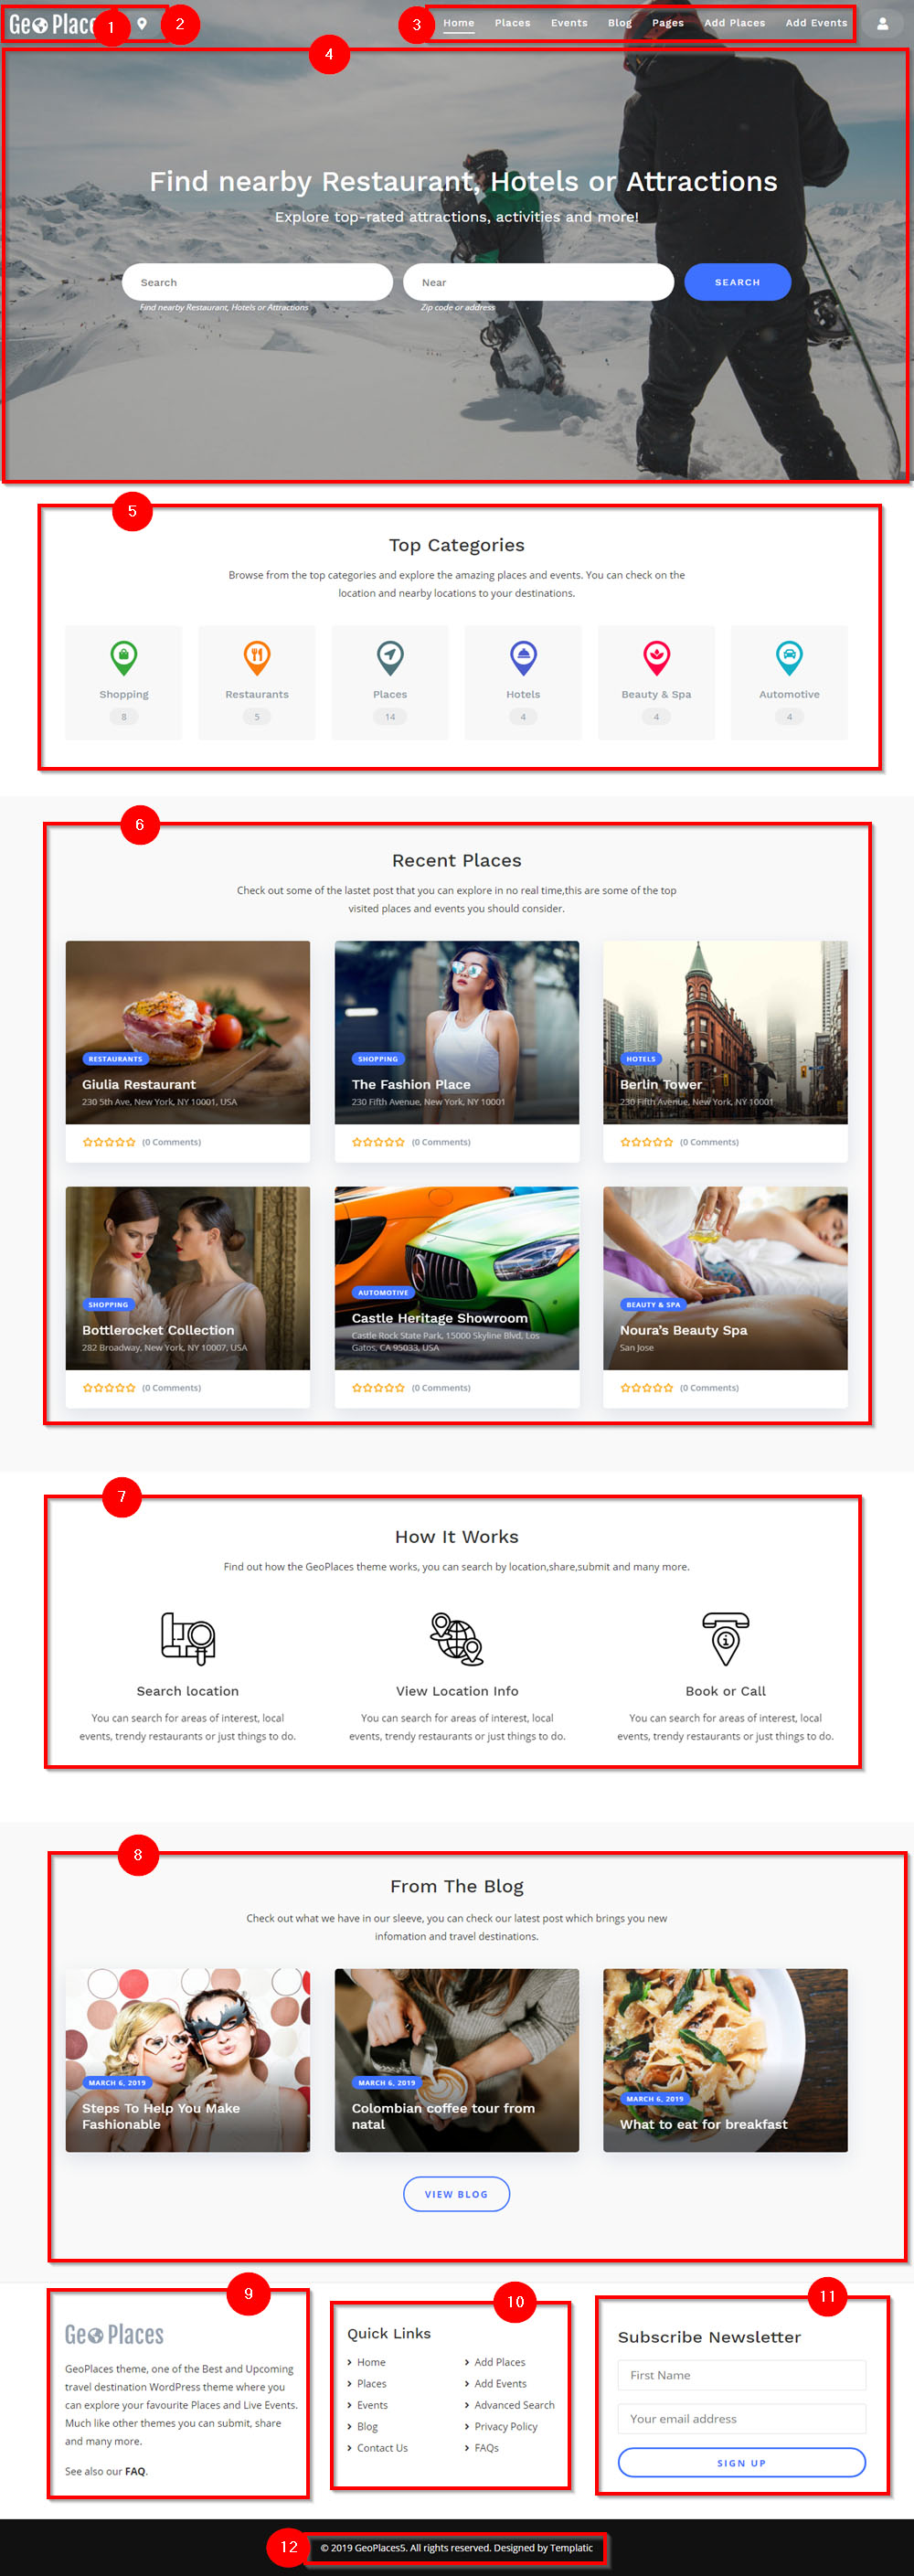
1) Theme logo
GeoPlaces theme allows you to set up the logo and if you don’t have a logo image, you can simply write down your name as the site title and it will be shown in a well-formatted form. To change this, you can go to GeoPlaces ⇒ Basic Settings ⇒ General Settings.
Identity and key in the Site title name. You can even set the tagline for your website. Or, to change the logo, navigate to Appearance ⇒ Customize ⇒ Site Logo and upload the logo as well as favicon for your site.
2) City Selector
The city selector drop down, will let your users choose the city they want to look for. You can set a default city for your website by navigating to Geoplaces ⇒ Advanced Settings ⇒ City Settings ⇒ Display default city to users.

However, if you are using the Geoplaces website for a single city, you can remove the city selector from the header, as your directory is dedicated to one city only.
Note: After you create a city you must clear your browser cookies + cache for the change to take affect. Another way you can check if everything is ok is to visit your site with Incognito mode (Chrome) or Private browsing (Firefox) turned on.
To remove the city selector, navigate to Appearance ⇒ Widgets ⇒ Widget area ‘Header city selector’ and delete the widget ‘ T → Multicity options’.
This is the T → Multicity options is the widget that is responsible for showing multicity selector beside your logo.
3) Menus
Mega menus are used to make regular custom menus look bit good and clean. To create it follow, these steps:
To set the menu, you have to first create a menu and for that, you can get to your dashboard ⇒ Appearance ⇒ Menus and create and save new menu.
This codex article on how to create a menu should help.
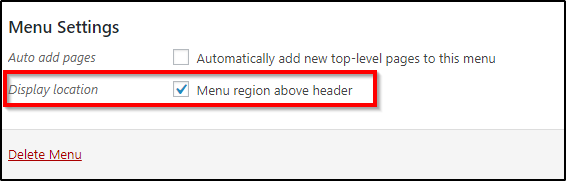
Now, to set the menu you have created as the main menu of your website, scroll till the end of the same page(Dashboard ⇒ Appearance ⇒ Menus). Check the option for display location, menu region above the header.
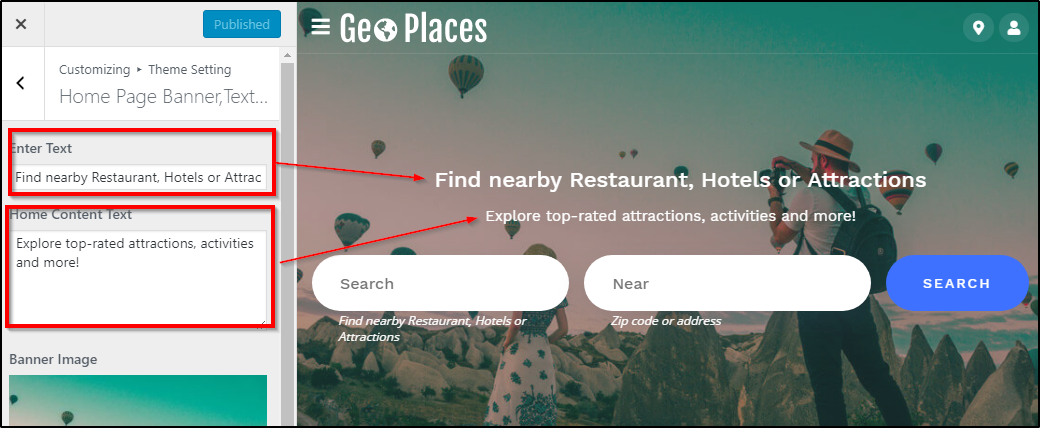
4) The homepage banner
The homepage banner can be changed by navigating to Appearance ⇒ Customize ⇒ Theme settings ⇒ Homepage banner, Text and image settings.
Here, you can upload a new banner and also change the text over the banner.

With the available options, you can also change the text over the banner.
5) Top categories
This will help your viewers easily find popular categories or the categories of their interest quickly.
This section(and the following 3 sections) are displayed through widgets in the Front content widget area.
To change this section, navigate to Appearance ⇒ Widgets ⇒ Front content widget area. The widget that shows categories collection is the widget called the ‘T – Category Collection (Homepage)’, and you can change its order by re-arranging the widgets in the widget area.
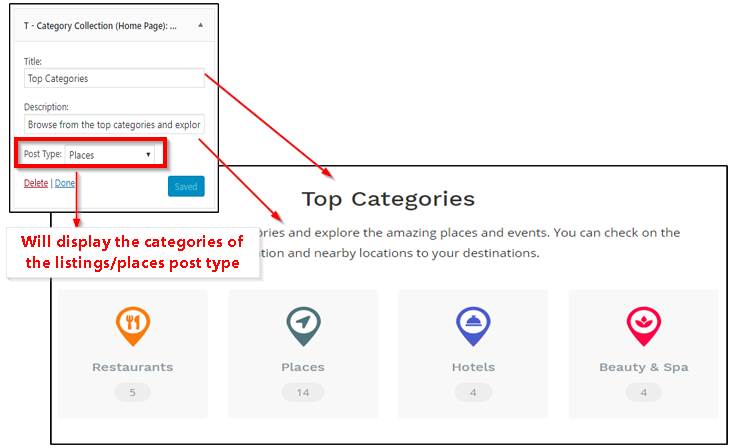
You can set this widget to show categories of blog posts, places or events.
6) Recent posts
This section, also a part of the ‘Front Content’ widget area, gives your visitors some quick links to the recently visited listings on your website.
To change this section, navigate to Appearance ⇒ Widgets ⇒ Front content widget area. The widget that shows categories collection is the widget called the ‘T – Latest Listings (Homepage)’, and you can change its order by re-arranging the widgets in the widget area.

You can set the number of recently visited listings to be shown on the homepage. The widget can show 9 listings at most. For 9 listings it will show 3 rows of listings with 3 listings in each row.
7) How Does It Work?
This is a widget that lets you explain your service on the homepage. Besides, you can edit this widget and use it for any else purpose you want.
This section, also a part of the ‘Front Content’ widget area, and it can be basically used to explain your services to your users.
To change it, navigate to Appearance ⇒ Widgets ⇒ Front content widget area ⇒ T – Service (homepage) widget.
All you have to do here is add an image, change the title and description as per your requirement. You can easily change the services or remove this section by clicking the “delete” option in the widget.
8) Recent posts
This is the last widget in the ‘Front content’ widget area. As the name suggests, it shows the recently published blog posts on your website.
To change it, navigate to Appearance ⇒ Widgets ⇒ Front content widget area ⇒ T – Latest Posts (Home Page) widget.
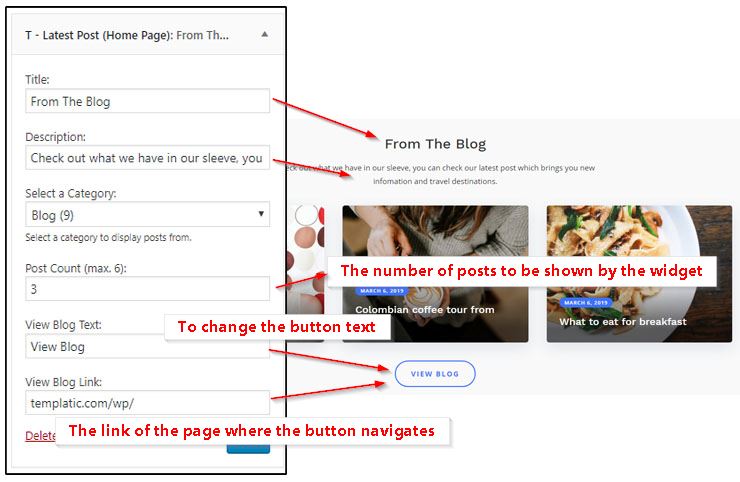
You can set the number of recent blogs to be shown in the section. The widget can show 6 blogs at most. You must also set the link of the button at the bottom so that it navigates to your blog list page.
9, 10 and 11) Pre-footer content
To change this content, navigate to Appearance ⇒ Widgets ⇒ Pre-footer: First Column/Pre-footer: Second Column/Pre-footer: Third Column.
The first column has a simple text area. The second column has the widget ‘Navigation Menu’. The third column has the widget Mail Chimp Sign Up Form.
12) Footer Credits
To change the copyright information in the footer, simply navigate to Appearance ⇒ Customize ⇒ Theme Settings ⇒ Theme options ⇒ Footer Credit Text.
Category Page (places, events)
The Category page will show all the listing of the post type (Places, Events) of the selected category.
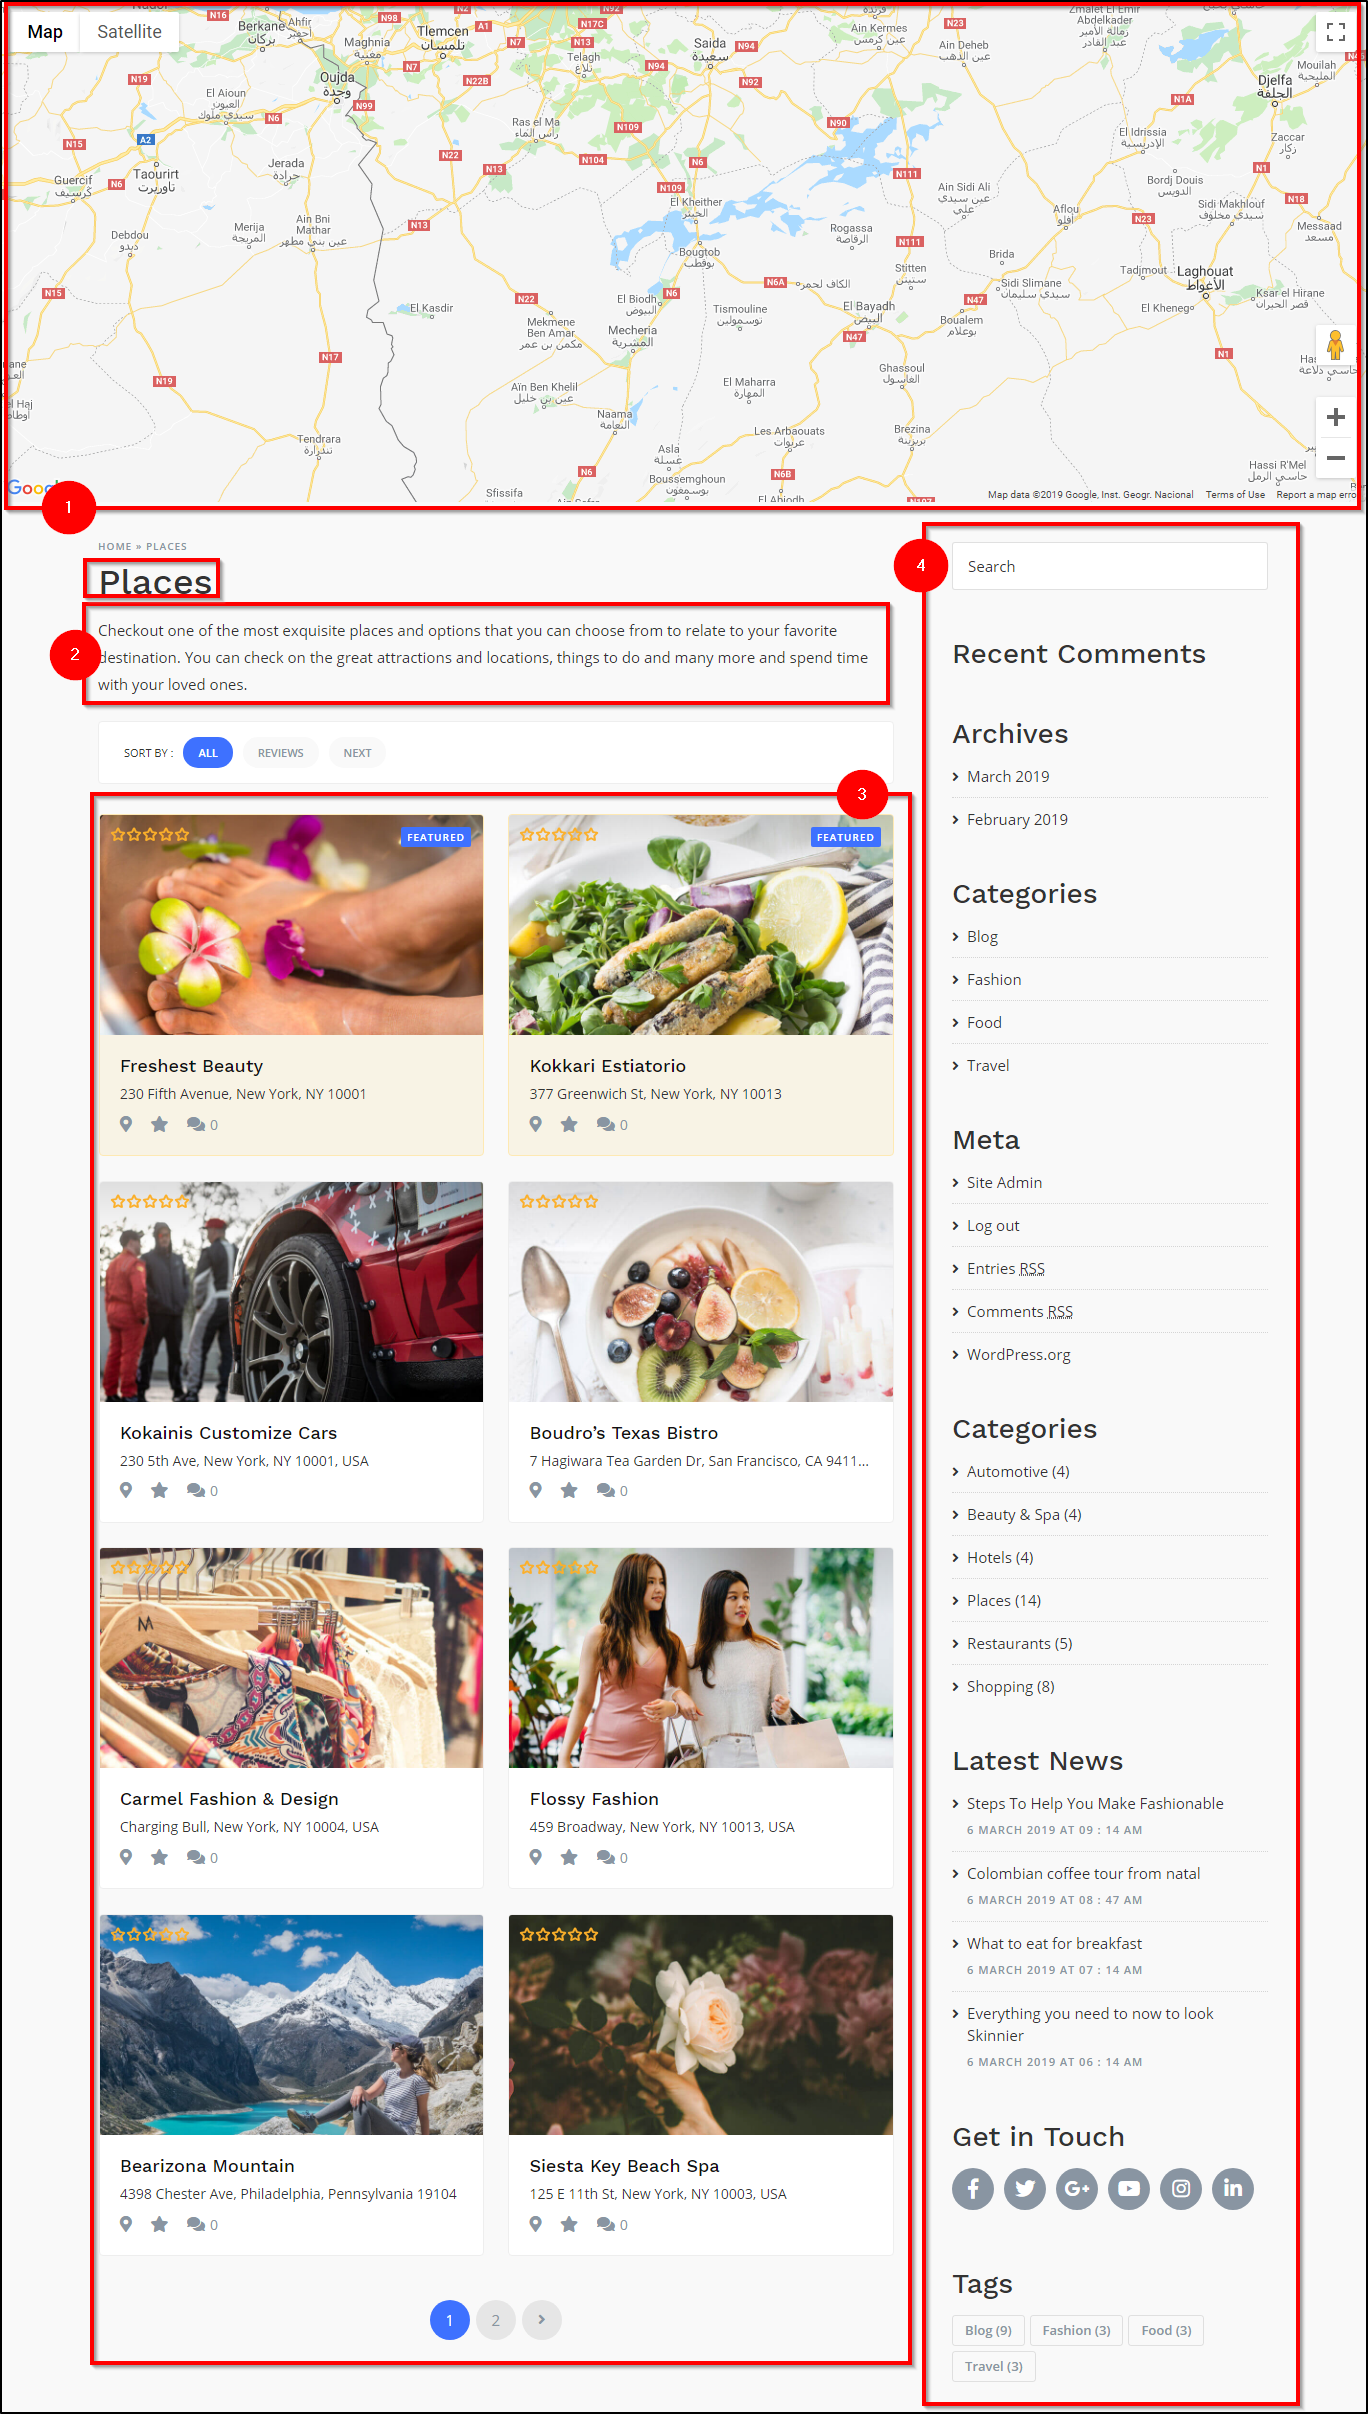
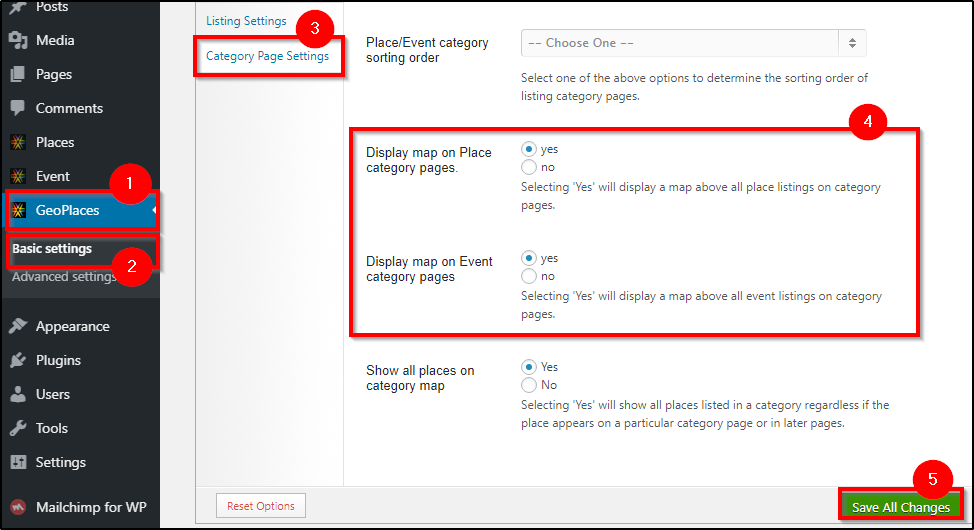
1) Map on the category page
With the sample data installed, your category page will show a map banner by default. You can enable/disable this map on the category page by navigating to your dashboard ⇒ Geoplaces ⇒ Basic setting ⇒ Category page settings ⇒ Display map on place category page/Display map on the events category page.
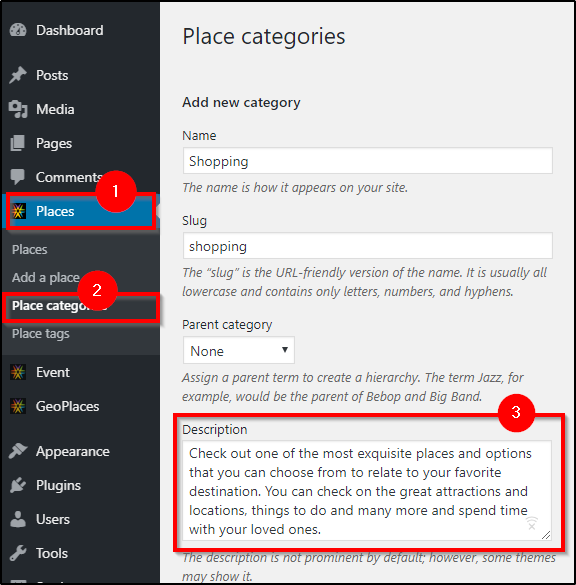
2) Category description
This is the category page description. You can add/update this data by editing the (place/event) category.
Place Category Description
To change the Category description for the places category page, you can navigate to places ⇒ Places categories ⇒ Places Category description.
Event Category Description
Similarly for your event listings, you can navigate to Events ⇒ Event categories ⇒ Event Category description.
3) Category page sidebar
You can manage the sidebar content of the category pages by managing the widgets in the ‘Place Listing Sidebar’, and the ‘Event Listing Sidebar’, for place category page as well as events category page, respectively.
Navigate to Appearance ⇒ Widgets ⇒ ‘Place Listing Sidebar’ and control the widgets present there to manage the category page of the Places post type.
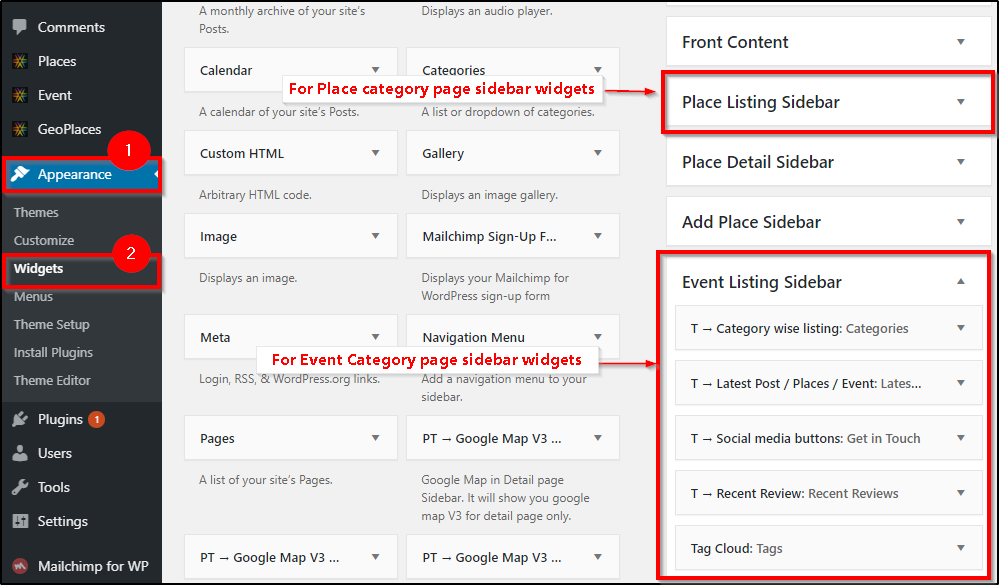
Similarly, to manage the category page of the Events post type, navigate to Appearance ⇒ Widgets ⇒ ‘Event Listing Sidebar’ widget area. You can manage, add, remove the existing widgets and even re-order them.
4) Listings
This section shows the listings of the selected categories. For more settings regarding the category page of events as well as places, you can navigate to GeoPlaces ⇒ Basic Settings ⇒ Category Page Settings. 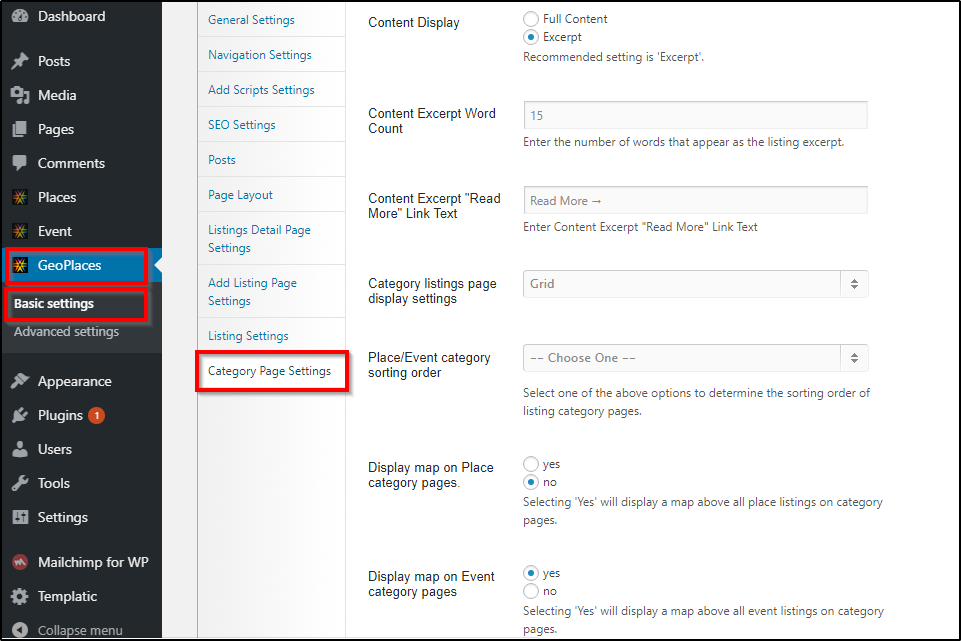
Listing Detail Page (Places, Events)
The Listing detail page is the individual page for each listing as shown to the viewers of your website. This page derives most of its content from the listing data inserted by the listing’s author/owner while creating the listing. However, the sidebar and a few other sections of this page can be changed through easy options.
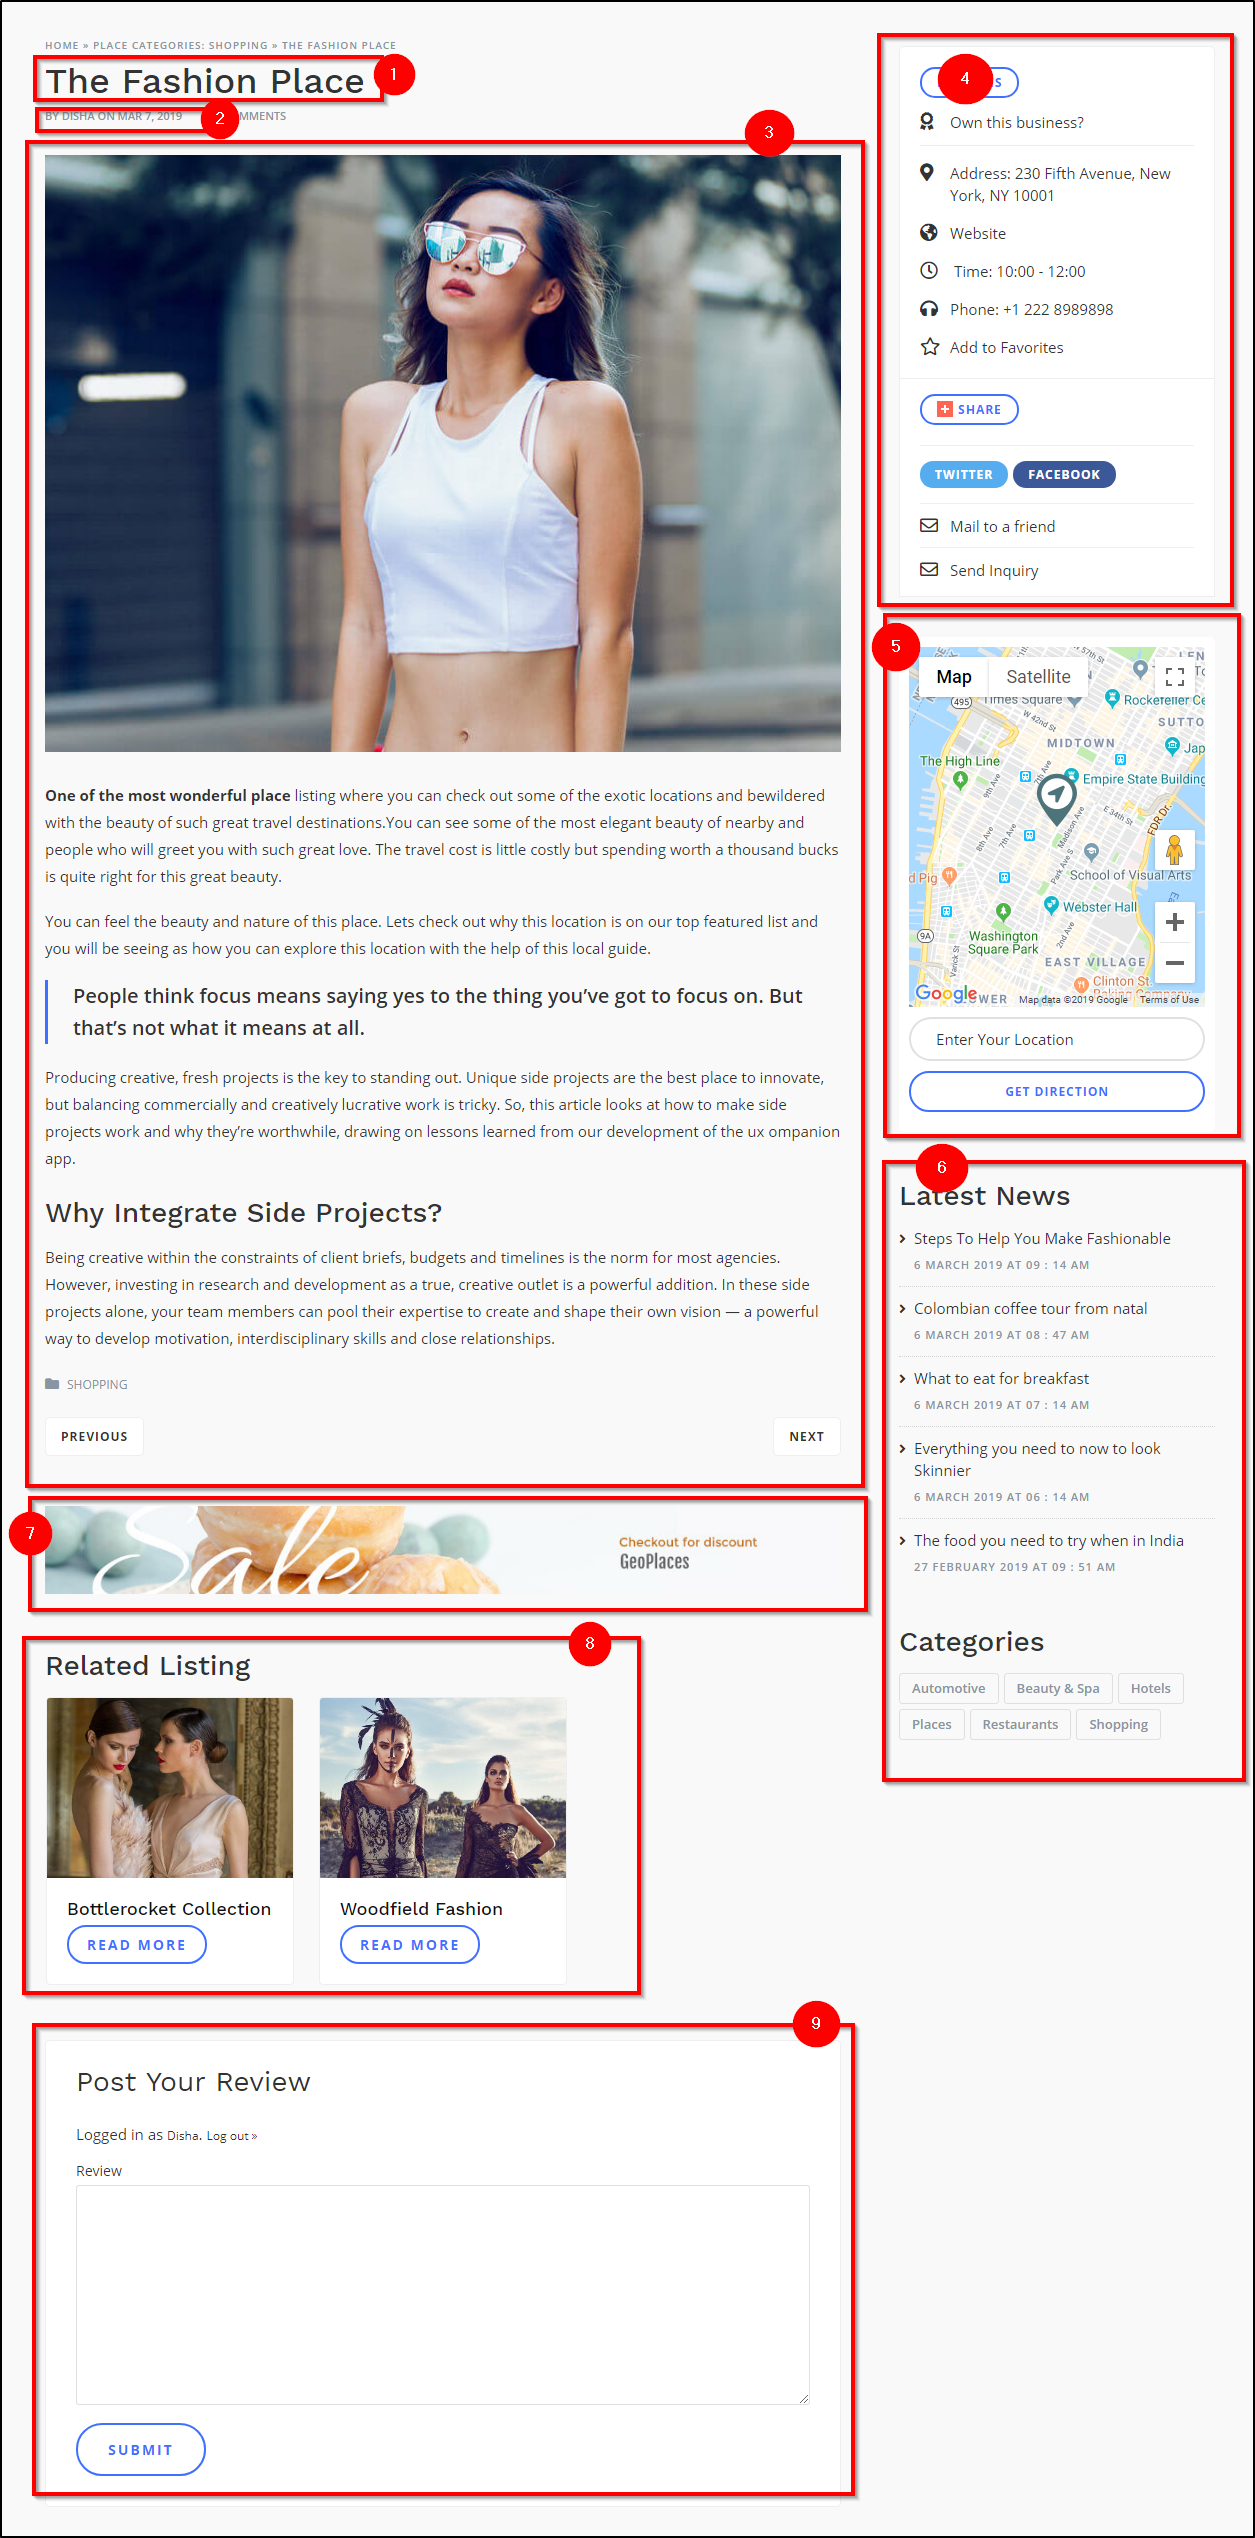
1 & 2) The listing title and Author name
These details are derived from the listing data. If you want to change them, you will have to find the listing and edit it to update the title or the owner info.
3) The Featured image and the description.
These details too are derived from the listing data. If you want to change them, you will have to find the listing and edit it to change the description, or upload a different featured image.
4) Claim ownership button, social buttons and other info
This section has some important buttons as well as listing information in a well organized form. While the information like operational hours, address, etc. comes from the listing data, you can change it by updating the listing.
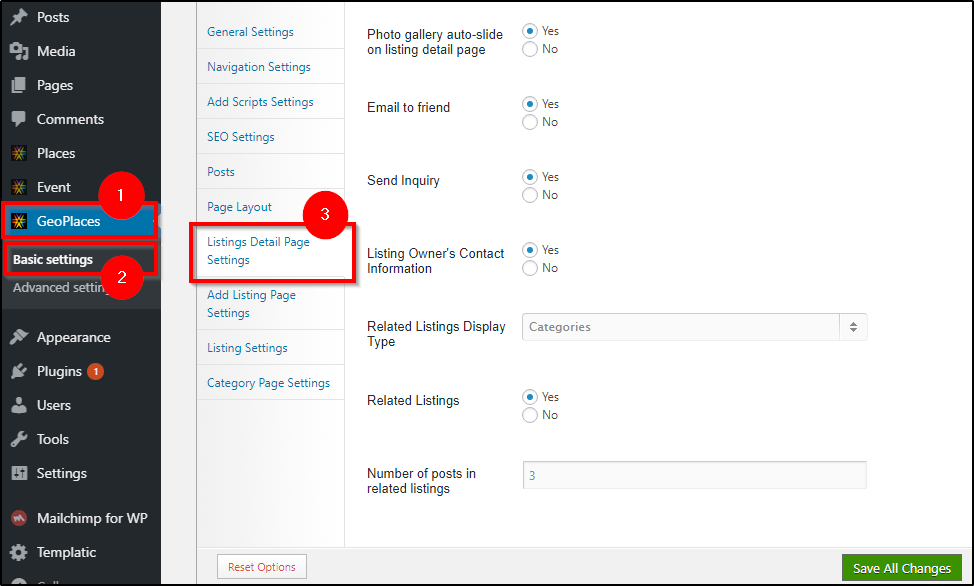
However, the other details on this page can be managed by navigating to GeoPlaces ⇒ Basic Settings ⇒ Listing Detail Page Settings
5) The map to show listing location
This map, shows the location of the listing on the map and has the navigational features. This section is displayed through a widget.
To change it, navigate to Appearance ⇒ Widgets ⇒ Place detail sidebar/Event detail sidebar. The widget is the first one ‘PT – Google Map V3 – Detail page’.

6) Other sidebar content
To change the other content in sidebar, you can navigate to Appearance ⇒ Widgets ⇒ Place detail sidebar/Event detail sidebar. Here you can add/remove/update the widgets and rearrange them.
7) Advertisement Space
If you want to display banner advertisement, or run Google AdSpace campaign, you can put the code for the advertisement at Appearance ⇒ Widgets ⇒ ‘Single Post: Below Content’ widget area.
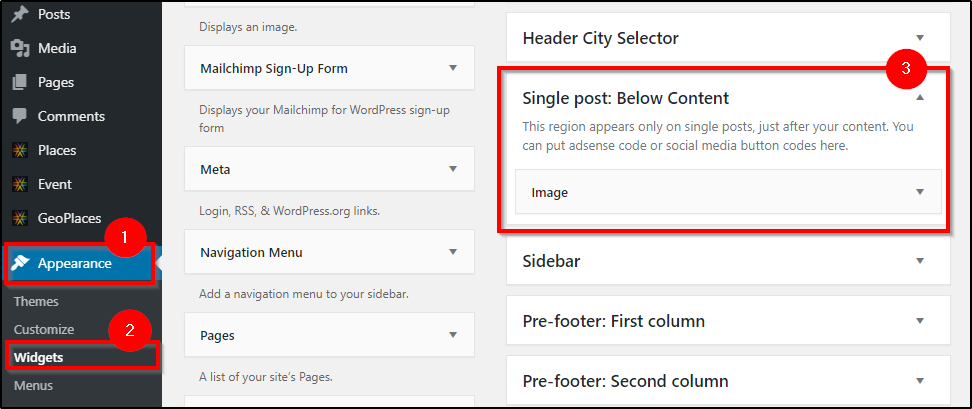
Here you can use a widget as per your requirement, an HTML or text widget for AdSense code. Or an image widget for banners.
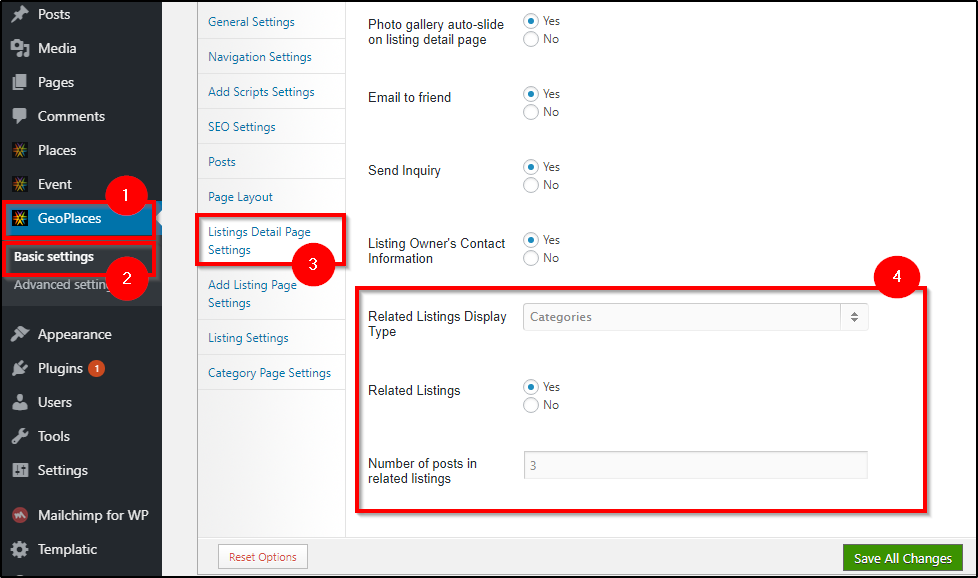
8) Related Listings
This is a great way to keep users engaged and redirect them to the pages of their interest and reducing the exit rates.
To change the settings for this area, you can navigate to GeoPlaces ⇒ Basic Settings ⇒ Listing Detail Page Settings, for both the Event as well as Place post type.
9) Comments on the detail page
To enable user reviews in form of comments on the detail page of the listing, go to wp-admin ⇒ Basic Settings ⇒ Posts. Select “Yes” in “Detail Post Comment”.
Registration and User Management
User Sign in / Register
First, activate the ‘T → Login & Add place widget’ (as shown above). This will enable the ‘Signin’ & ‘Register’ links in the header. Click on ‘Register’ to sign up as a new user.
GeoPlaces also supports social logins. To enable that you must install the Social Login plugin. Once the plugin is installed (and configured) you should see social icons in your sign in / register pages right away.
Author dashboard page
Authors, i.e. the listing adders on your site, will have their own dashboard after they create an account on your Geo site.
They will be able to add/edit their personal information, edit/delete/renew their submissions and can view their favorite listings.
To go to the authors page, they’ll simply need to click their username via T → Login & Add place widget’ on top.
How authors would edit their profile?
Authors on your site can edit their personal data like profile picture, website, links to their social media profiles, etc.
By clicking on their username via ‘T → Login & Add place widget’ on top. They will be taken to the Author Dashboard page.
How to setup custom user info fields?
You, as an admin, can specify what kind of personal data you’d like your authors to submit in their profiles. This can be done by adding custom fields to Author Dashboard pages.
You can navigate to wp-admin ⇒ GeoPlaces ⇒ Advanced settings ⇒ User Profiles Fields. Here you can create fields which will be displayed in the Author profile edit page which they are required to fill in.
Adding a Listing
Add a Place or an Event listing
As an admin: You can add/edit a place or an event from the front-end as well as the back-end.
As a user: One can add/edit a place or an event from front-end only.
After signing up click on “Add Place” or “Add event” to add a new Listing. Both of them can have different fields as per the requirement. Once you add a listing, you will are taken to the preview page. Users can edit back changes and finally do the payment and publish the listing.
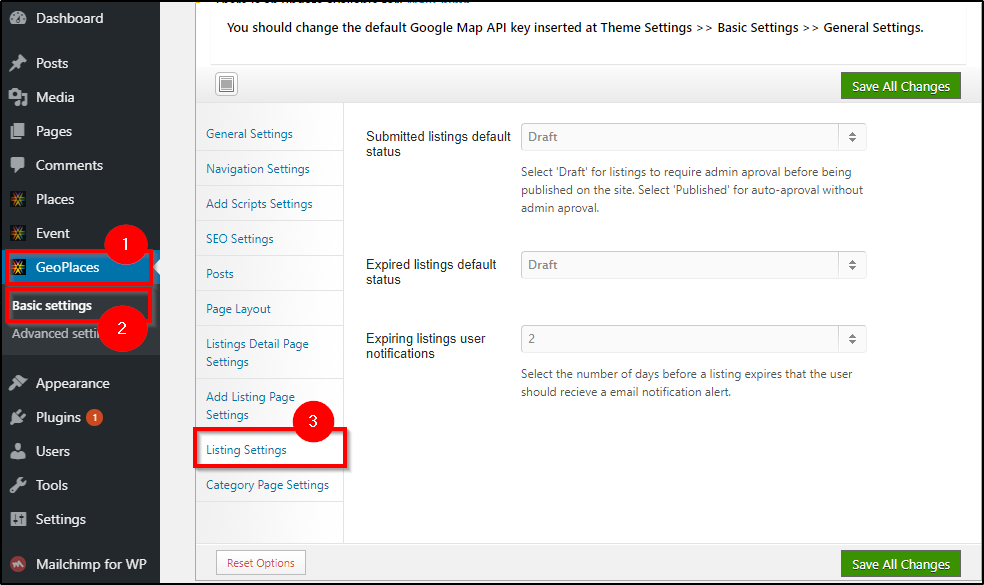
When user submits a place or an event on the site and if as an admin you want to verify it before getting published then this settings you can do here in “WP-admin ⇒ GeoPlaces ⇒ Basic Settings ⇒ Listing Settings”. You can select or set status for new listings as well as expired listings.
Delete a Place or an Event listing
As an admin: You can delete a listing by navigating to wp-admin ⇒ Places ⇒ Deleting the listing, just like a regular WordPress post.
As a user: One has to navigate to the Dashboard by clicking the username (on top) and then navigate to the required listing and click on “Delete”. You will be presented with a confirmation, click on “YES DELETE PLEASE!” to delete the listing.
Adding and Manage Cities
GeoPlaces is a location based theme. You can use this theme to create a single city directory(city guide) website or a multiple city website.
Adding a city
To add or manage a city, navigate to wp-admin ⇒ GeoPlaces ⇒ Advanced settings ⇒ Manage cities. You can add a city by pressing “add a city” button on the top of the screen.
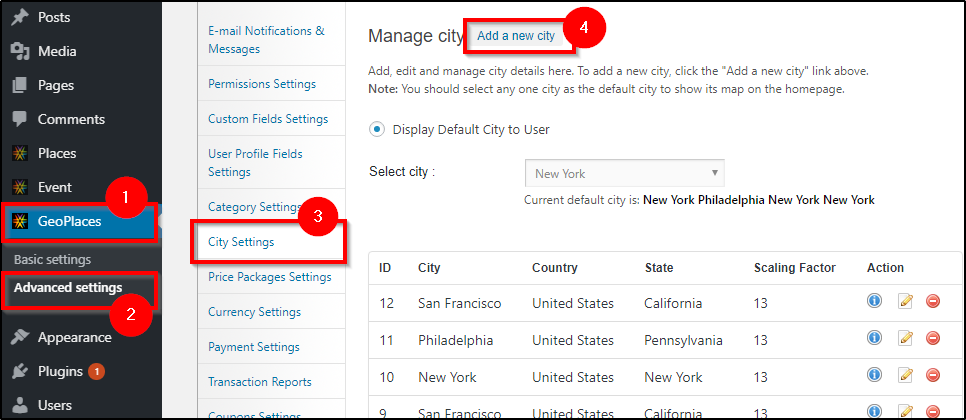
To add/edit/manage a city, go to WP-Admin ⇒ GeoPlaces ⇒ Advanced settings ⇒ Manage cities. Here you can add a new city or edit an existing one.
Select appropriate country, state/region and type down the city name. Then click the button ‘Set on map address’ to pin-point the city on Map. You can drag the zoom slider and set it to desired level.
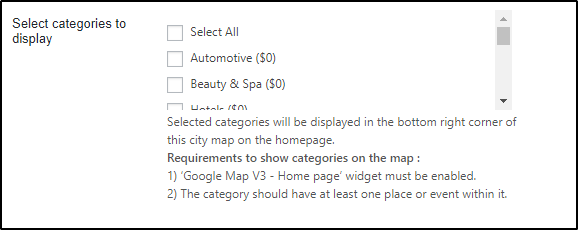
Note: The categories that you have selected here in “Select categories to display on homepage”while creating city, category icons of those only will be shown on the Home Page MAP of that city.
Editing a city
To edit a city, you can navigate to the same page, WP-Admin ⇒ GeoPlaces ⇒ Advanced settings ⇒ Manage cities.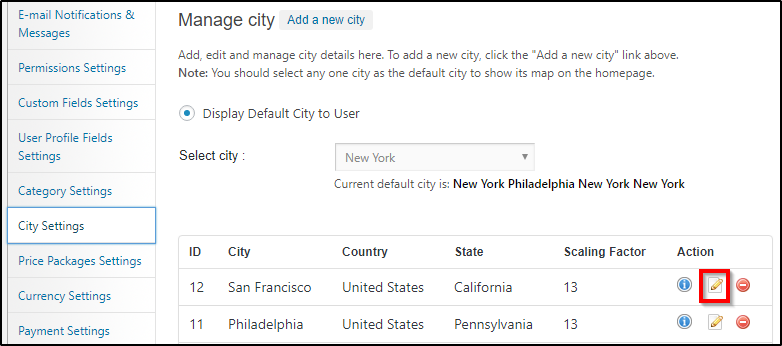
Manage pricing package
To accept payments, you can create different pricing packages with different provisions.
Create a pricing package
Go to wp-admin ⇒ GeoPlaces ⇒ Advanced settings ⇒ Manage Price packages. Here, click the ‘Add new Price package’ link. You can create as many price packages you want. To create a free package, follow the same process but set the price as zero.

Setting up individual pricing for featured listings on homepage/category pages
Go to wp-admin ⇒ GeoPlaces ⇒ Advanced settings ⇒ Manage Price packages. Here, you can create a new price package or edit an existing one.
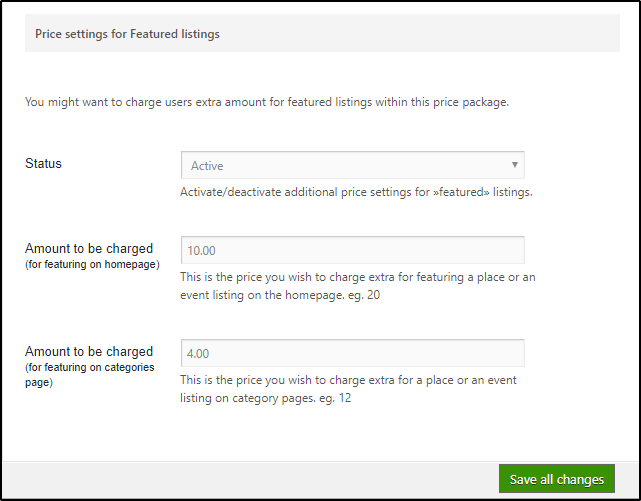
Scroll down(till the end of the page) to the section ‘Price settings for featured listings’ Specify different pricing to make posts as featured on homepage and category page.
Setting up recurring payments
Go to wp-admin ⇒ GeoPlaces ⇒ Advanced settings ⇒ Manage Price packages. Here, create a new price package or edit an existing one. Scroll down to ‘Recurring payments’ and specify the billing period and number of times the recurring process should occur.
Also make sure that in your PayPal account – Auto Return has been set to “on”. This will allow the user to redirect to your site(Success page) after doing payment.
Managing currency
Go to wp-admin ⇒ GeoPlaces ⇒ Advanced settings ⇒ Manage Currency.

Here, you can add a new currency and specify its symbol.
Specify category pricing/individual pricing for each category
Yes, you can set different pricing for each category here: wp-admin ⇒ GeoPlaces ⇒ Advanced Settings ⇒ Category settings.

You can then change category icons and their pricing by editing them. Don’t forget to click the ‘Save’ icon.
Managing payment methods
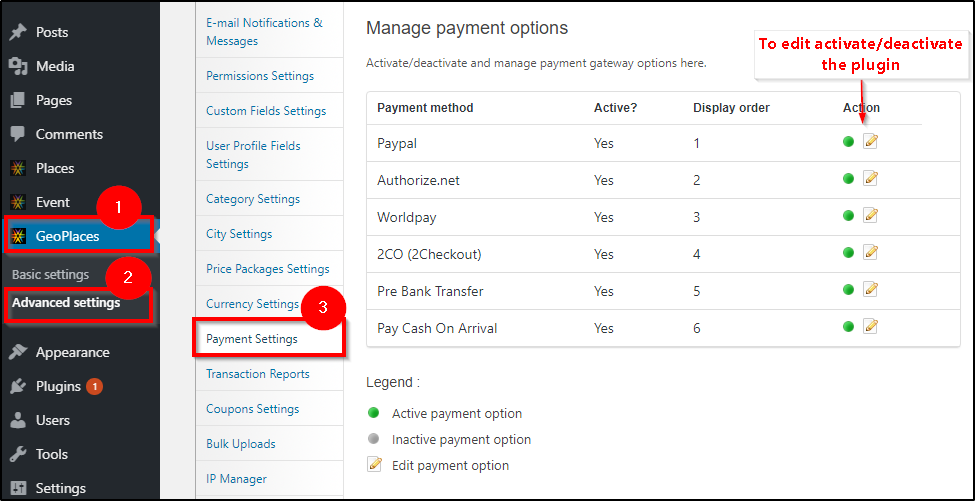
Go to wp-admin ⇒ GeoPlaces ⇒ Advanced settings ⇒ Payment Options. You can edit/activate or de-activate the available payment options.
Add, edit or delete discount coupons
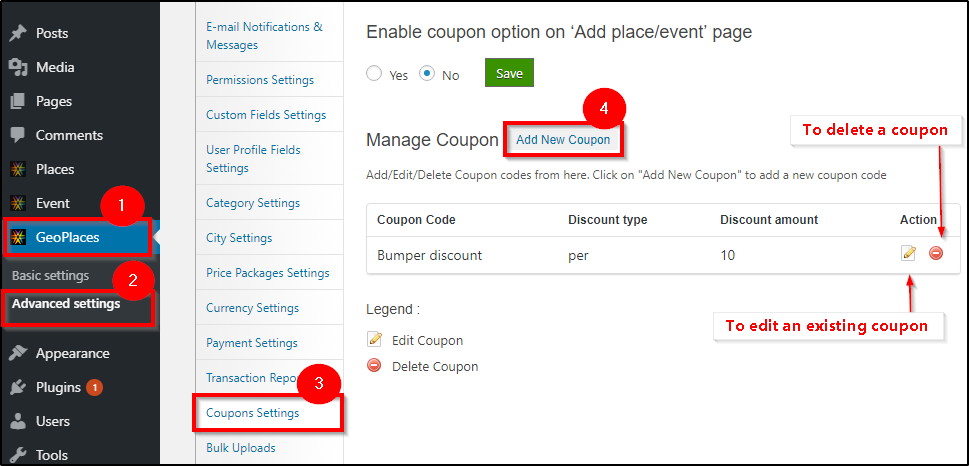
Go to wp-admin ⇒ GeoPlaces ⇒ Advanced settings ⇒ Manage coupons. Add discount coupons here which are shown to your users while adding a place or an event listing.
Customizing the submission forms (Place/Event)
The video below explains how you can customize the submission form of your Geoplaces theme.
Widgets and their recommended locations
Text widget, Tag cloud, Latest Tweets, Recent postsPre-footer: First column, Pre-footer: Second column, Pre-footer: Third column
| Widgets | Recommended widget location |
| T → Login & Add place widget | Header: Right area |
| T → Featured Listings For Home Page (List view / Grid view) | Front Content |
| T → Advertisement Widget | Sidebar |
| PT → Recent Review | Sidebar, Place Listing Sidebar, Event Listing Sidebar |
| PT → Latest Post/Places/Event | Sidebar, Place Listing Sidebar, Event Listing Sidebar |
| PT → Google Map V3 – Detail page | Place Detail Sidebar, Event Detail Sidebar |
| PT → In The Neighborhood | Place Detail Sidebar, Event Detail Sidebar |
| Event Listing Calendar | Event Listing Sidebar, Event Detail Sidebar |
| PT → Latest Post/Places/Event | Blog Listing Sidebar, Blog Detail Sidebar |
Managing Bulk Upload
Bulk Upload functionality is still in beta so problems may occur. If your bulk upload fails please double-check the file you’re uploading. One stray comma can ruin the whole upload
Bulk upload has mainly two sections in it “Import” and “Export”.
A) Import
1) Import Places, events and blog posts
It is a very simple procedure to upload your desired option, follow these steps for that,
-
- Select any of the places, events or posts as per your need
- Select its CSV file from your computer drive and import it
For your ease, under these option a sample CSV file has been given, you can download it and can arrange your data in that pattern before uploading it otherwise you will not be able to have successful upload.
But this sample CSV file is for uploading just Places and not for events. To have a sample CSV file for events click here to download it and arrange your events CSV file in the same manner.
B) Export
A simple step to export all your data of the particular post type into CSV file. Simply select the post type whose data you want to have in CSV format and click the “Export to CSV” button.
Blog settings
1) Creating blog categories
First of all, you should create blog categories for blogs.
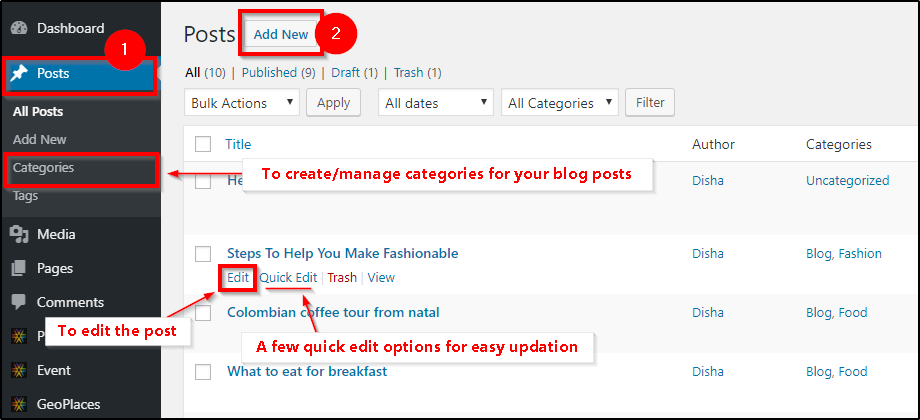
2)How to add a new Blog Post
Login to WordPress admin and click on Posts ⇒ Add New
- Blog Post Title
- Description
- Geo Places Custom Settings ⇒ Detail page image position setting
- Select a Category. Note: It should be your Blog category.
- Select Your Featured Image
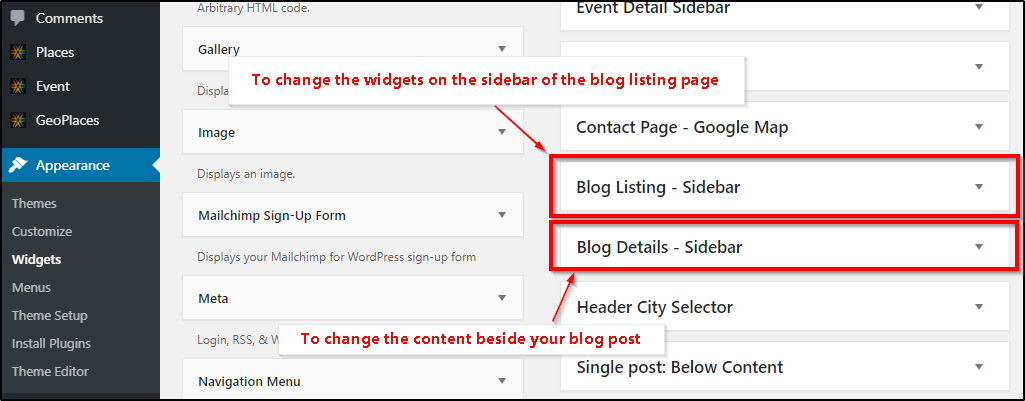
2) Blog listing page
Use the required widgets in the ‘Blog Listings-Sidebar’ region to show appropriate widgets on the blog listing page.
3) How to add a new Page and use Page Templates
Now lets add a new page. Go to Pages ⇒ Add New.
- Enter the page title
- Enter the page description
- And finally select the template and click on “Publish”.
There are 8 page templates which you can use namely:
- Advanced Search
- Archives
- Contact Us
- Full Width
- Gallery
- Left Sidebar
- SiteMap for event
Email notifications
1) How to setup email notifications?
Go to wp-admin ⇒ GeoPlaces ⇒ Advanced settings ⇒ Email notifications and messages.
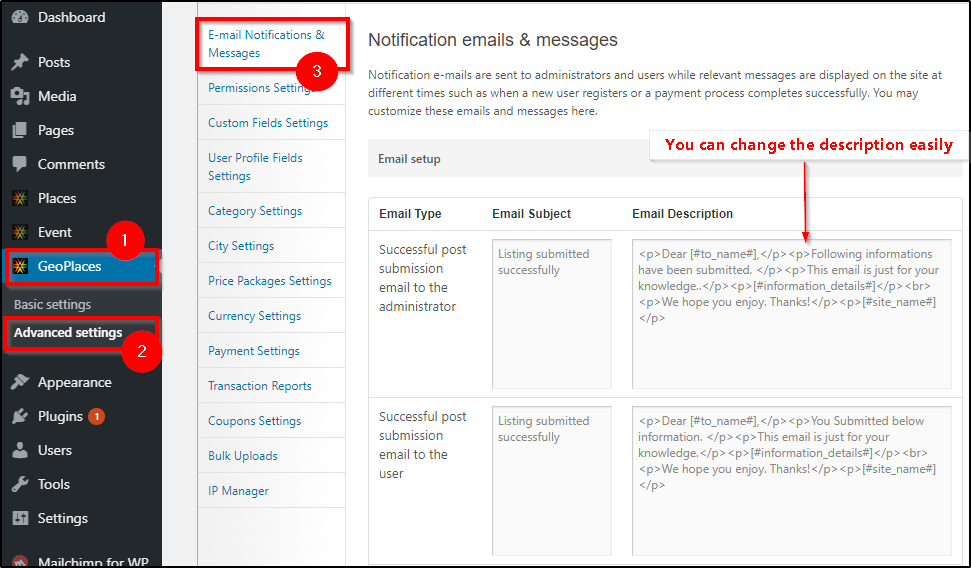
Here, you can change the content of the emails that are sent to admin and users. Use the shortcode-legends are specified on the page. You can also modify instructional messages displayed on-site like when a payment is successful.
Other Settings
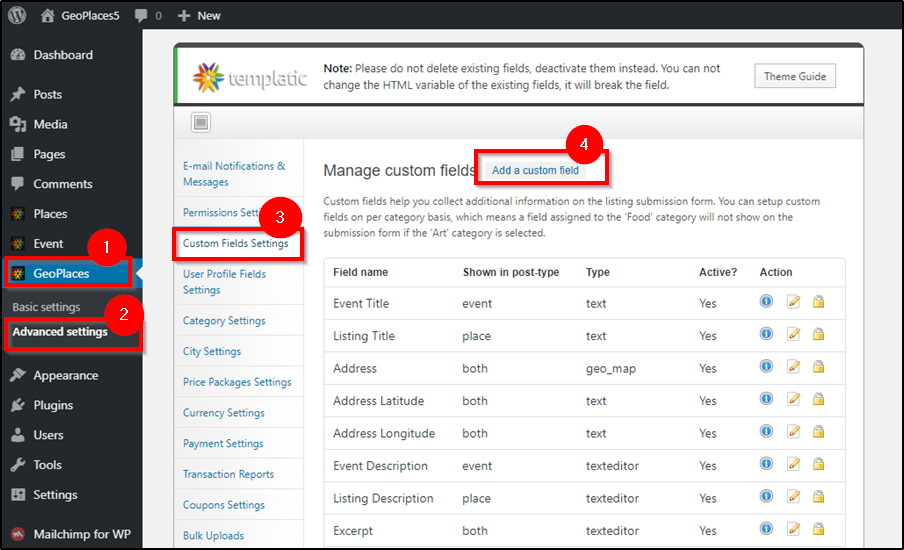
1) How to add or delete custom fields?
Go to wp-admin⇒ GeoPlaces ⇒ Advanced Settings ⇒ Custom Fields. You can add/edit and manage custom fields here with options to show them in the backend, frontend or both. Custom Fields are basically used for post attributes or fields like address, post-city, post-title, etc…
Show for categories field won’t work if “checkbox” option is selected in Basic Settings ⇒ Add Listing Page Settings ⇒ Category display settings.
2) How to find Category ID ?
To know the category ID, just go to Posts > Categories and hover your mouse over the category name E.g. Attractions. and notice its URL at bottom of the screen above the status bar. It would be something like id=3. This 3 is your category ID. Watch this video to understand it better.
3) Which permalink structure can I use with this theme?
To change Permalink structure go to Settings ⇒ Permalinks.
You can use only two types of Permalinks with Geoplaces theme.
- Default
- Custom Structure: In “custom structure”, you can only use “/%postname%” permalink.
Please ensure that you don’t use any other permalink, other than these two.
Frequently asked questions
1) How does Claim Ownership work?
When a person clicks on “Own This Business” and submits the claim, a new entry is added to your admin dashboard. You can now accept or deny that ownership claim. If you accept you must manually create an account for that person and add that listing to his or her account.
You can create an account under wp-admin ⇒ Users ⇒ Add New. Make sure you assign a Contributor role to that person, otherwise you won’t be able to assign the listing to that person. You assign a listing by changing the post-Author.
2) How to add Place and Event categories to my navigation bar?
You can add those while you’re creating your custom menu.
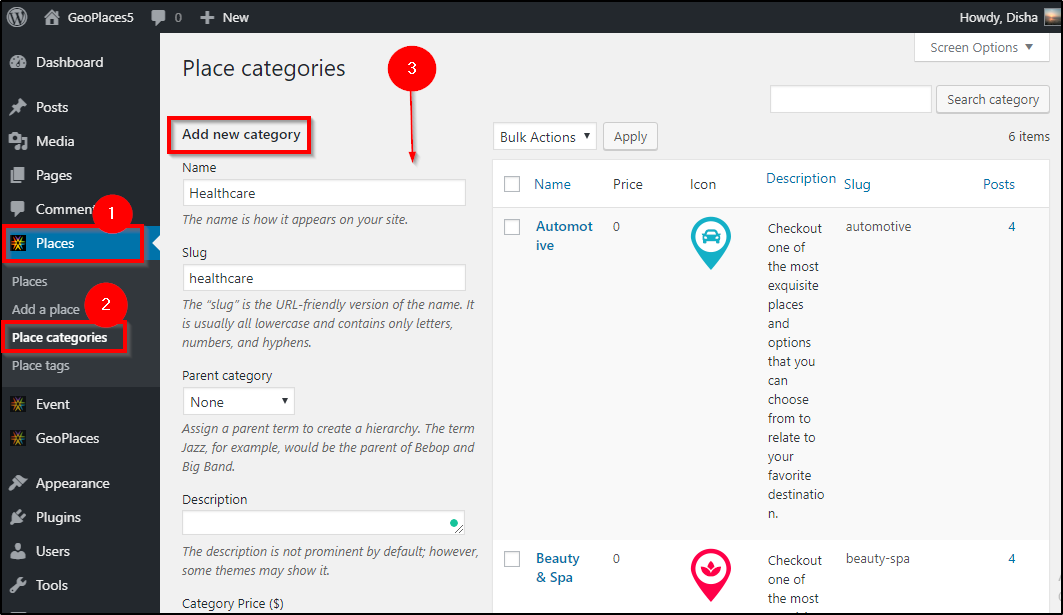
Step 1: Creating a Place/Event Categories
To add a category for place/event post type, navigate to Places ⇒ Place Categories and fill up the form and then click “Add new category”.
Step 2: Get the link of the category page
Once you click “Add new Category”, you will see the place categories added in the list of the existing categories on the same page. You can click the view option (this will be visible on mouse hover over the category name) and click it. Copy the URL of the category page.

Step 3: Adding to the menu
Now to update the menu, navigate to Appearance ⇒ Menu and choose your menu from the dropdown to edit it.
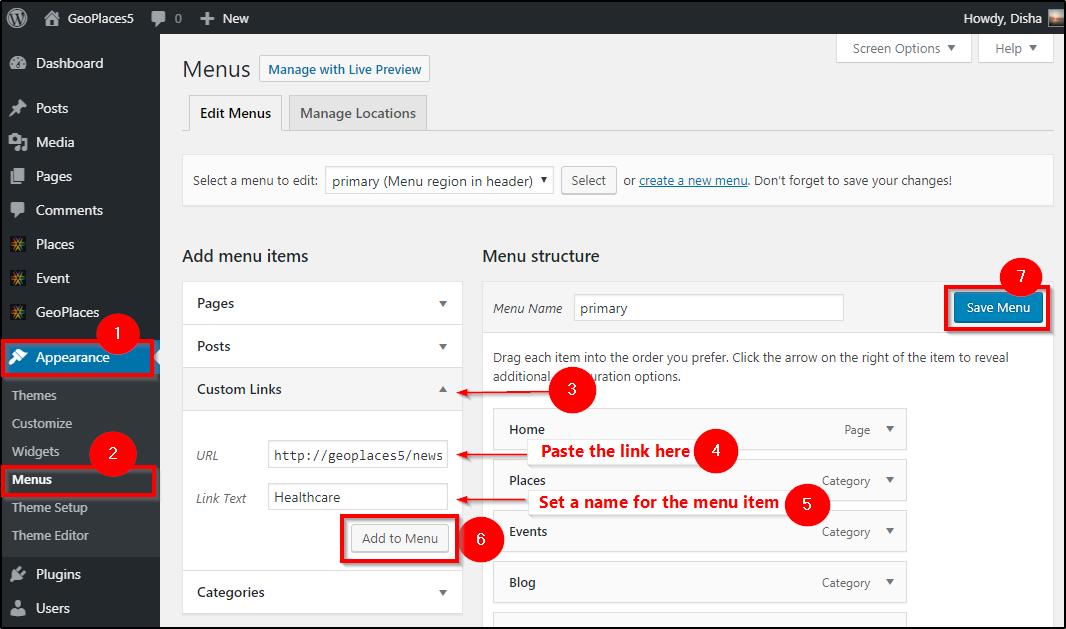
Open the custom link section, Paste the link in the text box given for URL, set the link text and click “Add to Menu”.
Now you can change the order of the menu item and click “Save Menu” to save the changes.
3) How to create or show the Add Event or Add Place links on my home page?
To show it on your Home Page
- Go to wp-admin > GeoPlaces > Basic Settings > Navigation Settings
- Select “Yes” for “Show Add Place Link” & “Show Add Event Link“
- Place a widget “T – Login & Add place widget” in the “Header: Right area” from wp-admin > Appearance > Widgets.
- Refresh your site
- By doing this, it will display a link at the top right corner of your Home Page
Clicking on these links, you will see the URL extended with “?ptype=post_listing” for Places” & “?ptype=post_event” for Events
To show it in your Navigation Menu
Just follow the above said steps except placing the Widget in above mentioned widget area at your back end
- Instead, use the links created for the Add Event & Add Place as a custom links in your Navigation Menu & add them from wp-admin ⇒ Appearance ⇒ Menus ⇒ Custom Links.
- Save your Menu & Place either “jQuery Mega Menu” or “Custom Menu” in the Below Header widget area from wp-admin ⇒ Appearance ⇒ Widgets & Save it.
- Now, Refresh your site, you must be having it in your menu items.
4) How to assign one listing to 2 or more cities?
You must do this from the back-end. Open the listing in back-end and below the Description, under Select City enter multiple city ID’s
5) How to control the type (Roadmap or Satellite) of my listing/detail page map?
The type of map you select while creating a city is the type that will be applied to all your maps (homepage, listing and detail map).
6) What does “Pinpoint” button do?
Pinpoint button is displayed in category listing pages and requires the listing map to function. When you have a listing map in your Place/Event Listing Sidebar widget area and you click on “Pinpoint” the theme will focus on that particular listing on the map.
7) Which third-party plugins work with GeoPlaces?
You can use WMPL plugin to translate your theme into multiple languages. To know more about it and download the plugin, click here
8) Why isn’t the register button showing?
To display the register button you must turn on registrations. You can do that in wp-admin⇒ Settings ⇒ General ⇒ Membership
9) Should I use dummy data? Can I leave it on even after I start working on my site?
Dummy data is a great tool to see how theme content is organized and we recommend turning it on after activating the theme. If handled property dummy data can’t hurt your site.
The only instance when dummy data can cause loss of real data is when you edit dummy data posts and then delete (deactivate) dummy data.
To avoid this we recommend activating the dummy data under Appearance⇒ Themes and then going to GeoPlaces ⇒ Basic Settings ⇒ General Settings ⇒ Disable Auto Install ⇒ YES. This won’t disable dummy data, it will just hide it from Appearance -> Themes. With the area hidden you don’t have to worry about accidentally deleting it.
10) How to change the current city ID with a link
To change the current city without using the Multi-City Options widget simply append the following code after your domain root → ?front_post_city_id=X with X being your city ID (can be seen in Advanced Settings ⇒ Manage cities). The following example (link) will directly open San Francisco on the GeoPlaces demo site
https://templatic.com/demos/geoplaces4/?front_post_city_id=6
You can use this prefix to open a specific listing/category in another city as well. Simply append the prefix after your URL. Like this:
https://templatic.com/demos/geoplaces4/place/sampan-16/?front_post_city_id=6
If you experience any issues while setting up the theme please Contact Us and we’ll help you out.
11) My selected city gets change when I again visit the home page?
Let’s understand the problem in detail, when anyone visits your site and selects (suppose) London from the cities that you have on your site, then again from the same city option, he selects New York and visits some of the listings of that particular city and hits “home” to head over to home page but strangely, the city selected i.e. New York changes to “London”!
This kind of problem arises when you have any kind of cache plugin activated on your site as it stores the cache and cookies it will not let you keep the city selected that you chose after choosing the first one. So, to avoid it you should keep your cache plugin deactivated and if you are already facing this problem then along with deactivating, you should also clear the cache and cookies as well.