Note: Before installing this theme, please ensure that you are using the latest version of WordPress.
Here’s a step by step installation guide for PlusOne theme where we will explain how you can setup this theme and configure various options.
Installing and Activating PlusOne Theme
Upload PlusOne theme to wp-content/themes directory and then Activate the theme from your WordPress Admin panel > Appearance > Themes. Installing this theme is just like any other WordPress theme.
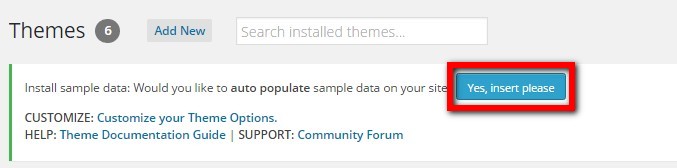
Auto Install Dummy Content
If you want to auto install the dummy data then just click on “Yes insert sample data please”. Theme will be activated and completely installed with some added dummy content and categories by default so you can start using it right away.
If you wish to delete the dummy data that we populated in your site then you can remove it by clicking on Yes Delete Please!
Note: If you entered your data by editing this dummy data, then please don’t click on “Delete sample data”, as it will delete all the data which you have entered.
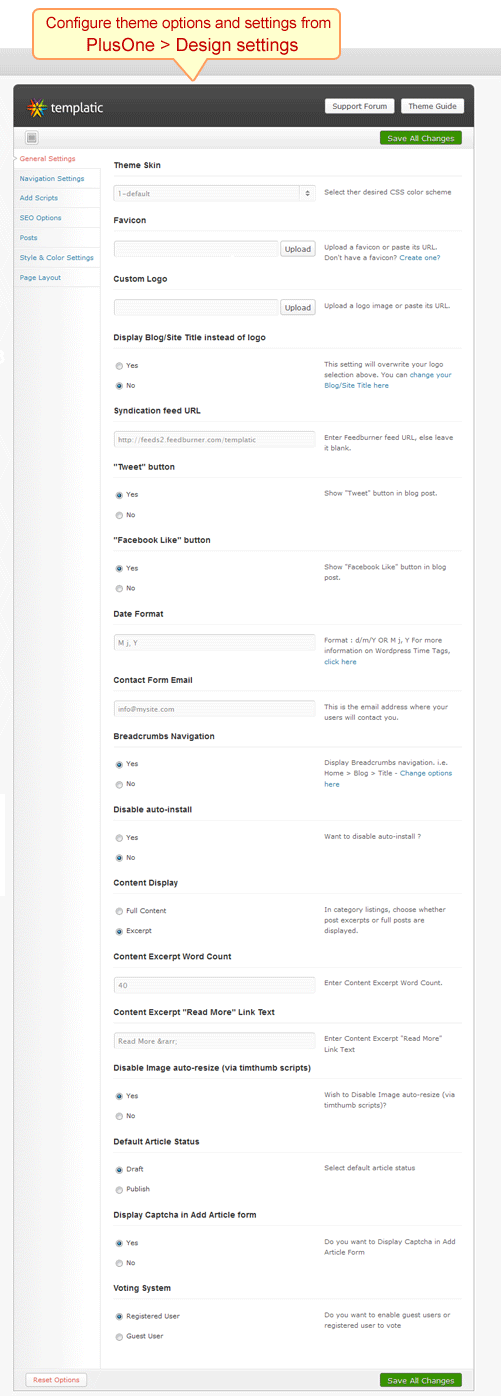
PlusOne Theme Options
Go to wp-admin > PlusOne > Design settings and take a thorough look at all the flexible options available to you. Do the settings as per your wish and then save them.
Homepage Settings
Lets learn how to configure the Homepage:

- Go to wp-admin > > PlusOne > Design settings > General Settings > Custom Logo –> Click on Upload to upload your logo image and then just click on “Insert into Post” button
- Go to wp-admin > > PlusOne > Design settings > Navigation Settings > Top Header Navigation settings > Activate. Now go ahead and make your own custom menu from wp-admin > Appearance > Menus. Give a name to this menu and create it as per your wish. From the Top Header Navigation menu select the menu name which you just created.
- Go to wp-admin > > PlusOne > Design settings > Navigation Settings > Main Header Navigation settings > Activate. Now go ahead and make your own custom menu from wp-admin > Appearance > Menus. Give a name to this menu and create it as per your wish. From the Main Navigation menu select the menu name which you just created.
- Go to wp-admin > Widgets > Homepage Content > Text. And then enter the text as per your wish
- Go to wp-admin > Widgets > Sidebar 1 > T Submit Article button. Expand this widget and write button text and its description
- Go to wp-admin > Widgets > Sidebar 1 > Search
- Go to wp-admin > Widgets > Sidebar 1 > T Login box and write the widget title here
- Go to wp-admin > Widgets > Sidebar 1 > PT Custom taxonomy and select “Article tags” as taxonomy option
How to add new Articles
Now lets see how to add new articles. You can add articles from frontend also and from backend also. To add articles from frontend, just click on that big “Submit Article” button. To add articles from backend go to wp-admin > Articldes > Add Post
First create a new category by clicking on “Add new category” or select a category from the list provided.

- Add Post Title
- Add Image by clicking on “Add an Image” button
- Add Description
- Select Category
- Add Tags (or skip adding tags)
- And finally, click on Publish
Preview of Article Listing Page
Below is a preview of Article Listing Page

Preview of Article Detail Page
Below is a preview of Article Detail page

- Go to wp-admin > PlusOne > General settings > Tweet button.
- Go to wp-admin > PlusOne > General settings > Facebook Like button.
How to submit/add an Article from frontend ?
This is really easy, just click on the big “Submit Article” button from the frontend.
Step 1: Login or Register. If you are already a member, then login, or else, register. And then click on “Next Step”.

Step 2: Submit Article. Just fill out all the article details like title, description, category, tags, upload image, etc. and click on “Next Step”.

Step 3: Article Preview page. Now that you have submitted all the details, a preview would be shown to you. If you are satisfied by this preview. then click on “Publish”, or if you want to edit this article then click on “Go back and edit”.

Step 4: Article posted successfully. This page will give you a success message that the article is posted successfully.

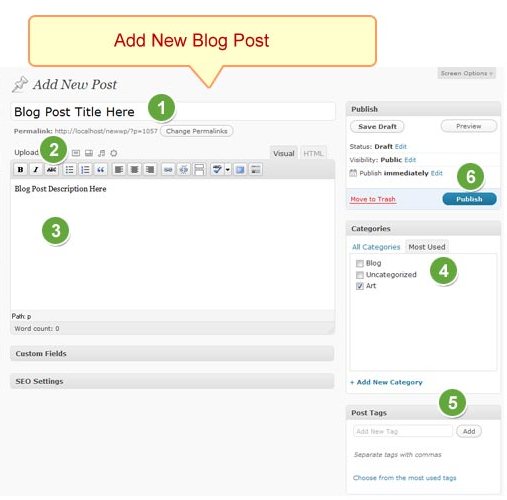
How to add new Blog Post ?
Yes, you can also have a Blog on the site. To add Blog posts, go to Posts > Add New.
- Add Post Title
- Add Image by clicking on “Add an Image” button
- Add Description
- Select Category
- Add Tags (or skip adding tags)
- Finally, click on Publish
Note: There is a difference between Article pages and Blog pages. On Blog pages, there will not be any option for voting.
Preview of Blog listing page
This is a preview of Blog listing page:

Preview of Blog detail page
This is a preview of Blog detail page:

How to add a new Page and use Page Templates
Now lets learn how to add a new page and use page templates. Go to wp-admin > Pages > Add New Page
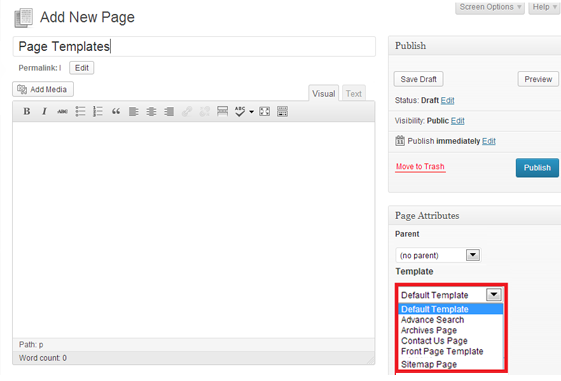
- Add Page Title
- Add Page Description
- From the right sidebar of this page, Select “Page – Contact Us” from Template section. (This is used just as an example. You can use any page templates)
- Click on Publish
You can configure your Contact Us Email address from wp-admin > PlusOne > Design settings > General settings > Contact Form Email. Enter your Email address here. Emails from Contact form will go to the Email address which you supply here.
Contact Page
This is a preview of “Contact Us” page template which we used in previous step.

Complete documentation on Templatic Framework
We have prepared exhaustive documentation on Templatic Framework which is used to develop this theme. Click here to view documentation on Templatic Framework.
How to update Templatic Framework ?
Templatic Framework is used in the development of this theme. We will keep on updating this framework whenever the need arises. Firstly you need to know, if you are having the latest version of this framework or not. To know about this, just go to
wp-admin > PlusOne > Update Framework
If you have the latest version of this framework, then you will get a message like “You already have the latest version of framework”. If you are using an older version, then you will get this message “You need to update framework”. Just click on Update Framework to update it.
How to use different Shortcodes
We have prepared a detailed documentation on how to use shortcodes.
How to enable User Registration?
If you get an error stating “User registration is currently not allowed” while registering, then go to wp-admin > settings > General and checkmark “Anyone can register”.
How can I change default article status to Publish or Draft?
When users submit post, their default status will be published. If you want to change this status, and you think that each and every article should be moderated, then you can change the article status to Draft. To change this article status, go to:
PlusOne > Design settings > Default Article Status and select Draft or Publish, as per your wish.
How can I enable and disable Captcha?
By default, a Captcha would be shown in Submit Article page, in step 2. This is to prevent automatic bot submission, and stop spam. You as a Admin, can enable or disable this captcha option from:
PlusOne > Design settings > Display Captcha in Add Article form and set it to Yes or No.
How to use Post Custom Fields
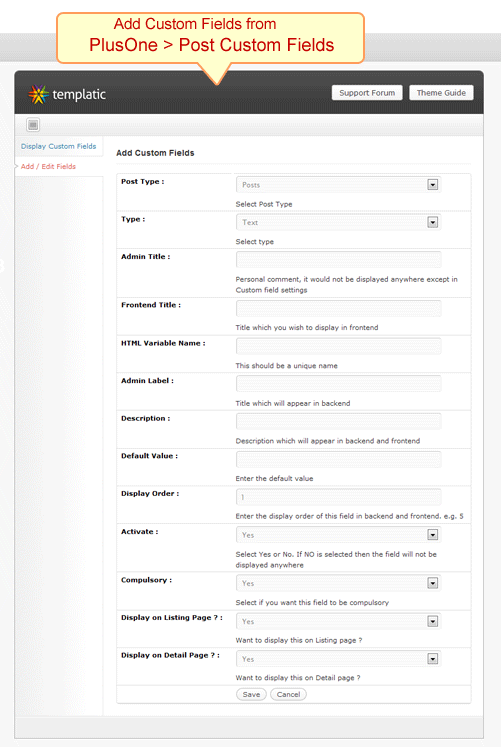
Yes, you can also add new custom fields, and without doing any coding. Our new easy to use interface is here. To use/add new custom field, go to wp-admin > PlusOne > Post Custom fields
And here is detailed explanation of each of these custom fields:
- Post type: Whether you want to display this custom field in Posts (Blog) or Article. Most likely, you will need to select Article here.
- Text: Select type e.g. text, checkbox, radio, etc
- Admin Title : This will be the title which will be shown in “Post Custom Fields” and it will not be shown anywhere else. This is just for you to remember this custom field.
- Frontend Title : This title will be displayed in front end.
- HTML Variable Name : This should be a unique name which you have not used previously
- Admin Label : This is title which be displayed in backend
- Description : This is description which be displayed in backend and frontend. This should be something informative, which explains about your custom field.
- Default Value : The default value of the field. E.g. if you have selected “type” as multi checkbox, and your options are “Yes” and “No”, then what should be its default value, yes or no ? You can also leave this field as blank.
- Display Order : The order of this new custom field. E.g. 1. If 1 is entered then this would field would be displayed first in backend and in frontend also
- Activate: Do you want to activate this new field or just want to save these settings ? If you want to activate it, then select YES and if you just want to save these settings to use later on then select NO.
- Compulsory: Do you want this field to be mandatory ? If you want that users should fill out this custom field in any case, then select Yes, else select No.
- Display On Detail page ? : Select “Yes” if you want to show this field in detail page and “NO” if you don’t want to show this field
And finally, after filling out all the information, don’t forget to click on Save button.
How to use Custom Usermeta
Just like “Post Custom Fields”, you can also use this new “Custom Usermeta” functionality. Are you wondering what is the difference between “Post Custom Fields” and “Custom Usermeta” ?. “Post Custom Fields” is displayed in “Submit Article” page, and then on “Article Detail” page. Whereas “Custom Usermeta” is displayed while Registering a new user, and then on his profile page. Hope this explains you the difference between them.
Any Queries? Contact us and we’ll help you out.