Here’s a step by step installation guide for PrivateLawyer theme where we will explain how you can do basic setup of this theme.
Installing and Activating PrivateLawyer
- Connect to member area and expand the Private Lawyer section under My Downloads. Download the theme to your hard drive.
- Connect to your WordPress dashboard (wp-admin) and navigate to Appearance -> Themes. Click on the Install Themes tab and then on Upload. Use the Browse option to locate the private lawyer zip file on your hard drive – then click on Install Now. After the installation process is finished activate the theme.
In case WordPress rejects the .zip file use FTP to install the theme:
- Extract privatelawyer.zip then upload to /wp-content/themes directory
- Once uploading is done connect to the WordPress dashboard and activate the theme
- If you run into more problems during installation please visit our Installation Guide
For detailed instructions on using FTP please click here
Need help with installing the theme? Hire us!
Facing Problems in installing the theme? Don’t worry, we’ll do that for you, just click here!
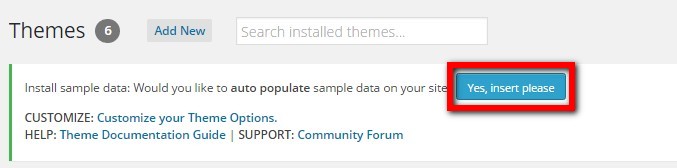
Auto Install Dummy Content
If you want to auto install the dummy data then just click on “Yes insert sample data please”. Theme will be activated & completely installed with some added dummy content and categories by default so you can start using it right away.
If you wish to delete the dummy data that we populated in your site then you can remove it by clicking on Yes Delete Please!
Note: If you entered your data by editing this dummy data, then please don’t click on “Delete sample data”, as it will delete all the data which you have entered.
PrivateLawyer Theme Options
Go to wp-admin > PrivateLawyer > Theme Menu
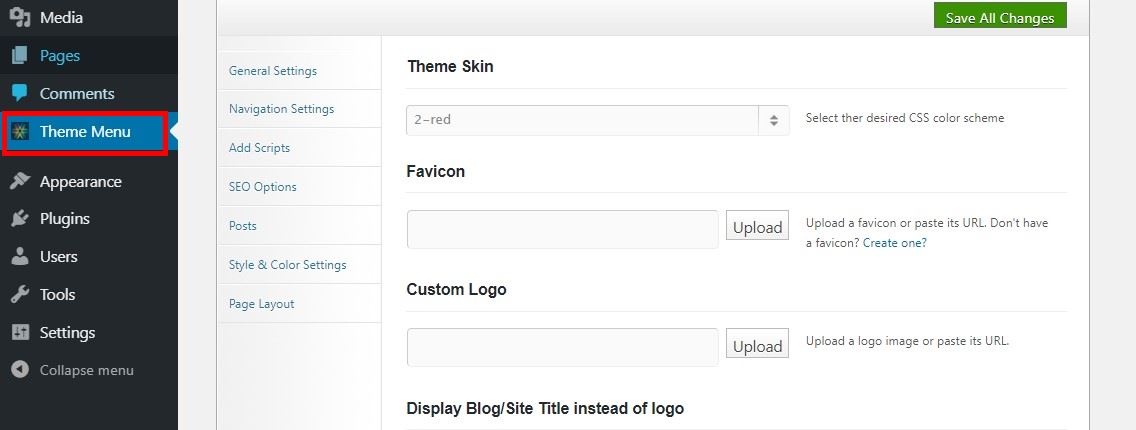
You can take a thorough look at all the flexible options available to you. Do the settings as per your wish and then save them.
Homepage Settings
Lets see how to configure the Homepage:

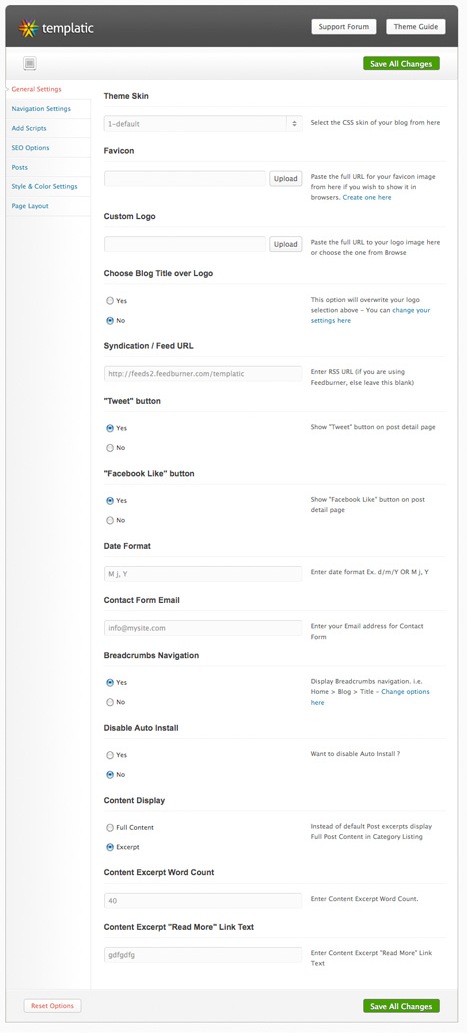
- Go to wp-admin > > PrivateLawyer > General Settings > Custom Logo –> Click on Upload to upload your logo image and then copy the image’s URL and paste it in this field
- Go to wp-admin > > PrivateLawyer > Navigation Settings > Top Header Navigation settings, pages and categories
- Go to wp-admin > Widgets > Home Slider > T Anything Slider. Enter the number of posts and category IDs. To insert images/videos, edit that particular post and use the custom fields of Full Image and Custom Video Code
- Go to wp-admin > Widgets > Home Slider > Services List. Enter your Title, image and description
- Go to wp-admin > Widgets > Index Page Sidebar left > T Tab Headline and News. Enter the title, number of posts and categories. Also insert T Subscribe widget here and enter Feedburner ID.
- Go to wp-admin > Widgets > Front Page Content > T Team List. Enter all the required information in this widget.
- Go to wp-admin > Widgets > Front Page Content > T Practice List. Enter all the required information in this widget.
Add New Posts
Now lets see how to add new posts. Go to wp-admin > Posts > Add New
First create a new category by clicking on “Add new category” or select a category from the list provided.
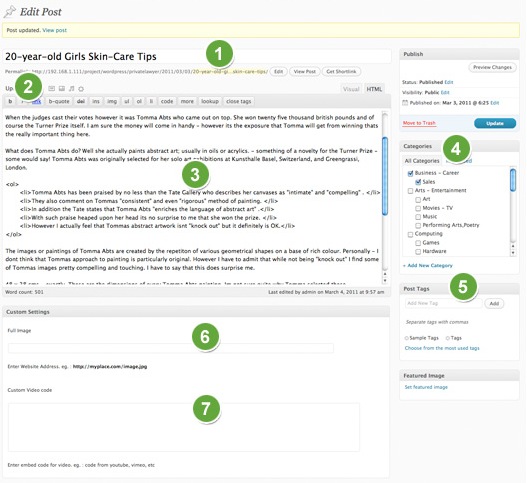
- Add Post Title
- Add Image by clicking on “Add an Image” button
- Add Description
- Select Category
- Select Tags
- Insert image full URL (for slider purpose ONLY)
- Insert custom video code (for slider purpose ONLY)
Note: The image full URL and custom video code is used to display image/video in slider only. If you are adding this post in slider, then only these custom fields will be effected. Just add the image here and then this image will be shown in slider.
If you want to show image and video in post detail page, then you will need to insert image/video in Description field (wordpress editor).
Blog Listing Page
This is a preview of Blog Listing page

Blog Detail Page
This is a preview of Blog Detail page

- Go to wp-admin > Private lawwyer > General settings > Tweet button.
- Go to wp-admin > Private lawwyer > General settings > Facebook Like button.
Inner Page Sidebar Settings
Now lets insert a new Page. From Pages > Click on “Add New”.
- Go to wp-admin > Appearance > Widgets > Inner Page Sidebar Left > T Tab Headlines and News
- Go to wp-admin > Appearance > Widgets > Inner Page Sidebar Left > T Subscribe
- Go to wp-admin > Appearance > Widgets > Inner Page Sidebar Left > Contact Us
Using Contact Us Page Template
Now lets learn how to use page templates. Go to wp-admin > Pages > Add New Page
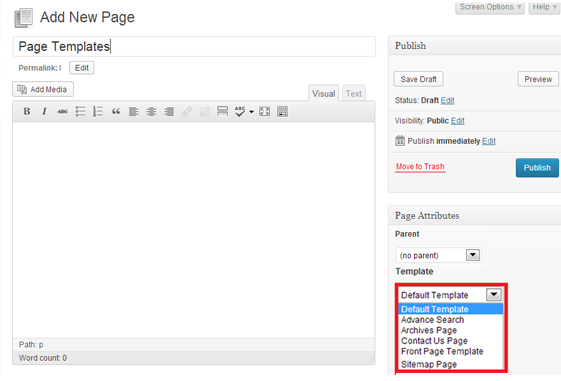
- Add Page Title
- Add Page Description
- From the right sidebar of this page, Select Page – Contact Us from Template section and publish this page.
- Go to wp-admin > Theme Menu > General settings > Contact Form Email
Contact Page
This is a preview of “Contact Us” page template which we used in previous step.

How to use instructions tags
Just follow the below instructions. E.g. to use this, write <p class=”download”> and then write down your text in between and close that by using </p> Please use HTML view for this.
<p class=”download”>Download: Lorem ipsum dolor sit amet, consectetur adipisicing elit, sed do eiusmod tempor incididunt ut labore et dolore magna aliqua.</p>
Download: Lorem ipsum dolor sit amet, consectetur adipisicing elit, sed do eiusmod tempor incididunt ut labore et dolore magna aliqua.
<p class=”alert”>Alert: Lorem ipsum dolor sit amet, consectetur adipisicing elit, sed do eiusmod tempor incididunt ut labore et dolore magna aliqua.</p>
Alert: Lorem ipsum dolor sit amet, consectetur adipisicing elit, sed do eiusmod tempor incididunt ut labore et dolore magna aliqua.
<p class=”note”>note: Lorem ipsum dolor sit amet, consectetur adipisicing elit, sed do eiusmod tempor incididunt ut labore et dolore magna aliqua.</p>
Note: Lorem ipsum dolor sit amet, consectetur adipisicing elit, sed do eiusmod tempor incididunt ut labore et dolore magna aliqua.
<p class=”info”>note: Lorem ipsum dolor sit amet, consectetur adipisicing elit, sed do eiusmod tempor incididunt ut labore et dolore magna aliqua.</p>
Info: Lorem ipsum dolor sit amet, consectetur adipisicing elit, sed do eiusmod tempor incididunt ut labore et dolore magna aliqua.
Complete documentation on Templatic Framework
We have prepared exhaustive documentation on Templatic Framework which is used to develop this theme. Click here to view documentation on Templatic Framework.
How to update Templatic Framework ?
Templatic Framework is used in the development of this theme. We will keep on updating this framework whenever the need arises. Firstly you need to know, if you are having the latest version of this framework or not. To know about this, just go to
wp-admin > Private Lawyer > Update Framework
If you have the latest version of this framework, then you will get a message like “You already have the latest version of framework”. If you are using an older version, then you will get a message something like “You need to update framework”. Just click on Update Framework to update it.
You can also refer to the complete Documentation of Templatic Framework.
Any Queries? Contact us and we’ll help you out.
Need help with installing the theme? Hire us!
Facing Problems in installing the theme? Don’t worry, we’ll do that for you, just click here!