Publisher runs on the base of 2 main plugins Tevolution and DigitalDownloads. So you must go through their guides as well to use publisher well.
Installing Publisher
- Connect to member area and expand the Publisher section under My Downloads. Download all available files. It will have four folders Supreme, Publisher (Theme), Tevolution and Digital Downloads (Plugins).
- Connect to your WordPress dashboard (wp-admin) and then navigate to Plugins -> Add New. Now click on Upload and then on Browse. Load the tevolution.zip file you downloaded earlier as said in step above and then click on Install Now
- Once the install process is done click on Activate Plugin
- Navigate again to Plugins -> Add New -> Upload and repeat the steps for tevolution-digitaldownloads.zip. Activate the plugin once the install is completed.
- On activating this plugin, A module named Digital Downloads will appear in wp-admin -> Tevolution -> Dashboard, activate it from there too.
- With the plugins installed navigate to Appearance -> Themes. Click on the Install Themes tab and then on Upload. Use the Browse option to locate the supreme zip file on your hard drive – then click on Install Now. After the installation process is finished do not activate supreme.
- Navigate again to Appearance -> Themes -> Install Themes -> Upload but this time load/install the Publisher zip file. Once it’s installed activate the theme.
In case WordPress rejects the .zip files use FTP to install the theme
For detailed instructions on using FTP please click here
- Extract tevolution.zip and tevolution-booking.zip then upload to /wp-content/plugins directory
- Extract supreme.zip and publisher.zip then upload to /wp-content/themes directory
- Once uploading is done connect to the WordPress dashboard and activate them in this order:
1. Tevolution, 2. Digital Downloads, 3. Publisher - If you run into more problems during installation please visit our Installation Guide
Quick Video on how you can install the theme on your own
Need help with installing the theme? Hire us!
Facing Problems in installing the theme? Don’t worry, we’ll do that for you, just click here!
Inserting Sample Data
Wanna make your site same as like our demo site? Or Do you want some sample data on your site to get started? If yes, you can do it very easily by a single click!
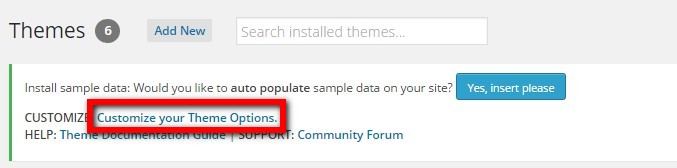
Go to WP-admin -> Appearance -> Themes. If you have activated the theme correctly, you’ll be able to see a button named “Yes, Insert Please”. Click it.
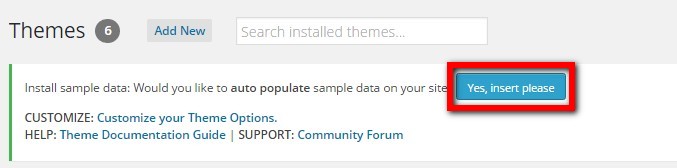
This will create some products,posts,categories, etc… It will also do some widget settings and theme settings. In short, you’ll have a site same like our demo site.
When yo want to delete it, you can click on “Yes Delete Please!”.
Deleting dummy data, will delete all the widgets settings too with the post data that it has inserted while inserting sample data.
Setting Up Home Page
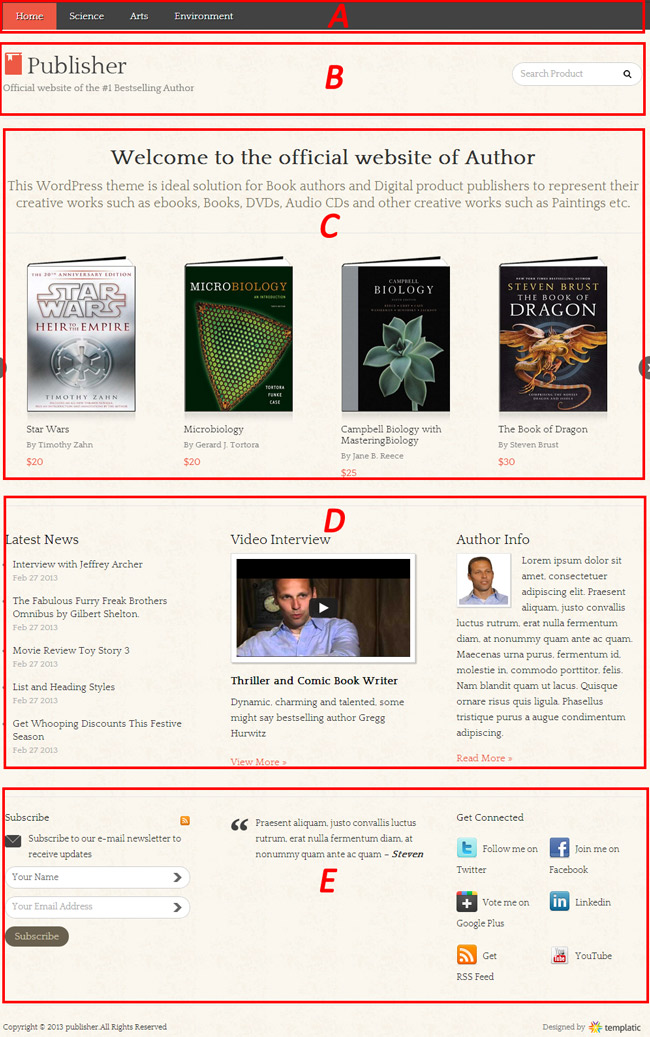
Click on below tabs to see the relavant information of above screenshot:
A – Menu
In Publisher, you can have menus at the top of the page. For that, you will need to go to WP-admin -> Appearance -> Menus. Create and save a menu. Now, select the menu in the Theme Locations -> Primary area.
Do you want to have jquery menu here? It will enhance the look of your menu if you have so many menu items.
For that, go to Wp-admin -> Appearance -> Widgets and place “jQuery Mega Menu” widget in “JQuery Mega Menu” area. That’s it! 🙂
B – Logo
Logo image can be set up from WP-admin -> Appearance -> Themes -> Appearance -> Customizer. You can have more details here.
Search: Go to WP -admin -> Appearance -> Widgets. Place “T → Product Search” in “Header Right” area
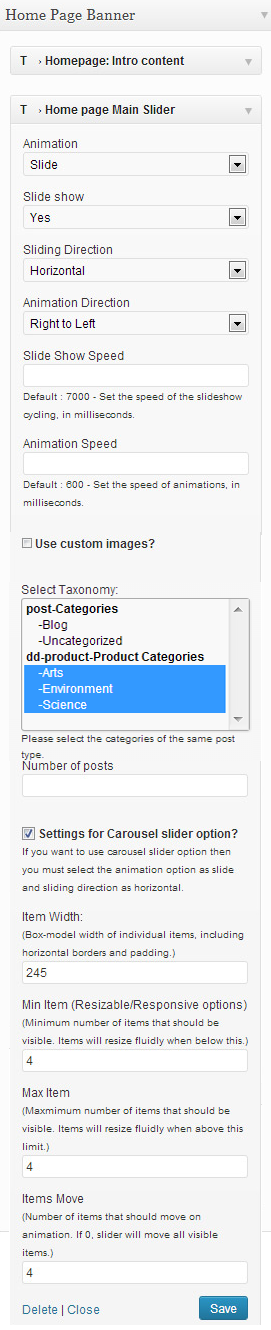
C – Slider area
Go to WP -admin -> Appearance -> Widgets and place:
- Intro Text: Place “T > Homepage Intro Content” widget in “Home Page Banner” area.
- Slider: Place “T > Homepage Main Slider” widget in “Home Page Banner” area. You can have more details for slider here.
D – Below Slider area
Go to WP-admin -> Appearance -> Widgets and place below widgets in “Content Widget Area”:
- T > Simple Latest Post: This widget is used to display a list of simple WordPress posts. You can specify how much posts you want to display
- T> Video Interview: You can display one vide here with some information about the video. You’ll need to use iframe code to display the video.
- T > Author Info Box: This widget displays the text with a small image. For example, you can give here some information about your self (Hoping you are the writer of the books the site selling).
E – Footer area
Go to WP-admin -> Appearance -> Widgets and place below widgets in “Footer Widget Area”:
- T > Newsletter Subscribe: Put your Feedburner ID here. So that your users can subscribe to your site.
- T > Testimonial: This widget is used to show up some of the good experience of your users/customers. It just slides the quotes one after the other.
- T > Social Media: This widget links your social site’s accounts to this site. By clicking on icons in front end, users can view your profile on relative social site.
Pages and Page Shortcodes:
With the theme, you can have below page templates:
Default: This is a default page template with a sidebar.
Archives: This page lists all the posts of your site date wise.
Contact us: This is used to create a contact us page. Explained here.
There are also some shortcodes provided in to Tevolution, to create different pages like login, advanced search page, map page, etc… You can have more info in FAQ section of Tevolution guide.
Styling Shortcodes
The easiest way to add buttons or columns into a post is to use shortcodes. Click here to download the Shortcodes plugin and then follow the same instructions you used to install the theme, but instead of placing the folder inside /wp-content/themes, place it inside /wp-content/plugins. For detailed FTP instructions open this article:
https://templatic.com/docs/how-to-upload-and-edit-files-on-your-server-ftp-tutorial/
To see what are the actual shortcodes available to you click on the link below:
https://templatic.com/demos/catalog/shortcodes-guide/
Contact Us Page
Let’s see how we can set up the contact us page using Publisher:
- Go to WP-admin -> Pages -> Add New.
- In Page Attributes, select “Template – Contact Us”.
- Click on “Publish” button.
- To have Google map on this page you can place “T → Google Map Widget” widget in “Contact Page Widget Area” area under WP-admin -> Appearance -> Widgets.
- To stop spams from this page, captcha can also be added to the it.
- Go to WP-admin -> Tevolution -> General Settings -> Capthca tab.
- Register your website for reCAPTCHA here and add the keys you will get from there in the fields: Site Key & Secret Key. Mark “Registration page, Contact Form and Comment form” and click on “Save All Settings” button to make available the captcha in the Contact us page.
Style, Color & Layout Settings
Go to WP-admin -> Appearance -> Themes. Click on customize.
Now on front page you’ll be able to see the customizer on the left hand side. Here you can change some CSS for the site without editing the code. Below are the different options given in the customizer.
Change Logo/Title:
- Expand “Site Logo” by clicking on it. Here upload your logo image and click on “Save & Publish”.
- Instead of Logo image, if you want title there then it can be settled from Site Title & Tagline section. You can give description about your site in a line which will display under the logo in front end. Check mark site description field if you want to hide it.
Templatic theme Setting:
- Use Custom CSS: Enable this option if you are using custom.css file. Here is more details for custom.css file.
- Hide autoinstall: Enable this if you want to hide insert sample data option from WP-admin -> Appearance -> Themes.
- Enable comments on pages and posts: Enable this if you want to display comments on the pages and posts single pages.
- Show author biography on posts: Enable this if you want to display author detail and avatar on single post detail pages.
- Show author biography on pages: Enable this if you want to display author detail and avatar on single pages.
- Show Breadcrumb: Enable if you want to show breadcrumbs.
Excerpts Settings:
- Display excerpts on Search Result Pages: Enable this if you want to display excerpt on the search result pages.
- Display excerpts on archive pages: Enable this if you want to display excerpt on the category pages.
- Excerpt length: Specifies the length of the excerpt to be shown.
- Text for Continue reading: Text for the link to the detail page of the post.
Layouts:
Your site page’s layout can be changed from Layouts Settings:
- Default Layout: This is default layout as like our demo site.
- One Column: This is a full width layout without any sidebar.
- Two Columns, Left: This is a layout with sidebar on left hand side.
- Two Columns, Right: This is a layout with sidebar on right hand side.
404 Page Settings:
Post type slug(s): Here you can provide the slugs of the post types which you want to display on the 404 page. Categories of that post type will be displayed there. For example, to show posts, you can give “post” there.
Footer Copy Right Text:
This is easier now. Instead of editing footer.php, this can be done from Footer Section given in customizer. You can add your own code as well.
Other Plugin’s Support:
We have also provided compatibility with some other plugins:
WooCommerce:
- You can click here to download wooCommerce.
- See the “Getting Started” Tutorial for installation and setting up WooCommerce plugin.
- WooCommerce’s Documentation/guide is available here.
bbPress:
Let’s see how this plugin works.
- First, download, install and activate bbPress just like you activate any other plugin. You can get it from here.
- When we activate the plugin, three taxonomies are added – Forums, Topics, and Replies. Replied depends on its Topic. Topic depends on its forum.
- For Example, In Templatic Forums, there are different forums: Catalog theme forums, GeoPlaces Theme Forums, etc… This Catalog theme forum is a “Forum” in bbPress.
- Now, under Catalog theme forums there will be many forums. These are treated as “Topics”.
- And a Topic can have many replies. Each of them is known as “Replies” in bbPress.
- Forums can only be added from backend. Topics & Replies can be added from Front-end & back-end.
- If you are adding a Topic from back-end, then you must select Forum for that topic from WP-admin -> Forums -> New Forum -> Forum Attributes -> Type field.
- If you are adding a Reply from back-end, then you must select its respective forum and topic from WP-admin -> Replies -> New Reply -> Reply Attributes section.
- bbPress’s other settings are placed in WP-admin -> Settings -> Forums.
WPML Plugin
This plugin is useful when you are willing to translate your theme in multiple language. Get the Plugin itself and detailed explanation on it
FAQ
What are the ideal sizes of logo image and product image used in the theme?
Ideal image size for logo is 293 x 63px.
Ideal image size for product is 275 x 370px.
What is Catalog mode?
Catalog mode enables you to have you just showcase your products. That is your users will be able to see the information about the products. They won’t be able to purchase the products.
How to have slider same as like our demo site?
Place “T > Homepage Intro Content” widget in “Home Page Banner” area.
Do the same settings shown like in below screenshot.
How to change the thumbnail size of images on listing page?
To have more detailed info about the slider and it’s options click here.
Can I show the pop up for my image gallery in normal WordPress pages?
Yes you can, but the condition is, if you have activated Templatic-Shortcodes plugin. Otherwise, it will open the image gallery as pop up for the products but not for the normal WordPress pages.
How can I replace the Amazon, Nook and Kobo logos under the “Buy This Book” button on the product pages?
It is an image. You can change the image by replacing that image with yours.
Open the “\wp-content\themes\Publisher\images\” folder on your server using the FTP tool, you will get image named “e-books.png“. Replace that image with your image and keep same image name.
If you have followed the whole theme guide and still you are not able set up some things then try to insert the sample data. If still having any queries then you can create a ticket in helpdesk.
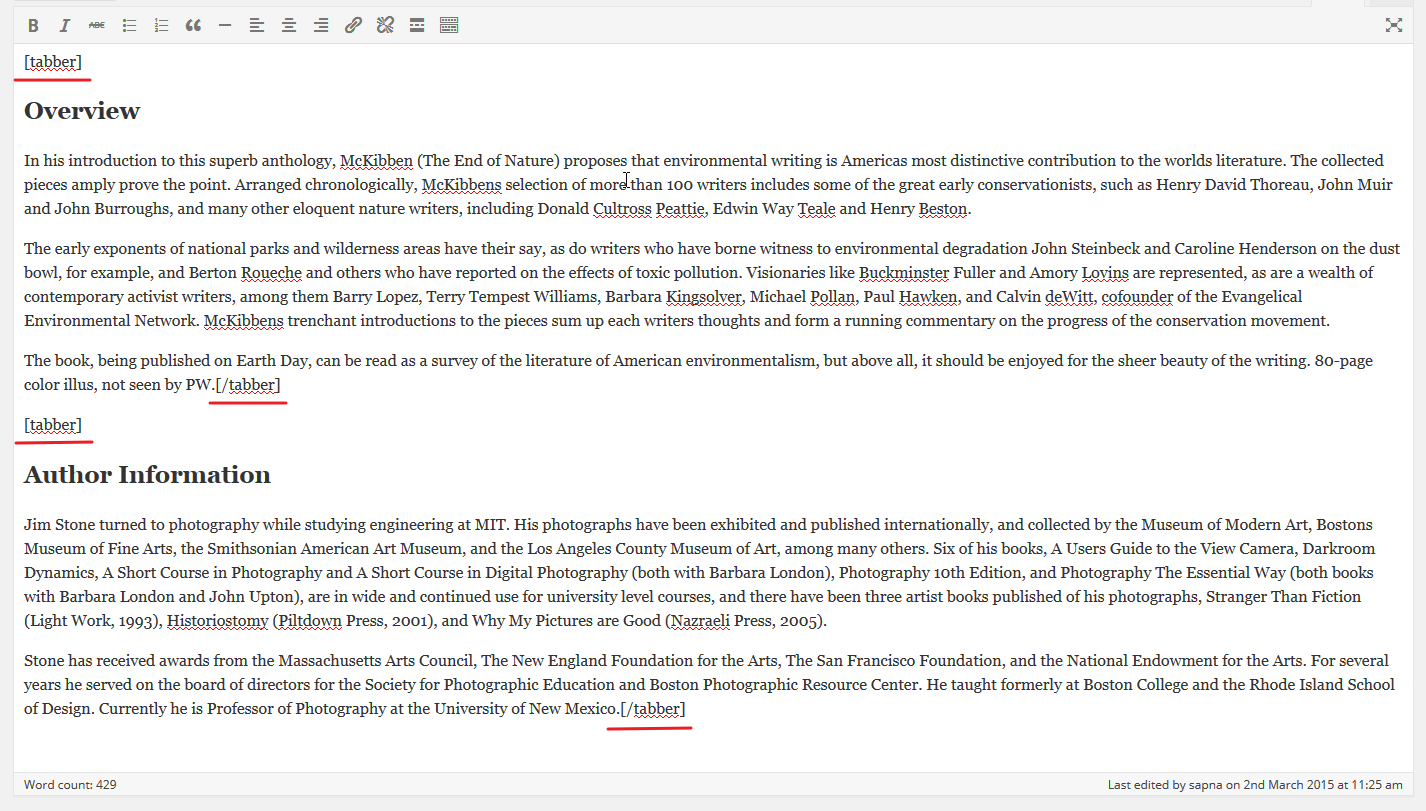
How to display the Author Information Tab on Product detail page?
You can use tabber shortcode to display the Overview and Author Information as separate tabs on the product detail page. Add shortcode into the description area of the product (WP-admin >> Products >> Add/Edit) as mentioned in the below attached screenshot:
Hope you enjoyed the guide and theme and best of luck for your site!
Need help with installing the theme? Hire us!
Facing Problems in installing the theme? Don’t worry, we’ll do that for you, just click here!