Here few pre-conditions are mentioned without which you will not be able to use the Tevolution-Stripe plugin. Then after, chronological steps are given with which you can install and activate this plugin. Along with that, we would like to suggest you to check for its operational countries too because if it does not operate in your country then you won’t be able to use it.
Pre Conditions
To use this gateway, you should
- Have SSL certificate, know more about it
- Visit https://stripe.com/
- Sign up with them and make your merchant account
- For more details, refer their FAQ and documentation
Install and Activate
- Download the plugin (Tevolution-Stripe) from your members area to your desktop.
- Now, Go to WP-admin → Plugin → Add New → Upload.
- Browse the plugin zip file and click on “Install Now” button.
- You can also upload it in to your “wp-content/plugins” folder to your server directly using FTP.
- Once, uploaded go to WP-admin → Plugins and activate the plugin.
Back-end Configuration
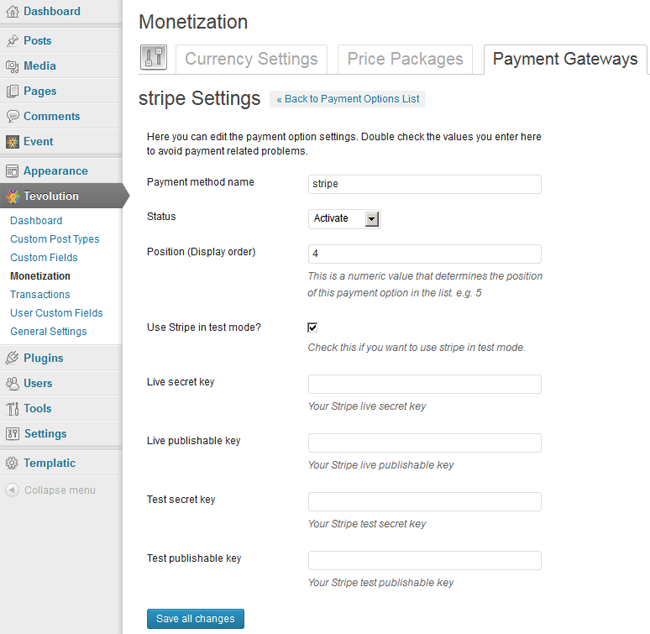
- After activation go to Tevolution → Monetization → payment gateways. Activate the stripe in “Payment Method” named column from “Actions” option list and click on settings link given below the payment method name.
- Hover on gateway name in “Payment Method” named column, you will see “settings” option, click it and start editing there.
- Payment method name: This name is displayed on the checkout page. So it will give detail to your user about the gateway using which he’ll make payment.
- Status: This status should be “Activate” if you want to enable the payment method on your checkout page.
- Position (Display order): This contains a numeric value and it is used for ordering payment methods on front end.
- Use Stripe in test mode? : If you check mark this, it will run into test mode and if user pays in between, you won’t be able to receive the payment. This mode is beneficial when you want to test its working on admin side. (Tip: Once finished the testing, uncheck it to avoid any problem in payment receipt)
- Live secret key: This key is required when you are in live mode and you can get this API key from your stripe account.
- Live publishable key: The another key required will be this one, so apply this one too from your stripe account.
- Test secret key: If you want to test the working and are in test mode(check mark the test mode option) get the API keys for it from your stripe account.
- Test publishable key: For test mode, apply this key too from your stripe account
How to setup recurring payments?
To setup recurring payments all you have to do is create a cron job on your server and make it call/load the following file once every day:
/wp-content/plugins/Tevolution-stripe/includes/stripe_recurring_cron_job.php
If you’re unsure how to create a cron job, open these links for more details
http://www.thesitewizard.com/general/set-cron-job.shtml
https://kayako.atlassian.net/wiki/display/DOCS/Setting+up+a+server+cron+or+scheduled+task