1) Install and activate
- Connect to member area and expand the Tevolution Admanager plugin section under My Downloads. Download Tevolution and Tevolution Admanager plugins to your hard drive.
- Connect to your WordPress dashboard (wp-admin) -> Plugins -> Add New. Click on the Upload, browse the plugin located at your hard drive and then click on Install Now button.(Repeat this process for both the plugins)
- If you are using “Multi Site” means a network for your WordPress site, then go to Network Admin -> Dashboard -> Plugins -> Add New -> Upload and browse Tevolution plugin.zip then click “Install Now” button. Repeat the same process for Tevolution Admin Dashboard.zip file.
- Now head over to wp-admin -> Plugins and activate Tevolution first and then Tevolution Dashboard Booster plugin.
On activating Tevolution plugin, it will ask you a Licence key,
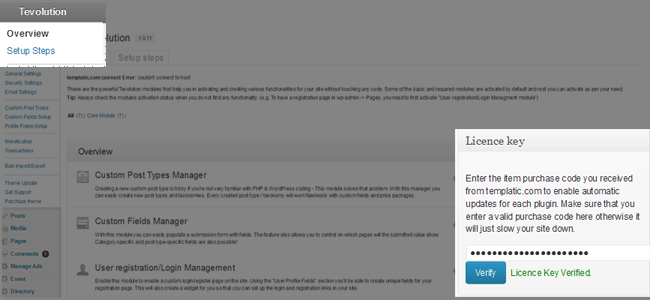
- Connect to your member area and get your licence key (simply copy it) for using the theme. You can locate it under “Your Subscriptions” area in your account.
- Then, go to wp-admin -> Tevolution -> Overview
- At the middle right of your screen, you will see a section called “License Key”, just paste your copied licence key here
- Click “Verify” button. On successful verification it will show you a green colored message “Licence Key Verified.”. If your key does not match, please contact our support team.
2) Purpose
When you build up your own website and showcase something on it for sale, what would be the first few things that you would like to check out when you login to your site? The most general requirement and answer would be how many people have visited your site, how many transactions have been done on your site in a specific duration time period and the important one, what you have earned in total and in a week (the current one). So, keeping all these requirement into mind this plugin has been developed to achieve the same. Let’s see how you can set these things on your WordPress dashboard following the below said steps and points.
What and where will it affect?
This plugin has been developed for admin only so will be in effect at your admin back-end. It uses WordPress default dashboard as its base and adds the below said widgets there which you can use it as per your need then.
3) Settings
As soon as you activate this plugin, you will automatically be redirected into the dashboard section. Now, the setting process begins,
A) Turn on the dashboard widgets from Screen Options
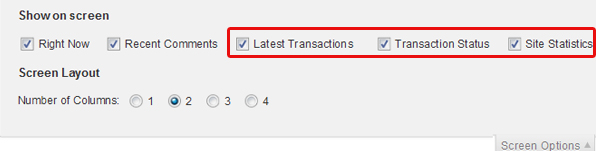
- 3 widgets belong to this plugin that will appear in the Screen Options given on the top right corner of your dashboard screen (mentioned in detail below).
- Just check mark those which you want to appear on your dashboard.
- If you do not want to show any of the already activated widget then uncheck it from the Screen Options in the same manner like you activated.
B) All the widgets
As said above, there are 3 dashboard widgets which will get activated with the activation of this plugin. There will also be another widget named as Ownership Claims which will appear in screen options for selection, if you have activated Tevolution module “Claim Post Manager“ on your site. What are these widgets and what do they do? Let’s find out,
Some of the widgets are generated using Tevolution Dashboard Booster plugin whereas some are from Google Analytics Dashboard for WP plugin Download it from here, so we will have a look accordingly,
Tevolution Dashboard Booster Plugin
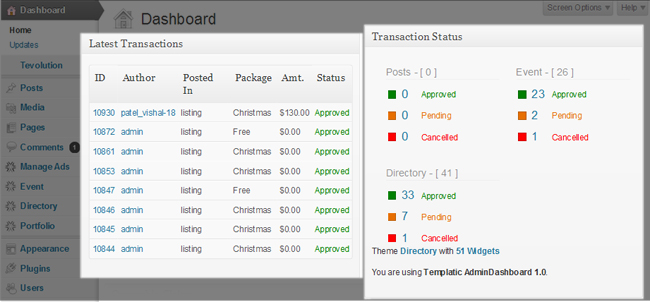
- Latest Transactions – It is a customizable widget that shows you the latest transactions but with graphical representation! However, you can choose its representation style as per your need.
- To customize it, click “Configure” link given on the top right corner of this widget.
- Set Post Type (e.g. Events, Listings etc),
- Number of transactions (this will work when you select “Table” view for transaction representation)
- Report View – You can select “Pie Chart”, “Column Chart” or “Simple Table” for representing your transaction data.
- Transaction Status – It will show you the “Approved”, “Pending” and “Cancel” status of transactions done for all the posts and custom post types on your site. These status are linked to the wp-admin -> Tevolution -> Transaction, so clicking it, you will be redirected to the detailed Tevolution transaction section.
- Site Statistics – Will show you unique visitors (for current day) and will show 3 different columns about the subscribers on your site 1) New subscriber 2) Subscribers Today and 3) Subscribers yesterday.
- To customize, click “configure” link given at the top right side of this section.
- It will open up a form that will show you few fields that comes from this Google Analytics plugin that let you set few things such as “Time Period” i.e. for what duration you want site statistics report weekly/monthly/yearly. Your Google Analytics email Id, password and profile ID.
Tevolution widget that can enhances plugin’s purpose
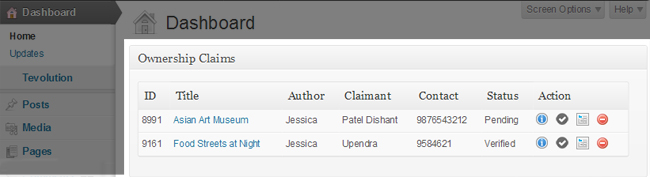
- Ownership Claims – As Tevolution provides you a module that helps in showing a claim option open for the users on your site, you can have the information about that too on your dashboard (technically it is handled in Tevolution plugin but you can use it here). This widget will show you how many of your posts have been claimed by someone else and whether you have verified it or still in pending status means yet to be dealt with. Read more about this Tevolution module – Claim Post Manager
Google Analytics Dashboard for WP Plugin
You can also use this third party plugin “Google Analytics dashboard for WP plugin” to show you total number of users visited your site and many more other features are available.
- Google Analytics Dashboard – Shows you total 3 things in it, 1) Polygon graph showing you the total visits of your site from the current day till the whole month in various respective columns. It will also show some more information in simple text below this graph about “Bounce Rate” of your site as well as “page views” and “pages per visits”.
4) How is it helpful?
We can take an example to understand its usability better,
Example:
Suppose john wants to start a company that accepts event organizing orders through out the Europe and so builds up a website where he can list the events organized in Europe and not only that but also let the people list their own events on his site (for which they will be charged as well). Now, to manage all these activities simultaneously, what would he require? Some of the things said below,
- Daily/ Weekly/ Monthly Transaction Report
- Recurring Orders etc
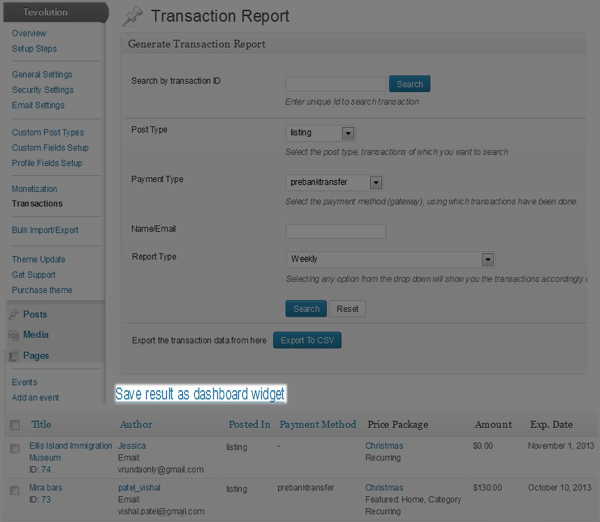
Simply go to wp-admin -> Tevolution -> Transactions (show in below screenshot), when you search for any report, it displays you an option “save as dashboard widget” below the search button to let you save your searched report on your dashboard. Click it and then give your desired title to it on your dashboard. So, this way various reports can be searched and saved on your dashboard which will help you take decisions for your site betterment.
The term “event” used above is just an example to explain the usage of this plugin in better way. However using it does not require events compulsorily. But to have events you can either use Tevolution “Custom Post Types” or can buy “Tevolution – Events” plugin for advance options and features.
5) Cautions and Tips
- All the widgets mentioned above works on the base of Tevolution -> Transactions. So directly or indirectly are related to this area only.
- These widgets will show you the information only when you have some transactions and related stuff on your site.
- If you do not see any of the here said widget on your dashboard, verify that whether you have check marked (turned on) that widget in Screen options
or not. - You can always search transaction reports as per your requirement from Tevolution -> Transactions and save them on your dashboard giving your own title to it. You can do this multiple number of times .