Tevolution is an advanced WordPress plugin designed to power latest Templatic themes. There is a lot of ground to cover, so let’s get started…
Installation and initial setup
General Settings
- Basic Settings
- Claim Settings
- Captcha Settings
- Email Settings
- Templatic Widgets
- Transaction Settings
- Security Settings
Custom Post Types
Bulk Import/Export
Custom Fields
Monetization
Transactions
User Custom Fields
Frequently Asked Questions
Developer Section / Customizing Tevolution
Installation and initial setup
Installing Tevolution
Tevolution is installed in pretty much the same way as other plugins. Follow these steps:
- Connect to member area and under “Plugin Downloads” section download the Tevolution Plugin to your hard drive.
- Navigate to wp-admin -> Plugins -> Add New -> Upload and upload the downloaded zip file.
- Activate the plugin once the upload process is finished.
If you run into problems with the above method (the file cannot be uploaded), extract the zip file, connect to your server via FTP and upload the Tevolution folder to /wp-content/plugins directory
Module overview
Modules in Tevolution are basically different features you can enable or disable at any time. To learn more about what each module does head over to wp-admin -> Tevolution -> Tevolution and read the contents of each module box.
We’ll be explaining the functionality behind each of these modules later in the guide, for now feel free to go through the tour for each module. You’ll fine a “Start Tour” button in some of the module boxes.
To avoid issues with the site we recommend you do not deactivate Custom Fields Manager and Custom Post Types Manager modules.
General Settings
Basic Settings
Show custom fields categorywise
This option relates to the submission form. It lets you decide whether fields should be displayed based on the selected category (selected on the first step of submission) or not. For this option to work you need to have categories selected for each of your custom fields. If you want all of your fields to show inside the submission form at all times, set the value to No.
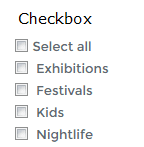
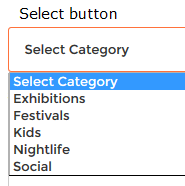
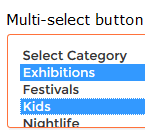
Category display setting
Tevolution allows you to choose between 3 different category-selection types: checkbox, select box and multi-select box. Checkbox and multi-select box allow you to select multiple categories while the regular select box limits you to selecting just one category.
Default submission status
In Basic Settings you will find three options Set default status for free submissions, Set default status for paid submissions and Default status for expired listings. The first two let you control what happens with content submitted using the submission form. If you want to moderate content (to make sure no spam is submitted) set the option to “Draft”. To do the opposite (publish everything) select the “Published” option.
The last option is for expired listings (billing days have passed); you can choose whether to “Draft” these listings (so they can be renewed) or totally delete them (“Trash” option).
Terms and conditions
Enabling this option will display a checkbox inside the submission form. Visitors will not be able to submit their content without clicking on the checkbox. This is a good way to force visitors to read your license agreement.
Registration Options
If you do not see these options go to Tevolution dashboard and enable the User Registration module
If you want your visitors to be logged in right after registering click yes on the Allow user to autologin after registration option. When “No” is selected, each new member will have to login manually (using the password that was sent via email).
In this section you can also set the Login, Profile and Register pages. Activating the User Registration module should have generated these pages manually. If it hadn’t, go to wp-admin -> Pages -> Add New and create new login/profile/register pages using these shortcodes
Login page -> [tevolution_register]
Profile page -> [tevolution_profile]
Register page -> [tevolution_login]
Claim Settings
In this section you can set for which post types should Claim Ownership functionality be enabled.
What is Claim Ownership?
It’s a feature that will allow your site visitors to claim a post or other types of content as their own. Most directory admins will populate sites with some content themselves to make it more appealing to visitors. Once an actual owner of that business visits your website, he can claim the post and associate it with his/hers own account.
How to enable the feature?
In order to make the Claim Ownership button appear on the detail page you must do the following:
- Enable the Claim Post Manage module from Tevolution -> Tevolution
- In Tevolution -> General Settings -> Claim Settings make sure the functionality is active for your post type
- Go to wp-admin -> Appearance -> Widgets and place the Claim Ownership widget inside the appropriate widget area i.e., your detail page sidebar.
Example: If using events (Nightlife theme) you would place the widget inside Event Detail – Sidebar area
If everything was done correctly you should see something like this inside your detail pages

What happens when someone claims a listing?
Once someone claims one of the submitted listings an entry will appear inside the WordPress dashboard index (first page you see after logging in to wp-admin). It will look something like this:
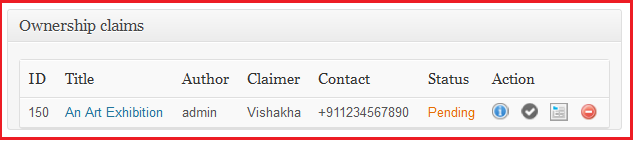
From there you can choose to view the claim details, accept or delete the claim. Accepting the claim means that you now have to add that listing to the new owner. Perform the following steps:
- Go to wp-admin -> Users
- If the new owner already has an account edit his account and set the user role to “Contributor”. If he doesn’t have an account, create a new one and set Contributor as the role
- Edit the actual listing and change the Author. The Author box is usually located at the bottom of the edit window. If you don’t see it click on “Screen Options” in top right corner to enable the box. Authors can also be changed from the Quick Edit screen.
- The new owner will now see this listing inside the front-end dashboard, he will also be able to manage it.
- Optional step: Change the user role back to Subscriber by going to wp-admin -> Users and managing that user.
Captcha Settings
To secure your site from spammers you will have to enable some sort of verification inside your registration or submission pages. Those tweaks are made in the Captcha Settings panel. Here you can choose between tho systems:
- WP-reCAPTCHA
- PlayThru
WP-reCAPTCHA
This is probably the most popular verification plugin for WordPress. It presents visitors with scrambled text which they need to decode and input with their keyboard. It’s very secure but can be somewhat long to solve.
The easiest way to install the plugin is to head over to wp-admin -> Plugins -> Add New and enter WP-reCAPTCHA inside the search bar. From there you can install the plugin very easily. Once installed, head over to Settings -> WP-reCAPTCHA and enter the public and private keys. You can get the keys for free by clicking here. With the keys entered and WP-reCAPTCHA selected inside the Captcha settings panel, everything should be working fine. In case you notice issues with captcha head over to WP-reCAPTCHA settings again and disable the “Enable for comments form” and “Enable for registration form” options.
PlayThru
Unlike captchas that require you to input values using the keyboard, PlayThru depends on mouse input. The system presents visitors with a simple game. Once a game is completed the form can be submitted. This games can mostly be solved much faster than captchas. To get started with PlayThru first create an account on the AreYouAHuman website. Once that is done head over to wp-admin -> Plugins -> Add New and enter Are you a human inside the search bar. From there you can install the plugin very easily.
With the plugin installed head over to Settings -> Are you a human and enter the Publisher and Scoring keys. You will get these keys from your account on the areyouahuman.com website.
Email Settings
Inside the email settings area you can edit the default email templates which are sent out by the plugin.
Under Email you can choose between PHP mail and WP SMTP mail. Basically, you can choose which function to use for sending emails; the PHP mail() function or WordPress’ wp_mail() function. Unless you’re experiencing issues using the default ( mail() ) function we recommend you keep the setting as is.
Before editing email contents be sure to scroll down to the legend in order to see which variables/shortcodes are available to you.
Templatic Widgets
Use this section to enable/disable certain Tevolution widgets.
Transaction Settings
Change colors for certain post types so you can easily distinguish them in Tevolution -> Transactions section.
![]()
Security Settings
In case you want to block a certain IP from visiting your website just enter it inside the Block IP address section. Inside the Security Settings section you can also turn on SSL for submission and registration pages. Set the setting to “On” only if you already have an SSL certificate for your domain. If you activate it without SSL it will cause problems during content submission.
Custom Post Types
Introduction
Post types in WordPress are essentially a new way you can use to organize the content. Instead of relying on just posts and pages, you can create new types such as “Places”, “Events”, “Reviews”, “Testimonials” and other. Each of these post types will then come with matching taxonomies (categories and tags), so you will have Place categories, Event categories and so on. To learn more about post types be sure to read this codex article: http://codex.wordpress.org/Post_Types
In Tevolution, these post types integrate heavily with custom fields and price packages. In other words, you can create fields and price packages for each post type. Once all that is created, Tevolution allows you to generate a new submission form for the post type. If you create a post type called “Places”, both you and your site visitors can add content for it. You will add content using the back-end while visitors will use the submission form.
To review and edit post types available inside Tevolution navigate to Tevolution -> Custom Post Types.
Adding a new post type
From Tevolution -> Custom Post Types -> Add Custom Post type you can create new post types for your site. Each required field is explained in the plugin itself so read the descriptions carefully. Make sure you don’t have any spaces inside the post type and taxonomy slugs.
If you’re unsure what a slug is, open the WordPress glossary.
Bulk Import/Export
Introduction
Bulk importing is an important feature for all those looking to add massive amounts of content at once. The feature allows you to upload a .csv text file containing information that would otherwise have to be entered manually.
Importing / Updating
Inside the Tevolution -> Bulk Import/Export section you can choose the post type for which you’re importing content. Once you select that just upload the .csv file. A sample csv is provided there as well
Tips for filling out the .csv file
- Uploads work best when using text processors such as Notepad++. You can download the program here
- If the text you’re including has commas ( , ) wrap it inside double quotes
"Text, more text". Do the same when you want to assign a listing to multiple categories. Example:"Food,Parks,Something" - In case you want to bulk upload values for your custom fields just add them at the end of the top row (the column row) and assign a value like it was a normal column
- If using Notepad++ is too clumsy for you, try reading the following Excel tips
To update a listing using bulk upload make sure the post title (you’re uploading) is the same as one of the posts you already have on the site. In cases such as that the post will be updated with the new information (instead of creating a new one)
Once the import process finishes you will see something like this at the top. The strip is there to notify you about the outcome of the upload

Exporting
To export contents of a specific post type just choose the post type and click on “Export to CSV button”
Custom Fields
Introduction
Along with custom post types and price packages, custom fields are one of the pillars of Tevolution. Custom fields are used to associate custom information with a listing. This listing can be a regular WordPress post, page or a custom post type that you created. These fields are the most important part of a submission form, without them visitors couldn’t submit anything on your site. In short, when you open a page such as this one, most of the input fields you see are created in this “Custom Fields” section.
In Tevolution -> Custom Fields you can review and edit existing fields.
Adding a custom field
Add a custom field form allows you to tweak many settings related to the field you’re creating. Possibly the most important is the setting at the top; choosing the post type. Depending on what you choose here the created field will or won’t display for the selected post type. Since most of the fields are rather self-explanatory, we’ll just focus on explaining those that aren’t.
Heading Type
A submission form can have multiple sections – headings. For instance, in this submission form there are two headings: “Event Information” and “Organizer Information”. The Heading Type option allows you to choose under which section your field will appear. To create a new heading type just create a custom field with the “Heading” field type.
Select the Field Type
The way your field will work highly depends on what you select here. Selecting the “Text” type will display a simple text field to users while selecting “File uploader” will allow people to attach a file with their submission. Certain field types will add an additional option under the “Select the field type” option. For instance, selecting “Radio”, “Select” or “Multi Checkbox” will display a new field for adding values.
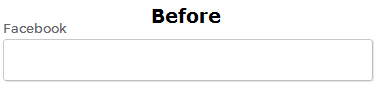
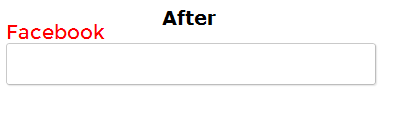
CSS Class
In this option you can enter a CSS class that will apply to the label of the custom field that you’re creating. This allows you to make the field stand out from the rest. The place where you can define/write the class is custom.css. For instance, to change the color of the label and to increase the font size we would add something like this
.mycustomclass {

color: red;

font-size: 20px;

}
Once the class is created enter the class name ( mycustomclass ) inside the CSS class field.
In the above example, the end result would look like this
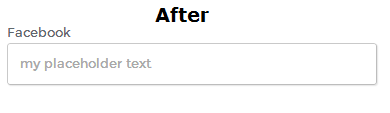
Extra Parameter
Unlike the CSS class option that controls the label, this option controls the input field itself. We control the field by defining attributes for the HTML input tag.
For instance, to define a placeholder for the field we would input something like this
placeholder="my placeholder text"
In that case the end result would be…
Monetization
Introduction
The primary goal of Tevolution is to help you make money. Those money-related settings are done right here inside the Monetization section. If you can’t see this section make sure you’ve turned it on inside the Tevolution dashboard.
Currency Settings
Use this section to change the currency displayed by the plugin. Be careful when entering the currency code. The code must match the ISO standard. Open this link to see codes for various countries.
Price Packages
Simply put, price packages are the most direct way to make money in Tevolution. Located inside the submission form, price packages force the visitors to pay in order to post content. Don’t worry though, price packages can be free as well.
Existing price packages can be reviewed / modified from Tevolution -> Monetization -> Price Packages
Add New Package
The first option inside “Add New Package” form is also the most important one – the package type. You have two options at your disposal
- Pay per post – visitors are required to pay for each submission
- Pay per subscription – visitors can select a subscription package. For instance, they pay once and are allowed to submit 10 listings
Some of the settings you should keep an eye on are Select Categories and Show Package. If you can’t see the created price package inside the submission form it’s most likely because it is showing just for specific categories. To make it show at all times check the Show Package even when no category is selected button.
To add featured prices click on the Active checkbox. This section allows you to earn extra money money by setting additional prices for featuring the listing on category page and homepage. Featuring content gives a significant advantage since such listings appear at the top of homepage and category page lists.
Payment Gateways
In this section you tweak the methods of payment available to your visitors. By default only two are available. To download more visit the member area.
Click on the Settings button under each payment method to edit its settings. To setup PayPal you just need to mention your PayPal email.
Managing Coupons
Coupons are closely related to price packages. By creating a coupon you can offer discounts for your price packages. Coupons are created in Tevolution -> Monetization -> Manage Coupons -> Add a new coupon.
Coupons can be based on percentage or an actual amount (50% or $5 – your call).
Transactions
Use this section to review the transactions made on your site. An entry will appear in that section when someone chooses a paid price package and then proceeds with the payment. Pending status will be assigned to those transactions (people) that started the payment process but didn’t complete it. Transactions that were successful will appear as Confirmed.
Use the fields at the top to search and filter through transactions. You can search by IDs, names, emails and more. To see details of a particular transaction click on the name
![]()
User Custom Fields
Introduction
User custom fields are used to provide unique fields for the registration page. They allow you to obtain more information about your visitors, i.e. people registering on your site.
To review or edit existing custom fields head over to Tevolution -> User Custom Fields. To add a new field click on the Add a new field button at the top. Fields inside the form are pretty self-explanatory. Be extra careful while entering the HTML variable, that value must be unique and can’t contain any spaces or special characters.
Frequently Asked Questions
How to generate submission forms or map pages?
In earlier versions of Tevolutions such custom pages were created using page templates. In the latest version this content is created using shortcodes. Click here to learn more about registration shortcodes, others are listed below.
Shortcodes below can be placed inside any listing. This includes pages, posts, your custom post types and even widgets (the Text widget)
Submission form shortcode
[submit_form post_type='event']
Available attributes
- post_type – the post type for which you’re generating the submission form
Advanced Search shortcode
[advance_search_page post_type='event']
Available attributes
- post_type – the post type for which you’re generating the advanced search template
Map shortcode
[map_page post_type='event' image='thumbnail' latitude='21.167086220869788' longitude='72.82231945000001' map_type='ROADMAP' map_display='0' zoom_level='13' height='450']
Available attributes
- post_type – the post type for which you’re generating the map
- image – the thumbnail size for the image inside the tooltip. By default WordPress comes with three thumbnail sizes; thumbnail, medium and large. You can change their sizes in wp-admin -> Settings -> Media
- latitude – north-south geographic coordinate of the location. You can get this information using numerous services available online, click here to open one of them. The site will generate geo coordinates base don the provided address.
- longitude – east-west geographic coordinate of the location. You can get this information using numerous services available online, click here to open one of them. The site will generate geo coordinates base don the provided address.
- map_type – the style/type of the map. Possible values: ROADMAP, SATELLITE, HYBRID
- zoom_level – attribute that controls the scaling factor (zoom) of the map. Setting it to 1 will show the whole planet. Setting it to 15 will zoom in a map to show a specific house. To show a city area set it to 13
- height – controls the height of the actual map window. The value is in pixels
Developer Section / Customizing Tevolution
Using this tutorial we’ll try to demonstrate the best ways to customize your Tevolution-powered theme. I should mention that we won’t cover the basics such as accessing files on the server and similar, we assume you’ve got that part covered. If this is your first attempt at customizing please read most of the entries inside the “We Recommend” category to get started.
Since editing Tevolution files directly isn’t recommended (customizations are lost when updating), the following two ways are the roads you should take when tweaks to the plugin are necessary:
- Overwriting Tevolution files
- Using hooks
Overwriting Tevolution files
Overwriting means that you will take a file from the Tevolution folder (/wp-content/plugins/Tevolution) and place it inside your theme folder. It’s worth noting that not all files can be overwritten like this. The files that allow you to do this are located inside /Tevolution/templates folder. These template files are mostly used for editing category and individual post pages.
Cool thing about this overwrite functionality is that it allows you to overwrite different post types with a single file. For example, to edit the event detail page (in Nightlife theme) we’d have to do the following:
- Navigate to /Tevolution/templates
- Copy the single-tevolution.php and paste it inside your theme folder (in our case that’s /wp-content/themes/nightlife)
- Once copied, rename the file (inside the theme folder) to single-event.php. If you’re doing this for some other post type change the highlighted (event) part with your own custom post type.
With that change you’ve created a file which will allow you to make modifications to the event detail page without affecting the original file. For instance, you can change the structure of the detail page simply by moving the do_action hooks around (more on hooks later in this thread).
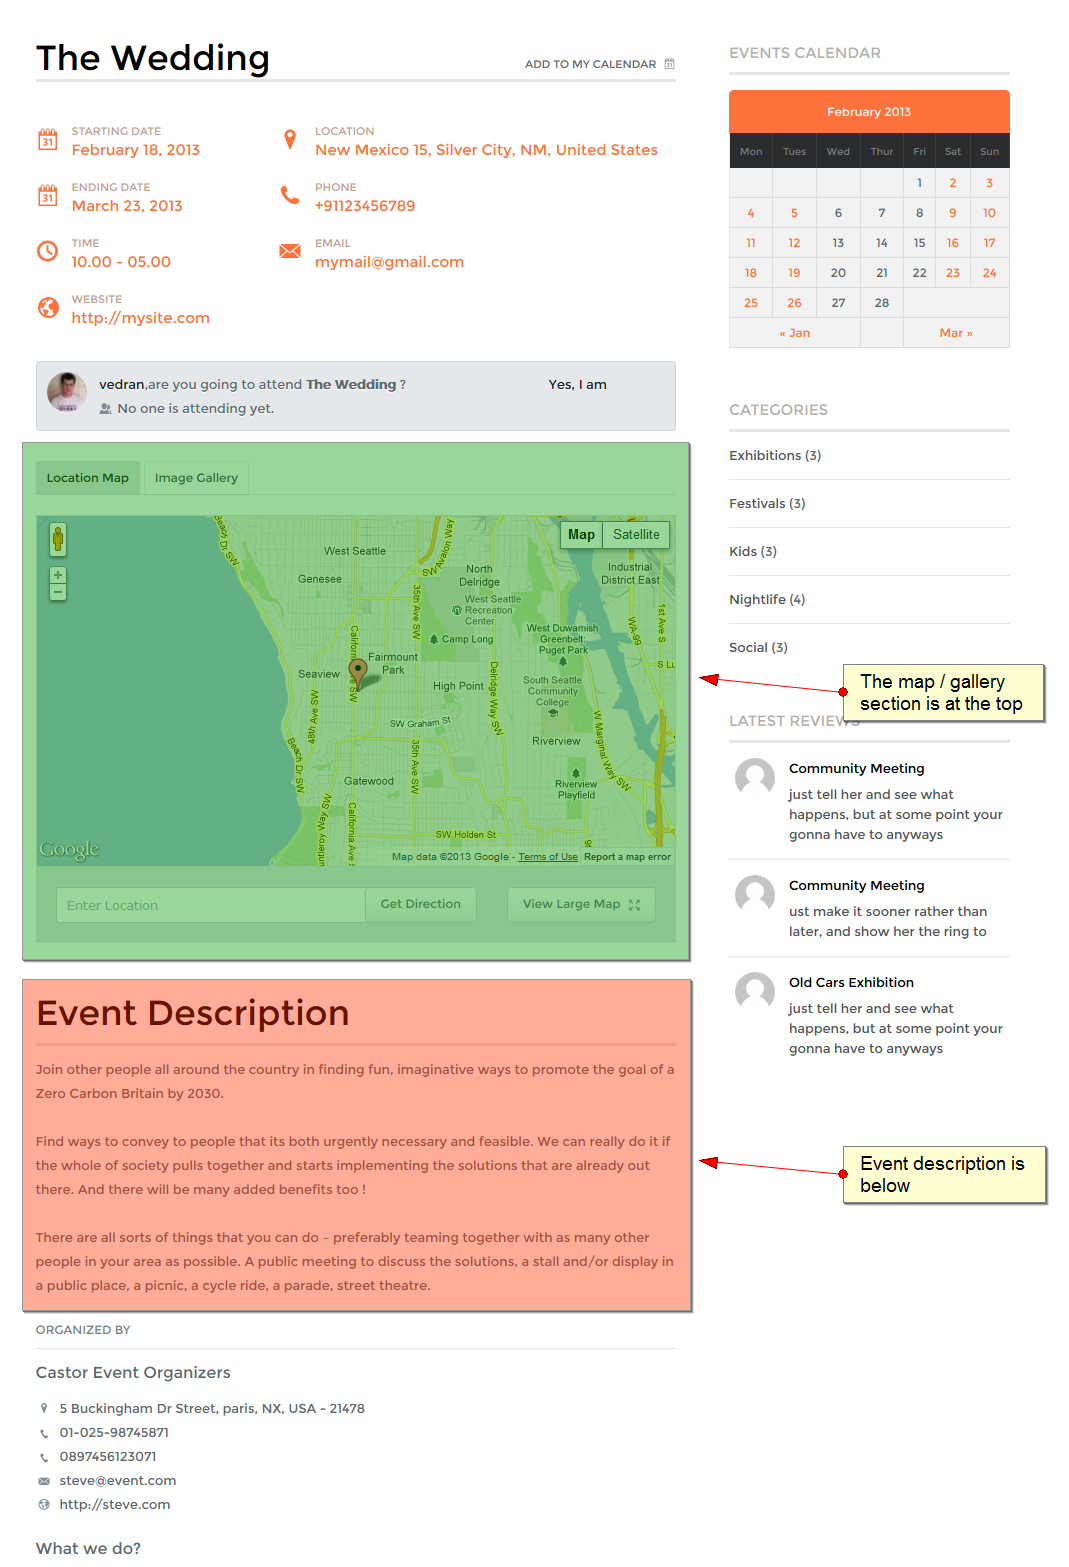
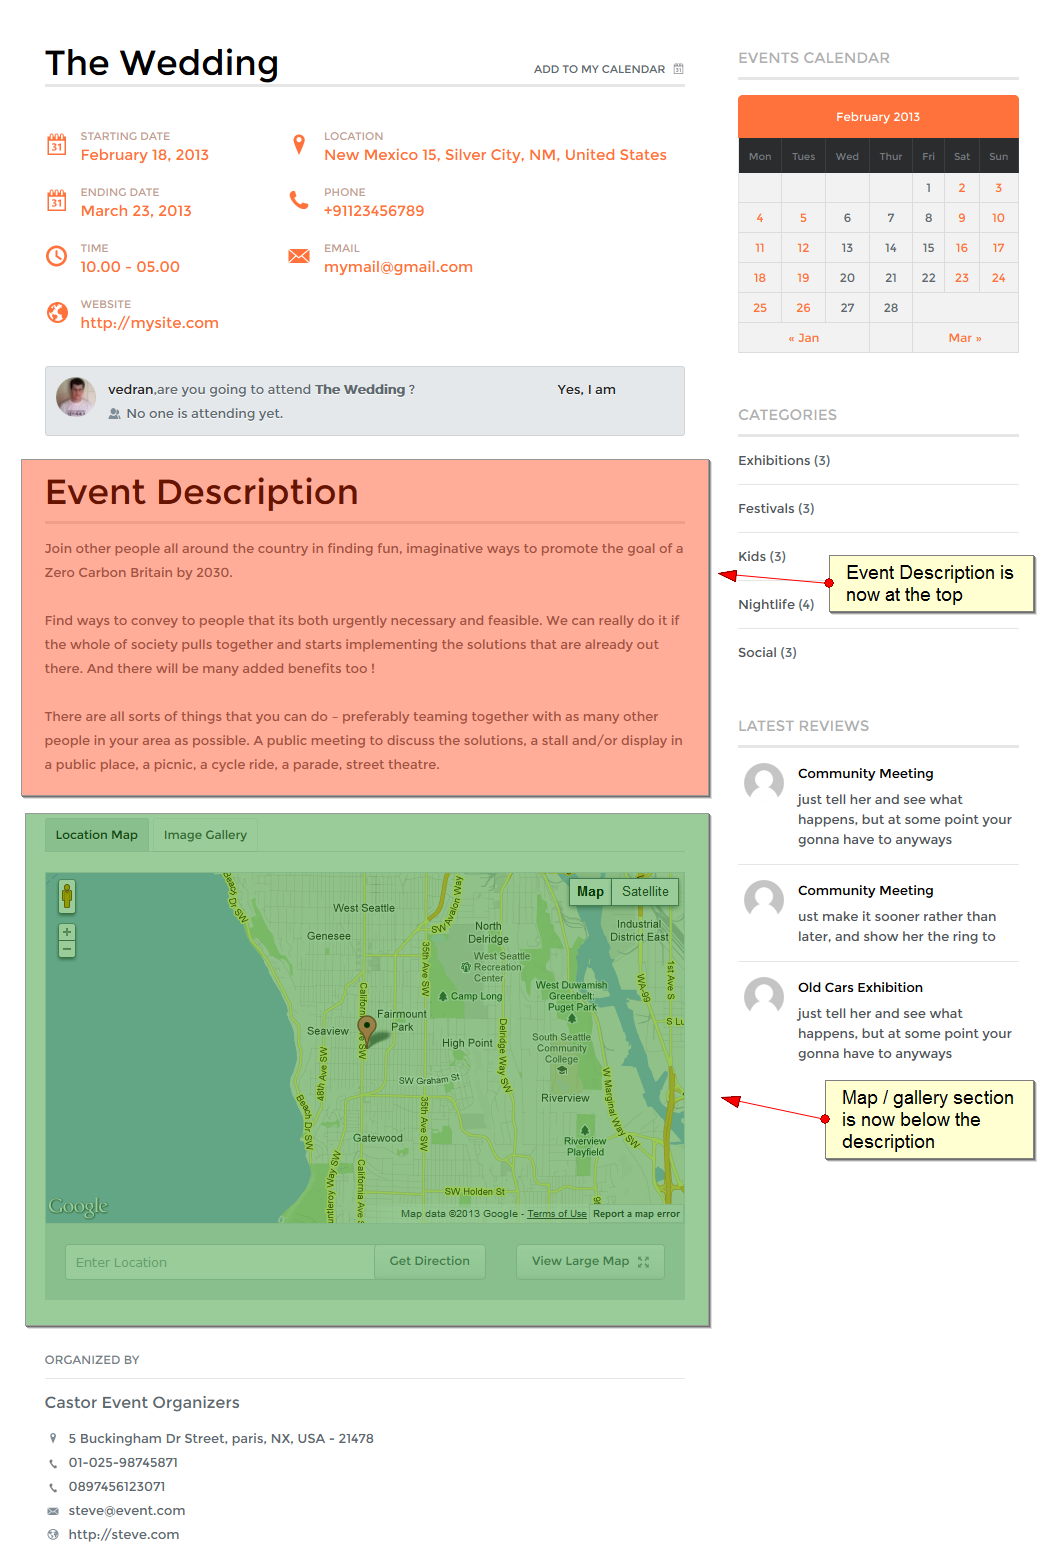
Example: Moving the description above the map / gallery section (Nightlife theme)
In the images below (left – before | right – after) you can see the change inside the event detail page. This was achieved by editing the previously created single-event.php file (inside the Nightlife) folder. I simply moved the contents of line 41 to line 37.
Using hooks
Hooks are one of the building block of WordPress and are used heavily in the CMS itself, plugins and themes. Since there is already a lot of good content on hooks we won’t go in too much detail in this tutorial. In short, there are two types of hooks:
- Action hooks – allow you to insert custom code at various points (wherever the hook is ran)
- Filter hooks – these are used to manipulate content. Often used to modify the information before it’s stored inside the database
How to use them?
The custom code you wish to use to modify the site should be placed inside the functions.php file located inside the theme folder. The path to the file will be something like this:
/wp-content/themes/your_theme_name/
Creating an action hook
add_action('action_name', 'your_custom_function');
function your_custom_function() {
// Your custom code goes here
}
To execute an action hook use the do_action() function -> do_action(‘action_name’);
Creating a filter hook
add_filter('filter_name', 'your_custom_function');
function your_custom_function( $variable ) {
// Your custom code goes here
return $variable;
}
To execute a filter hook use the apply_filter() function -> apply_filter(‘filter_name’, $variable);
[templ_msg_box type=”success”]To learn more about hooks please open the following tutorial:
http://wpcandy.com/teaches/how-to-use-wordpress-hooks/