Installing Video using the WordPress dashboard
- Connect to the member area, expand the Video theme section and download the Video.zip file.
- Inside your WordPress dashboard, navigate to Appearance ⇨ Themes ⇨ Add New ⇨ Upload ⇨ and load the .zip file you just downloaded.
- Once the upload is finished click on “Activate”. With that done choose to “Install sample data”.
Installing with FTP
Installing via FTP is necessary on servers that aren’t optimized for WordPress and can often interrupt the installation process because of the long execution time. Good news is that this type of install isn’t particularly hard, just longer compared to installing from the back-end.
For general instructions about using FTP please open this tutorial.
- Connect to the member area and download the Video.zip file.
- Extract the file using software like 7-Zip. Use the Extract Here option.
- Assuming you read the above linked FTP tutorial, navigate to /wp-content/themes/ on your server and upload the extracted theme folder
- Login to your WordPress dashboard and go to Appearance ⇨ Themes. Activate the Video theme
- While in the Appearance ⇨ Themes section, click on the blue “Install sample data” button to populate your site with dummy data and make it look like our demo.
Video Homepage settings
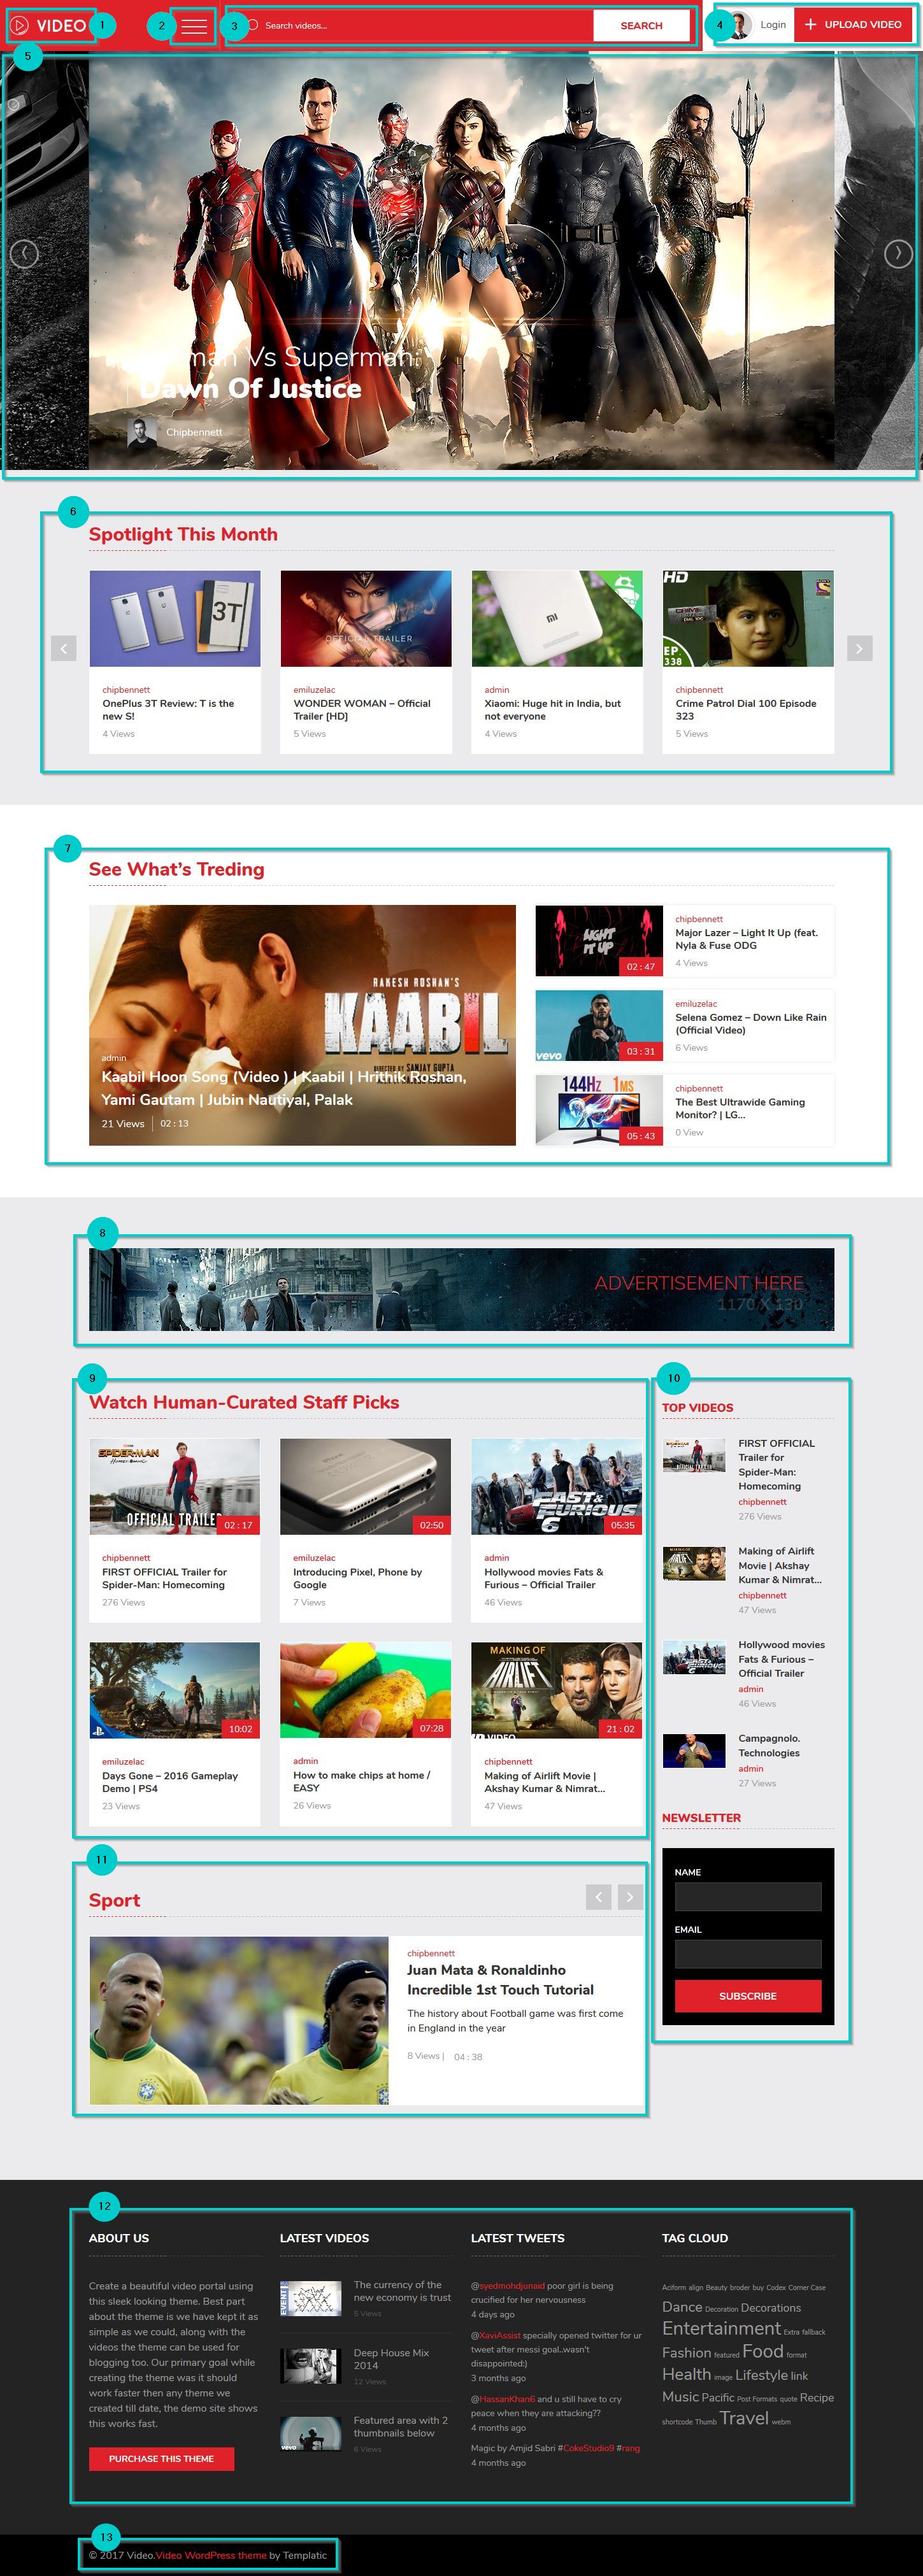
1) Site Title and Logo
This is the site title/logo section, the logo image or the site title you set at Appearance ⇒ Customize ⇒ Site Logo, will appear here.
2) Menu
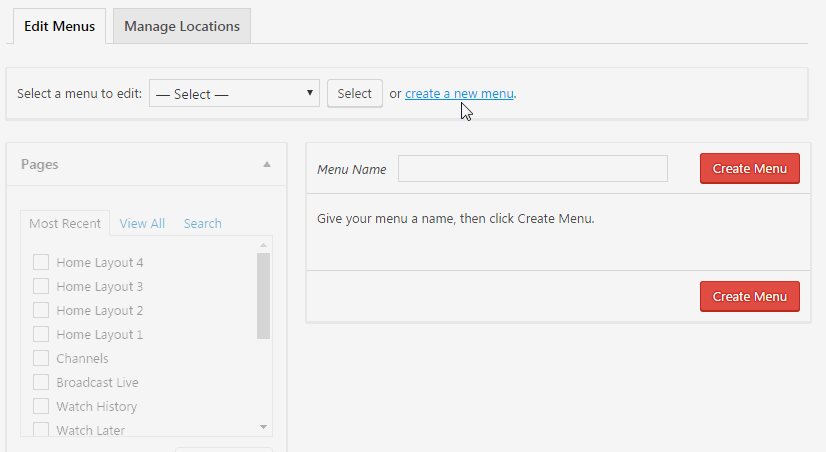
To add a new menu or edit existing, navigate to Appearance ⇒ Menus. This is where you can add the desired links into the menus. Choose Primary menu from the drop-down and change the items in menu as per your requirements.
The image below shows creating a new menu and setting it as the primary menu.
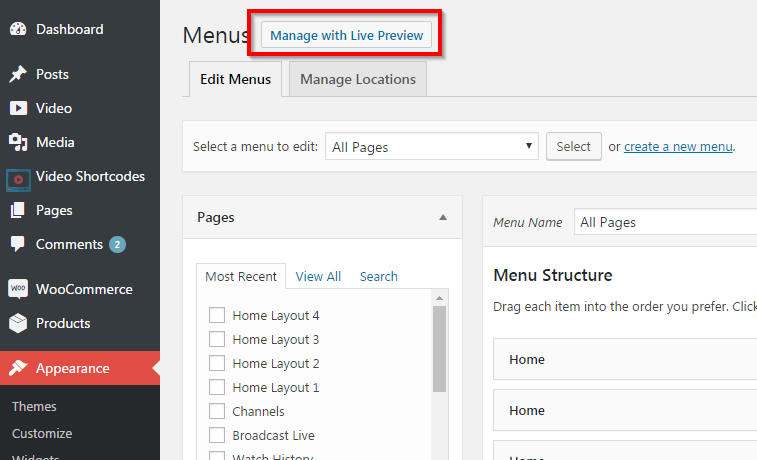
You can click, “Manage with live preview and see the real time effects of changes you make”.
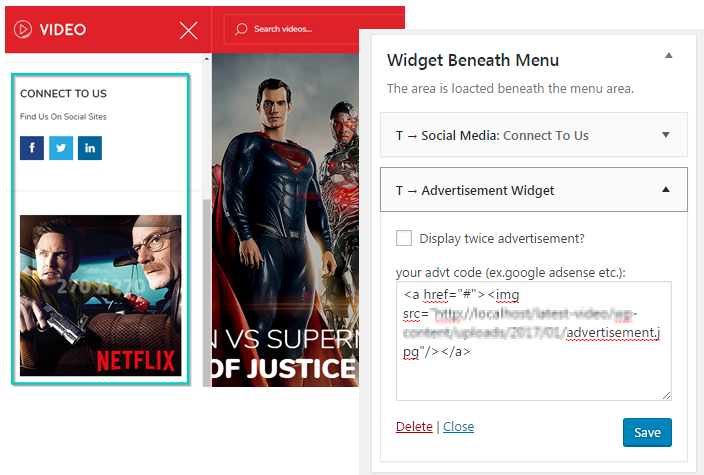
The connect us links and the advertisement visible under the menu items in the menu bar can be changed at Appearance ⇒ Widgets ⇒”widget Beneath menu” widget area.
The widgets placed in this area are T → Social media and the T → advertisement widget.
3) Search bar
The search bar that you see in the header appears with “search” widget placed in the Header Search Widget widget area.
4) Login
The user gravatar and Upload Video button in the header comes with the text widget placed in the Login Header right widget area. The following code is placed into the text widget.
[header-right-menu login='1' register='1' author_link='1' submit_video='1']
The author_link='1' will show the author link in the header while the submit_video='1' will show the submit video button into the header. So, if you want to remove any of the two items from the header, you can remove the corresponding attribute(and its value) from the code.
For example – [header-right-menu login='1' register='1' submit_video='1'] will only show the Upload video button.
5) Slider
The slider is shown by placing the T → Home Page Slider Widget, in the “Front banner” widget area. You can choose the category of the videos of which the featured images will be shown on the slider. Alternately, you can also use “Master slider widget”.
This is the main full width slider that is displayed on the homepage of your website.
Note – To use the Master Slider, you must first download and install it. Next, create your slider and configure your master slider to display the slider you created.
6) Spotlight this month
This is yet another widget put into “Front banner” widget area after the T → Home Page Slider Widget. The widget that displays this content is the T → Home Page Spotlight Slider Widget.
This widget will show a slider of posts in grid or detail view. The gird view will show a list of videos of selected categories. The detail view will show only one video at a time in the slider.
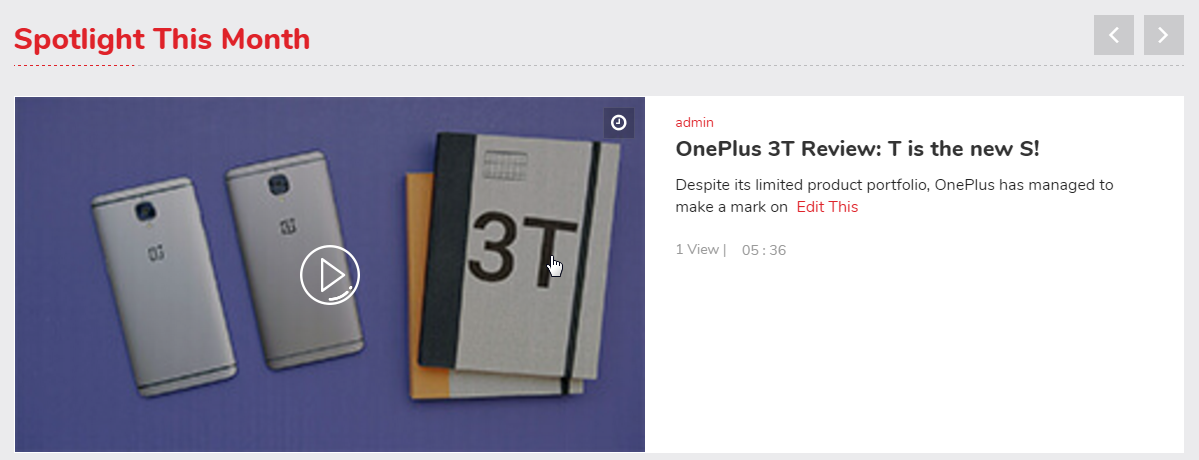
Here, you can choose if you want to show your posts with detail or grid view. You can set the number of posts you want to choose, and the lastly and most importantly, you can choose the category of the videos that you want to show.
7) Trending
The content shown here is the result of T → Home Page Trending Widget placed in “Front banner” widget area. This widget is placed after the T → Home Page Slider Widget and T → Home Page Spotlight Slider Widget. This widget will show the trending videos(that is most viewed) of the selected category.
8) Advertisement
This is where you can show the advertisements on your website. It is the T → Advertisement widget placed in the “Front Banner” widget area. Basically, you can show advertisements anywhere on your Video website using this widget. You can also use the advertisement widget in sidebars.
You can place your Google AdWords in this widget. Or you can place the advertisement code over here.
9) Video listings
The video listings that appear here are through T → Latest posts/videos widget placed at Home page – Content widget area. Configure the widget according to your requirement, choose the category you want and set the number of posts you want to show, and the type of posts (Video or blogs).
10) The sidebar
The sidebar of the homepage can be changed by navigating to Appearance ⇒ Widgets ⇒ Homepage – Sidebar. The widgets placed here are T → Popular Posts and T → Newsletter.
11) Video spotlight widget
This is the T → Home Page Spotlight Slider Widget placed at the Homepage – Sidebar widget area.
12) Footer
The footer of the video theme is divided into four columns. To change it, navigate to Appearance ⇒ Widgets ⇒ Footer widget area. The widgets placed into the footer widget area are Text widget (for about us), T→ Latest posts/Videos for showing latest videos, T → Twitter feed for showing live twitter feed and Tag cloud.
13) Footer Credits
To change the footer credits, navigate to Appearance ⇒ customize ⇒ Footer and change the text in the footer.
Video Category Page
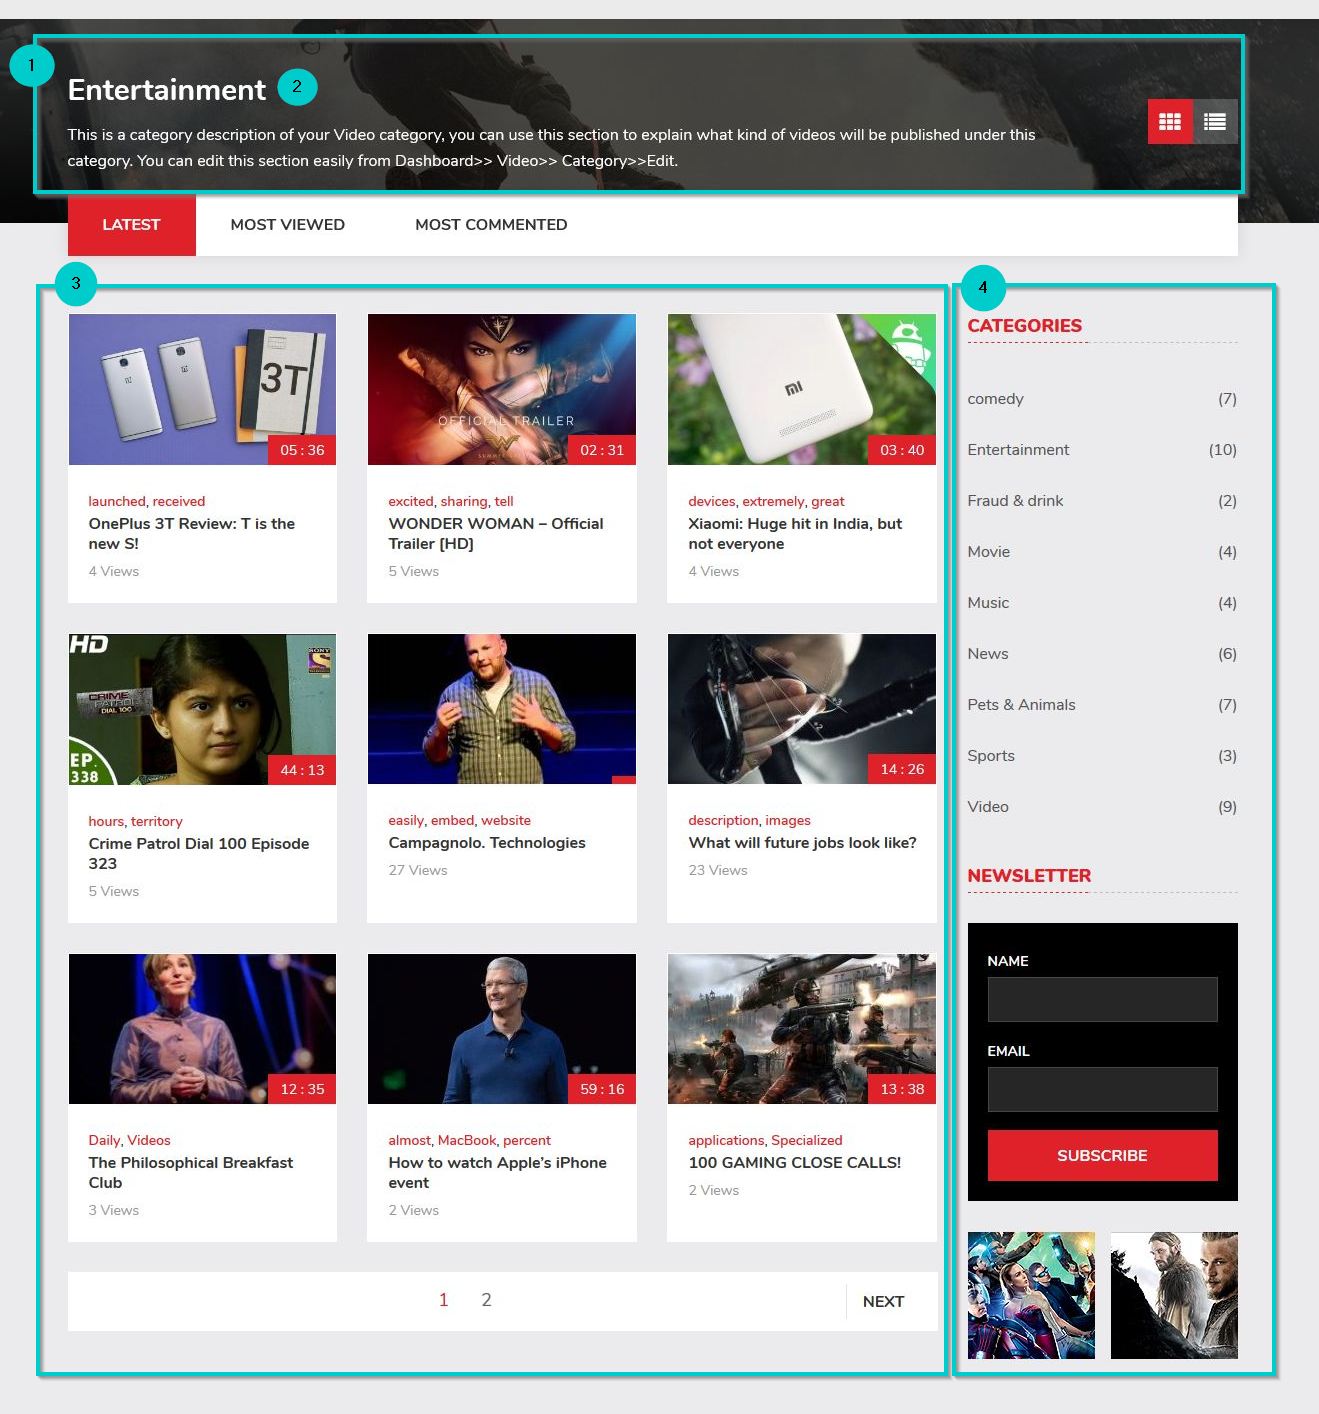
1. Parallax image background
The background here can be changed by navigating to Video ⇒ Video Category. From the categories listed here, choose the category of which you want to change the image. With mouse hover on the category name, the edit option will appear. Click on the edit option and upload the image
2. Category description
You can change the category description visible over here by editing the category. Navigate to Video ⇒ Video Category and mouse over on the category name you want to edit. The edit option will appear, Click it and change the category description.
If you don’t want any text to appear over here, simply leave the category description field blank.
3. Content area
This area will show the videos posted under the category. The videos will be divided into three tabs.
4. Sidebar area
The sidebar area of the category page can be managed at Appearance ⇒ Widgets ⇒ Video – Category page sidebar. The best-suited widgets over here are T → Video Categories, T → Advertisement widgets, T → Advertisement, T→ Related Posts/videos, T → Popular posts/videos.
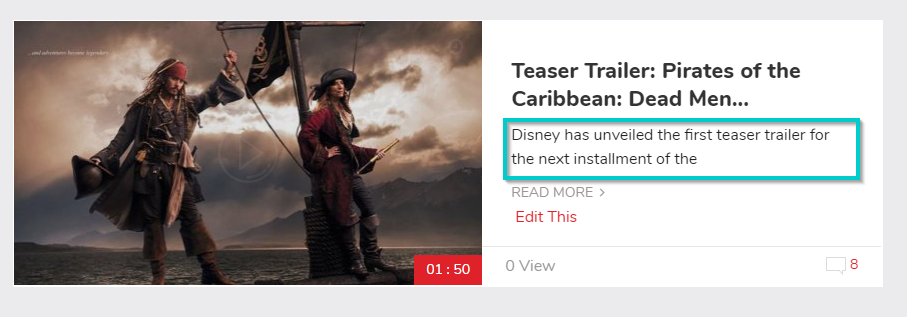
Video excerpt length (Category page, List view)
If you don’t add the excerpt manually, the video theme will show a part of the video description as an excerpt. You can change the length of the excerpt text following the simple steps. When the visitors changes the view to the list view on the category page, an excerpt from the video description will be shown(as shown in the image) .
You can change the excerpt length with a little code tweak. Find out the file \functions\tmpl_functions.php from the theme files. Find the value for video_excerpt_length and specify the number of characters you want to allow.
Front end submission from
The front end submission form will allow your users to submit their videos by registering themselves with your site. With the Templatic’s video theme, you get a pre-designed and well-planned Video submission form. When you enable Video submission from the front end, and the visitors click the submit video from, and can submit their videos on your website.
The video submission form inside Video is hard coded and can be modified by tweaking the source code. The changes can be made in this file
/wp-content/themes/Video/functions/post_videos_functions.php
The name of the function (and action) that contains the default form fields is
tmpl_custom_fields_video_option_after
Field validation for the form is located in this file
/wp-content/themes/Video/functions/submition_validation.php
Controlling the user submissions
When you allow user submission, you may want to control what the user uploads to your website. This can be easily done with your Video WordPress theme, upload moderation feature.
Set the default status of a user upload file
When the user submits a video to your website, you can choose if you want to publish it right away or keep it as a draft for moderation.
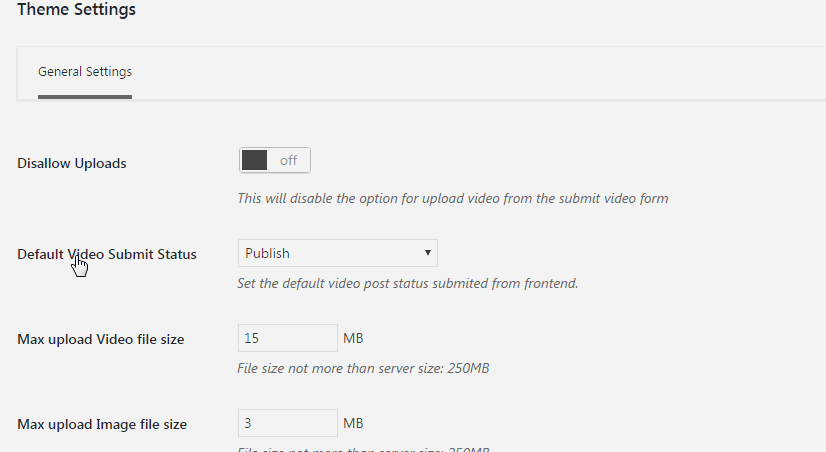
Change this setting at Appearance ⇒ Theme Settings ⇒ Default Video Submit Status. There are two options. By selecting “Publish”, the posts will be automatically published. If you select “Draft”, the posts will be saved as drafts for admin review. As an admin, you can check the video before publishing it. So, in this state, the videos will only be published after admin intervention.
Setting the Video/Image Upload size
Navigate to Appearance ⇒ Theme settings ⇒ Max upload video file size. Here you can set the maximum upload size of the videos the users can submit. You set the size(in MB). For example – If you set this value to be 15 MB, then only the videos of the size 15 MB or less will be allowed to be submitted by the users.
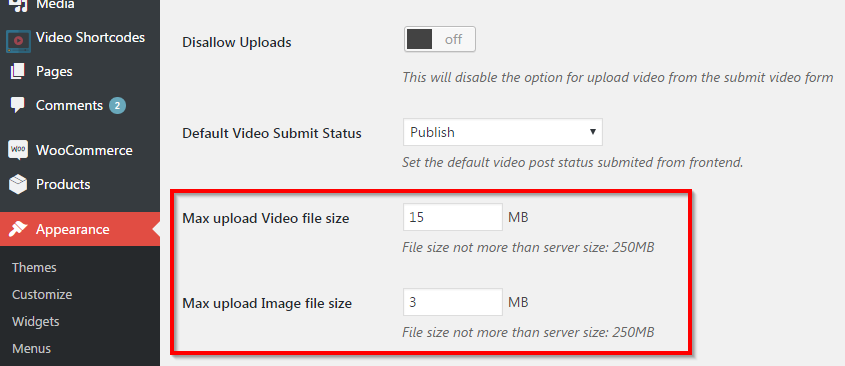
Similarly, you can also control the image file size using the Max upload image file size.
Theme Customization
All of your customization options will be available at Appearance ⇒ Customize. With the video theme, you have every opportunity of personalizing your website and creating a design that suits your branding and subject of your website.
Changing the site title and icon
Navigate to Appearance ⇒ customize ⇒ Site Identity. If you don’t want to display icon and want to display site name instead, you can specify the site title here. You can also give the site tagline or slogan over here.
Site Logo & favicon
To change the site Logo, you can navigate to Appearance ⇒ customize ⇒ Site logo. You can upload the logo image here. To set the site icon, you can navigate to Appearance ⇒ customize ⇒ Site identity ⇒ Site icon or it is also available at Appearance ⇒ customize ⇒ Site logo.
Changing the colors
To change the site colors, navigate to Appearance ⇒ customize ⇒ color. This is where you can change the colors of the various segments of your website.
Background and fonts
As your website’s background, you can set solid color or images. To set the color background, navigate to Appearance ⇒ customize ⇒ colors ⇒ Body background color. If you wish to set an image as the background, you can do so at Appearance ⇒ customize ⇒ Background images.
Changing the fonts
Choose the fonts that complement the colors and appearance of your website. Navigate to Appearance ⇒ customize ⇒ Typography.
Using the custom CSS editor
Now you can make changes to the theme appearance without bothering with the CSS files. This can be done using the Custom CSS editor feature. All you need to do is find the CSS class you want to change using tools like firebug and then write the class and the new code to the custom CSS editor. The code in custom CSS editor will override the one in the CSS file. Changing the appearance through custom CSS also helps you retain the changes after theme update.
The custom CSS editor can be found at Appearance ⇒ Custom CSS editor.
Comments Management
Comments on the videos and posts are one of the main attraction on your website. All the comments related settings can be found at Settings ⇒ Discussion. Here, you can specify if you want to allow the user comments on your posts and if the comments will be automatically published or held for moderation before being published.
Enabling/Disabling comments on individual posts
To manage the comments settings of individual posts you can go to the All posts page (All videos page – in the case of videos). Hover over the post name and click the quick edit link, uncheck the option for “Allow comments”.
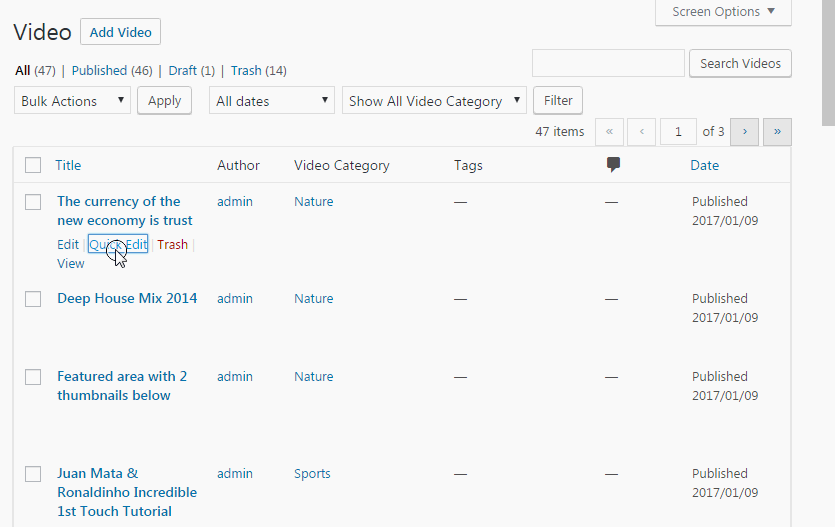
The image shows how to disable comment for a single post. With the Quick edit option, you can uncheck the “Allow comments” option and comments will be disabled for the individual post.
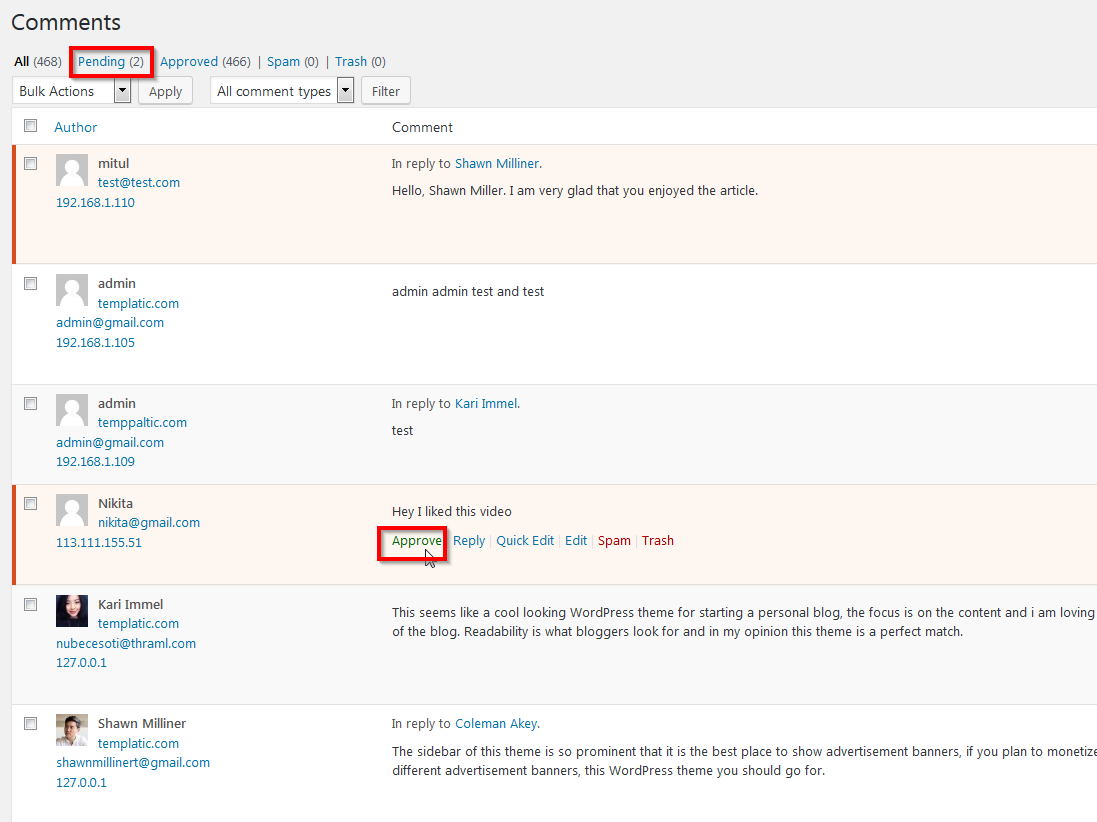
Moderating user comments
The comments held for moderation can be managed from the dashboard by comments. All the comments that the users have published can be held here. The pending tab will show all the comments that are submitted by the users but not yet published. You can either approve the comment, reply to it, add it to spam or delete it.
Managing user’s registration
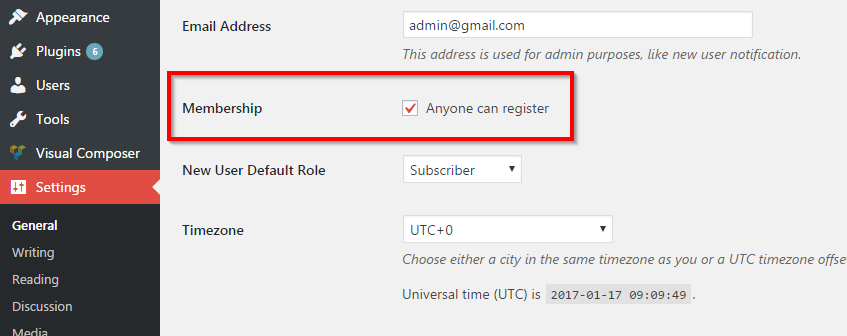
Enabling/Disabling User’s registration
To enable or disable the registration, navigate to General settings ⇒ Membership.With the Anyone can register check box checked, registration will be enabled and the front end users won’t be allowed to create an account on your website. With the anyone can register checkbox unchecked, registration will be disabled.
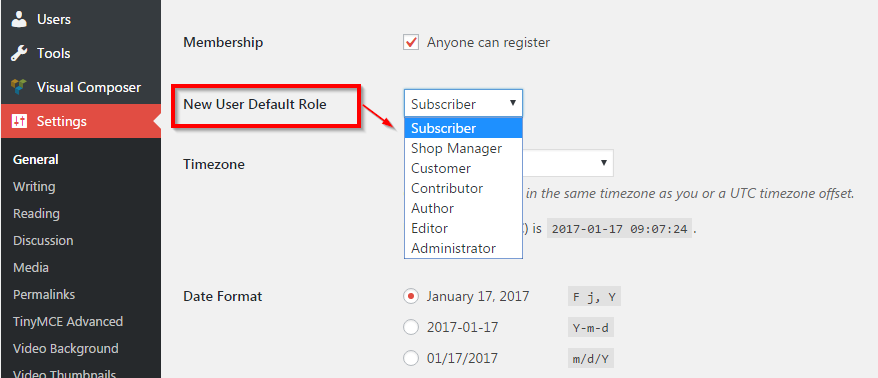
Default User role
When you enable the user registration from the front end, the users will be able to key in their email address and username and create their accounts on your website. Now, you can set the default user role by navigating to Settings ⇒ New User Default role. Choose the role from the dropdown and that will be default role for a newly registered user.
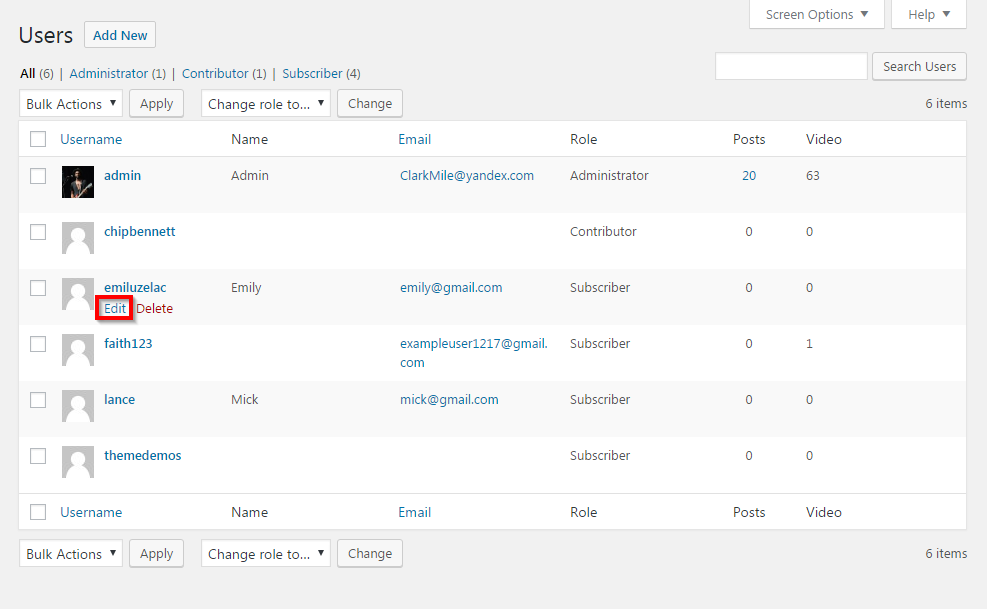
Set the User role
You can use the native WordPress settings for changing the role of the registered users. On the dashboard, choose the User option. This will show the lists of users of the website. This is where you can view the details of the users, change it and even assign a different role to the user.
Video Categories
Video categories are a great way to organize the videos added to your website. The categories not only help order your content, but it also helps your users find the videos of their interest easily. The Video WordPress theme, allows you to add as many categories as you want.
Creating categories
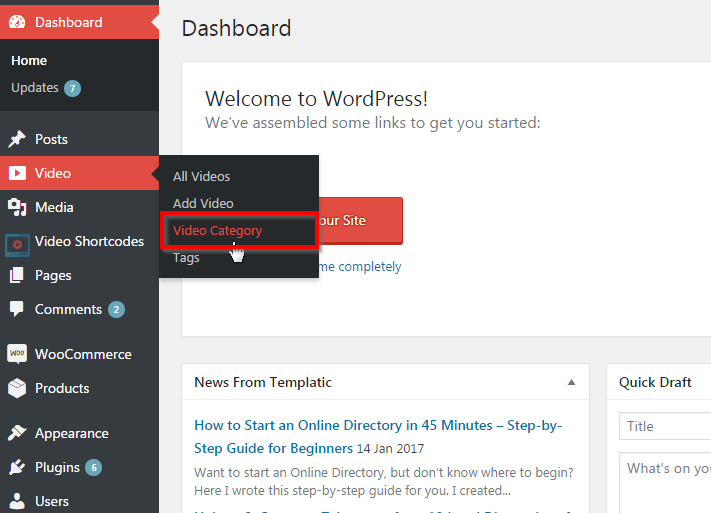
The videos you add to the site will be organized by categories. In Video theme, you can add as many categories as you want. You can create video category by navigating to Video ⇒ Video Category ⇒ Add new category.
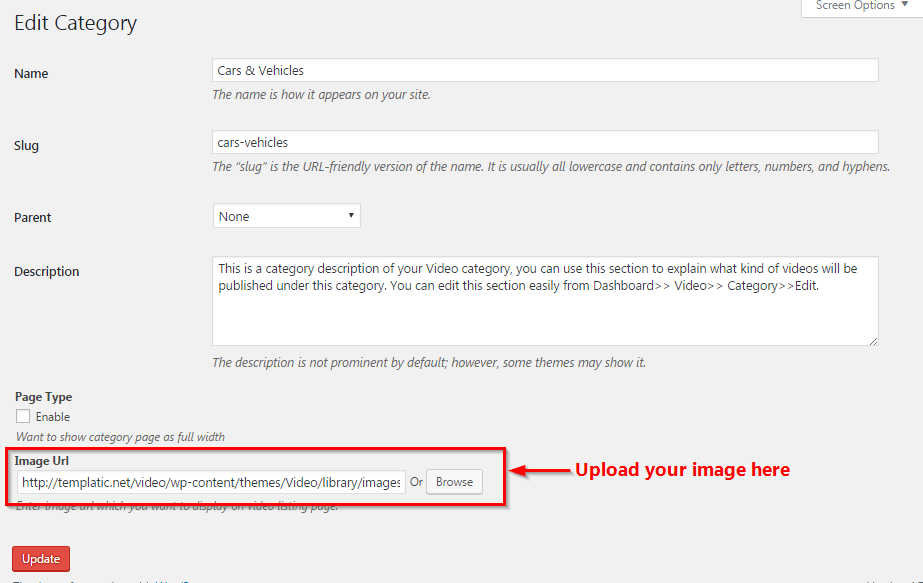
Category images
You can have unique banners for each of the categories. Category images will be shown on the top of Video category page. The images will be set as the parallax background image, located in the banner area. You can add category images while creating categories at Video ⇒ Video Category ⇒ Add new category.
If you want to add/change images of existing categories navigate to Video ⇒ Video Category ⇒ Find the category you want to change ⇒ Edit (Edit link will appear on mouse hover over the category name).
Choosing categories
For adding a video in particular category, you will choose the category right at the time of adding the video. When you upload the video using the video upload form(at the front end) or the Add video page(At the backend) you will be allowed to choose the category for your video.
However, the category can be changed anytime by editing the video listing.
Managing the permalinks/URL of your website
To set how you want your page URLs to appear, navigate to Settings ⇒ Permalinks, Choose the structure you want and Save Changes.
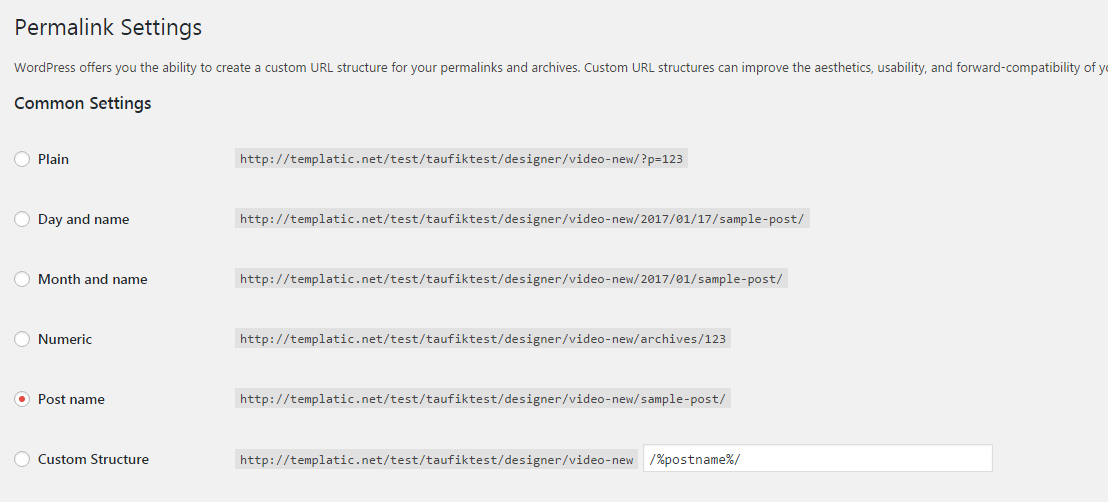
The URL of your web pages play a vital role for the Search Engine Optimization of your site. URLs that reflect the motive of the content should be preferred. So, choose your URLs accordingly.
List of compatible plugins
The following are the third party plugins that we provide complete compatibility for. Any of these WordPress plugins will integrate seamlessly with your Video website.
- Ajax search lite
- WooCommerce
- Envira gallery lite
- Sticky spotlight video player
- uTube Video Gallery
- Video background
- Video Thumbnails
- W3 total Cache
- WooCommerce PayPal Express Checkout Gateway
- WPBakery Visual Composer
- Huge IT Video Player
These are the plugins tried and tested with the theme. If you want to use a plugin not mentioned in the compatibility list, you can try it too. However, make sure you have your site backed up before you install a new plugin, with undecided compatibility.
Frequently Asked Questions specific to Video theme
How does this theme count total views on video? and how it is different from the total views on Vivo theme?
The views will be counted according to the visits of that particular video(s) individually and on the Vivo theme, the script has been developed with the latest pattern of code the views will be counted on Vivo theme according to the youtube views.
How does this theme showing video duration?
the video’s duration of length will be shown according to the youtube API itself.