


WordPress was basically designed for creating blogging websites but then with the advanced tools and developments, it became one of people’s favorite platforms to create their website. With plugins like WooCommerce and WP eCommerce, you can now create a feature-rich ecommerce website with unparalleled features.
If you want to create your hotel websites with an online booking system, you can do so easily using the advanced tools available on the internet, without writing a line of code. The reasons to choose WooCommerce and WooCommerce bookings to create your website are many. A few of them are listed below
- Simple setup, very easy to use
- Extensible and Flexible
- Feature rich and manageable
- Manage persons and resources
- Create custom availability and price slots
Now, if you are ready to kick start your website development process, here are the steps through which you can install and use WooCommerce bookings –
A brief introduction about the type of booking websites you can create
WooCommerce bookings are one of those powerful plugins that work with WooCommerce. The WooCommerce plugin itself is feature-rich, and with WooCommerce bookings installed and active, you can create bookable products. So, whether you want to create a website that allows online appointment booking, or a hotel booking website where people can book the room of their choice, you can do it with this plugin.
WooCommerce bookings come with well-planned and organized options. You can create bookable blocks. You can just set the value of the blocks and allow the customers to have their say on the number of blocks they want to book. Or you can have the bookable block pre-determined period. For example – an appointment for a spa treatment lasts for 2 hours, so you can let the visitors book the fixed blocks of 2 hours. You can also assign the number of blocks It can be hours, days, or months. For instance, you are creating an appointment booking website for your clinic. So you can create a bookable block of hours. When you create it for a resort, you can have a bookable block of days. For booking hostel rooms, it can be for months or years.
Some of the WordPress plugins that can help you create booking websites
- Hotel/hostel booking websites
- Resort booking website
- Online reservations system
- Appointment booking system
![]()

Signup now to get our discount – only $2.95/month.
Templatic Themes fans get a special low price when hosting with Bluehost. Signup and claim this deal.
Installing WooCommerce bookings
WooCommerce booking is a plugin that works with WooCommerce to create bookable products. Therefore, to use WooCommerce bookings, you need to first install and configure WooCommerce plugin. To set up WooCommerce, you can use this guide. Once WooCommerce is ready to use on your website, you can install WooCommerce bookings and start creating bookable products.
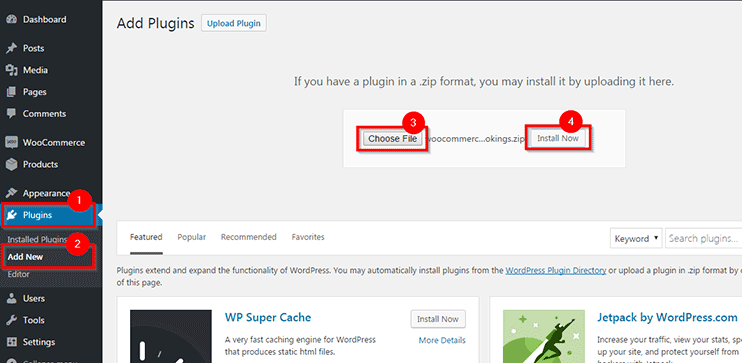
Here are the simple steps through which you can install WooCommerce bookings:
- Download the WooCommerce bookings zip file from here.
- Login to your dashboard
- Navigate to Appearance ⇒ Plugins ⇒ Add new
- Upload the zip file and install it
- Activate the plugin once successfully installed
When you activate WooCommerce bookings, an additional menu item will appear under WooCommerce. This tab will introduce all the settings available for the booking feature on your website. However, there is a different procedure to add bookable products to your website which we shall see in the later section.

Creating a bookable product
Creating a bookable product using WooCommerce bookings is as easy as you create normal products with WooCommerce. All it needs is a few extra configurations.
To add a bookable product, the first step is to navigate to Products ⇒ Add Product.
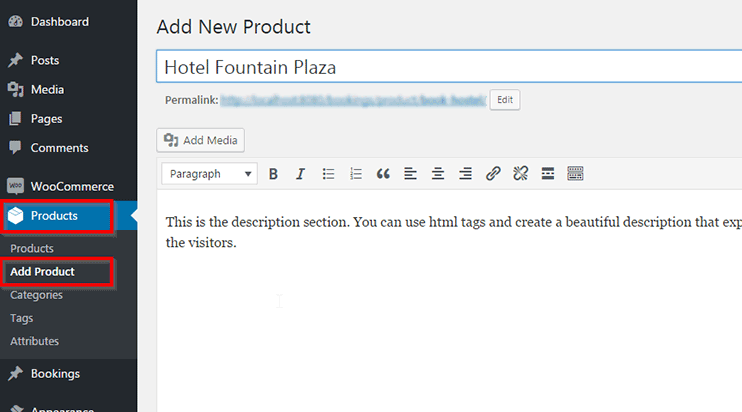

In the next step, you have to specify that the product you are creating is a “Bookable product”. The option for bookable products in the drop-down for product data will only appear when you have WooCommerce bookings installed and active.
Bookable products are generally not physical. So don’t forget to check to mark the virtual product box for intangible bookable services.
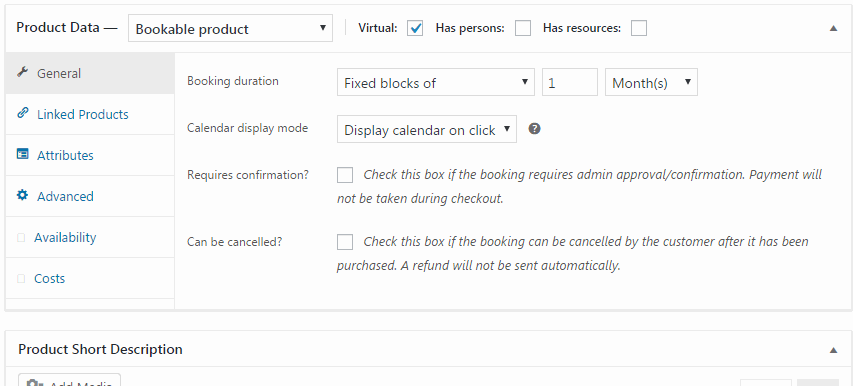
When you choose the “bookable products” options from the drop-down, the field for the products will change accordingly. Let’s understand what each of the fields means.
Booking duration
The drop-down selection allows you to choose if you want to allow booking for a fixed block of time or if you want the customers to book for the duration determined by the customer.
Fixed block of
You can choose the pre-determine the duration of bookings. So whenever a user tries to book, the booking will be processed for a fixed period of time only.
For instance, if you are creating a website for booking an appointment at a massage parlor, it’s for a fixed duration of 2 hours. So for this situation, you can choose the “fixed block of” option and specify the duration.
Customer defined blocks of
When you choose this option, you can allow the customers to choose. You can determine the duration and allow the customer to choose the number of blocks they want to book. However, when you choose these option, you can specify the minimum or maximum duration of days/hours for the booking.

Enable the calendar range picker
Enabling this will allow the users to select a start date and end date on the calendar. This will calculate the duration automatically.
Calendar display mode
You can choose to display the calendar on click or you can make the calendar visible by default.
Requires confirmation
If checked, a booking request will be sent and payment processing won’t be done till the admin confirms the booking. So the booking request will only be confirmed when the admin reviews and approves it.
Can be canceled
This option lets you determine if the visitors can cancel their booking once confirmed. If you disable this option they won’t be allowed to cancel their booking once done. If you choose to allow cancellation, you can choose till when can be the booking be canceled.
In the example shown below, the booking can be canceled before one hour of the commencement of the booked time. This means, that for the massage parlor appointment, the visitors can cancel their appointment one hour before the commencement of their appointment time. They won’t be allowed to cancel their booking after that. For example – If a user has a booked a session that starts at 2 PM, they will be allowed to cancel the appointment till 1 PM. After 1 PM the cancellation will not be allowed.


You can also choose the duration, before the start date, for which the cancellation will be allowed. So, as per the example in the image, you can cancel the booking before 1 hour of the start time.
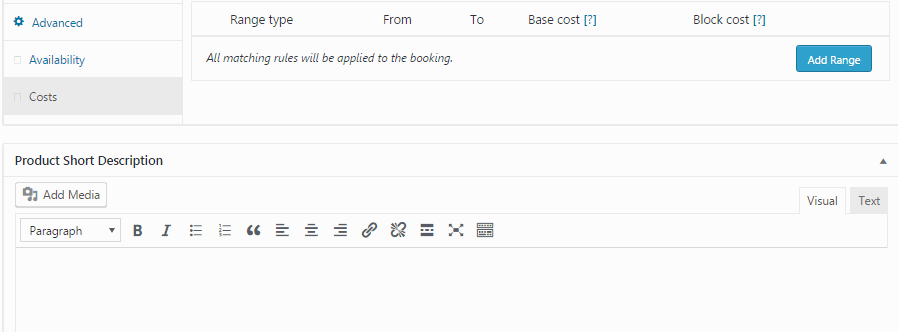
Setting up the costs
You can set up the cost for each block you’ve created and show it on the sales page of your booking site.
Base cost
This can be the booking charge or the signup cost or anything, the base cost will be charged with each and every booking regardless of the block cost. It’s important to note that the base cost is independent of the block cost. Even when a user books more than one block, the base cost remains the same for a booking.
Block cost
You can set the price of a single block here. The total cost will be calculated by multiplying the per block price and
Display cost
This is the price displayed to the customers regardless of the base cost and the block cost. When you leave this field blank If there are different price ranges, they will be calculated by the system according to the system based on the selections made by the customer. If the price to be displayed is from a custom-defined range the front end will display “from:” before the display cost.
Range
For additional customization for your booking costs, you can use these fields. This is helpful when you want to offer your users a special discount or a special hike for a specific situation. For instance, your beauty salon is going to have a bumper discount offer from 25th Feb to 27th Feb. For this duration, bookings will be available at half the price. So, in the example, a range is created accordingly.

Setting up the availability
Max booking per block – The number of bookings that can be allowed for the same block. This can be better understood through an example. Suppose you have 5 hair treatment experts that can work simultaneously at a given block. So you can specify “5” as the value for “Max booking per block”.
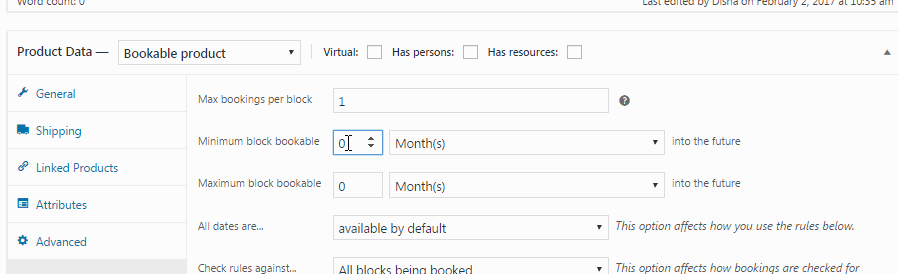

Minimum block bookable
You can specify, with this field, the extent of time in the future, for which the booking can be done. For example, If according to the example, we’ve specified minimum block bookable as 1 week into the future. This means that the visitors can book only for a block available a week after today’s date. Suppose today is 3rd May, then the visitors can only book for blocks on 10th May and onwards.
Maximum block bookable
This option is similar and complementary to the previous one. With this option, you can specify the maximum time in the future for which the users can book. For instance, most probably, you wouldn’t want visitors to book one or two years in the future.
Example – We have specified “2 months” in our example. So the visitors can book for a date within two months of the current date. So if the current month is January 31st, the visitors will be able to book for February and March. They won’t be allowed to book for any date after march.
All dates are
With this option you can specify if all the dates will be available by default. You can make all the dates unavailable for default too. This can be helpful for limited period offers. You can make all the dates unavailable for default and then use the range to make them available for a specific time range.
Check rules against
You can make the system check the rules for all the blocks being booked, or just the first block of the range of blocks being booked.
If you specify “All the blocks being booked”, the rules will be checked for each and every block that the user books. If a user books for 3 blocks at once, the availability of each and every block will be checked and booking will be allowed only if all three of them are available. However, specifying “starting block only” will only check the availability of the first block only.
Range
You can specify the range for availability as per your requirements using the range option. Click add range and create custom availability. For instance, you know your beauty salon will be closed for 10 days in March, then you can specify a range for the unavailability.
You can allow and process cancellation too
Cancellation and refund are one of the most important features of an online booking website. It is as important as bookings itself. Whenever you create a website that allows online booking, you must allow a cancellation service. Even though it is not a compulsory feature, allowing cancellation and refund is a good practice. Most of the online booking services allow that and it will mostly work in your favor.
Creating a bookings website with cancellation feature is easy too. Most of the best booking plugins for WordPress allow you to choose if you want the booking to be canceled or not. You can also set parameters as to how long before the booking date, can the customers cancel it.
With WooCommerce bookings, you can do that very easily. You can decide for each and every bookable product if it is cancel-able or not!
Conclusions
This is how you can sell bookable products using WooCommerce and WooCommerce Bookings plugins. It is easy to use and configure. If you find difficulty regarding any of the features of this plugin you can refer the WooCommerce’s documentation for creating an online booking system using WooCommerce Bookings.
Good luck with your new online booking website!!
![]()
Signup now to get our discount – only $2.95/month.
Templatic Themes fans get a special low price when hosting with Bluehost. Signup and claim this deal.