Installation
For setting the Mass Mailer plugin at your site you need to have 2 plugins installed and activated at your site, MailPoet plugin and Tevolution Mass Mailer plugin
- Download the Tevolution Mass Mailrer plugin from the Directory ⇨ Directory Extensions section of the Templatic member area.
- Navigate to wp-admin ⇨ Plugins ⇨ Add New ⇨ Upload. Use the “Browse” button to load the previously downloaded .zip file. Click on “Install Now” to confirm.
- Once the plugin is finished installing click on the “Activate” button.
- For installing the Mail Poet plugin go to wp-admin ⇨ Plugins ⇨ Add New ⇨ Search for ‘MailPoet’ plugin and form the list available select the MailPoet Newsletter plugin and install it. After installing the plugin you need to activate it at wp-admin ⇨ Plugins.
By activating this plugin you can now see a new menu item got added with name ‘MailPoet’ in your Dashboard at themes backend.
Setting up the plugin
With the plugin installed, head over to themes backend ⇨ MailPoet ⇨ NewsLetter ⇨ Create a new email . On the next page that arrives you can notice the below message,on the top of the page. It is necessary to add this codes in the given files.
Before you get started adding your newsletters we need you to add a few actions in MainPoet plugin files to create a bridge betweeen both the plugins, here are the details:
- Add this line of code:
$step = apply_filters('tevolution_mass_mailer_step',$step);in mailpoet file
File Name: plugins\wysija-newsletters\views\back\campaigns.php
Line No: 1096, just above this line of code:if (!isset($msg['browsermsg'])) { - Add this line of code:
do_action('tevolution_mass_mailer_save_lists',$campaign_id,$email_id);in mailpoet file
File Name: plugins\wysija-newsletters\controllers\back\campaigns.php
Line No: 1181, after given code:$this->_saveLists($campaign_id, true); - Add this line of code:
do_action('tevolution_mass_mailer_delete_newsletters',$campaign_id);in mailpoet file
File Name: plugins\wysija-newsletters\controllers\back\campaigns.php
Line No: 746, just below this line of code:$modelEmail->delete(array('campaign_id' => $campaign_id));
Using the Plugin
There are 2 types of NewsLetter
1. Standard Newsletter
2. Automatic Newsletter
The only difference between the above newsletter types is that with Automatic Newsletter you can sent scheduled emails i.e on Weekly,Montly or Immediately as per the options given
In the Subjectline Field you can specify the Subject of the Newsletter you want to sent.
There is a Send Email to Users select dropdown given to select to whom you want to sent this newsletter. ( i.e to which group of users ). 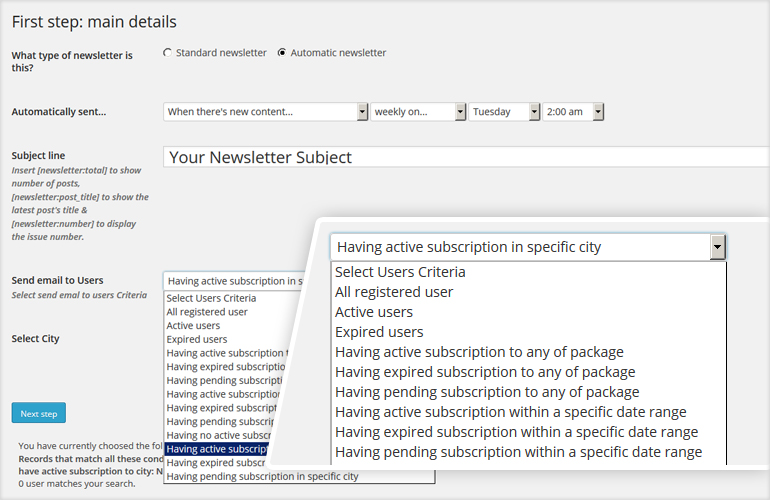 As shown in the screenshot above there are below options given this select dropdown
- All registered users – By selecting this you can sent the newsletter to all the registered users at your site.
- Active users – By selecting this you can sent the newsletter to all the active users ( users whose subscriptions are active ) at your site.
- Expired users – By selecting this you can sent the newsletter to all the expired users ( users whose subscriptions has been expired ) at your site.
- Having active subscription to any of the package – By selecting this you can sent the newsletter to users having active subscription to any of the Price package selected by the user at your site. (You can see the Price Packages option getting visible below the ‘Send Email to Users’ dropdown)
- Having expired subscription to any of the package – By selecting this you can sent the newsletter to users having expired subscription to any of the Price package selected by the user at your site.(You can see the Price Packages option getting visible below the ‘Send Email to Users’ dropdown)
- Having pending subscription to any of package – By selecting this you can sent the newsletter to users having pending subscription (i.e payment pending for the package selected ) to any of the Price package selected by the user at your site.(You can see the Price Packages option getting visible below the ‘Send Email to Users’ dropdown)
- Having active subscription within a specific date range – By selecting this you can sent the newsletter to users having active subscription within specific date range.(You can see the Start Date and End date datepickers along with the Price Packages option getting visible below the ‘Send Email to Users’ dropdown)
- Having expired subscription within a specific date range – By selecting this you can sent the newsletter to users having exired subscription within specific date range.(You can see the Start Date and End date datepickers along with the Price Packages option getting visible below the ‘Send Email to Users’ dropdown)
- Having pending subscription within a specific date range – By selecting this you can sent the newsletter to users having pending subscription within specific date range.(You can see the Start Date and End date datepickers along with the Price Packages option getting visible below the ‘Send Email to Users’ dropdown)
- Having no active subscription to any of – By selecting this you can sent the newsletter to users having no active subscription at all for any of the package you have on your site.
- Having active subscription in specific city – By selecting this you can sent the newsletter to users having active subscription for specific city.(You can see the Select City drop down getting visible below the ‘Send Email to Users’ dropdown)
- Having expired subscription in specific city – By selecting this you can sent the newsletter to users having expired subscription for specific city. (You can see the Select City drop down getting visible below the ‘Send Email to Users’ dropdown)
Below are the steps given to send Newsletter using the Mass Mailer plugin.
- Go to wp-admin ⇨ MailPoet ⇨ Newsletter ⇨ and click on Create a new email link.
- In the next page that opens select the type of Newsletter you want to send i.e either Standard or Automatic.
- In the Subjectline field specify the subject of the Newsletter mail you want to sent to your users.
- Now from the Send email to users dropdown select the relevant options ( as explained above ) to send the newsletter to the users.
- Now click the ‘Next Step’ button and in the next page that appears you can format the Newletter mail content by adding Titles,Images,Styles etc.
Frequently Asked Questions
How to translate the plugin?
You can translate the plugin by using the language file located inside the /languages folder. For instructions on handling PO and POT files open the following article
https://templatic.com/docs/how-to-localize-templatics-wordpress-themes/