Initial Setup
1. Install directory plugin using WordPress back-end
Basically directory plugin runs on the base of Tevolution and is specially developed to work with Directory theme. So, the installation process is already mentioned in the Directory documentation guide. However, being an add-on, here are the steps to download and activate Tevolution-Directory add-on individually.
- Connect to member area ,under Plugin Downloads section, expand the Tevolution and Tevolution – Directory plugin sections and download both the Zip files given there (as directory plugin works on the base of Tevolution plugin).
- Connect to your WordPress dashboard (wp-admin) and navigate to Plugins -> Add New -> Upload.
- Choose the downloaded zip file of Tevolution plugin from your respective hard drive and click Install Now tab.
- Repeat the same process to install Tevolution- directory plugin.
- Again head over to Appearance -> Plugin section and activate Tevolution plugin first and then Tevolution – directory
On activating Tevolution, it will ask you for the Licence key to use Tevolution. Here is how you can get your licence key.
- Connect to your member area and get your licence key (simply copy it) for using the theme. You can locate it under “Your Subscriptions” area in your account.
- Then, go to wp-admin -> Tevolution -> Overview
- You will see a section called “Licence Key”, just paste your copied licence key here
- Click “Verify” button. On successful verification it will show you a green colored message “Licence Key Verified.”. If your key does not match then report us at help desk.
2. General Settings
As said above that the plugin works ideally with the Directory theme but still here are the steps that should be followed if you are using this plugin with any other theme.
After you activate your plugin, follow these steps to setup some general things that you would or would not like to use on your site.
First of all include 3 lines of code into your theme’s functions.php file located under your theme’s root directory if you are using theme other than city directory.
add_theme_support("home_listing_type_value"); – It adds an option here in general settings that helps you to show various post types on your home page. (To show it, you need to add this option, check mark it and then have to place a widget T – All category list Home Page in your home page widget area from your back-end)
add_theme_support("tev_taxonomy_sorting_opt"); – By adding and check marking this option, it helps you to show a sorting options on your listing taxonomy page using which your users can sort the listings as per their preference (e.g. Alphabetically).
add_theme_support("tev_taxonomy_excerpt_opt"); – By adding and check marking this option, you can limit your content upto certain characters on your listing category page.
Then after,
- Go to wp-admin -> Tevolution -> Overview
- Activate your needed modules from there (also should follow the given basic steps at wp-admin -> Tevolution -> Setup Steps to setup your site easily)
- Now, head over to wp-admin -> Tevolution -> General Settings, you will be having setting options whose module you have activated from the overview section as said above.
- Setup your settings as per your requirement. (All major controlling settings you will find here only)
Note: Ignore the above said steps, if you are using this plugin with Directory theme.
Let’s discuss some of the obvious settings options that you must observe are in “Submission page settings” section in the Tevolution -> General Settings.
Allowed image upload size – To increase logo uploading capacity that you upload on submitting your listing
Default status for free submissions – When user submits his/her listing with you, this option helps you decide that whether directly publish it or make it a draft on your site which you can see and approve manually. This one is applicable when anyone selects the Free (price pack) on your site.
By default it will be in “Published” status. The other effect of this you will be seeing in the wp-admin -> Tevolution -> Transactions -> Status. If you have published selected then this “Status” field will show you “Approved” status.
Default status for paid submissions – when user submits his/her listing with you, this option helps you decide that whether directly publish it or make it a draft on your site which you can see and approve manually. This one is applicable when anyone selects the paid listing (price pack) on your site.
Likewise you can setup other things as well. To read things in some more detail, refer Tevolution guide.
3. Setup cities
Chronologically it is now turn of setting up cities for your site but that depends on whether you are using its plugin or not. You can simply make your directory awesome with an additional feature of adding as much as locations possible to your website and show listings city wise on both your site and map. This awesome feature comes with an additional plugin named as “LocationManager”. However it is not compulsory to have it to use directory plugin but using it makes you operate with multiple cities on your site easily (LocationManager is not an on sale plugin at the moment and comes bundled with Directory theme).
Lets have a look how location manager helps you manage your locations.
- As soon as you activate LocationManager plugin, automatically all the countries their zones and 3 cities will be inserted into your website.
- These locations are inter-connected (or say grouped) means particular country will show you only its own states, likewise particular state shows its own cities.
- It lets your users select their preferred city from an options box which comes from the T – Select a city widget on your site.
- You can also show listing wise map as well as detail maps using the 2 special widgets of this plugin.
- You can also get the city logs that shows you a total number of times any particular city has been viewed with the relevant IP addresses.
If you have Location Manager with you, please refer its guide to use it to its optimum.
4) Widget Setup
Generally websites are divided into certain sections which we recognize as widget areas, so to fill up these areas Tevolution and Tevolution – Directory plugin comes with the below given widgets helpful in various ways. You can easily drag and drop them. Let’s discuss these widgets in detail,
Tevolution based widgets
- T – About Us – It can be used to write something about yourself or company with some html <tags> or simple plain text as per your need. Usable in any sidebar area.
- T – Browse by Categories – Shows the posts by its category selected in this widget. It can be applied in any sidebar area.
- T – Browse by Tags – Shows the tags given to any post/custom post (whichever you have selected in this widget). It can be applied in any sidebar areas.
- T – Detail Page Map – This widget is specially made for the listing detail page. On placing it in the Listing Detail – Sidebar, it will appear in the sidebar and not in the content area but if do want it in content area then remove this widget from this widget area and follow this instructions. The suitable widget area is Listing Detail Page Sidebar
- T- Author Listing – It lets you show authors on your website with the counter number of their total listings posted on your site. You can either show all the authors on your site or can show specific authors selecting the role from the widget.
- T – Advance Search – Simply select the post type in it (like listing, events etc) for which you want to show advance search and save it.
- T – Homepage Map – single city – Will display a google map on your home page with whatever settings you have in Tevolution -> General Settings. The best suitable widget area is : Any home page area
- T- Category Page Map – single city – Will show a Google map on the category page of listings in sidebar. The only suitable widget area is Listing Category Page Sidebar
- T – Login Box – It gets activated when you activate “User Registration/login managment” module from wp-admin -> Tevolution -> Overview. It displays Login/registration form prior to login and as soon as user logins, it shows 4 links,
- Dashboard – Shows total information of user that he has added in his profile.
- Edit profile – Redirects to profile page (made using tevolution’s profile page shortcode).
- Change password – Redirects to the profile page of the user
- Log out – Logs out the user from his account.
Directory based widgets
- T – All Categories List – It displays a listing of posts belonging to each category of the post type selected in this widget. It is for the home page widget area.
- T – In The Neighbourhood – Helps to search the related posts of the listing whose detail page is opened on your screen. e.g. If I am looking at some listing ‘s detail page then this widget will help me finding other listings falling under the distance selected in this widget with respect to opened listing detail page. The Only suitable widget area is Listing Detail Page Sidebar
- T – Search by Address – It shows a search box using which you can search any listing post available on the whole website and the search result will get displayed on the search page. The most suitable widget areas would be Any Home Page area, Listing Category Page Sidebar, Listing Detail Page Sidebar, Listing Tag Page Sidebar
- T – Search by Miles Range – It displays a range bar on your website selecting range from which you can find the listing post matching that particular distance. This is doing using “ajax” so it shows you result on the same page without loading it again. The best suitable widget area would be
Add Listings
What are Listings?
It is quite a wide concept which means to keep a record of. So with this custom post type “Listings”, you can manage any kind of listing on your site whether it is an event, place, reviews etc. Basically it is one of the custom post type that gets activated as soon as you activate the plugin.
Start adding listings
Follow these steps to start adding listings,
- Adding a listing is similar to adding a regular WordPress post. Simply go to wp-admin -> Tevolution -> Directory -> Listing Category
- Now create a listing category (as many as you want). If you are going to make your site such that where you charge people on adding their own listing on your site then you can set a price for your specific listing category. This charge will get included into the price package selected by your user at the time of listing submission.
- Then, staying in the same listing section, click “Add a listing” and start adding your listing there. below
Here is the detail explanation of each and every fields that comes in add listing form.
A) Listing Information
- Google Map View – Whatever type you select for your map here that way it will appear on your event detail page of this particular event on your site.
- Address – To show where your event is getting organized on the map, enter the exact and accurate address and click “Set Address on Map” button to setup in on the map.
- Special Offers – It is a simple text field and will appear as one of the tab on the listing detail page. You can highlight your offer for any particular listing here.
- Time – This one is also a text field and so you can use alphanumeric characters here to specify the timings for your listing. (e.g. you have restaurant as one of your listing and you want to add its availability timings then you can write 10 am to 7 pm daily)
- Logo – You can also upload business logo of your own business or listing related one here. There is no upload limits applied here but uploading a bigger size may break your site’s design. So, we would recommend to upload an image with having an ideal size ” “of pixels.
- Video – To share your video, simply copy the embedded code of your video and paste it here. This video will appear on the detail page of your event.
B) Contact Information
Use this section to show your contact information on your event detail page.
- Phone – This number appears on the detail page of this event. So, enter the number on which you would like to be contacted.
- Email – The purpose is same as of phone number but here mention your email-Id.
- Website – If you have website, mention that too.
C) Social Account
- Twitter – What’s your Twitter handle? Specify here, with this your target audience will be able to follow you there as well.
- Facebook – Share your Facebook account/page name to let your users find and follow you there.
- Google+ – Same goes for the Google plus. Share your Google+ Id with them.
D) Price Package
This section comes from the Tevolution -> Monetize -> Price Packages. By default, a package named “Free” gets created automatically to give you a demo that how a price package will look like! Read in detail, how to create it.
Now, this section (price package) appears on both user-end (front end) and admin-end (back-end). But is more practical when anyone (user) is posting an event on your site and selects the price package which he would like to pay and then you approve his/her event listing. But same can be done from the back-end as well when you are adding an event from Tevolution -> Add an event.
So, if you haven’t created any price package, it will show you “Free” named price package and if you have created some more packages then it will be listed along with for the selection.
Where do these fields will appear?
1) Front end
To understand better, let’s take “Listings” (a custom post type) as an example but you can create any custom post type based on your need. To post a Listing from front-end i.e. user side, you will need a submit page that shows a form using which you/user can post a Listing on your site. To create it follow these steps,
- Go to wp-admin -> Pages -> Add New (Note: check whether you have submit page for listing by default? If not then create it using these steps)
- Copy this shortcode and paste it in your page.
[submit_form post_type='listing']and publish it - Now, place this page on your site (front end) such that your users can easily see it and add their Listings. (Tip: Generally, navigation menu (wp-admin -> Appearance -> Menus) is the best place for it)
2) Back end
- Go to wp-admin -> Tevolution -> Add a Listing
- Start adding your content and publish it.
How to add/edit/delete custom fields from the add listing form?
Above said fields are included by default when you activate Tevolution-Directory. If you want to add/edit or delete any of these field then go to wp-admin -> Tevolution -> Custom Fields Setup and look for your field and click “Edit” option that appears on keeping mouse pointer on it (hover).
Tip: As there may be so many fields, to find out that you are editing the correct field, check the column “Show in post-type” at Tevolution -> Custom Fields Setup to know which post type the field belongs to. Read Tevolution guide to know more on custom fields.
How to customize their visibility?
You may want that some of the Listings custom fields should be visible to admin but not to user in the submission form. This can be done very easily,
- Just go to wp-admin -> Tevolution -> Custom Fields Setup
- Look for the field that you want to edit and click “Edit”.
- Go to Display Options -> Display Location, it will show you 3 options in it that where you want this particular field to appear, select any of the options as per your need,
- Admin side (Backend Side) will show you this field only at the back-end at wp-admin -> Tevolution -> Add an Event
- User Side (Frontend Side) will show you this field only at front-end using event submit page.
- Both will show this field at back-end as well as front-end.
Read in detail, how to create custom fields?
2. Show Map view
Map view is a feature that helps you show a map showing locations of all the listings of that particular category in your map. It can be useful when you do not want to display a map directly on your site at the header part but want to give an option to users to select and view map of those listings on your site.
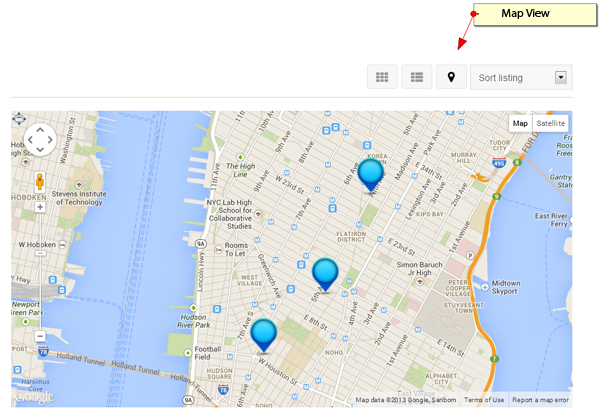
Map view is for category page of your listings so will be in effect there only. To have this view on your listing category page, follow these steps,
- Go to wp-admin -> Tevolution -> Map Settings, check mark the field Show map view in category pages.
- Save changes. Doing this, any map widget placed in the listing category widget area will not work. ( same is true for any of your added post type listing widget area as well)
3. Setup map marker icons
Map markers are icons that will represent the places of the posts belonging to a particular category on the map. We provide you a default map marker in the plugin but if you want, you can change it following below said steps,
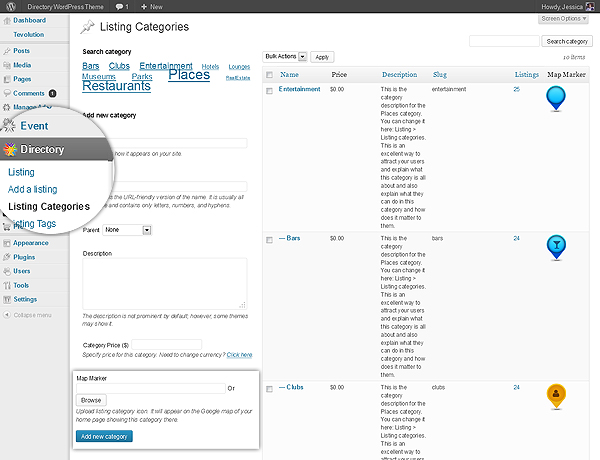
- Go to wp-admin -> Directory -> Listing Categories
- While creating a new category, there is a field given at the last position Map Marker, upload your favorite icon there and Add the category.
- Same is true for replacing icon in the existing category. Just click edit for that category and upload your icon there.
[templ_msg_box type”alert”]These map marker icons works only with “listings'” post type created by this plugin and not with any other post types created using Tevolution plugin. If you want to use these markers for other post types as well, read this Article which helps you to setup different map maker icon for differemt categories
4. Setup sorting options
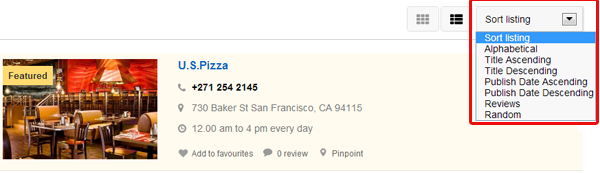
- Go to wp-admin -> Tevolution -> General Settings -> Category page settings
- 2 types of looks (layouts) are available in the field named as “Show the sorting box as” that helps you show the sorting options in a particular way,
- Simple Links – It will show all the sorting options as simple links clicking which it will sort the listings accordingly.
- Sorting options in sorting box, this is the option where you can check mark any or all the options given there (explained in Total sorting options available) which will appear in the sorting box said above and this total option will appear on your site from where all the sorting will be possible.
Except the Random sorting option, other sorting options will not consider to show feature listings’ at top position.
Total available sorting options are,
- Alphabetical – Shows A to Z alphabets above all the listings clicking which you can have all the listings whose title belongs to that particular alphabet. e.g. If you click “A”, it will show all the listings whose title begin with alphabet “A”.
- Title Ascending – This will show listings in alphabetical flow i.e. will show listings on the top starting from A to Z.
5. Listing Views
There are two types of views available “List View” and “Grid View” as buttons (options) on your listing page from which your user can select any of them and can see the listings accordingly. By default list view will be used.
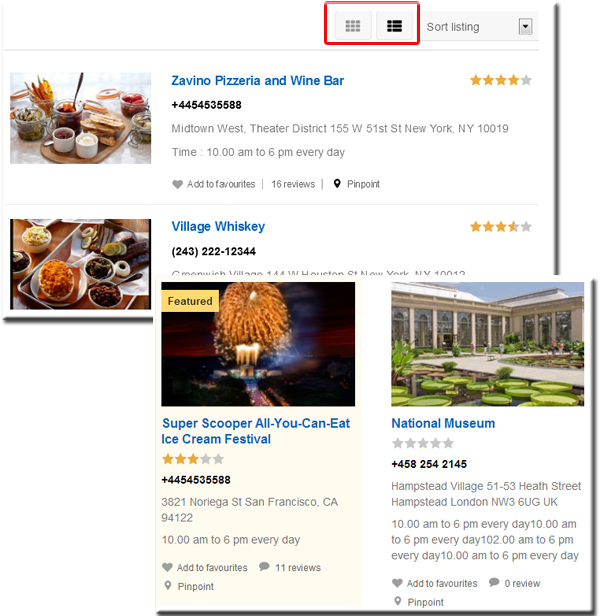
What do these views mean?
- List View – Shows listings one after another horizontally i.e. row wise
- Grid View – Shows listings one after other vertically i.e. column wise.
How to setup these views?
- Go to wp-admin -> Tevolution -> General Settings -> Category page settings
- Select your needed view from Grid view, List view and Map View from the option “Default page view“
6. Add to favorite link
Below mentioned questions will help you understand about this feature well,

Where does it come from?
- Firstly, there are 2 things in it, one is icon and other is label. Icon comes from a css class defined in the code and label is also hard coded so that comes too from the code. So, you can modify them or can remove them by customizing some code.
How to change icons and label name of this feature?
A) Favorite Icon
These icons are made using CSS with their specific names. So, if you want to change the icons then,
- Go to http://fortawesome.github.io/Font-Awesome/icons/
- Click on your icon to get its CSS class which you will be adding in the code.
B) Change label name
If you want to change the label name “Add to favorite” to something else then simply follow these steps,
- Install Poedit tool. Know how to use it.
- Go to ..\wp-content\plugins\Tevolution-directory\languages, there open the file “en_US.po”
- Search for the word “Add to Favorite” and replace it with yours and save it.
- Refresh your browser to see the effect.
How does it work?
Basic idea behind it is that it will help you store your favorite listings in your account and sustain its information till you want. But to have it, there are certain conditions,
- It will only be available to your site users who have registered with you.
- So, for that you must have registration, profile and login page created on your site.
- These pages come from the User registration/Login Managment module in Tevolution -> Overview, so you need to activate it first
- These pages are made using shortcodes and will get included in wp-admin -> Pages. Refer Tevolution guide for their shortcodes and detailed information.
- On user registration, an author page will get created automatically which will show user name along with the option “Logout”.
- On clicking user name it will redirect you to author page where these favorites lists get stored. Know more, what else you can do with author page?
7. Review counter
It shows you the number of reviews that a particular listing has got (reviews can be added from the detail page only). It appears right on its category page which is a kind of helpful information when you are just concerned with review numbers and do not want to see the whole detail page for the sake of it.

- Like some other option, this one also comes from the code.
- You can change the label of it or can remove it completely by customizing some code.
To change the label name follow these steps,
- Install Poedit tool. Know how to use it.
- Go to ..\wp-content\plugins\Tevolution-directory\languages, there open the file “en_US.po”
- Search for the word “reviews” and replace it with yours and save it.
- Refresh your browser to see the effect.
8. Social site sharing buttons
Basically, there are two types of social sharing buttons, A) one that is coming (controlled) from Tevolution – > General Settings and B) other one is the (default) custom fields (from wp-admin -> Tevolution -> Custom Fields Setup) that come on the submit listing page. Let’s know their purpose and working,
A) one that is coming (controlled) from Tevolution
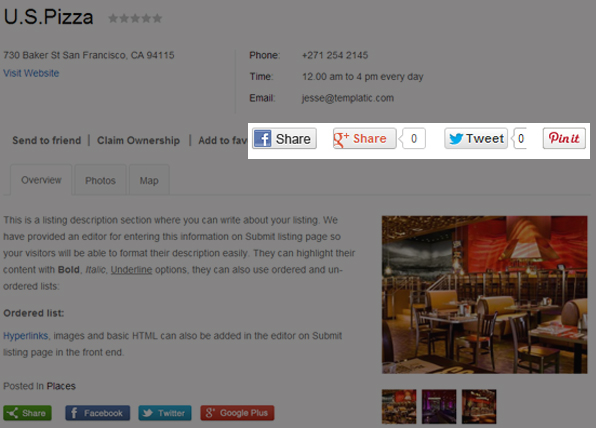
These buttons will take the user to his/her own Facebook dashboard and will allow to share, post etc that particular listing. We only provide you four social sharing buttons which you can check/uncheck to show on your site. If you want to add more of such social sharing button, you will have to code for it.
- Go to wp-admin -> Tevolution -> General Settings
- Check/Uncheck your needed social sharing buttons from the field “Show sharing options for” located under the section “Detail/Single Page Settings” there.
B) other one is the (default) custom fields
These social sharing buttons will redirect the user to the actual URL which has been entered in its relevant field on the submit listing page at your site. These fields are default custom fields which you can edit/remove from your submit listing form follow the below mentioned steps,
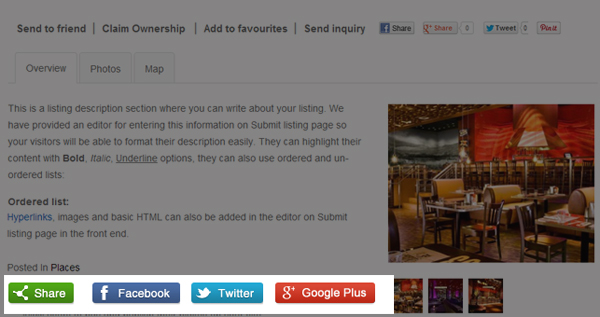
- Go to wp-admin -> Tevolution -> Custom Fields Setup
- There you will find these 3 social sharing fields “Facebook”, “Twitter” and “Google+” which you can edit/remove from your submit page.
Manage Pricing
After creating submit pages and their settings, you would also like to charge your users for submitting listings with you. For that, you require to setup some more things as mentioned here,
1. Setup currency with which you will operate
Here are the two steps required to have your desired currency type.
A) Setup currency
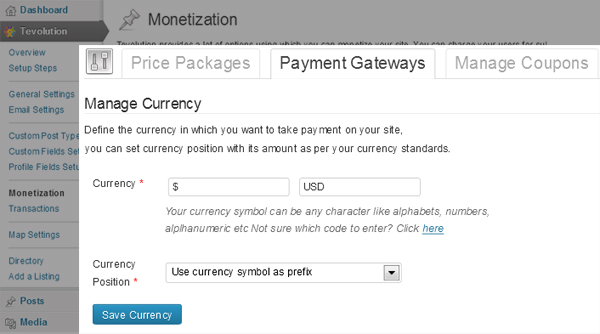
Whatever currency you choose will be applicable to all your monetize transactions on your site. If you do not know your currency code then you can find it here. Follow these steps to setup currency,
- Go to wp-admin -> Tevolution -> Monetize -> Payment Gateways
- There select your currency, its symbol and its position
- Click “Save Currency”
B) Where will it appear on front end?
It will be visible wherever you have quoted price using this plugin. Some of them will be,
- On listing submission form, it will show price package value in your selected currency
- Deducts coupon discounts taking your currency as base and shows total payable bill amount
- Shows your listing categories in your selected currency. (Category price that you add while creating any listing category for your users under which they post their listings)
- As basically it is related to your money involved transactions, you can also see it at wp-admin -> Tevolution -> Trasnactions
Note: Currency selected by you is only applicable to the transactions and listings done using Tevolution-Directory plugin.
2. Create price package for your various services
Price Packages
You can have single or multiple price packages as per your need. Follow these steps to create it,
- Go to wp-admin -> Tevolution -> Monetize -> Price Packages
- Click on “Add New Package” and fill up the options as per your need.
You can setup all the options as per your requirement but here are some of the options highlighted which are quite important for any business,
- Define Package Type – You can setup here that how you want to charge user on submitting listings with you. There are 2 options,
- Pay per post – This will charge every time user comes to post his listings. In short, it will charge all listings individually.
- Pay per Subscription – With this one, you can specify total number of posts that a user will be able to list on your site under this package.
- Define Billing Period – It is actually a validity of your package that till what date it will stay active. To renew it, user will have to pay for it again.
- Setup Recurring payments – If you setup a time (validity) period for your package type then you must have to setup recurring payment as well to make it possible for your users to renew their subscription. So, just check mark this option as “yes”. But you can only use this feature with Paypal payment gateway.
3. Install, configure and activate Payment gateways
As you are building a website where you will accept the listings from others and will charge them for that then the core requirement that emerges is of ONLINE PAYMENT ACCEPTANCE, here is how you can do it,
Pre-condition:
To use any payment gateway you must have merchant’s account with them. By default with Tevolution plugin, we give you “Pre Bank Transfer” and “Paypal” gateways where you can use pre bank transfer without merchants account and where you have to manually approve the payment status. To use “Paypal”, you must have merchant’s account with them as you have to specify your Paypal mail account while setting it up at the back-end.
To have extensions, you can purchase and install some more payment gateways according to your requirement.
Activate gateways
- Go to wp-admin -> Tevolution -> Monetize -> Payment Gateways
- You will be having a gateway table at the bottom of your screen, just activate/deactivate it from the column “Action”
- As soon as you activate it, click the “Settings” option that appears right below the gateway name and fill up all the information required there and save it. You can read gateways’ users guide available at our doc center to know each and every thing in detail.
Note: Every payment gateway extensions purchased from Templatic comes with a text file named as “readme.txt” to guide you about necessary things to use the extension. So, please refer it as well.
You can add coupons to your site using which your users can get some discount while submitting a listing on your site and at the same time you can use it as a publicity tool too. Follow these steps to create coupons,
- Go to wp-admin -> Tevolutin -> Monetize -> Manage Coupons
- Add your coupon using “Add a new coupon” link given there.
- Fill up the fields given there and save it.
Here added coupons play a vital role on your submit page. Your submit page asks for the coupon code (at the bottom) and then there is a verification button given using which it verifies that do you really have a coupon with entered code? If yes, it deducts it from the total payable amount.
But how you will let your users know about it?
Well, there is no special feature given for it. So, you can simply promote it on your blogs, social media etc and as you can define the expiry date for the coupon, it becomes easy to maintain for you.
How to remove coupon code field from submit form?
It is very simple,
- Just go to wp-admin -> Tevolution -> Custom Fields Setup
- Search for the word coupon code. it will show the custom field with the same name.
- Delete it and you are done.
- Refresh your browser to see the effect.
View and edit all your transactions
Whatever transactions using this plugin are done where payment is involved are stored here with each and every information related to transaction and payment. Payment status shows you whether payment has been made or is pending yet.
What and how to edit things here?
- If you need then you can manually change the Status from “Pending” to “Approved”. Simply click the ID number of the transaction and change it from “Transaction Status”
- You can search transaction report based on your specified criteria using “Generate Transaction Report”.
- You can also export all your transactions to a CSV file. Please note that it will export all your transactions and not just the searched one.
- You can setup different color for different custom post type in your transaction report. Click on the link “You can change transaction color settings from here..” given in the section’s main description on the top of the screen. Just pickup your desired color from the color picker ans save it
To read more about transactions, refer Tevolution guide
If you have followed this tutorial and still facing any difficulty, Feel free to create a new ticket at Contact us and we’ll help you out.