Theme installation
- To install the theme, login to your WordPress dashboard and navigate to Appearance ⇒ Themes.
- Click add new ⇒ Upload Theme.
- Using the file upload dialog, upload the Zip file you have downloaded from Templatic’s member area, and click install now.
- When the theme installation is complete, click activate to activate the theme. This will take you to the setup wizard.
Installing your theme through FTP
- Download the eCommerce theme Installation file from the member area and extract them using software like 7-Zip. Use the “Extract here” option; don’t extract into a new folder.
- Navigate to /wp-content/themes/ and upload this folder.
- Now
- Login to your WordPress dashboard, navigate to Appearance ⇒ Themes. You will find the eCommerce theme in the list. Activate it.
- Upon activation, you will be redirected to the setup wizard and it will install and activate the required plugins, and update your site with the sample data too. (Skip to the setup wizard)
- When asked to, enter the license key available inside our member area.
The theme setup wizard will help you initialize your theme by setting up plugins, sample data, etc. Even though it is optional, we highly recommend you follow these steps to set up your site easily.
The setup wizard
To quit the setup, you can use the “return to dashboard option”, but it is not recommended. The following are the steps of the setup wizard to help you prepare your website:
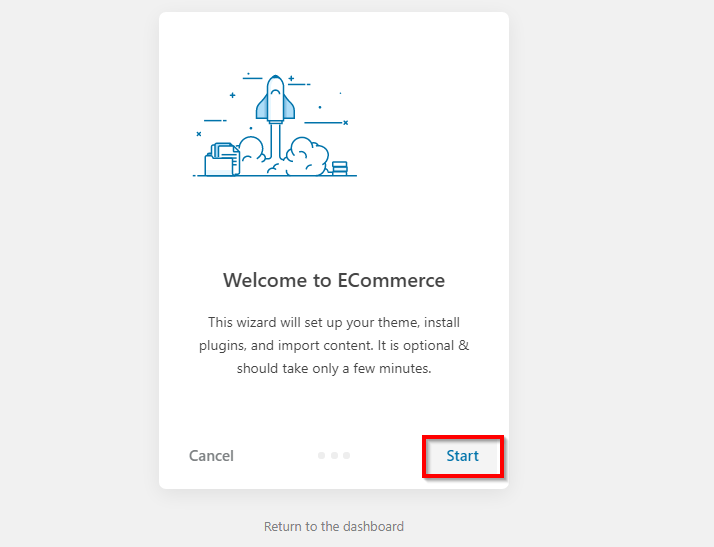
- Pressing “Start” will initiate the setup processing.
- Install Plugins: This step will configure your website with the required plugins for your site. Again click “Install”. You can remove the plugins you don’t need at a later stage.
- Import content: This will import the sample data. Sample data makes your website building process easier with the dummy data, images, and widgets in the places. With the sample data installed, your website will start looking like the theme demo and you can edit the parts you want to change to customize your site. Click import and wait till the dummy data is imported.
- At the end of the setup wizard, you can choose to “View the website” or “return to the dashboard” for further editing.
Setting up the header
1. Changing logo
![]()
To upload the logo navigate to Appearance ⇒ customize ⇒ Site Identity ⇒ Logo.
You can even change the site title, and upload a site icon from here.
Setting up the menus
Menus on your eCommerce play a very important role. To set the menus for your online store, follow the steps mentioned below:
1) This menu can be set by navigating to Appearance ⇒ Menus.
2) Choose the Main menu at “select a menu to edit” and then start editing it. You can add, remove and manage the hierarchy of the menu from the “Menu Structure” section.
3)When you are done editing the menu, click the “save menu” button and changes in the menu will be reflected on the front end.
Alternately, You can also create an all-new menu with the menu items of your choice and display it over here by choosing the location “secondary”.
Setting up the Homepage
Homepage Standard
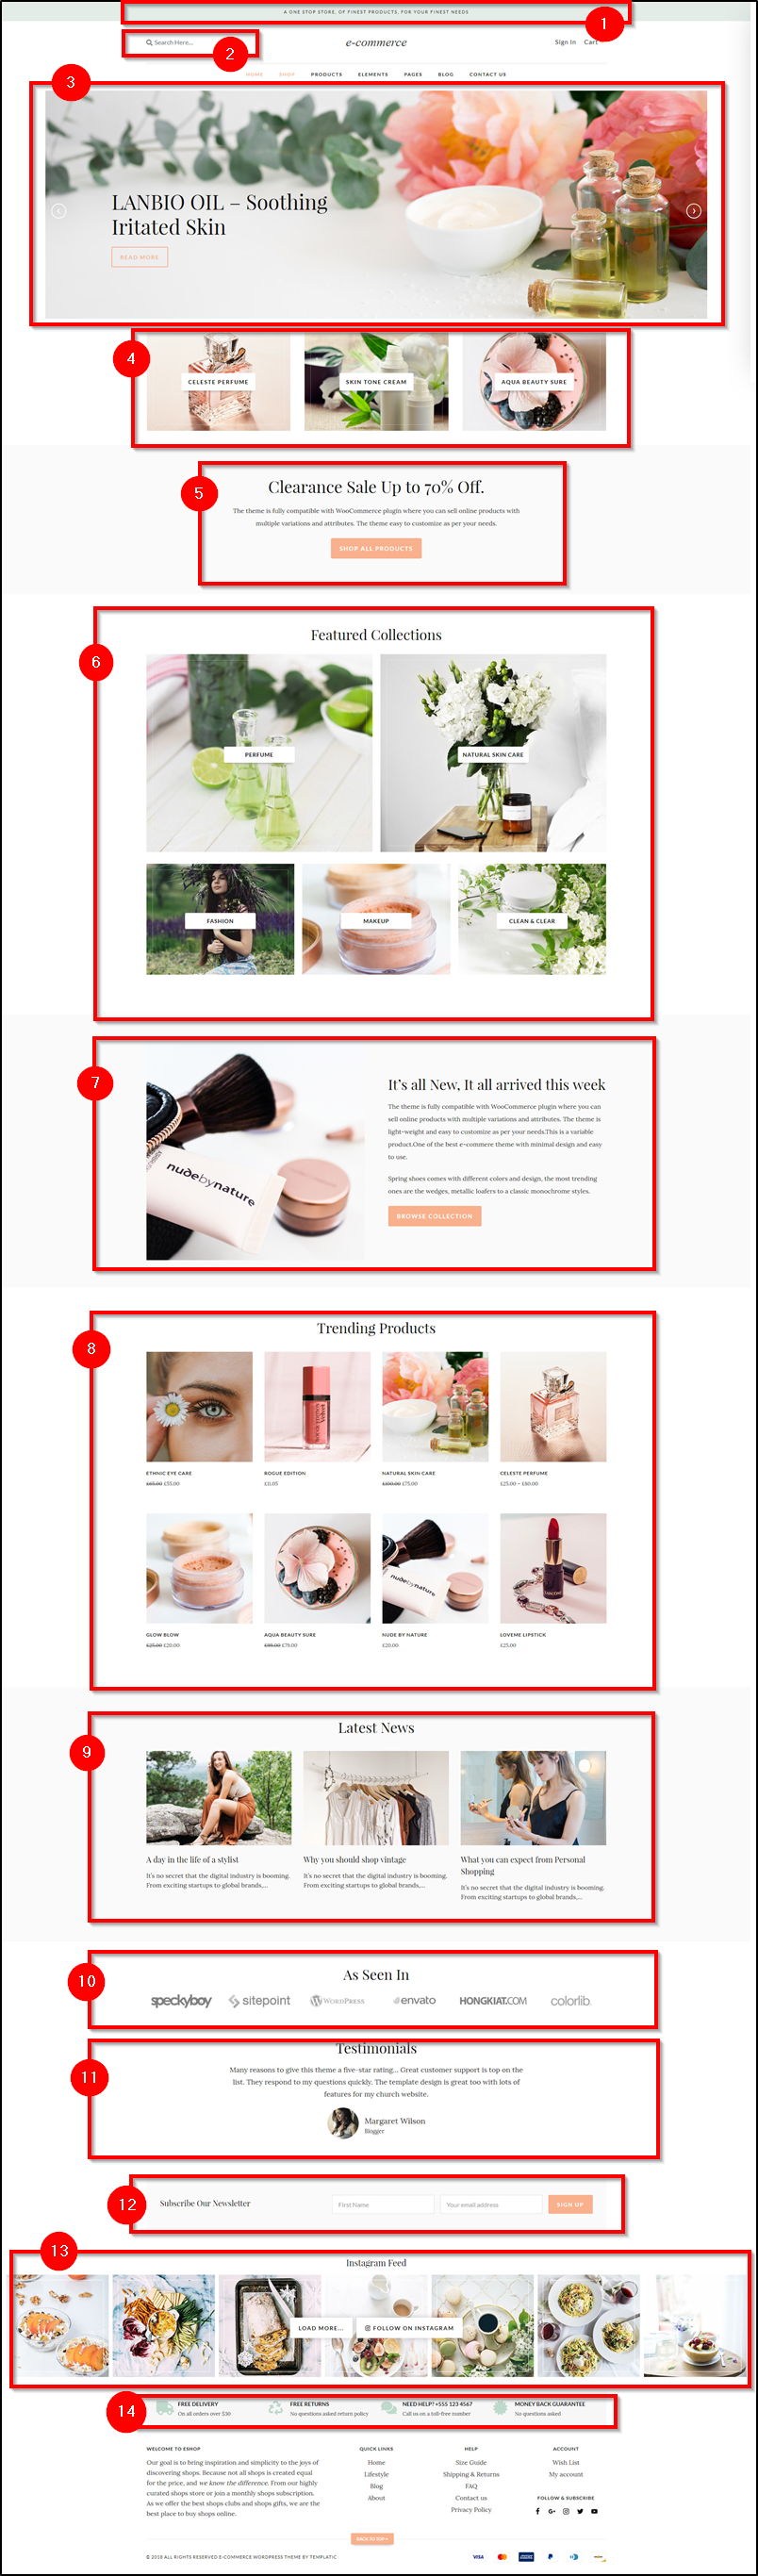
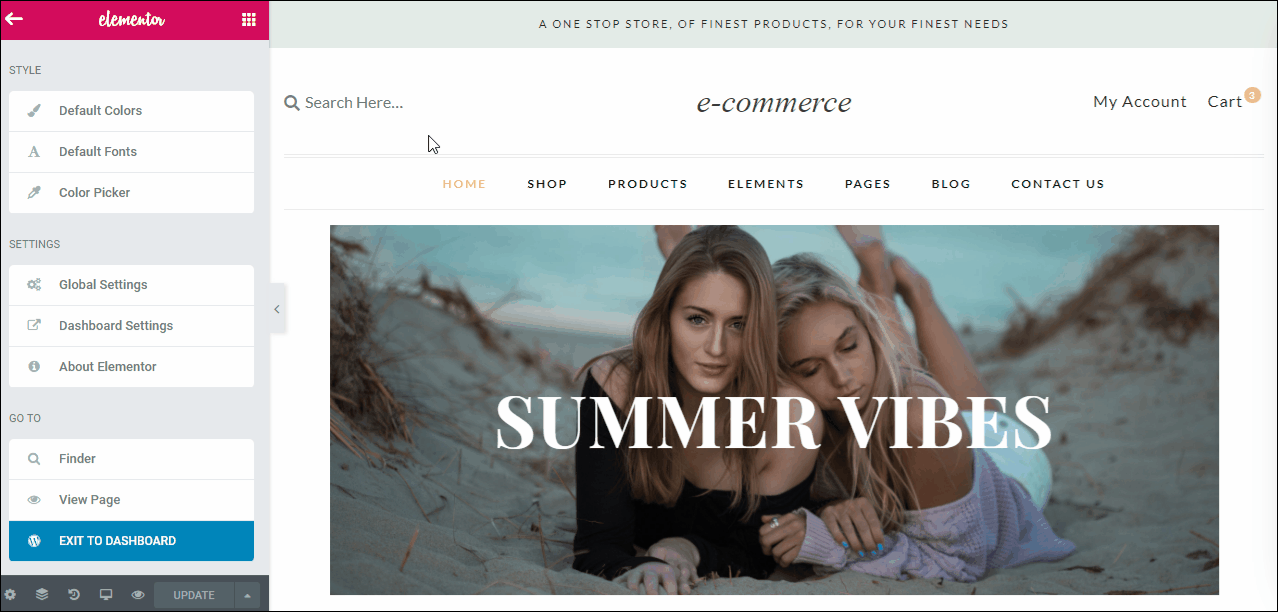
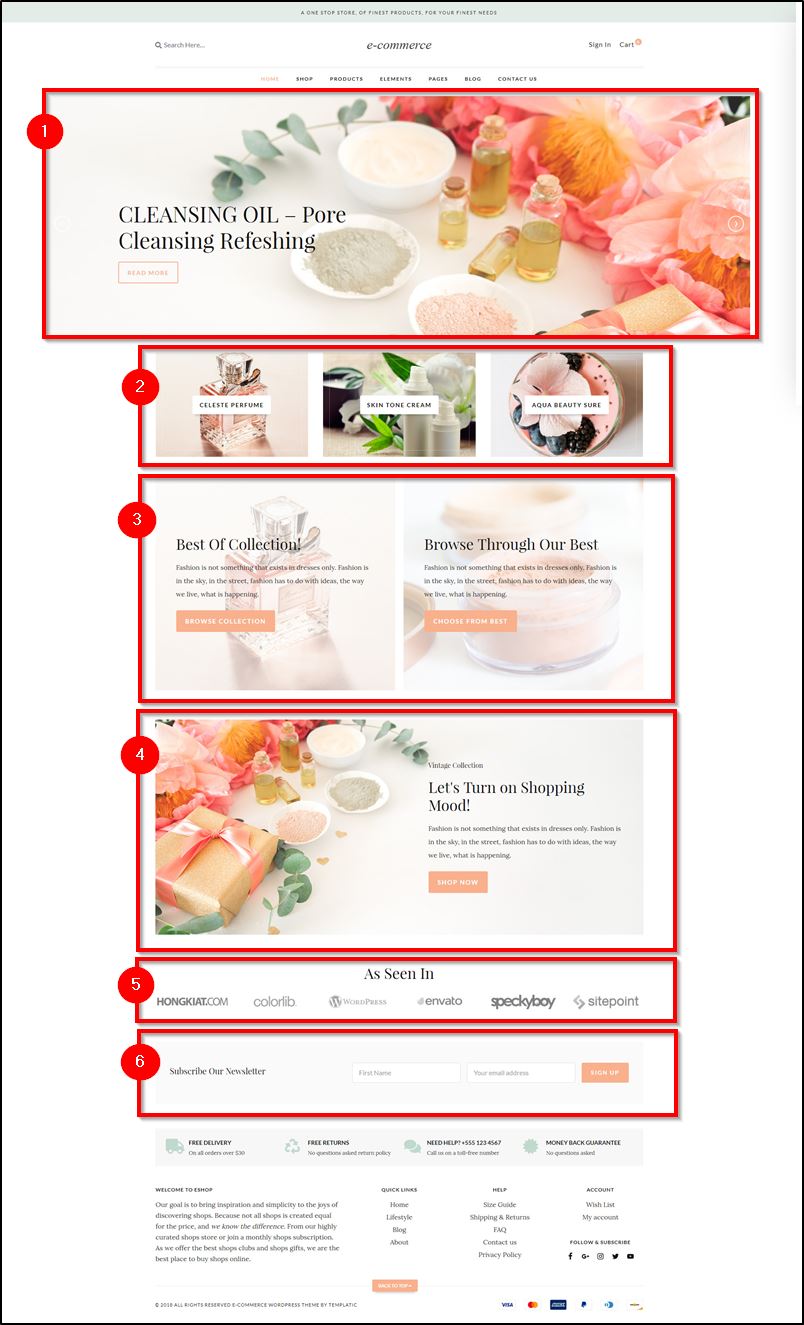
1. Changing the banner area
The images in the banner are featured posts. The banner images are infact the featured images of the posts you select.
To feature a post, or to change the banner area, you can navigate to Appearance ⇒ Customize ⇒ Theme Setting ⇒ Slider settings, and enter the post Id numbers.
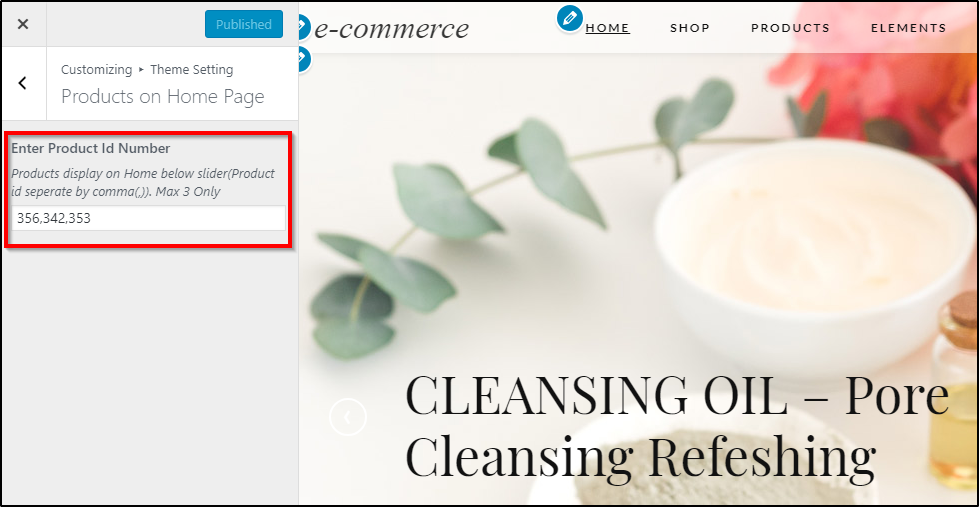
2. Below banner products
As you can see, these products images are sort of featured products. To change what products are featured, you can navigate to Appearance ⇒ Customize ⇒ Theme Setting ⇒ Products on the home page, and enter the Product Id Numbers of the products you want to be featured.
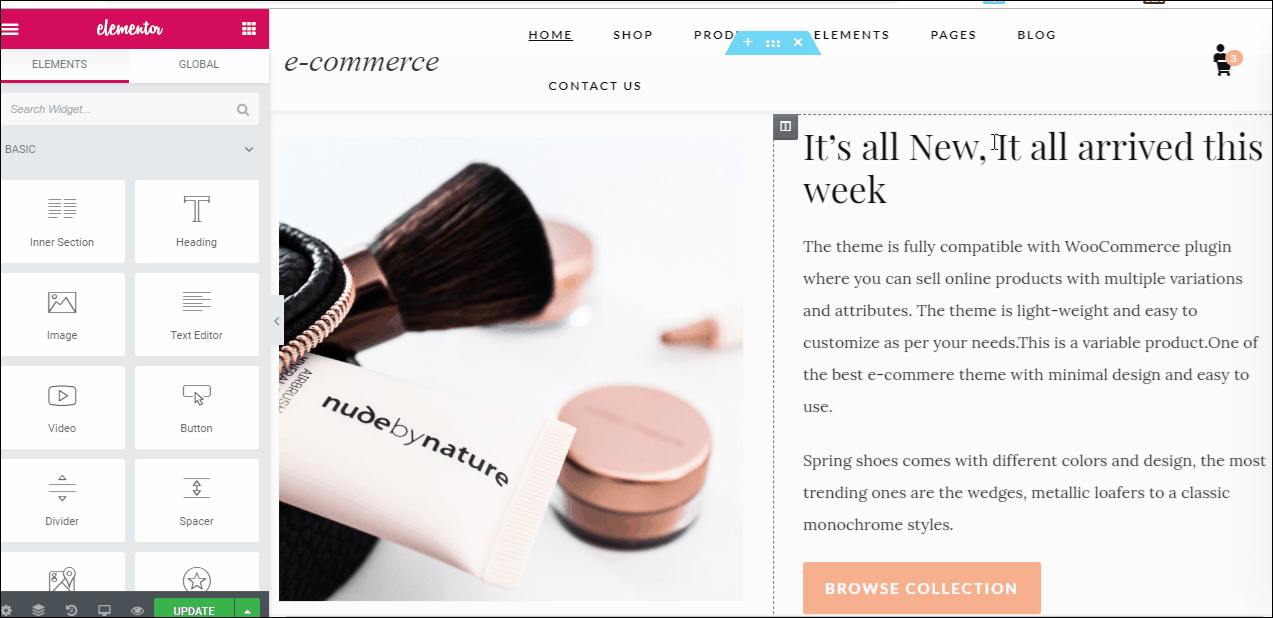
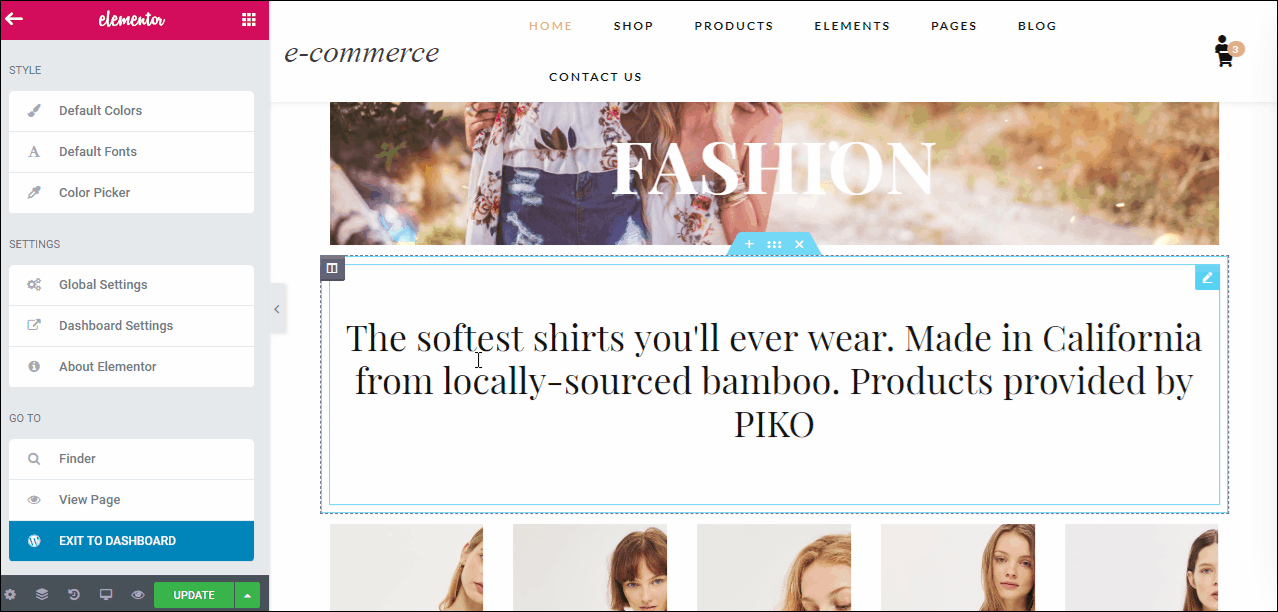
3. Text area
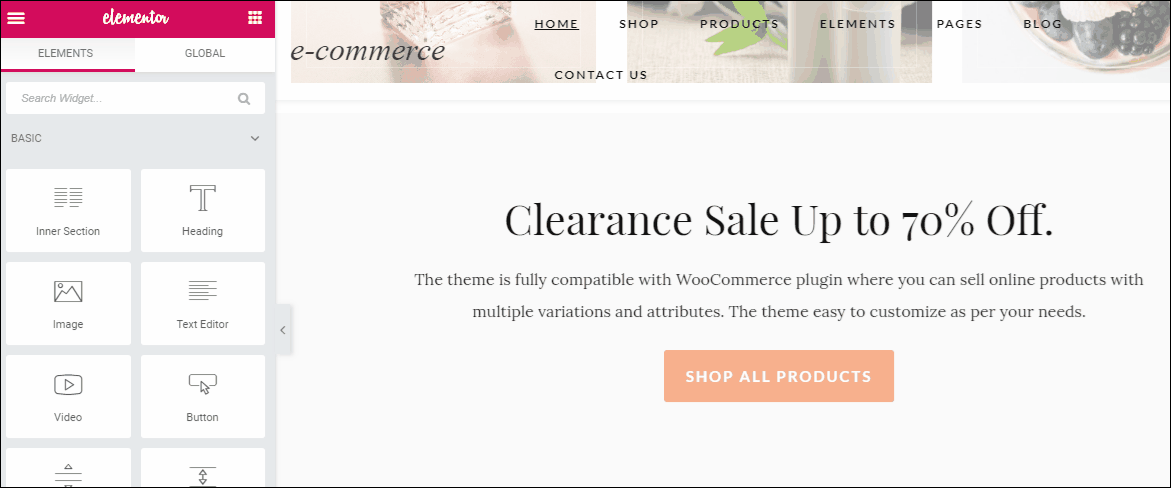
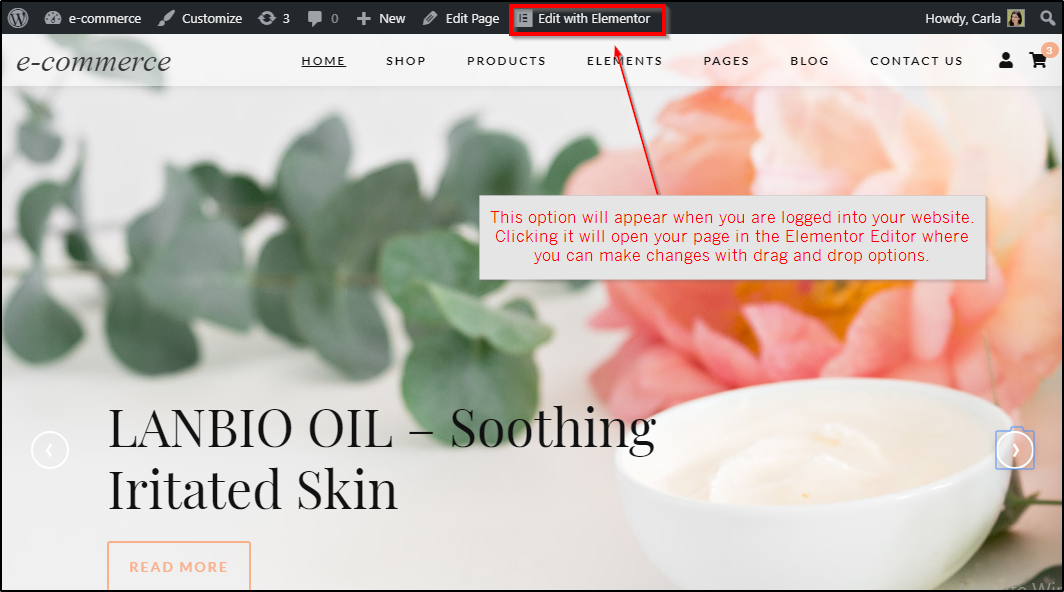
To edit this section of your WordPress eCommerce theme, open the page in Elementor. The Edit with elementor option will be visible when you hover over the page name or it appears above your page when you are logged in.
When you are using the Elementor editor, to change the text, all you need to do is to click on the text element you want to change and start typing right away.
This is how you can change the text. below the title
Click on the button to change the text, color, effect, etc.
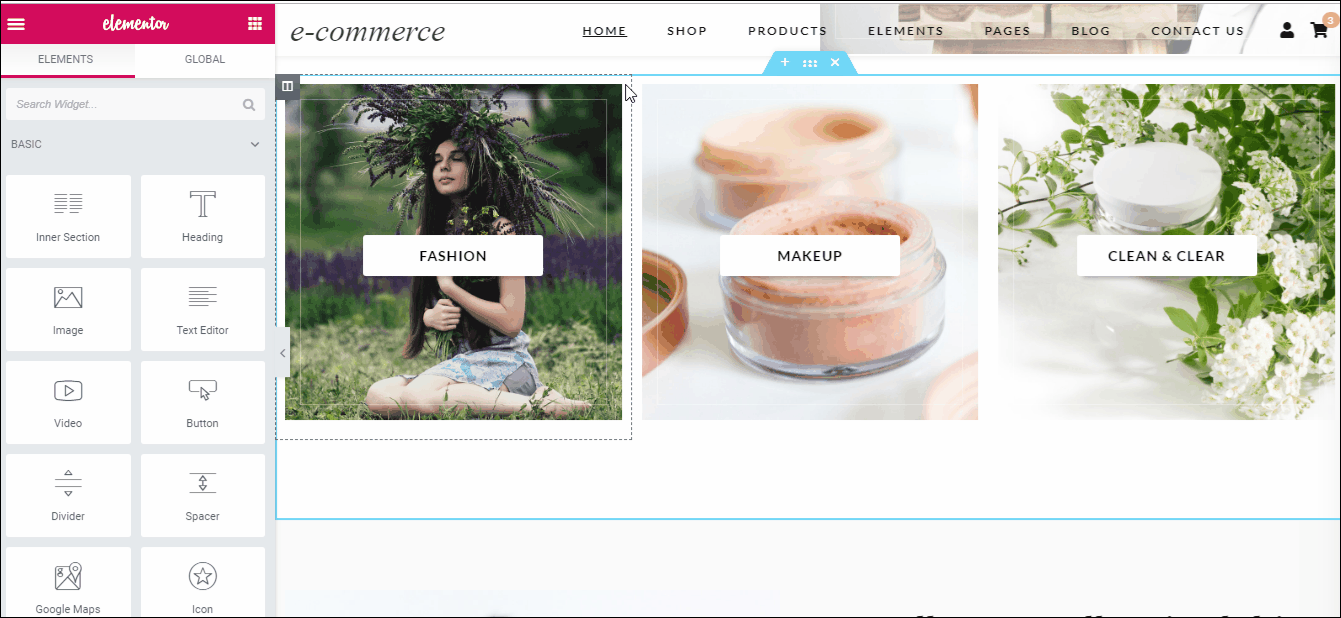
4. Featured Collections
The featured collections section is too designed with elementor. So you can easily change the content there.
Using the Elementor options, you can change the image, change the text on image and link it to the page of your choice.
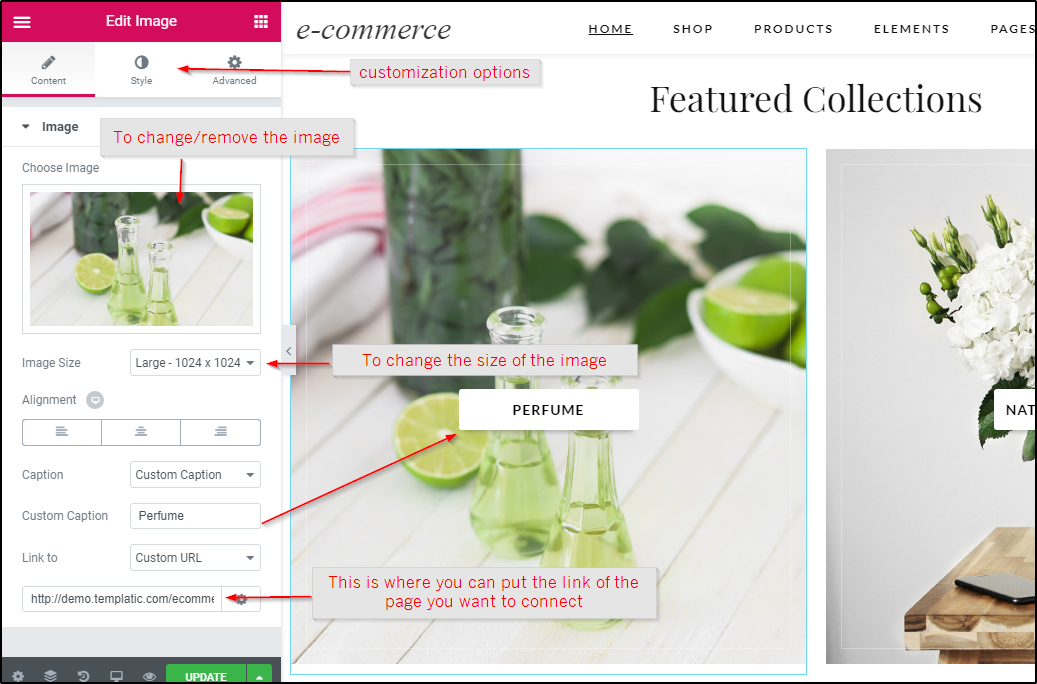
To duplicate any section created with the Elementor page builder, simply rightclick on the section and choose duplicate.
5. Text + Image section
This is a simple section with an image on the left and text + Button on the right. It is a simple section that can be edited through the drag and drop editing options of the Elementor page builder.
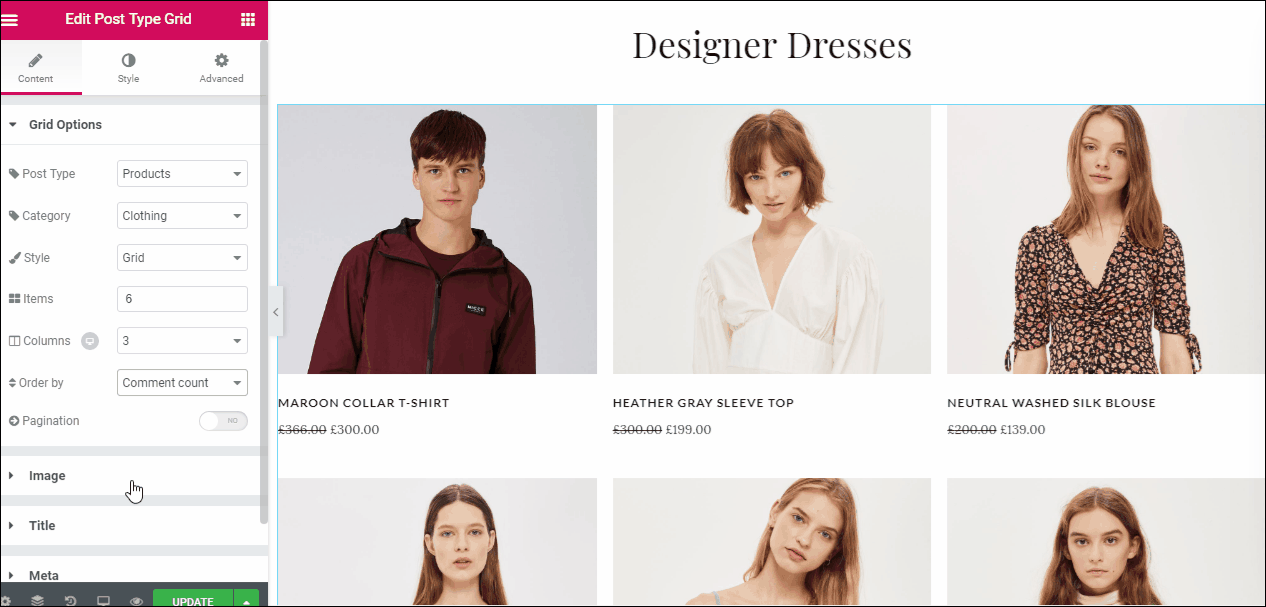
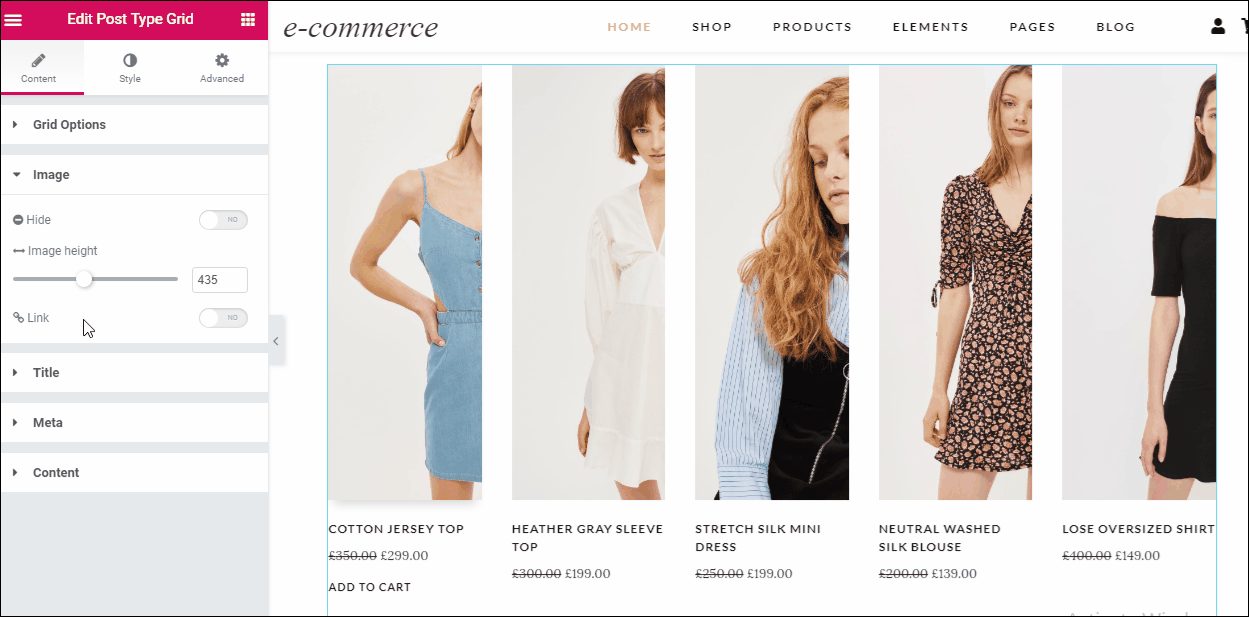
6. Trending products
This section lets you show a grid of products on the homepage. You can choose what you want show here: products, pages, or posts. Besides, you can choose the category of the product, page or posts you want to show. It also lets you manage the number of columns and the number of products you want to show in this section.
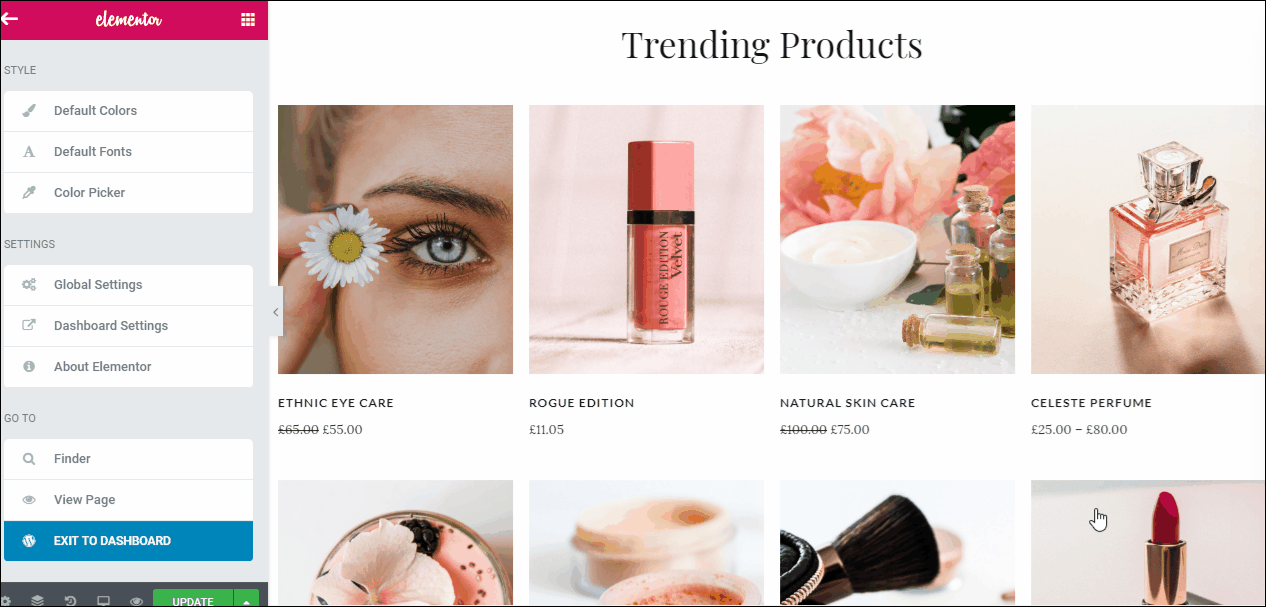
You can also change the formatting and manage the design of this section using the Elementor settings as shown below.
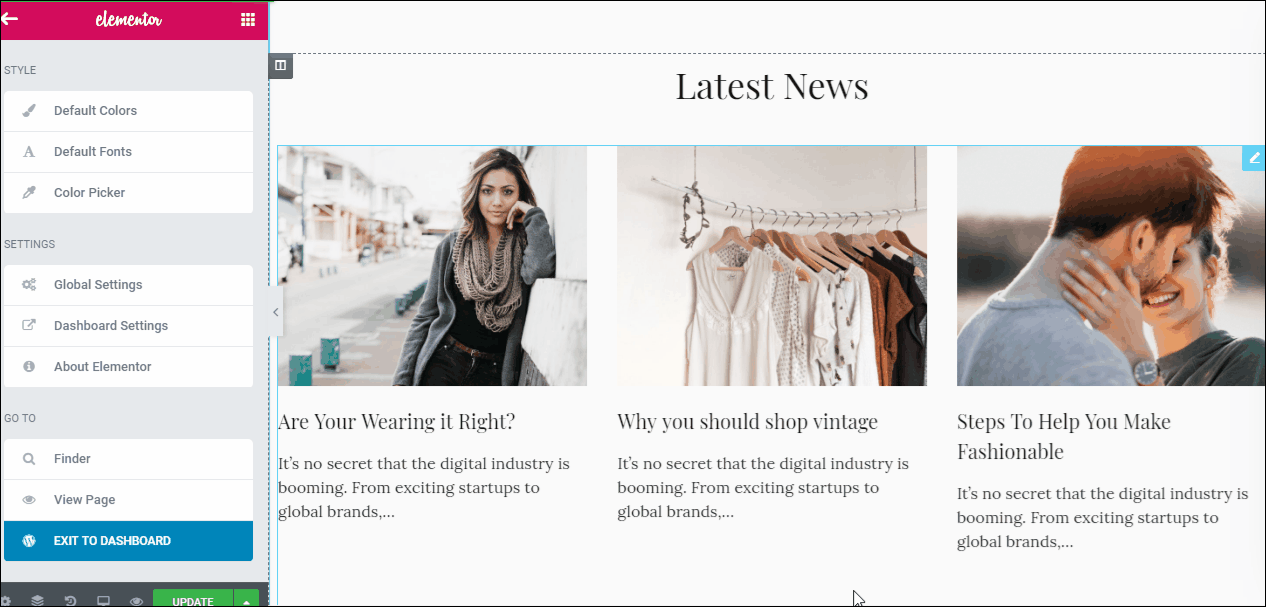
7. Latest News
Create a section with latest news/blog/posts/products here. You can change this section using the Elementor Page Builder.
This section too can be edited just like the previous section. You can set the image height, the number of blogs, adjust the column numbers, etc.
8. As seen on
This is where you can showcase your partners or similar sections.
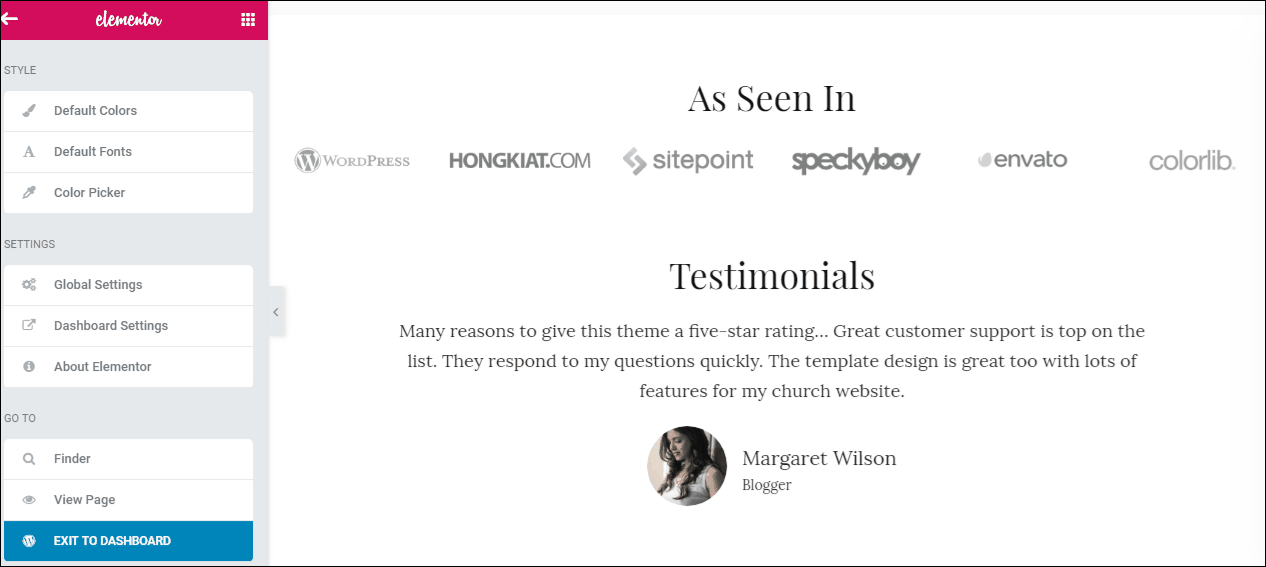
This section lets you display a series of icons. The icons can be added in form of a gallery. You can click on the gallery image to start editing the gallery.
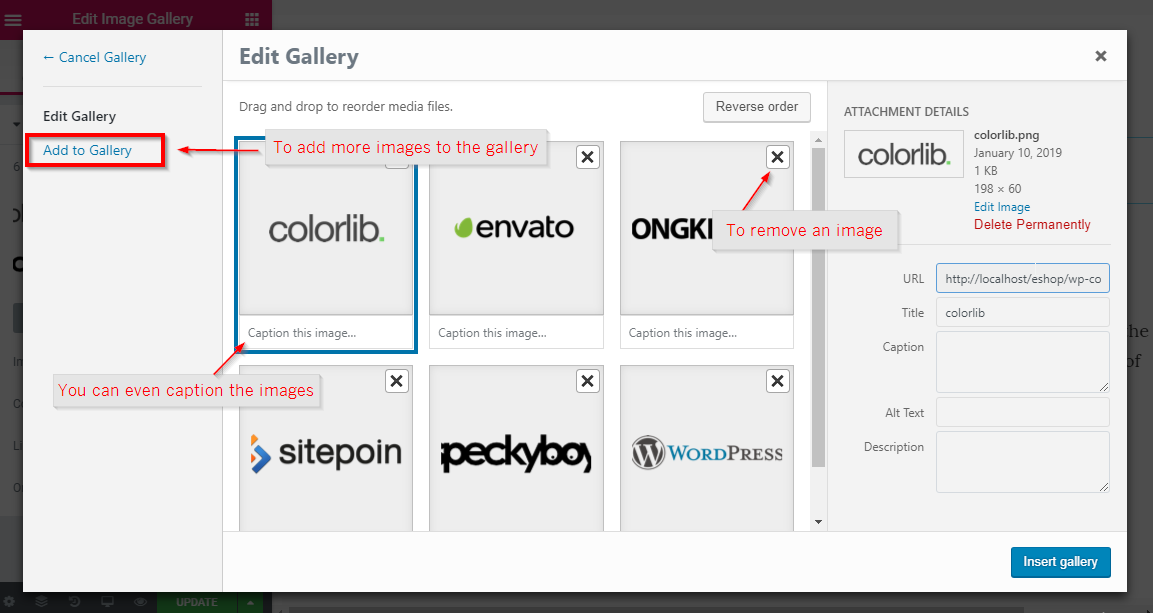
You can arrange the images in the gallery by simply dragging and dropping

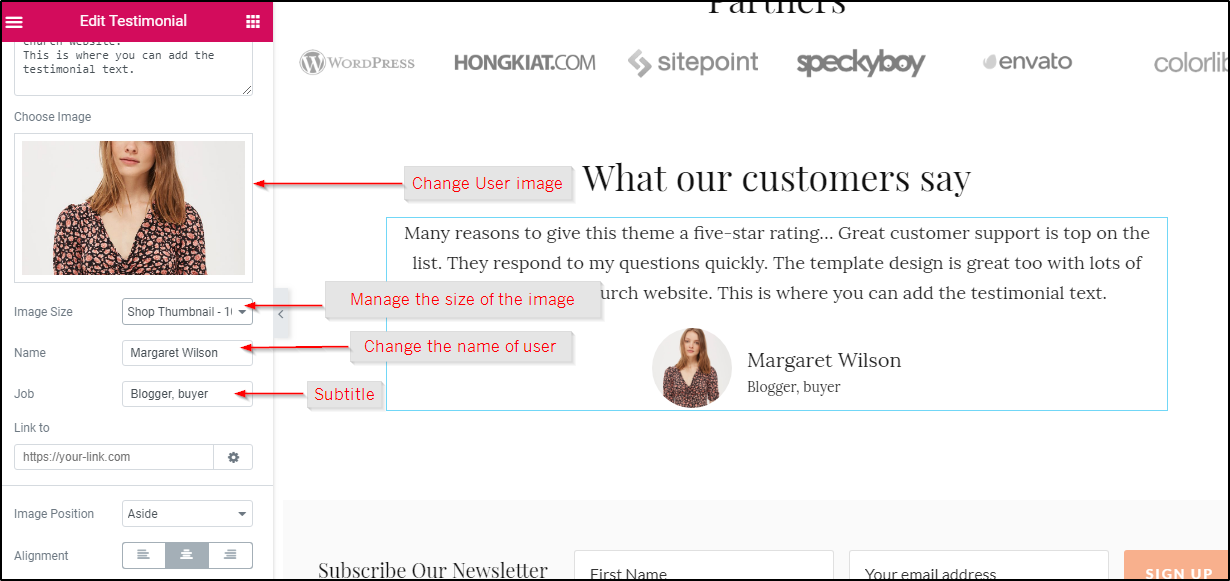
9. Testimonials
This is the section where you can display testimonials from your buyers. It can be edited easily with the Elementor page builder.

You can set the user image, manage image size, name, etc.
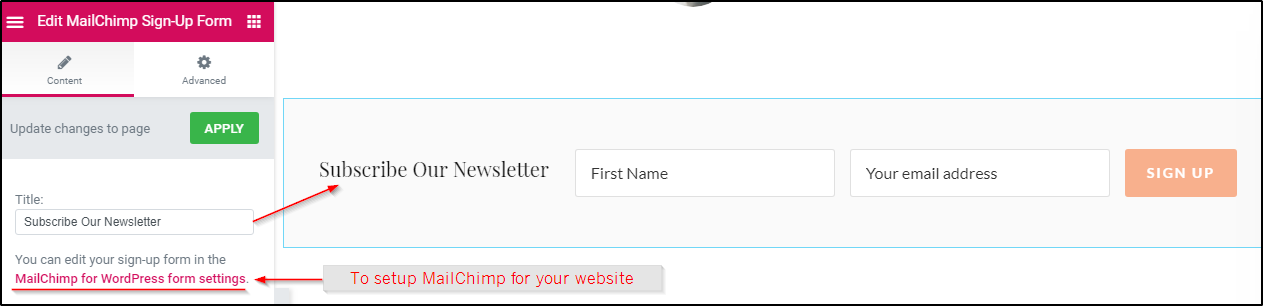
10. Newsletter
This is where you can ask your visitor to subscribe to your newsletter. This section can be edited through the Elementor Page Builder.
11.Instagram Feed
The Instagram section can be managed by navigating to Appearance >> Footer – Full Width Widget Area >> Custom HTML. If you want to remove this section, you can remove this section.
12.Text section above the footer
This section is a Custom HTML widget with the HTML code to display the icons and text for free delivery and other services. To change the text, navigate to Appearance >> Widgets >> Above footer.
The widget consists of the code to change the text and icons. You can have a look and easily change the text in this widget.
Homepage Lookbook

1.Banner area
Click on the text on the banner just by clicking and starting to type.

2. Below banner areas
This section is completely based on Elementor page builder. To edit it, click on the section and start editing.
3. Shop these looks
This section can be edited through the Elementor Page Builder. You can choose the type of products you want to display the products in the grid, the number of columns, etc.
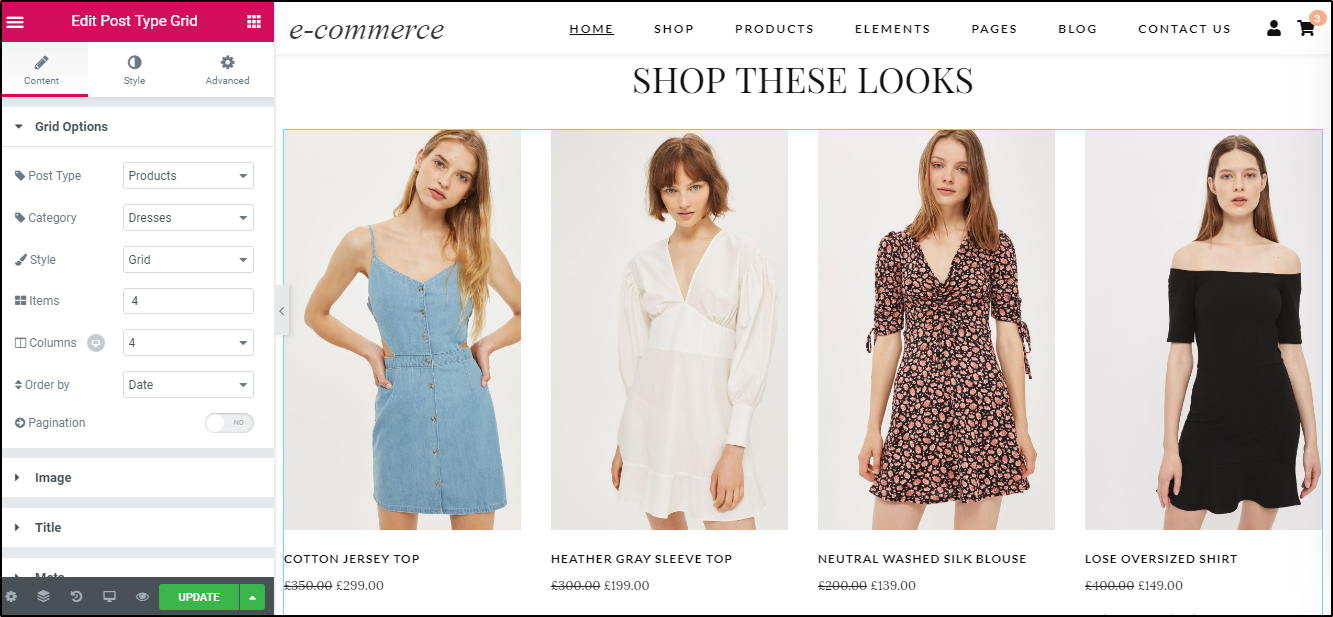
The title be easily edited using the Elementor option
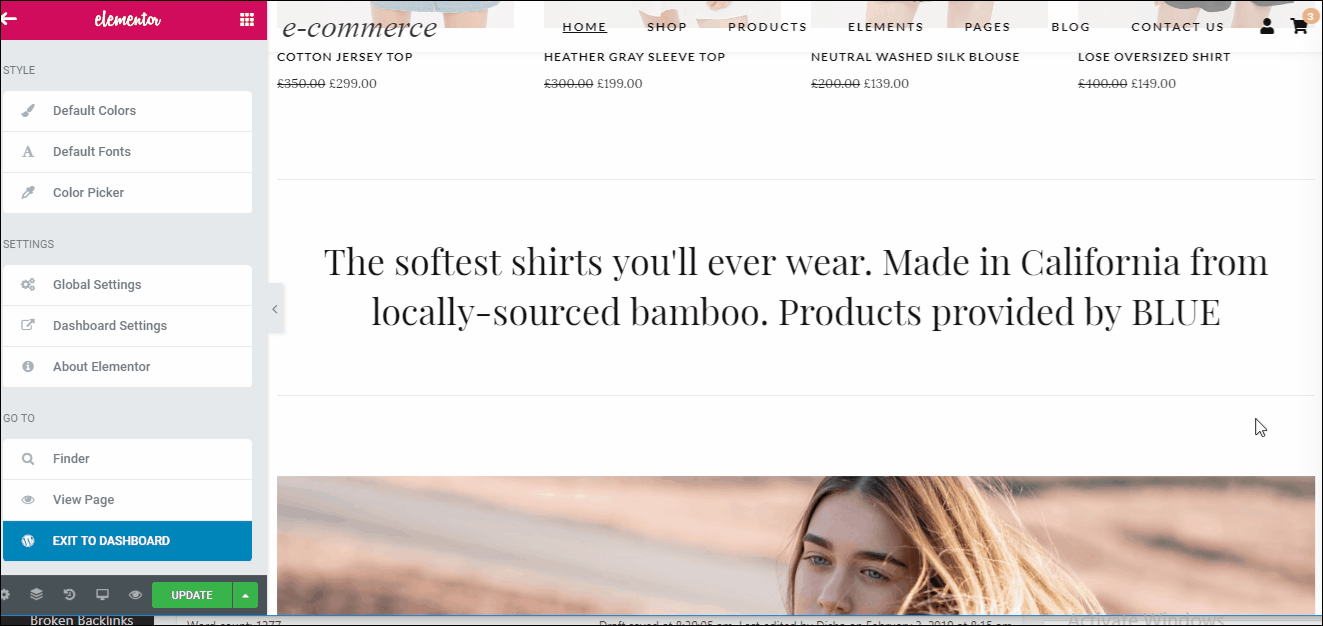
4. Text heading
This is an ordinary text section that you can easily edit using the Elementor Page builder.
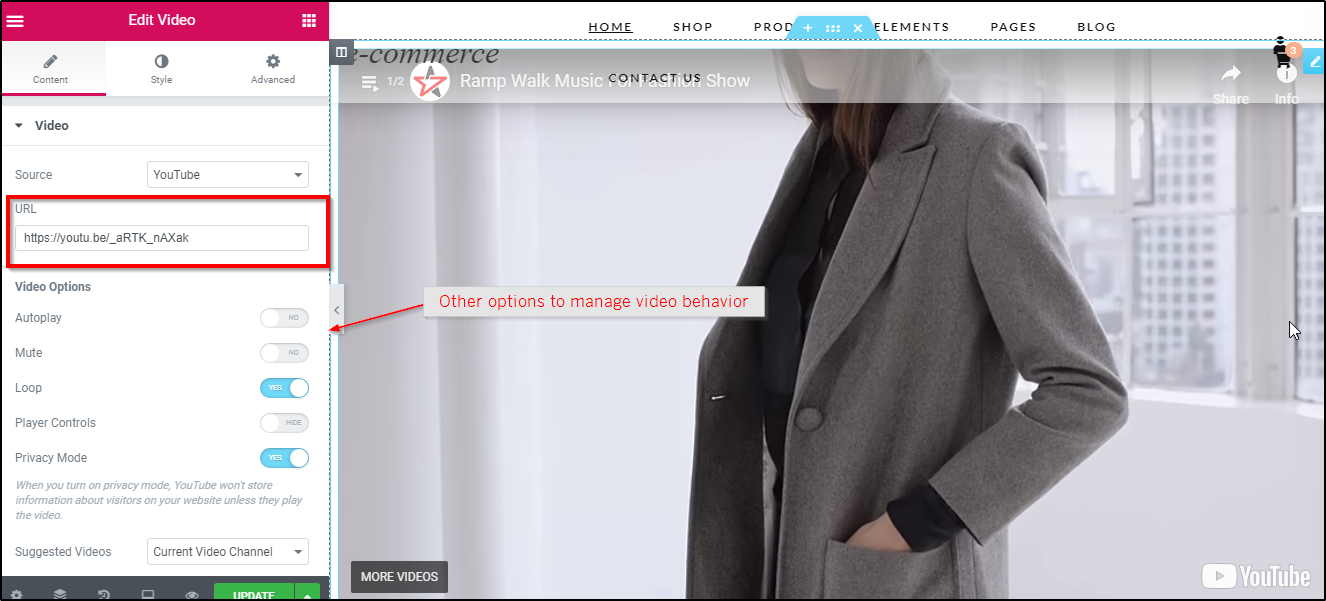
5.The video section
Click on the video section and you can start editing it. The Elementor menu will show you a field to enter the video URL, this is how you can attach the URL to display the video.
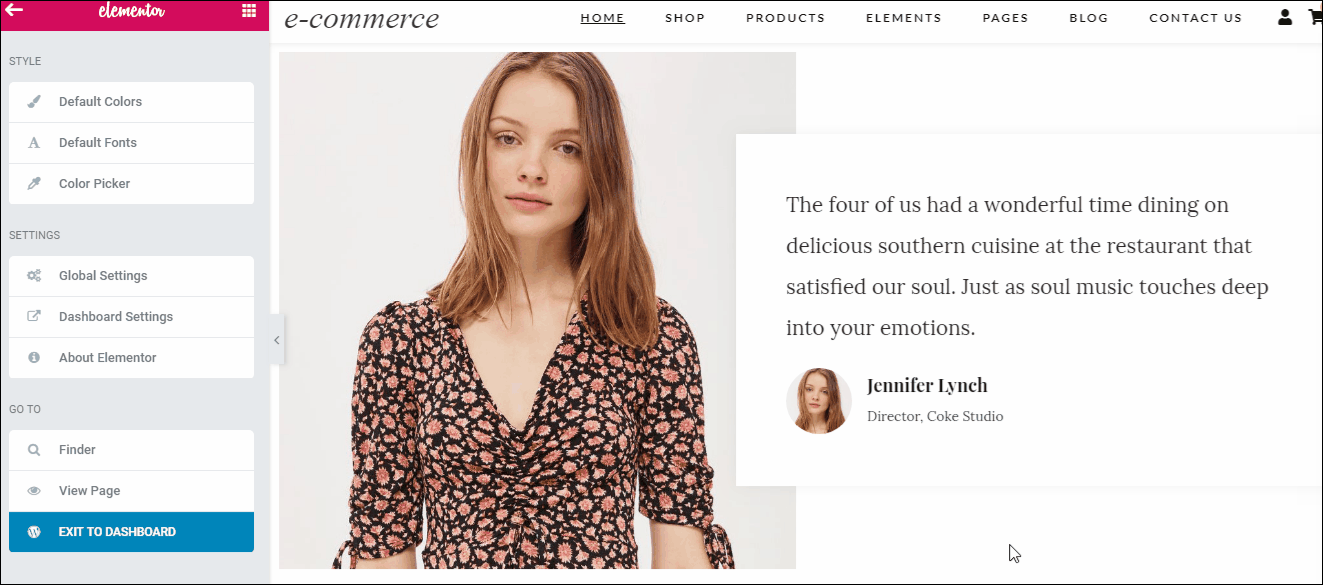
6. The featured quote
Just click and start editing the featured quote. You will find more options to manage this section in the style tab and the advanced tab will let you manage it’s animations, etc.

7. Popular Collections
This section is similar to the “Shop these looks” section and it can be managed the same way.
8. Latest from blogs
You can change this section using the Elementor Page Builder. You can set the image height, the number of blogs, adjust the column numbers, etc.
9. Text + Image section
This section serves as a testimonial or a director’s message section. It can be easily changed with the page builder options.
10. The newsletter
To change the text above the newsletter, you simply have to click over and start typing. There’s a heading and a subtitle that you can edit.
For the newsletter, you must click on the main subscription box and the newsletter options will be shown.
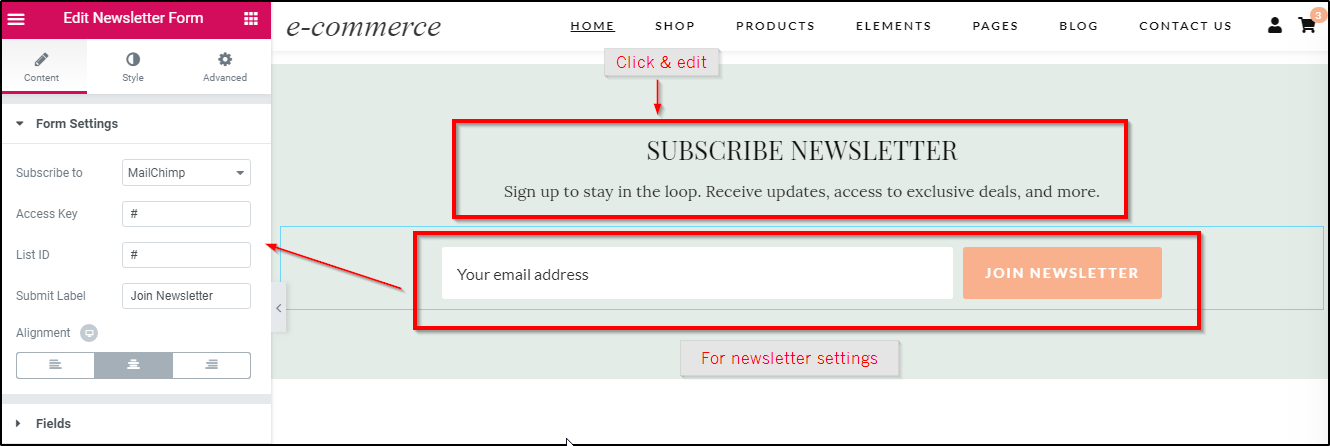
You can even add new field to the subscription form
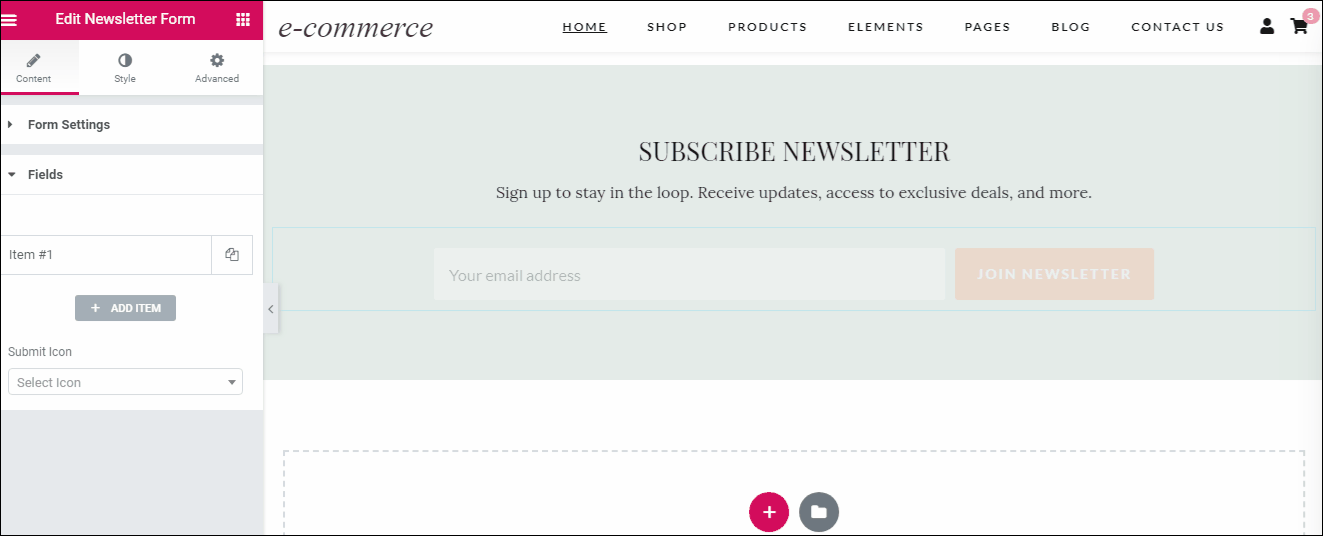
Besides, you can easily change the format of the button by using the Elementor page builder. Click on the button and manage its text, format, behavior, etc.
11.Text section above the footer
This section is a Custom HTML widget with the HTML code to display the icons and text for free delivery and other services. To change the text, navigate to Appearance >> Widgets >> Above footer.
The widget consists of the code to change the text and icons. You can have a look and easily change the text in this widget.
Homepage Classic
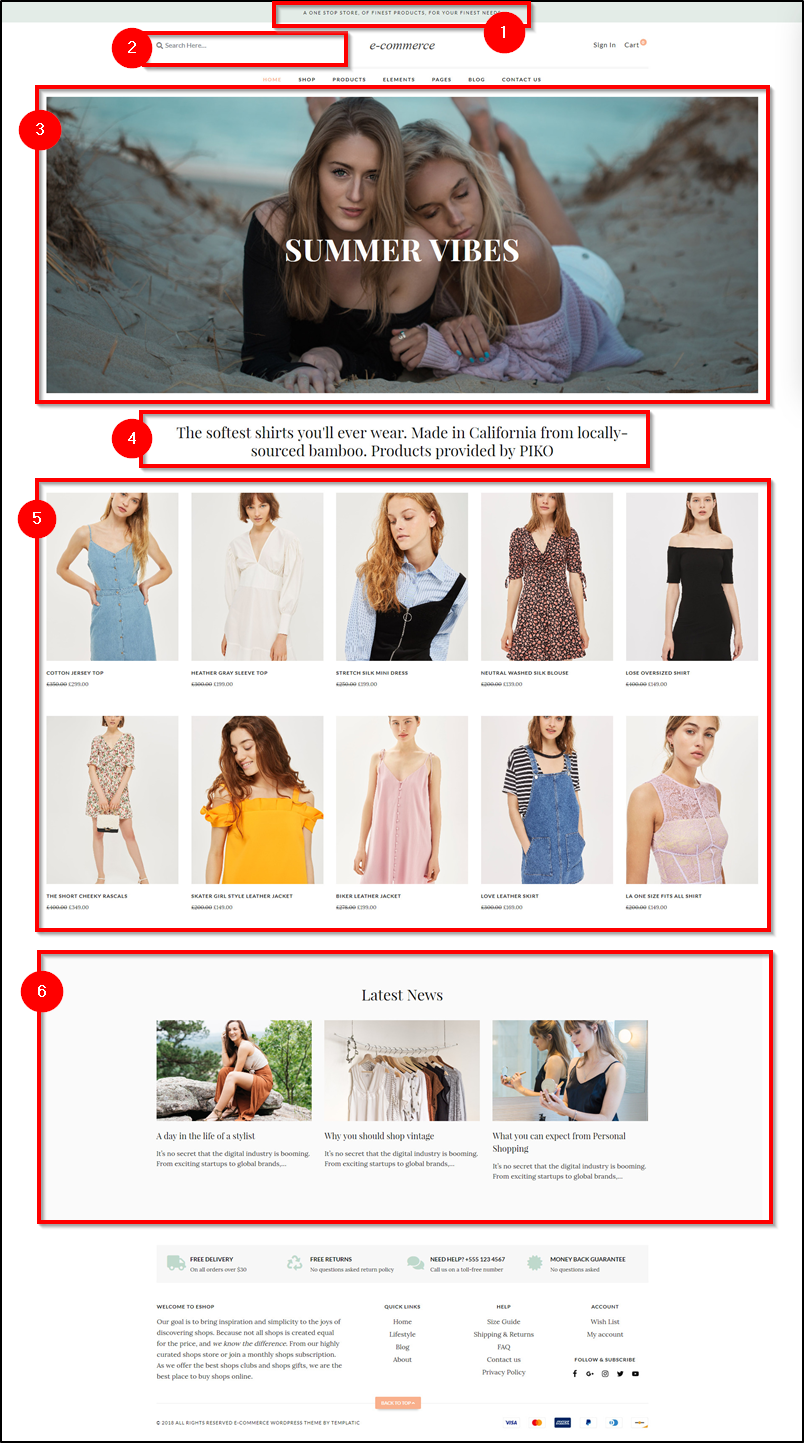
1. Top bar
This text can be changed at Appearance >> Customize >> Theme Settings >> Theme options >> Hello bar text.

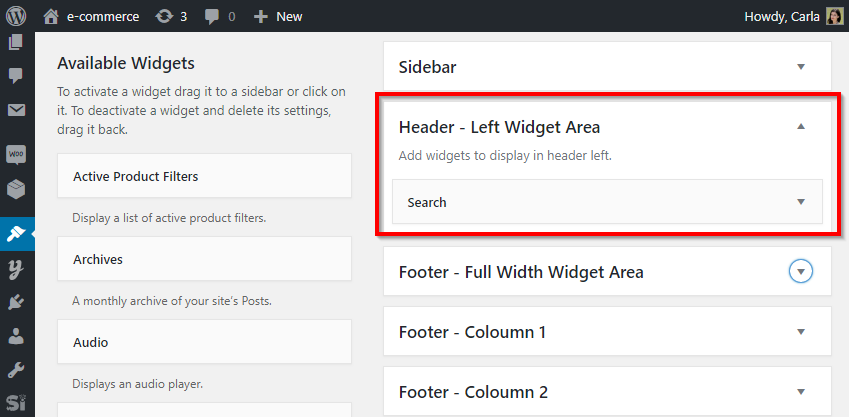
2.Search bar
The search bar can be removed, adjusted at Appearance >> Widgets >> Header – Left Widget Area. The widget that displays the search bar is the ‘search’ widget.
3. Banner
The banner can be easily changed with the page builder. Click on the banner image and easily change it.
4. Text
This is an ordinary text section that you can easily edit using the Elementor Page builder.
5. Products Grid
This is the grid of product or posts to display on your homepage.

Besides, you can also format this section be adjusting the column and row margin, and the image height
6. Latest News
You can change this section using the Elementor Page Builder. You can set the image height, the number of blogs, adjust the column numbers, etc.
Homepage Clean
1. Changing the banner area
The images in the banner are featured posts. The banner images are infact the featured images of the posts you select.
To feature a post, or to change the banner area, you can navigate to Appearance ⇒ Customize ⇒ Theme Setting ⇒ Slider settings, and enter the post Id numbers.
2. Below banner products
As you can see, these products images are sort of featured products. To change what products are featured, you can navigate to Appearance ⇒ Customize ⇒ Theme Setting ⇒ Products on the home page, and enter the Product Id Numbers of the products you want to be featured.
3. 2 columned section
This two columned section with text and image background can be edited using the page building options as shown below

4. CTA with a background image
This section acts as a CTA to drive the traffic to an important page on your website. You can easily change the background image. You can even change the text, titles, and buttons.

5. As seen on
This is where you can showcase your partners or similar sections.
This section lets you display a series of icons. The icons can be added in form of a gallery. You can click on the gallery image to start editing the gallery.
You can arrange the images in the gallery by simply dragging and dropping
6. The newsletter
To change the text above the newsletter, you simply have to click over and start typing. There’s a heading and a subtitle that you can edit.
For the newsletter, you must click on the main subscription box and the newsletter options will be shown.
You can even add new field to the subscription form
Besides, you can easily change the format of the button by using the Elementor page builder. Click on the button and manage its text, format, behavior, etc.
Footer settings
The four columned footer can be easily changed using the widgets options.
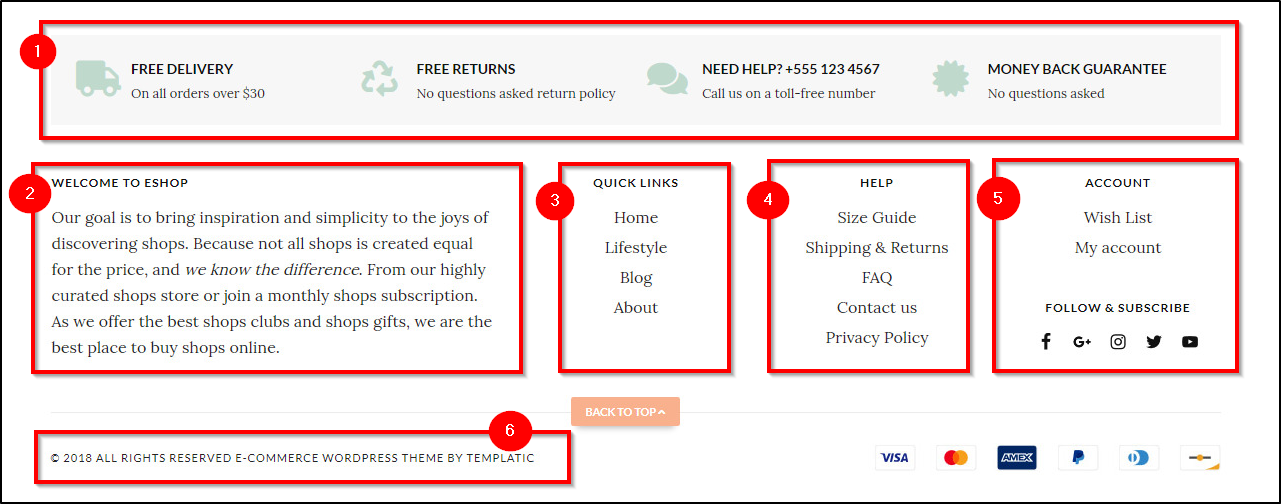
1.Text section above the footer
This section is a Custom HTML widget with the HTML code to display the icons and text for free delivery and other services. To change the text, navigate to Appearance >> Widgets >> Above footer.
The widget consists of the code to change the text and icons. You can have a look and easily change the text in this widget.
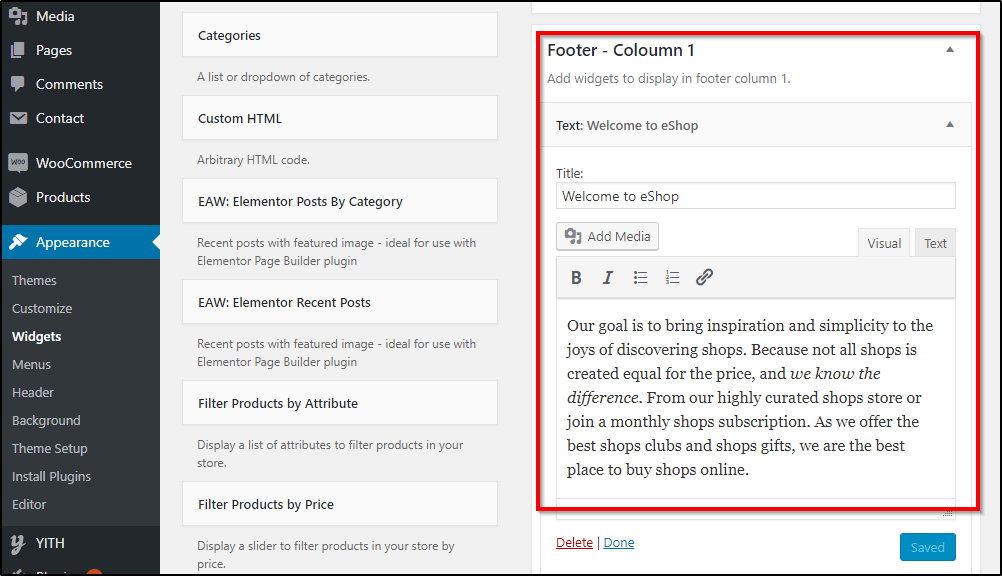
2. Footer column
To change the footer, navigate to Appearance >> Widgets >> Footer column 1 widgets.
3. Footer Column 2
To change the footer, navigate to Appearance >> Widgets >> Footer column 2 widget area.

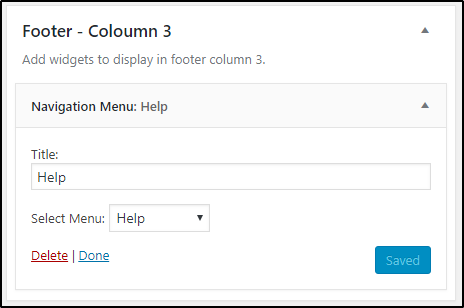
4. Footer Column 3
To change the footer, navigate to Appearance >> Widgets >> Footer column 2 widget area.
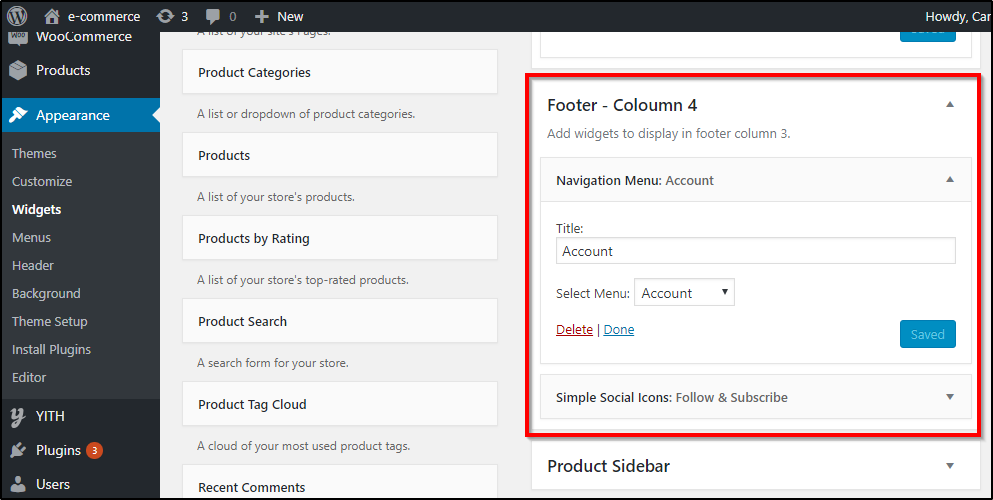
5. Footer Column 4
To change the footer, navigate to Appearance >> Widgets >> Footer column 2 widget area.
6. Footer Credit Text
To change the footer credits navigate to Appearance >> Customize >> Theme Setting >> Theme options >> Footer Credit Text.

Shop pages
You can choose from the available shop page designs. You can choose from shop pages with 2 columns, 3 columns, 4 columns, 5 columns, or 6 columns.
Moreover, there are shop pages with load more options, infinite scroll, or pagination. You can choose the type of shop pages you want.
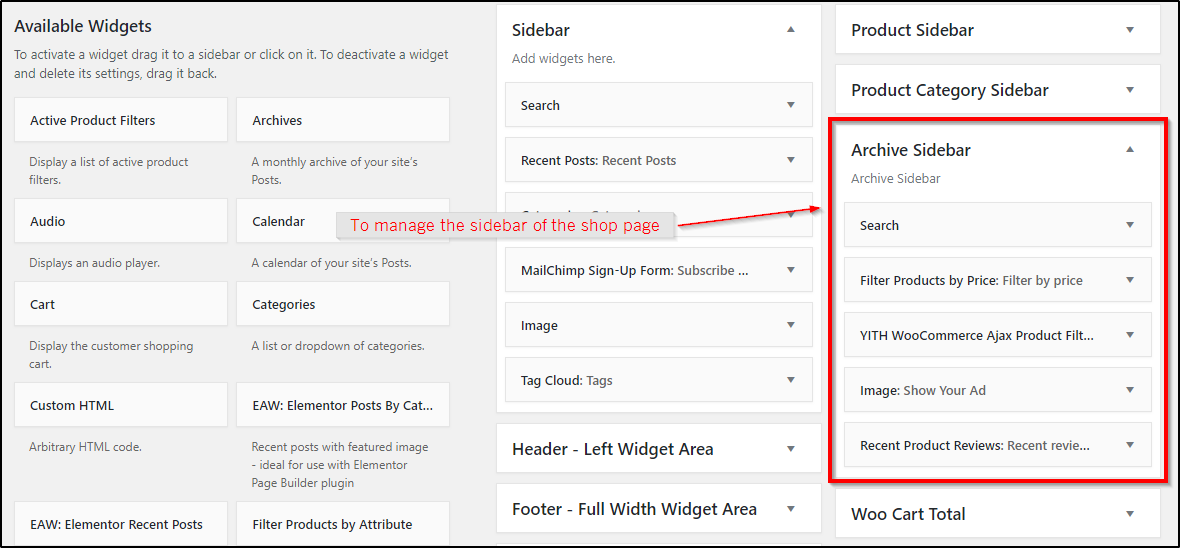
Shop page with sidebar
If you choose the shop page with sidebar, you can manage the sidebar widgets by navigating to Appearance >> Widgets >> Archive Sidebar widget area.
Shop page top bar
This text can be changed at Appearance >> Customize >> Theme Settings >> Theme options >> Hello bar text.
Using Blogs on your eCommerce website
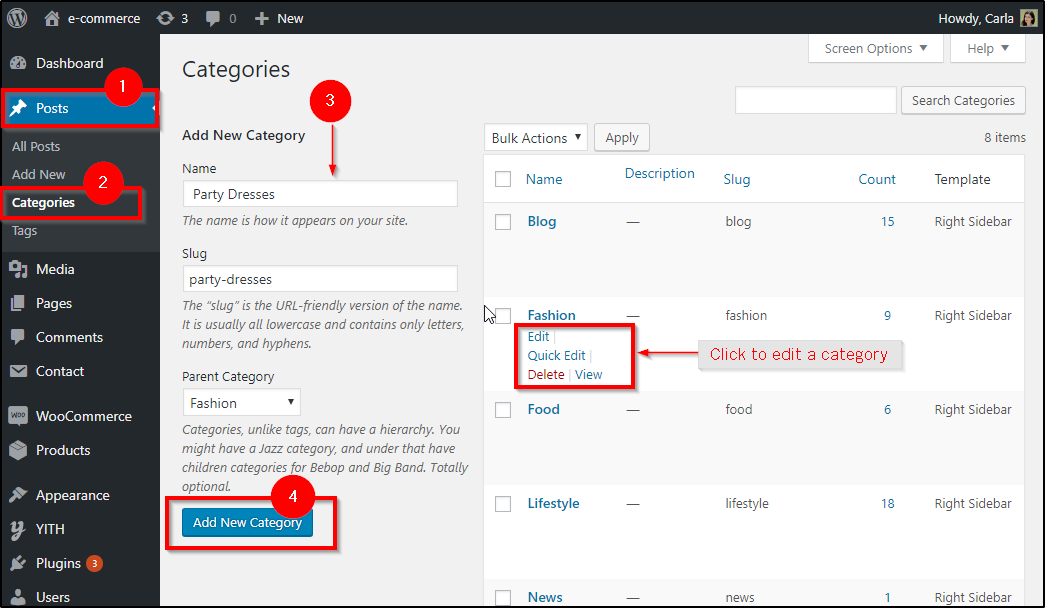
You can use your eCommerce website as your blogging platform. To start blogging, you can navigate to wp-admin ⇒ posts ⇒ Categories and set the categories for your blogs.
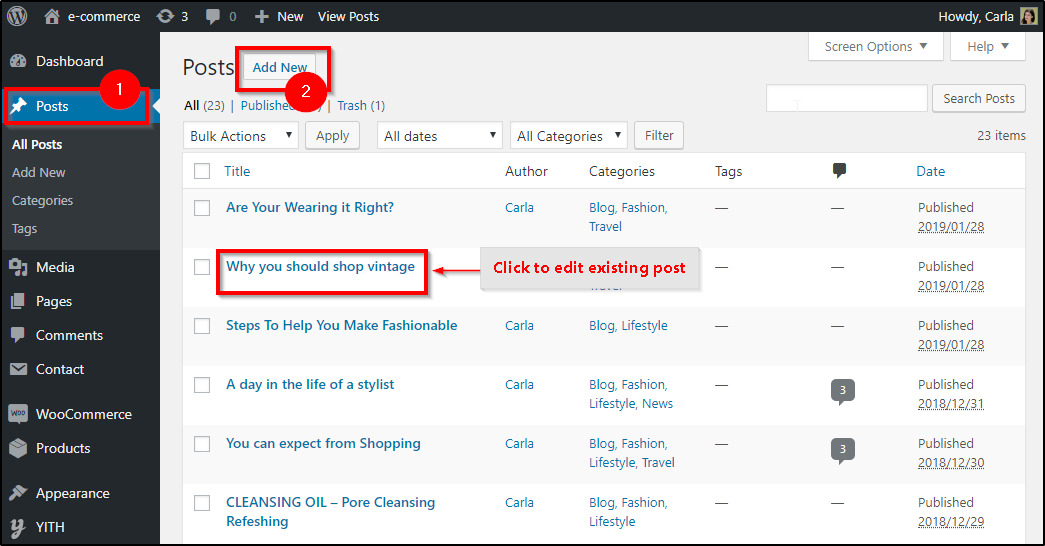
1)Adding New Blog
Creating new blog is easy as other pages and post. Navigate to wp-admin ⇒ Posts ⇒ Add New and start writing your new blog.
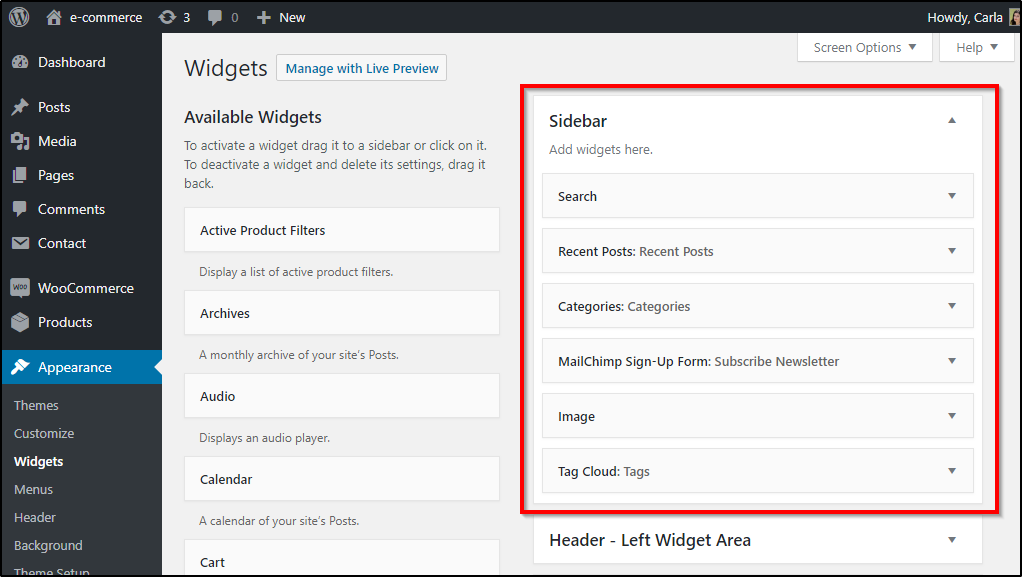
2)Blog page sidebar
You can manage the widgets of blog page at Appearance ⇒ Widgets ⇒ Sidebar. There are many widgets placed by default in the sidebar, you can remove the one you don’t like. Besides, you can rearrange them and also add new widgets too.
Other Settings
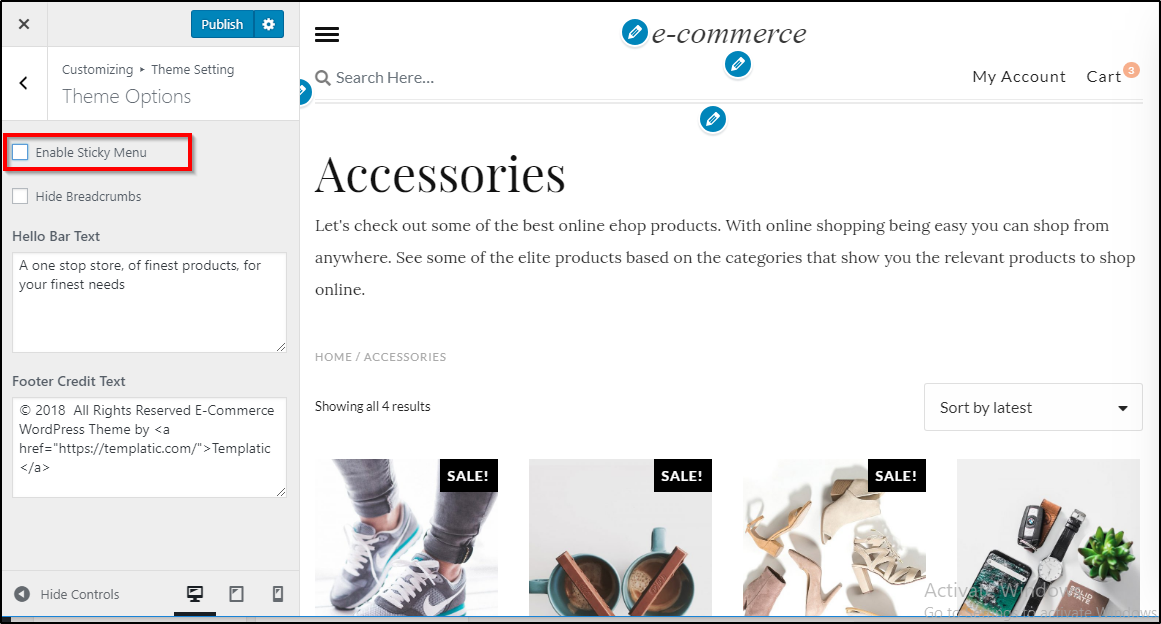
How to enable disable sticky menu
Appearance >> Customize >> Theme settings >> Theme Options >> Enable sticky header
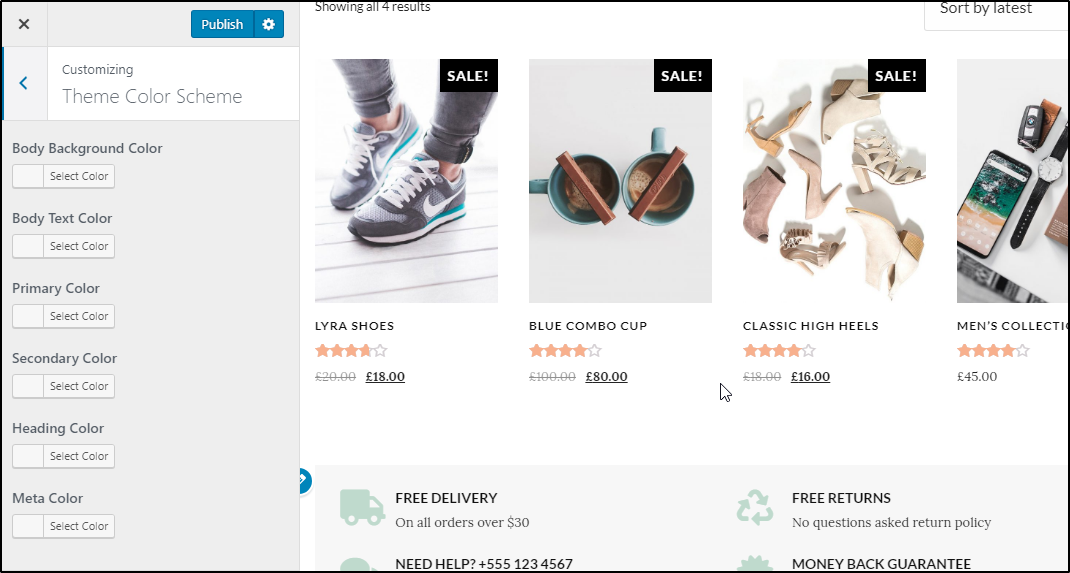
Change Theme Colors
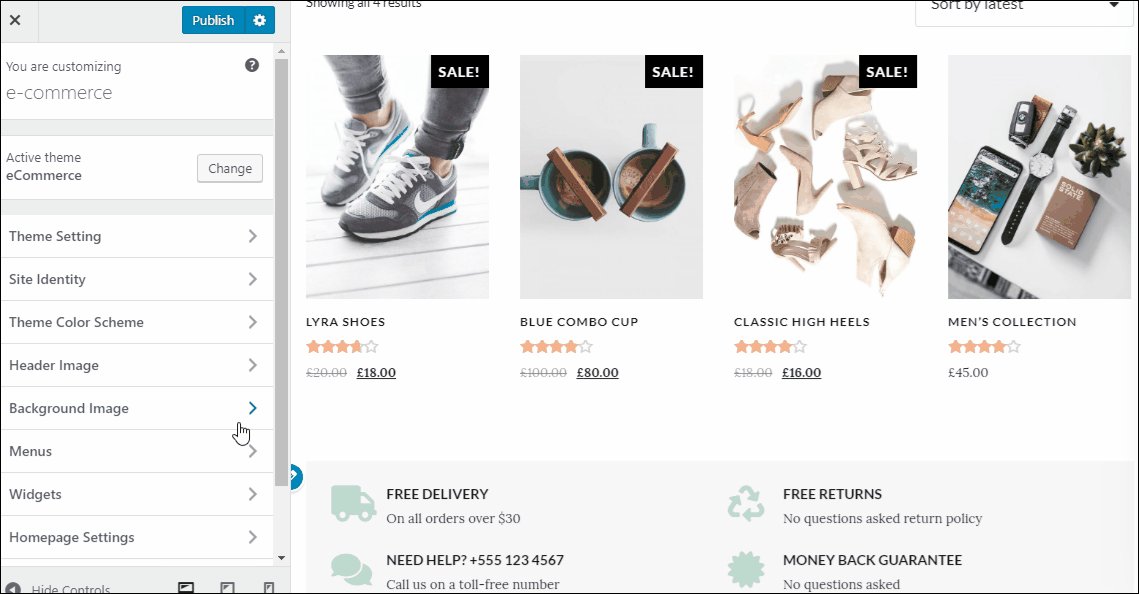
To change the colors of the different sections of your theme, navigate to Appearance >> Customize >> Theme Color Scheme.
How to change the type of header
To change the header of your website, navigate to Appearance >> Customize >> Theme settings >> Header option setting. You can choose from transparent header, centered header or standard header.

How to add a background image to your website?
You can add a background to your website by navigating to Appearance >> Customize >> Background Image.
Note :
For WooCommerce settings, i.e. Setting related to the price, shipping, tax, currency etc. please refer the woo-commerce documentation. Templatic provides the theme flow and the page settings. For technical and e-commerce settings kindly follow the instructions of the WooCommerce user manual.
If the guide doesn’t help you solve your query regarding the theme settings, never hesitate to generate a support ticket. Our support team will answer you and help you troubleshoot in the best way possible.