Index
Basic Faqs
- Why you should insert sample data?
- What Listing Posts Widget does & how to set it up?
- What social media widget does?
- What are page templates & how to use it to create various pages?
- What is Favicon Icon?
- What are Excerpts?
- It says me 404 error, this page cannot be found!
General Faqs
- My custom field is not getting displayed in front end for the all the categories that I selected?
- Lost your custom field table accidentally?Want to have default custom fields back?
- What is PSD file & how to use it?
- How to apply a specific css style to the custom fields?
- How to create WordPress network (multi site)
1. Why you should insert sample data?
Inserting the sample data will thoroughly give you an idea that how this theme can be helpful in setting your website. It will make you aware of the usage of many things like widgets, widget areas, custom post types, pages & posts etc
So, though you want to design your site your way but having glanced to sample data will make you more creative for your site.
| Back to Top |
2. Detail Explanation on Listing Posts Widget
This widget is specially designed to let you list your posts in any of the page sidebars. You can set your choice as below:
- Title – Give the main Title to your list of posts.
- Select Post – Choose from the available taxonomies
- Select Category – Choose from the post category
- Number of Posts: – Limit the number of post to be displayed in this particular widget in numeric value.
- Order By: – You can display them using their attributes like title, Id, Parent etc.
- Sort Order – This option takes post date as a base & lets you display them in either ascending order or descending order.
- Show Author gravtar – Helps in displaying the Author’s picture & other profile details
- Show featured image – Displays the image that is featured in that particular post.
- Show post Title – It displays the title of the post individually.
- Content Type – It helps to select if you want to show excerpts or want to limit the content or completely avoid the limit i.e display full content.
- Limit Content to – Here, you can specify the exact number of characters up to which you want to limit your content.
- More Text (If applicable) – When you select excerpts, you need to define the text for the link like “Read More” or any of your choice. That you can define here.
| Back to Top |
3. Detail Explanation on Social Media Widget
As the name suggests, its a widget that is designed to show your social media account links with the icon. Placing this widget depends totally on your requirement but footers are the good suggestion for it.
It asks for very simple settings like:
- Title – Give the title for this widget
- Description – May or may not add the description for your social media accounts.
- Social Link – Place the full URL of your social media account.
- Social Text – Write the text on which the above URL will be applied.
You can add or remove the number of such social media accounts by using the “+Add New” & “Remove” options.
| Back to Top |
4. What are page templates & how it can be used to create various pages?
Template pages are ready to use pages where you do not have to design & define the whole page instead just enter some texts that you want to show at your page & select the “Template” from the drop down given at the right side of the “Add new Page” option & you are done! let’s have a look at some of such automotive templates.
Page Templates are theme dependent, so they change with the themes.
| Back to Top |
5. What is Favicon Icon?
The small icon before the site name in the browser bar is nothing but the “Favicon Icon”. This icon is quite small but does a very big impact on the users mind. It is a symbol of your site or say trade mark. By just seeing it, user can have an idea that it symbolizes which site! However it also depends on the popularity of a site. Know more about Favicon
Favicon Icon
Excerpts are the starting words of some content which you want to display as a highlight text of that post or article etc. This option is very useful when you want to show some part of your post on some page but not the full content & then if the user wants to read more (s)he can click on the Excerpt text link (example: Read More) & then he will be redirected to that page to continue the reading. Know more about Excerpts
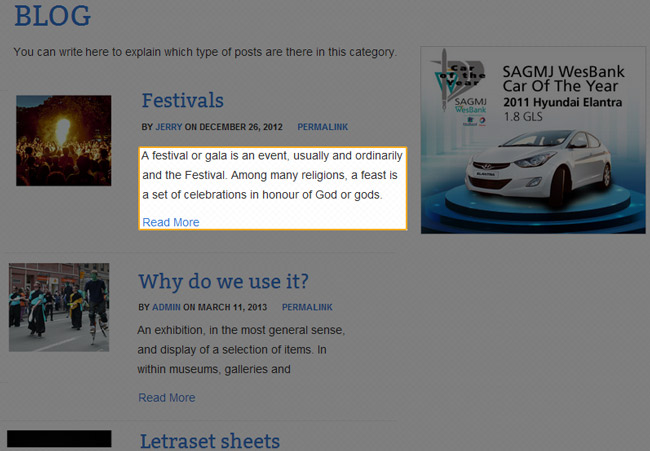
Excerpts on front end
7. It says me 404 error, this page cannot be found!
Well, this is a common error that we encounter frequently. But solution to this is also unbelievably easy! Let’s see how,
- Go to wp-admin > Settings > Permalinks
- Select “Post name” in “Common Settings”.
- Save the changes
That’s it. Now you will be able to view your page.
| Back to Top |
General Faqs
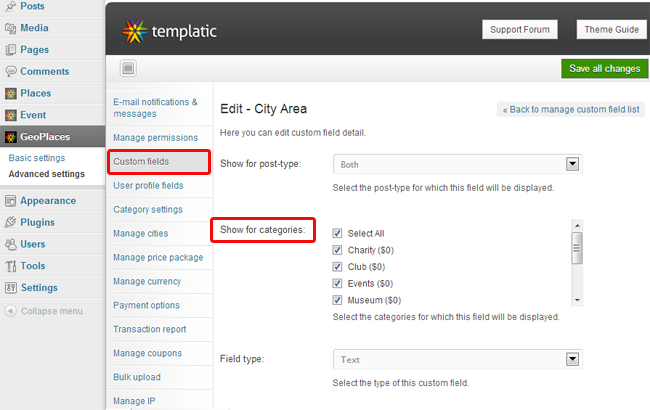
1. My custom field is not getting displayed in front end for all the categories that I selected?
Now, this is common & important question! When you create a custom field for your custom post & some times it happen that it is not visible on all the categorys’ detail & submit pages that you selected & saved from the Advance setting option of the theme.So, lets find out its solution
We are talking about the custom category as mentioned here,
- wp-admin > Theme option (or Theme name like GeoPlaces) > Advance settings
- Then Custom fields > Edit Field (for particular field)
Solution
- Go to your phpMYAdmin (Database)
- open the table wp_templatic_custom_post_fields (it may be extended with some more characters like _g4 for geoplaces depending on your theme)
- Go to Structure > field_category > Change
- Extend the default value with your required one. It is character base counting & the specified figure is a collective length of all the field category. So, increase it accordingly.

| Back to Top |
2. Lost your custom field table accidentally? want to have default custom fields back?
If you have lost your custom field table in the back end accidentally then you have to restore that particular Database Table to get all those default custom fields in your Custom Post Back end. Let’s see, how you will do that!
[templ_msg_box type=”error”] Note well: Only the Default Templatic Custom fields(Not data in it) will be restored. You have to create custom fields added other than the Templatic’s default fields, again manually.