Installation
- Download the plugin fromTemplatic member area. You’ll find it inside the “My Plugins” sub-section.
- Navigate to WP-admin ⇨ Plugins ⇨ Add New ⇨ Use the “Browse” button to load the previously downloaded .zip file. Click on “Install Now” to confirm.
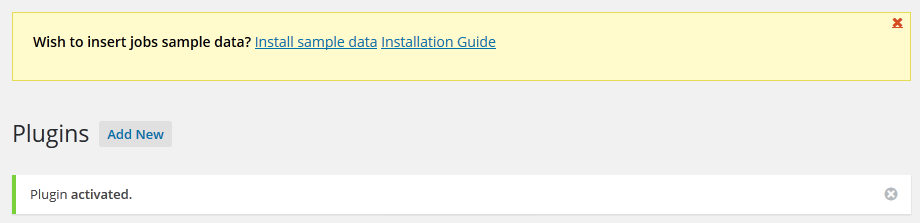
- Once the plugin is finished installing, click on the “Activate” button.
Load Sample Data
As soon as you active the Jobs add-on a new post type will be created on your site – Jobs. If you want to load a few sample properties, click on “install sample data” given at the top of the plugins page which comes after plugin activation.
Manage Pages
Category Page
Category and search pages are the most second pages any visitor goes to while searching for a job or while thinking to post the job on any portal. Thus set up the categories and their views as it suits most needs of the site visitors.
Various sections in category page are explained below:
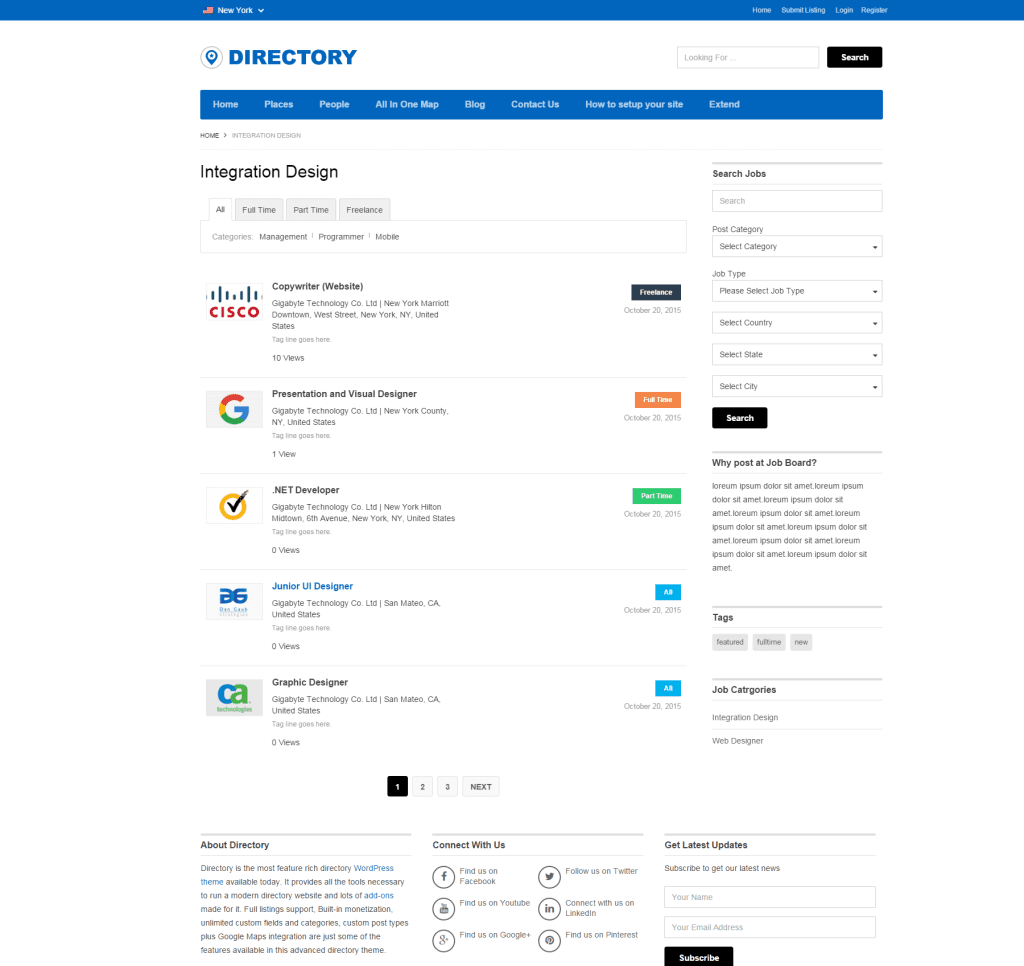
- Configure tabs
On the category page there are different tabs to surf different types of Jobs. If you want to add/edit this tab, this can be easily done by editing the custom field named “Job Types”. This is well explained here.
- Increase/decrease number of post
How to increase/decrease the number of post showing in category page?
Please traverse to WP-admin >> Setting >> Reading >> Blog page shows at most >> from here you can increase/decrease the number of post showing in category page.
- Set up sidebar
Different widgets relevant to the audience and for purpose of increasing sales can be placed in to the Jobs category page sidebar.
Go to WP-admin >> Appearance >> Widgets. “Job Category Page Sidebar” is the area in which different widgets can be placed. As per our recommendation, different widgets that suit this area are:
- T > Login Box
- Advertisements
- T > Browse by Categories/Tags
- T > Featured Job: Highlights a most important Job. As a site owner, you can use this widget to charge some of the clients to highlight their Jobs when they need excellent candidates or candidates on urgent basis.
- List Filter*
Quick tips
- To increase the number of entries available per-page on category pages (default is 5), go to WP-admin ⇨Settings ⇨ Reading and change the value associated with the “Blog pages show at most” option.
- I also recommend adding this Blog category to your navigation menu. Do that by going to Appearance ⇨Menus and creating a new menu. Expand the category dropdown, choose “Blog” and hit “Add to menu”. For details on creating custom menus, watch our video tutorial.
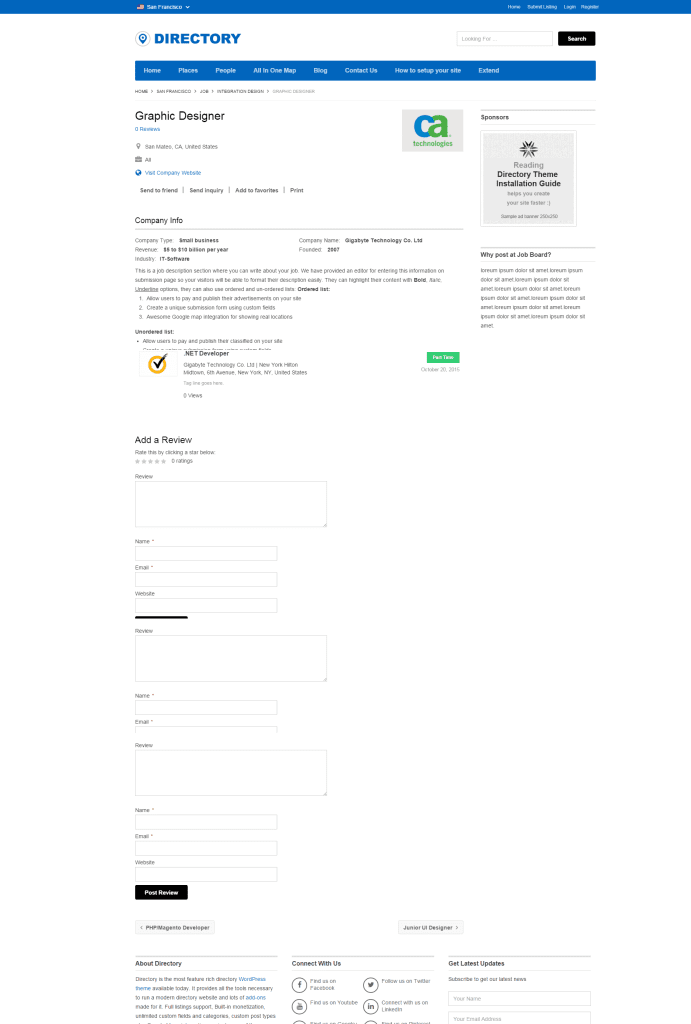
Detail Page
Detail page consists of various things with detailed information about a particular job. We will cover here purpose of that information, including how to set up them.
Header Fields: Fields like address, website, etc… are displayed by default into the theme. They can be altered from Tevolution >> Custom Fields section.
You can also add some more fields to highlight some more information of the jobs by using Header Fields plugin.
Send Inquiry/Send to Friend: These are the mails which enable your users to contact the company which posted the job or send recommendation to someone for that job.
To enable of disable them, go to WP-admin >> Tevolution >> Settings >> Email Settings & Notifications. Options can be disabled or enabled from “Detail Page Forms”.
Claim ownership: Please go here to read more on this.
Related Jobs by Category: Related jobs in the same category enabled job seeker to have a look of the similar positions he/she is searching for. For example: a person looking for the PHP developer post will have another three similar job of PHP development into the same page. Thus he will have more options to choose from.
“Number of related posts” can be set up from WP-admin >> Tevolution >> Settings >> General Settings >> Detail Page. You can also choose various other options which can be configured to set the related jobs as per the site requirement. The options are: Filter related posts by, Enable distance-aware related posts for & Set the distance.
Other Jobs by same company: This is an important feature in to Job Portal. It provides other vacancies available into the same company which give a bigger view of the company to the candidate for sure.
Comments & Ratings: People can comment and give ratings to jobs using this feature. Comments on the site can be enabled from WordPress setting’s Discussion settings.
Star ratings on the site can be enabled from WP-admin >> Tevolution >> Settings >> General Settings >> Detail Page >> Ratings option.
“Force Ratings” option is also there. If enabled, visitors won’t be able to submit a comment without entering a rating first.
Sidebar: Different widgets relevant to the audience and for purpose of increasing sales can be placed into the Job’s detail page sidebar.
Go to WP-admin >> Appearance >> Widgets. “Job Detail Page Sidebar” is the area in which different widgets can be placed. As per our recommendation, different widgets that suit this area are:
- T > Browse by Categories/Tags
- T > Related Jobs
- Advertisements
- T > Detail Page Map
Submit Job
How to create submit page
Submit page can be created by using this shortcode:
| [submit_form post_type=’jobs’] |
To add/edit/remove different options, go to WP-admin > Tevolution > Custom Fields. Here you can add/edit/delete different fields. Please read more here.for this and explore the section more properly.
What are the different Job Types available?
Different job types helps the jobs to bifurcate further and thus search for the right job and candidate becomes easier. By default, we have provided three job types: Full Time, Part Time & Freelance.
If you want to add/edit/remove these job types, go to your WordPress’s Tevolution >> Custom Fields settings. Edit the field named “Job Type”. Change titles in option “Option Title” & “Option values”. Save the field.
There are different colors associated with the types. You can define these colors at Tevolution >> Settings >> Category page >> Set the title and colors for job types option. These color tags affects on the various pages such as Home Page, category page, etc…