Product Attribute functionality helps you add different attributes to your products like size, color, price etc. If you need then you can make these attributes interdependent on each other. Follow these steps to create your product attributes,
- Go to WP-admin -> Products -> Add/ Edit Product -> Key – Product Attributes -> Products Attributes Settings.
- Here 1st attribute is quite important where you can also specify its stock value as shown in the screenshot below. 1st attribute is given the field “stock” because usually the main attribute needs that. For instance “Size” (an attribute) has the values small, large and extra large with the stock value of 5 each.

Stock fields are for the stock. It mentions that I am having 5 plates with small size, 10 plates with medium size and 5 plates of large size. If in Stock Settings (Below product attributes settings), you have marked “Apply Stock Management” checkbox then it won’t allow your users to buy more than 5 small plates or more than 10 medium plates.
You can have stock management per attribute for the first attribute only.
To add another attribute, Give attribute name in “Attribute 2 Title”. In “Attribute 2 Value” column you can give values. In above example, you are having color also. White and Grey color’s Plates are of Small size. In Medium size I am having silver, White colors and for Large size I am having white plates. Then the settings would be this way.

Different values in an attribute can be differentiated by using a tilde(~). For example: White~Silver~Golder.
When you’ll select Small in size attribute the “Color” attribute will change accordingly and will display values White & Gray.
The same way you can add the attribute 3, 4, and so on. To give second value in these attributes click on “Add New” button.
How it works on front-end?
After setting up all the attributes and products in the back end as explained above, you need to know about how these attributes will be visible at the front end.
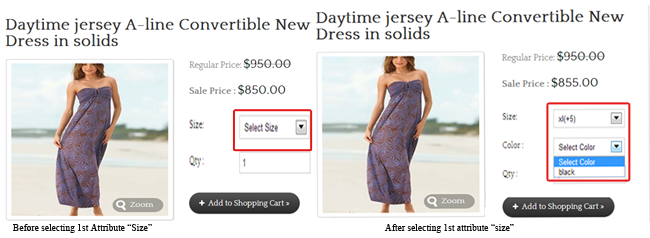
- It is compulsory to select the first attribute from the drop down list.
- By doing this, it will list the related available attributes in the other drop down lists given next to it.
After making any changes in to attribute settings or adding any attribute first click on “Set Changes” button then click on “Update” button.