eCommerce is our framework based on which we have created so many themes with different look , feel and plus-minus features. Some of the core features remain the same for all the themes based on this framework which are explained here. Here is how you can setup your website using various eCommerce functions,Before going through all the below explained features, you must also read Getting started with Ecommerece Framework tutorial to get your hands on the theme easily.
Install and activate
1. Install fresh theme
To successfully install a Templatic eCommerce theme first connect to the member area. Click/expand the section for your theme (if it isn’t expanded already). Inside you will see two items:
- Ecommerce Framework
- Child theme (Store, Market, Emporium, etc)
Now do the following:
- Download both available files
- Connect to your WordPress dashboard (wp-admin) and navigate to Appearance -> Themes. Click on the Install Themes tab and then on Upload. Use the Browse option to locate the eComFramework zip file on your hard drive – then click on Install Now. After the installation process is finished do not activate the ecomFramework.
- Navigate again to Appearance -> Themes -> Install Themes -> Upload but this time load/install the child theme (other file you downloaded). Once it’s installed activate the theme.
In case WordPress rejects the .zip files use FTP to install the theme:
- Extract eComFramwork.zip and child theme zip file then upload to /wp-content/themes directory
- Once uploading is done connect to the WordPress dashboard and activate the child theme (don’t activate the framework)
- If you run into more problems during installation please visit our Installation Guide
For detailed instructions on using FTP please click here
2. Upgrade your existing theme/framework
If you’re already running one of our e-commerce themes please visit the following article since it explains how to handle e-commerce updates (even updating products to use WooCommerce).
3. Insert sample data
After installing and activating a theme,
- Go to wp-admin -> Appearance -> Themes
- You will find a message with a button that says insert sample data, click that button ‘Yes, insert please’ to insert sample data
- Sample data includes some posts, products, page(s) and widget settings to help you create a site with all the dummy content.
- As soon as you insert sample data, it will turn that ‘yes, insert please’ button into ‘yes, delete please’ which means that on clicking it, all your sample data and widget settings will be deleted
Be careful while deleting sample data if you have modified or extended it because once sample data is deleted there is no way of bringing the same data back.
Products
1. Add New product
Now, in framework there is a new custom texonomy for your products! We named it as “Products”. You can have different product categories, product tags, etc… You can follow the below tutorial to add a product more easily.
- In WordPress administration, on the left side, click on Products > Add New Product.
- Enter the product title and description.
- Select product type, E.g. physical product, digital product, virtual product, donation product or affiliate product.

Uploading Product Images:
- Under Product Attributes, click on Product Images > Select Image to Upload
- Select the file, upload it, and click Insert Into Post

Skip the “Digital Product” section, as this is for digital product only. If your product is digital, then enter the URL for digital product in the field provided.
Product Price Settings:
- Price: Normal price of the product
- Last Day of Your Special Product: If your product is a special/sale product, then enter last date of its “special price”.
- Special Price: Special price can also be sale price or discounted price.

Product Code, Weight and Tax settings:
- Product Model: The product model or code
- Size Chart: The size chart of the product. It can be normal text or HTML or Image
- Weight: Enter products weight here. If in shipping method, you have selected as “Weight based shipping”, then don’t forget to enter the products weight
- Is Taxable: Select the checkbox if the product is taxable.
- Select Taxes: Select which tax system should apply to this product.
- Select for Free Shipping: Select this checkbox to apply free shipping for this product

Product Attribute Settings:
Additional product attributes like brand, type, size, color, etc can also be inserted. Insert as many products attribute as you like.

- Attribute 1 Title: Title of the attribute, e.g. Brand
- Attribute 1 value: e.g. Adidas
- Attribute 1 Price: e.g. +100 (if the user selects Adidas, then his price will be added by 100)
Stock Settings:
- Apply Stock Management: Select this checkbox to apply stock management for this product
- Opening stock: Opening stock of product. Set stock at 0 if the product is out of stock or leave the textbox as blank if you want to show the stock as unlimited
- Low Stock Notification: Enter the low stock quantity here, if you(as admin) want to get notified. E.g. When there are only 5 products left and you want to get notification about it, then enter 5 here.
- Show Available Stock on Your Store: Select this if you want to show the available stock to your visitors

2. Manage or edit products
To edit product’s details or manage products, in the WordPress administration panel, on the left side, go to Products > Products. All products details, managing, and editing can be done from here.

- Edit: To edit a product. If you have already added a product and wish to change any information like title, description, price, etc then you can do it from here.
- Quick Edit: To quick edit a product. You can quickly edit products details like title, slug, date, categories, post tags, etc
- Trash: To delete the product
- Preview: To see a preview of the product
- Duplicate: To make a duplicate of the product
3. Product Attributes
Product Attribute functionality helps you add different attributes to your products like size, color, price etc. If you need then you can make these attributes interdependent on each other. Follow these steps to create your product attributes,
- Go to WP-admin -> Products -> Add/ Edit Product -> Key – Product Attributes -> Products Attributes Settings.
- Here 1st attribute is quite important where you can also specify its stock value as shown in the screenshot below. 1st attribute is given the field “stock” because usually the main attribute needs that. For instance “Size” (an attribute) has the values small, large and extra large with the stock value of 5 each.

Stock fields are for the stock. It mentions that I am having 5 plates with small size, 10 plates with medium size and 5 plates of large size. If in Stock Settings (Below product attributes settings), you have marked “Apply Stock Management” checkbox then it won’t allow your users to buy more than 5 small plates or more than 10 medium plates.
You can have stock management per attribute for the first attribute only.
To add another attribute, Give attribute name in “Attribute 2 Title”. In “Attribute 2 Value” column you can give values. In above example, you are having color also. White and Grey color’s Plates are of Small size. In Medium size I am having silver, White colors and for Large size I am having white plates. Then the settings would be this way.

Different values in an attribute can be differentiated by using a tilde(~). For example: White~Silver~Golder.
When you’ll select Small in size attribute the “Color” attribute will change accordingly and will display values White & Gray.
The same way you can add the attribute 3, 4, and so on. To give second value in these attributes click on “Add New” button.
How it works on front-end?
After setting up all the attributes and products in the back end as explained above, you need to know about how these attributes will be visible at the front end.
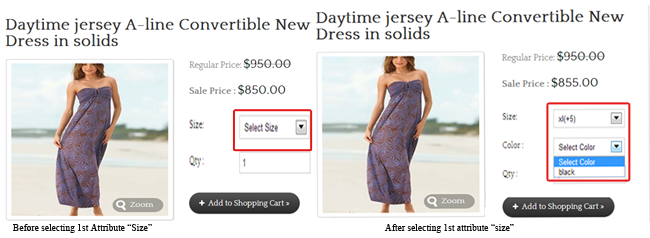
- It is compulsory to select the first attribute from the drop down list.
- By doing this, it will list the related available attributes in the other drop down lists given next to it.
After making any changes in to attribute settings or adding any attribute first click on “Set Changes” button then click on “Update” button.
4. Bulk Upload Products
How to bulk upload products?
Bulk upload is very useful if you want to add several products to your store. So instead of manually adding each product, just fill out the CSV and upload it.
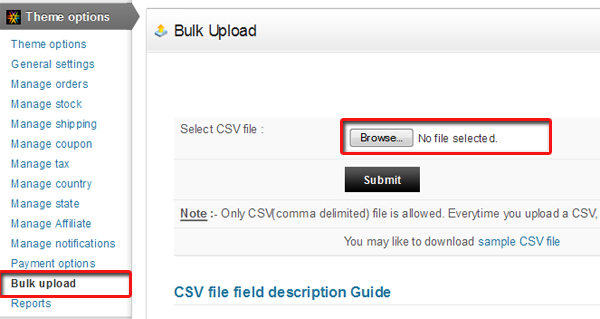
- Click on “Theme options” and then on “Bulk Upload”
- Click on “sample CSV file” to download a sample CSV file.
- Prepare the new CSV by looking at the sample CSV. Click on “Browse” and select the new CSV and click on “Submit”
To know about various fields used in the CSV, click on CSV file field description guide. You will get a detailed explanation of all the columns used in CSV file. For accuracy, have a look at here given explanation as well.
Important: Sequence of these columns matter and so you should not change the column positions to let your import work correctly.
- Post Title – Mandatory field (can’t leave blank) that describes product title.
- Post Content – Mandatory field (can’t leave blank) that describes product description
- Post Category – Describes the products category. If it’s blank, all products will be inserted under “Uncategorized” category.
- digital_product – To insert a digital product, you’ll need to first setup it’s path from wp-admin > Theme options > General settings > Product Settings > Digital Product Path. There, just enter the file name of the product. E.g. icons.zip
- price – Specify price of your product
- spPrdLstDate – Specify the last date for your special products price
- specialprice – Write the special price for your product like a discount.
- model – Write products model number
- size_chart – It is for products size chart. It can be image URL or basic HTML code.
- is_free_shipping – If you have physical product and want to set shipping as free, then set it to “1” else “0”.
- weight – Write your product weight here in numeric value. You can set weight unit from wp-admin > Theme options > General settings > Shopping cart > Default Weight Unit. E.g. if products weight is 10 lbs, then just enter 10
- Istaxable – If you want to apply tax to your product, then write “1”, else write “0”.
- sizetitle, colortitle, att3title, att4title, att5title – These are product attribute titles. Write your required attribute here like size, shape, brand, type, etc.
- size, color, attribute3, attribute4, attribute5 – These are product attribute values. Multiple values should be comma separated and price should be entered in brackets e.g. Red(-2), black(+2), Blue(+1).
- size_stock, color_stock, attribute3_stock, attribute4_stock, attribute5_stock – Manage stock for each and every attributes from here. E.g. for these product attributes: Red(-2), black(+2), Blue(+1), you can enter stock as10,15,50
- is_check_outofstock – Enable stock management for your product writing “1” and “0” to disable.
- Initstock – To enable stock management, write the initial stock (starting stock) value here. “0” means out of stock and if you leave it blank, it will consider it as unlimited stock.
- minstock – To set minimum stock alert, set its limit here. E.g. 5. You’ll receive an Email on your specified Id under wp-admin -> Settings -> General, if the product stock reaches 5 or less than 5.
- isshowstock: To show stock details in “Product detail” page.
- productimage: Filename of the products image should be inserted in this field. E.g. tie_01.jpg. To insert more than one product, insert the column with same title, which would be “productimage”, then just enter its filename e.g. tie_02.jpg. So it means, only enter the name of the image file and not its full URL. Finally upload the CSV and then you’ll be presented URL where you’ll need to upload the images. Use an FTP client like FileZilla to upload the images at that path.
Page settings
1. Setup your Login and registration page
To place the Registration and Login page on your site you can do any of these two things ,
- Either you can place the widget T – Login Information widget at the suitable widget area from wp-admin -> Appearance -> Widgets. (Generally header widget areas are most suitable)
- Or you can append this
?ptype=logininto your site URL and place this link with any of your navigation menu clicking which site visitors can be redirected to it.
On registering with you, your new registered user will get an email having his credentials. This email is handled at your back-end at wp-admin -> Theme options -> Manage Notification with a subject line for this one is “Customer Registration Email”. You can modify the content as per your need.
By default theme shows some content at the top of the registration page which you can alter or delete from wp-admin -> Theme options -> General Settings, switch to tab “other settings” and find the option “Login Page Top Content”. Read more about the whole section of Other settings
2. Products Listing Settings – Home Page & Latest Products
With all eCommerce framework based themes, you can showcase your latest products on your homepage with the help of “T- Latest Products” widget. Follow these steps to setup your latest products on your homepage,
- Go to wp-admin -> Appearance -> Widgets
- Place “T – Latest Products” widget into Front Page Middle content. (Widget area name can be different according to your theme but crux is to place widget at the content area of homepage)
- Specify the category id of your products that you want to display on your home page as latest products
- Select the listing type (list or grid)
- Check mark option “Wish to display Store link?” if you want to show the store page link on your homepage and save your widget
- Now, go to wp-admin -> Theme options -> Theme options
- Expand the section “Products Listing Settings -> For Home Page – Latest Products”
- Start doing your required settings there and save them.
All the above did settings will only affect the latest products on your homepage. Some of the settings like “Display Description?” and “Display View Button” will work only when you have selected list view for your latest products in the widget “T – Latest Products” on your home page.
3. Product listing settings – Archive & Category
Setting up your category page basically has 3 parts, i) Setup product category options ii) Add products with all your preferences there and iii) Setting up widgets from wp-admin -> Appearances -> Widgets.
Let’s understand the 1st one in detail as later ones are subject to your specific eCommerce framework based theme.

To setup all your product category page options,
- Go to wp-admin -> Theme options -> Theme options
- Expand the section named “Product Listing Settings -> For ‘Archive’ or ‘Category’ Page
- Start doing your settings.
All your set options will have effect on the product listing page. For instance if I have a product category “Shirts” and when I view it on the site navigating through it and the page that I reach shows all the shirts that belongs to this category is known as category page and the option shown above will have effect there.
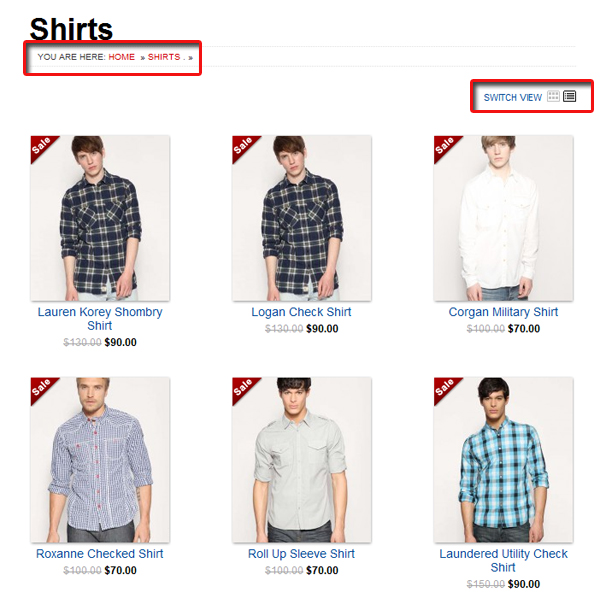
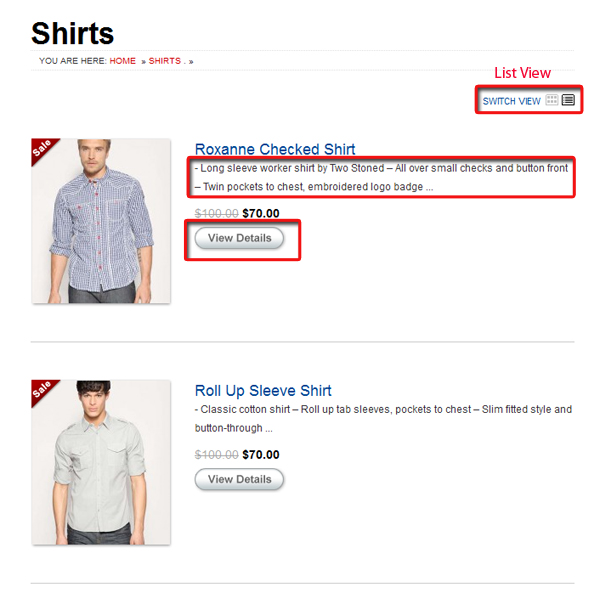
Some of the options will have effect only when you have selected “listing view” (by default it will be “grid view) in the option “Listing Format” such as,
- Display Description? – it shows product description below it on the product category page
- Display View button? – Shows display button linked to product detail page.
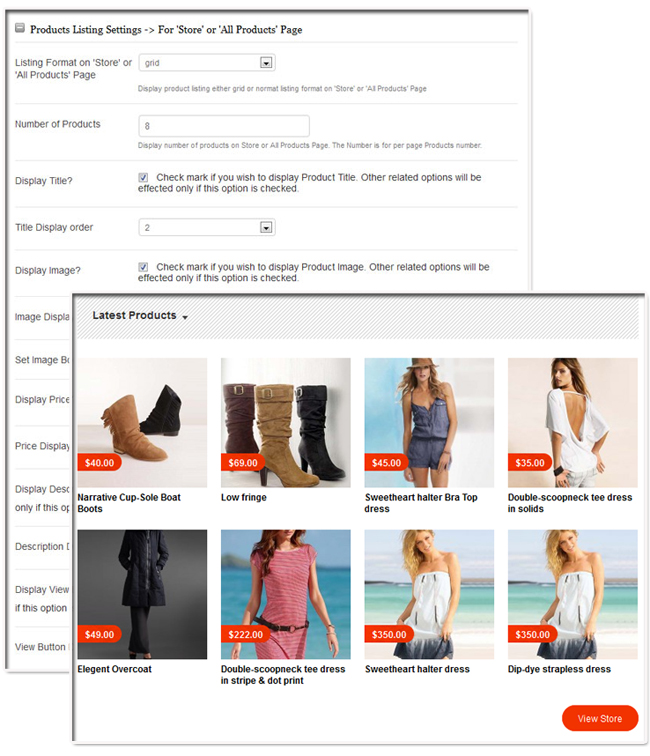
4. Product listing settings – store & all product page
Whenever you add products to your site, “store” page gets created automatically. You can also refer the same page as “All Products” page as it lists all your products there.
If you directly want to set it in your navigation menu, you can append ?ptype=store into your link URL. (For example – https://templatic.com/demos/emporium/?ptype=store) where all the below mentioned settings will effect. To do settings for this page,
- Go to wp-admin -> Theme options -> Theme options
- Expand the section “Products Listing Settings -> For ´Store´ or ´All Products´ Page”
- Start doing your settings and then click on “Save changes”
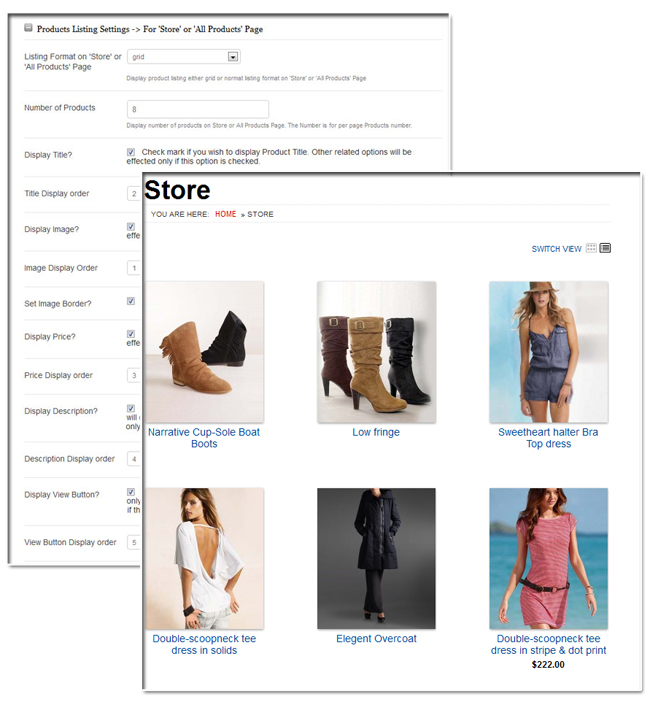
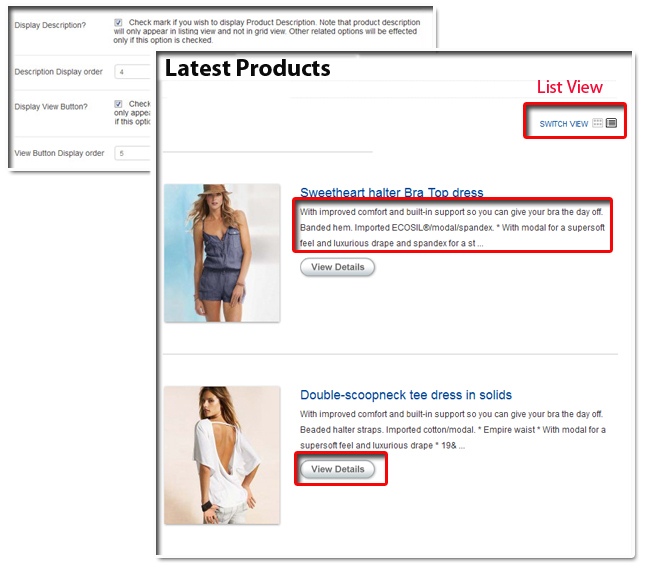
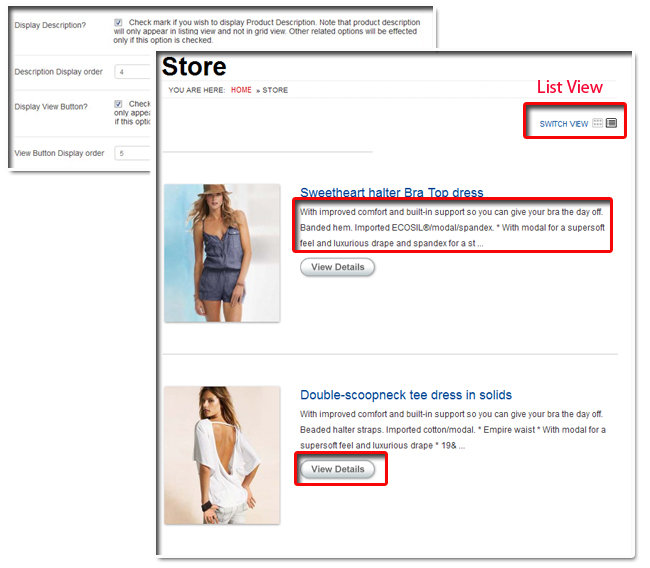
Some of the options given at the back-end will only be in effect when you have selected “List view” for Listing format field as shown below,
- Display Description? – Will show product description under the product when list view is selected.
- Display view Button? – displays a view button that redirects you to its detail page.
5. Image default width & heigth Settings – Product Listing
Displaying product image on your product listing page is necessary but it is not always that you have same size of images for each of your product! So, to maintain the design accuracy, the theme itself crops the larger images to the dimensions specified to it to make your product listing page images look similar sized. Following these steps, you can specify your required dimension of the product image for your product listing page,
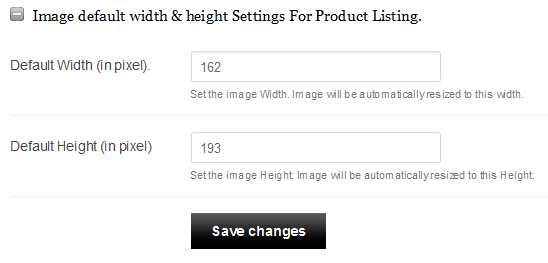
- Go to wp-admin -> Theme options -> Theme options
- Expand the section Image default Width & Height settings for product listing
- Enter your required width and height for your product image.
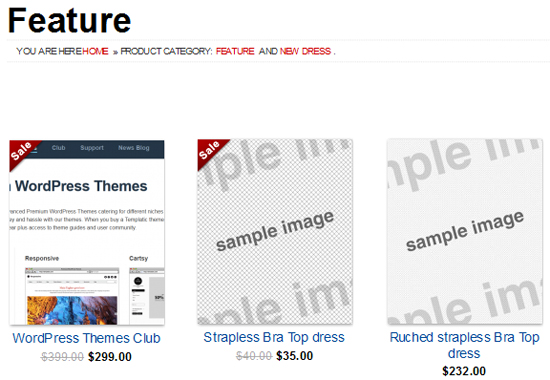
On front-end it will look something like this,
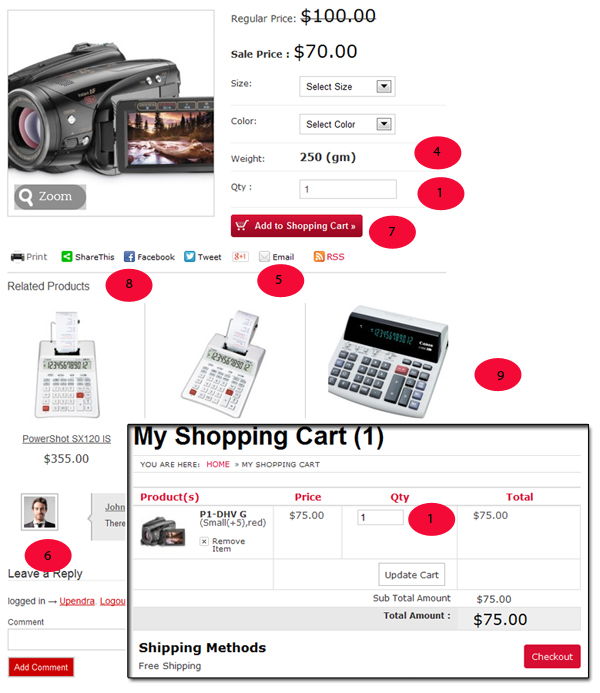
6. product detail page settings
Here explained options help you control majorly “Product detail page” on your site and some of the options that come on the product checkout page.
[templ_msg_box type=”success”]Tip: While setting up these options, also open up your product detail and shopping cart page (check out page) and test both the things simultaneously by saving your settings and refreshing your both the page to get the exact idea.
- Go to wp-admin -> Theme options -> Theme options
- Expand the section “Product Details Page Settings” to setup these options

- Display Quantity Textbox – This option has 2 values to select, “Show” and “Hide”. On selecting “Show” option, it will show an editable quantity text box on your product detail page where user himself can input number of quantity he wants of that particular product.
- Set quantity textbox on Shopping Cart page – When you select “Editable” option here, it lets your user manually alter the quantity number on their shopping cart page before placing an order. Whereas “Readonly” doesn’t allow to do that.
- Maximum number of Quantity Decimal – Write the number of decimals up till which your product quantity can be purchased or say available. (e.g. gold carrots like 1.7 grams)
- product weight – If you are selling a product where weight matters, select option “show” here and it will be displayed on your product detail page. (Note: To show weight, you must have entered it in that particular product form the back-end while adding it to your site from wp-admin -> Products -> Add New Product
- Tell a friend – On product page, there are various social sharing options available amongst which you will also see an email icon that helps you tell your friend about the particular product. Selecting hide will not show this option there.
- Add comment – It allows anyone to comment for your product on the specific product detail page.
- Add to Cart/Send Inquiry Button Position – This is the HERO button of your product detail page clicking which anyone will add the product to their cart and ultimately shop from your website. So, this option helps you show your important button either below the product content or on both the sides of content i.e. above and below content.
- Related products – Products that belong to same categories are shown in the related products section. so, using this option you can show or hide related products on the product detail page.
- Number of related products – Using this option you can specify the number of related products that will appear on your product detail page.
To understand better, above explained options are given numbers. So, refer the below given screenshot following those numbers.
7. Blog Page
How to select categories as Blog categories ?

- Click on Theme options >> Theme options
- Click on Blog section settings
- Select the categories
How to display full post content in Blog ?

- Click on Theme options >> Theme options
- Click on Blog section settings
- Click on “Display full post content”
8. Shopping cart page
Shopping cart option basically helps you to decide what kind of products you will show and sell on your site. It has 3 main options “Shopping Cart”, “Digital Shop” and “Catalog mode”.
To locate it, go to wp-admin -> Theme Options -> General Settings, there is a tab named “Shopping Cart”
- Shopping Cart – Allows users to add as many products as they want into their cart and then make a final checkout paying for all of them together.
- Digital Shop – As soon as you click buy now button, it will redirect to the checkout page. You cannot add products to your cart and then make a final payment. For each product you buy, you will have first make the payment and proceed further.
- Catalog Mode – It only displays “Send Inquiry” button on your product detail page using which users can place you an order but cannot buy immediately from there.
Let’s see what else you can do here,
Call to action button for product purchase on your site
It has 2 options to select “Shopping cart” and “Buy Now button”. Ideally “Buy Now button” is for digital shop.
How people can buy product from your site?
Using Checkout Login Method option, you can decide this very easily. It has 4 options to select,
- Normal Login checkout – User has to login and buy his products
- Checkout as Guest – Allows all your site visitors to purchase product on your site. registration will not be compulsory.
- Login and Registration not allowed – It disables both login and registration on your site.
- Registration not allowed – Disables only registration and not the login. It is helpful when you have fix clients and being an admin you create your client account from WordPress back-end. But yes, on doing that theme will not fire credential email to your users. However WordPress itself gives you email option.
Other options that affects your checkout page
- From Email Name – Used as “From” name in the email that gets fire to user on a particular purchase
- From Email ID – Used as From email Id in the email that gets fire to user on a particular purchase
- Default Currency – Write the currency in which you trade
- Default Currency Symbol – Write your default currency symbol
- Price Format Decimals – Specify the decimal points up to which your product costs. By default it set to 2, e.g. 250.50
- Price Format Currency Symbol Position – Shows the currency symbol as specified with amount figure.
- Default weight unit – Specify the default weight for your products
- Product Tax – Specify tax here and it will get included on the checkout page of product.
9. Site pages layout settings
Please note that these options and features are not for the eMarket theme users as eMarket theme is built around a new framework
Site Page Layout settings section allows you to decide and apply different layouts for the various pages on your website. Let’s figure out how many layouts are available and actually how many pages can have them,

- Go to wp-admin -> Theme options -> Theme options
- Expand the section “Site Pages Layout Settings” to start setting layout for your site pages
- Click the “Save’ button given under the section and then also click “Save Changes” button for the whole Settings part.
- Refresh your browser to see the effect.
How many Layouts are there?
After selecting here said layouts for your required pages you will have to fill up these sidebars using required widgets in that particular widget area given at wp-admin -> Appearance -> Widgets. E.g. Selected right sidebar layout for blog detail page as shown in above screenshot and then placing any widget say “Recent Posts” in Blog Detail Sidebar Right widget area.
- With Right Sidebar – Applies right sidebar area to the page for which you choose it.
- With Left Sidebar – Applies left sidebar area to the page for which you choose it.
- 3 column content with left & right sidebar – Basically provides a space for sidebar at left and right side of the main content located in the middle.
- 2 column sidebar in right side – Shifts both right and left sidebars to right side of the page content.
- 2 column sidebar in left side – Shifts right as well left sidebars to the left side of the page content.
- Full page – Allows no sidebars. It only displays the page content.
At what pages you can actually apply these layouts?
Here is a list of pages where you can apply the above said layouts on your website,
- Home page – The main page where users land whenever (s)he opens your website.
- Content pages – like contact us, About Us etc
- Product Listing pages – where per category products are listed
- Product detail page – A particular product page that describes each and every information about it and from where you can buy that product.
- Blog Listing page – A page that lists all the posts/blogs on your site
- Blog detail page – A page that shows all the content of a particular blog/post in detail
- Store listing – A system generated page that lists all the products of your site on a single page. It gets created by appending a link
?ptype=storeto your site URL. - Shopping cart page – Page that shows a table of all the information of your added to cart products like product name, quantity, Price etc from where you can go to your checkout page to make the final payment.
- Checkout page – This is the final page for product purchase on your site. From here user can choose his payment method and make the final payment.
- Order Detail and My Account page – When registered user makes purchase, it stores the history of such purchases along with the total downloads and his/her profile information, that is the page which is known as Order Detail and My Account page. It is system generated page and gets created by appending the link
?ptype=myaccountto your site URL.
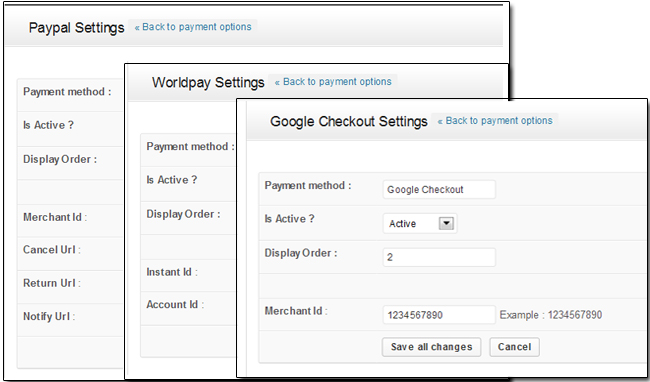
10. Accept payment online
eCommerece Framework themes come with built in payment gateways like “Paypal”, “2co (2Checkout)”, “Authorize.net”, “eWAY”, “Google Wallet (google checkout)”, “payondelevary”, “PayPal”, “PayPal_Pro” “prebanktransfer” and “WorldPay”. You just need to have merchant account with your respective payment gateway and based on that do minor settings into integrated payment gateway options into your theme.
Let’s figure out how to set your payment settings,
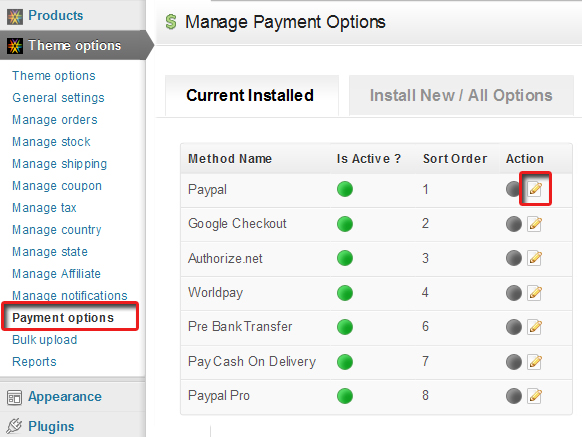
- Go to wp-admin -> Theme options -> Payment options
- It will have 2 tabs namely “Current installed” and “install New/All options”
- The first tab “Current installed” will show you only those payment gateways which are installed whereas the other one will show the whole list of both installed and uninstalled gateways.
- Coming back to payment settings, click on “edit” under “Action” column given under 1st tab and you will see the settings part as shown in the below screenshot,
- Fill up all the required information there and save all your changes. (You will get all the asked information from your merchant account on your payment gateway website)
To understand better, let’s take and example of PayPal gateway,
- Choose its display order position for your checkout page.
- Then, simply enter your “Merchant ID” and save all the changes. You are done.
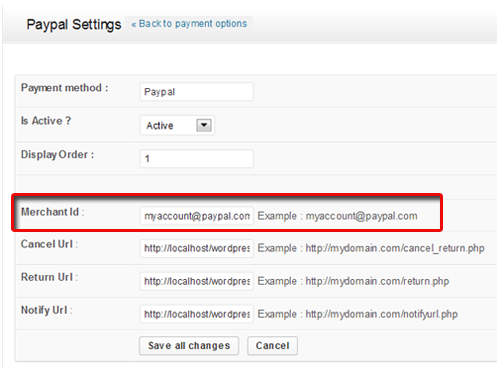
(Note: Merchant ID is your Paypal Email ID.)
Manage
1. Manage stock
- Go to wp-admin -> Theme options -> Manage Stock
- You can know all the details about stock in one go from this screen. e.g: opening, current, and sold out stock

- Opening Stock: Display’s the opening stock of the product
- Sold Out: Display’s how many units are sold out
- Current Stock: Display’s the current stock of the product
- Low Stock Value: Display’s the low stock value of the product
- Stock Enabled: Display’s if the stock limit applies to a particular product or not
How do you edit a product?
Another easy way to edit the product is going to Theme options -> Manage Stock and clicking on the product name which you wish to edit.
2. Manage Tax
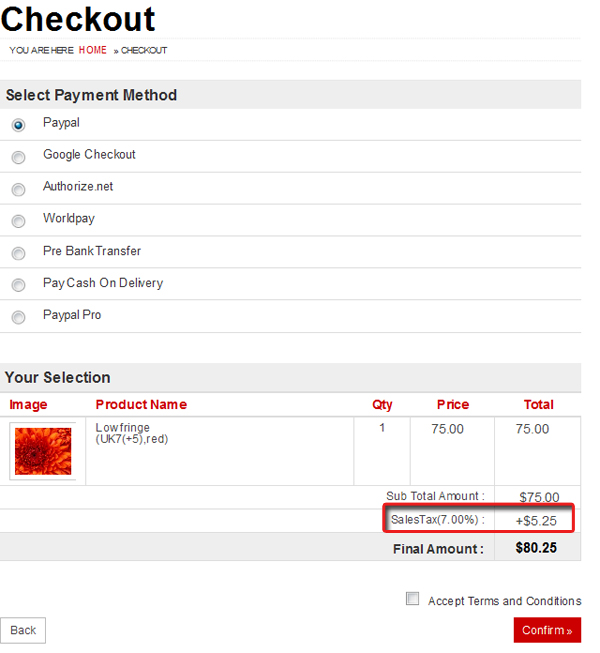
Different countries have different tax norms and rates so accordingly you can apply them on your eCommerece framework based theme products using these steps. These taxes will be visible on the product checkout page and will be added into the total bill value of a user who purchase the respective product.
To add a new Tax:
- Go to wp-admin -> Theme options -> Manage Tax
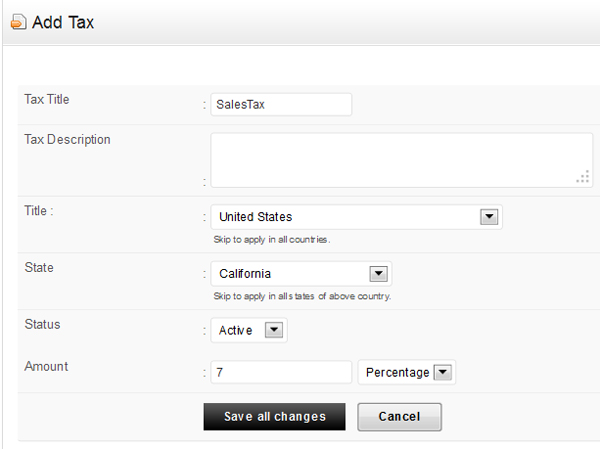
- Enter the “Title”. It could be anything
- Enter the “Tax Description”. e.g. Tax for California
- Select the Country to which you want to apply this tax, e.g. United States
- Select the State, e.g. California
- Set the “status” as active
- Set the “Amount” as per your wish. This could be in Percentage or Amount. (Note: Amount means a flat tax will apply, e.g. $10, so this $10 will be charged to the customer, no matter how much amount of products he/she purchases)
- Click on Submit
How to apply this tax on your product?
After creating your tax,
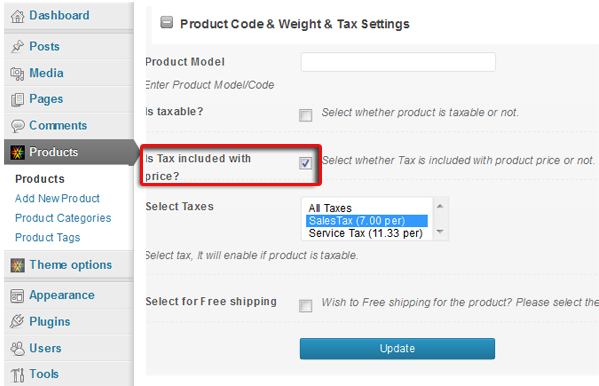
- Go to wp-admin -> Products
- Add/edit the product to which you want to add tax
- There under the section “Product Code & Weight & Tax Settings”, select “Is taxable?” option and click update
Same way, you can also select the option “Is Tax included with price?” when you do not want to apply additional tax on your product.
How it works on front-end?
After following all the above said steps, this is how it will appear when anyone checkout after purchasing any product from your site,
How to delete a tax ?
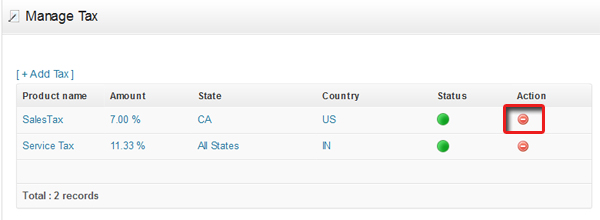
- Go to wp-admin -> Theme options and click on “Manage Tax”
- Simply click on “Delete” icon given under the column “Action” to delete that tax system
- Or you can simply set the status as “Inactive” by editing that particular tax system, instead of deleting it completely.
3. Manage Coupon codes
Shopping and discount always go hand in hand and that’s something which can help you get your best sales on your site. With eCommerce framework based themes you can easily create and apply discounts on your products. We have termed it as “coupons”.
How to add a new coupon?
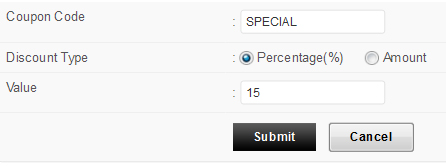
- Go to wp-admin -> Theme options >> Manage Coupons
- Click on “+Add coupon” to add a new coupon code
- Enter the coupon code, e.g. megadiscount, Abc123 etc (Note: code can be alphabets, numbers and/ or alphanumeric but cannot contain spaces or special characters like “-” etc. Also coupon code is case sensitive, so when coupon code is “abc”, entering “ABC” will return you invalid coupon message.)
- Check mark either Percentage or Amount. Select Percentage if you wish to give percent based discount on the total bill value and “Amount” to directly specify the fix discount amount.
- Enter the value in the box and click on “Submit”.
How to turn on and off coupon code box on your product check out page?
To let your users enter the coupon code and get the benefit on their purchase, do this,
- Create coupon like said above
- Then go to wp-admin -> Theme options -> General settings ->
- Under “Other settings” tab, select “Yes” for the option “Display Coupon code on checkout page” if you want to show coupon code box on checkout page
- Submit your settings
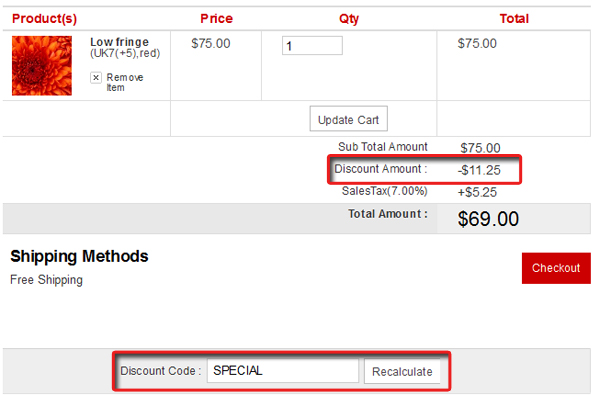
How will it work on front-end?
After following all the steps said above, this is how it will look,
How to edit and delete a coupon?
Follow these steps when you either want to edit existing coupon or add new one,
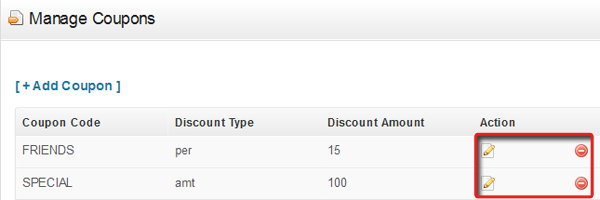
- Go to wp-admin -> Theme opions >> Manage Coupons
- Click on “Edit” icon under the “Action” column to edit a coupon code OR
- Click on “Delete” icon to delete your coupon completely.
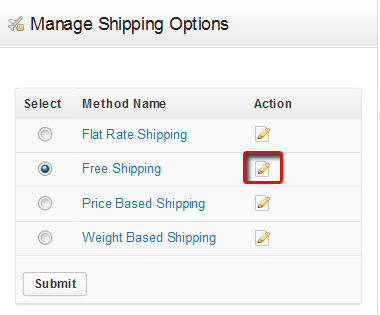
4. Manage Shipping
- Go to wp-admin -> Theme options -> Manage Shipping
- Select your required shipping option from the provided list.
- Click “edit icon” from the column “Action” to set it according to your requirement
- If you are adding your preference for the first time, click “Add New” else click “Edit”.
- Flat rate shipping: This shipping method will apply a flat rate on your products. You can even set different shipping prices for different locations/states/countries. To configure flat rate shipping, click on “Settings” and then click on “Add New”. Now enter the amount, range, country and state and finally click on Submit button. Range means the product price range to which you want to apply the shipping. E.g. 10 > 20. Now any products which comes in between this price range will be applied flat rate shipping.
- Free shipping: As the name suggests, this shipping method will apply free shipping on all products.
- Price based shipping: This shipping option also works like Flat rate shipping only. You can set different shipping prices for different locations/states/countries. To configure, click on “Settings” and then click on “Add New”. Now enter the amount, range, country and state and finally click on Submit button.
- Weight based shipping: If you want to apply shipping based on weight of the product, then select this shipping option. But ensure that you enter weight of all the products while adding them. There is a field for “Weight”, while adding products. Don’t forget to enter weight of the product there, or else shipping will not be applied.
To understand better let us take an example of one of these option say “Free shipping”. It is a global setting and will apply to all the products.
How to insert shipping system based on country or state?
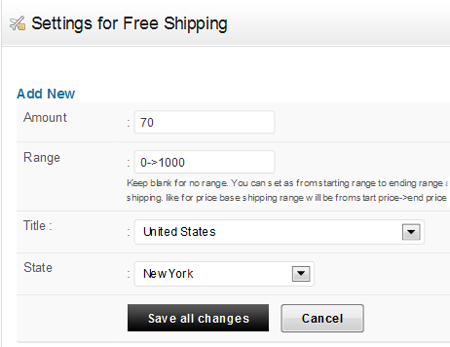
- Selecting “Free shipping” option following the steps said above, click on edit icon located under “Action” column.
- Write the shipping amount.
- Specify the range of price (as per this example) for which this shipping charge is applicable.
- Choose the country and state to apply this shipping.
- Save all changes.
5. Notifications and Emails
Adding and selling products involves so many actions in between on your site like charging price, checkout page, payment gateways (online payment) etc. One of these important action is “Emails and notifications”. On purchasing any product from your site, user and admin (you) will be fired an email as well as a screen notification message. Now this was just about the email action done on product purchase, similarly there are several other actions too on which emails and notifications are given.
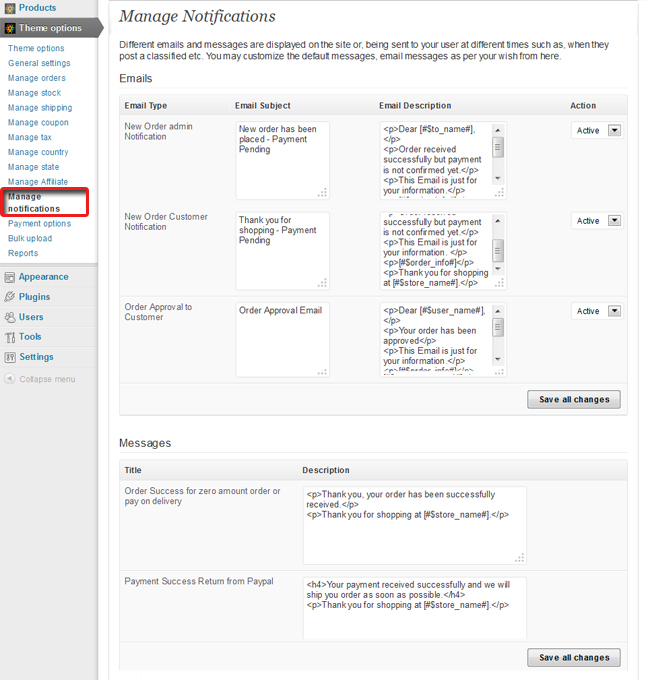
By default, the theme comes up with the relevant email/ notification messages but if you want to personalize these content then you can do it easily with these steps. However, you have no option at back-end to add completely new email for any particular action. To do that, you will have to custom code it.
- Go to wp-admin -> Theme options -> Manage notifications
- The whole section is divided into 2 part, “Emails” and “Messages”(that gets display on the user computer screen)
- You can read the email-subjects to the particular email purpose and modify the content accordingly.
- If you think that any of the email(s) is not needed then you can easily turn it off by selecting “Inactive” from the “Action” column. By default all the emails and messages will be in “active” mode.
- You will have to save your changes different for 2 different parts. Meaning, after getting done with emails, click “save all the changes’ button given in its part and repeat the same process for “Messages” as well.
6. Managing orders and changing their Status
When anyone purchases a product from your site and clicks “confirm” on the check out page, it will add a transaction entry at your back-end in a “pending” status which you can change according to your need from the available statues. Let’s figure out how you can search through the orders,
- Go to wp-admin -> Theme options -> Manage orders
- Whatever purchases are made on your site, it will have a list of of those orders
There are 2 main options “Order numbers”, “Payment options” and “Select status” to search through orders which can be used individually as mentioned below
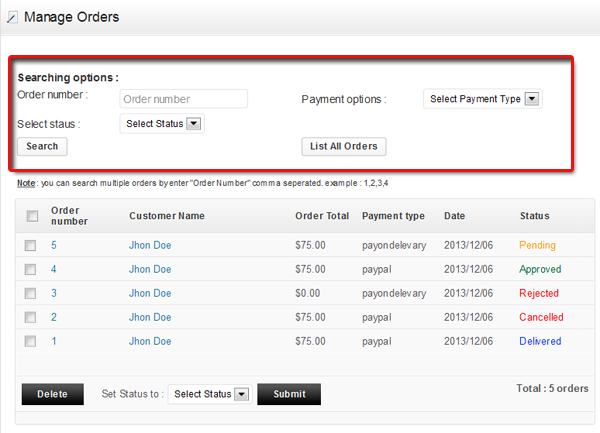
- Searching through Order Number – Click on “order number” text box to enter your required order number and search for its details
- Searching through Payment type – If you want to search your order based on a particular payment type, then select your required payment type and click on search
- Searching through Order status – To search any order based on its status, select the order status and click on Search.
- Listing all orders – It will display you all the orders that you have till date on your site.
How to know the order details?
At wp-admin -> Theme options ->Manage orders, you will find only list of orders but to view their detail,
- Click on the order number given in the list.
- It will list you all the details of a particular order which includes “product ordered, user information, shipping address, payment information, product name, image, quantity, price, tax” etc.
How to change the order status:
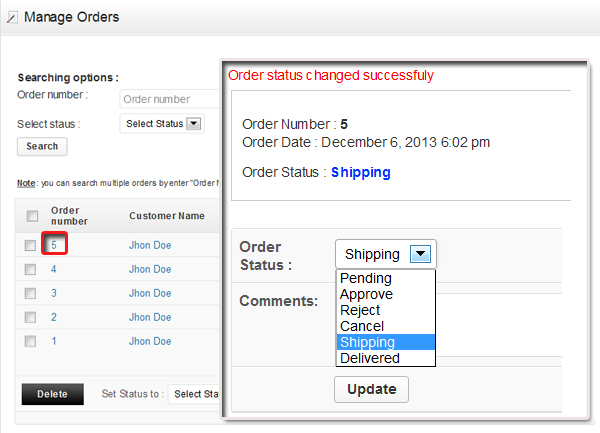
- Go to wp-admin-> Theme options- > Manage orders
- Now click on the Order Number
- Scroll down and change the order status from the available status given at the last of the screen and click on Update. You can also add comments (like quick notes) in the comments field.
- The available order status are “Pending”, “Approve”, “Reject”, “Cancel”, “Shipping” and “Delivered”
On changing order status to approval, Reject or Shipping it will fire a mail to the user. Using back-end theme options you can control these mails to a certain limit as follows,
- If you want to change the email content to give your personal touch to it, you can do that from wp-admin -> Theme options -> Manage notifications
- Under Emails section, locate the email with the subject “Order Approval to Customer”, “Order Rejection to Customer” or “Order Shipped to Customer” and change the content accordingly. (Note: The variables written under “square braces []” displays the particular user filled information)
- Or if you do not want to mail your clients on the above said actions then simply just turn of these mails by changing their status from “Active” to “Inactive” from the column Action at wp-admin -> Theme options -> manage notifications
Other Settings
1. Adding Affiliate
What is Affiliate links?
Basically, with this option you can add your affiliates’ unique links, with which you can have the awareness & record that what business you have drawn from which of your affiliate! & these reports will be visible in the Sale Report section.
Affiliate Unique Link
- Being an admin, you have to add a Link of your particular product or simply just add the home page URL, with the purpose of allowing someone to promote & sale your products in their respective source (like Websites)
- If you want to allow your Affiliate to sale only specific product then add only such product URL OR can add Home Page URL to let them sale any of your product
- These links will be visible in that particular Affiliate’s account (created with the help of Registartion Links)which (s)he can set at appropriate place for the Sales at their sites
- Links can be placed with any Page,Post,Custom Post or Widgets
- If Affiliate want to set this link at their Registration Page then they have to add it in its particular code file as mentioned here.
-
- Modify code in
Framework/Library/Includes/registration_profile.php - At around
line number 28 - Add
<a href="templatic.com" target="_blank">Want to register as an affiliate? </a>below the code :<input type="button" onclick="showhide_registration();" value="Register »" name="confirm"/>
- Modify code in
Here templatic.com link is used as an example, you can use your preferred link
-
How to add Affiliate links ?

- Click on Theme options > Manage Affiliate > Links
- Click on “Add Affiliate Link”
- Enter the “Link Title”, “Link URL” and “Link status” & Submit it
2. Affiliate Members Detail
How to know about the Affiliate members username and their total sales ?
Members are your total number of Affiliates whom you have added using the “Link” section. This area will show you their name, total sales done by them till date & their share amount till date (Irrespective of paid or unpaid).

- Click on Theme options > Manage Affiliates > Members
- Sale amount means the price of the order and share amount means affiliate’s share in it. E.g. if a orders price is $100, then this $100 is “Total sale amount” and if you have set “Affiliates Share Amount” as 10%, then his “Total share amount” will be $10.
3. Afiiliate Sale Report
How to get the Affiliate sales report ?
After adding a Affiliate Links, you will be able to see the sale report done by those affiliate (If any) from their source sites.

- Click on Theme options > Manage Affiliate > Sale Report
- To Search the reports, select the date from the calender and click ‘Search”.
- To get the Excel file of your reports, click on “Export this to Excel”
4. Affiliate Settings
Short Summary
Manage Affiliates is a feature that helps you to easily create and manage your affiliates. With it, you can manage Settings, Links , Sales Report & Members. All the major business needs are covered in these sections.
First, lets have a look, how to set the “Settings” !
How to activate affiliates program ?

- Click on Theme option > Manage Affiliate > Settings
- Select “Yes” from the dropdown for “Activate Affiliates” field
5. How to get the Affiliate registration page and login page URL ?

- Click on Theme option > Manage Affiliate > Settings
- There will be 2 fields as shown in the above screen shot, these are your links for Registration & Login respectively.
- Using Registration link, Affiliate account can be created (Can also do copy-paste the link & create account).
- Such Affiliates will be visible at the Members area
If you are using a WordPress multisite feature, then do not forget to “Allow new registration” from Network Admin > Settings > Network Settings > Registration Settings > Allow new Registration
How to set Affiliate share amount ?

- Click on Theme option > Manage Affiliate > Settings
- Set the share amount in “Affiliates Share Amount(%)” in percentage only.
How to set Affiliate cookie alive time?

- Click on Theme option > Manage Affiliate > Settings
- Enter days in “Affiliates Cookie Alive time (in Days)”
How to change Affiliate page message ?
- Click on Theme option > Manage Affiliates > Settings
- This option is helpful when you want to display the message on your registration page.
- Enter the text in “Registration Page Message (above form)” and “Registration Page Message (below form)”
6. Captcha & Checkout settings
How to disable Captcha on registration page ?
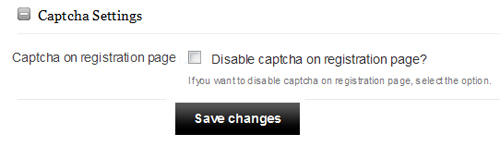
- Click on Theme options >> Theme options
- Click on Captcha Settings
- Check Disable captcha on registration page?
How to enable comment on checkout page ?
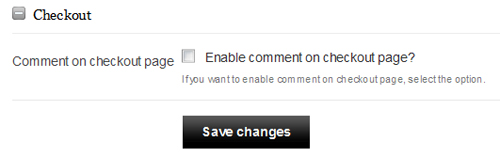
- Click on Theme options >> Theme options
- Click on Checkout Settings
- Check Enable comment on checkout page?
7. Cufon settings
- Go to wp-admin -> Theme options -> Theme options
- Expand the section Cufon Setting
- Check Enable cufon style being used for titles
Basically it is a design setting which may or may not be included in your theme. It comes from the core framework but you should also read your theme guide to find out its presence there.
8. Email Settings
Email Settings:
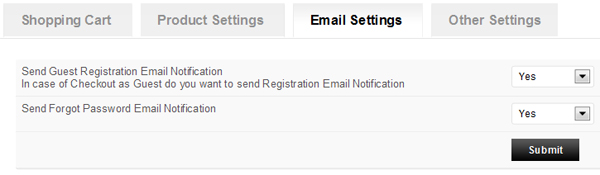
You can set which Email notification you want to send to your customer.
- Go to wp-admin -> Theme options and click on “General settings“
- Click on “Email settings“
- Send Guest Registration Email Notification – Select Yes if you want to send guest registration email, else select No
- Send Forgot Password Email Notification – Select Yes if you want to send forgot password email, else select No
What if you want you change the email content?
For, User registration you can do with these steps,
- Go to wp-admin -> Theme options -> Manage notifications
- Locate the email content for “Customer Registration Email” and save all the changes
9. Footer Navigation settings
How to select which Pages appear in Footer Navigation ?

- Go to wp-admin -> Theme options -> Theme options
- Expand the section Footer Navigation
- Select the pages that you wish to see in the footer
It may or may not be included in your theme. It comes from the core framework but you should also read your theme guide to find out its presence there.
10. General settings
The General Settings section controls basic design related elements. Below are detailed explanations of the settings available.
Theme Skin
A Theme skin allows you to choose different css skins for your blog or site.
- Go to wp-admin -> Theme options -> Theme options
- Click on General Settings to expand it
- Here Select the Theme skin for your blog from the dropdown menu.
Custom Stylesheet
A custom stylesheet allows you to overwrite the rules already set in your theme’s style.css file which controls styles, colors, and background images of your store. Instead of modifying the style.css file directly, you place all of the modification CSS codes in the custom.css file.. Doing this keeps your store’s design future proof. If we release any update for the theme you’re currently using, you simply upload it to your web hosting server without a worry because all of the modifications sitting in the custom.css file will not be effected.
How do you turn on the custom stylesheet?
Before you can use the custom.css file, you must tell your theme you are doing so. Here’s how:

- In WordPress Administration, on the left side, find Theme options and go to the sub menu Theme options
- Click on General Settings to expand it.
- Check Use Custom Stylesheet
- Click on Save Changes at the bottom of the page.
- Now your custom.css file is ready.
Favicon
A favicon is a small image, typically 16 by 16 pixels, representing your website. This is where your logo should be. Whenever someone bookmarks your site, the favicon size logo will show up on that person’s list of bookmarks.

- Go to wp-admin -> Theme options -> Theme options
- Click on General Settings to expand it
- Enter the full URL of the favicon in the field named Favicon
Header or Logo Image
This is self-explanatory. Link to the image you’d like to use in the header of your site as a logo or banner.
- Click on Theme options -> Theme options
- Click on General Settings to expand it
- Enter the full URL to the header or logo image in the Header Logo Image Path field
Display Blog Title instead of Logo
It allows you to display Blog title and Tagline instead of your logo.
- In WordPress Administration, Go to Theme options -> Theme options
- Click on General Settings to expand it.
- Check Display Blog Title and Tagline
- You can change your Blog Title and Tagline by click on change your setting here
Syndication Feed and Feed URL Link
RSS is how users can stay up to date with what’s going on at your site. When visitors subscribe to your RSS feed, the feed will notify them of any updates. Some like to use services like Feedburner to manage their RSS feeds. If you’ve signed up to a service like Feedburner, insert your ID and / or new feed address here.

- Go to wp-admin -> Theme options -> Theme options
- Click on General Settings to expand it
- If you’ve signed up for Feedburner, in the Syndication / Feed field enter the feed ID. e.g.templatic. If you’ve signed up for a difference service, enter the feed URL in the Feed URL Link field.
11. Header navigation
The Header navigation section controls the header part of the theme.
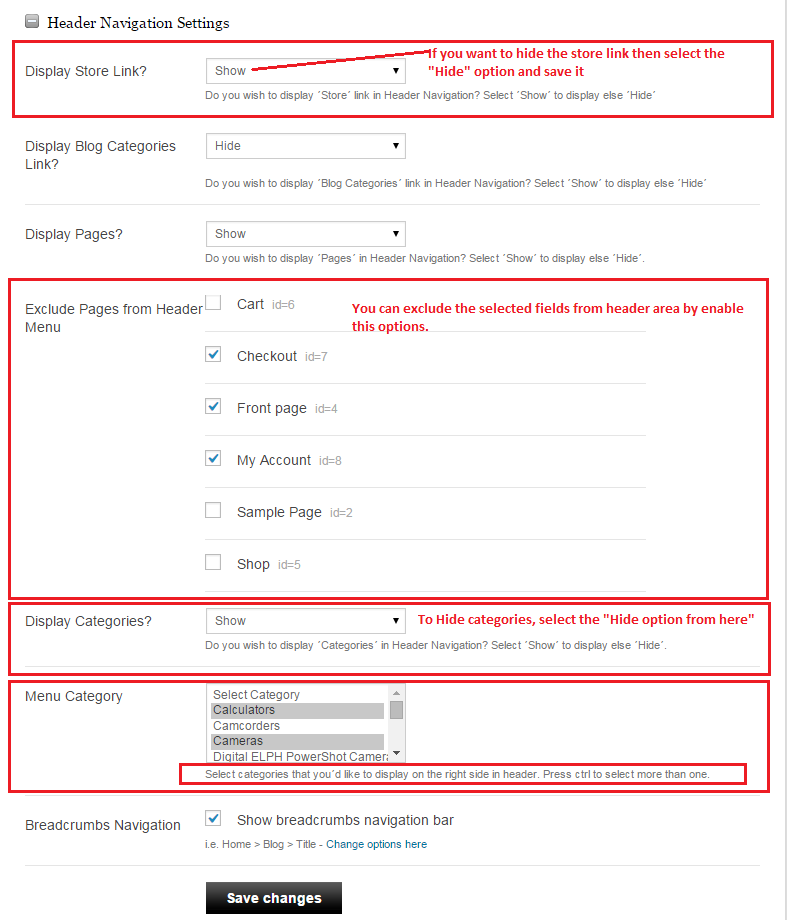
Display store link : If you want to hide the “store” link select the “hide” option from here.
Display Blog categories link : If you want to hide the “Blog categories” link select the “hide” option from here.
Display Pages link : If you want to hide the “Pages” link select the “hide” option from here. You can also exclude the pages from here as shown in the screenshot.
Display categories and menu categories You can manage the menu categories and categories from this section by selecting this given options.
Breadcrumbs Navigation You can manage to show/hide the breadcrumbs option from here.
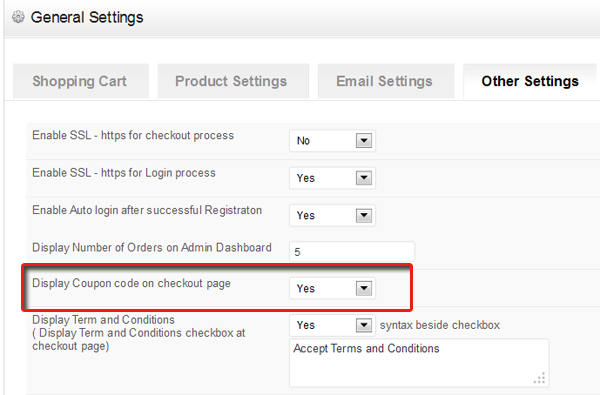
12. Other settings
This part has many settings that looks small but quite important for your site. From here you can setup SSL certificate for some of the really vital pages, enable things like terms and conditions acceptance before actually checking out, enable coupon code box on checkout page, Set some fields as compulsory for registration page and login page content. Lets see them one by one,
First of all to do all the settings,
- Go to wp-admin -> Theme options -> General settings
- Switch to ‘Other settings’ tab

- Enable SSL – https for checkout process – Turning it on (selecting ‘yes’) makes your checkout page and procedure secure. To have this option in effect you must have SSL certificate configured on your server.
- Enable SSL – https for Login process – It works the same as said above but for the Login page and its process. The same condition is applicable here too of SSL certificate configuration on server.
- Enable Auto login after successful Registration – When it is selected as ‘Yes’, it redirects the user to his account page (appended with
?ptype=myaccountin URL) as soon as user registers with your website. - Display Number of Orders on Admin Dashboard – Whatever number you specify here, those orders will be visible on your admin dashboard at back-end i.e. at wp-admin -> Dashboard. By default it will show a widget “Latest Order List” there but if you do not find it then turn it on from the Screen options given at the top right corner.
- Display Coupon code on checkout page – When selected ‘yes’ it shows a box to apply coupon code for discount on your checkout page.
- Display Term and Conditions – When selected ‘yes’ it shows a check box that says to accept terms and conditions compulsorily before checking out. A box is given just below that which allows you to write your message for this check box and using html tags like anchor tag (<a>) you can also link your terms and conditions page there.( e.g. Accept <a href=”http://example.com/terms”>Terms and Conditions</a>)
How to select “Mandatory Fields” in registration page ?

There at ‘other settings’ part, is another option “Registration Page Mandatory Fields”. Select the fields that you want to make mandatory while registering with you. It will have an effect on your registration page.
How to change the “Login page” top content ?
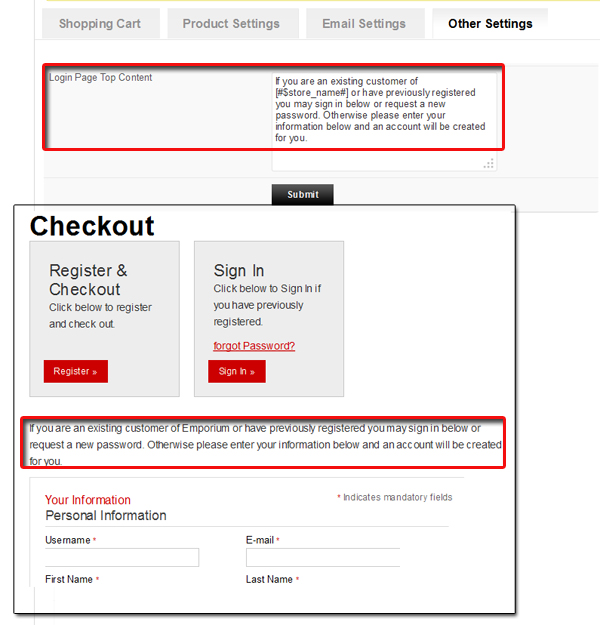
Content written in the option ‘Login Page Top Content’ gets display on the Registration & checkout page at the top, you can write and save your own content here.
To place the Registration and Login page on your site you can do any of these two things ,
- Either you can place the widget T – Login Information at the suitable widget area from wp-admin -> Appearance -> Widgets. (Generally header widget areas are most suitable)
- Or you can append this
?ptype=logininto your site URL and place this link any of your navigation menu clicking which site visitors can be redirected to it.
13. Reset Design Settings to default
When you do not want to apply your settings anymore on your site, you can use this function to reset everything like it came by default when you bought the theme. It can also be helpful when you are just testing around and then you decide to start a serious work with your website.
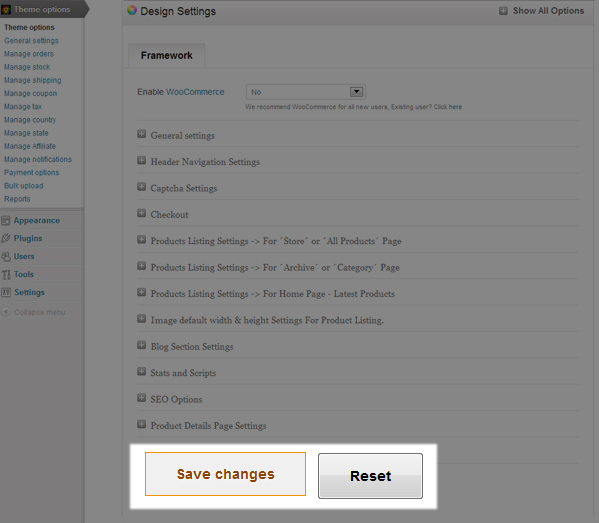
- Go to wp-admin -> Theme options -> Theme options
- Click on Reset button at the bottom of the page
- After clicking you’ll be presented with a confirmation box. Simply click on “OK”
14. SEO Options
Using SEO option you can insert Meta Description, Meta keywords and Meta Author for SEO to your site. Follow these steps to do so,

- Go to wp-admin -> Theme options -> Theme options
- Expand the section SEO options
- Enter the Meta Description, Meta keywords and Meta Author in these fields
15. Stats & scripts
Including some site tracking (analytic) codes using scripts like Mint or Google analytics on your site may help you boost the overall benefit of your site. So, with this purpose eCommerce based themes provide you an option to include such scripts to the header and footer of your site.
Below said scripts will be visible at the header and footer part of your site.
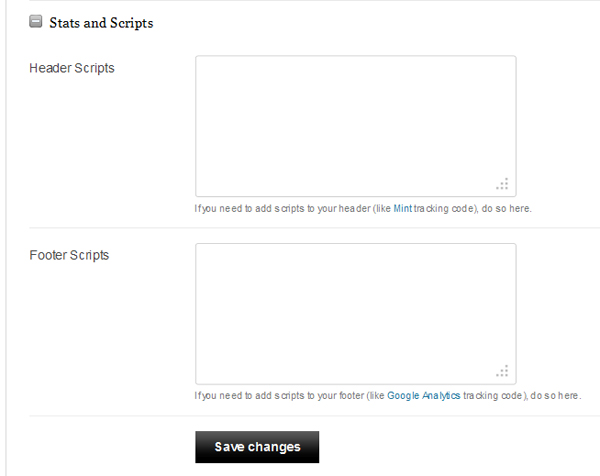
Add header scripts
- Go to wp-admin -> Theme options -> Theme options
- Expand the section Stats and Scripts
- Insert your code/script in Header scripts
- Save your changes
Add footer scripts or Google Analytics code ?
- Go to wp-admin -> Theme options -> Theme options
- Expand the section Stats and Scripts
- Insert the Google Analytics code in Footer scripts. (You can also insert any other code)
- Save your changes
Any Queries? Contact us and we’ll help you out.