Getting Started
1) Install Booking add-on using WordPress back-end
- Connect to member area ,under Plugin Downloads section, expand the Tevolution plugin section and download the tevolution.zip file.
- Then staying in the members area, expand Templatic Booking plugin section and download the tevolution-booking.zip files given there.
- Now, connect to your WordPress dashboard (wp-admin) and navigate to Plugins -> Add New -> Upload.
- Choose the downloaded zip file of Tevolution plugin from your respective hard drive and click Install Now tab.
- Repeat the same process to install Templatic Booking plugin.
Note: Activate Tevolution plugin first and then after Templatic Booking add on. Following this order will help it work accurately as Templatic Booking works on the base of Tevolution plugin.
In case, WordPress rejects it then,
- After downloading the zip file of plugin as mentioned in above steps, Extract the files.
- Move that extracted folder to your active WordPress directory in ../wp-content/Plugins/
2) Install sample data
Booking system plugin facilitates you with the sample data to demonstrate its working. To add some sample Rooms and Houses, follow these steps,
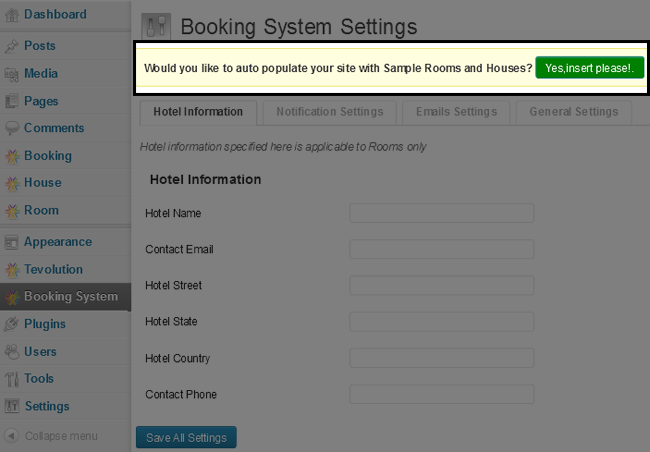
- Go to wp-admin -> Booking System
- At the top of the screen, there will be a strip asking to add sample rooms and houses, just Click on the “Yes, Insert please” button.
It will populate sample houses, sample rooms and notification emails in wp-admin -> Houses, wp-admin -> Rooms and wp-admin-> Booking System -> Email Settings respectively.
Going Deeper
1. Pages made using Booking system shortcodes
As soon as you activate the Tevolution and Booking System plugin, you will have 4 built in pages in your wp-admin -> Pages. These pages are made using plugin shortcodes as mentioned below,
- Booking Form –
Booking Request Form[booking_submit_form] - Booking Calendar –
Booking Calendar[booking_calendar] - Booking cancel –
[booking_cancel] - Booking Tariff –
Booking Tariff[booking_tariff]
Generally these pages will be there if you insert the sample data but if you have not then you can simply go to wp-admin -> Pages -> Add new and copy paste these shortcodes and publish the page.
Tevolution being the base for many of our themes, will not work for its option of “Show custom field category wise” for this add-on at wp-admin -> Tevolution -> General Settings. Booking form will not have any option to select the custom field category wise.
2. Setup the booking form
When you are offering rental stay, booking form becomes the necessity. In this plugin, Booking Form is created with the help of Short Code. when you install the sample data, this page gets added automatically but in case if you don’t insert the sample data then you can create it by applying the below short code
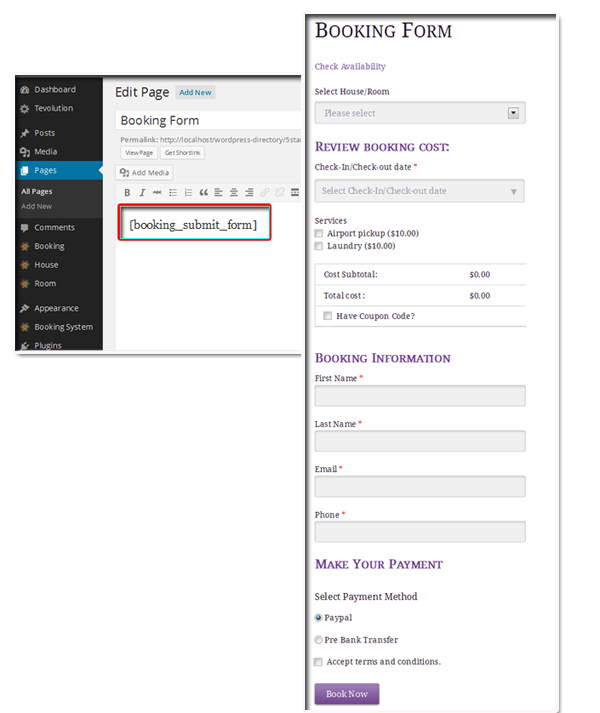
Above screenshot is taken using 5 Star theme. However, the booking form design depends on the theme you are using.
- Go to wp-admin > Pages > Add New
- Apply, short code
Booking Request Form[booking_submit_form] - If you want to display some text on the page along with the booking form, you can write it down in the page, else leave it blank.
Note: To avoid the 404 error, Make sure that you have selected “Post name” in wp-admin > Settings > Permalinks > Common Settings
3. Add House/Room
With the help of Booking-system & Tevolution plugin, you will have 3 options listed in the WordPress menu in your wp-admin. 1) House, 2) Room and 3) Booking. Booking is discussed in the later point.
1) House
When you provide rental stays, then House will be one of them to be offered. So, from here you can add such Houses to your website. Let’s see it step by step.
- House – Shows all the available houses with the Categories, Tags, Author, Post Date, Total Guests & whether you want to apply Tax on it or not.
- Add a House – Here, it is from where you can add your houses describing all the necessary things like content, images & other custom fields
- Minimum Stay – you can add minimum stay period for your houses from here. By adding this, user have to select at least the minimum stay period otherwise it will not allow to proceed further while booking
- House category – From here you can add/edit the category for your house according to your requirement
- House Tag – It will allow you to add the tags for your House.
2) Room
Just like House, Room also has all the four options & you can perform all the actions similarly except the “minimum stay” option, you cannot add minimum stay period for rooms.
Setting the prices for your rental stays has two methods
- Apply the charges on the House/Room individually when you are adding it from House > Add a House Or Room > Add a Room, in the custom fields asked there.
- Or you can apply some seasonal pricing on your rental stays. By applying this one, it will be given the primary consideration in charging the clients.
To set & apply such charges (described in option 2), follow these steps:
- Go to wp-admin > Booking System > Manage Prices
- Click the “Add new seasonal price”
- Select the start & end date for such seasonal price
- Select your house/room on which you want to apply it.
- And finally, define your price desires in the asked price table.
There are some default and mandatory custom fields for both houses and rooms like “Charge Tax?”, “Total Guests” etc. In same way, if you want to include some more fields there, you can easily do that by adding your required custom fields from wp-admin -> Tevolution -> Custom Fields Setup. If you want it to include on your submit form (i.e. Booking form) as well then simply select “Both” in the field “Display location” while creating custom fields. Read Tevolution guide to know more about custom fields.
4. View/Add Bookings
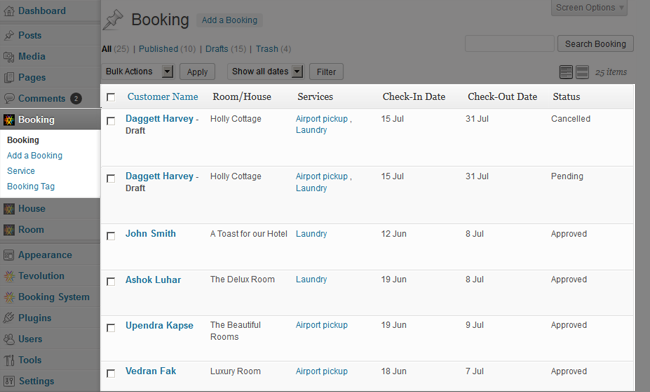
Main purpose of Booking is to show you the bookings made by the users for particular room/house & services on your website using the booking form. But if admin wants to add such bookings, services & tags from the back-end then also it is possible.
View Bookings
To add booking, it has 4 items in it:
- Booking – This area will display you the total information of any booking made, like type of House/Room booked, Services requested, Check In & Out date & Status.
- Add a Booking – With this option you can add the booking from backend itself following the custom fields, images, content, selecting services, tags etc as per your requirement
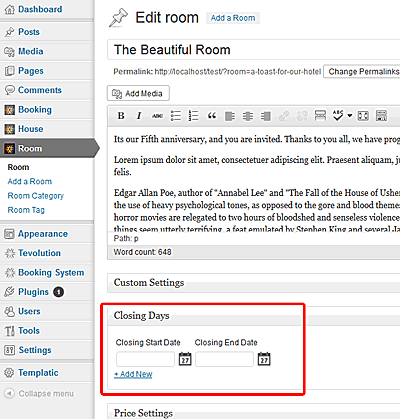
- Closing Days – This feature allows you to set a NO NO to the bookings on the dates specified in this field. So, on these days, no bookings will be available to anyone. (It is a custom field available at the back end when you add the Room/House).
- Service – services are like WordPress category. You can add the services that you provide to your clients. By default (Sample Data) some of the services added are Airport Pickup & Laundry.
- Services – When you apply the charge for any service while creating it from wp-admin > Booking > Service > Category Price, it will be applied on the PER DAY basis. So, if a service charge is $10 & person stays for 4 days, he will be charged $40.
- Booking Tag – You can add tags to your Room/House from here which can be helpful in searching them on your website.
5. Add Tax/surcharge on your rooms/houses?
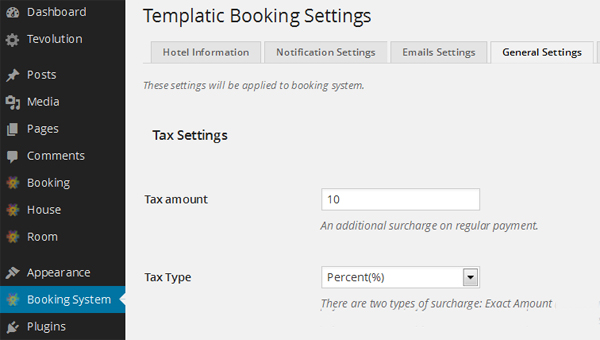
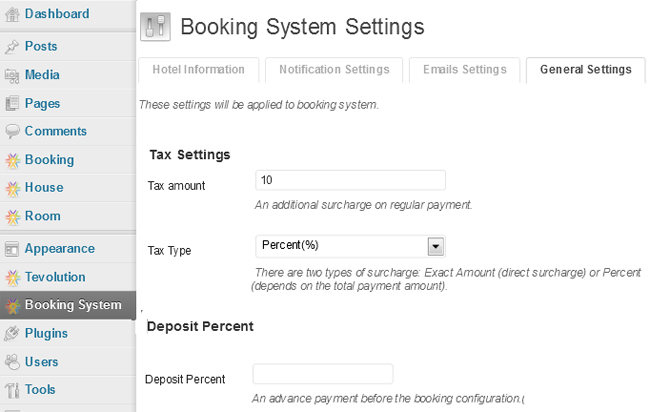
- Go to wp-admin > Booking System > General Settings
- Describe the Tax amount
- Describe the Tax Type. Whether you want to apply the exact amount or want to apply the percentage on the total bill value of the client.
You can also set the pages for your Booking Form, Cancel & Calendar respectively from the drop down given in “Page Settings”.
6. Other Booking Settings
Hotel Information:
- Go to wp-admin > Booking System > Hotel Information
- Fill your respective information there.
This information is necessary when you are notifying your clients via emails. So, this information is used there.
Notification Settings:
To notify your client about the Booking & payment Success message, you need to set it up your message here.
- Go to wp-admin > Booking System > Notification Settings
- Apply your message using html<tags> in respective fields
Your here set messages will be used in the email which will be fired to your clients on above defined situations.
Email Settings:
Now, this setting is something more than the ‘Notification’ one as it allows you to set your messages for various situations for your clients & users.
- Go to wp-admin > Booking System > Email Settings
- Apply your message using html<tags> in respective fields
General Settings:
Apart from setting the Tax amount for your Room/House, you can also add a Deposit amount needed to be paid by your client before the booking gets confirm.
- Go to wp-admin > Booking System > General Settings
- Enter the amount in “Percentage” that is to be paid as a deposit & Save the settings
- If you do not want to charge a deposit before the booking gets confirm then simply leave this field blank.
7. Increase or decrease the limit of guests per Room/House
By default, such rooms & guests will be limited but you can increase or decrease them according to your requirement.
Rooms:
- Go to wp-admin > Tevolution > Custom Fields > Number of Rooms > Option Values
- Write the numeric values up to the number you want to increase/decrease, separated by commas
- Update changes & refresh once
Guests:
- Go to wp-admin > Tevolution > Custom Fields > Total Guests > Option Values
- Write the numeric values up to the number you want to increase/decrease, separated by commas
- Update changes & refresh once
If you do not find this field there, check the second page or simply write “total guest” in search box.
8. Payment Options
The very important thing in any business is “Payment”! So, it is very obvious to have question, “how do I receive a payment from such online booking?” Well, the answer is ‘Payment Gateways’. With the help of Templatic’s “tevolution” plugin, you can set up your payment methods using these gateways.
In your back-end, these gateways will be visible at wp-admin > Tevolution > Monetization > Payment Gateways. By default, you will have two kinds of payment methods 1) Pre bank transfer and 2) Paypal.
- To edit the settings, hover on gateway name and click on edit option given below to start the settings
- You can activate/deactivate it from the column named “Action“.
Whenever any user click on “Book Now” button, all the activated payment gateways will be listed among which your user can choose his choice and process the payment. We also have some more paid payment extensions that may help you meet your exact requirement.
Let’s see in detail about it.
FAQs
1) How to delete the “House” or “Room” options completely?
If you just offer Rooms and not houses then it is likely that you want to delete the whole option of House from your back end. You can do this with the following steps,
- Remove all the Houses, House Categories and House Tags
- Delete them from the Trash as well. (This will delete all the data from your database as well)
- Now, go to wp-admin > Tevolution > Custom Post Types
- Click “delete permanently” given below the “House” custom post type
Similarly, you can also remove other custom post types as per your requirement.
Please note – You should first delete the houses, categories and tags to delete this custom post type from your database as well. Otherwise directly deleting it from the Tevolution > Custom Post Type will delete it from your back end but not from your database.
2) How do this rates affect(calculation) the Houses or Rooms?
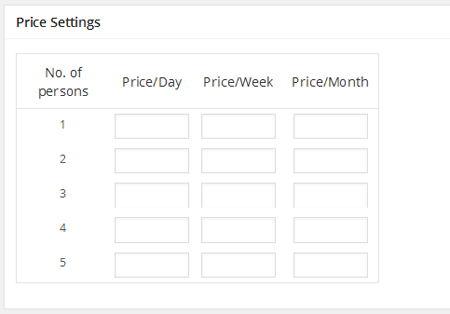
Mainly some prices that you set at the back end are,
- 1st is the actual amount that you charge on your Room/House (from wp-admin > House/Room > Add a Room/House > Price Settings)
- 2nd is the Tax Amount (from wp-admin > Booking System > General Settings > Tax Settings)
- Then, the particular Service Amounts (from wp-admin > Booking > Service > Category Price)
So, as per the price on number of persons that you set at the back end at the time of adding your particular House/Room will be counted + all the other charges like Tax & Services will be added to the total bill value as per the selection done by the client while booking from the Booking Form in the front end.
And not to forget, if you have set any “Deposit Amount” (from wp-admin >Booking System > General Settings > Deposit Percent) then it will ask the client to first pay that much of amount before booking confirmation, only then it will let him proceed further.
Example:
- Suppose, price for the deluxe room is $100 per day and $500 per week.
- John books this same room for 10 days then..
- He will be charged $500(weekly rate) + $300 ($100 daily rate) = $800 for 10 days.
The base of calculation here is amount entered PER PERSON in respective House/Room. So, formula is No. of Person X No. of Rooms/Houses.
3) How can I change the images of Houses or Rooms individually?
Uploading images to Rooms & Houses are same as for the regular WordPress Posts.
- Just go to wp-admin > House/Room > Add House/Room
- Now, to add image click “Add Media” button & upload your desired image that’s it.
- But if you want to set any image as a feature image for your custom post then just click on “Set feature image” given at bottom right of your screen.
- Check mark the image from the available one or can also upload the new one. & click the set feature image button. (This image will be seen as a thumbnail on your custom post listing page)
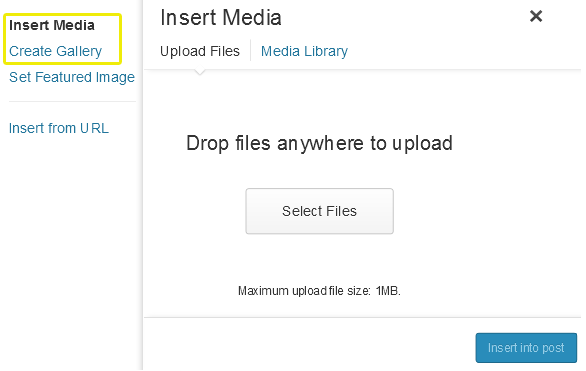
- Similarly, you can also create the image gallery for your house/room. Whole process remains the same, just you need to click “Create Gallery” when you open the Add Media.
4) What do this “Deposit” feature does?
This feature allows you to set the amount in percentage of total bill value of the booking that is needed to be paid by the client before the booking gets confirm( Like an advance payment), otherwise it will not allow to proceed further. But if you do not want to charge such advance payment, leave this field blank.
You can use this feature from wp-admin > Booking System > General Settings
5) Can I add minimum stay for my House or Rooms?
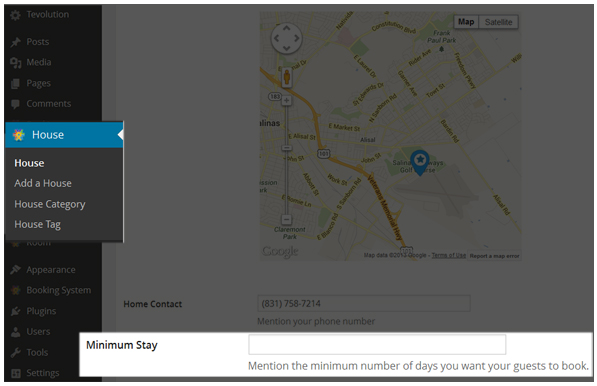
You can add the minimum stay for your Houses but not for Rooms. Go to wp-admin > House > Add a House > Minimum Stay. (This will not let the clients book the House less than the specified minimum days.)
6) Can I add closing days for my Hotel Houses or Rooms?
Yes, you can. By adding closing days to your Room or House, it will not let the user book the same during these specified dates.
- You can do this from wp-admin > House/Room > Closing Days (You can have multiple closing days! just click “+Add New” link given there)
If you have followed this tutorial and still facing any difficulty, Feel free to create a new ticket at Contact us and we’ll help you out.

