How to bulk upload products?
Bulk upload is very useful if you want to add several products to your store. So instead of manually adding each product, just fill out the CSV and upload it.
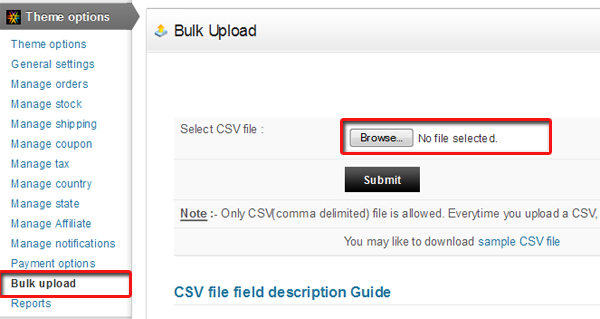
- Click on “Theme options” and then on “Bulk Upload”
- Click on “sample CSV file” to download a sample CSV file.
- Prepare the new CSV by looking at the sample CSV. Click on “Browse” and select the new CSV and click on “Submit”
To know about various fields used in the CSV, click on CSV file field description guide. You will get a detailed explanation of all the columns used in CSV file. For accuracy, have a look at here given explanation as well.
Important: Sequence of these columns matter and so you should not change the column positions to let your import work correctly.
- Post Title – Mandatory field (can’t leave blank) that describes product title.
- Post Content – Mandatory field (can’t leave blank) that describes product description
- Post Category – Describes the products category. If it’s blank, all products will be inserted under “Uncategorized” category.
- digital_product – To insert a digital product, you’ll need to first setup it’s path from wp-admin > Theme options > General settings > Product Settings > Digital Product Path. There, just enter the file name of the product. E.g. icons.zip
- price – Specify price of your product
- spPrdLstDate – Specify the last date for your special products price
- specialprice – Write the special price for your product like a discount.
- model – Write products model number
- size_chart – It is for products size chart. It can be image URL or basic HTML code.
- is_free_shipping – If you have physical product and want to set shipping as free, then set it to “1” else “0”.
- weight – Write your product weight here in numeric value. You can set weight unit from wp-admin > Theme options > General settings > Shopping cart > Default Weight Unit. E.g. if products weight is 10 lbs, then just enter 10
- Istaxable – If you want to apply tax to your product, then write “1”, else write “0”.
- sizetitle, colortitle, att3title, att4title, att5title – These are product attribute titles. Write your required attribute here like size, shape, brand, type, etc.
- size, color, attribute3, attribute4, attribute5 – These are product attribute values. Multiple values should be comma separated and price should be entered in brackets e.g. Red(-2), black(+2), Blue(+1).
- size_stock, color_stock, attribute3_stock, attribute4_stock, attribute5_stock – Manage stock for each and every attributes from here. E.g. for these product attributes: Red(-2), black(+2), Blue(+1), you can enter stock as10,15,50
- is_check_outofstock – Enable stock management for your product writing “1” and “0” to disable.
- Initstock – To enable stock management, write the initial stock (starting stock) value here. “0” means out of stock and if you leave it blank, it will consider it as unlimited stock.
- minstock – To set minimum stock alert, set its limit here. E.g. 5. You’ll receive an Email on your specified Id under wp-admin -> Settings -> General, if the product stock reaches 5 or less than 5.
- isshowstock: To show stock details in “Product detail” page.
- productimage: Filename of the products image should be inserted in this field. E.g. tie_01.jpg. To insert more than one product, insert the column with same title, which would be “productimage”, then just enter its filename e.g. tie_02.jpg. So it means, only enter the name of the image file and not its full URL. Finally upload the CSV and then you’ll be presented URL where you’ll need to upload the images. Use an FTP client like FileZilla to upload the images at that path.