With Directory updates being released relatively frequently (every few weeks) it’s becoming increasingly important to make your tweaks update-resistant. By that I mean customizing a theme in a way that allows you to update all components without painstakingly merging your customizations with changes that normally come with a new theme version.
How can you achieve this?
Tweaking CSS
Available from the Appearance ⇨ Custom CSS Editor section, the CSS editor allows you to quickly overwrite any CSS class used by Directory. Along with that, the section also allows you to create new classes… ones that you can then utilize when writing (new) PHP code. Possibly the best part about the Custom CSS Editor is that it saves all content inside the database, allowing you to update the theme without worrying about backing up any files (assuming that’s all you’ve changed).
Note: In order to work, the CSS Editor must first be enabled from the Appearance ⇨ Theme Settings section.
How do I know which class to change?
Awesome thing about CSS (and javascript) is that it’s executed within the browser and not on the server (like PHP). Since it’s executed by the browser you can see every CSS file and every CSS property executing on the page. To access the info you’ll need to utilize your browsers Developer Tools.
Assuming you’re using either Google Chrome or Mozilla Firefox, open the page you want to customize and right-click on the element that you want to change. Choose “Inspect Element” in the context menu. You should now see HTML on the left and CSS (for the selected HTML element) on the right. Tweak the CSS class shown on the right by editing its properties (or adding new ones). The changes you make are reflected on the page in real-time.

Once you’ve made the desired changes copy the CSS class and its properties and paste it into the Custom CSS Editor. They should be immediately reflected on the actual site. If they aren’t, try clearing your browse cache (or use Incognito/Private browsing mode). For additional details on how these things work open our Custom CSS tutorial. It even contains a short video.
Quick Tip: If you’re new to HTML & CSS I highly recommend completing the web course over at Codeacademy. It is truly awesome.
Examples: Hiding stuff with CSS
Hiding specific blocks of content is the first thing most people learn to do. To hide something in CSS all you have to do is add the following property inside a CSS class ⇨ display: none;
Listed below are some Directory areas that people often ask us to hide most often. As you can see, all you have to do is mention the CSS class name and enter the display: none property. The code mentioned below should be placed inside the Appearance ⇨ Custom CSS Editor.
Header city selector
.toggle_handler #directorytab {
display: none;
}
The meta strip (containing author information) displayed inside the Blog
.byline {
display: none;
}
Tweaking PHP
Before I start explaining how to customize PHP code in Directory I should mention that this article is aimed at people who are already experienced with customizing PHP code. Since PHP isn’t something that can be learned with one simple tutorial you will need to learn more about it elsewhere. My advice is to take the Codeacademy PHP course, it’s brilliant.
Creating a plugin for your custom functions
Unlike some of the stuff we’ll tackle later on, creating a new plugin is actually dead-simple. To do it just follow these steps…
- Create a new folder somewhere on your computer (desktop is fine). Set the folder name to my-functions.
- Open a text editor (I recommend Notepad++) and create a new file (CTRL + N). Add the following code inside the newly created file:
<?php
/*
Plugin Name: My Functions
*/

?>
- Save that file inside the folder you previously created (my-functions) and set the file name as my-functions.php.
- Now connect to your server with FTP and navigate to /wp-content/plugins. Drag the “my-functions” folder from your computer (desktop) and into the /plugins folder.
- Connect to your WordPress dashboard and navigate to the Plugins section. The plugin we just created should already be showing. Now just activate it and we’re ready to go.
Now you’re probably wondering: Why do I need a plugin? The plugin will allow us to overwrite chunks of Directory code without actually touching the theme (or plugins). This will be achieved with hooks.
Code Snippets plugin – a good alternative
Code Snippets is a really good WordPress plugin that you can download for free from the plugins directory. It allows you insert snippets of PHP code within your WordPress site. This allows them to be much more organized… it also makes it easy to quickly disable specific tweaks. The biggest downside is that it doesn’t allow you to customize function-less files.
Introduction to hooks
Hooks are one of the building blocks of WordPress and something that can be a bit tricky to figure out. At first they might seem unnecessary, but you will very quickly start seeing their benefits. They come in two types: Actions and Filters.
Action hooks are kind of like placeholders that you can use to append (i.e. “hook”) additional content. This “additional content” can be added by the theme or any active plugin. The most popular of these action hooks is wp_head(). You’ll find that hook inside the header file (within the <head> tag) of any WordPress theme. What wp_head() does is allow you to easily append code inside the header. Remember those Google Analytics options most themes have? Well, the code you enter there is most likely being appended to wp_head().
Filter hooks are functions in WordPress used to intercept and manipulate data. Imagine you want to add a disclaimer at the end of each of your posts. Yes, you can edit each post and paste the paragraph, however wouldn’t it be better if you could add a piece of code that does that for you? By using hooks you can grab each posts content and modify it to display your disclaimer.
This hooks introduction was as brief as it gets. For more details on hooks I highly recommend reading this comprehensive WPCandy hooks tutorial.
Using hooks to customize Directory
Most of your customizations in Directory will be done using action hooks. Even though action hooks are normally used to append additional code at a certain point of the theme, they are also useful for overwriting a whole function. What you’ll do is copy the contents of the function (the one you want to change) inside the my-functions.php file and give the function a new name. You’ll then make the action use your own function instead of the one already associated with the action. You are essentially telling WordPress “Hey, this function is not really working for me… he’s a better one”. I’ll try to make this a bit clearer with examples…
How do I know which hook to focus on?
Possibly the trickiest part when customizing is figuring out where to actually make the change. These steps are identical whether you’re looking to change the theme file directly (not recommended) or make the change via a plugin. Here’s roughly what you need to do:
- Download a new copy of the theme and all plugins to your hard drive and extract it.
- Open the page/area you want to change inside your browser. Use developer tools to see the name of the DIV wrapping that section.
- Use Agent Ransack to locate the theme file in which that DIV is present. Open that file.
- Note down the function in which your code (DIV) is located.
- Use Agent Ransack again and search for that function name. Use it to locate the name of the action (hook) that’s loading the function.
To help you track down the file in charge of the code you’re tweaking I also recommend checking out the What The File plugin.
Good news is that often both the function and the action hook will be located right next to each other. The code will look something like this…
add_action('example_action', 'original_function');
function original_function() {
THE CODE
}
How to overwrite the action?
As mention earlier, we overwrite the code by disabling the current action and creating a new one; one that’s associated with our new function. This new code should be added to the My Functions plugin. Here’s how it should look:
remove_action('example_action', 'original_function');
add_action('example_action', 'customized_function');
function customized_function() {
MY CUSTOMIZED CODE
}
So, whenever the example_action is called inside the code (with do_action() ) it will no longer load the original_function(), instead it will load your customized_function().
What to do when the file you’re customizing doesn’t have a function to hook into?
Some files within the Directory theme are written without any functions for you to hook into. An example of this would be the Send Inquiry form (popup_inquiry_frm.php). Customizing those types of files is done by hooking into the function that loads the file. The process goes something like this:
- Locate the file you want to change. Copy the whole file inside your plugin (My Functions) and do your tweaks.
- Enter the file name as the keyword in Agent Ransack. You want to see which function is loading the file you just customized.
- Copy the function and action (that’s loading the file) inside my-functions.php
- Remove the original action and create a new function (as explained earlier). Customize the function so that it loads the customized file from your plugin and not the one located inside the theme.
Use the following code to reference your own plugin when entering a new path
plugin_dir_path( __FILE__ );
Code example
$pluginpath = plugin_dir_path( __FILE__ );
include_once($pluginpath."your-file-name.php");
What to do if the area you want to customize isn’t hookable?
Most of the times you will be able to customize the theme using the tips provided inside this article. However, if the area you’re customizing just cannot be customized remotely please contact us and let us know. The developers will try to include a hook inside the next version of the theme.
Examples
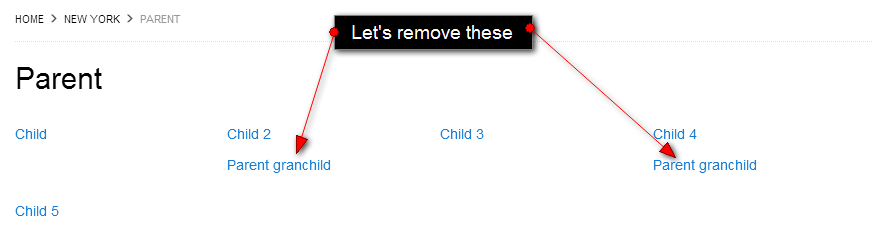
Action hook example: Hide category grandchildren on category pages
Let’s say you want the categories at the top (of category pages) only showing immediate children of the current (parent) category; not their granchildren as well.
The code for this part of the theme is located inside /plugins/Tevolution-Directory/functions/directory_listing_functions.php. The function and action making this work are:
add_action('directory_subcategory','directory_subcategory');
function directory_subcategory(){
	global $wpdb,$wp_query;
	$term_id = $wp_query->get_queried_object_id();
	$taxonomy_name = $wp_query->queried_object->taxonomy;
	do_action('tevolution_category_query');
	$featured_catlist_list =  wp_list_categories('title_li=&child_of=' . $term_id .'&echo=0&taxonomy='.$taxonomy_name.'&show_count=0&hide_empty=1&pad_counts=0&show_option_none=&orderby=name&order=ASC');
	if(is_plugin_active('Tevolution-LocationManager/location-manager.php'))
	{
		remove_filter( 'terms_clauses','locationwise_change_category_query',10,3 );
	}

	if(!strstr(@$featured_catlist_list,'No categories') && !empty($featured_catlist_list))
	{
		echo '<div id="sub_listing_categories">';
		echo '<ul>';
		echo $featured_catlist_list;
		echo '</ul>';
		echo '</div>';
	}
}
To customize this function we need to add the following code inside my-functions.php
remove_action('directory_subcategory','directory_subcategory');
add_action('directory_subcategory','my_directory_subcategory');
function my_directory_subcategory(){
	global $wpdb,$wp_query;
	$term_id = $wp_query->get_queried_object_id();
	$taxonomy_name = $wp_query->queried_object->taxonomy;
	do_action('tevolution_category_query');
	$featured_catlist_list =  wp_list_categories('title_li=&child_of=' . $term_id .'&echo=0&taxonomy='.$taxonomy_name.'&show_count=0&hide_empty=1&pad_counts=0&show_option_none=&orderby=name&order=ASC&depth=1');
	if(is_plugin_active('Tevolution-LocationManager/location-manager.php'))
	{
		remove_filter( 'terms_clauses','locationwise_change_category_query',10,3 );
	}

	if(!strstr(@$featured_catlist_list,'No categories') && !empty($featured_catlist_list))
	{
		echo '<div id="sub_listing_categories">';
		echo '<ul>';
		echo $featured_catlist_list;
		echo '</ul>';
		echo '</div>';
	}
}
The only change we made was adding the depth parameter to the wp_list_categories() function. This is enough to prevent the grandchildren from showing up in category lists.
Filter hook example: Edit which menus display the login/register buttons
By default, the Directory theme will automatically add Login & Register links to your primary and footer menus. However, what if you want them to display inside the secondary menu area (the main menu) instead? It’s easy… we use filters.
Within the code, the menu in which these links display was defined with this code
apply_filters('tmpl_logreg_links',array('primary','footer'));
In general, whenever you see something defined using the apply_filters() function, it means you can easily manipulate that value. To make the Login & Register links display inside the secondary menu area all we do is add this to our plugin (the my-functions.php file).
add_filter('tmpl_logreg_links','link_tweaking_function');

function link_tweaking_function(){
return array('secondary');
}
A list of Directory hooks
Frequently Asked Questions
Can I use a child theme to customize Directory?
Yes, you can. The main reason why I didn’t use a child theme for my customization explanations is because a number of Directory owners already use (our own) child themes. It’s not possible to create child themes of child themes. So, if you already have a child theme installed (like City Guide or Locations), you must customize PHP code using a plugin. Creating a child theme for holding your customizations is a good idea if you like the parent theme and don’t plan on using the child themes that we provide.
How to create a child theme? This process has been explained in numerous articles over the web so I’m not going to do it here. Check out this ManageWP article to get started.
Using pluggable functions
The use of pluggable functions is the biggest benefit of using a child theme compared to a plugin. Even though a number of functions inside Directory aren’t pluggable, you’ll be able to find a few that are. Spotting a pluggable function is easy….
Regular functions are declared like this
function example() {
THE CODE
}
Pluggable functions are declared like this
if(!function_exists('example')) {
    function example() {
		THE CODE
    }
}
One big difference between a child theme and a regular plugin is that the child theme executes before the parent theme. This allows you to easily redeclare functions within the child theme without worrying you’ll mess something up in the parent theme. If I wanted to redeclare the example() function all I have to do is add this to the child theme.
function example() {
My TOTALLY NEW CODE
}
Make sure you only use this method with pluggable functions, otherwise expect to see blank page when you try to visit your site.