Theme installation
- To install the theme, login to your WordPress dashboard and navigate to Appearance ⇒ Themes.
- Click add new ⇒ Upload Theme.
- Using the file upload dialog, upload the Zip file you have downloaded from Templatic’s member area, and click install now.
- When the theme installation is complete, click activate to activate the theme. This will take you to the setup wizard.
Installing your theme through FTP
- Download the Food Blogger theme Installation file from the member area and extract them using software like 7-Zip. Use the “Extract here” option; don’t extract into a new folder.
- Navigate to /wp-content/themes/ and upload this folder.
- Now
- Login to your WordPress dashboard, navigate to Appearance ⇒ Themes. You will find the Food Blogger theme in the list. Activate it.
- Upon activation, you will be redirected to the setup wizard and it will install and activate the required plugins, and update your site with the sample data too. (Skip to the setup wizard)
- When asked to, enter the license key available inside our member area.
The theme setup wizard will help you initialize your theme by setting up plugins, sample data, etc. Even though it is optional, we highly recommend you follow these steps to set up your site easily.
The setup wizard
To quit the setup, you can use the “return to dashboard option”, but it is not recommended. The following are the steps of the setup wizard to help you prepare your website:

- Pressing “Start” will initiate the setup processing.
- Install child theme: This will install the child theme that will save all the customizations, so you can easily update the parent theme without losing the customizations. Click “Install” to proceed.
- Install Plugins: This step will configure your website with the required plugins for your site. Again click “Install”. You can remove the plugins you don’t need at a later stage.
- Import content: This will import the sample data. Sample data makes your website building process easier with the dummy data, images, and widgets in the places. With the sample data installed, your website will start looking like the theme demo and you can edit the parts you want to change to customize your site. Click import and wait till the dummy data is imported.
- At the end of the setup wizard, you can choose to “View the website” or “return to the dashboard” for further editing.
Setting up the Homepage with Sidebar
The homepage of the Food Blogger theme is built of many strategically designed sections. Most of these can be edited through the Elementor drag and drop options.
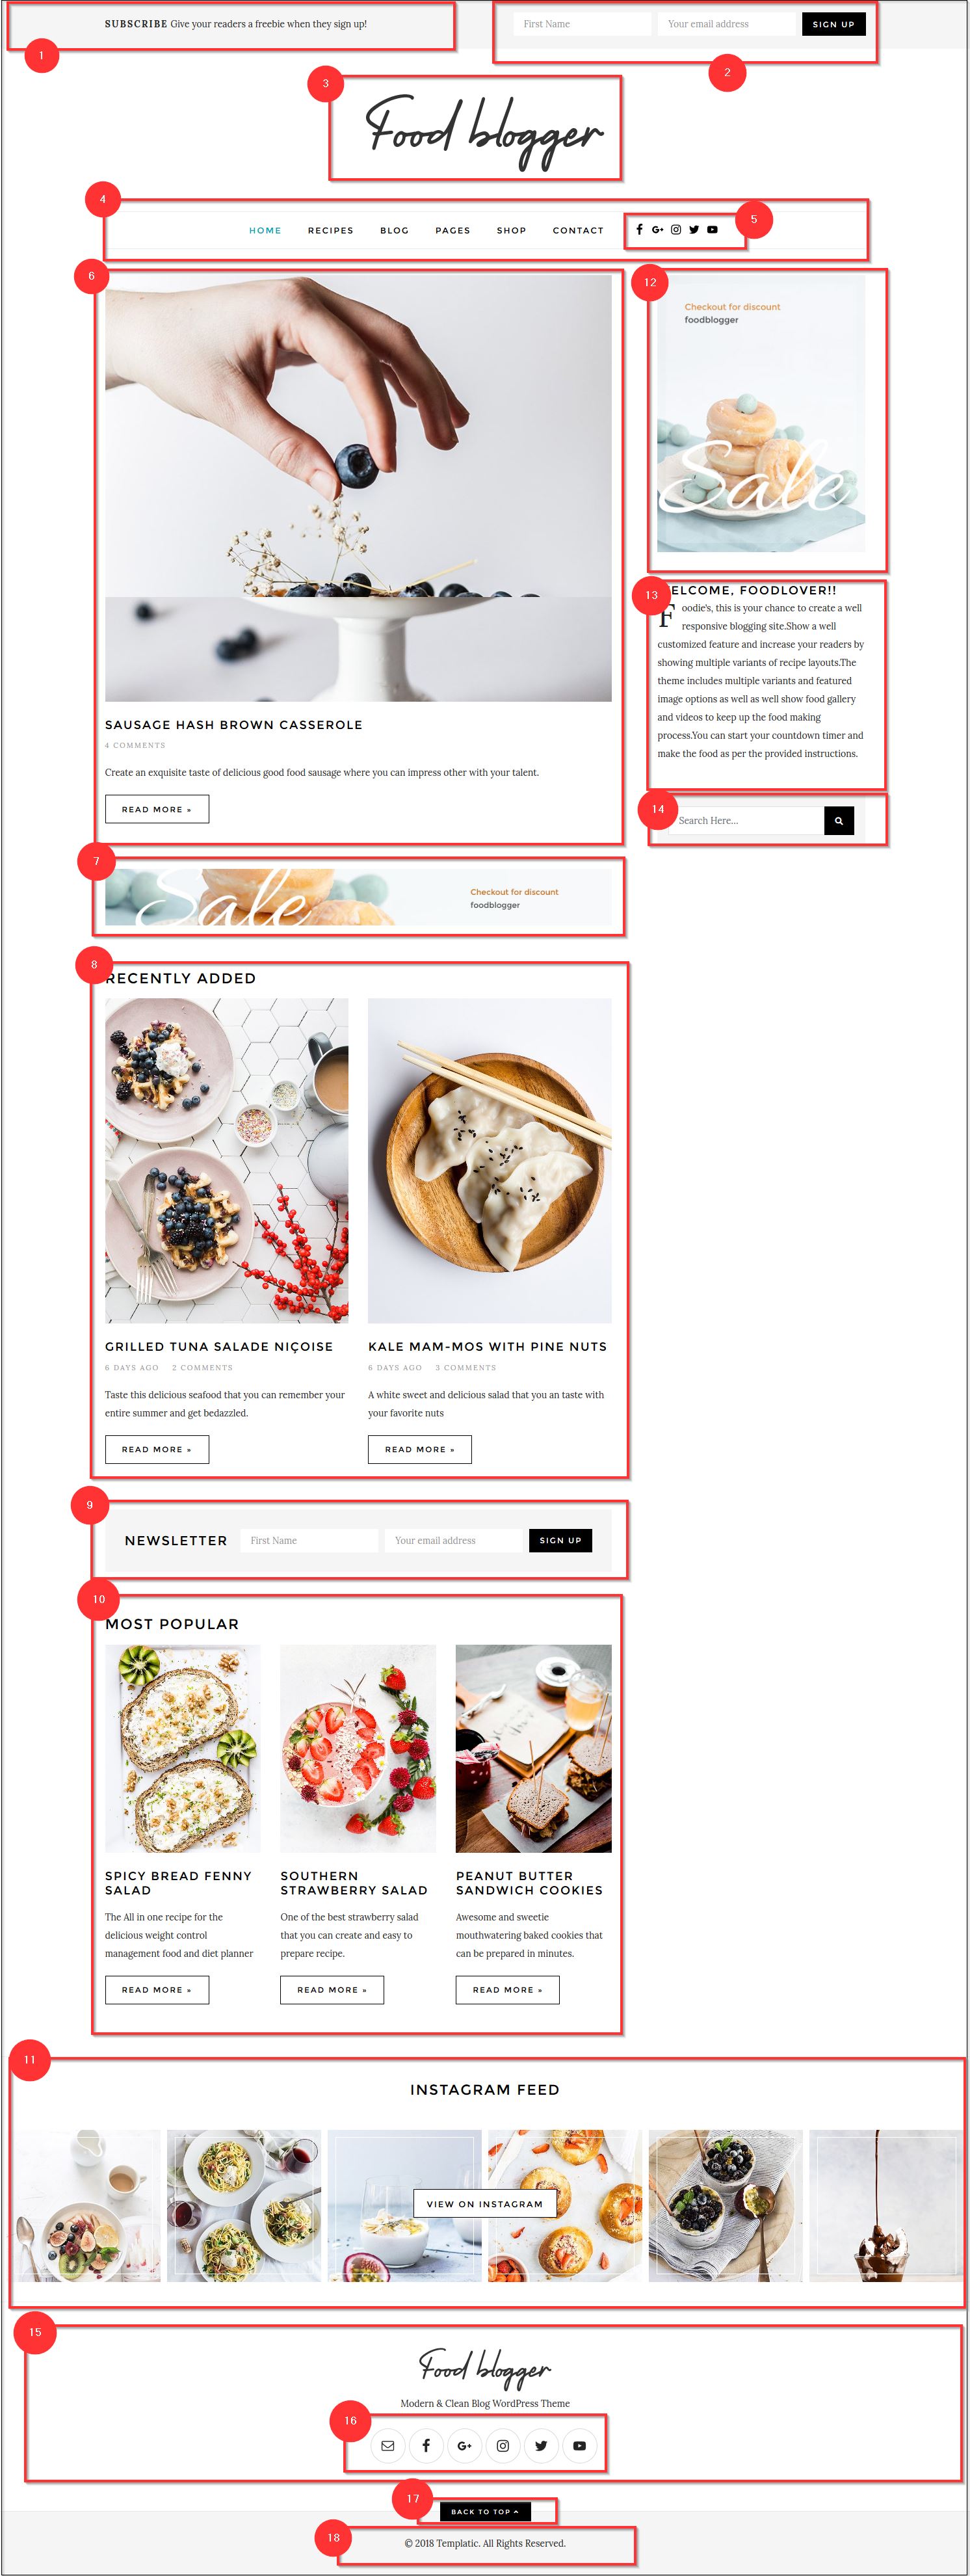
1) Subscribe header
In order to change the text given here by navigating to the backend of your site Appearance >> Customise >> Header – Top Widget Area.
2) Sign-up
The signup dailoge comes from the plugin named MailChimp for WordPress. In Order to give any title to it navigate to Appearance => Customise => Header – Top Widget Area.
3) Site Identity
You can easily customise the site logo by navigating to Appearance => Customise => Site Identity and uploading logo of your choice.
![]()
If you don’t have a logo to upload, you can use the site title instead. As shown in the theme demo, the site name will be highlighted as logo. You can even manage the site Title and tagline easily.
4) Menus
You can create menus on your website with all the menu items you need in a matter of minutes. It is important to properly plan the menu items and place the links of all the important pages into the menu.
To create a new menu and set it as a primary menu, you can navigate to Appearance ⇒ Menu ⇒ Create a new menu.
You can either use the already given menu or ‘Create a new one’ with your categories and post types.
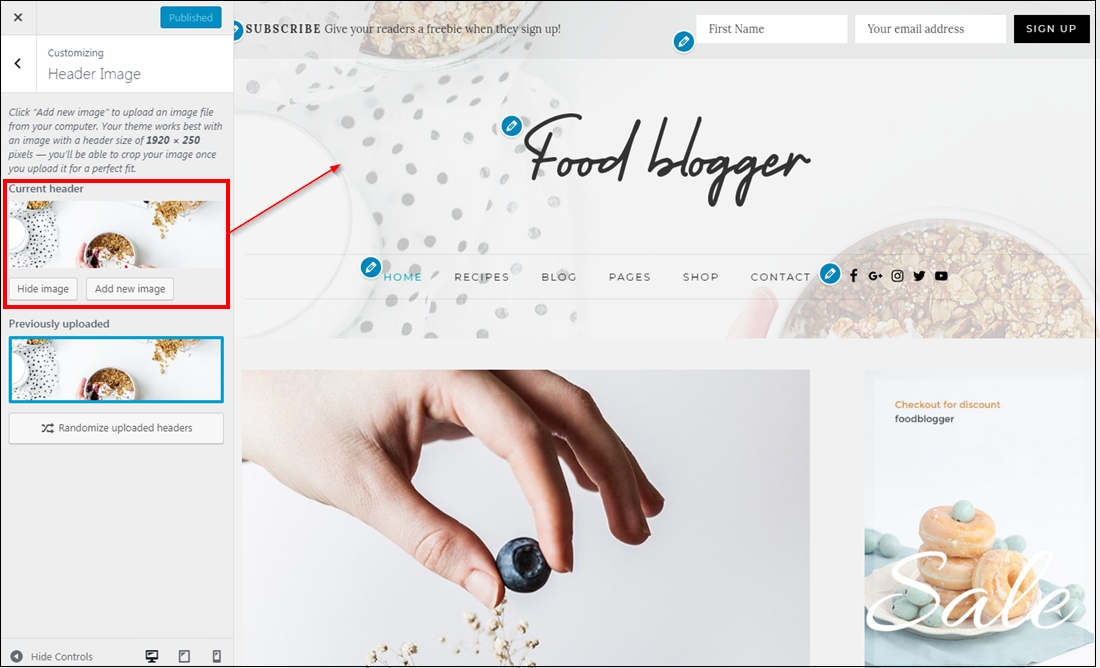
Changing the Header image
While in Elementor Page Builder you can modify the header of your website to make it more personalized. Navigate to Appearance => Personalised in that Header image option.
5) Social Icons
You can have your social sites linked up here on these buttons. If you wish to add or delete any navigate to Appearance => Customise => Widgets => Sidebar => Simple Social Icons: Get in Touch Widget.
![]()
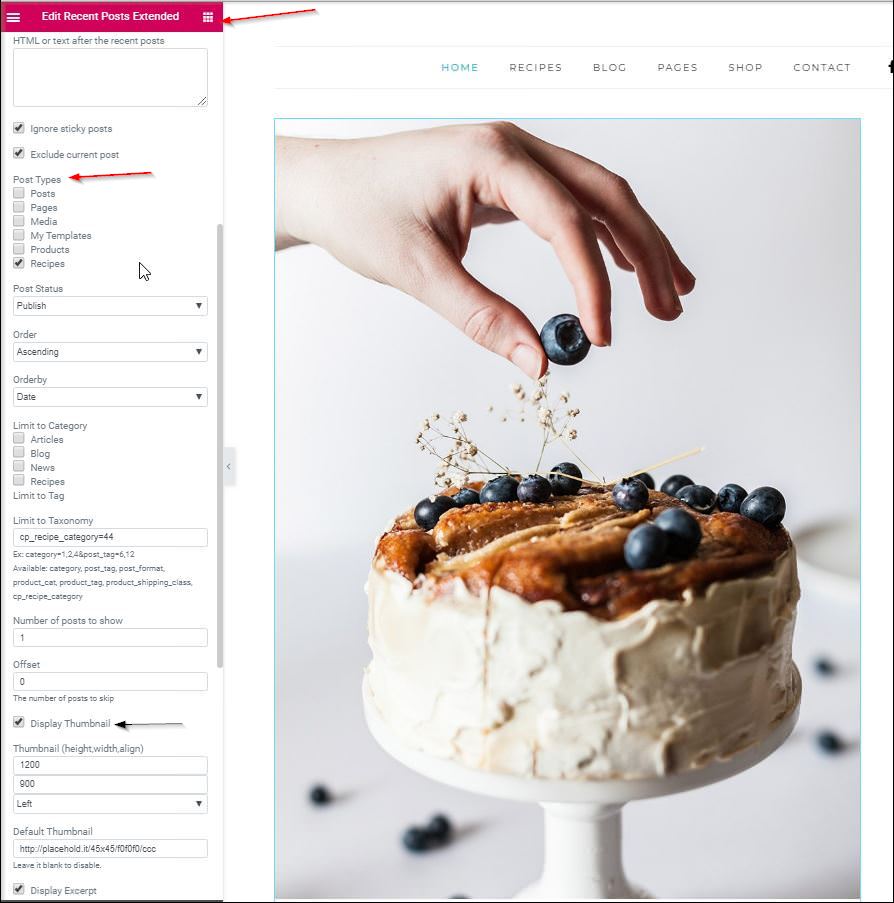
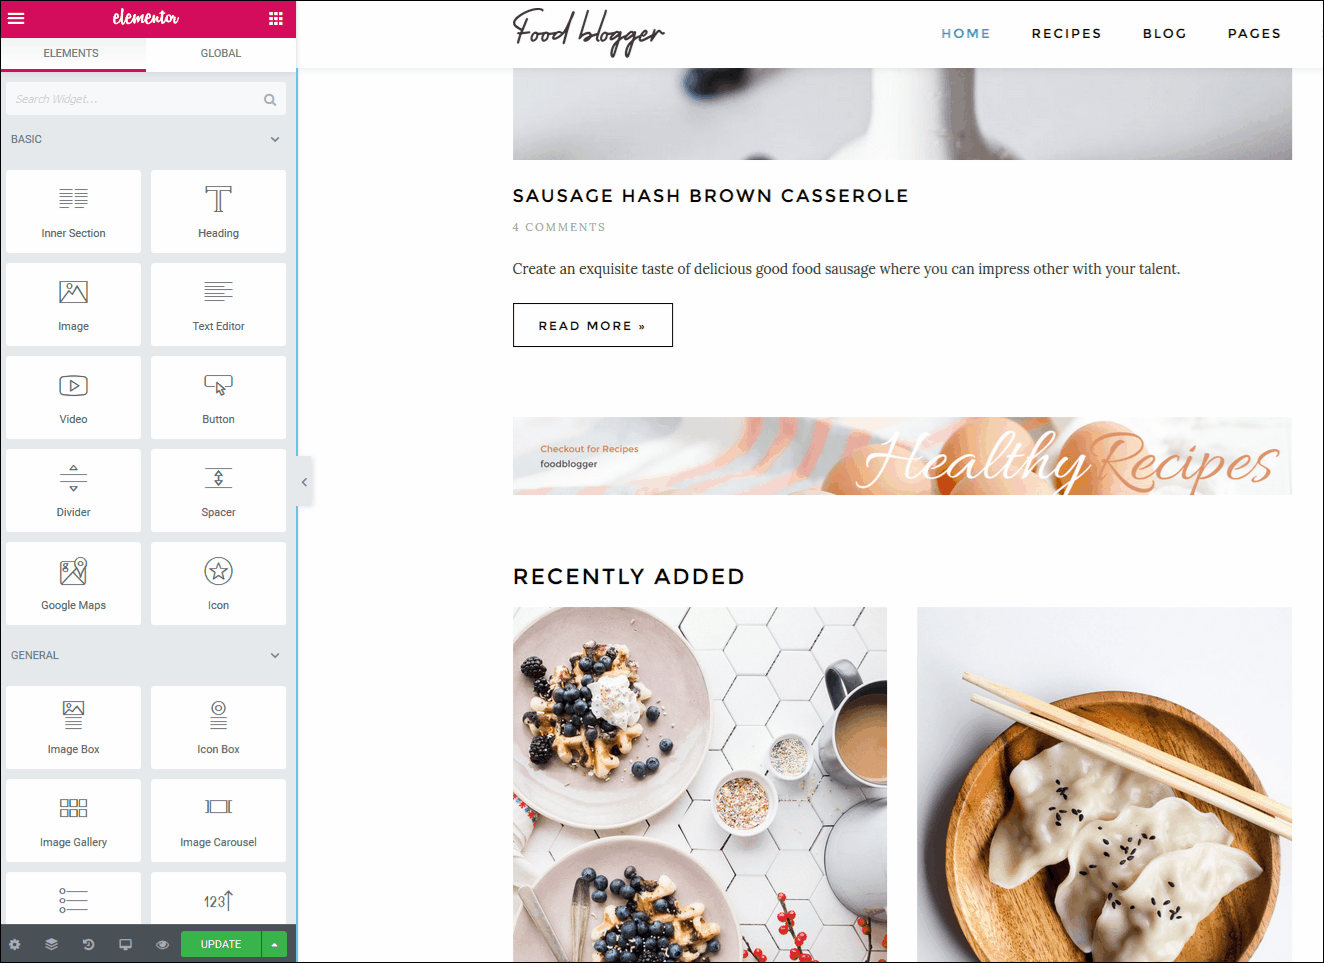
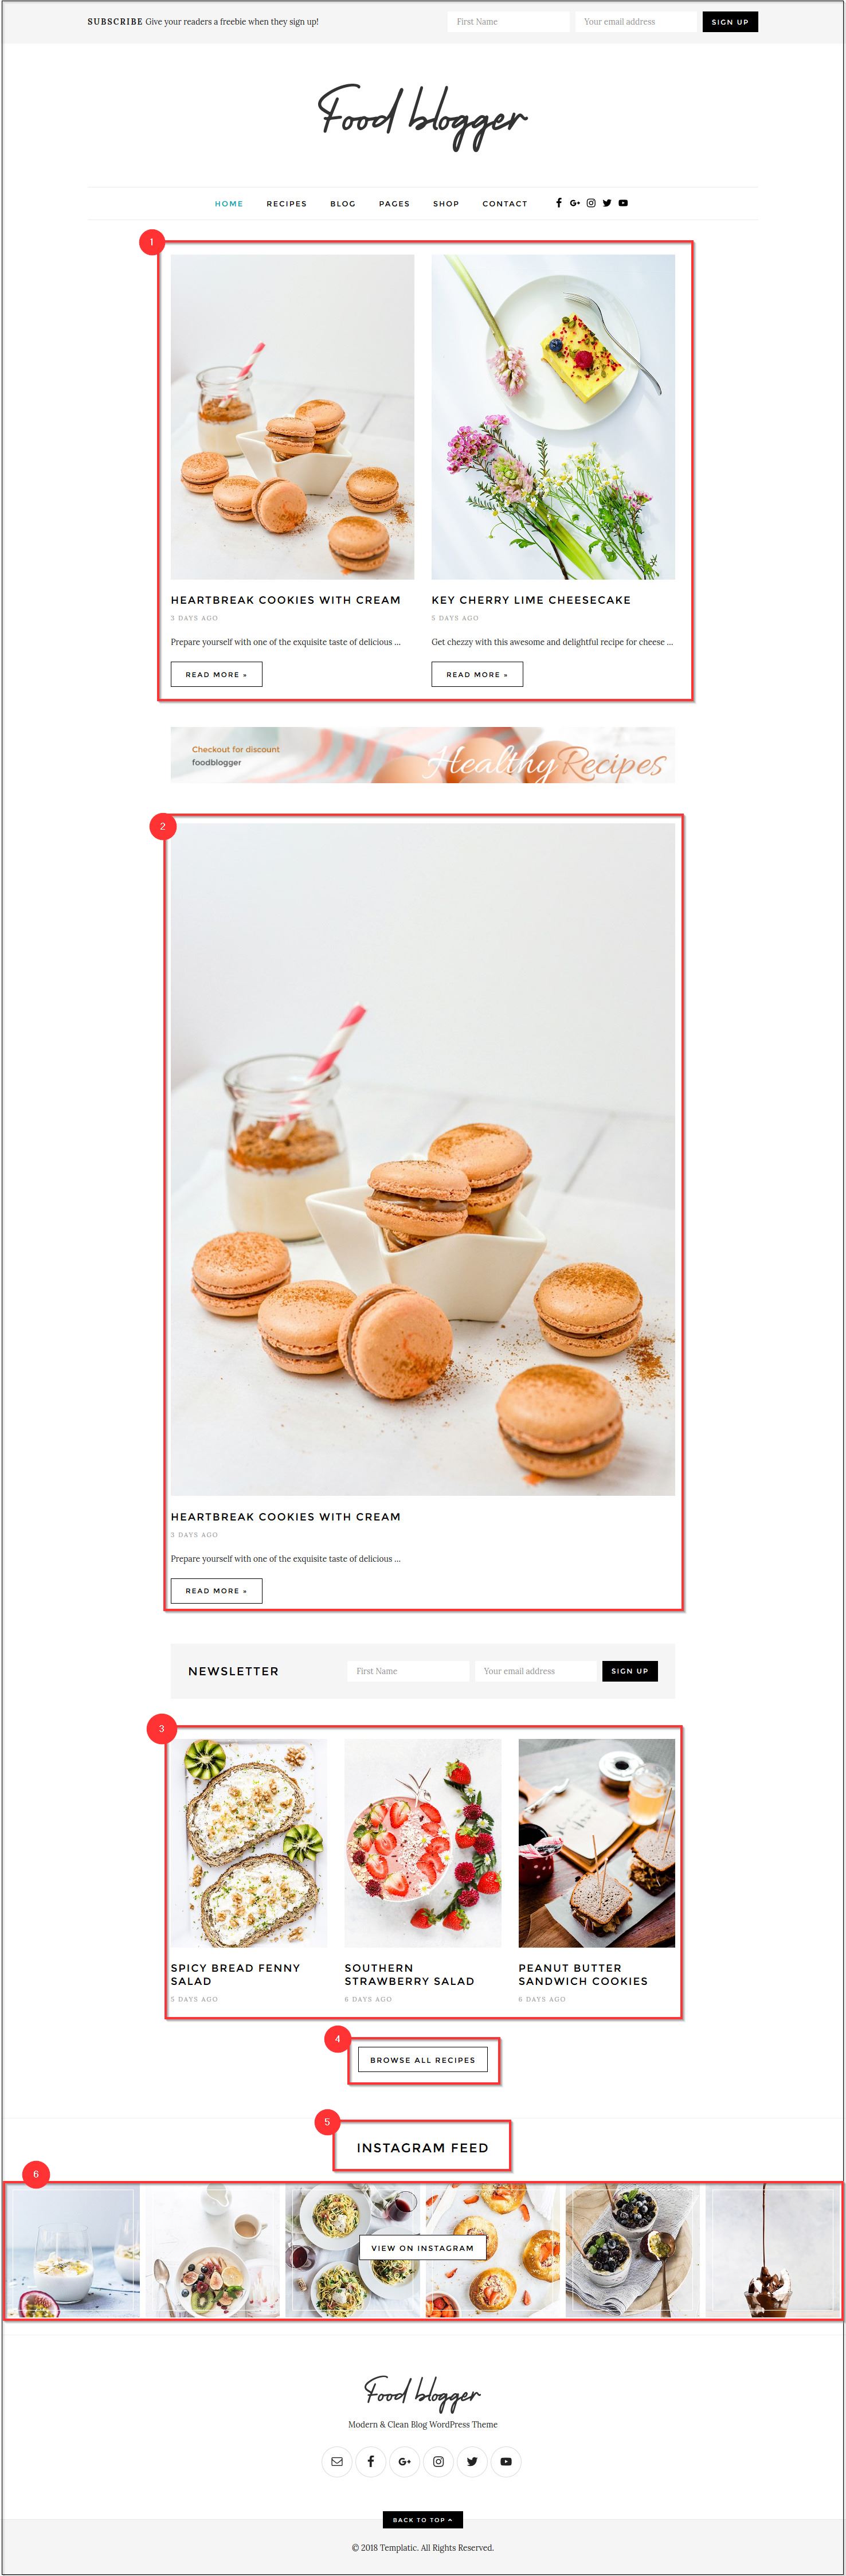
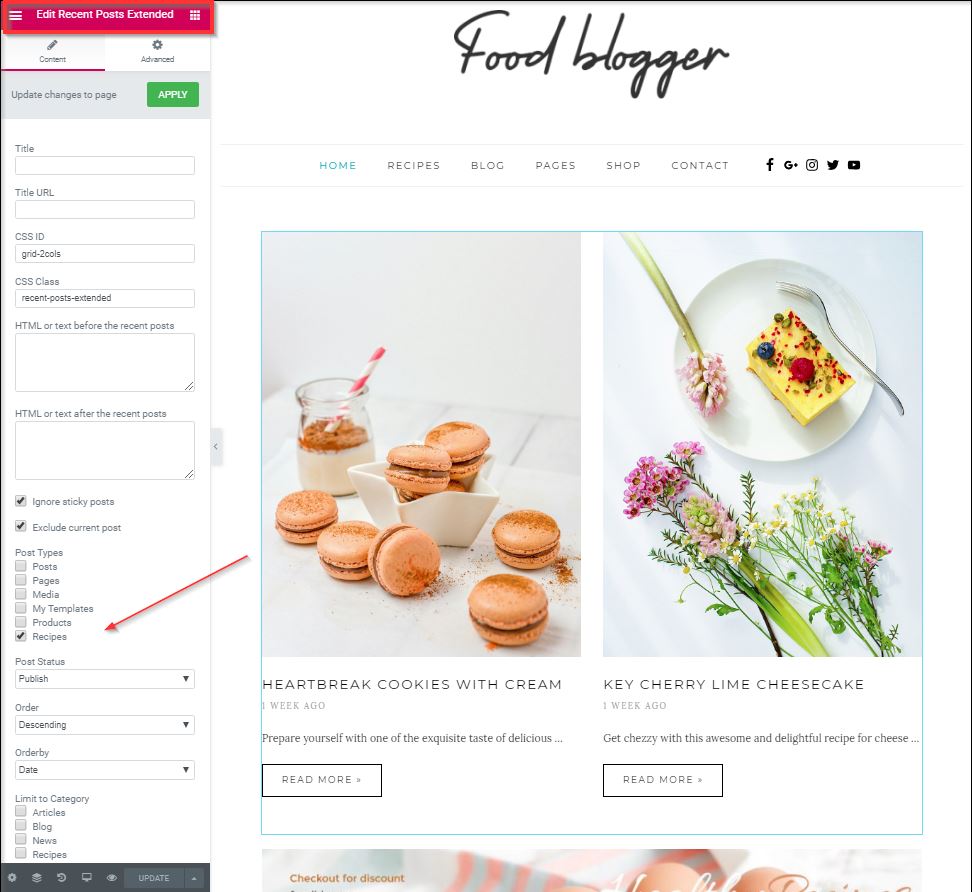
6) Recent Posts
You can easily edit the page with the help of Elementor Page builder.
Just open the page using ‘Edit in Elementor’ option. Select the post you want to change.
Once selected, “Edit Recent Posts Extended” widget is Displayed on the left sidebar; from it just select what kind of Post Types you want to be displayed here.
7) Ad Banner area
You can click and edit this section easily. Just click on the element you want to edit while editing the page using the elementor and update the section as per your requirement.
Just click on that image and on the left sidebar Choose image you want to upload for the banner.
8) Extended Posts
Refer to point 6 of Homepage with sidebar.
Now into this section make changes as per your requirements.
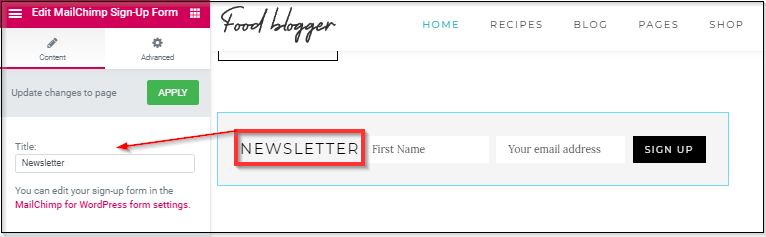
9) Sign Up
You can use the Elementor Page Builder option to easily edit. This is a Plugin named MailChimp Sign-Up Form, You can change the Title from Newsletter to something else you want.
Wherever you want to put this widget in your site just add a section there.
Now go to the WordPress widget from the left elementor widget section ⇒ Mailchimp Signup Form.
10) Most Popular
Refer to point 6 above.
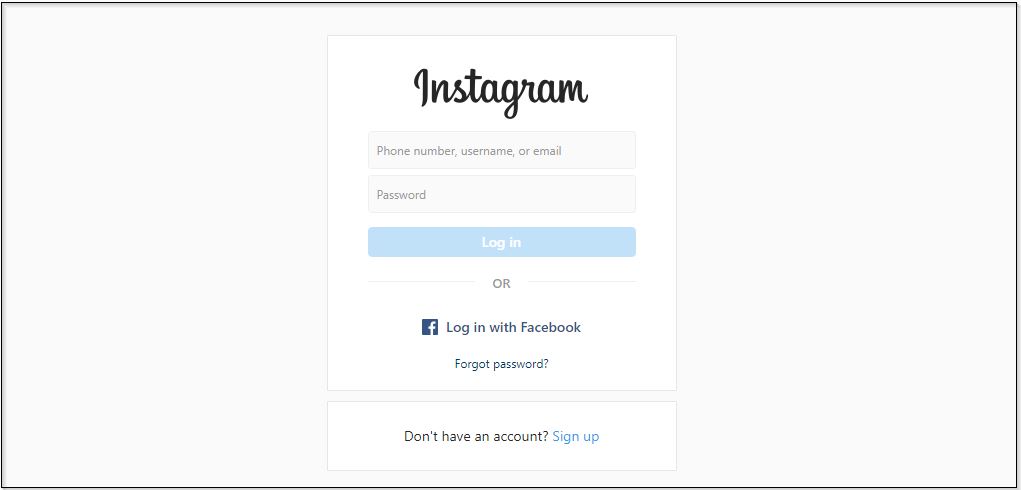
11) Instagram Plugin
To display images from your Instagram page; Navigate to Instagram => Configure tab => Connect an Instagram account button as shown in the image below on the backend of your site. You can choose a different setting from the Customize tab.

It will take you to the Login window displayed below from there you can link your Instagram food blog to your website.
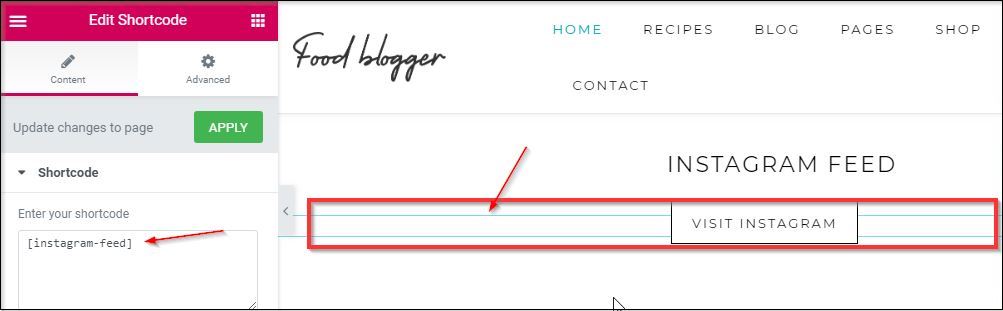
Below the ‘View on Instagram’ button, there is a shortcode added to display your Instagram feed as shown in the below image.
12) The page sidebar banner
While login and editing with elementor. You can update each element by just clicking on it.

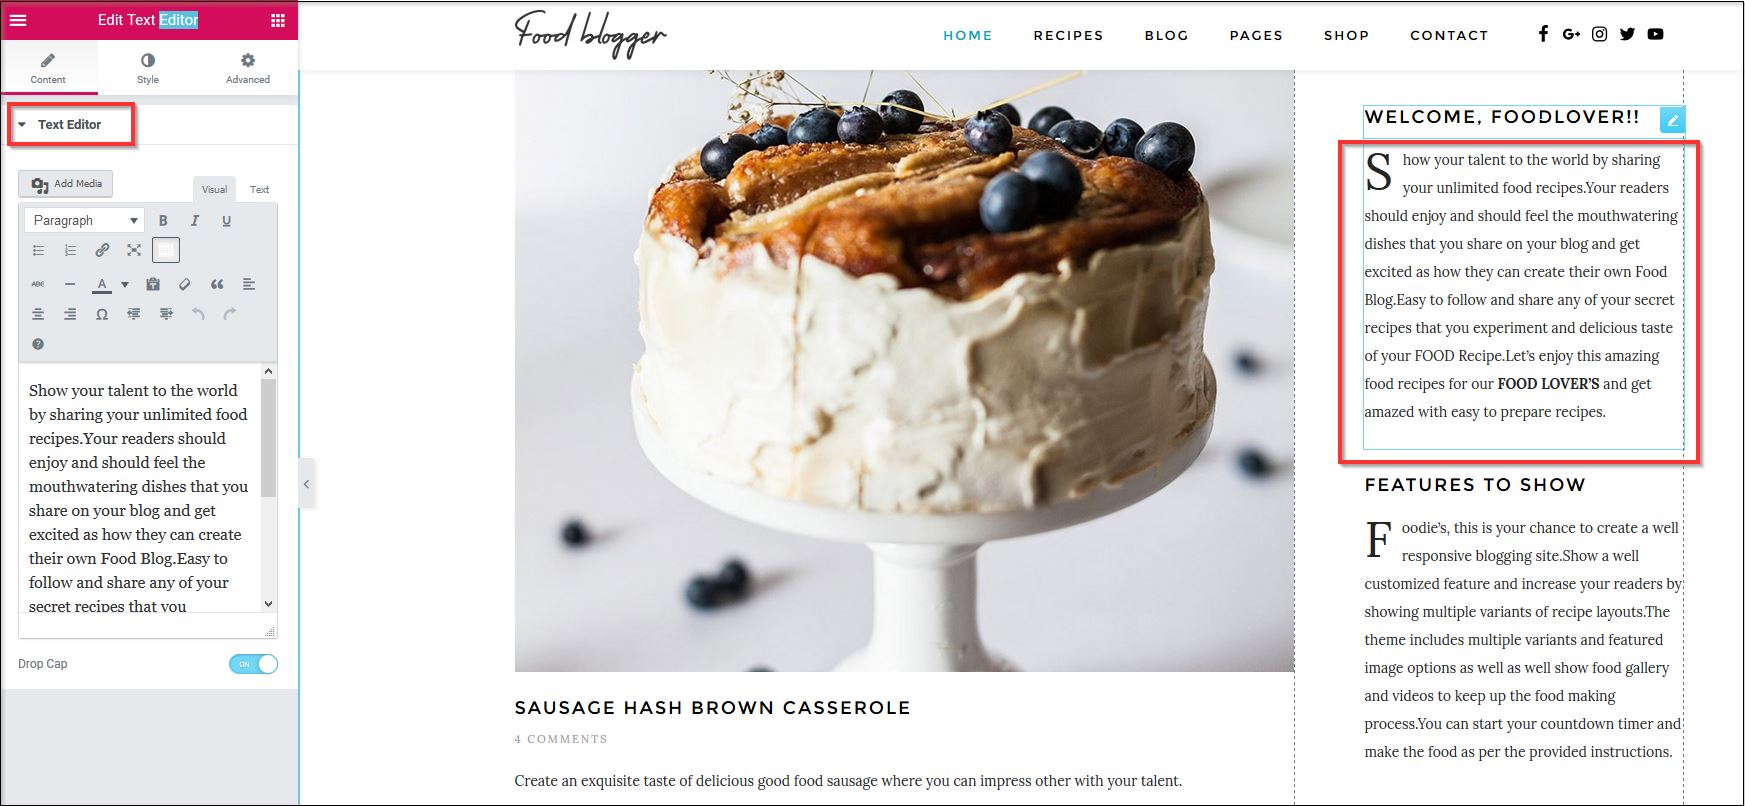
13) Text
You can easily modify using the Elementor Page Builder; click on the text you want to edit and change it.
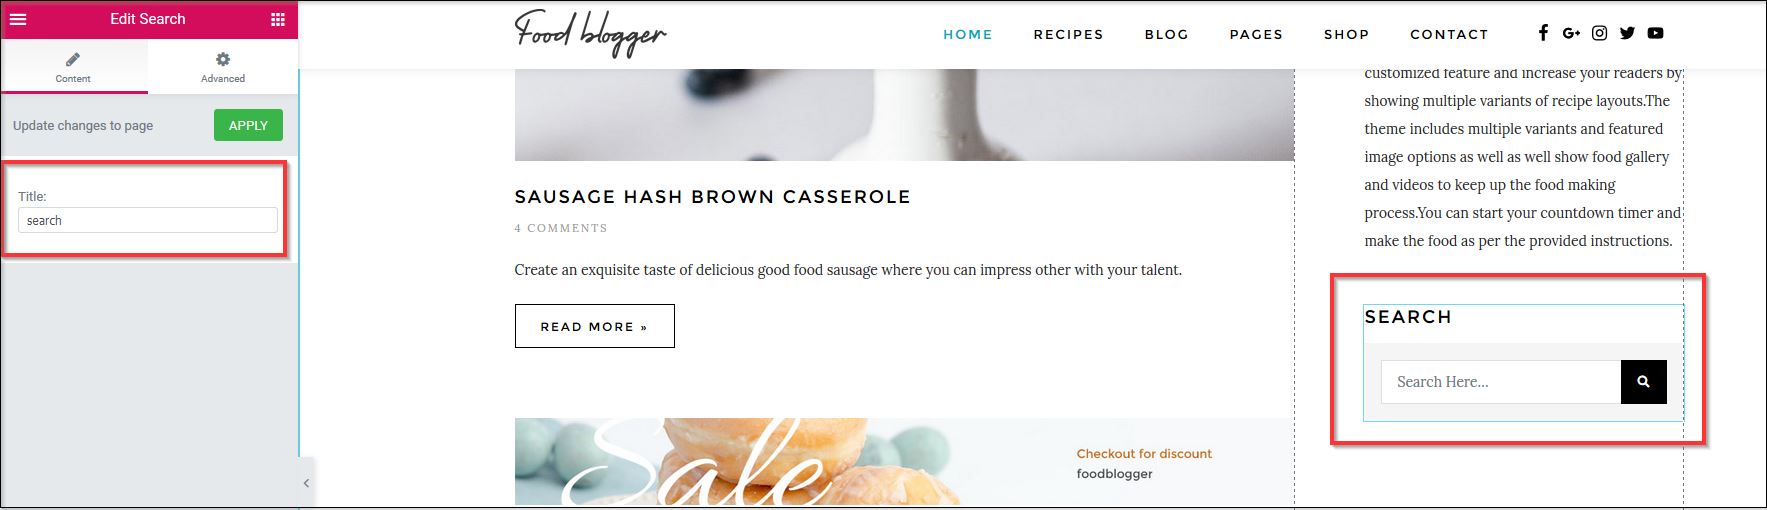
14) Search button
You can easily modify using the Elementor Page Builder; click on the text you want to edit and change it.
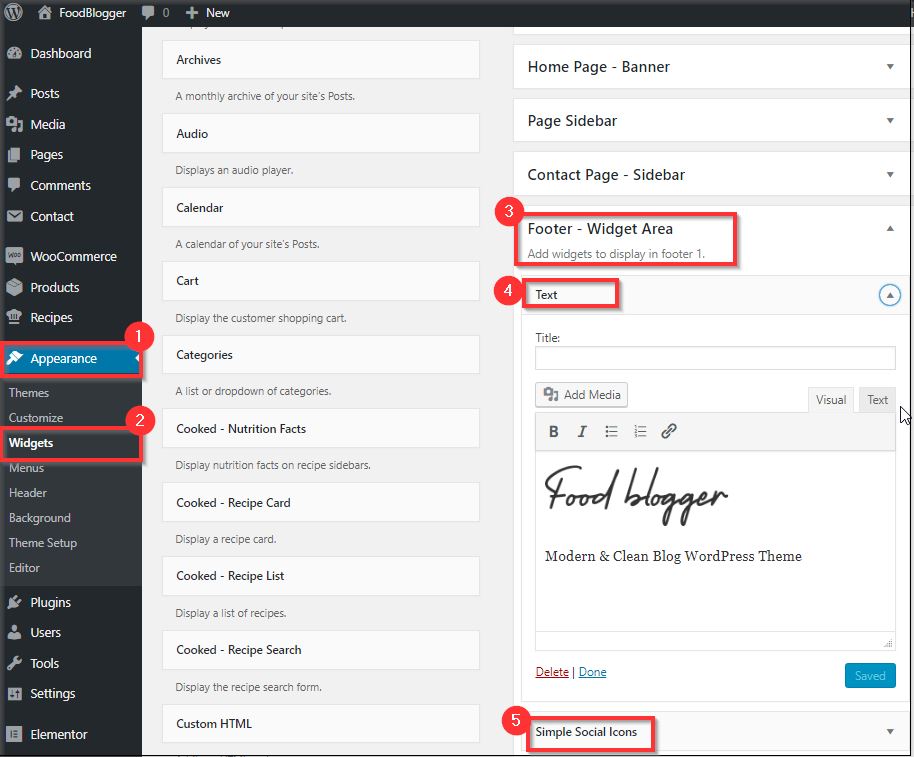
15) Footer area
The footer can be changed through the widgets. To change what the footer shows, navigate to Appearance ⇒ Widgets.
16) Social Buttons
You can give different links to your blog. Navigate to the backend Appearance=> Customise. Click on the button or the pencil icon displayed. If you don’t want to add any social button just remove the link or # from the sidebar.
Homepage Full Width
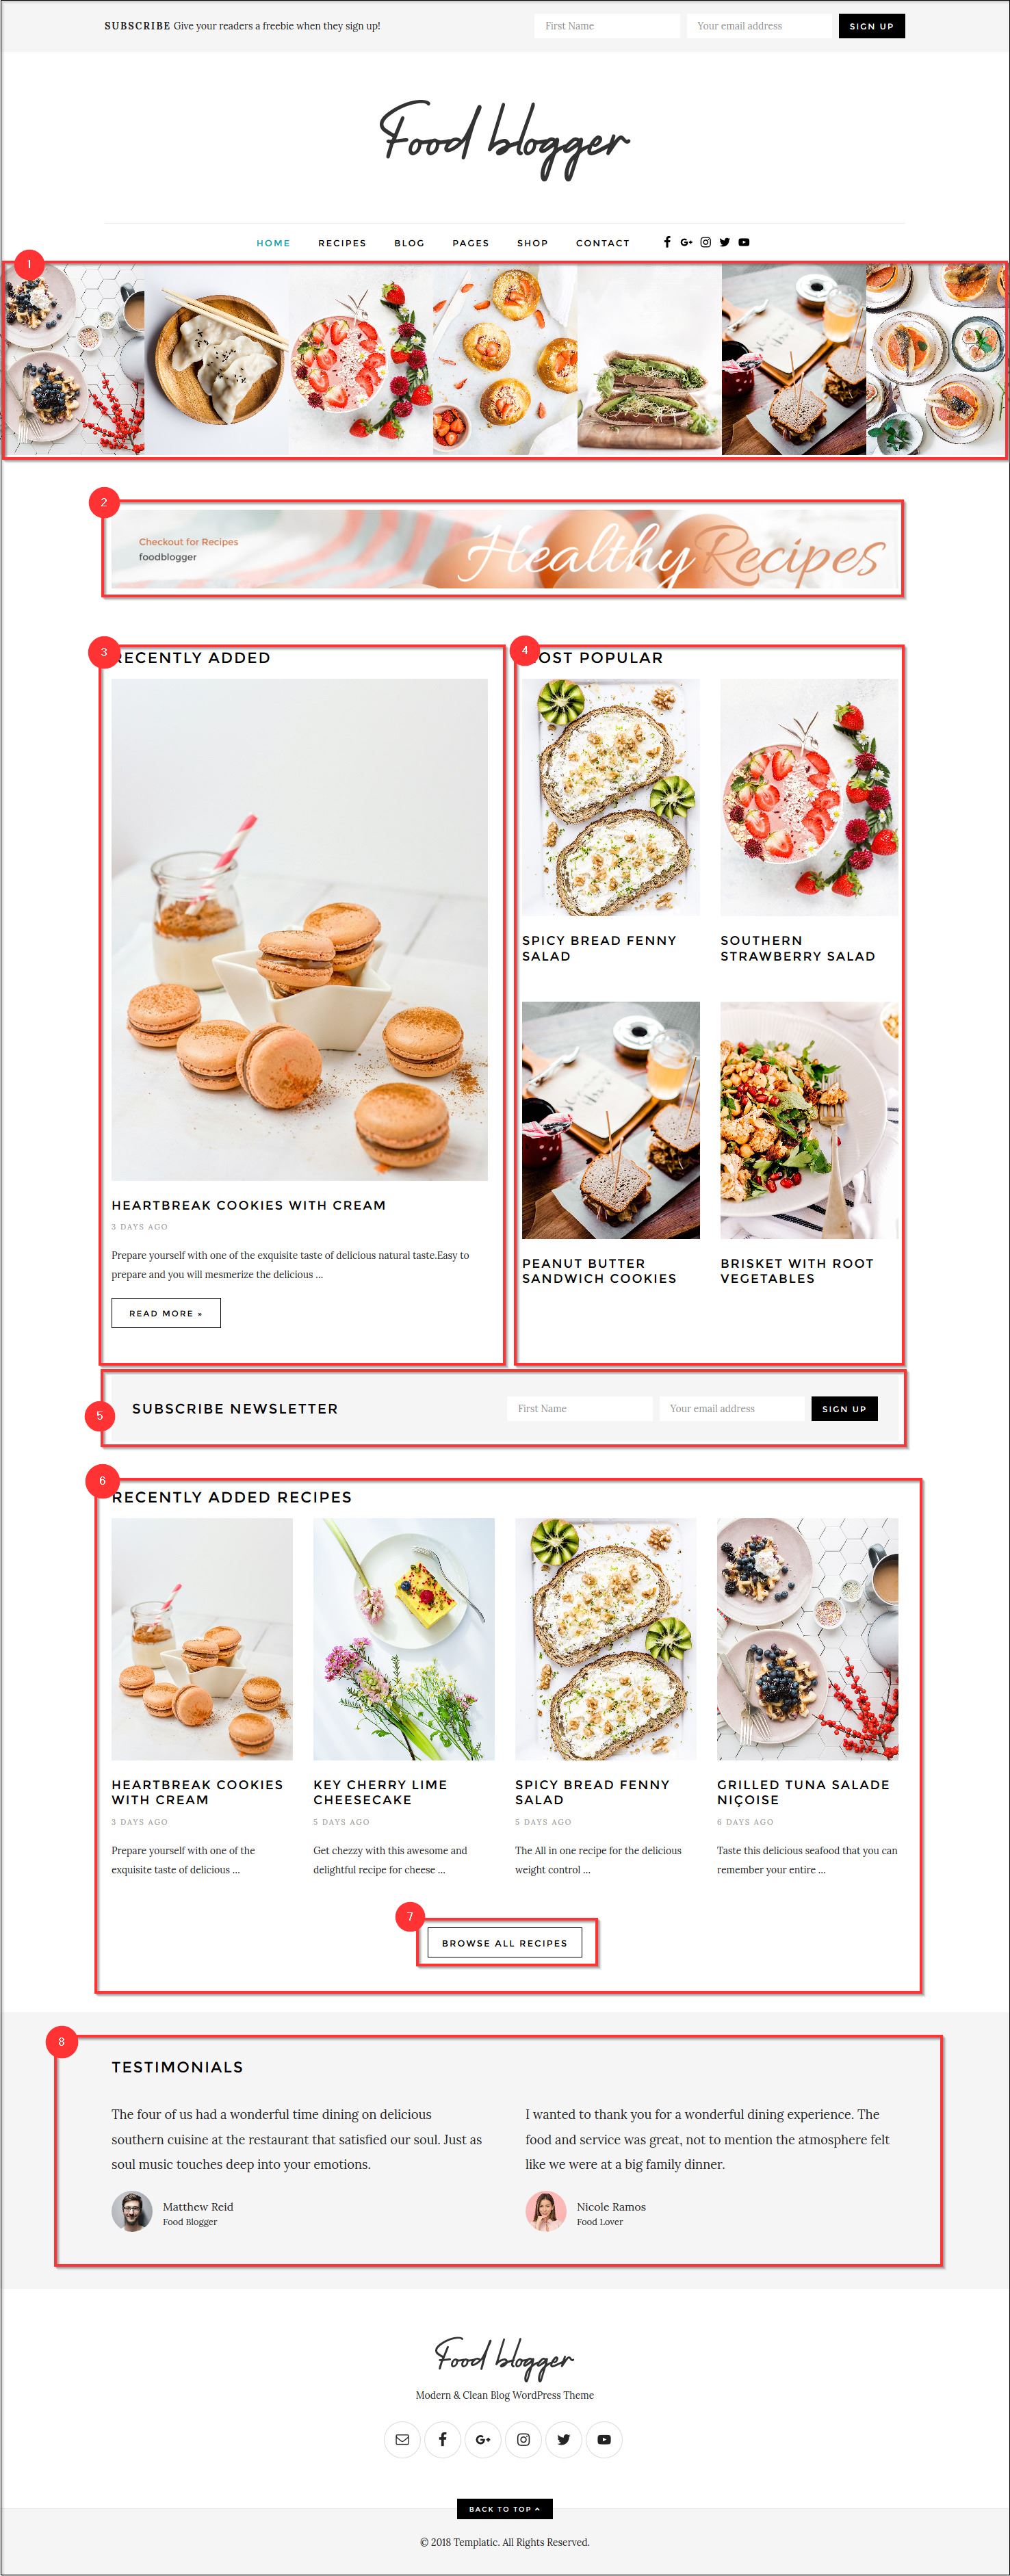
Open the page with Elementor Page Builder and its easy to do the editing.
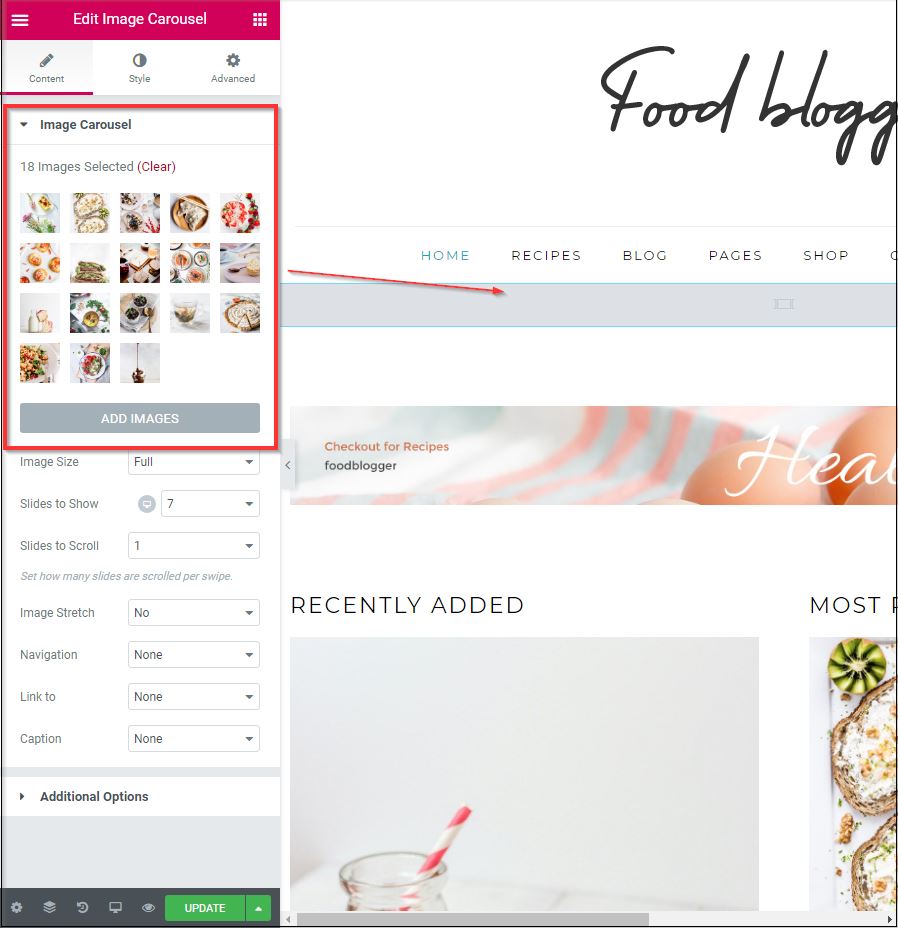
1) To change the images being displayed in the carousel. Edit the page in Elementor Page Builder and change the images you need to be displayed in the Image Carousel Widget.
2) Refer to point 7 of Home with left sidebar.
3) Refer to point 6 of Home with left sidebar.
4) Refer to point 10 of Home with left sidebar.
5) Refer to point 9 of Home with left sidebar.
6) Refer to point 8 of Home with left sidebar.
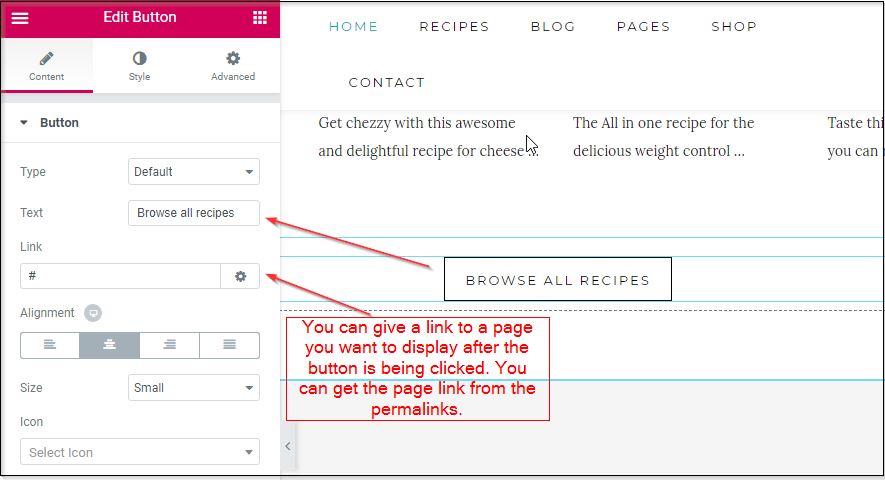
7) By clicking on the Button in the Elementor editor you can edit the text as well as where you want to redirect after the clicking is done.
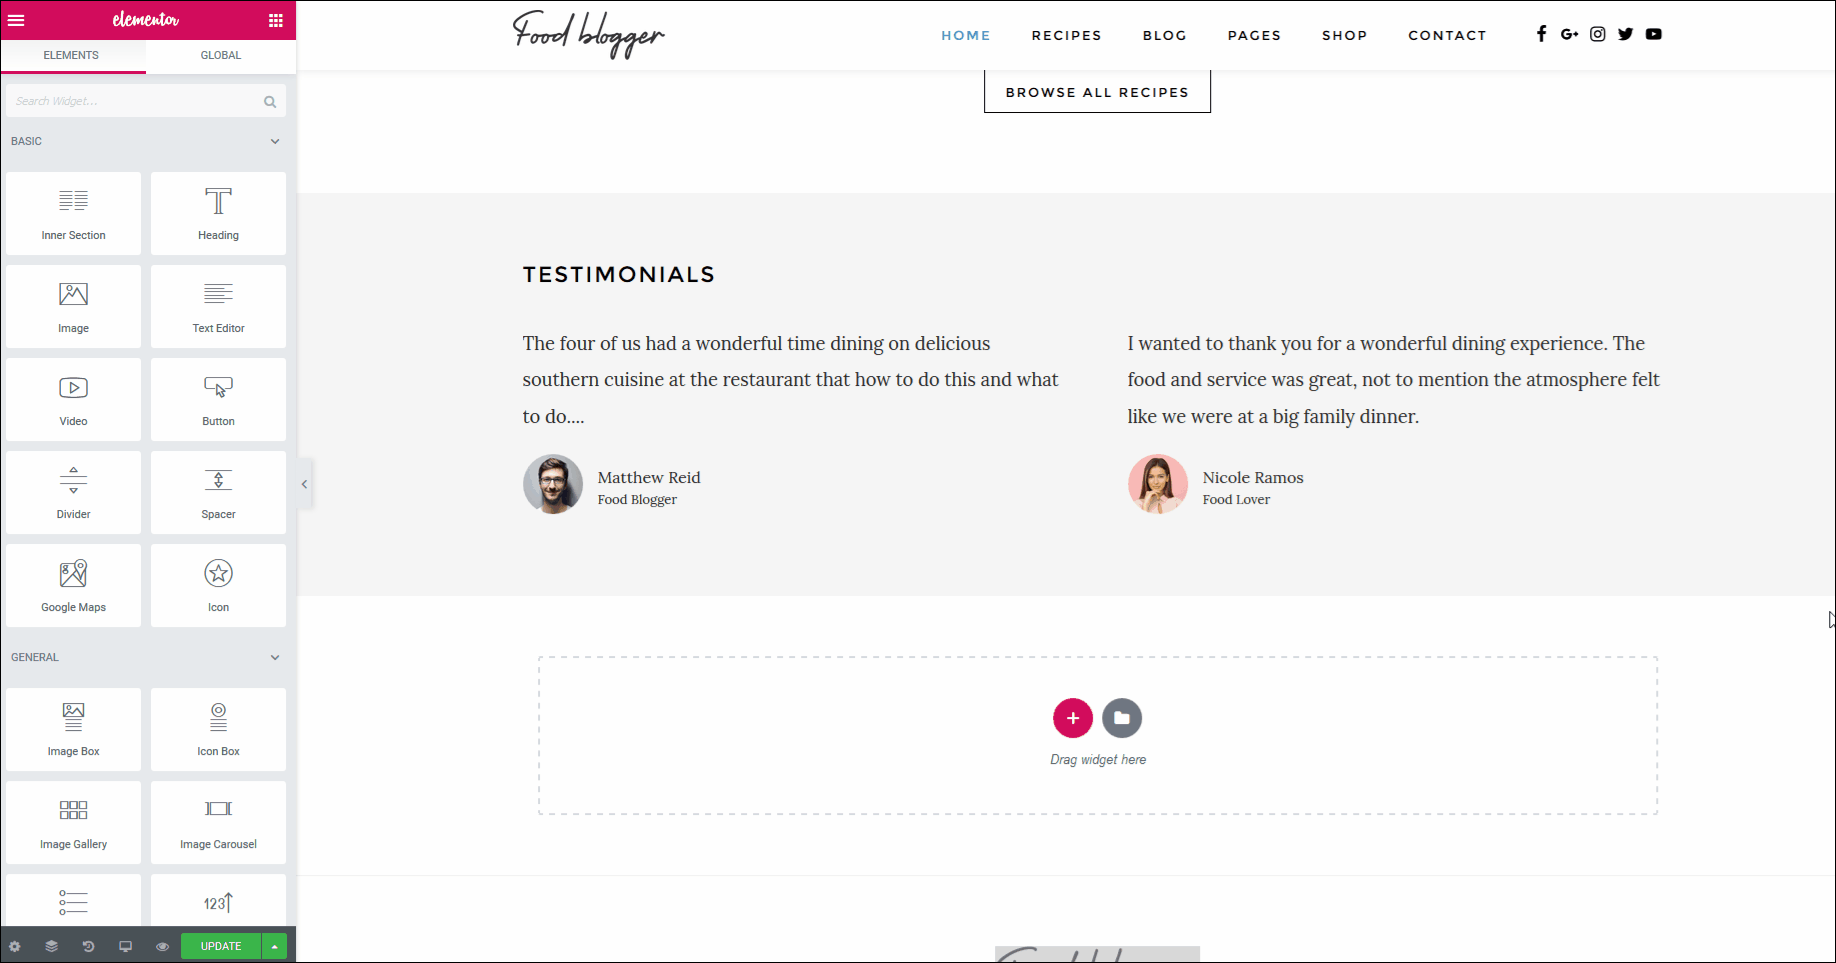
8) To change the Testimonials, change the picture, alignment or duplicate the testimonials. Refer the below attached GIF.
Homepage Narrow Width
To change the background image just click anywhere on the page and on the left sidebar select whatever image you want.
Refer to Change the background section in the Homepage with Sidebar.
1) To change the posts displayed check the below image. Just edit the posts types.
2) Refer to the point 1 of Homepage Narrow Width.
3) Refer to the point 1 of Homepage Narrow Width.
4) refer Refer to point 7 from Homepage with Sidebar to make changes here.
5) Refer to point 10 from Homepage with Sidebar to make changes here.
6) Refer to point 8 from Homepage with Sidebar to make changes here.
7) Refer to point 9 from Homepage with Sidebar to make changes here.
8) Refer to About us page ⇒ 3rd section.
About Us Page
Food Blogger theme comes with easy to edit about us page. You can add the Image, a small introduction, some quotes, testimonials by editing the page using elementor.
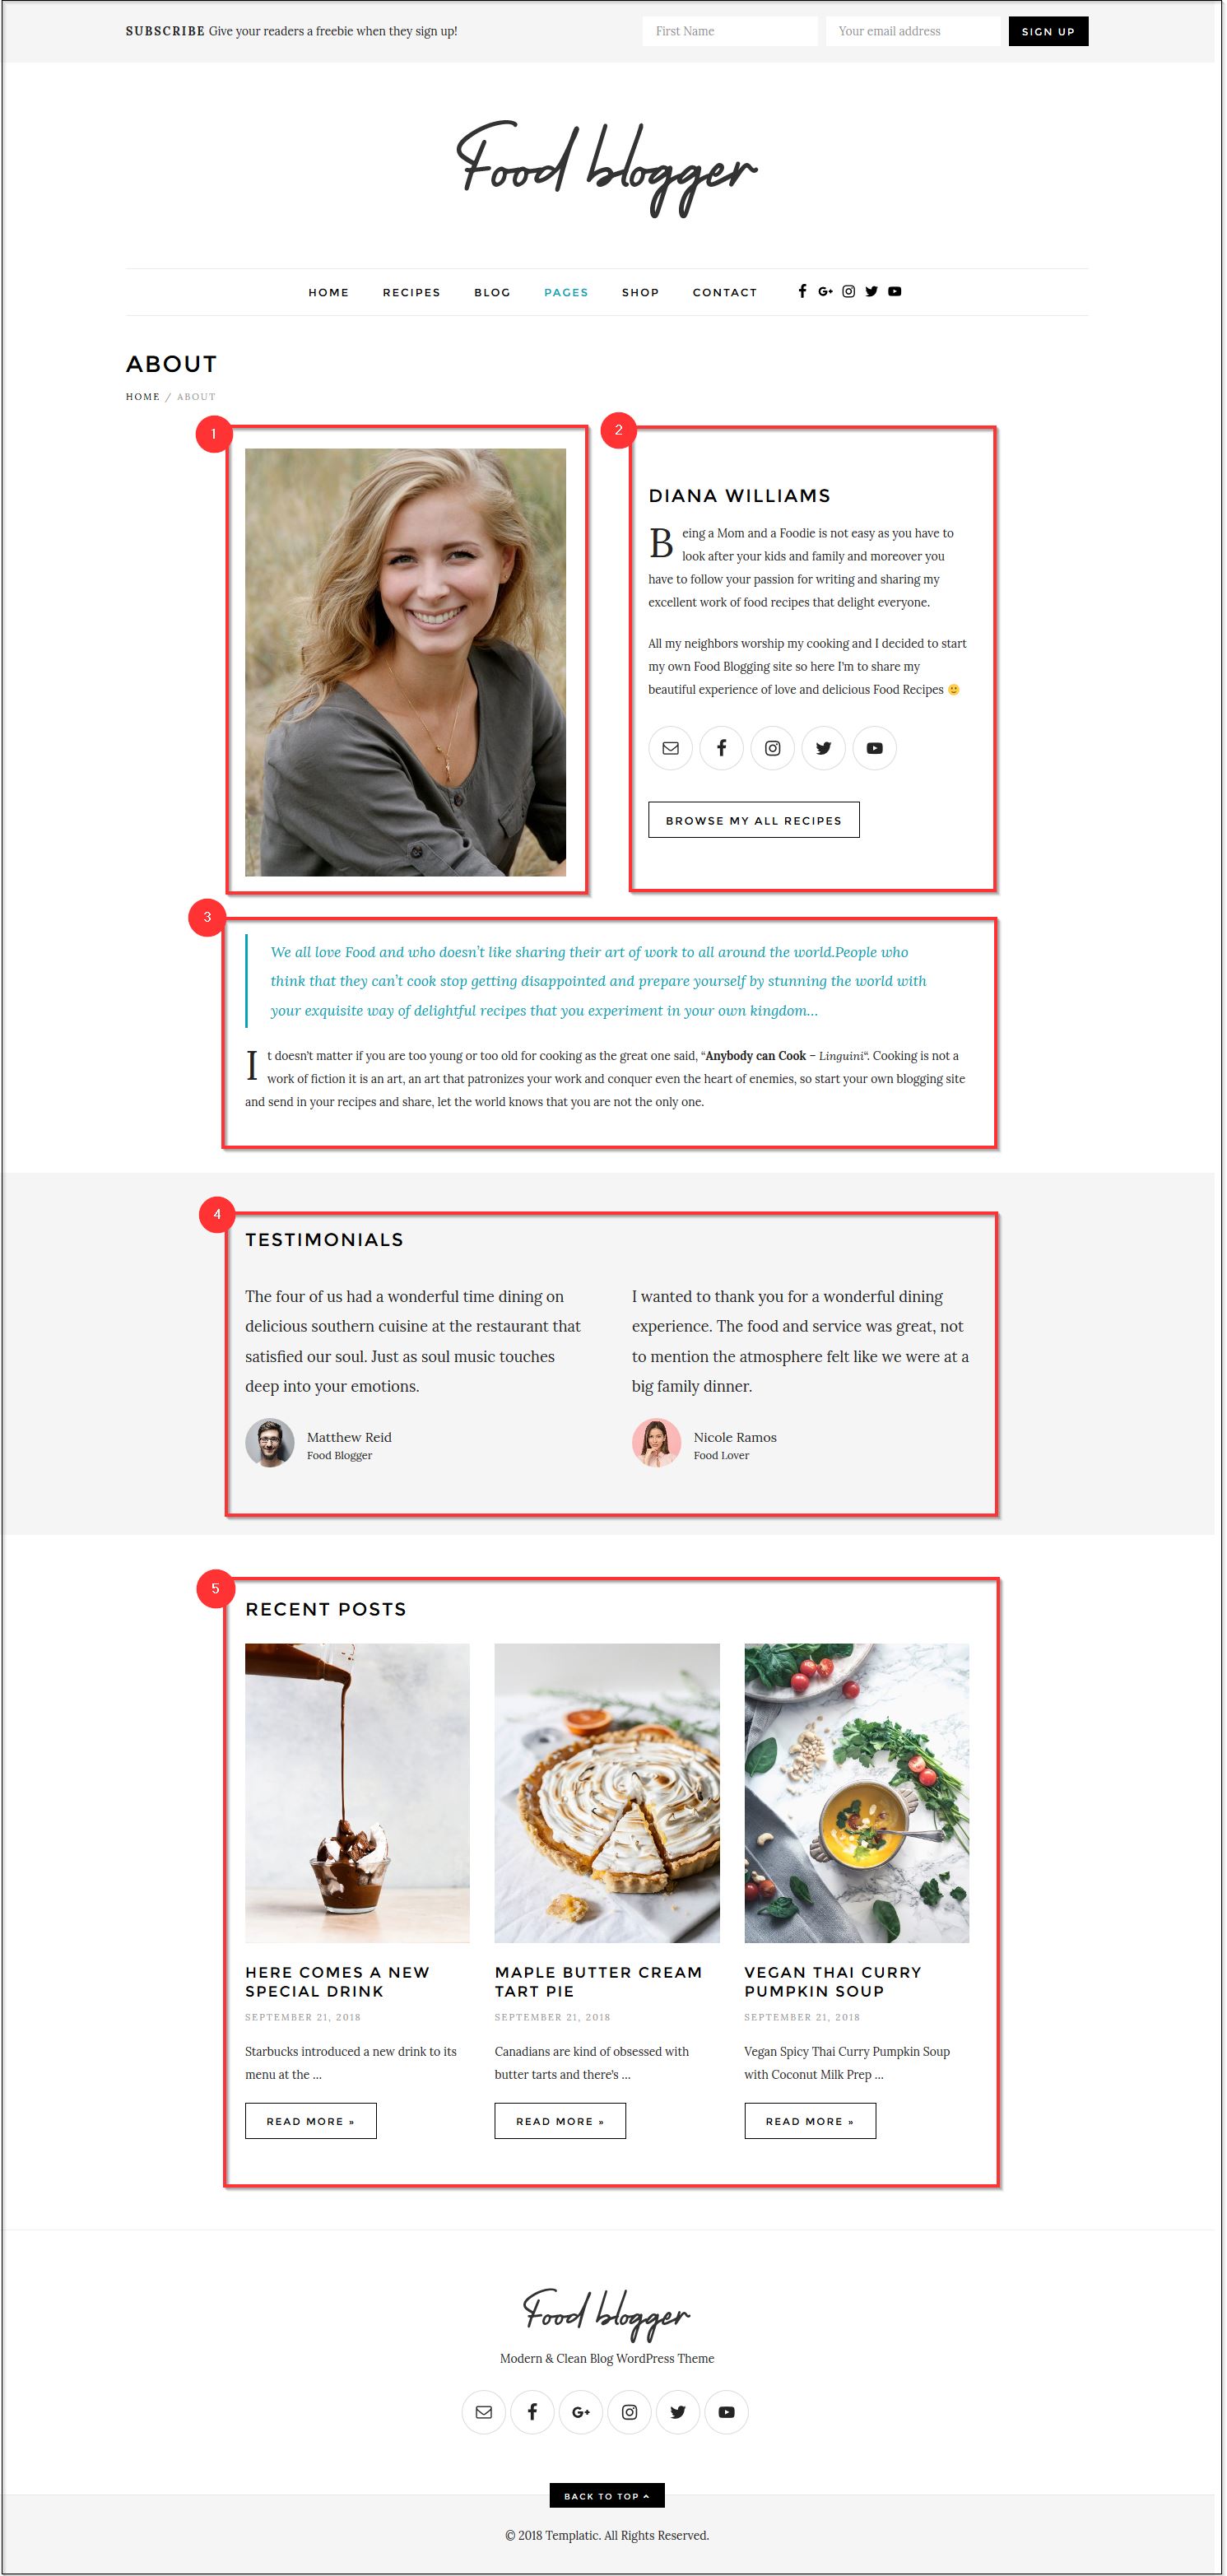
1) Author Image
While logged in with the elementor you can edit the page by just opening it in the Elementor page builder. On the image box section, Choose an image of your choice as well as in Style section ⇒ Hover Animation drop-down box you can change the hover effects too.
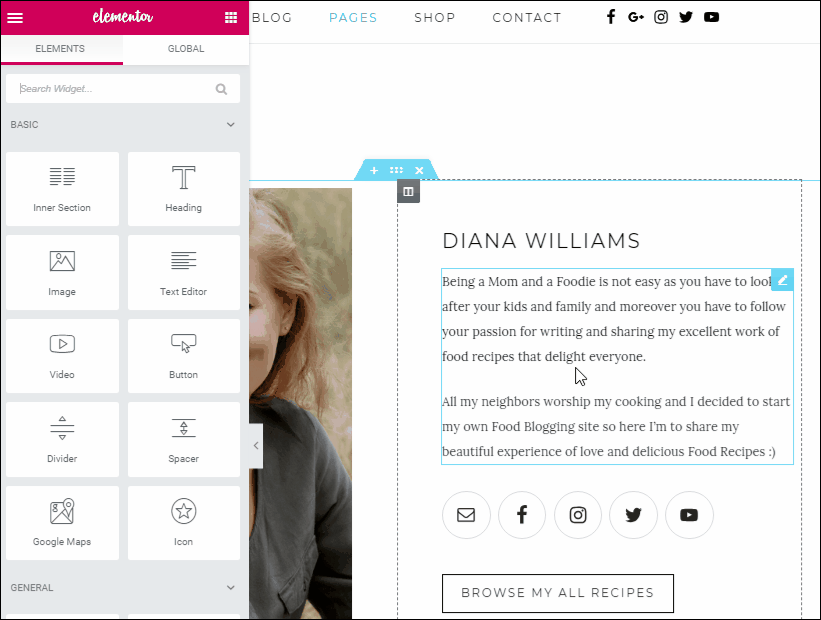
2) Bio
Change the name and description from the Title and Description section respectively. Click on the column containing the description and change the contents to suit your image. On the left sidebar, you get many different options to modify the text as well as change the font.
3) Quotes
With the help of Elementor Page Builder, you will be able to modify this section easily. Click on the column containing the quote and then upload any quote of your choice from your favorite book or chef.
4) Testimonials
With the help of Elementor Page Builder you will be able to modify this section easily.
If you want to add another Testimonial. Add it through Elementor widget menu ⇒ drag and drop widget named ‘Testimony’.
For more details, you can refer to point 8 in HomePage Narrow width section.
5) Recent News Section
In order to display recent post on your homepage. Add a widget recent post extended widget from the elementor widget list while editing with elementor.
In Post Types, Select the type of posts you want to display and the Number of posts section you can choose how many post to be shown.
For more information on this please visit this page.
Recipie Page
The page display list of Recipes uploaded by the blogger.
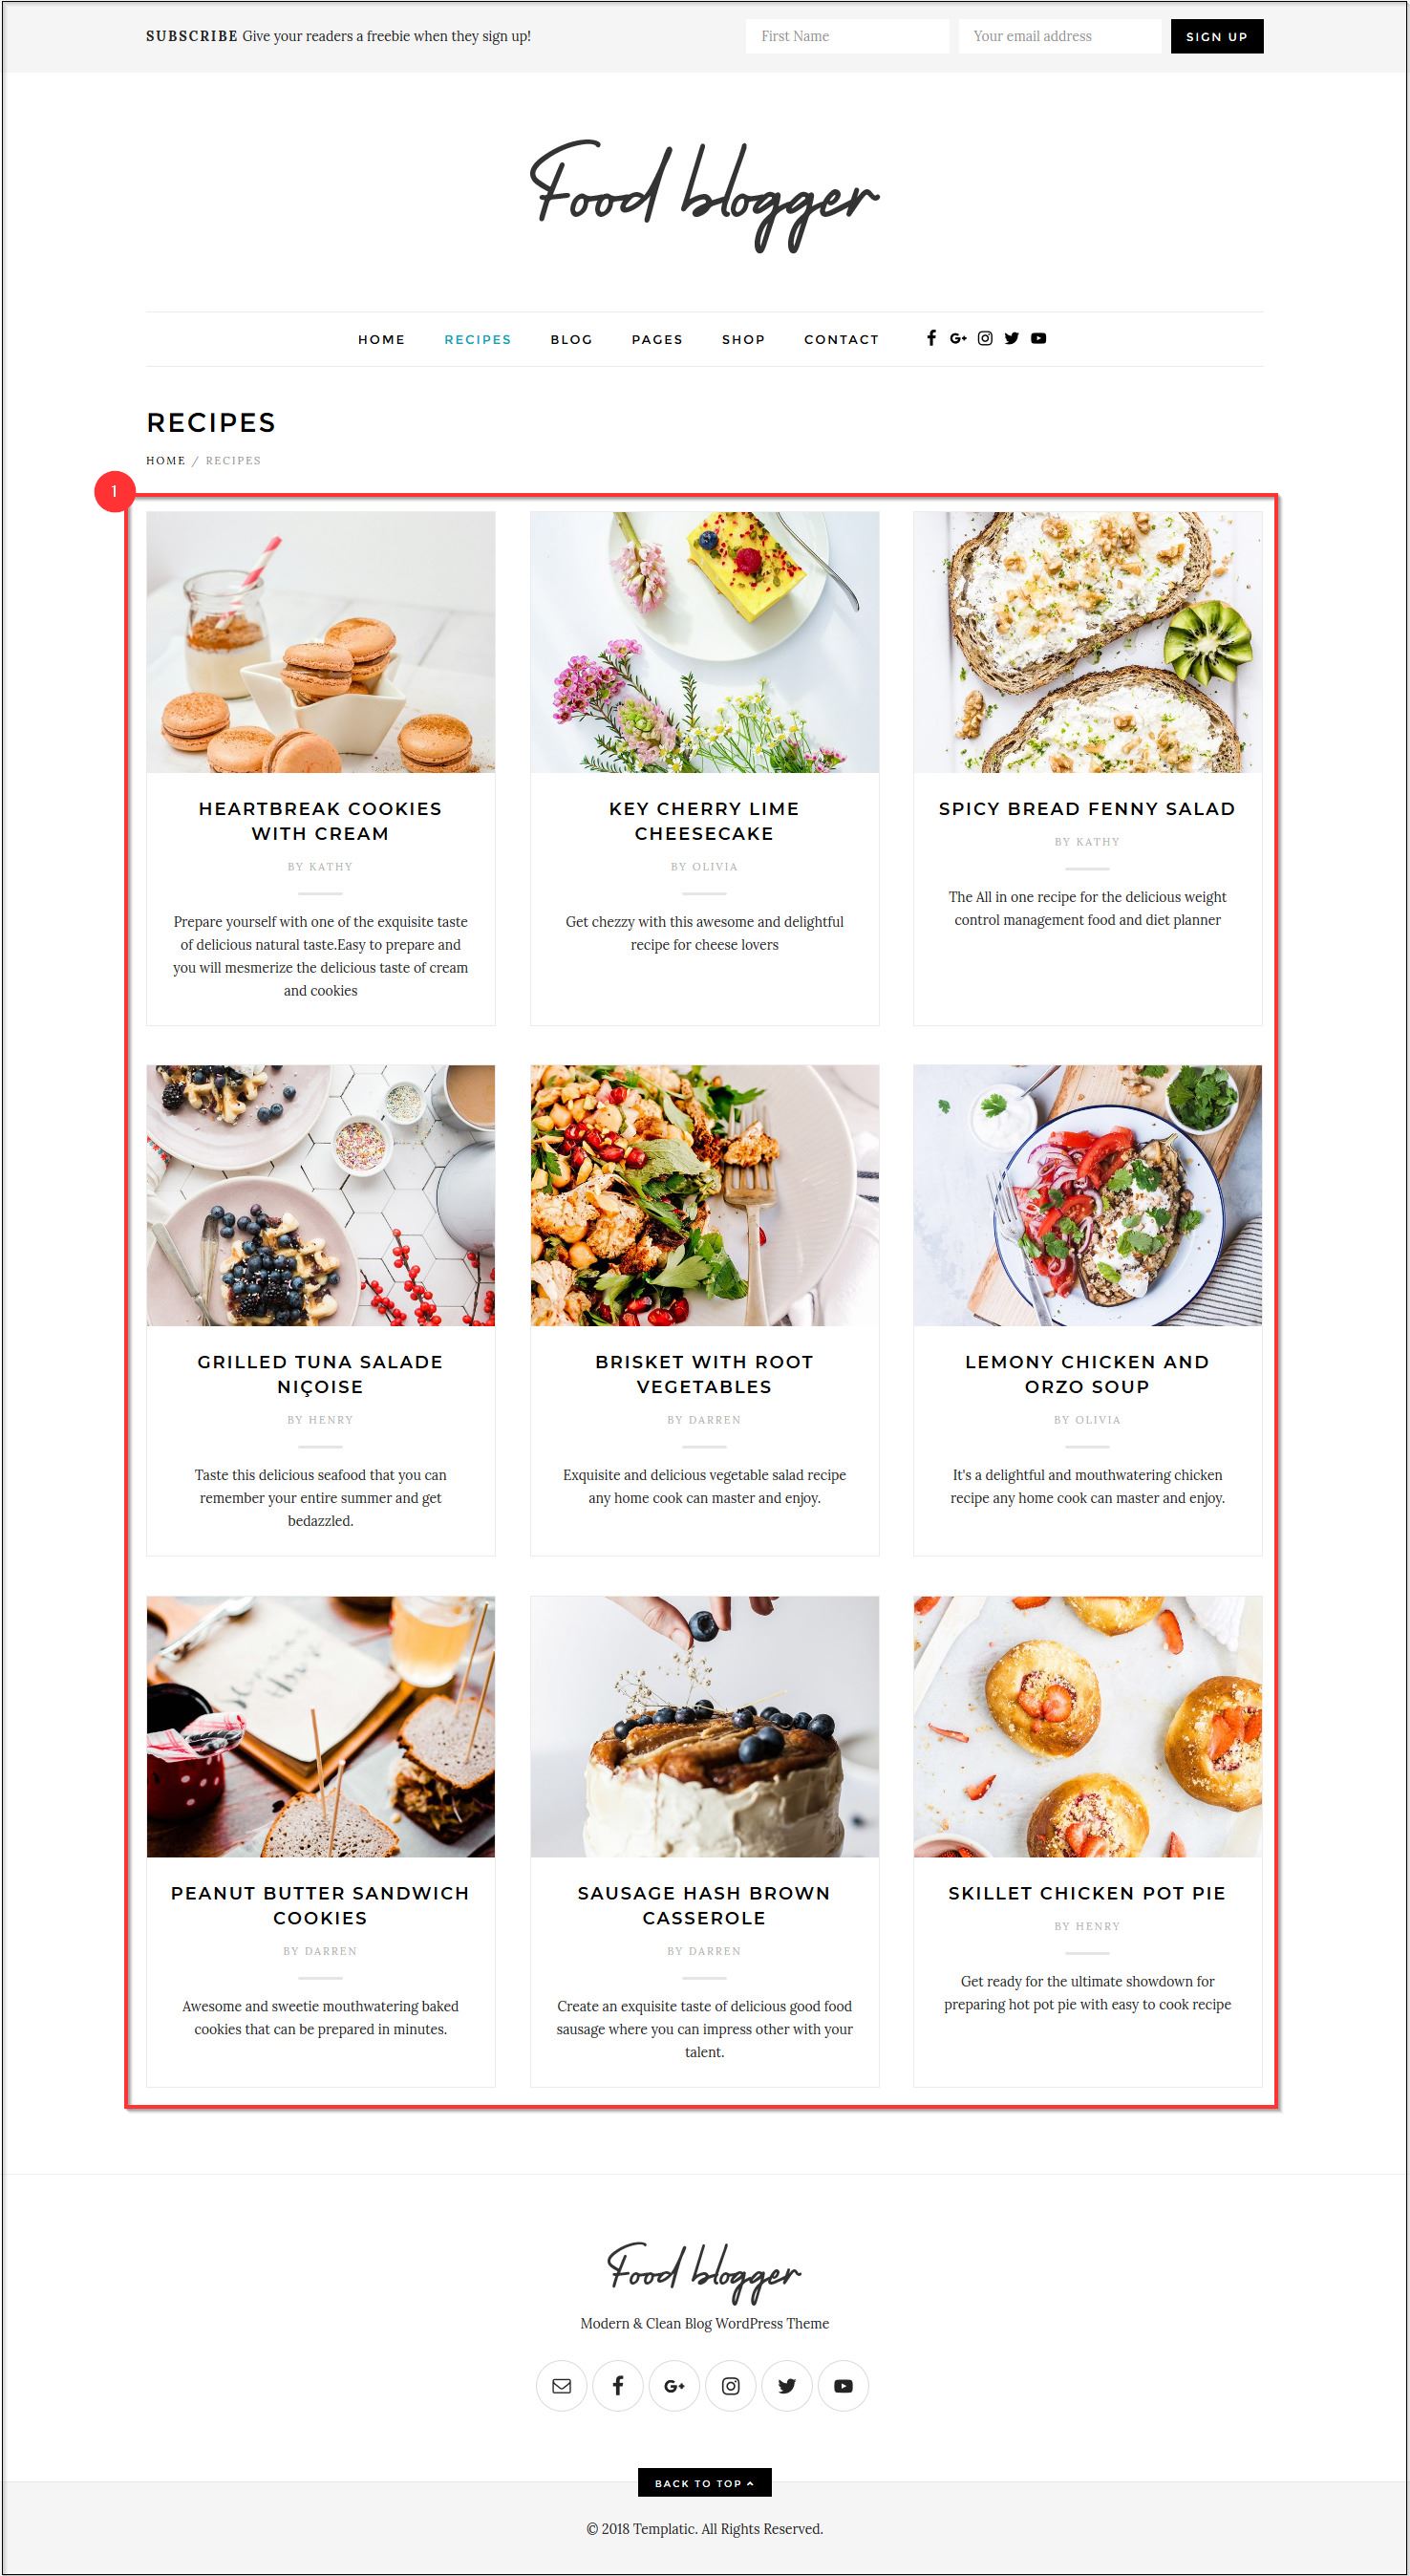
Open the Page and edit the page with Elementor Page Builder. To change the displayed recipes you need to change the shortcode.
For Further guidance on this section visit here for all the documentation regarding the receipe shortcode.
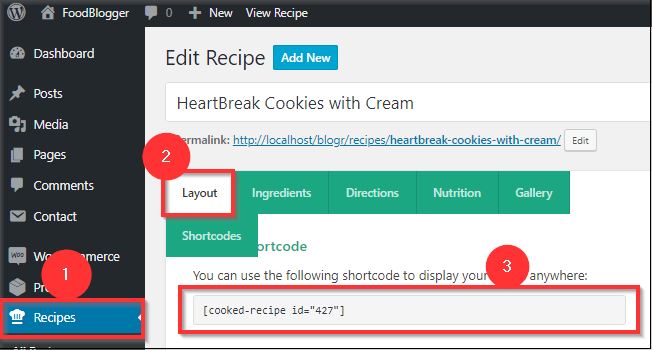
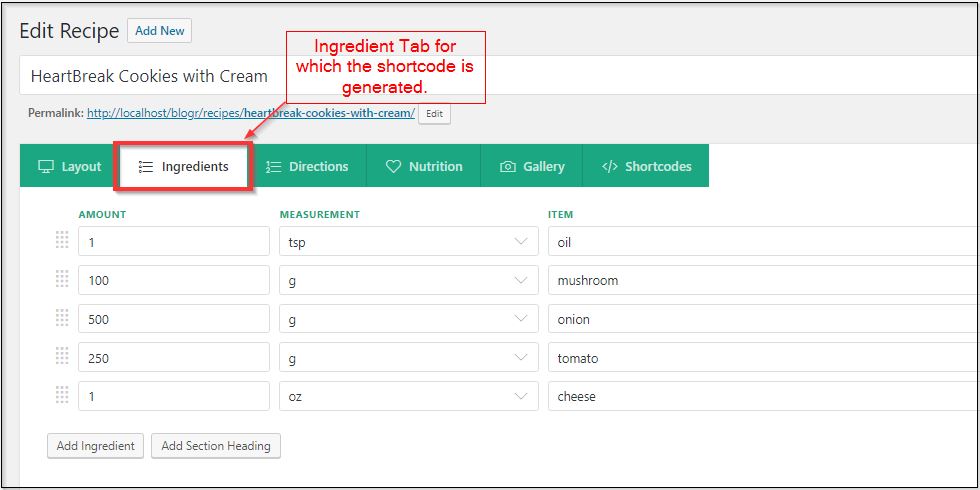
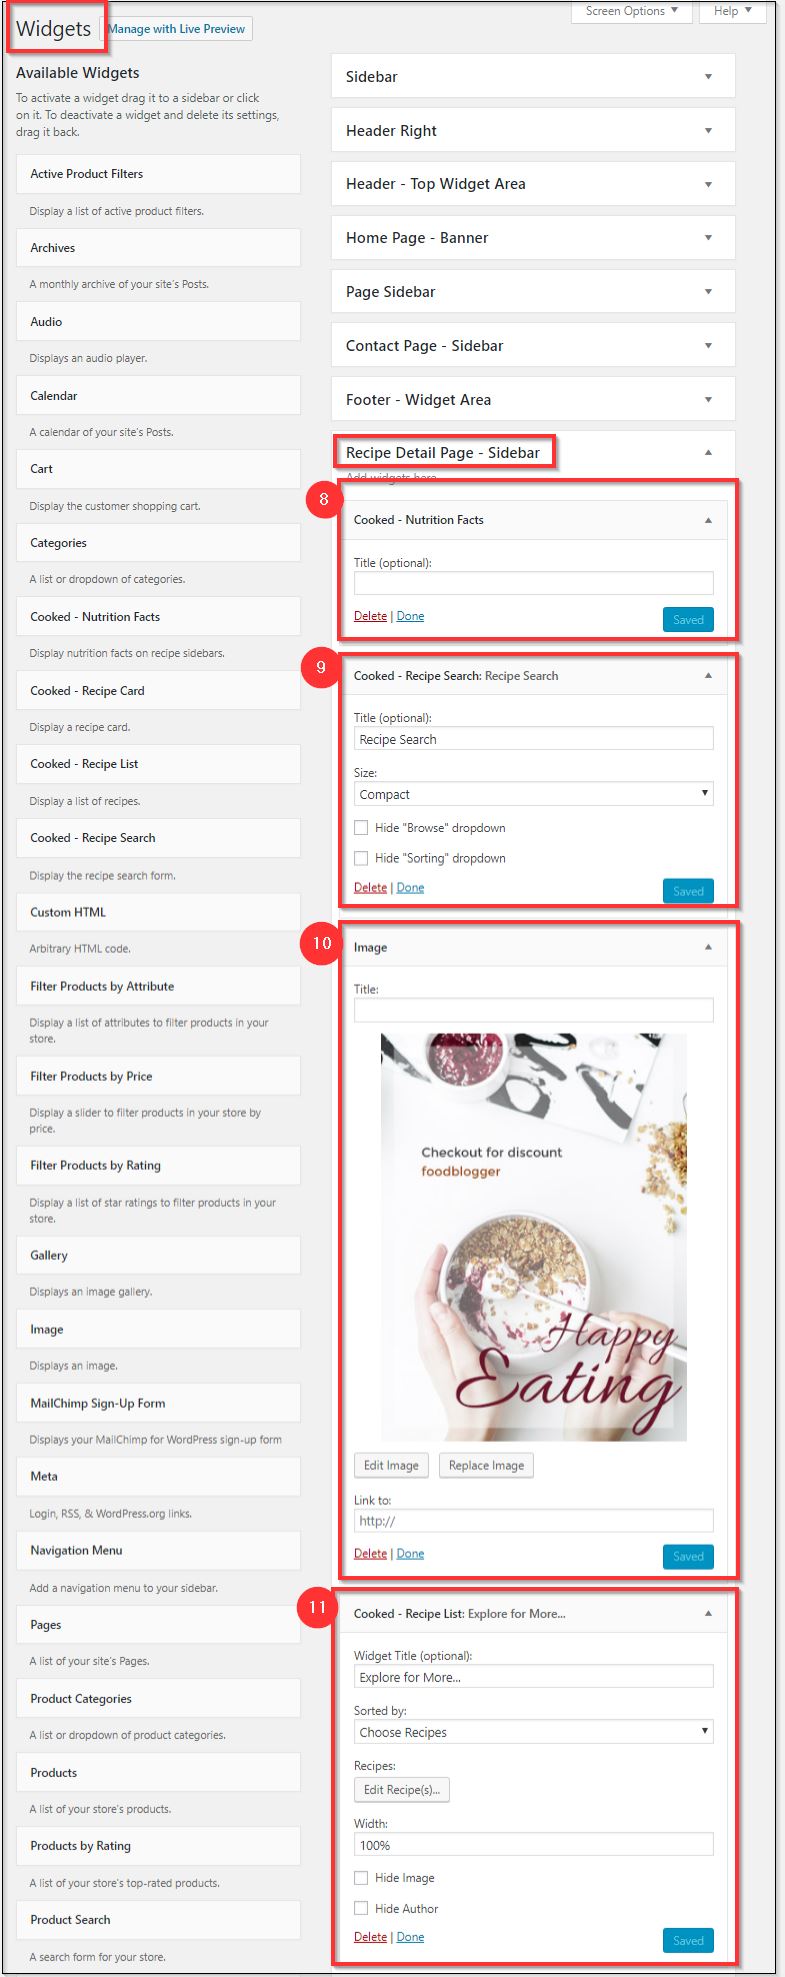
Recipie Details page
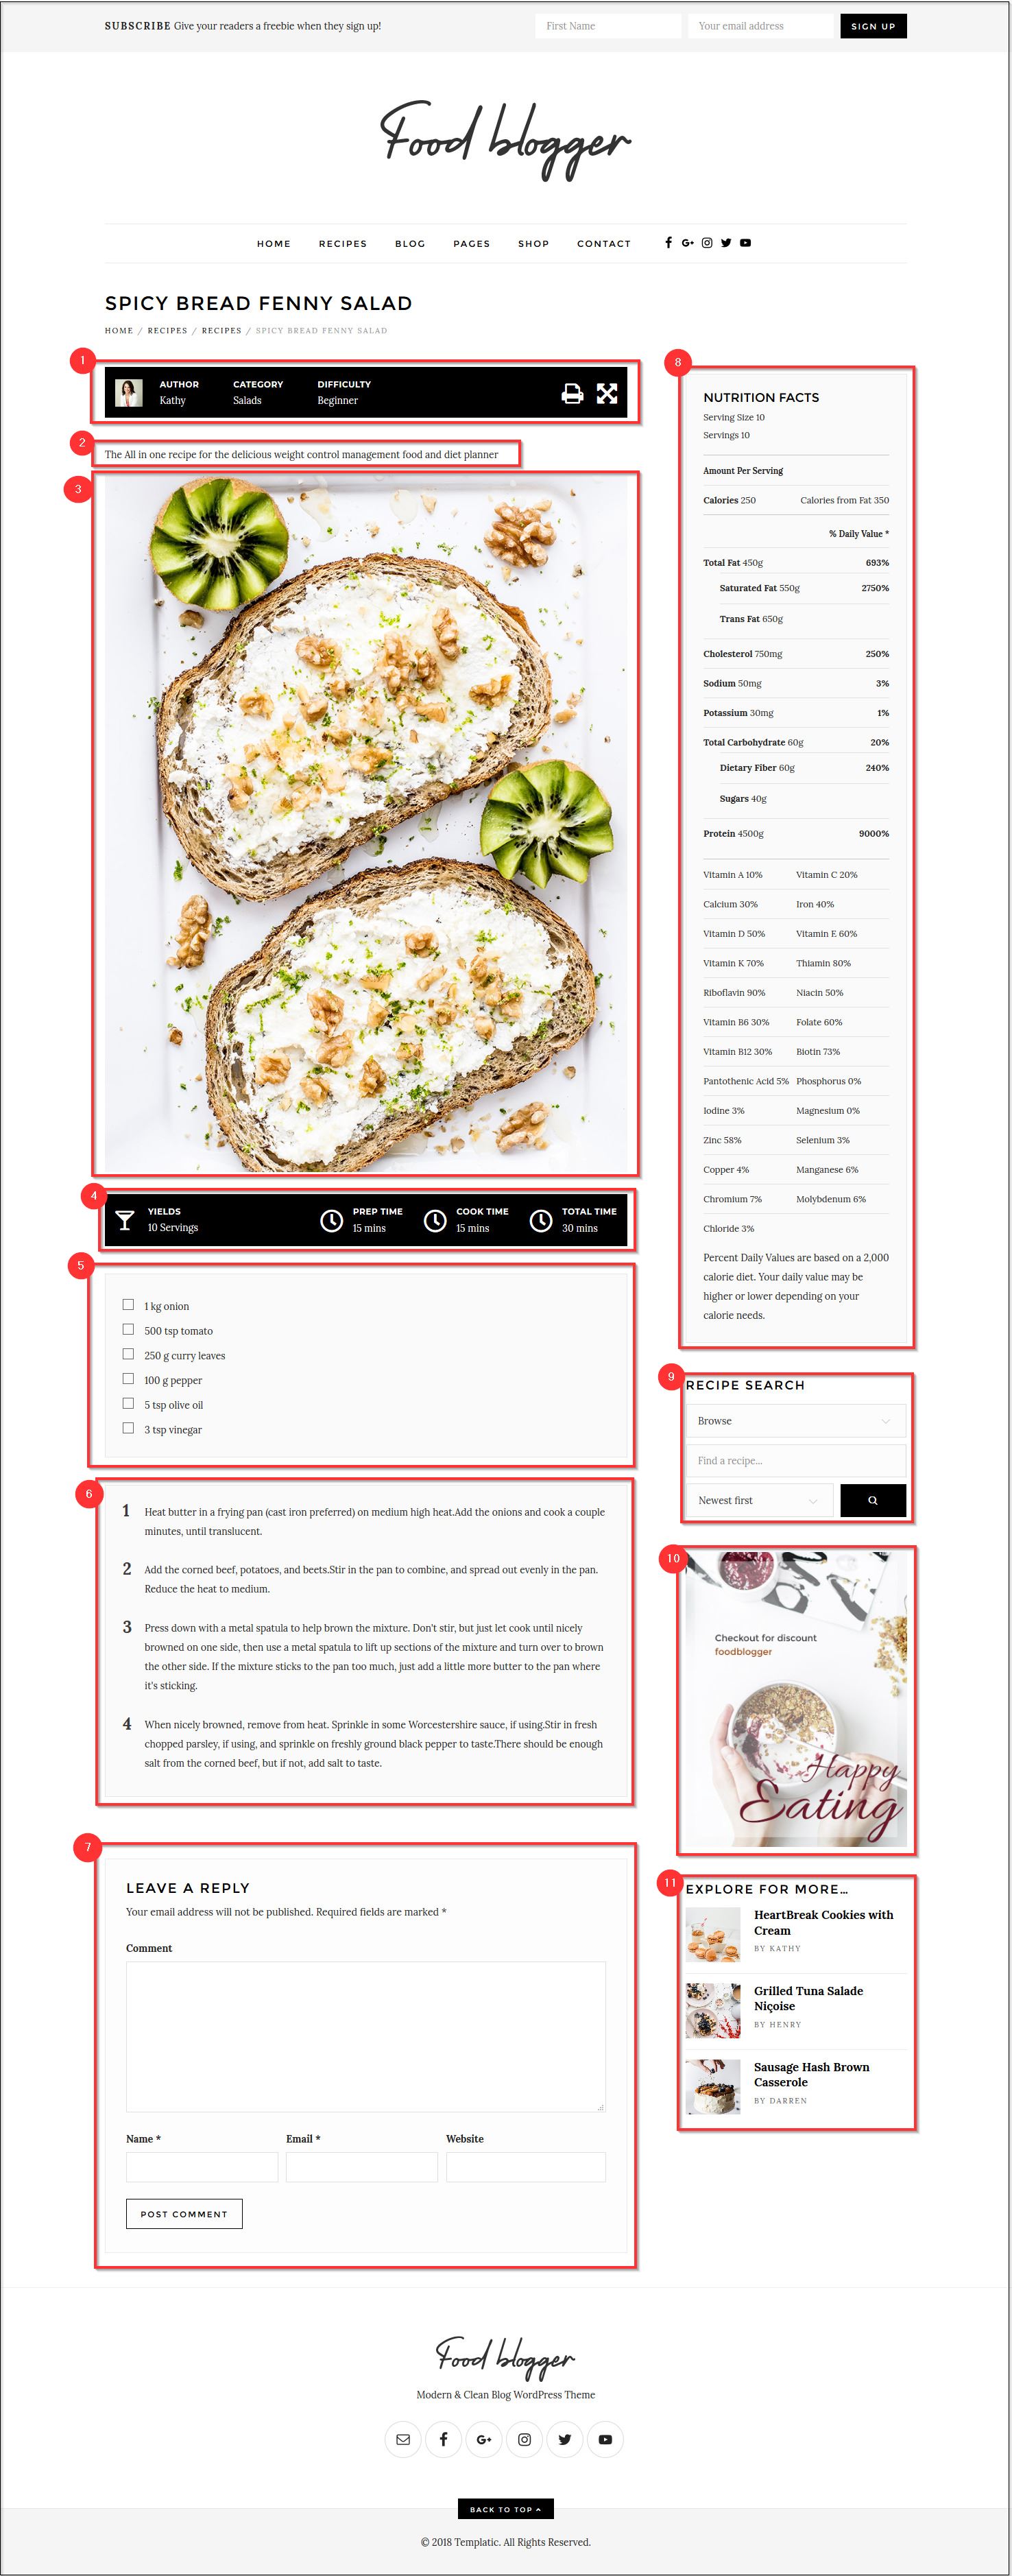
You can change the appearance of the page from the backend by navigating to Recipes => Clicking on any recipe =>Layout tab to see the default template.
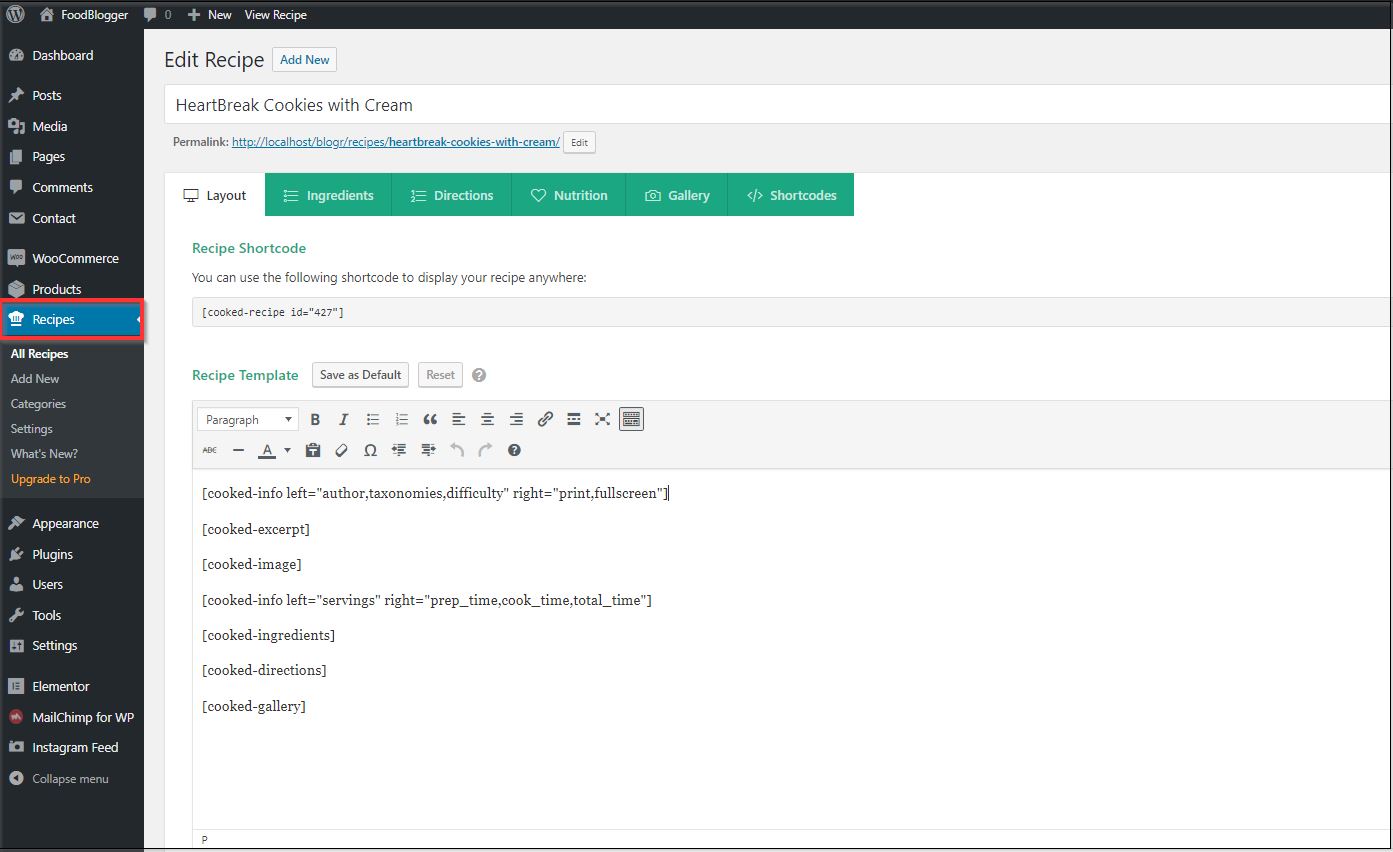
You get a short-code of the whole recipe detail page for wherever you want to display it.
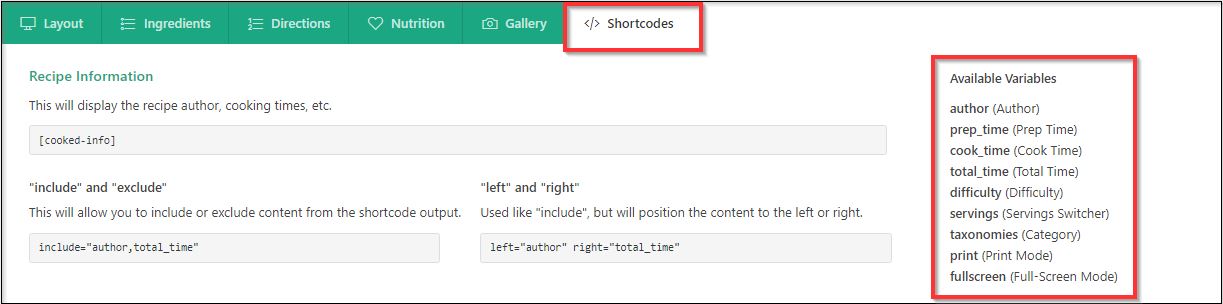
1) Author details
You can add Author details from the shortcode as displayed in the below image. Different variables can be used too that are listed.
You can change the values as per your need and requirements.
2) Excerpt
The excerpt gives a small detail about what the recipe is based on. You can generate the shortcode as displayed below.
You can change the values as per your need and requirements.

3) Recipe Image
You can upload the image of the recipe by navigating to Recipe=>Add New Recipie=>right-hand side “Featured Image” dialogue box.
The shortcode uses the image uploaded there.
You can generate the shortcode as displayed below.
You can change the values as per your need and requirements.

4) Cooking time
The preparation time, cooking time, etc can be added using the same shortcode as used while adding the Author details, just the Variables will be different.
Refer to Point 1 in this article.
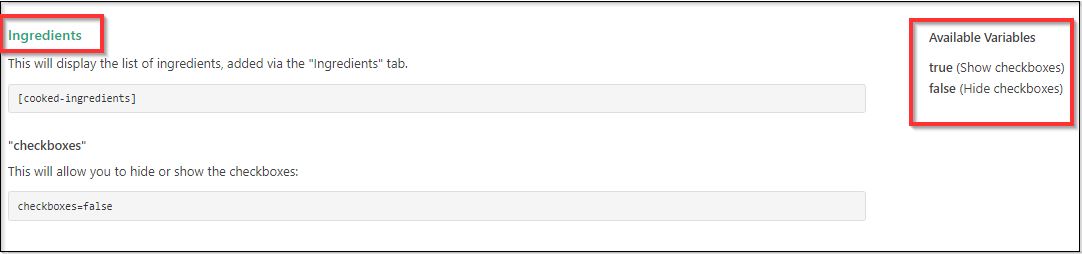
5) Cooking Ingredients
Displays the ingredients you have written in the Ingredients tab.
You can generate the shortcode as displayed below.
You can change the values as per your need and requirements.
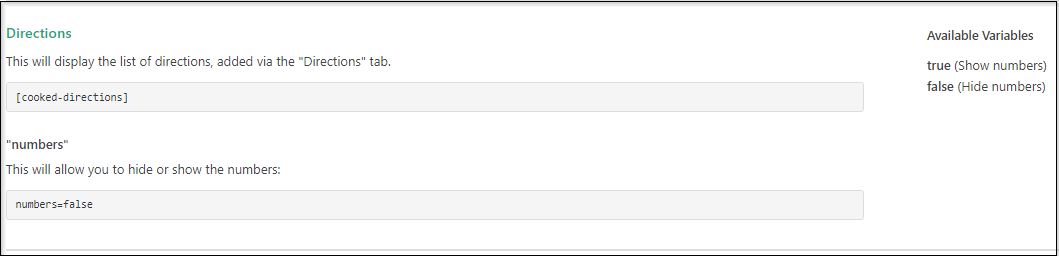
6) Cooking Directions
The Directions of your recipe is displayed through this. You can generate the shortcode as displayed below.
You can change the values as per your need and requirements.
7) Comments
By checking the checkbox of Allow comments you can allow people to post a comment on your post.
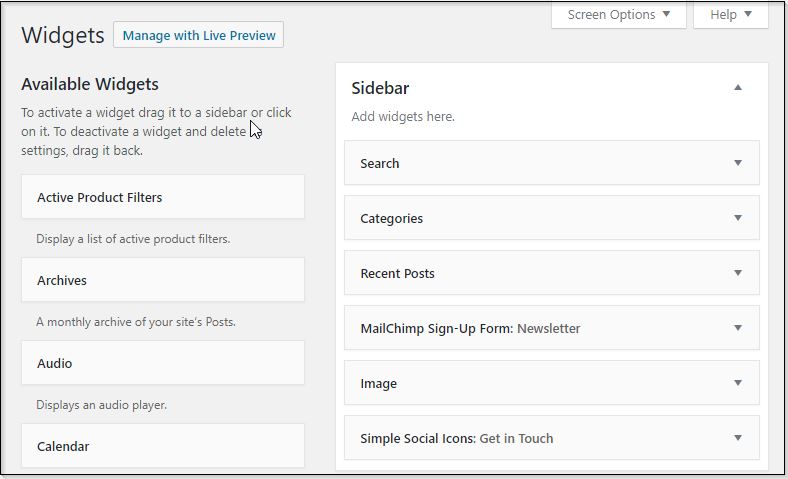
You can easily modify the sidebar of the Recipe detail page by navigating to Appearances=>Widgets as shown in the following image.
For Further guidance on this section visit here for all the documentation regarding the receipe shortcode
For Further guidance of Cooked General, Design, and Permalinks settings visit here .
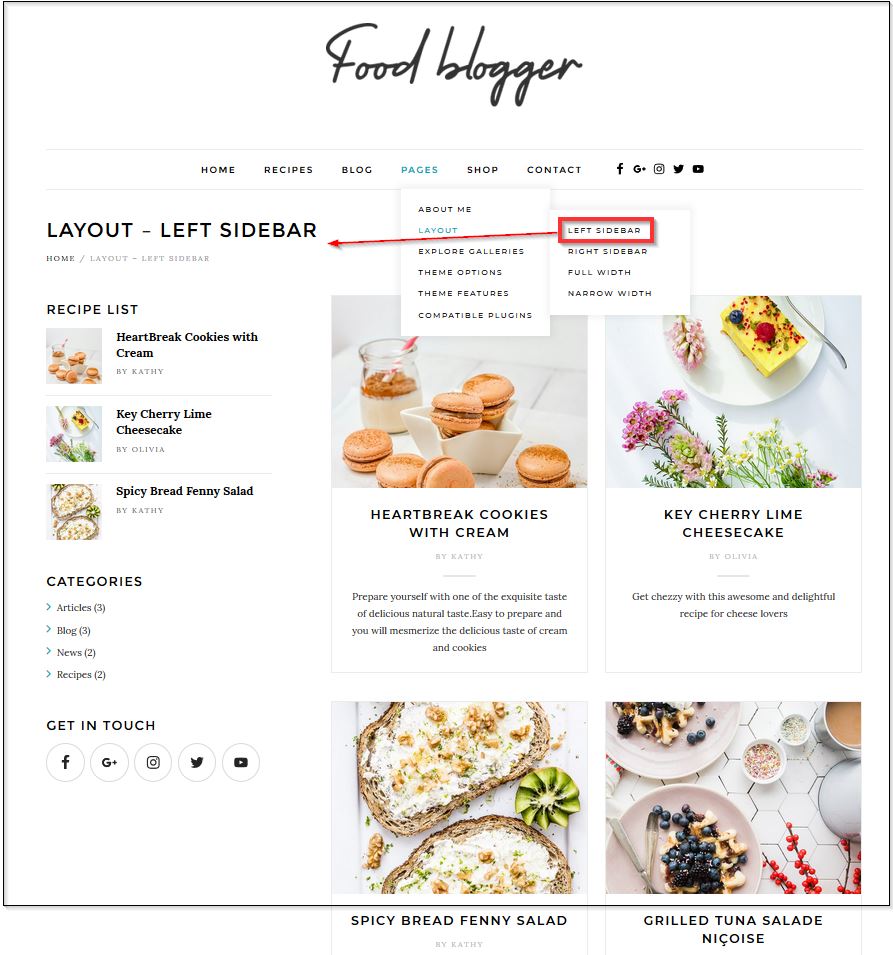
Page Layout
There are many variation for displaying Pages, You can use the format of your choice to display Pages using left sidebar, right sidebar, Full width and narrow width.
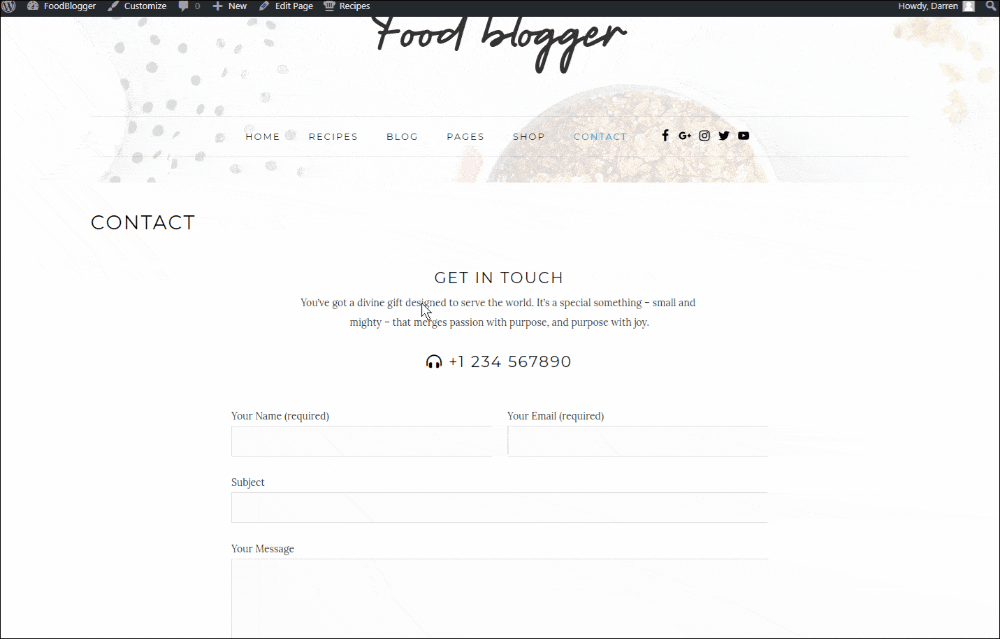
Contact Page
For your website, the contact form will play a very important role.
With the setup wizard, all the necessary plugins will be installed automatically including the contact form. With this plugin, you can create all the contact forms you want by navigating to the wp-admin dashboard ⇒ Contact. To create a contact form, you can click on the “Add new contact form” button, while to view the existing form templates, you can click the first option – “contact forms”.
However, if you need more fields, you can refer to the contact form 7 documentation and create a custom contact form for your website.
Creating a contact form
With the contact form 7 plugin, you can easily create a custom contact form to collect the data that you want from the users using the form. Here’s the contact form 7 guide on how to edit the form fields to create a contact form. Moreover, there are other tabs to set up the mail, and for advanced settings. Moreover, you can also change the messages to be displayed at certain events like successful form submission, validation errors, wrong email address, etc.
Contact form short code
Once you have created a contact form, you can use it on the different pages through the shortcode.
The shortcode will look something like:
[contact-form-7 id=”234″ title=”contact form”]
You can create a text block wherever you want to insert the contact form and then paste the contact form shortcode there to insert the contact form.
Using Blogs on your Food Blogging website
You can use your Food Blogger website as your blogging platform. To start blogging, you can navigate to wp-admin ⇒ posts ⇒ Categories and set the categories for your blogs.
Categories can be anything like food, recipe, dishes making etc.
1)Adding New Blog
Creating new blog is easy as other pages and post. Navigate to wp-admin ⇒ Posts ⇒ Add New and start writing your new blog.

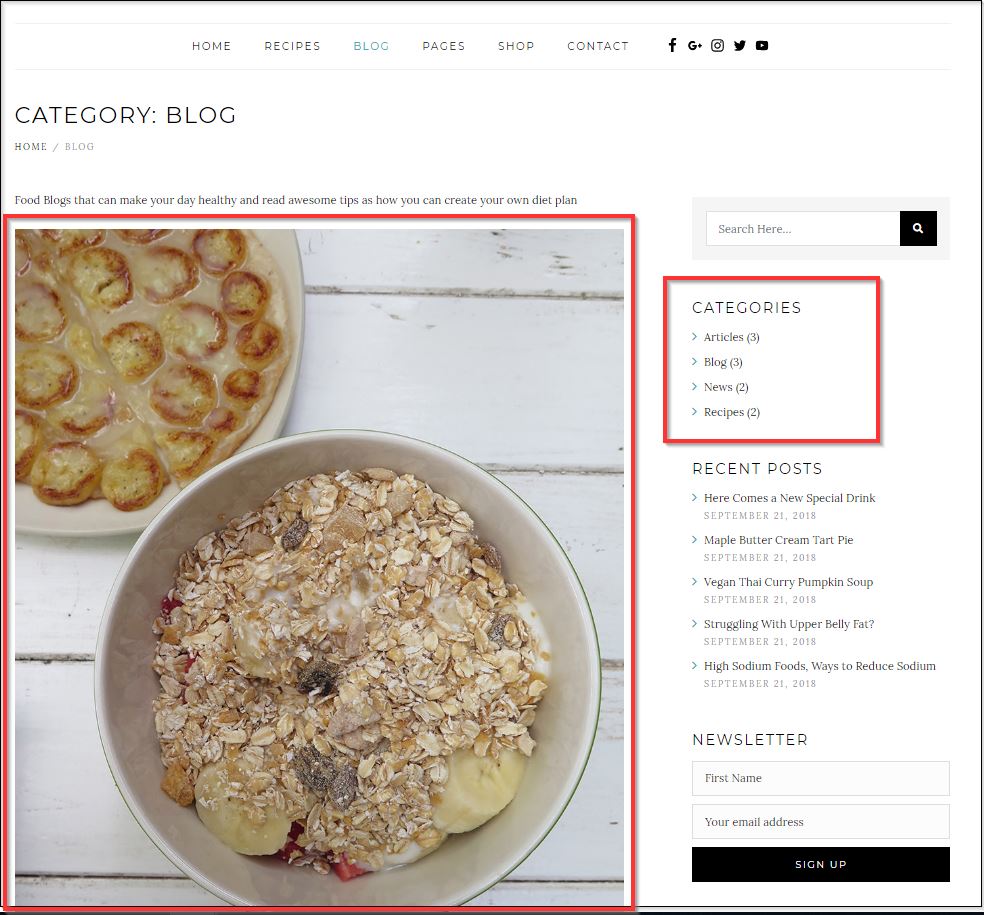
2)Blog page sidebar
You can manage the widgets of blog page at Appearance ⇒ Widgets ⇒ Sidebar. There are many widgets placed by default in the sidebar, you can remove the one you don’t like. Besides, you can rearrange them and also add new widgets too.
Creating a multilingual Food blog
A multilingual food blog is a good idea, isn’t it?
You can easily create a multilingual WordPress food blog using this theme and Weglot Translations. Weglot is an amazing solution for quickly and easily translating your website into multiple languages. Refer this post on how to use Weglot with Templatic themes to get started.
Set colors and image background
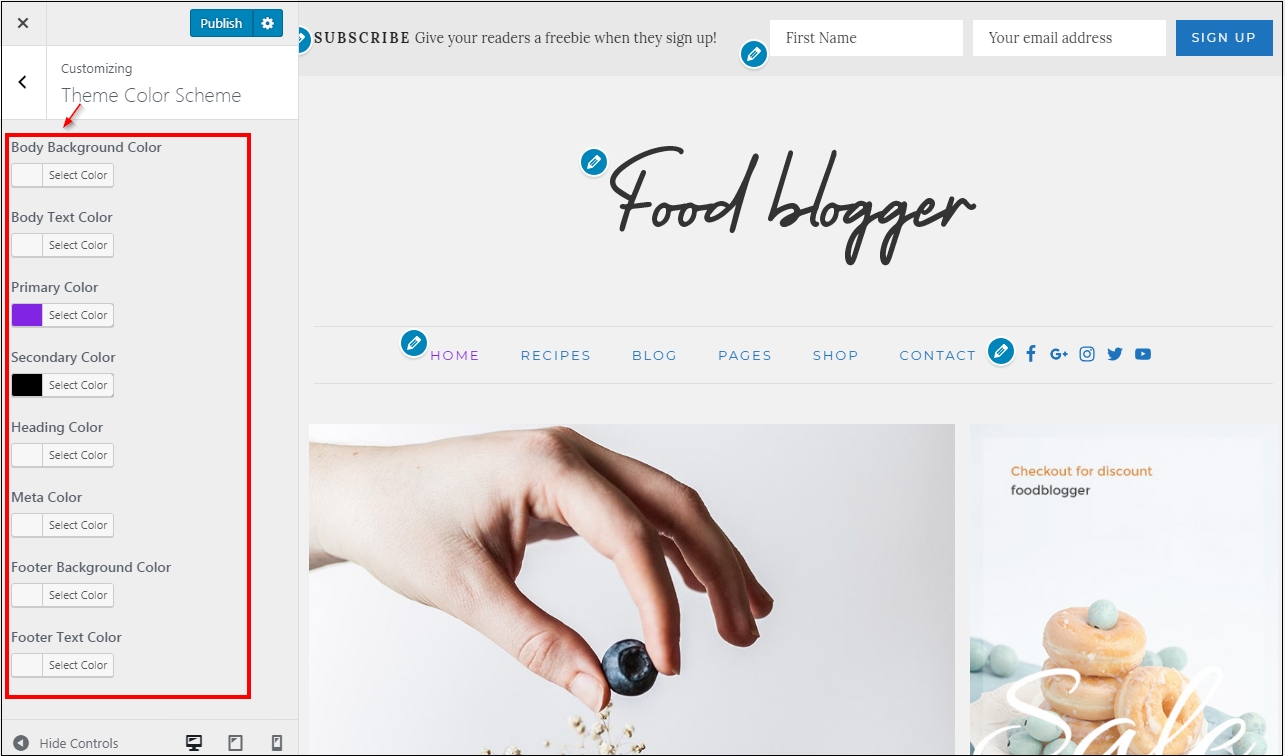
You can change the color and background of individual sections through the Elementor editor. However, you can also change the colors of your site at Appearance ⇒ Customize ⇒ Theme colors.
The following color options are available.
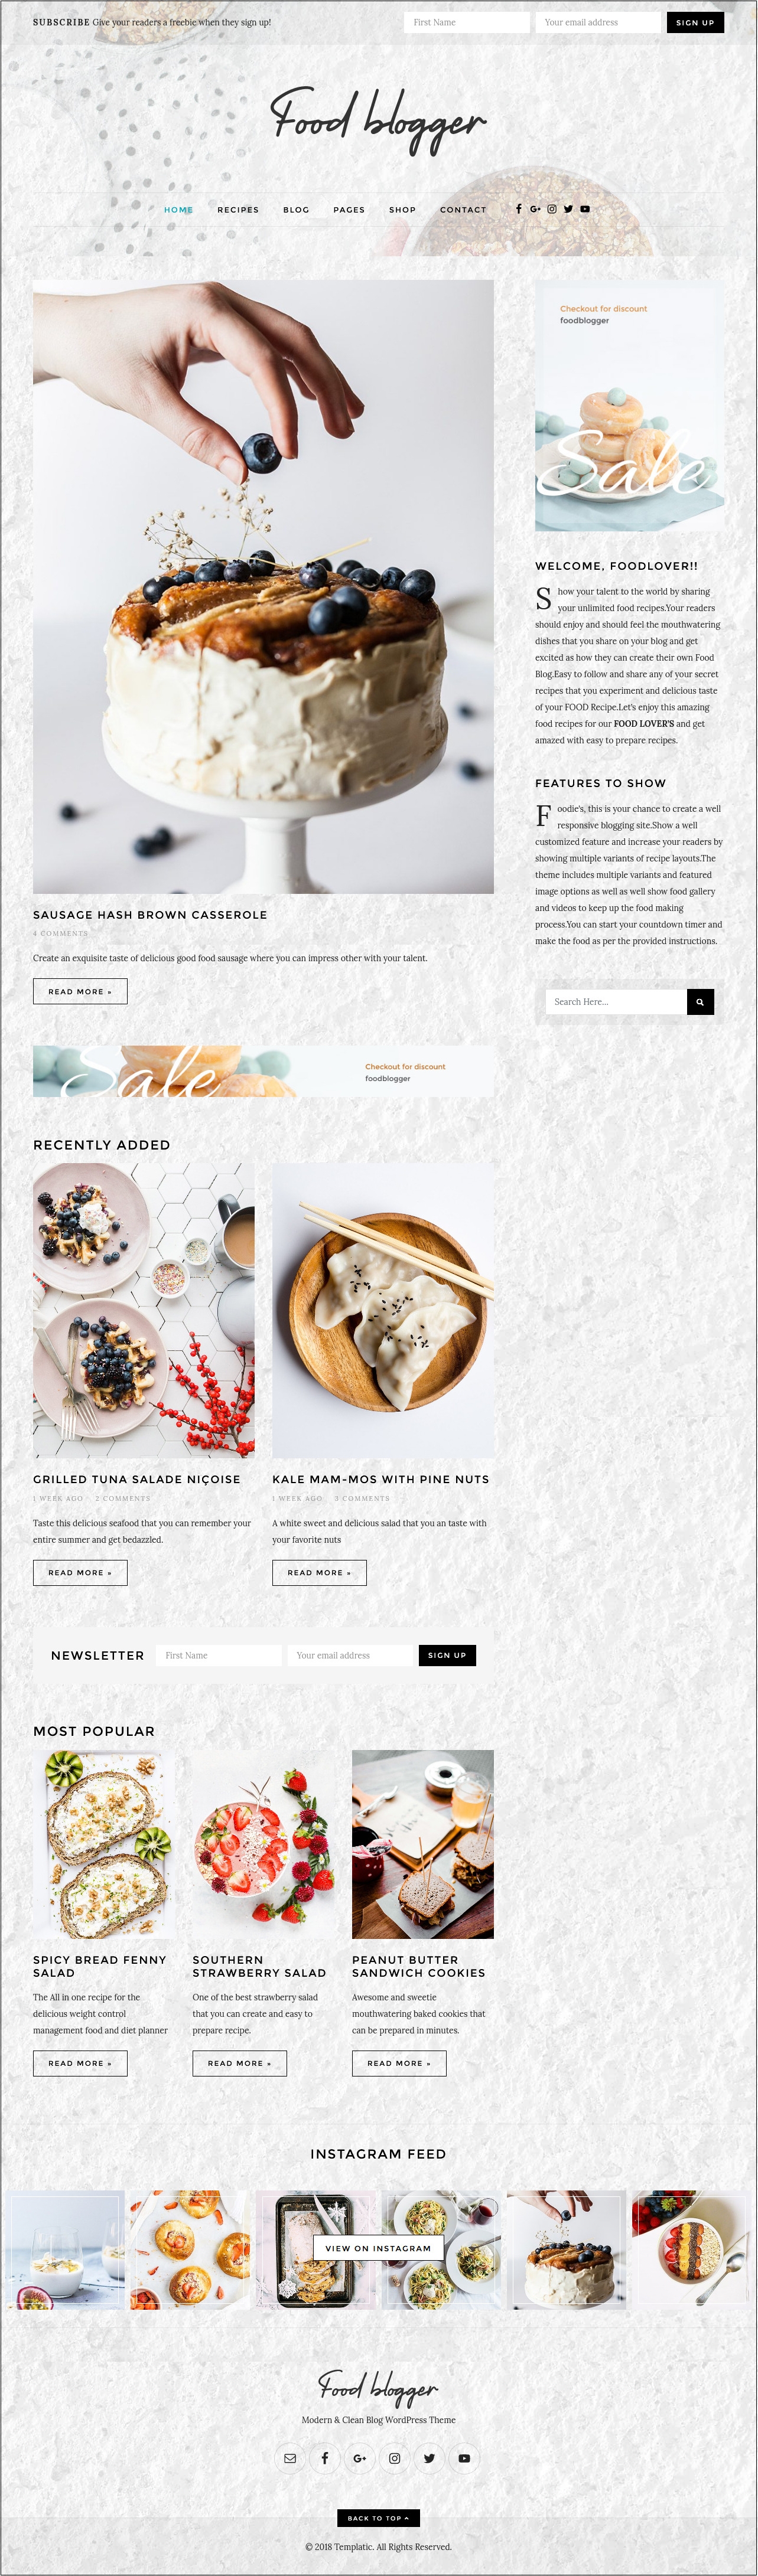
You can also set background to your website using the background image option.

Your site with an image background will look something like this.
Woo Commerce Compatibility and configuration
In order to sell your food online you can also configure Woo Commerce plugin. The plugin is fully compatible with the FoodBlogger theme.
You can create a shop page for your FoodBlogger site.
For more detail about elementor plugin and it’s use you may refer this guide