Installation
- Download the plugin from the Directory ⇨ Directory Extensions section of the Templatic member area.
- Navigate to wp-admin ⇨ Plugins ⇨ Add New ⇨ Upload. Use the “Browse” button to load the previously downloaded .zip file. Click on “Install Now” to confirm.
- Once the plugin is finished installing click on the “Activate” button.
By activating this plugin you have now enabled new options in your Dashboard ⇨ Tevolution ⇨ Manage Locations section.
Setting up the plugin
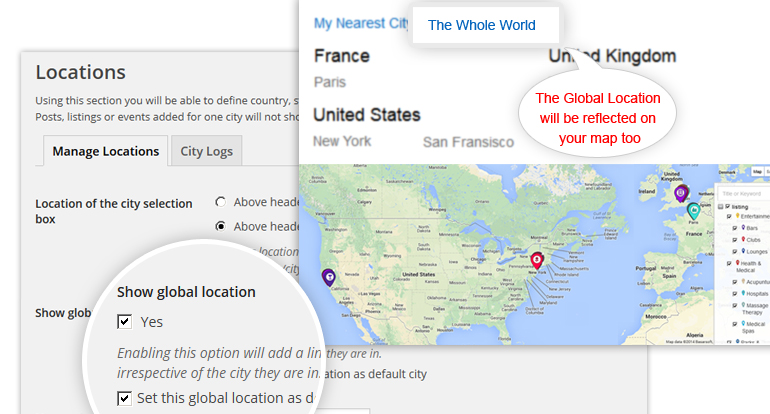
With the plugin installed, head over to Tevolution ⇨ Manage Locations and you will notice a new option named Show global location, enable that option and you will see three more relevant options pop up.
What these options will do?
- Show Global Location – Enabling this option will add a new link named Global Location in your city Selector, once you click on that link city-wise filtering will be disabled and you will be able to see listings from all the cities you have added on your site.
- Set this global location as default city – Enable this option if you want to show your home page with this Global Location selected(listings from all the cities) to the first time visitor of your website.
This will overwrite the default home page you have selected in the Homepage Displays option.
- Name of your global location – You can rename the link title(Global Location in front end) to any name which matches your requirement. For example if you are only displaying cities from US, you can add a name like All of United States.
- Description for your global location – Just like you add city description while adding a city you can add description of your global location which will be displayed in the city selector area.
Using the plugin (in the front-end)
Once you have set up the above mentioned options you will see a link in your city selector to go to your Global Location(which displays listings from all your cities). Once you click on that link you will see listings from all your cities on all the pages(Home page widgets, category pages, search results, etc.). Even the map will be changed to show all your cities automatically.
Frequently Asked Questions
How to set Global Location for homepage permanently?
If you are using this plugin then you might be aware about the fact that according to the default code of this plugin, once you will click on particular listing(s) the will be redirected to that city in which that particular listing(s) is added. Then, if you click again on the homepage OR logo on your site, it will show you the home page for that selected city now and not the Global Location as a result.
It actually happens with the system because of we are currently using a php session for the entire city selector mechanism associated with the location manager module. So, if we click on the home button or logo the system will hold the same city we have selected previously and resultant homepage will be displayed accordingly.
In this tutorial, we will show you How to set Global Location for homepage permanently, even after selection of any listings and visiting another page too. So, you can avoid that php session mechanism and can get the Global Location associated homepage all the time.
Generally, we have two places from where we can get redirected to the homepage again from any other page of the site by:
- Clicking LOGO
- Clicking the Home tab of menu(s).
So, here you will need to change the URLs of LOGO and the homepage links if placed into the menus (primary/secondary). Follow the steps given below to change both the URLs.
For “Clicking LOGO”:
As we know that once we click on the logo the site will be redirected to the homepage with the only domain name URL like this: http://www.mydomain.com
So we will need to change this URL manually by editing a file as follows:
Open a file named as header.php located into your wp-content/themes/yourtheme/ folder.
At around line number 157 you would find this one:
<a href="<?php echo home_url(); ?>/" title="<?php echo bloginfo( 'name' ); ?>" rel="Home">
Change it and make it like this:
<a href="<?php echo home_url(); ?>/city/global-location" title="<?php echo bloginfo( 'name' ); ?>" rel="Home">
For “Clicking the Home tab of menu(s)”:
By default after selecting a global location if you will click on any of the listing(s) you will be redirected to this kind of URL: http://mydomain/city/cityname/listings/listingdetailpage/
For example if the listing you are going to click is added into the New York City then the URL would be like this: http://mydomain/city/new-york/listing/asian-art-museum-3/
Now, if you will just select the Global location link from the city selector then you will get this URL for the global location as: http://mydomain/city/global-location/
So, you will need to use this custom URL as custom links for Homepage tab(s) into the custom menu that you have created from your back-end by this way.
That’s it 🙂
How to translate the plugin?
You can translate the plugin by using the language file located inside the /languages folder. For instructions on handling PO and POT files open the following article
https://templatic.com/docs/how-to-localize-templatics-wordpress-themes/