This part has many settings that looks small but quite important for your site. From here you can setup SSL certificate for some of the really vital pages, enable things like terms and conditions acceptance before actually checking out, enable coupon code box on checkout page, Set some fields as compulsory for registration page and login page content. Lets see them one by one,
First of all to do all the settings,
- Go to wp-admin -> Theme options -> General settings
- Switch to ‘Other settings’ tab

- Enable SSL – https for checkout process – Turning it on (selecting ‘yes’) makes your checkout page and procedure secure. To have this option in effect you must have SSL certificate configured on your server.
- Enable SSL – https for Login process – It works the same as said above but for the Login page and its process. The same condition is applicable here too of SSL certificate configuration on server.
- Enable Auto login after successful Registration – When it is selected as ‘Yes’, it redirects the user to his account page (appended with
?ptype=myaccountin URL) as soon as user registers with your website. - Display Number of Orders on Admin Dashboard – Whatever number you specify here, those orders will be visible on your admin dashboard at back-end i.e. at wp-admin -> Dashboard. By default it will show a widget “Latest Order List” there but if you do not find it then turn it on from the Screen options given at the top right corner.
- Display Coupon code on checkout page – When selected ‘yes’ it shows a box to apply coupon code for discount on your checkout page.
- Display Term and Conditions – When selected ‘yes’ it shows a check box that says to accept terms and conditions compulsorily before checking out. A box is given just below that which allows you to write your message for this check box and using html tags like anchor tag (<a>) you can also link your terms and conditions page there.( e.g. Accept <a href=”http://example.com/terms”>Terms and Conditions</a>)
How to select “Mandatory Fields” in registration page ?

There at ‘other settings’ part, is another option “Registration Page Mandatory Fields”. Select the fields that you want to make mandatory while registering with you. It will have an effect on your registration page.
How to change the “Login page” top content ?
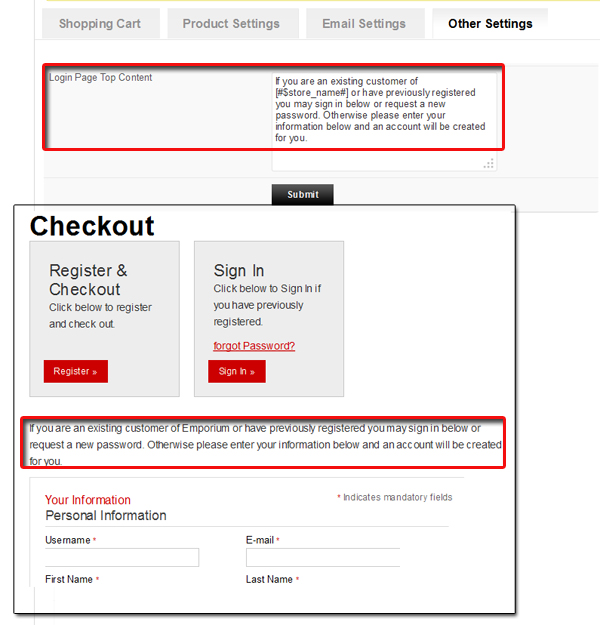
Content written in the option ‘Login Page Top Content’ gets display on the Registration & checkout page at the top, you can write and save your own content here.
To place the Registration and Login page on your site you can do any of these two things ,
- Either you can place the widget T – Login Information at the suitable widget area from wp-admin -> Appearance -> Widgets. (Generally header widget areas are most suitable)
- Or you can append this
?ptype=logininto your site URL and place this link any of your navigation menu clicking which site visitors can be redirected to it.