Quick tip: There are many questions answered in to the Directory guide you may have. Have a look at it.
Installation
- Download the plugin from Templatic member area. You’ll find it inside the “Directory Extensions” sub-section.
- Navigate to wp-admin ⇨ Plugins ⇨ Add New ⇨ Upload. Use the “Browse” button to load the previously downloaded .zip file. Click on “Install Now” to confirm.
- Once the plugin is finished installing click on the “Activate” button.
Load sample data
As soon as you active the Real Estate add-on a new post type will be created on your site – Property. If you want to load a few sample properties to get you started more quickly just follow these steps:
- Download another copy of the Real Estate plugin from member area and extract it. Use software like WinRar, WinZip or 7Zip.
- Go to Tools ⇨ Import and click on WordPress. Proceed with the WordPress Importer installation. Once it’s done, click on the “Browse” button.
- Open the plugin folder you extracted in step 1 and load the property-dummy-data.xml file. It’s inside the root folder of the plugin.
Sample Widgets Set up
Want to have the properties widgets to be configured like demo? If yes, then below are some widgets required to place in to the wp-admin ⇨ Apperance ⇨ widgets section. Below is the list of the widgets and its suitable areas. After you place the widgets as specified, it will almost look like demos:
Home Page:
T ⇨ Property Search: Homepage Banner area.
T ⇨ Homepage Display Properties:Homepage – Main Content area. Check the List view and Grid View options in to the widget settings.
Property Category Page(Demo):
Category pages (as the one screenshoted below) are generated automatically as soon as you create a category from Properties ⇨ Property Categories. For more details on how to edit each of the category page components check out this guide.
Map: To have the map in category page like demo site, place widget “T ⇨ Category Page Map – multicity” or “T ⇨ Category Page Map – single city” into the widget area “Properties Category Pages – Below Header”. To have the map in top, the “Map view” option is required to disabled into the Tevolution -> Map Settings.
T ⇨ Property Filters: The most important widget inside this area is “T – Property Filters”. This widget will allow visitors to filter through displayed properties in real time. You can edit the fields that appear inside the widget by going to Tevolution ⇨ Custom Fields Setup.
For instance, to add more options inside the “Property Status” area, edit the “Property Status” custom field. Add new options by editing “Option Title” and “Option Values”.
Property Detail page(Demo):
The property detail page is what you get after opening an individual property (created from Properties ⇨ Add Property). For more info on each element within that page read here.
The Tevoltuion-RealEstate plugin specific things are explained here too:
Go to “Properties Detail Page Sidebar” area. Place below widgets there.
T ⇨Property‘s Agents Detail: This widget displays the information about current property’s author. The information displayed in this widget is coming from the author’s profile. Visitors can send inquiry too via contact form.
T ⇨ Finance Calculator: It simply calculates the monthly payments on the loan amount.
T ⇨ Advertisements: You can place your advertisement code here in this widget.
Categories: It will list the categories of your site. Choose “Property Category” option in “Taxonomy” field and save the widget.
Add a property
Add properties from the back-end
To add a property go to wp-admin ⇨ Properties ⇨ Add Property. Inside the “Add Property” screen that opens you should enter the property title, description and populate the fields listed under “Properties Information” section. You can control which fields show inside this area from Tevolution ⇨ Custom Fields Setup. For more details on that section open the Tevolution guide.
Below the “Property Information” area you should see available price packages. To create and manage your price packages navigate to Tevolution ⇨ Monetization.
For more information on property detail pages open the “Manage Pages ⇨ Detail page” section of this guide
Add properties from the front-end
Front-end submission is done using the “Submit Property” form. A page containing this form should have been created when you activated the plugin, you’ll find it from wp-admin ⇨ Pages. The URL of that page will be something like www.your-domain.com/submit-property. In case you deleted this page (or it was never created), go to Pages -> Add New, insert the below shortcode, set a title and publish the page:
[submit_form post_type='property']
Now that the page is created, both you (the admin) and your visitors can use it to submit content. Similar to the back-end submit section, most of the input fields available inside the form can be modified from the Tevolution ⇨ Custom Fields Setup section. You can also use that section to add new fields. To modify the “Select a package” section of the submission form, navigate to Tevolution ⇨ Monetization section.
How and where to moderate user submitted properties?
Once users submit properties, the will show up inside the Properties ⇨ Properties section. From there you can draft, publish or edit them. Another place from where you can manage them is Tevolution ⇨ Transactions. Use that section to bulk-confirm or bulk-deny transactions/listings.
To set the default status for submitted properties (publish/draft) head over to Tevolution ⇨ General Settings ⇨ Submission page settings ⇨ Default status for free/paid submissions
Manage pages
Property detail page
The property detail page is what you get after opening an individual property (created from Properties ⇨ Add Property). For more info on each element within that page check out the image below.
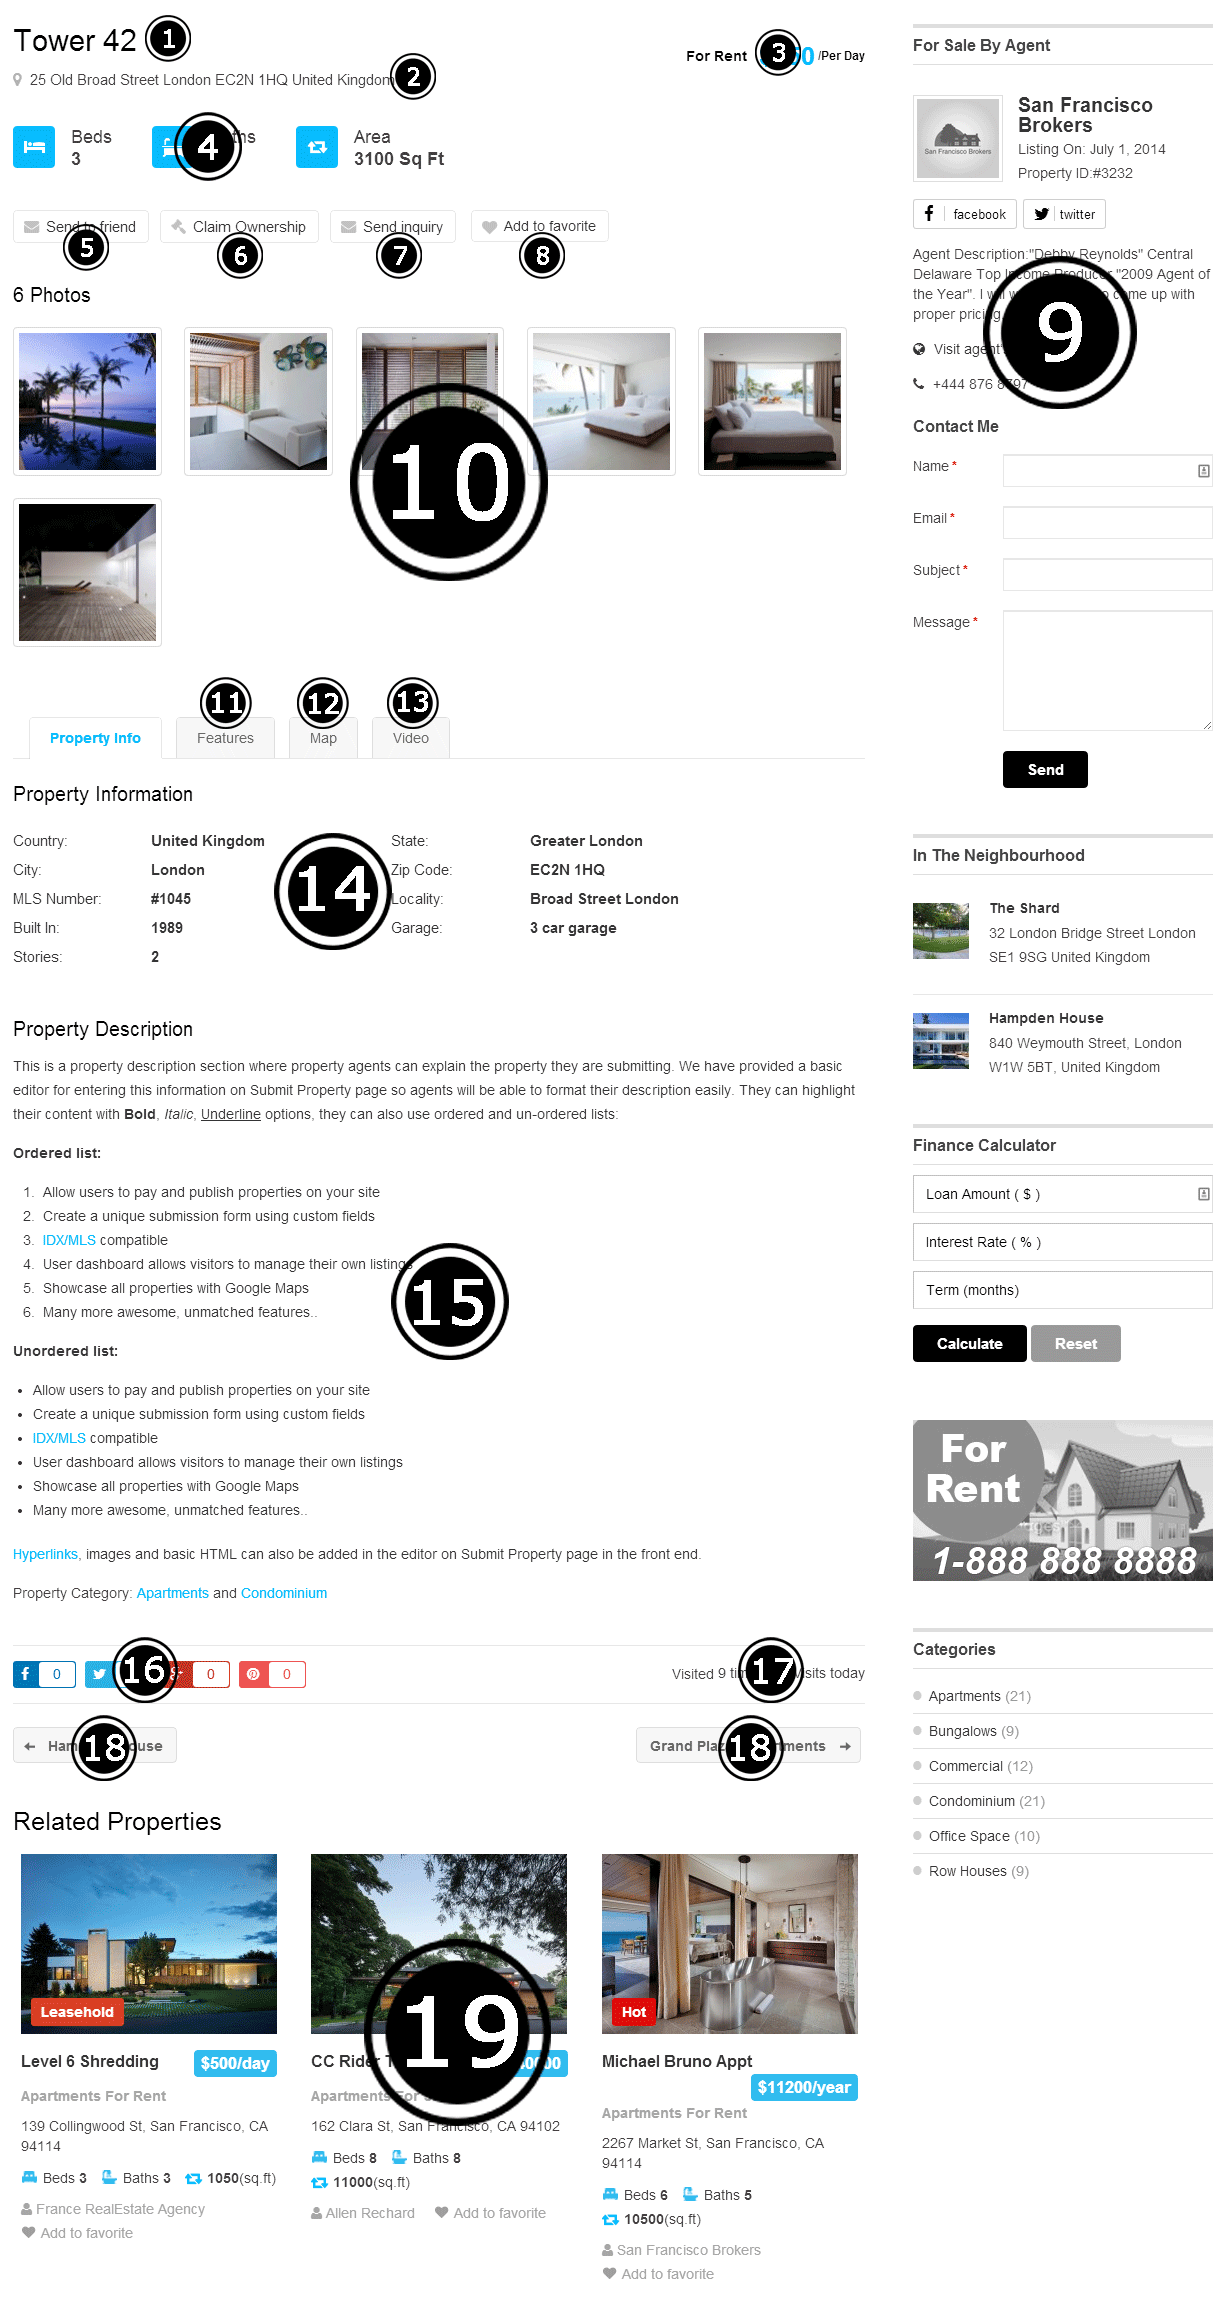
1 – Property title
This is the first bit of information you enter when creating properties from both the front-end and back-end.
2 – Property address
The information shown here corresponds with the value entered inside the “Address” field when submitting a property. The address field is available for editing from Tevolution ⇨ Custom Fields Setup section.
3 – Property price
The information shown here corresponds with the value entered inside the “Price” field when submitting a property.
Note: Enter whole numbers when defining prices. The plugin will add thousand and decimal separators automatically.
4 – Highlighted fields
Adding/editing fields in this area is possible only by customizing the plugin code. To edit that area use the following action and function
http://snippi.com/s/ie8ilhk
If you want to remove that whole section add this to Appearance ⇨ Custom CSS Editor
body.singular-property .entry-header-custom-wrap {
display: none;
}
5 – Send to friend form
This contact form allows visitors to quickly email a friend about the property (by sending the link). If you want to disable the form, do so from Tevolution ⇨ Email Settings ⇨ Enable additional forms.
6 – Claim ownership form
The main purpose of this feature is to allow visitors to claim listings on your site as their own. This is particularly useful in the early days of the site since you (the admin) will most likely add a lot of content yourself in order to make the directory appear bigger. The Claim Ownership feature will make it easier to transfer that listing to the rightful owner when he/she requests control over it.
Setting up/activating Claim Ownership
- Go to wp-admin ⇨ Tevolution ⇨ Overview and activate the Claim Post Manager module.
- Navigate to Tevolution ⇨ General Settings ⇨ Claim ownership settings and select the post types for which you want to enable Claim Ownership.
Quick note: The “Claim Ownership” button (inside a listing detail page) will not show to the listing owner. If you’re testing the functionality make sure you’re not logged in as admin.
Processing a claim
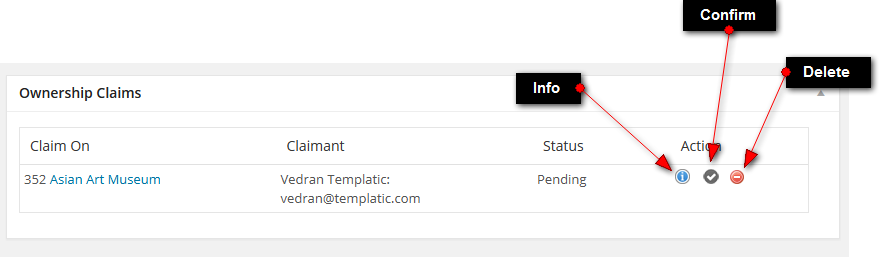
Once a visitor fills in the information requested by the Claim Ownership form the rest is up to you. Here are the steps…
- Go to wp-admin ⇨ Dashboard. Focus on the “Ownership Claims” widget. If you can’t see it, make sure the Claim Ownership module is enabled from Tevolution ⇨ Overview. You can also check the “Screen Options” button (top right corner) and see if it’s enabled there.
- Review the claim (click on the info icon) and choose the appropriate action by either confirming or deleting the claim

- If you confirm the claim, proceed with locating the new owners account. To do that, navigate to wp-admin ⇨ Users.
- Use the search function to look for a user with the email address mentioned inside the claim. If you get a hit, remember that username. If you don’t, add a new user by going to Users ⇨ Add New. Use the same email address that was mentioned inside the claim.
Important: While creating/editing the user set the role to “Contributor”.
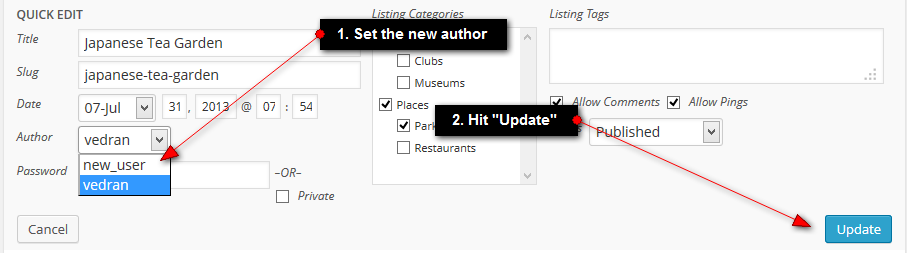
- Assign the listing to a user by going to wp-admin ⇨ Listings. Click on the “Quick Edit” button that appears while hovering over listings and edit the “Author” dropdown. Screenshot.
- Optional: Go back to the Users section and set the role back to “Subscriber”. To learn more about the differences between each role open this codex entry.
7 – Send Inquiry form
This form allows visitors to get in touch with the property owner, i.e. the person who submitted the property to the site. The same thing can be achieved by using the contact widget displayed at the top of the sidebar.
The send inquiry form can be disabled from Tevolution ⇨ Email Settings ⇨ Enable additional forms.
8 – Add to favorites button
The favorites button allows website visitors to save specific properties for later viewing. Once saved (favorited), the property will become available inside the visitors front-end profile, under the “My Favorites” tab. Screenshot.
9 – Property detail page sidebar
To edit this area go to Appearance ⇨ Widgets and place widgets inside the “Property Detail Page Sidebar” area. The widgets used inside the image above are:
- T – Property’s Agents Details
- T – In The Neighborhood
- T – Finance Calculator
- T – Advertisements
- T – Browse by Categories
How to customize the Property’s Agents Details widget?
This widget can be customized by unregistering and then registering again the TmplPropertyAgentDetails widget located inside \wp-content\plugins\Tevolution-RealEstate\functions\widgets.php around line 2130.
Here’s a small plugin containing several tweaks for the Property Agents widget. Once installed (from Plugins ⇨ Add New ⇨ Upload) the plugin will change the following:
- Remove the “Subject” field from the agent contact form.
- Change the subject inside the email notification to “Inquiry for: [post_title]”.
- Send a copy of every inquiry to the admin (i.e. the email set in Settings ⇨ General).
- Include a link to the property inside the email notification.
10 – Property images
Here displayed are the images assigned to the property while submitting it. Images can be added (from the back-end) by using the “Image Gallery” section inside the right sidebar. Please note that you need to upload new images in order to add them to the gallery.
11 – Features tab
The contents of the “Features” tab match up with the information added to the “Additional features” custom field while submitting a property. The field can be modified or disabled from Tevolution ⇨ Custom Fields Setup.
Quick note: To add other custom fields as tabs check out the Tabs Manager add-on.
12 – Map tab
The map tab shows a map of the location entered inside the “Address” field. The directions should be displayed inside the same language as your browser. Default language is English.
13 – Video tab
This tab will display a video under condition that the “Video” field is not empty. To edit/remove the tab, just edit the “Video” field inside Tevolution ⇨ Custom Fields Setup.
14 – Property information section
This is the main area in which the values assigned to your custom fields are displayed. The area will display both old (pre-loaded) fields and the new ones that you created. To edit field labels or even remove whole fields, use the Tevolution ⇨ Custom Fields Setup section.
Quick note: To hide a value from the detail page (but still keep the field active) uncheck the “Detail page” option inside the “Show the field in” area.
15 – The content
This is the primary description (content area) of your property. Feel free to use HTML and CSS to style the text. There are even plugins that allow you to execute PHP.
16 – Social sharing buttons
Website visitors will be able to use these buttons to share properties on Facebook, Twitter and other networks. You can enable/disable individual options from Tevolution ⇨ General Settings ⇨ Detail page settings ⇨ Show sharing options for.
17 – View counters
View counters show how many times that page has been opened today and all time. They can be disabled from Tevolution ⇨ General Settings ⇨ Detail page settings ⇨ Show view counter
18 – Next/Previous property buttons
These buttons allow visitors to quickly navigate to the next property within the same category as the one being displayed. If you don’t need these, hide them by adding the following code to Appearance ⇨ Custom CSS Editor.
.singular .pos_navigation {
margin-bottom: 0px !important;
visibility: hidden;
}
19 – Related properties
This section shows properties from the same category (or tag) as the one currently displayed. For editing related properties settings navigate to Tevolution ⇨ General Settings ⇨ Detail page settings. First 4 options within that section are dedicated to “related properties” section.
To edit that section of the plugin use the following action and function
http://snippi.com/s/qqnsdl9
Agent profile/dashboard page
This is the page that opens when you visit your own profile within the theme. Each users profile page can be accessed from a URL like this one: your-domain.com/author/the_username. Another way to access it is by clicking on your username inside the top navigation bar.
From the dashboard page all website users can manage their submitted properties, favorites and of course their own profile. The best part of the dashboard page is that you can control exactly which info appears there. Go to Tevolution ⇨ Profile Fields Setup to edit existing profile fields or add new ones.
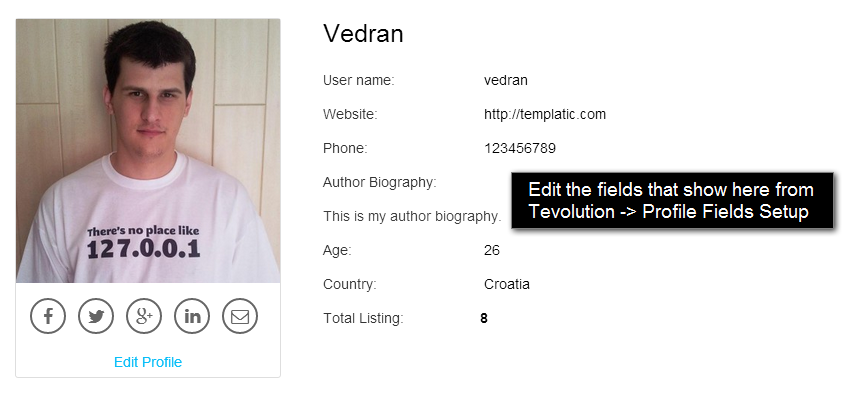
Note: When creating a new profile field make sure to check-mark “User dashboard page” within the “Show the field in” option. If you don’t, the value won’t show inside the user dashboard page.
How to edit my profile?
Each user can edit their profile from this URL: your-domain.com/profile. A link to this page is also provided underneath the avatar inside the author/dashboard page. To modify the profile page, go to Pages ⇨ Add New and edit the “Profile” page. The profile page is a regular WordPress page with a shortcode that generates the profile fields. This allows you to easily add new content inside the page (above or below the profile fields) or to change its title or slug.
If you accidentally deleted the profile page, re-create it by following these steps:
- Go to Pages ⇨ Add New and create a new page. Enter whichever title you want.
- Insert the following shortcode as the content for that page
[tevolution_profile]
- Go to Tevolution ⇨ General Settings ⇨ Registration options and choose the page you just created within the dropdown for the “Profile Page” option.
How to edit profiles from other users?
As the admin, you can edit profiles from all members by going to the wp-admin ⇨ Users section.
How to create an “Agents” page as seen on the demo?
This is the page in question. It has been automatically created when you installed the theme. You’ll find it inside the wp-admin ⇨ Pages section.
If you accidentally deleted the agents page, re-create it by following these steps:
- Go to Pages ⇨ Add New and create a new page. Enter whichever title you want.
- Insert the following shortcode as the content for that page
[tevolution_author_list role='subscriber' users_per_page='8'][/tevolution_author_list]
Advanced settings and features
MLS/IDX compatibility
The Real Estate add-on offers IDX/MLS compatibility through the dsIDXpress plugin. Once installed, the plugin will provide access to a IDX widget you can use to display properties from your MLS. I recommend placing this widget inside the Homepage sidebar.
Please note that properties pulled through the IDX system are separate from those within your database. Because of that there are certain limitations
- Visitors won’t be able to use the search functionality to find IDX properties.
- IDX properties can’t be categorized (displayed inside category pages)
- IDX properties can’t be displayed by the “Homepage Display Properties” widget. They can only be displayed by the dsIDXpress widget.
Using property statuses (tags)
Property statuses are essentially tags displayed on top of properties (within the thumbnail area) on your homepage and category pages. The theme allows you to customize both the tag name and color. Here’s how tags look on our demo
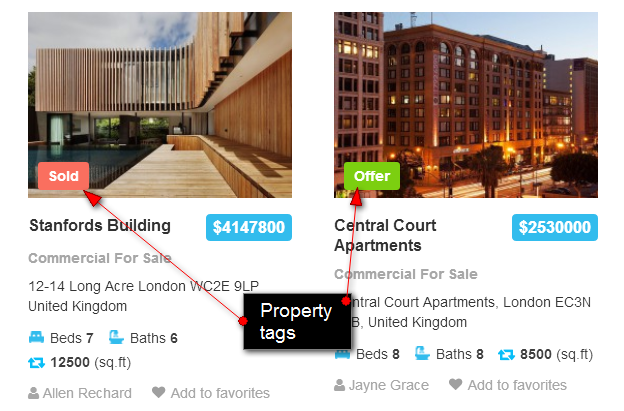
To edit existing tags navigate to Tevolution ⇨ Custom Fields Setup and modify the Property Status field. Change values within the “Option Title” and “Option Values” text boxes. Add new statuses by continuing the array, i.e. separate new values with commas.
The values you set within the Property Status custom field are the status names that will show inside areas like the Property Filters sidebar widget. To edit the name and color of the actual tag (like “Sold” and “Offer”) go to Tevolution ⇨ General Settings ⇨ Category page settings ⇨ Set the title and colors for property status tags.
Frequently Asked Questions
How to translate the plugin?
You can translate the plugin by using the language file located inside the /languages folder. For instructions on handling PO and POT files open the following article
https://templatic.com/docs/how-to-localize-templatics-wordpress-themes/
How to send a copy of inquiries submitted using the “Property’s Agents Details” widget to the admin?
You can do that by installing a small plugin provided here.
How to change square feet (sq ft) to meters (m)?
You can do this by translating the language file. Here’s is the full location to that file: /wp-content/plugins/Directory-RealEstate/languages/en_US.po. Within that file translate the Sq Ft and sq.ft strings. For details on how to translate that file open our localization tutorial.
How to add custom fields to the homepage search widget?
You can do that by going to Tevolution ⇨ Custom Fields Setup ⇨ Add a custom field. To make a custom field show inside the homepage search section make sure to checkmark “Property Search Widget” inside the “Show the field in” option.
How to setup the “Range” field?
A “Range” field allows you to define a minimum and maximum value. On the submission form authors will only be available to enter values that are between that maximum and minimum. Within the search form visitors will be able to select a range value using a nifty slider.
To set this up go to Tevolution ⇨ Custom Fields Setup ⇨ Add a custom field and select “Range Type” under the “Type” option. Then, in “Show the field in” checkmark “Property Search Widget” and then under “Show on search as” select “Range Slider”. Enter your min and max values within the “Define your range” boxes.
Can’t see changes made to custom fields?
By default the theme will cache custom fields. To disable caching go to Tevolution ⇨ Custom Fields Setup and click on the “Disable Cache” button at the top of the page.