Event manager plugin is specially made to create,manage and show your events on your site. It works on the base of powerful Tevolution plugin, so you must also read its guide to use this plugin to its optimum.
1) Install and activate Tevolution – Event – Manager plugin
Tevolution Event Manager plugin runs on the base of Tevolution plugin, so you need to have it installed and activated on your site to start using this plugin. Follow these steps to install and activate the plugin.
- Connect to member area and expand the Tevolution plugin section under Plugin Downloads and download it to your hard drive.
- Repeat the same download process for the plugin “Tevolution – Events” plugin.
- Then, connect to your WordPress dashboard (wp-admin) ⇨ Plugins ⇨ Add New. Click on the Upload, browse the plugin located at your hard drive and then click on Install Now button. (Upload both the plugins one by one)
- If you are using “Multi Site” means a network for your WordPress site, then go to Network Admin ⇨ Dashboard ⇨ Themes ⇨ Add New ⇨ Upload and browse Tevolution.zip file and Tevolution – Events.zip file (one by one) then click “Install Now” button.
- Now head over to wp-admin ⇨ Plugins and activate Tevolution plugin first and then Tevolution Event Manager plugin.
On activating Tevolution, it will ask you for the Licence key to use Tevolution. Here is how you can get your licence key.
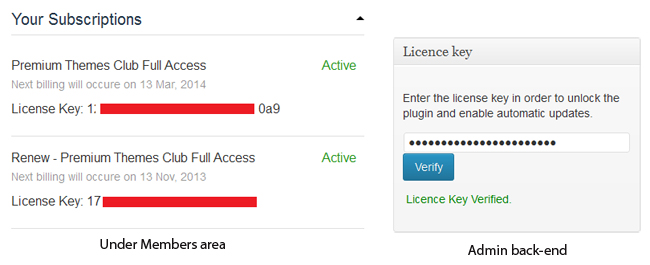
- Connect to your member area and get your licence key (simply copy it) for using the theme. You can locate it on your dashboard under “Your Subscriptions” area in your account.
- Then, go to wp-admin ⇨ Tevolution ⇨ Overview
- At the middle right of your screen, you will see a section called “Licence Key”, just paste your copied licence key here
- Click “Verify” button. On successful verification it will show you a green colored message “Licence Key Verified.”. If your key does not match then report us at help desk.
2) Purpose and flow of plugin
The main purpose of this plugin is to let you create events, show events, take events as an input from your users and charge them for posting events on your site. To achieve it, you will have to follow certain steps that will let you make an ideal event site,
- Create events using admin side and user side
- Show events on your site
- Charge users for posting their events on your site
- Setup the event-manage particular widgets on your site
Let’s go in detail that how will you achieve all these.
4) Event Settings
Go to wp-admin ⇨ Tevolution ⇨ Event Settings, there are 3 kinds of options available here as mentioned below,
Default Tab – Past/Current/Upcoming. These tabs use “Start Date” and “End Date” of each event to know that in which tab should these events be shown. These tabs will be shown on the listing page, which means all the events on your site will be listed in these tabs according to their start and end dates and so it will be your event listing page.
Attending events feature – The basic purpose of this feature is to show exactly how many people are attending a particular event and a button using which users can confirm the presence at the event. It gets display on the event detail page and is active by default.
NOTE: Attending event option remains visible for upcoming events only.
Select the people attending page – The main concept behind it is that it will let you show how many people are attending a particular event.
Show Facebook event on author page – When check marked, it will let your users show their Facebook events on their author page.
5) Setup the Tevolution Events particular widgets on your site
When you activate this plugin, 3 main widget areas get included into wp-admin ⇨ Appearance ⇨ Widgets
Total widgets that comes with the plugin (Here said widgets include both Tevolution and Tevolution – Events widgets)
- T – About Us – A simple widget where you can write about your self with just text or with html <tags> too.
- T – Advance Search – Shows a really advance form that helps you specify your search criteria deeply including Tags, start and end date of an event, author name (by whom event has been posted)
- T – Browse by Categories – Lists selected post/custom post total categories clicking which you can reach to that particular category page.
- T – Browse by Tags – Lists selected post/custom post total tags clicking which you can reach to that particular tag listing page.
- T – Event Calendar – Shows a calendar. Hovering on any date having event(s) organized will show a pop over with brief event details.
- T – Homepage Map – single city – Shows map containing the locations of all the categories of your selected post type on your home page.
- T – Category Page Map – single city – Shows map containing the locations of all listings in a particular category of your selected post type.
- T – Detail Page Map – You can show a detailed map of any event according to its address in the detail page of events as sidebar item. The type of map and address will be the same that you enter in event while adding it from back-end or with the help of submit page.
- T – Login Box – Show login form when not logged in and after login, shows links of Dashboard,Logout etc
A) Event Category Page Sidebar
This sidebar appears on the category page of your events.
Suitable Widgets:
- T – About Us
- T – Advance Search
- T – Browse by Categories
- T – Browse by Tags
- T – Event Calendar
B) Event Detail Page Sidebar
Widgets placed here will appear as sidebar items of an event detail page.
Suitable widget:
- T – Detail Page Map
- T – Event Calendar
- T – Advance Search
- T – Browse by Categories
- T – Browse by Tags
C) Event Add – Sidebar
This sidebar is called on the event submission form. It means that when user clicks on submit event page link, (s)he will be able to see the widgets placed in this widget area there.
Suitable Widgets:
- T – Browse by Categories
- T – Browse by Tags
- T – Login Box
- T- About Us
D) Event Tag Page Sidebar
On adding an event, you can also give a tag name to it which helps in searching a particular type of event easily and quickly. So, using T – Browse by Tag widget, you can click any of the tag and can reach on the Tag listing page (like any other category page). This sidebar will be called there means the widgets placed here will appear there.
- T – Advance Search
- T – Browse by Categories
- T – Browse by Tags
- T – About Us
E) Event Category Pages – Below Header
It basically appears below the header part of the event listing page i.e. between the secondary navigation menu area and the breadcrumbs
Suitable Widgets:
- T – Category Page Map – single city
What is “Past/Current/Upcoming events”?
Past/Current/Upcoming are different states of the event. It gives information whether the event is to be coming or is running currently or in past it was happened. The event changes the tab from Current-to-Past / Upcoming-to-Current depending on the Event’s start/end time and date.
For Example:
You have added an event with start date – 1st March 2015 10:00AM and End date – 3rd March 2015 18:00PM.
Until 1st march 2015 10:00, status of the event will remain “Upcoming”. That said the event will be displayed in to the “Upcoming” tab. From 1st march 2015 10:00 to 3rd march 2015 18:00 the status of event will remain “Current”. Once the event’s end date and time passes away, it goes to the Past tab.
Add Event
1) Create Events
- Adding an event is similar to adding a regular WordPress post. Simply go to wp-admin ⇨ Tevolution ⇨ Events
- Now create an event category (as many as you want). If you are going to make your site such that where you charge people on adding their own event on your site then you can set a price for your specific event category. This charge will get included into the price package selected by your user at the time of event submission.
- Then, staying in the same event section, click “Add an event” and start adding your event there. read below given Add an event fields section to know the meaning of each and every fields.
A) Add an Event fields
These are fields included by default when you activate Tevolution-Events. If you want to add/edit or delete any of these field then go to wp-admin ⇨ Tevolution ⇨ Custom Fields Setup and look for your field and click “Edit” option that appears on keeping mouse pointer on it (hover).
Tip: As there may be so many fields, to find out that you are editing the correct field, check the column “Show in post-type” to know which post type the field belongs to.
Event Information
- Google Map View – Whatever type you select for your map here that way it will appear on your event detail page of this particular event on your site.
- Address – To show where your event is getting organized on the map, enter the exact and accurate address and click “Set Address on Map” button to setup in on the map.
- Event Start Date – Select the date when your event begins from the date picker (kind of a calendar).
- Event End Date – Specify when your event ends using the same date picker.
- Start Time – Mention at what time your event will begin. Note: It only accepts 24 hrs time format so enter time accordingly (e.g. 16:00 for 4 pm). You cannot change its time format.
- End Time – Mention the end time of your event.
- Consider this event as – It shows basically 2 options as mentioned below. Regular means a non repeating event that occurs only once whereas Recurring means event that gets repeated on a regular time interval. So, you can decide in which category your event falls and choose accordingly.
- Regular event – It indicates that the event is non repeating one, so you just have to choose it and will show its listing and detail page with all information that you have added in it.
- Recurring event – It means that an event is going to be repeated on regular time interval, so it will display you some more fields like
- “Event will repeat” – specify your event will repeat daily, weekly, monthly or yearly
- “every” – Values for this option will keep on changing according to your selection in the above “Event will repeat” field. But on whole some, you have to be more specific that it will repeat every how many days/weeks/months/years
- lastly “Each event ends after” – Specify for how many days, your event will stay “ON”. e.g. If your event starts from 1st date of any month and lasts till 15th date of the same month then you can write 15 in this field.
NOTE: Moving this event to trash and restoring it again, will only restore the main event and not its recurrence. To add recurrence again, select the “Recurring event” option field and add the recurrence dates as per your need.
- How to Register – This is a simple text field. You can describe the process in few words that how people can register for your event.
- Registration Fees – If you want to charge some money on registration process then add amount along with currency symbol in this field.
- Video – To share your video, simply copy the embedded code of your video and paste it here. This video will appear on the detail page of your event.
Contact Information
Use this section to show your contact information on your event detail page.
- Phone – This number appears on the detail page of this event. So, enter the number on which you would like to be contacted.
- Email – The purpose is same as of phone number but here mention your email-Id.
- Website – If you have website, mention that too.
- Twitter – What’s your Twitter handle? Specify here, with this your target audience will be able to follow you there as well.
- Facebook – Share your Facebook account/page name to let your users find and follow you there.
- Google+ – Same goes for the Google plus. Share your Google+ Id with them.
Organizer Information
This section helps you make your users familiar with the organizer of an event and also when you want people to contact organizer about certain things of your event then this can be the best place to specify that. It will appear on the event detail page.
- Organizer Name – It is a simple text field to enter the name of an organizer of your particular event.
- Organizer Email – Specify organizer’s email Id.
- Select Logo – You can also upload business logo of your organizer here. There is no upload limits applied here but uploading a bigger size may break your site’s design. So, we would recommend to upload an image with having an ideal size ” “of pixels.
- Organizer Address – Mention the address of an organizer where (s)he can be contacted.
- Organizer Contact Info. – This is an extra field that lets you input some extra contact information about organizer like (Fax No., another mail Id etc)
- Organizer Website – Enter organizer’s website.
- Organizer Mobile – Specify the mobile number of an organizer where (s)he can be contacted.
- Short Description – Write down a short description about your event organizer that
Price Package
This section comes from the Tevolution ⇨ Monetize ⇨ Price Packages. By default, a package named “Free” gets created automatically to give you a demo that how a price package will look like! Read in detail, how to create it.
Now, this section (price package) appears on both user-end (front end) and admin-end (back-end). But is more practical when anyone (user) is posting an event on your site and selects the price package which he would like to pay and then you approve his/her event listing. But same can be done from the back-end as well when you are adding an event from Tevolution ⇨ Add an event.
So, if you haven’t created any price package, it will show you “Free” named price package and if you have created some more packages then it will be listed along with for the selection.
B) Where do these fields will appear
1) Front end
To post an event from front-end i.e. user side, you will need a submit page that shows a form using which you/user can post an event on your site. To create it follow these steps,
- Go to wp-admin ⇨ Pages ⇨ Add New (Note: check whether you have submit page for event by default? If not then create it using these steps)
- Copy this shortcode and paste it in your page.
[submit_form post_type='event']and publish it - Now, place this page on your site (front end) such that your users can easily see it and add their events. (Tip: Generally, navigation menu (wp-admin ⇨ Appearance ⇨ Menus) is the best place for it)
2) Back end
- Go to wp-admin ⇨ Tevolution ⇨ Add an Event
- Start adding your content and publish it.
C) How to customize their visibility?
You may want that some of the event custom fields should be visible to admin but not to user in the submission form. This can be done very easily,
- Just go to wp-admin ⇨ Tevolution ⇨ Custom Fields Setup
- Look for the field that you want to edit and click “Edit”.
- Go to Display Options ⇨ Display Location, it will show you 3 options in it that where you want this particular field to appear, select any of the options as per your need,
- Admin side (Backend Side) will show you this field only at the back-end at wp-admin ⇨ Tevolution ⇨ Add an Event
- User Side (Frontend Side) will show you this field only at front-end using event submit page.
- Both will show this field at back-end as well as front-end.
Read in detail, how to create custom fields?
D) Link your events
The mandatory requirement for using this feature is that you must be using Tevolution-Directory plugin along with this plugin. You can link your events to your listings in two ways, A) Using admin back-end and B) Your author users can link it from front-end as said below,
A) Using admin back-end
- When you have Tevolution-Directory plugin activated at your site, you will have a default post type “Listings” and at the time of adding/editing listings from back-end you will see an option “Events linked to this listing” at the middle right side of the screen at wp-admin ⇨ Tevolution ⇨ Add Listing
- Simply select the events (you must have events with you on your site to link) that you want to add with your listings and publish/update you listings
- On doing that, it will add another tab “Events” in the detail page of that particular listing and same will apply to linked events detail page, it will display the listing to which listing is linked.
B) Your author users can link it from front-end
- Using Tevolution shortcodes, you can create a register and login page using which anyone can become your registered user and can post listings/events on your site using another shortcode page ‘Submit Listing/events”
- Now being an admin go to wp-admin ⇨ Appearance ⇨ Widgets and place the widget “T – Add Related Event” widget into “Listing Add – Sidebar“
- Your authors (users that can post listings/events on your site) will be able to now link their posted events (and not anyone else) to their particular listings from their author page.
Note for both the ways:
- Author page gets created automatically once anyone registers with you. To locate it go to home page first and then add it at the end of the URL. e.g. http://directory.domain/author/username and to have it, make sure that your permalink is set to “Post name”.
- You can only link the events to listings and not the vice versa i.e. you cannot link your listings to an event.
2) Show Events
After creating events, it is now time to show events on your site. Events will be having two main pages “Listing Page” and “Detail Page”. Follow these steps for it,
- First of all, you require a navigation menu that helps users to navigate between the things
- Place those event categories which you created at the time of adding events in your navigation menu
- Now, go to wp-admin ⇨ Tevolution ⇨ Event Settings
- Select which tab you want to make visible by default in Default Tab – Past/Current/Upcoming. These tabs use “Start Date” and “End Date” of each event to know that in which tab should these events be shown. These tabs will be shown on the listing page, which means all the events on your site will be listed in these tabs according to their start and end dates and so it will be your event listing page.
- In the same section of Event Settings, there is another option named as People Attending Page. The main concept behind it is that it will let you show how many people are attending a particular event.
Create required event pages
1) Submit Page
Shortcode – [submit_form post_type='event']
Purpose – Being an admin you can always add your events from your site’s back-end but this submit page is required when you want to let your users add events on your page. Submit page is handled and controlled in Tevolution plugin using a shortcode as said above for creating submit page for various post types.
Steps to create it – Here is what you have to do for creating as well as using submit page,
- Go to wp-admin ⇨ Pages ⇨ Add New and add above said shortcode in it and publish it
- Now, place it on your site such that your users can easily find it to submit events with you. (Navigation bar is the most common place)
- This submit page will be having some default custom fields to take user input but you can modify them or add some more fields to your submit page as per your need from wp-admin ⇨; Tevolution ⇨ Custom Fields Setup
2) Event Calendar
Shortcode – [calendar_event]
Purpose – Using T – Event Calendar widget, when you click on any event date in the calendar, you will be redirected to this page and all the events organized on that particular date will be shown. If you directly view this page then it will just show you the current date events, neither past nor upcoming. (Tip: Use the here said widget in “Event Category Page Sidebar”)
Steps to create it – Here is what you have to do for creating as well as using submit page,
- Go to wp-admin ⇨ Pages ⇨ Add New and add above said shortcode in it and publish it
- Now, place the widget T – Event Calendar at “Event Category Page Sidebar” widget area.
3) Facebook event
For Admin:
Shortcode – [directory_facebook_event facebook_app_id=179915932173269 facebook_secret_id=35adb71dbace41277ca2032f6b81bfe0 facebook_page_id=588821274486155]
Purpose – It helps you (admin) to show a list of Facebook events on your site. Just create page and add the relevant Ids as required in the above shortcode and write them there after the “=(equal to)” sign.
Steps to create it – Here is what you have to do for creating as well as using this page,
- Go to wp-admin ⇨ Pages ⇨ Add New and add above said shortcode in it and publish it. (the keys shown above are dummy, you need to write your own Facebook event keys here)
- Now, place it on your site such that your users can easily find it. (Navigation bar is the most common place)
So, with this shortcode, being an admin you can create such Facebook event page from back-end.
For your users:
When you want your users to submit their Facebook events then simply activate the option “Enable Facebook events” in Event settings section at the back-end and it will display a separate Facebook tab in the author page where users can add their Facebook events Ids. These events will only be visible in their particular author page on your site.
4) Event Attending List
Shortcode – [event-user-attend-list]
Purpose – It helps you show a list of total people attending a particular event.
Steps to create it – Here is what you have to do for creating as well as using submit page,
- Go to wp-admin ⇨ Pages ⇨ Add New and add above said shortcode in it and publish it
- Now, place it on your site such that your users can easily find it to submit events with you. (Navigation bar is the most common place)
5) People Attending List
Shortcode – [event_attend_user_list]
Purpose – It shows you the list of total events that a particular person will be attending.
Steps to create it – Here is what you have to do for creating as well as using submit page,
- Go to wp-admin ⇨ Pages ⇨ Add New and add above said shortcode in it and publish it
- Now, place it on your site such that your users can easily find it to submit events with you. (Navigation bar is the most common place)
Monetize your events
1) Charge your users for posting an event on your site.
To charge your users for their event posting, follow these steps,
- Create price package from Tevolution ⇨ Monetize ⇨ Price Package
- Use payment gateways from Tevolution ⇨ Monetize ⇨ Payment Gateways
- Also can create category price which then gets included in the total amount of an event posting.
- Like mentioned in the above section, when you are creating a category for an event from wp-admin ⇨ Tevolution ⇨ Events ⇨ Event Category, add category price there. So, whenever anyone selects that particular category to post event in, Category price will be included in the total bill value.
Know more on it referring Tevolution guide.
8) Sell event tickets using WooCommerce
When you are organizing events, selling their tickets can be your requirement and so you can do it easily using our integrated feature with WooCommerce. Follow these steps for that,
- Download WooCommerce plugin and activate it
- Now, create a product called ticket (you can decide your product name) from wp-admin ⇨ Products ⇨ Add Product
- While adding products, under Product Data ⇨ General, enter your ticket price as per your need.
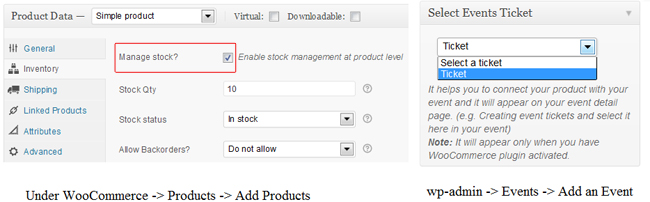
- Staying in the same product data section, click “Inventory” and check mark the option “Manage stock?” and add your stock quantity, it is compulsory and publish it.
- Now head over to wp-admin ⇨ Events ⇨ Add an Event
- While adding an event, you will have an option “Sell Events Ticket” on the middle right corner of the screen from where you can select your product (as created above) and publish your event.
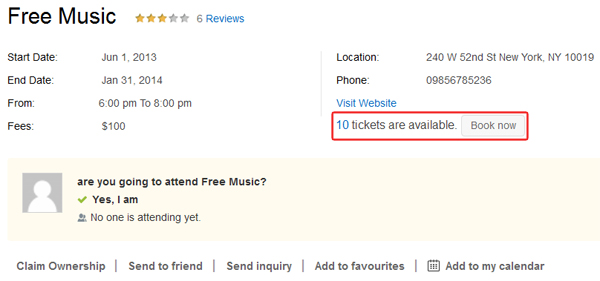
Where does it affect on front-end?
You can see it in the event detail page under the website link. When you click on book now button, it will redirect to the product detail page from where you can buy it.
Mange email and notification messages
1) Setup the email and notification content
Emails and notifications are managed under Tevolution and so you can edit the content there following these steps,
- Go to wp-admin – Tevolution ⇨ Email Settings
- Start editing the emails there.
You can easily find out that which email will be sent when seeing its subject line. Know more in detail that how to create it.
Localization
Translate strings of event manager plugin.
To translate it, you will need software like Poedit. Using Poedit you need to load en_US.po located inside your /languages folder and translate it. For detailed instructions on translating with Poedit open our localization tutorial. You can locate your (Tevolution-Event’s) .po file in your active WordPress directory at ..\wp-content\plugins\Tevolution-Events\languages.
Along with the included .po file, it is also WPML compatible. Once you purchase the plugin install it. Once installed, open the WPML documentation (will be provided after purchasing) and start translating. The actual translating process is no different than with any other WordPress theme.
How to set 12 hour Time format for event start time/end time custom fields?
- In order to switch the time format for both this default mandatory custom fields,
First, Go to your wp-admin ⇨ Tevolution ⇨ custom field ⇨ Edit both the custom fields individually.
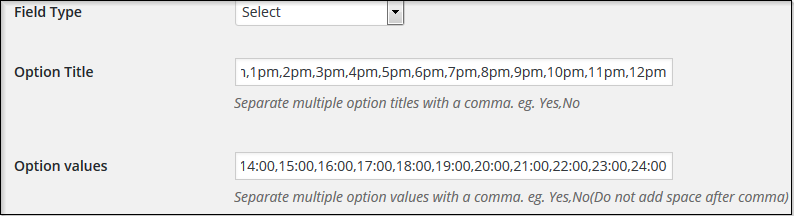
Switch the field type as select box. - Now under the option Values field, insert timing information along with your required format, for example you can set option titles as :
1am, 2am, 3am, 4am, 5am, 6am, 7am, 8am, 9am, 10am, 11am, 12am, 1pm, 2pm, 3pm, 4pm, 5pm, 6pm, 7pm, 8pm, 9pm, 10pm, 11pm, 12pm - And under the option title field, you have to keep 24 hours format.
i.e- 1:00, 2:00, 3:00, 4:00, 5:00, 6:00, 7:00, 8:00, 9:00, 10:00, 11:00, 12:00, 13:00, 14:00, 15:00, 16:00, 17:00, 18:00, 19:00, 20:00, 21:00, 22:00, 23:00, 24:00 and save changes. Refer the image below.
Any Queries? Contact us and we’ll help you out.