This add-on works with the base plugin Tevolution. So referring Tevolution guide will help you use this plugin to its optimum. Till now with Tevolution, you were able to make custom post type specific submit forms and charge for the different categories as well but with this plugin, the same thing has been extended further by letting you charge field wise in your price package.
To use it, you must have Tevolution activated on your site. Here are the quick and easy steps to install,activate and use this add-on.
1. Install and activate
- Connect to member area and expand the Tevolution Field Monetization plugin section under Plugin Downloads -> Plugin Downloads. Download the plugin to your hard drive.
- Connect to your WordPress dashboard (wp-admin) and navigate to Plugins -> Add New -> Upload (If you are using multi site then go to wp-admin -> Network admin -> Dashboard -> Plugins -> Add New -> Upload). Click on the Upload tab and use the Browse option to locate the Tevolution-FieldsMonetization zip file on your hard drive – then click on Install Now. After the installation process is finished activate the plugin.
If WordPress rejects to upload it, you can use FTP for that,
- Extract Tevolution-FieldsMonetization.zip then upload to /wp-content/Plugins directory
- Once uploading is done connect to the WordPress dashboard and activate the plugin
- If you run into more problems during installation please visit our Installation Guide
For detailed instructions on using FTP please click here
2. General Settings
After activating both Tevolution and Tevolution Field Monetization plugins, you will to have to do a setting to let this plugin start working with these steps,
- Go to wp-admin -> Tevolution -> Settings -> General Settings
- There under the section submission page settings, enable the option “Category specific fields” (Note: This one is mandatory otherwise your submit page will not work per category)
- Save all the changes
Also follow the captcha settings the way it has been mentioned in the important note in Tevolution guide to avoid any inconsistency.
3. Create custom post types and custom fields
Having your general settings done, here are the steps that are needed to be followed now,
- Create custom post types from wp-admin -> Tevolution -> Custom Post Types
- If you already have post types created then start adding custom fields from wp-admin -> Tevolution -> Custom Fields Setups for those post types, price package of which you are going to create.
4. Price Package
After enabling custom fields category wise,
- Go to wp-admin -> Tevolution -> Monetization -> Price packages
- There either edit your price package or add a new one according to your requirement
- Select the post type for which you want to apply the price package and accordingly it will display you its categories, select there also as per your need
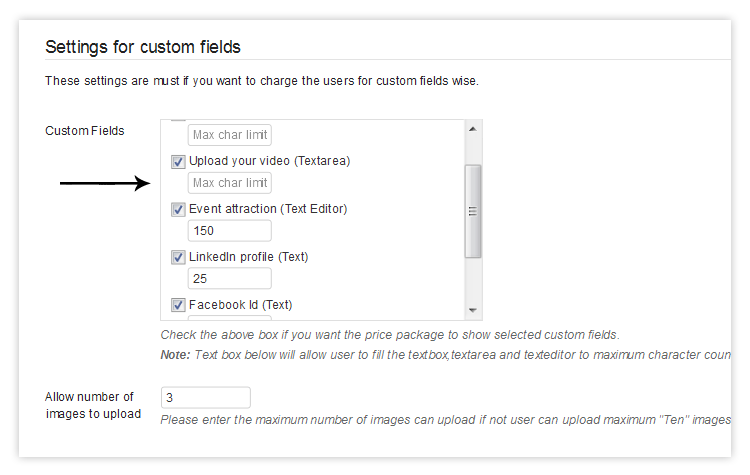
- Now, you will be having a section below the above said fields called “Settings for custom fields”
- There it will show you fields of the above selected categories along with the options of limiting those fields with the characters in it of text type
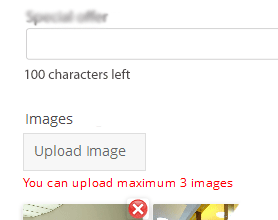
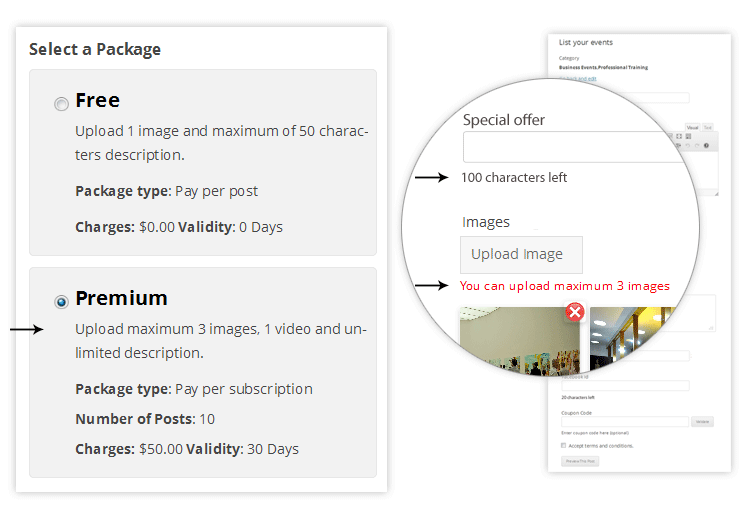
- Similarly, if your field is of image type then it will ask you to input number of maximum image as its limit. So, limit your fields like that and make your price packages accordingly
The field types where you can impose limitation are,
- Text
- Text Editor
- Textarea
Image upload Limitation:
- and there will be an additional option field asking you to limit to input maximum number of images that can be uploaded using particular price package.
- If you also want to change the upload file size of an image then go to wp-admin -> Tevolution -> General -> Submit Page Settings -> Maximum Image Upload Size
5. Create submit page with the special shortcode
After, limiting the fields for various price packages, to implement it on your site so that users can use it, you have to create a page using its special shortcode,
- Go to wp-admin -> Pages -> Create New
- paste this shortcode –
[submit_form post_type='your post type slug']there. (Note: change the part ‘your post type slug’ with the real post type slug(s) that you want to show on the page from where your users can select it)- For example – [submit_form post_type=’listing’]. With this, it will show listing post type’s submit page on your site.
- publish your page and place it on your site such that your users can use it
When you are using above said shortcode to create submit page you should not use the Tevolution generated submit page from back-end otherwise it will not work the way it should.
6. How does it look on front end
Performing all the settings and creating a submit page with its shortcode,
- It will show you all your price packages that you have created
- On selecting any of the price package, it will display its specific categories
- Category selection onwards, it will display a submit page based on the custom fields you created for that particular category along with its limitation.
A quick video tutorial just for you for better view for a live site
Please Note: These field character limitations and other settings that you did will be in effect only when you or your users are adding the listings using the submit form from front-end of your site. Adding from admin back-end will not have any effect of this.
Any Queries? Contact us and we’ll help you out.