Objective
This plugin will help you simply import Facebook events into your directory events. You can import public, published facebook events to your directory site in a single click. Here I am going to show you this amazing plugin is configured and get you started with it.
- To import events from a very commonly and often used social media i.e., Facebook.com which has been used globally to list many Events around the world. This so called plugin will allow you to fetch / Filter events from Facebook.com according to their Occurrence, City, Scheduling, and even by inserting their Id’s.
- This Plugin is to facilitate the directory site owner to import events in bulk which will drastically reduce hours and days of the time of manually adding the same events.
Advantages:
- Save hours and Days – Time Saviour
- Save manual hassle and human errors
- Bulk import facility.
Installation
- Download the plugin from Templatic member area. You’ll find it inside the “My Plugins” sub-section.
- Navigate to WP-admin ⇨ Plugins ⇨ Add New ⇨ Use the “Browse” button to load the previously downloaded .zip file. Click on “Install Now” to confirm.
- Once the plugin is finished installing, click on the “Activate” button in Plugin section of your Admin Panel.
Compatibility
This Plugin “Tevolution ImportFBEvents” is very much compatible to be used with Directory Platform based Plugin i.e., “Tevolution – Events“.
How to initialize
As soon as the plugin gets activated, page will be re-directed to “Tevolution -> Settings -> Facebook Event Settings” where it is required to establish a connection to your site with Facebook.com by fulfilling the fields below like: Facebook App ID, Facebook App Secret ID and Facebook Client Access Token under Configuration tab.
A qucik 5 minute process as how you can import Event from Facebook
How to create Facebook App id and App secret Id?
Follow the steps listed below:
- Access to your site backend Tevolution >> Settings >> FB Events Import Settings (tab) and enable the option of Facebook.
- You will see to insert App Id and Secret Key. Click on the link below the field and you will be redirected to Facebook Login page.
- Login to your Facebook account or create a new one.
- Open the Facebook Developers page. Allow developer access if you get prompted for that.
- Inside the top left corner click on + Add New App.
- Add your Display Name and Email that you want to show when users Login through Facebook.
- You will see multiple options and in that you need to select Facebook Login and click on the Set Up button.
- Choose the WEB option and add your site URL for the relevant field and save it.
- Go to Settings option and you need to Choose Basic Settings for your app.
- Choose Category as “Community & Government” and add your site URL in the App Domain field.
- You need to add the Privacy URL for your app to use the Facebook Login to work on your site.
- You will get the Privacy URL from this link Privacy Policy and follow the steps shown in the Video.
- After Creating the Privacy URL you need to copy the URL and paste it in your app and save the settings.
- Now to to the App Review Section and you need to enable the app PUBLIC.
- Next go to Facebook Login Settings and enable the option and your site URL and save the settings.
- Final Setup would be Go to Basic Settings and copy the AppID and Secret Key and paste it on your site backend.
How to create client access token?
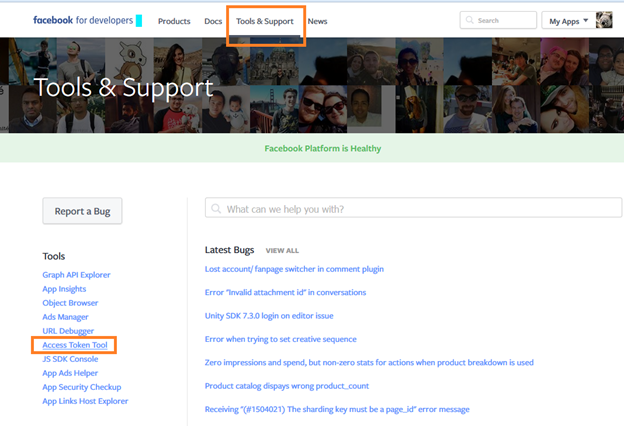
- Go to “https://developers.facebook.com”
- Click on “Tools & Support” link on menu.
- Left side menu click on “Access Token Tool” link.
Find your app id name, here my app name is: Testing app create
Click on Debug button. Now page is getting redirect to another page. If you are creating access token for the first time then it will be formatting you for the need to grant permissions to your app to get an access token, once you click on it u will prompted with the user access token, You need to extend the user access token by clicking on the debug button, there you can find the extended access token button.
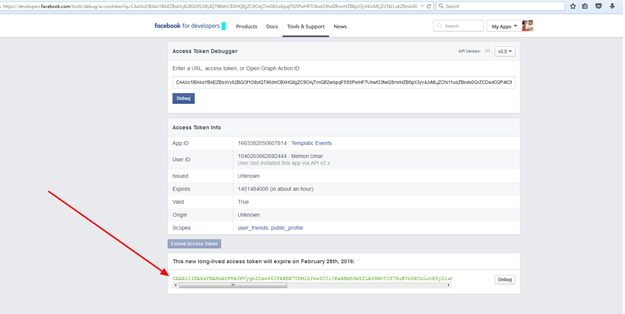
Click on “Extend Access Token” button. One pop up window will be shown. Enter your Facebook password and click submit button.
You will see a code. Copy that code and now go to “Tevolution -> Settings -> Facebook Event Settings” Click on this link “
Get User Access Token by providing the api, secret key and user access token” Go to the 9th step and paste your Access Token code, insert your app id and secret key. Click on Get my user access token button. You will get your access token code.
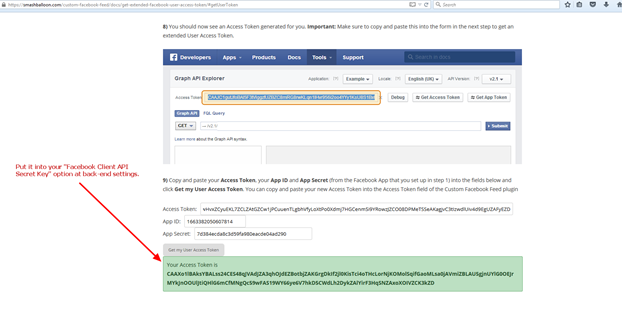
Copy that code and paste it over “Tevolution ->Fb events Import Settings-> Configuring with Facebook -> Facebook Client Access Token” Facebook Client Access token:
How it works?
-
There lies 3 filters in order to fetch Events. Please take all in account as follows:

-
By City Filter: This will help you Fetch / Search Events for that particular city which is desired to be searched in. As soon as the city filter is selected, there will include an additional filter for Date which will work in conjunction with city filter.
-
By Scheduler Filter: This will help you locate events which are based on time period and are going to be active after the selected schedule. Scheduler will include Hourly, Daily, Weekly and so on.
Example: If “Daily” is selected then, Scheduler filter will help you fetch the events which will be active after 24 hours time period. -
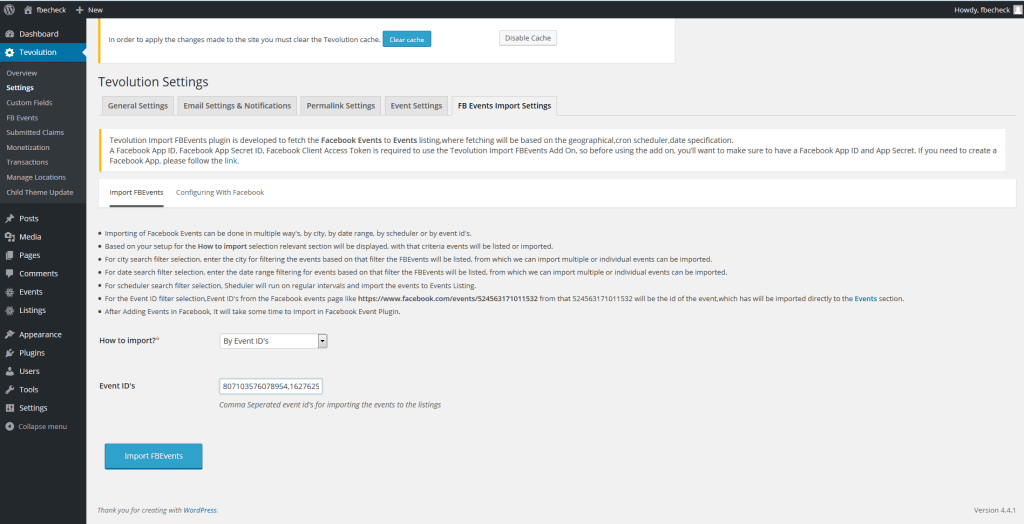
By Events Id’s: This plays an important role as well. This will help you import a particular event whose Id is known to you. This can be used to import more than 1 event at a time by adding many events id’s separated by comma.
Example : 785458964162123,841264752147415,895214785214625
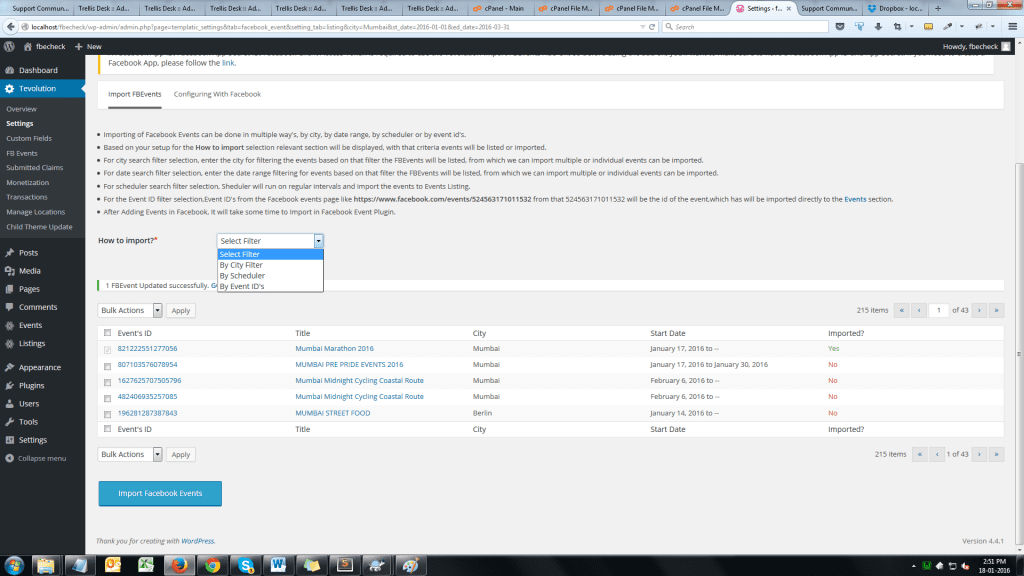
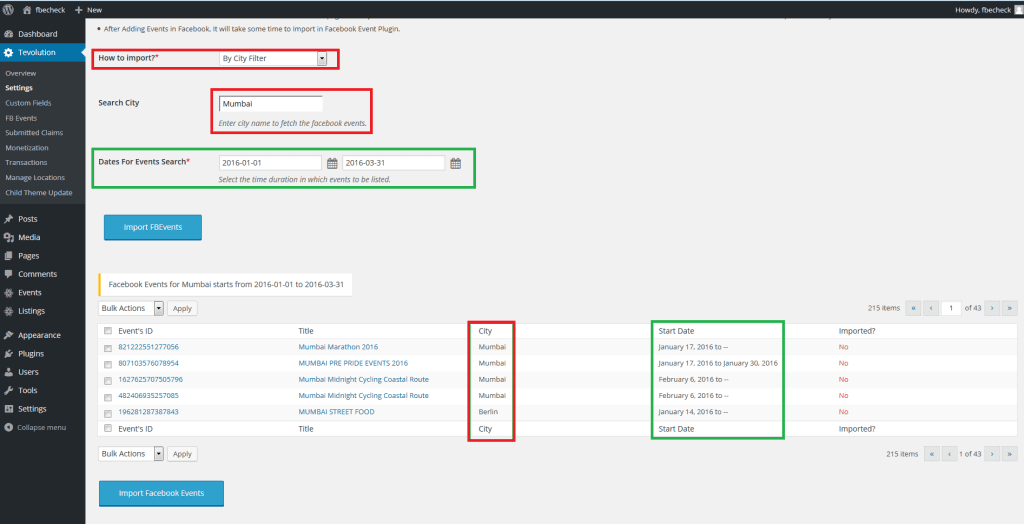
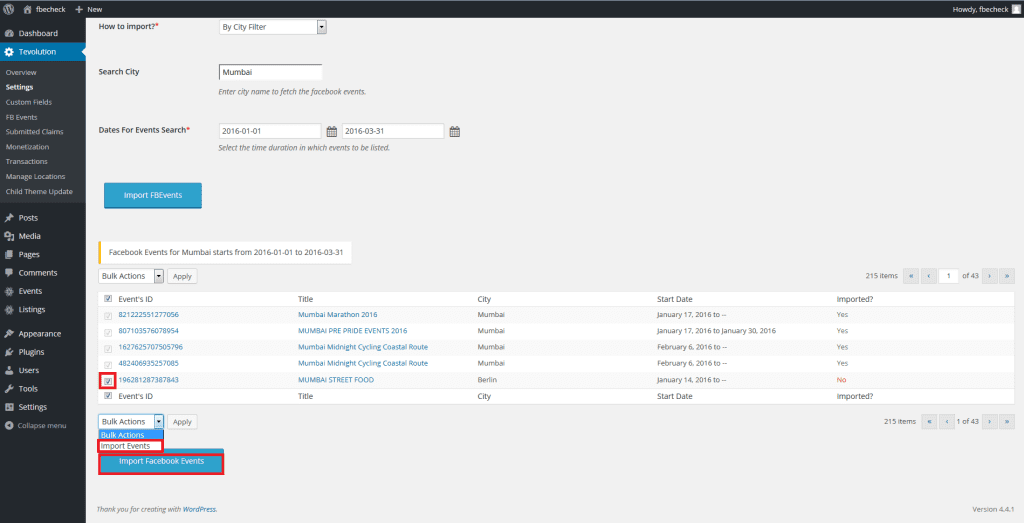
=>> After fetching / searching for the events using particular filter say by City filter, please enable the check-box of the events you desire to import and then, please click on Bulk action to get the drop down. In there, select import events and then click Import facebook event button in blue.
Please refer the captured screenshot to understand it well:
A clause: Please make a note that facebook events will be filtered only after 24 hours of their creation.
Once the events are fetched using one of the above filters, the next step will allow you import the events those you are in need.
All you will be required to do is enable the check-boxes for the one need to be imported and then click on Import.
Proceed to the Event section of your Admin Panel and there you will find all the events of facebook whichever you desired to import.