Please ensure that you are running WordPress 3.0 or higher
Let’s take a look at the theme setup and various configurations of Article Directory Theme.
Install and Activate
Upload ArticleDirectory theme to wp-content/themes directory and then activate the theme from your WordPress Admin panel > Appearance > Themes page.
Note: For a detailed explanation on how to install templatic themes, please click here
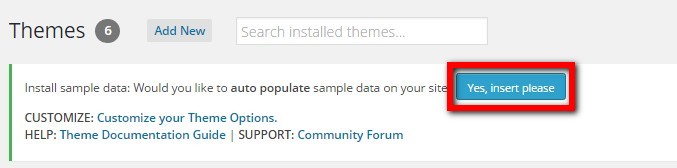
How to install sample data
Go to Themes and click on “Yes Insert Sample Data” to insert the sample, as shown in the live demo.
If you wish to delete the dummy data that we populated in your site then you can remove it by clicking “Yes Delete Please!”
Note: If you deleted this sample data and if in future you again want it, just go to Themes and click on “Yes Insert Sample Data”. Also don’t delete the sample data, if you have edited it and inserted your new data, or else you’ll loose your inserted data also.
Home Page settings:
Now lets configure the Homepage.
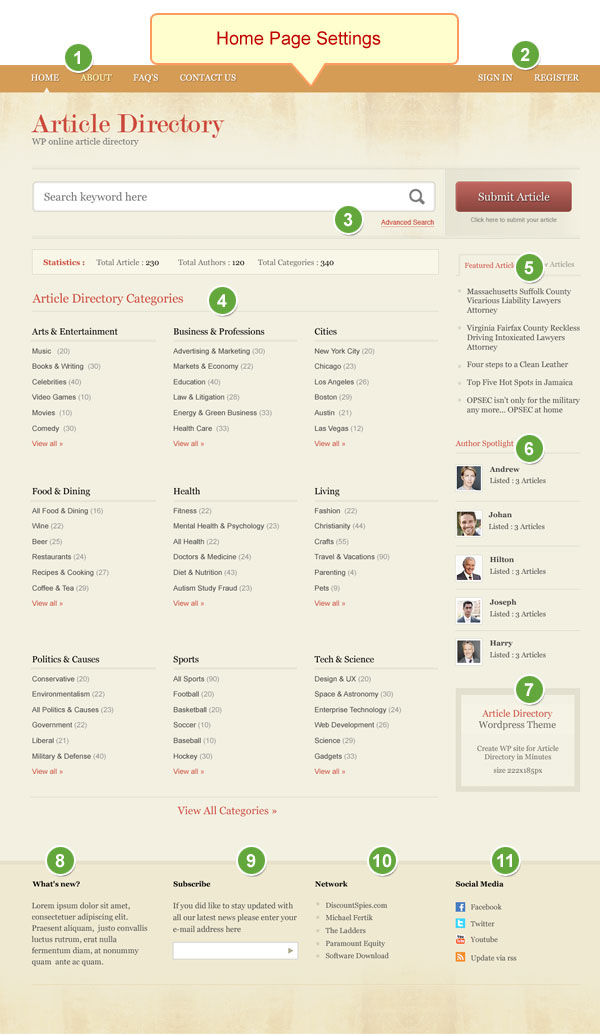
1) In order to change the Header Navigation Settings, go to WP-admin > Article Directory > Design Settings > Navigation Settings > Top Header Navigation
2) Users can login or Register from here
3) Advanced Search: This will be automatically displayed in the Homepage.
4) To customize Article Directory Categories go to WP-admin > Appearance > Widgets > Home Featured Area >T Article Category List or you can also use T All Category List Homepage widget to display all the categories.
5) To customize Featured Articles and New Articles go to WP-admin > Appearance > Widgets > Sidebar Right > Tab – Featured and New Articles.
6) To customize Author Spotlight options, go to WP-admin >Appearance > Widgets > Sidebar Right > Author Spotlight
7) To customize Advertisement options, go to WP-admin >Appearance > Widgets > Sidebar Right > T Advertisement
8) To customize What’s New go to WP-admin > Appearance > Widgets > Bottom 4column – First > What’s New.
9) To customize Subscribe go to WP-admin > Appearance > Widgets > Bottom 4column – Second >> Subscribe.
10) To customize Network go to WP-admin > Appearance > Widgets > Bottom 4coumn – Third >> Links
11) To customize Social Media go to WP-admin > Appearance > Widgets > Bottom 4column – Fourth > Social Media v2
Note: If you don’t want to display any navigation related to article or Blog in the navigation, then please go to Article Directory > Design settings > Navigation settings and ensure that you select NONE. E.g. Top Header Navigation Article Category and select it to None. Now if you do this setting, then no article category will be displayed in top navigation.
Article Directory Design Settings
For Customizing Article Directory Theme, head over to WP-admin > Article Directory > Design Settings. Various options can be controlled from. Take a thorough look at all the flexible options available to you. Do the settings as per your wish and then save them.
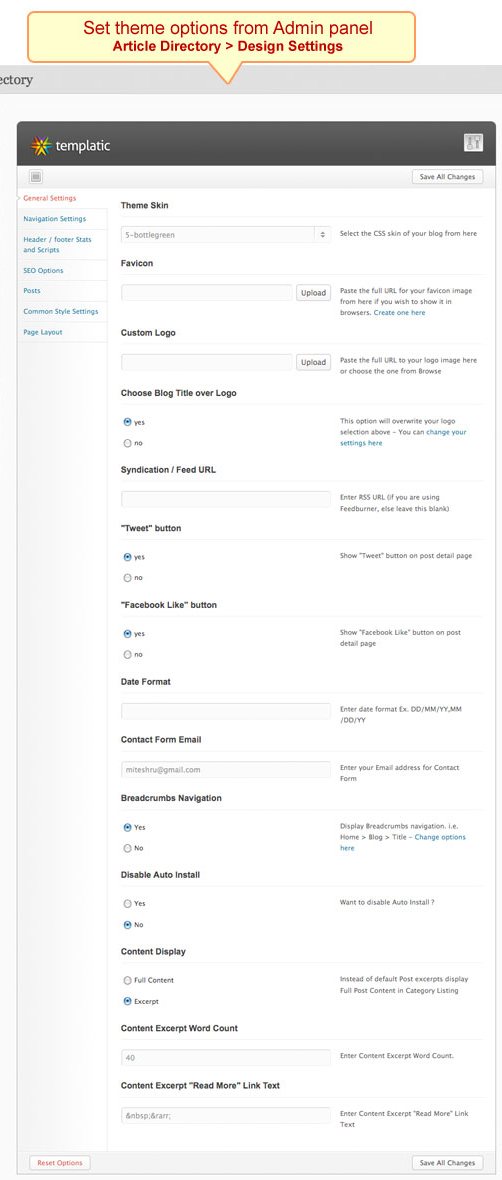
Theme Skin – You can choose the CSS Skin for your Theme using the drop down menu
Favicon – If you want to use a Favicon for your site, than just insert the image URL in the field provided. You can also create a favicon for your site using: http://www.favicon.cc/
Choose Blog Title over Logo – If you want to replace the default Logo from your theme, and want to use Text instead, than make use of this option
Syndication/Feed URL – If you are using RSS Feeds Managing Sites like Feedburner, Feedblitz etc., than you can insert your Feed Address in the field provided.
Tweet Button – If you want to insert Twitter Tweet Button in the Post Details Page than just select Yes, else select No
Facebook Like Button – If you want to insert Facebook Like Button in the Post Details Page than just select Yes, else select No
Date Format – Enter your preferred Date Format i.e. in DD/MM or MM/DD, which you want to display on your site
Contact Form Email – Enter the Email Address which you want to be used with default Contact Form integrated in the site
Breadcrumbs Navigation – If you want to display Breadcrumbs Navigation i.e. Home > Blog > Title at the Top of each Article, select Yes
Disable Auto Install – If you want to completely disbale Auto-Install than just select Yes.
Content Display – Select in between Full Content and Excerpt options, in order to display Post Excerpt or Full Content in the article category.
Content Excerpt Count – If you are using Excerpt for your theme, than you can set the total number of words, say 40, for your excerpt using this option.
Content Excerpt “Read More” Link Text – With this option you can set the Read More Link text easily on your own
Login or Register
You/your visitor can login directly using the Login Fields provided. In case, the user is not registered in your site, than he/she can instantly register using the same fields. Else he/she can also use the Sign In or Sign Up Form as shown below:

How to Add an Article
As soon as you click on Submit Article Button present in the Right hand Sidebar, you/your visitors will be presented with following page:
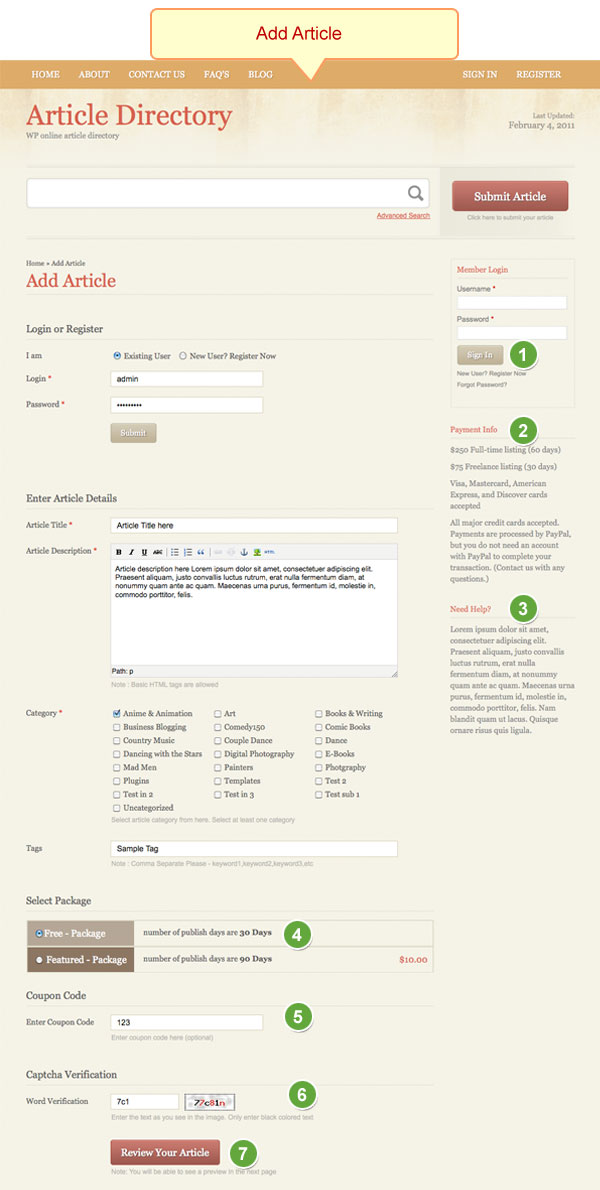
Now lets see how to configure this page:
- Go to Widgets > Submit Article Sidebar Right > T Loginbox
- Go to Widgets > Submit Article Sidebar Right > Text
- Go to Widgets > Submit Article Sidebar Right > Text
- You can make packages from wp-admin > Article Directory > Price Package
- You can create Discount coupons from wp-admin > Article Directory > Manage Coupon
- You can create Discount coupons from wp-admin > Article Directory > Design Settings > Captcha Settings
- Finally after filling out all the information, click on Review Your Article
Now lets see this detail:
Enter Article Details – Your visitor can start writing the article instantly, once he/she has been successfully registered to your site. Here all they need is to enter the Article Title and Complete Article Description. Apart from Article Title and Article Descripotion, your visitors also need to select Article Category, where they want to publish their Article, along with Article Tags, where each keywords are separated by a comma.
Select Package
Your visitors can either selecty in between Free Package and Featured Package before actually submitting/publishing their Articles
Coupon Code
If your visitors have Discount Coupon Code, than they can enter it right in the Coupon Code field
Captcha Verification
Before submitting the Article for review, users will have to fill a Captcha, in order to prove that they are Humans, not Bad Web Bots
Review your Article
You can also see Article Preview after clicking the Review your Article Red Button (See Screenshot below):
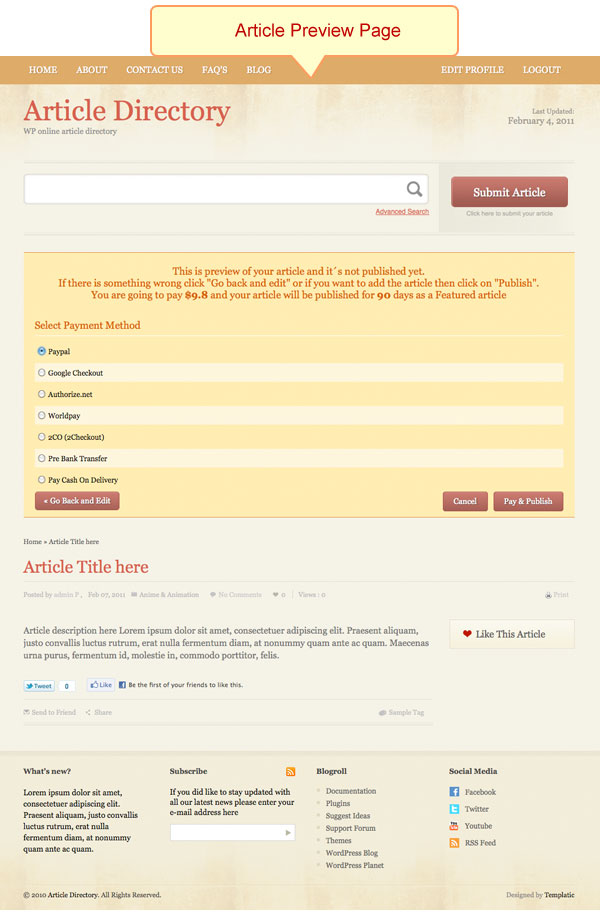
The Article Preview Window also shows complete payment informartion along with various available payment options. All you need is to do click on Pay and Pubish, and the Article is ready to be reviewed by the Administrator. If you think that you made a mistake, then click on Go back and Edit button. As soon as the Article Submission is complete, you will be getting a Successful Confirmation Message as follows:

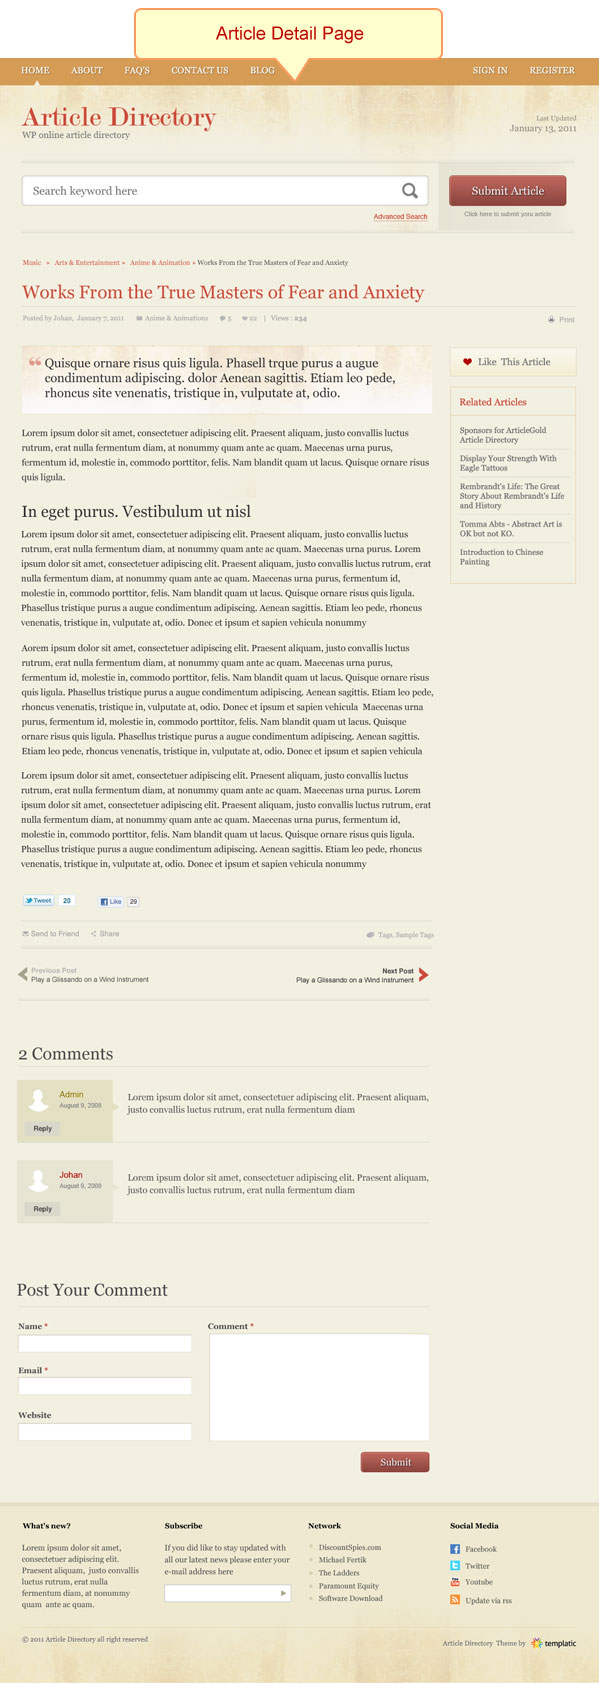
Article Detail Page
Once approved the Final Article Page looks as follows:
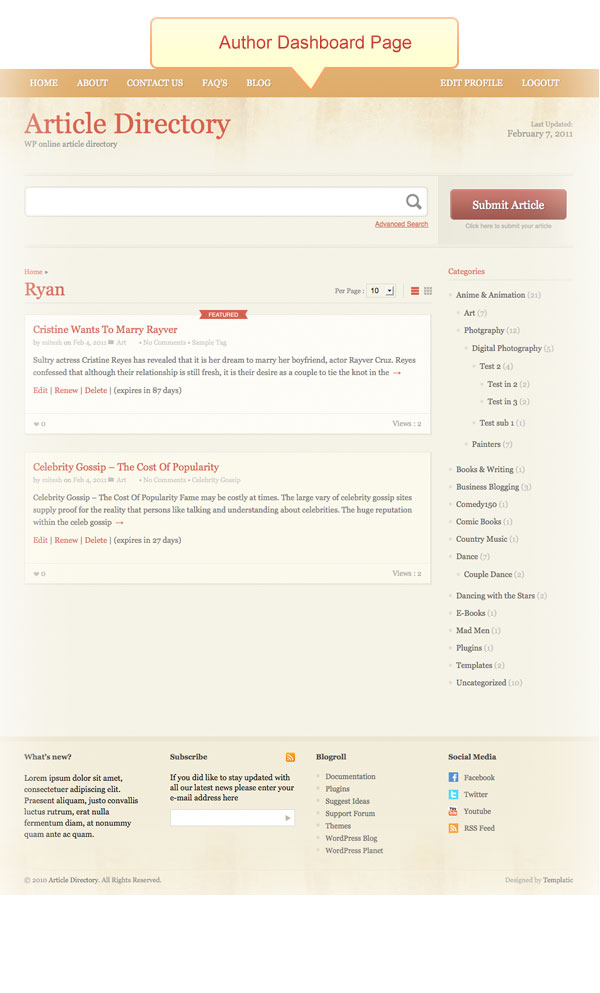
Author Dashboard
Once any of your visitor have published number of articles, his/her Author Dashboard Page will be looking as follows:
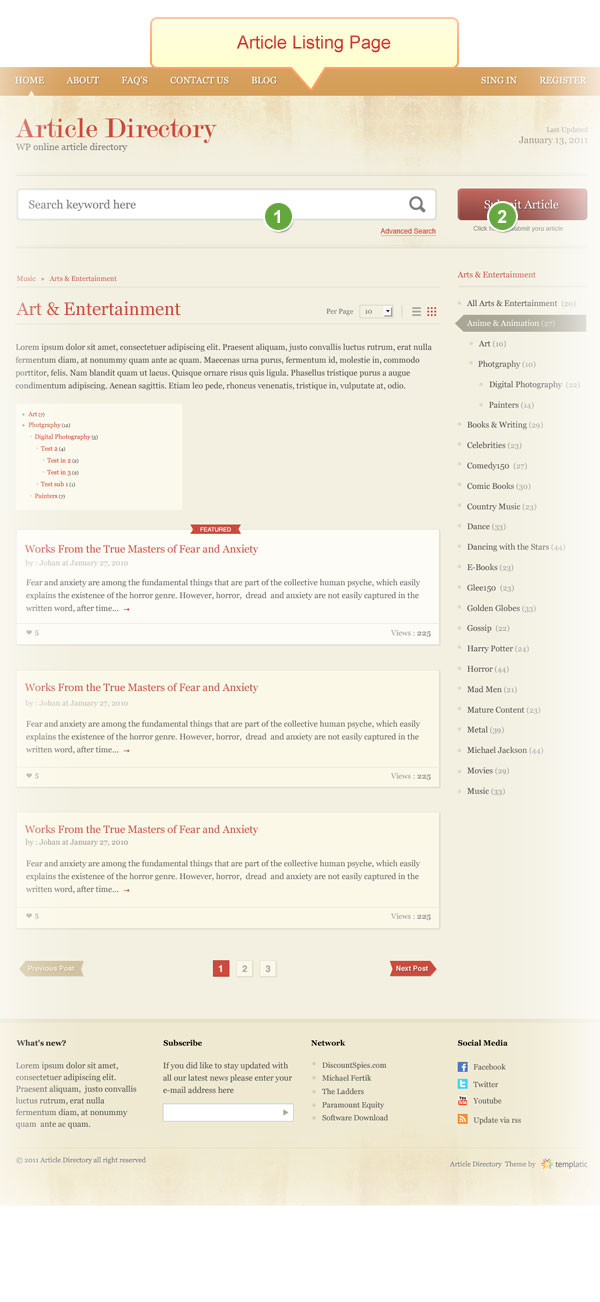
Article Listing Page
And the Article Listing Page will be looking as follows:
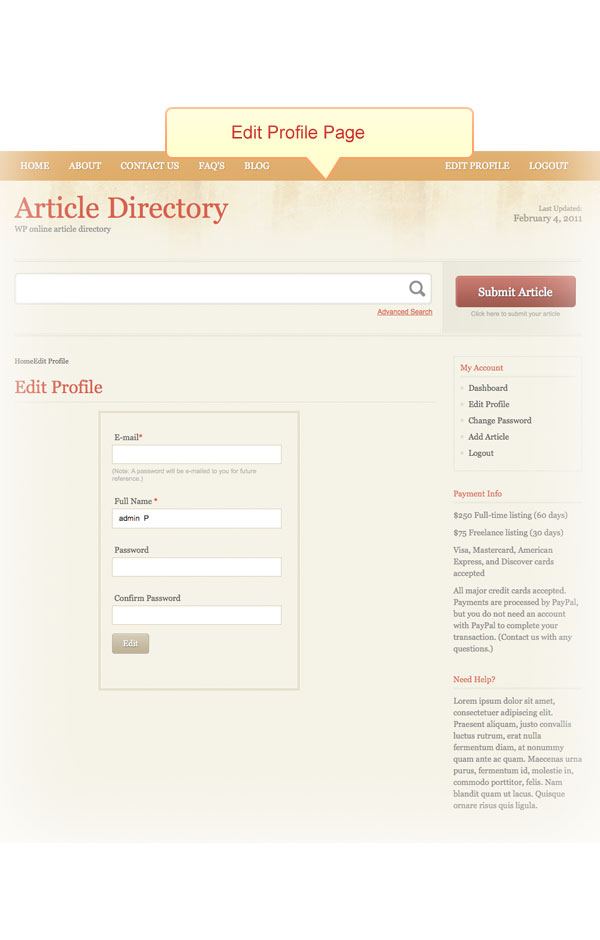
Edit Profile Page
In case, any particular user wants to edit his/her profile, than he/she can click on Edit Profile and do all the editing suitably:
How to add a new page and use Page Template
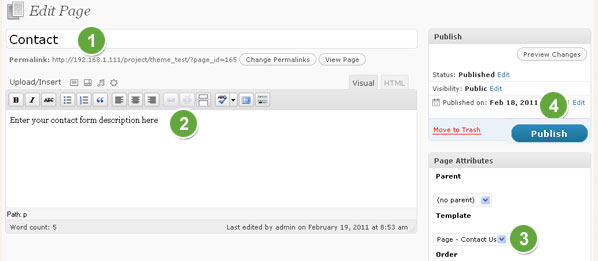
Now lets add a new page. Go to Pages > Add New.
- Enter the page title
- Enter the page description
- And select the template from that Templates section
- Finally click on Publish
Preview of Contact Page Template
This is a preview of Contact Page Template:
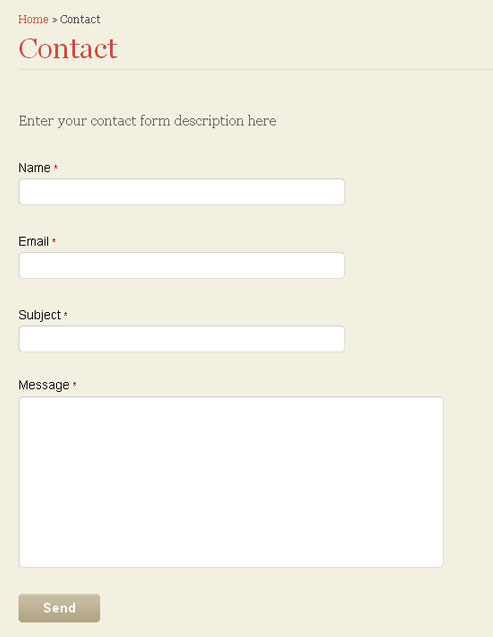
You can use any page template as per your wish. There are four page templates already provided with the theme:
- Archives
- Contact Us
- Gallery
- Sitemap
Note: If you are using contact form template, then make sure you enter its Email address in Article Directory > Design settings > General settings > Contact Form Email
How to find Category ID ?
To know the category ID, just go to Posts > Categories and hover your mouse over the category name and notice its URL, it would be something like id=3. This 3 is your category ID.
Manage Coupons
Go to wp-admin > Article Directory > Manage Coupon
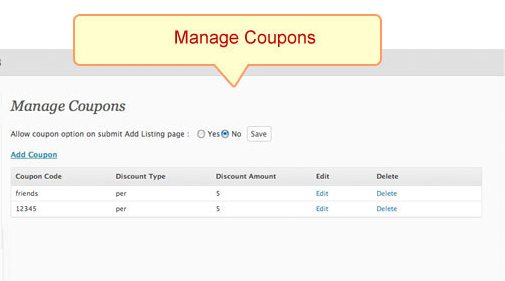
You can add, edit or delete discount coupons from this page.
Click on “Add coupon” to add a new coupon. Enter the coupon code and then select the discount type, such as percentage or flat amount and click on Submit. Thats it, your coupon code is added.
Managing Price Package
Go to wp-admin > Article Directory > Price Package
From here you can add add packages, free or featured or give it any name as per your wish.
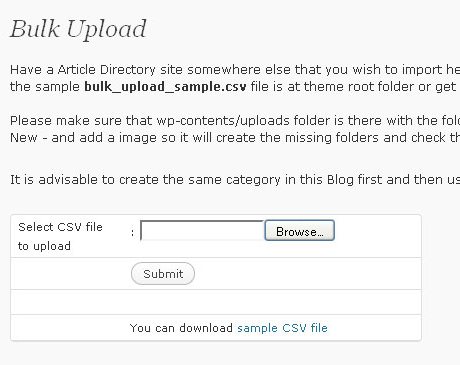
Bulk Uploading through CSV
Instead of adding each Articles separately you can also use the Bulk upload feature. Go to Article Directory > Bulk Upload. Simply download sample CSV file and import your data accordingly. Bulk upload means uploading several Articles automatically by just filling out the CSV. This saves time to manually add each articles individually.
How to add Blog Posts
Yes you can also add normal Blog posts. Just go to wp-admin > Blog > Add Post
Fill out all the information and finally click on Publish. To show Blog posts on site, you can create a custom menu. Go to Appearance > Menus and create a custom menu. Now insert this custom menu widget in “Main Navigation” widget area.
Various Article related Settings
You can configure various article related settings from wp-admin > Article Directory > Design settings > Article Settings
Below is a screenshot:

- Disable Article Expiry: Select Yes if you want to disable Article Expiration process or else, select No.
- Disable Article Expiry Email Notification: Select Yes if you want to disable article expiry notification Email being sent to the user or else, select No.
- Number of Days before pre expiry: Select the number of days before pre expiry Email notification is set.
- Article status: Select the Article status after the new article submission. You can select whether draft or publish or trash.
- Article Expiry Status: Select the Article status after the expiration
- Add Article page settings: Select the category display settings in Submit Article page
- Captcha: Select Yes if you want to enable captcha in Submit Article page or else select No
Complete documentation on Templatic Framework
We have prepared exhaustive documentation on Templatic Framework which is used to develop this theme. Click here to view documentation on Templatic Framework.
How to update Templatic Framework ?
Templatic Framework is used in the development of this theme. We will keep on updating this framework whenever the need arises. Firstly you need to know, if you are having the latest version of this framework or not. To know about this, just go to
wp-admin > Article Directory > Update Framework
If you have the latest version of this framework, then you will get a message like “You already have the latest version of framework”. If you are using an older version, then you will get a message something like “You need to update framework”. Just click on Update Framework to update it.
Any Queries? Contact us and we’ll help you out.