Theme Installation
There are 3 ways to setup the ListingPlus WordPress Directory theme and have a beautiful online directory website. The easy install method, sets up your site for you in minutes, without manual efforts from you.
Method 1: Easy Install & theme activation
Templatic provides an easy installation file for the Theme installation. The easy install is the simplest and recommended way to install and activate the theme.
- Download the Easy Install file from the member’s area by logging into your account.
- From your WordPress dashboard, navigate to Appearance ⇒ Themes ⇒ Add New ⇒Upload. Upload the .zip file you just downloaded.
- Activate the ListingPlus them.
- Or you can navigate to Appearance ⇒ Themes and Activate the ListingPlus theme. Please note that you don’t have to activate the Directory theme but only the listing plus theme at the completion of the installation process.
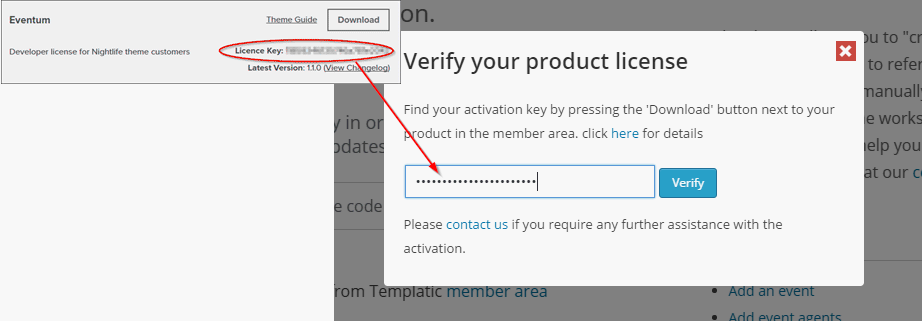
- Once the theme is activated, you will be asked for the verification key. The verification key for your ListingPlus theme can be found from the members’ area from where you download the theme. screenshot.
Installing the Sample data
To make your theme look exactly like the ListingPlus Theme demo, you must install the sample data. This sample data is a pre-configured, example content. By installing sample data, your site will be populated with all the widgets in relevant widget areas, example categories & post, etc.
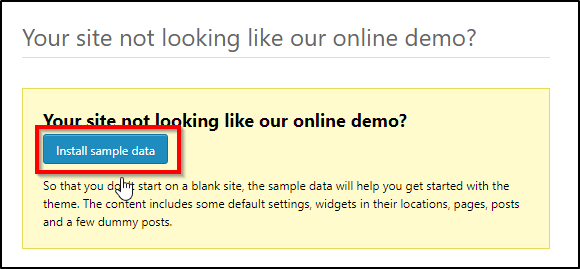
With the sample data installed, all you are supposed to do is to change the data as per your requirements and replace the example listings with your actual content. We highly recommend installing sample data as it will help you understand the theme much better and you will be able to customize it as per your requirements quick and easy.
Method 2: Traditional Install
In traditional install method, each component of the theme is installed separately. Let’s understand each component that needs to be installed for the ListingPlus theme.
Components for the traditional install
Directory: The parent theme that provides the basic framework to support the ListingPlus theme.
Tevolution: The key plugin that provides features of custom fields, monetization, transactions and other important components for your online directory.
The Tevolution Directory: This plugin is specifically designed to support the Directory listings (Optional).
The Tevolution Location Manager: This plugin supports the location-based features of your online directory. you will need it to integrate multiple cities in the website.
ListingPlus: The Child theme for the directory with a modern and multipurpose design.
Getting back to the installation, let’s see how you can install individual components
- Login to your WordPress dashboard and navigate to Appearance ⇨ Theme ⇨ Add New ⇨ Upload.
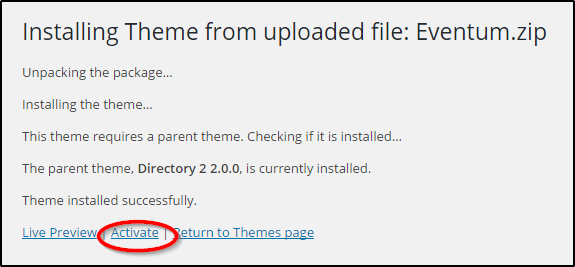
- Upload the Directory theme zip folder. DO NOT activate it. Then, upload the ListingPlus theme zip folder. You can activate the ListingPlus theme once it is uploaded. View this Screenshot.
Don’t! activate the Directory theme, just upload it.
- Now navigate to Plugins ⇨ Add New ⇨ Upload Plugin, and upload the plugins – Tevolution Directory, Tevolution. You can also upload any extra directory addon you have selected.
- Activate each of them as they are installed.
- Provide the verification key. See here.
Method 3: FTP install
If you don’t want to use the easy install method for any reason, there’s an alternate method called the FTP install for the Listing Plus theme. Here, we will manually place the theme and plugin folder at their required place on the server directory using an FTP Client.
Note: If you haven’t used FTP before, you can refer this FTP guide before proceeding to have a clearer idea.
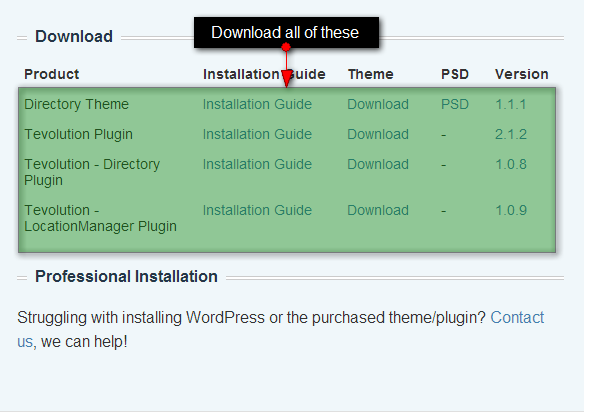
- Download all files available under “Traditional Installation” under ListingPlus section inside member area. These are zip files and you can extract them using software like 7-Zip. Use the “Extract here” option, don’t extract into a new folder. Because a folder in a folder may create problems with installation.
- Now, login to your FTP, access your website’s folder and navigate to /wp-content/plugins/ on your server and upload all the plugin folders (Tevolution and Tevolution-Directory.)
- Navigate to /wp-content/themes/ and upload the Directory folder and ListingPlus folder.
- Login to your WordPress dashboard and go to Plugins. Activate Tevolution and enter the license key available inside our member area.
- Go to the Plugins section again and activate all the plugins that you installed.
- Navigate to Appearance ⇨ Themes and activate the ListingPlus theme.
- While in the Appearance ⇨ Themes section, click on the blue “Install sample data” button to populate your site with dummy data and make it look like our demo.
Setting up the permalinks
With the permalink settings, we are setting up the permanent URLs for your online directory. Following a good URL structure is good for your site. With Directory theme, you can easily manage the permalink structure of your web-pages. In this section, steps for setting up permalinks are shown.
You can manage permalinks at Tevolution ⇨ Permalinks.
Or you can follow the steps below to manage the permalinks of your website.
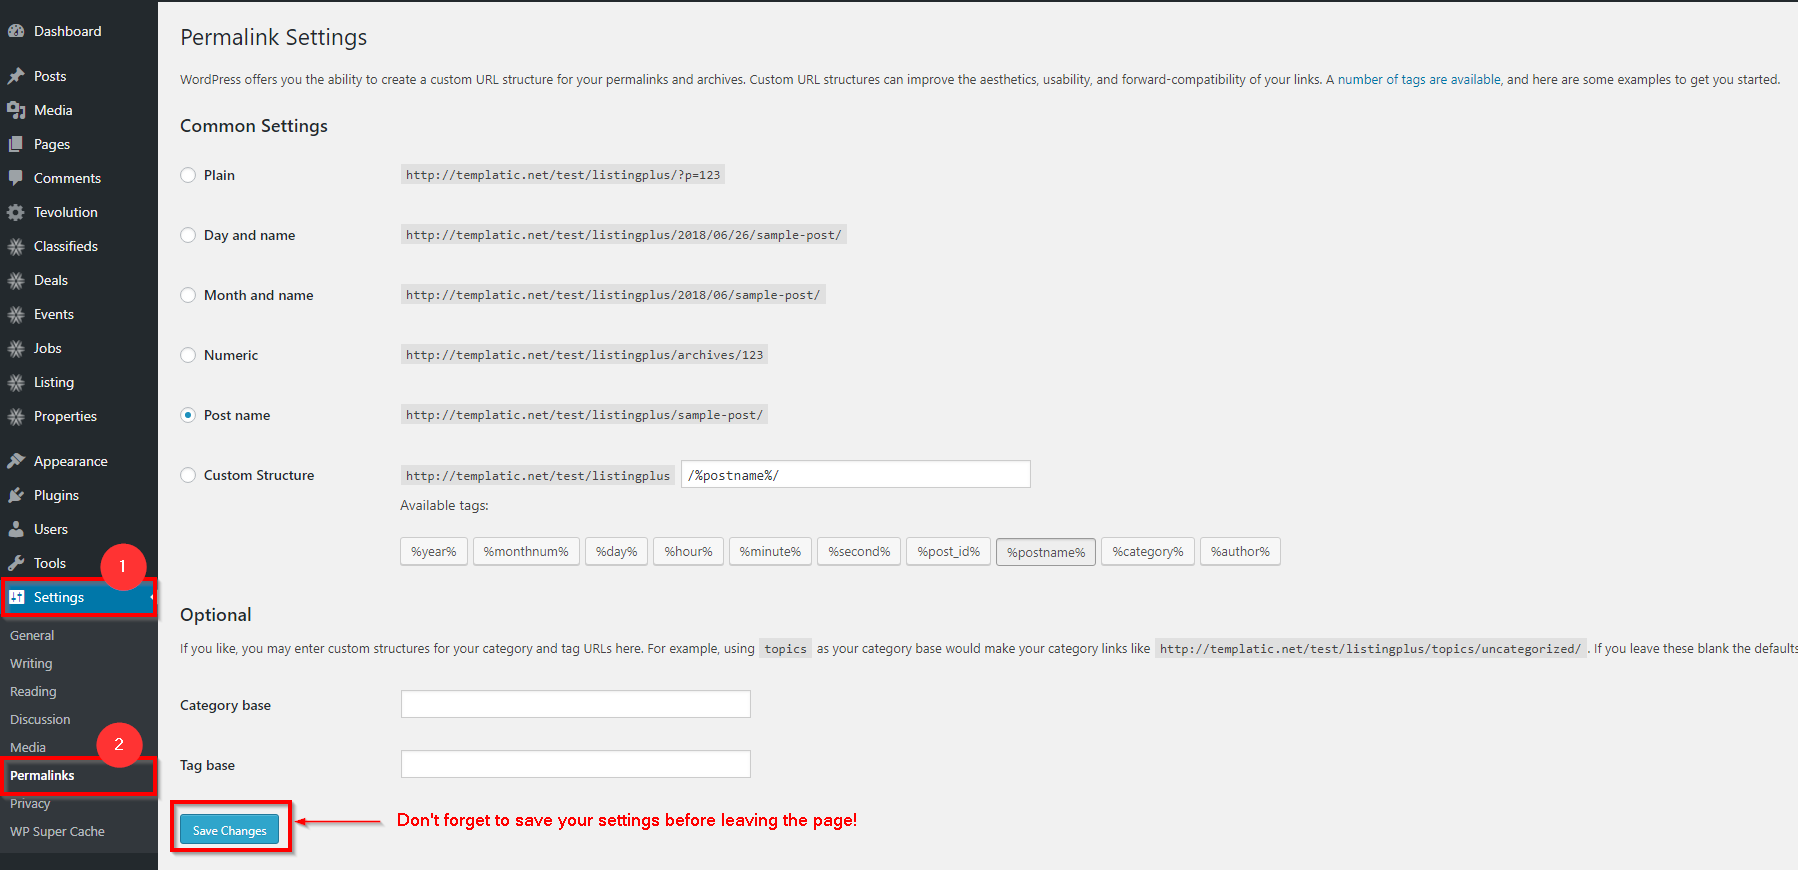
- Navigate to WP-admin ⇨ Settings ⇨ Permalinks.
- Choose the “Common Settings” tab choose the Post name option.
- Press “Save Changes”.
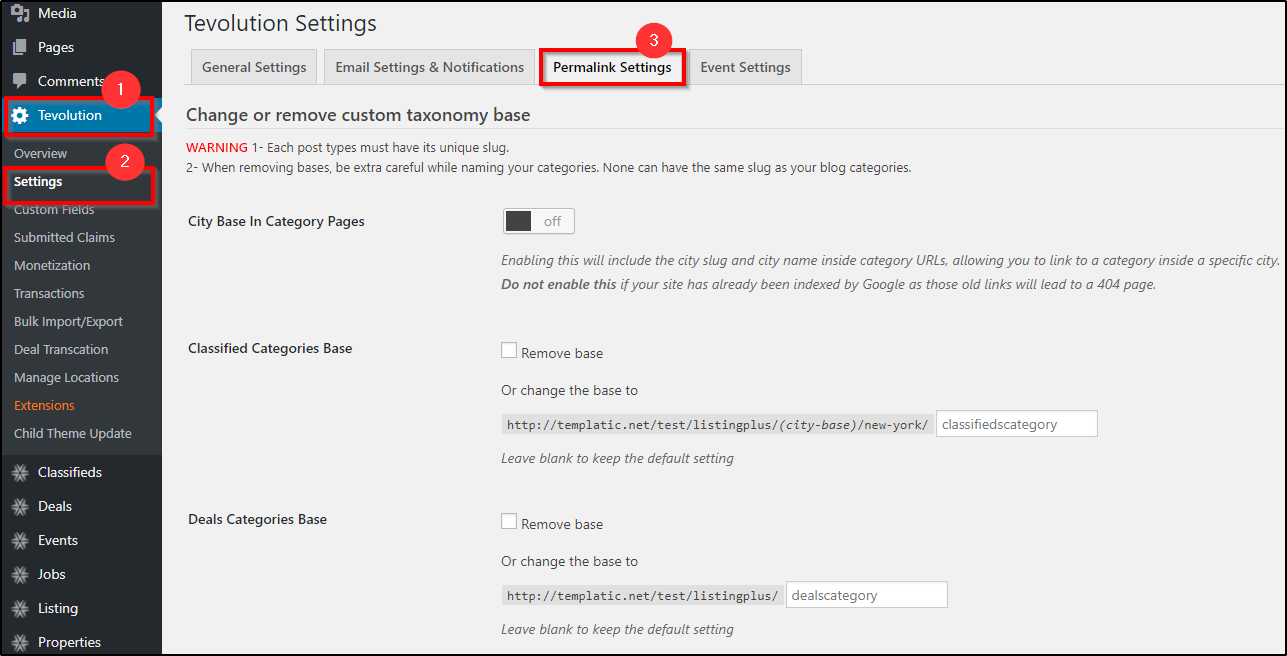
With Post name permalinks active, you can tweak permalinks further by navigating to Tevolution ⇨ Settings ⇨ Permalinks (tab). Here, you can remove or edit slugs for: Categories, Tags, Individual listings, Authors, Cities and even your custom post types.
For example, Event category pages in Directory contain the “Eventcategory” slug. To remove that just disable the “Events Categories Base” option inside the Permalinks section. So the result will be like:
Old URL: example.com/eventcategory/places
New URL: example.com/places
Manage Pages
Setting up the homepage
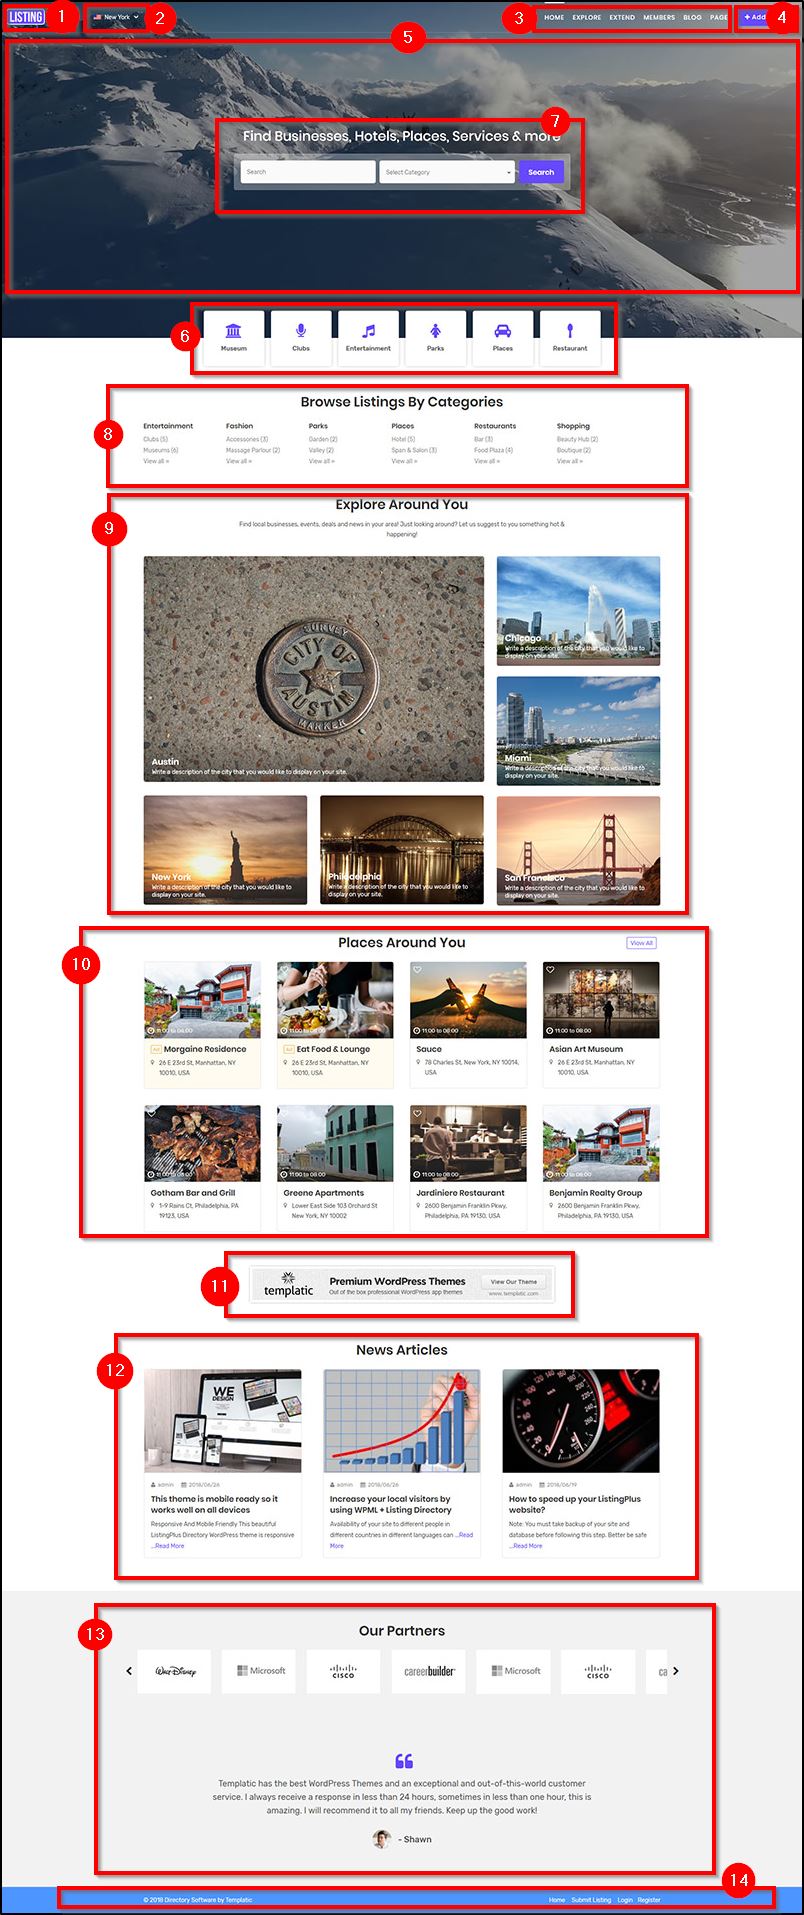
1)Change the Logo
To change the logo, navigate to Appearance >> Customize >> Site Logo. The default logo size is 150*40 px.
2) The Location selector drop-down
The location selector drop-down appears, when you are using your WordPress theme in multi-city mode, using the Tevolution – Location Manager plugin. If you don’t see this selector on your site, it means Tevolution – lo+cation manager is not installed or not activated.
If you wish to use the location manager, but don’t want the city selector dropdown to be displayed in the header, you can disable it by pasting the following code in custom CSS:
.toggle_handler #directorytab {
- padding: 6px 0 6px 0;
- display: none;
}
3) The Secondary menu
To set the Secondary menu, you can navigate to Appearance >> Menu. Here, you can create a menu of your own easily.
If you want mega menus for your WordPress directory website, download our free Mega menu plugin and show more options on your menu.
4) The Add listing button
This button is linked to the listing submission page. If you want to remove it all the following code to the custom CSS file.
.header-wrap .large-6 .templatic_text .button {
display: none;
}
5) Video banner
In order to edit the video and category with icons on the homepage. Please follow the below steps.
- Navigate to Dashboard ⇒ Appearance ⇒ widget ⇒ HomePage Banner

- expand the widget area Homepage Banner
- Expand Custom HTML (1)
- You’ll see the code
<div class=”banner-video”><iframe allowfullscreen=”1″ allow=”autoplay; encrypted-media” title=”YouTube video player” src=”https://www.youtube.com/embed/ThFCg0tBDck?autoplay=1&loop=1&?start=4&iv_load_policy=3&enablejsapi=1&disablekb=1&autoplay=1&controls=0&showinfo=0&rel=0&loop=0&playlist=ThFCg0tBDck&start=10&widgetid=1″ id=”widget2″ width=”100%” height=”100%” frameborder=”0″></iframe></div> - Now copy the Youtube video URL you want to add on your website
eg. https://www.youtube.com/watch?v=qS7FkzD1hig - Just change the highligted part on code with the highligted part on video URL.
- Save the widget.
6) Category Icons below the banner area
- Expand the second widget shown in screenshot.
- You’ll see the following code.
<div class=”cat-list-cards”>
<a href=”http://templatic.net/test/listingplus/listingcategory/museums/“>
<i class=”fa fa-bank” aria-hidden=”true”></i>
<span>Museum</span>
</a>
<a href=”http://templatic.net/test/listingplus/listingcategory/clubs/”>
<i class=”fa fa-microphone” aria-hidden=”true”></i>
<span>Clubs</span>
</a>
<a href=”http://templatic.net/test/listingplus/listingcategory/entertainment/”>
<i class=”fa fa-music” aria-hidden=”true”></i>
<span>Entertainment</span>
</a>
<a href=”http://templatic.net/test/listingplus/listingcategory/parks/”>
<i class=”fa fa-female” aria-hidden=”true”></i>
<span>Parks</span>
</a>
<a href=”http://templatic.net/test/listingplus/listingcategory/places/”>
<i class=”fa fa-car” aria-hidden=”true”></i>
<span>Places</span>
</a>
<a href=”http://templatic.net/test/listingplus/listingcategory/restaurants/”>
<i class=”fa fa-spoon” aria-hidden=”true”></i>
<span>Restaurant</span>
</a>
</div> - You just need to update the highligted part in order to change it.
To change the link of category replace the link with the highlighted link.
<a href=”http://templatic.net/test/listingplus/listingcategory/museums/“> - To change the icon using Font Awesome, visit the Font Awesome icon list and see which icons are available. Once you’ve decided on the icon, replace the class of your icon code with this highlighted code <i class=”fa fa-bank” aria-hidden=”true”></i>
Eg. You want to add icon of car <i class=”fa fa-car“></i>
Replace the class fa fa-car with the fa fa-bank - To change the name of your category just replace the name with the highligted name.
<span>Museum</span>
Eg. If you want to add Restaurants replace the Restaurants with Museum - Save the widget
How To Make The Missing Icons Appear
To make the icons appear on your website, please obtain and enter a Font Awesome key. You can do this from Dashboard >> Appearance >> Customize >> Font Awesome Setting.
7) The search widget
8) Browse listings by category
This is the T → All Categories list widget in the ‘Above homepage content’ widget area. It will make your website easier to search and navigate by displaying the list of categories.
9) Explore Around You
This is the ‘T→Interest widget with big image‘ placed in the ‘Above homepage content’ widget area. If you want to change the introductory text, you can do so through this widget. It also lets you select the cities that you want to show in the grid.
You can use this widget well if you have a multi-city directory with different cities registered. This widget uses the city information from your directory website. So, if you are using this widget, you have to make sure that with each city, you need to have the city message (which is shown as the text on the image through this widget) and the city image.
However, if you have not already added the city information, you can do so by Tevolution ⇒ Manage Locations ⇒ “Cities” tab ⇒ and choose edit city by hovering over the city name.
 On the edit page – you can enter/update the city message and the city image.
10) Places Around you
This is the T → Homepage Display Posts widget in the Homepage main content widget area. This widget displays a beautiful snippet of the listings of a certain post type.
11) Advertisement
You can use the ListingPlus WordPress Theme to make money by displaying advertisement banners. You can use the ListingPlus WordPress Theme to make money by displaying advertisement banners. To show advertisement here, you can use the simple text widget with the advertisement code into it.
12)News Articles
13) The Pre-footer area
14) The footer
Setting up the listing category page
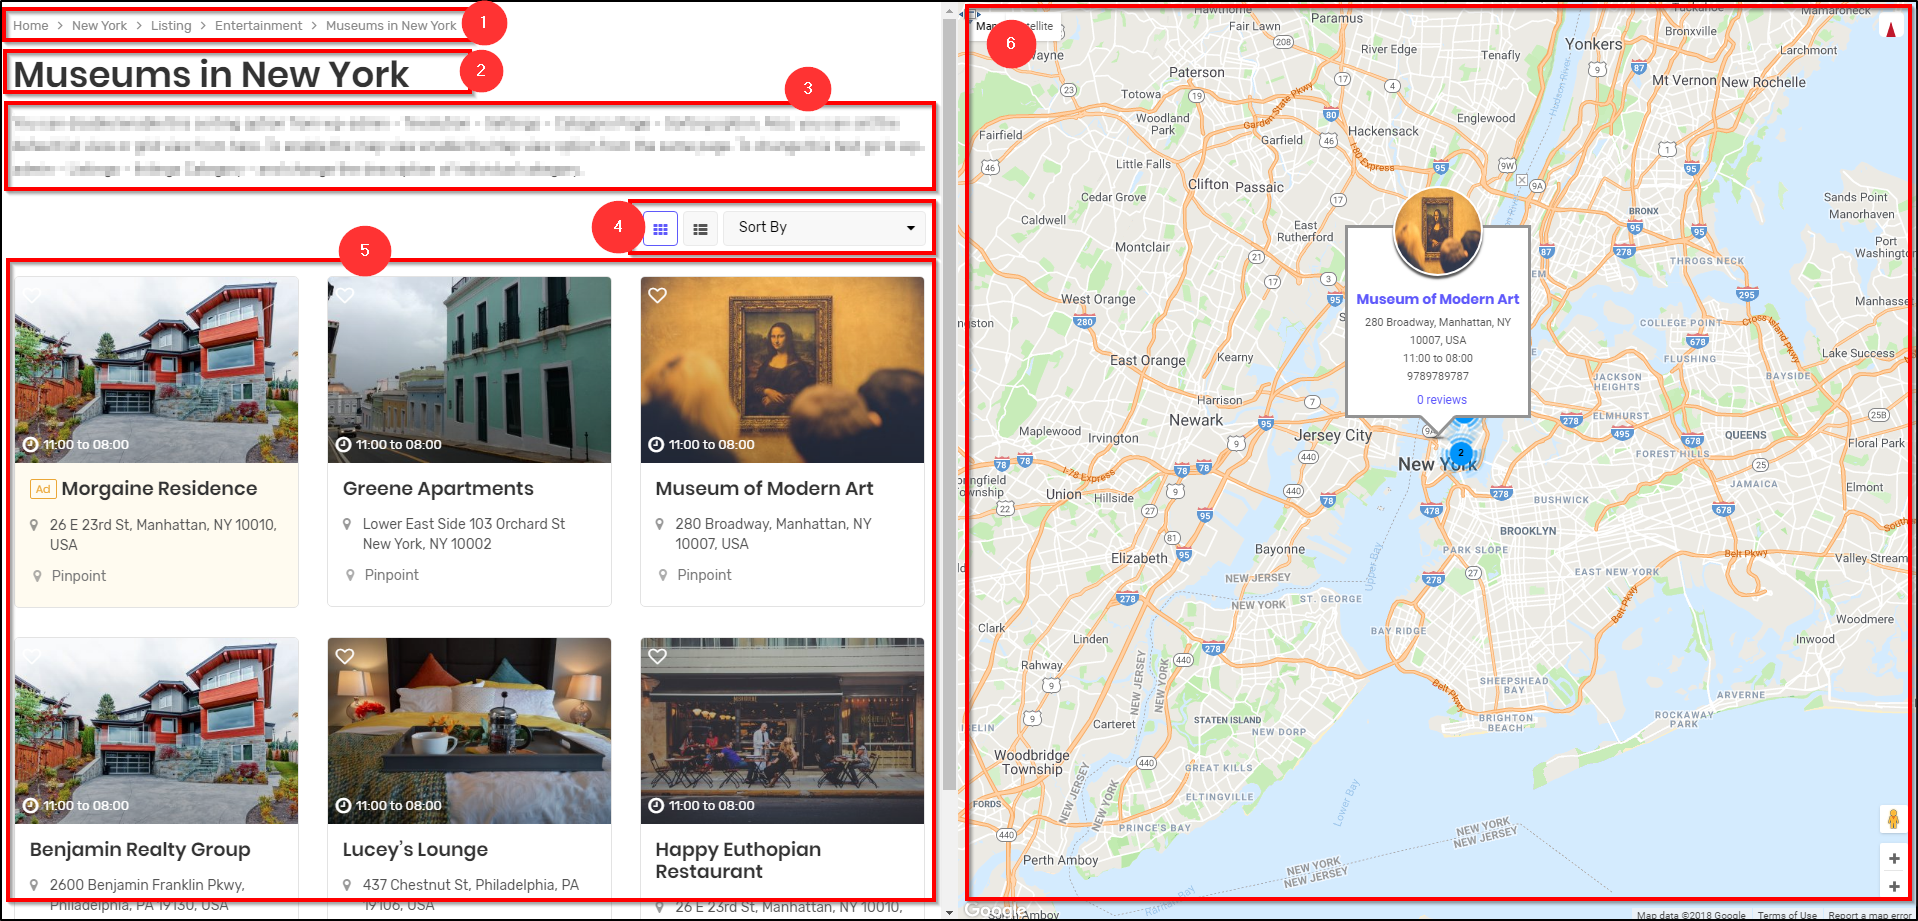
1) Breadcrumbs
Displays a path to your current category. Breadcrumbs can be disabled from Appearance ⇒ Theme Settings.
2) Category Title
This will be automatically displayed as the title for the category pages. However, since in our case, the location manager is active, and the listings shown are only for the selected city, “in New York” is appended to the title.
With the location manager inactive, the title of this page would be “Museums”, i.e exactly the same as the category name.
3) Category description
This is the category description you add while creating a new category following this procedure. So whatever you want to show the users as the introduction for the category page, you can write it as the category description.
4) Sorting Options
You can disable/enable this sorting option from Tevolution ⇒ Settings ⇒ Category Page ⇒ Sorting option. The options on the same page will also allow you to set the default list view or grid view.
5) The listings of the relevant category
This area displays the listings within your category.
How to set a featured image: When adding a listing from the back-end using the “Featured Image” box located inside the right sidebar. You can also do it by simply uploading an image to the listing image gallery.
How to set the number of listings visible on this page: To control the number of listings displayed on the category page go to Settings ⇒ Reading. You can edit the “Blog pages show at most” option to set the number. The rest of the listing will be carried forward to the next page with the help of pagination. To display everything on the first page just enter a big number here.
The PinPoint Button: Clicking on the pinpoint button will focus the category page map on that particular listing. You can tweak settings for this feature in Tevolution ⇒ Settings ⇒ Category Page (tab).
6) Category page map
To display the category page map in this way navigate to Appearance ⇒ Widgets and place the “T – Category Page Map” widget inside the “All Pages – Left Content” area. Please note that this area has been created specifically with the map in mind. Don’t attempt to place other widgets inside this area.
Setting up the listing detail page
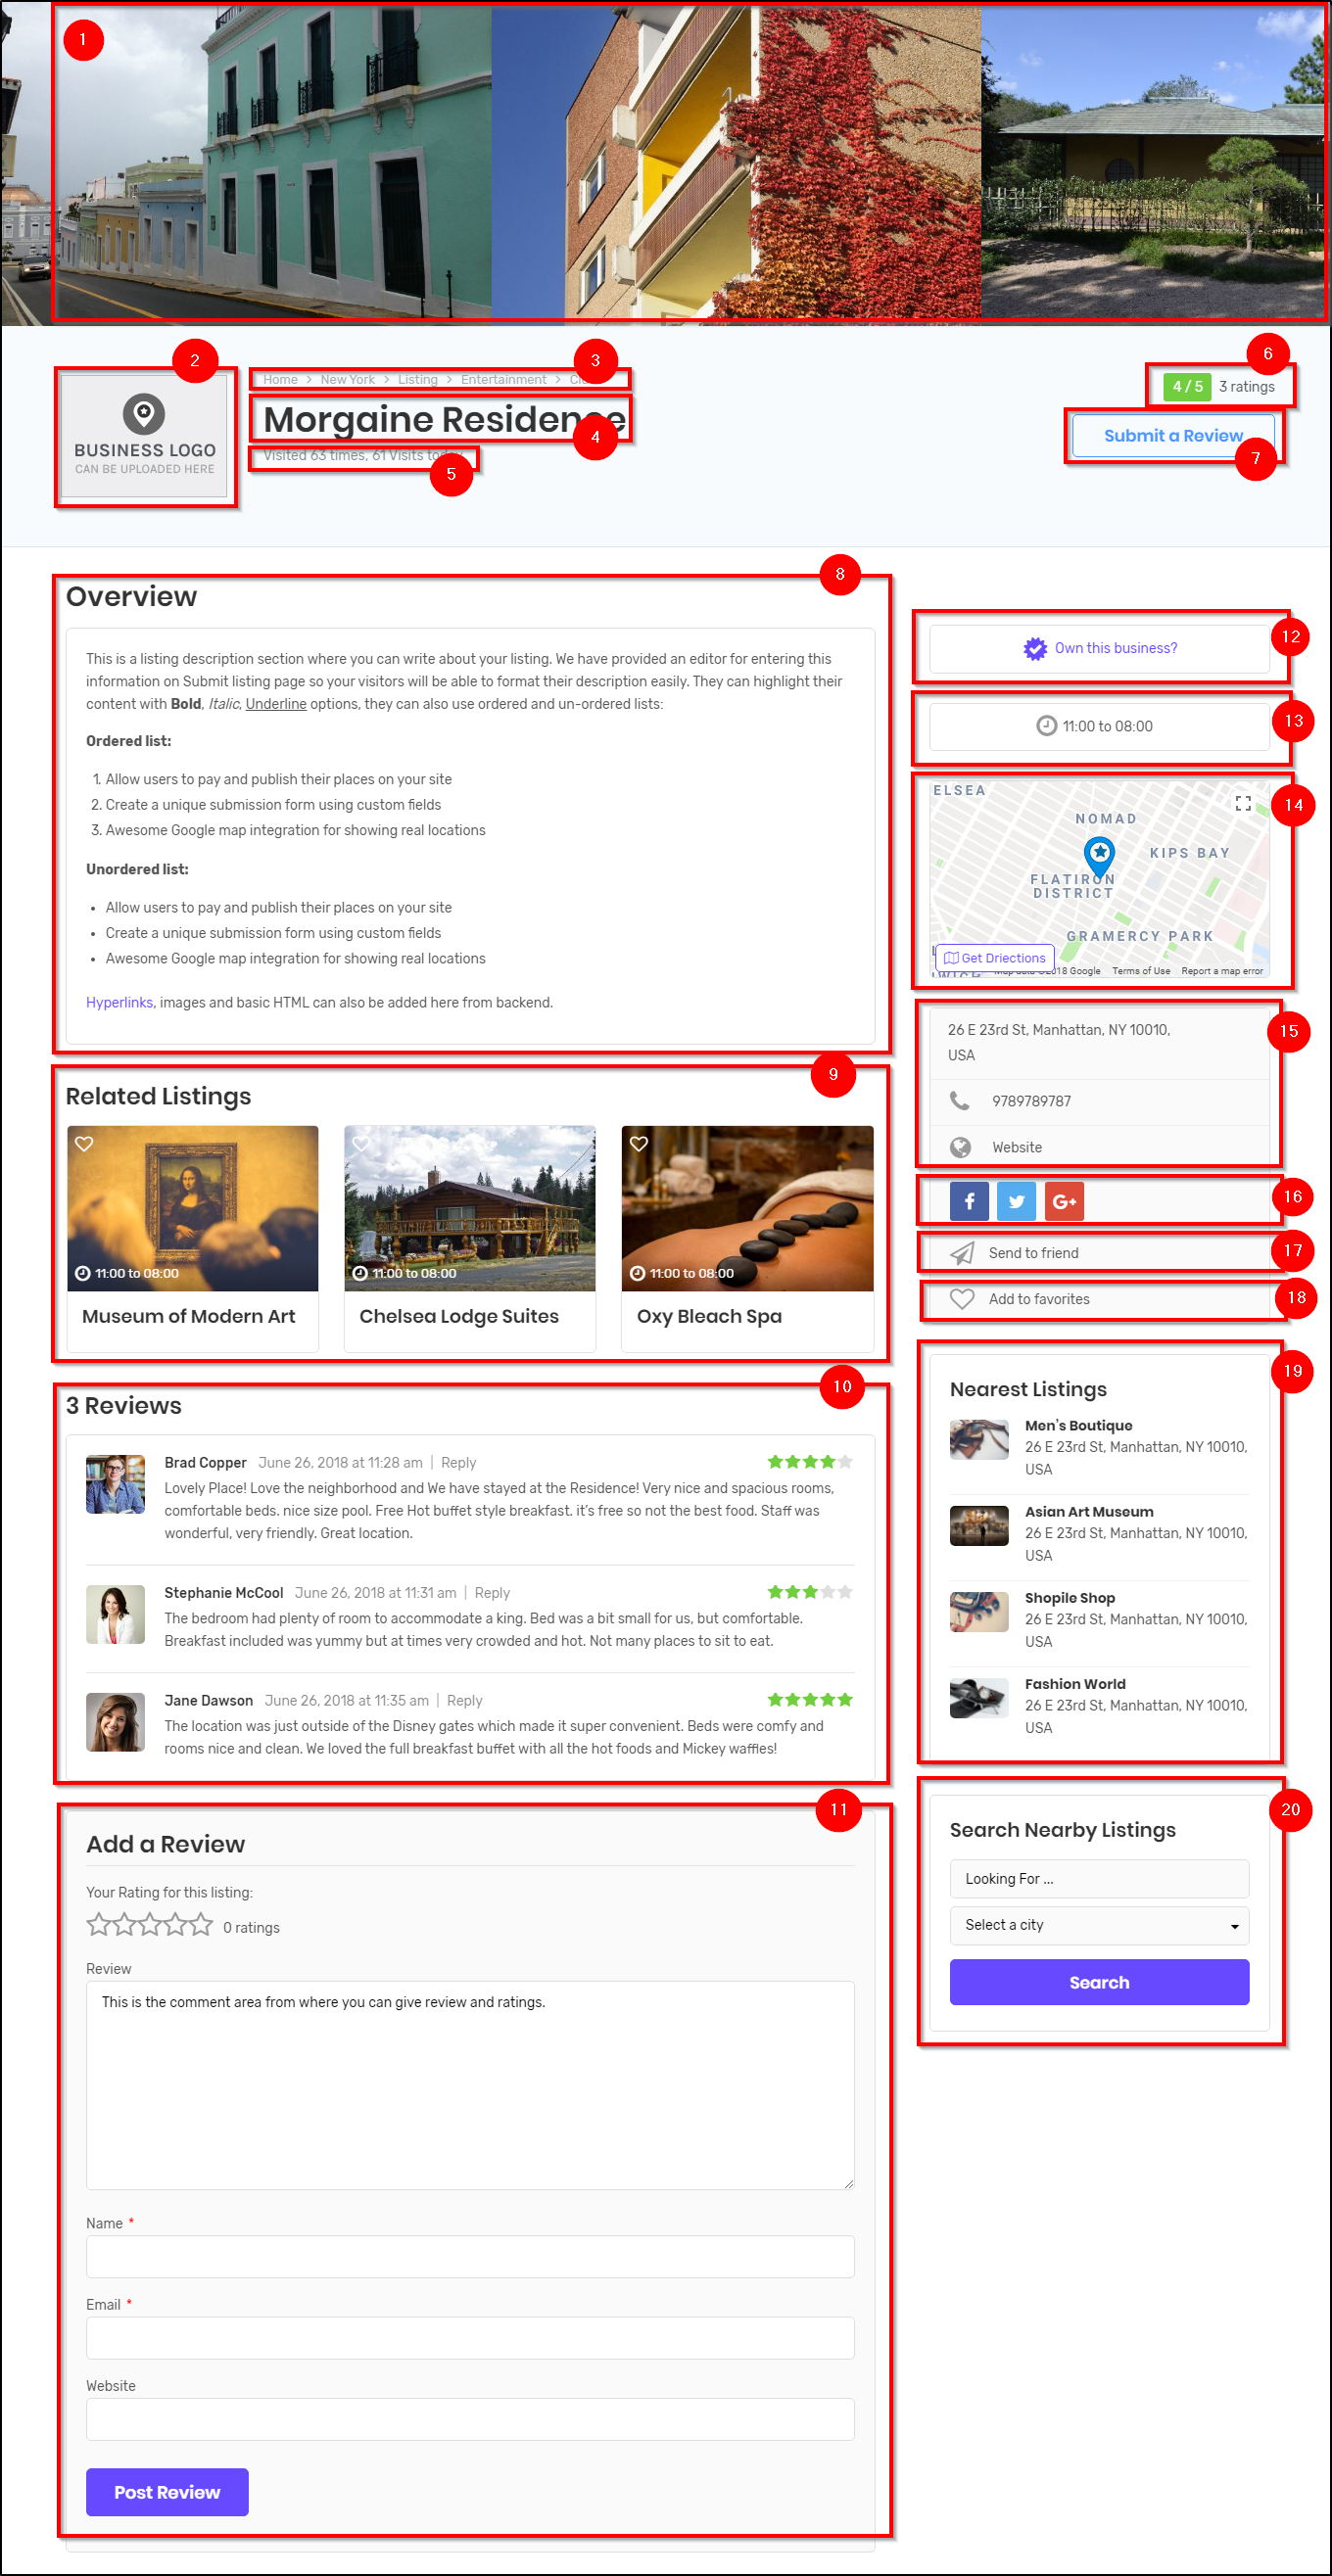
1) Image slider
These are the images that have been added as a part of gallery images while creating a listing.
2) Business Logo
This area displays the image uploaded as the logo while listing submission/posting. The related custom field is ‘HTML variable = listing_logo)’. If you want to remove this field, you can simply deactivate the custom field from Tevolution ⇒ Custom Fields ⇒ Logo.
3) Breadcrumbs
To enable or disable breadcrumbs on your website’s pages, you can go to Appearance ⇒ Theme Settings and disable them. This will disable/enable the breadcrumb appearance from all the pages.
4) Listing Title
the listing title will appear as it is on the Listing detail page. If you want to change this, you can navigate to Listings, and change the title using the Quick edit option.
5) View Counter
It shows the number of times the listing has been visited. You can enable or disable view counters from Tevolution ⇒ Settings ⇒ Detail Page ⇒ View counters.
6) Rating display
This will show the stars according to the ratings. If you don’t want this to appear here, you can remove it by placing the following code at Appearance ⇒ Custom CSS Editor.
.banner-call-action .directory_ratings{

display: none;
}
7) Submit a review
This is a simple button that will automatically lead the visitors to the end of the page where they can submit their review. You can remove this button by placing the following code at Appearance ⇒ Custom CSS Editor.
.banner-call-action .secondray-button {

 display: none;
}
8) Listing description
This is the listing description section where the text description about your listing will appear. The text here is added inside the “Listing Description” field in the front-end , or the main content box inside the back-end. The area can display HTML and Shortcodes.
9) Related post
This section shows the listings related to the one you are currently viewing. This section enhances user engagement as the visitors quickly find the kind of content they are looking for.
To change how the recent posts are displayed, you can navigate to Tevolution ⇒ Settings ⇒ Detail Page ⇒ Filter related posts by.

10) Review and comments
The reviews and comments submitted by the users will be displayed here. With no reviews and ratings submitted by the users, this area will remain blank.
11) Add a review
This section lets the visitors add comments and ratings for the listing.
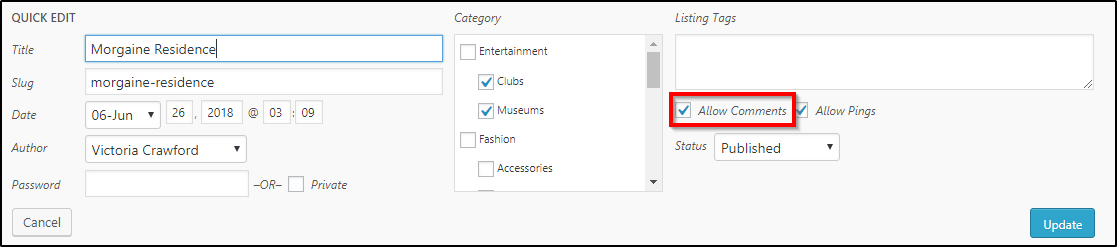
If you want to disable comments for a specific listing, you can do so by navigating to the Listings page. You can disable them by unchecking “Allow Comments” in the quick edit window and disabling the listing for that particular page using the quick edit option.
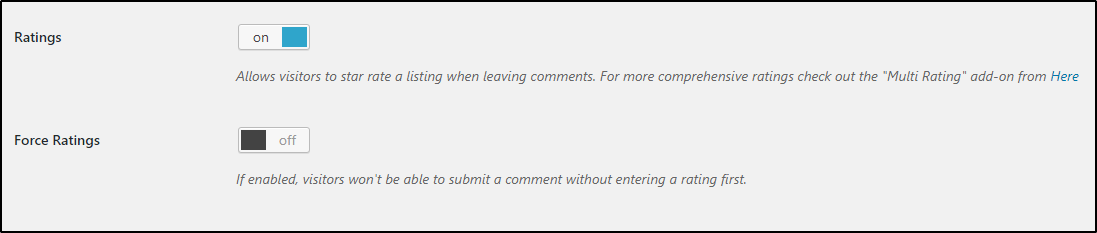
To disable ratings and use regular comments go to Tevolution ⇒ Settings ⇒ Detail Page ⇒ Ratings. If you want to make it so that a rating must be provided while submitting a comment, turn on the “Force Ratings” option.
12) Own this business button
This is the claim ownership button. It will only appear if the claim ownership feature is enabled. When the feature is disabled, this button will disappear from your listing detail page.
You can enable or disable the claim ownership at Tevolution ⇒ Settings ⇒ General settings ⇒ Claim ownership.
13) The Timing
This will display the working hours/timing of availability for each listing, as per entered by the listing owner or the admin.
14) Map
This mini map showing the listing location will automatically appear if you have disabled the detail page map tab at Tevolution ⇒ Settings ⇒ Detail page settings.
15) Contact details
The first three details in this area – the address, phone number, and the website URL will be derived from your listing data.
16) Social sharing buttons
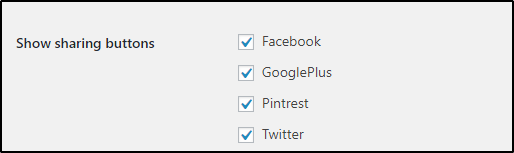
The social sharing options shown below can be managed at Tevolution ⇒ Settings ⇒ Detail page settings ⇒ Show sharing buttons. Uncheck the options that you don’t want to appear.
17) Send to Friend form
Allows the visitor to send a quick email (containing a link to the listing) to a friend. This form can be disabled from Tevolution ⇒ Settings ⇒ Email Settings & Notifications (tab) ⇒ Detail Page forms.
To enable captcha for this form navigate to Tevolution ⇒ Settings ⇒ Captcha.
18) Add to favorites button
The favorites button allows website visitors to save specific listings for later viewing. Once saved (favorited), the listing will become available inside the visitors’ front-end profile, under the “My Favorites” tab. Screenshot.
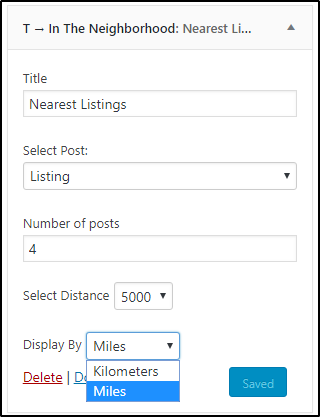
19) The Nearest Listing Widget
This is displayed by a widget placed in the listing detail page sidebar widget area. The widget T → In the Neighbourhood is configured to show the nearest listing. You can set the distance and the listings within that range will be displayed through the widget.
20) Search nearby listing
This block is nothing but a search widget that your visitors can use to search your website. It is the T → Instant Search Widget placed in the listing detail page sidebar widget area.
Setting up the widgets and widget areas
All the widgets available with the ListingPlus theme are available at Appearance ⇨ Widgets. Here, different widgets can be used to draw different results. The feature of every widget is explained below the widget, in the widget section. On the other half of the screen, you will find the different widget areas where you can accommodate the widgets.
Listing Management
By default the theme comes with the post type called listings. Listings post type is a general post type you can use for places or business locations. However, With the feature to create custom post type and custom fields, you can create define new post types for your website.
Besides, you can use our add-ons to add events, real estate, classifieds, jobs, & deals with your website. This makes you work even easier.
With the directory install, you will have the post type listings. You can edit the fields of listings using the custom fields settings. To start adding and showing listings, first of all, you will need to create some listing categories.
Create and manage listing categories
Listing categories can be anything: Churches, restaurants, breweries, hospitals, schools, gyms, museums, etc.
You can create any number of listing categories you want. The directory theme allows creating listing categories in a hierarchical method.
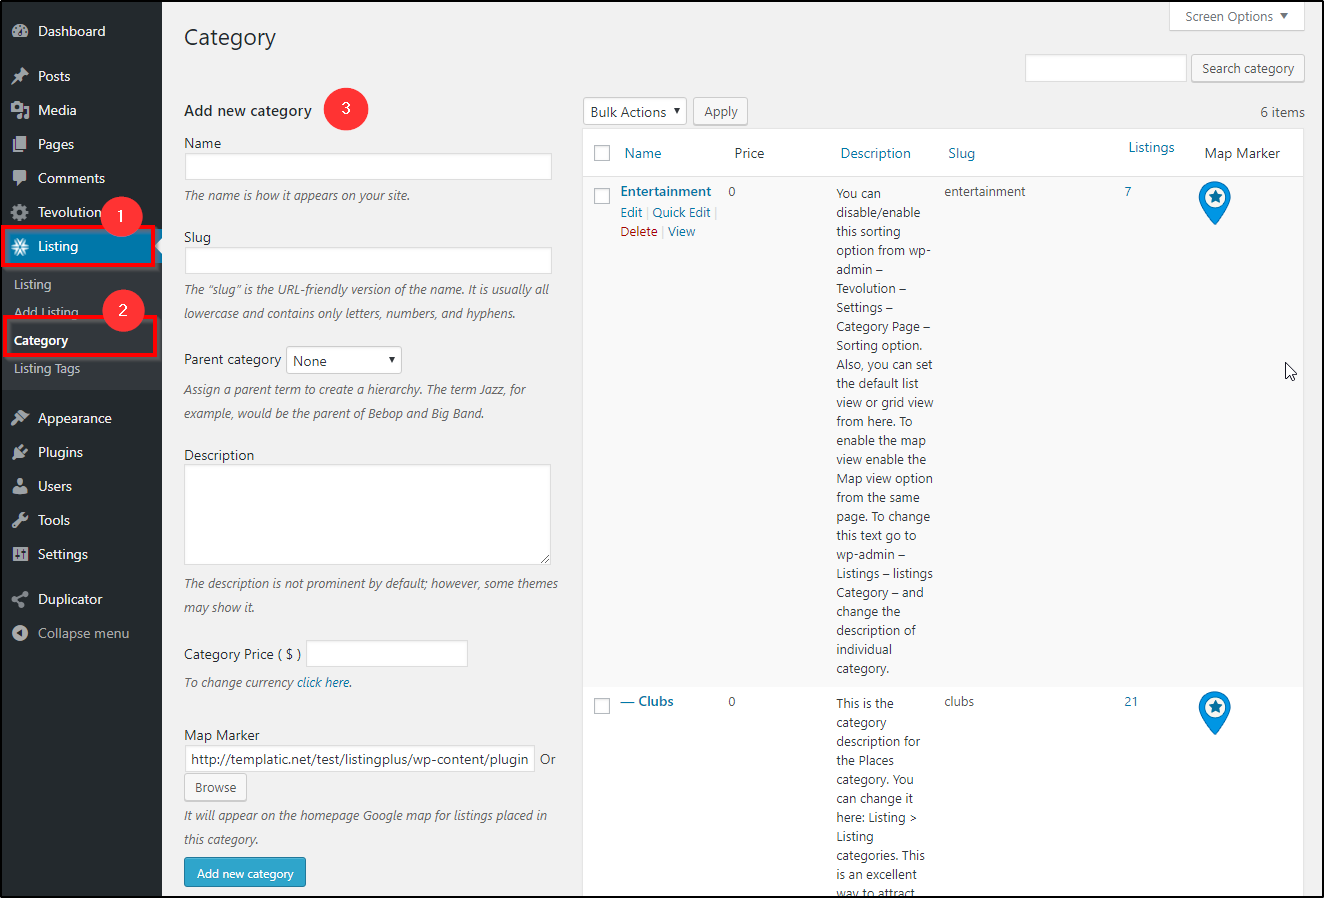
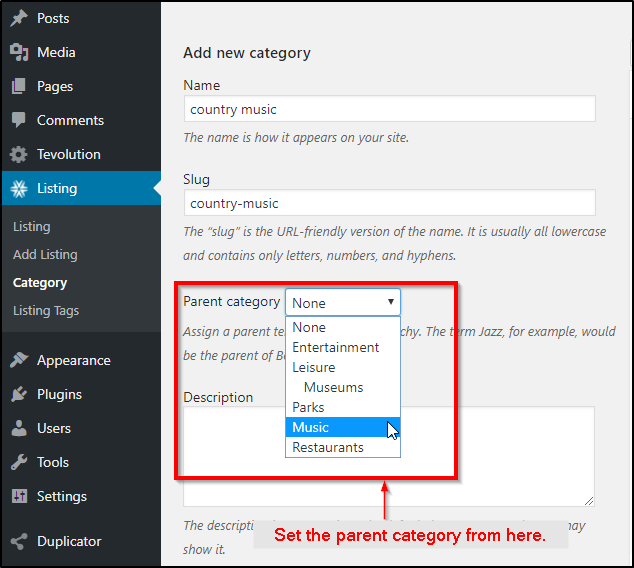
Create a category: To create a category, you can log in to your dashboard, Listing ⇒ Listing categories. From here you can add a new category or edit the existing ones.
Use the form shown in the image to create a new category.
Create a child category: While adding a category, you can set it as a child category simply by choosing a parent category.
Listing tags will allow you to set multiple tags for the listings.
Set a unique map marker for a Category
If you want different categories to be represented by different map markers on the map, you can set map marker based on the category.
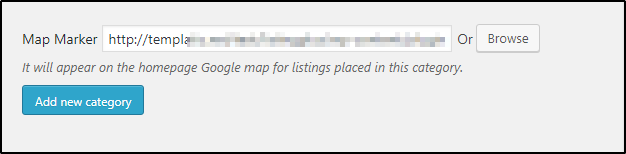
You can upload the map marker while creating the category, or add it at a later stage by editing the category.
Add a listing
The WordPress Directory theme allows adding listings in two ways:
- From the backend, by the admin
- From the frontend, by registered users
Adding Listings from the backend.
Before you allow front-end submissions for the listings on your site, you can add a few listings from the backend. For this navigate to wp-admin ⇨ Listings ⇨ Add Listings.
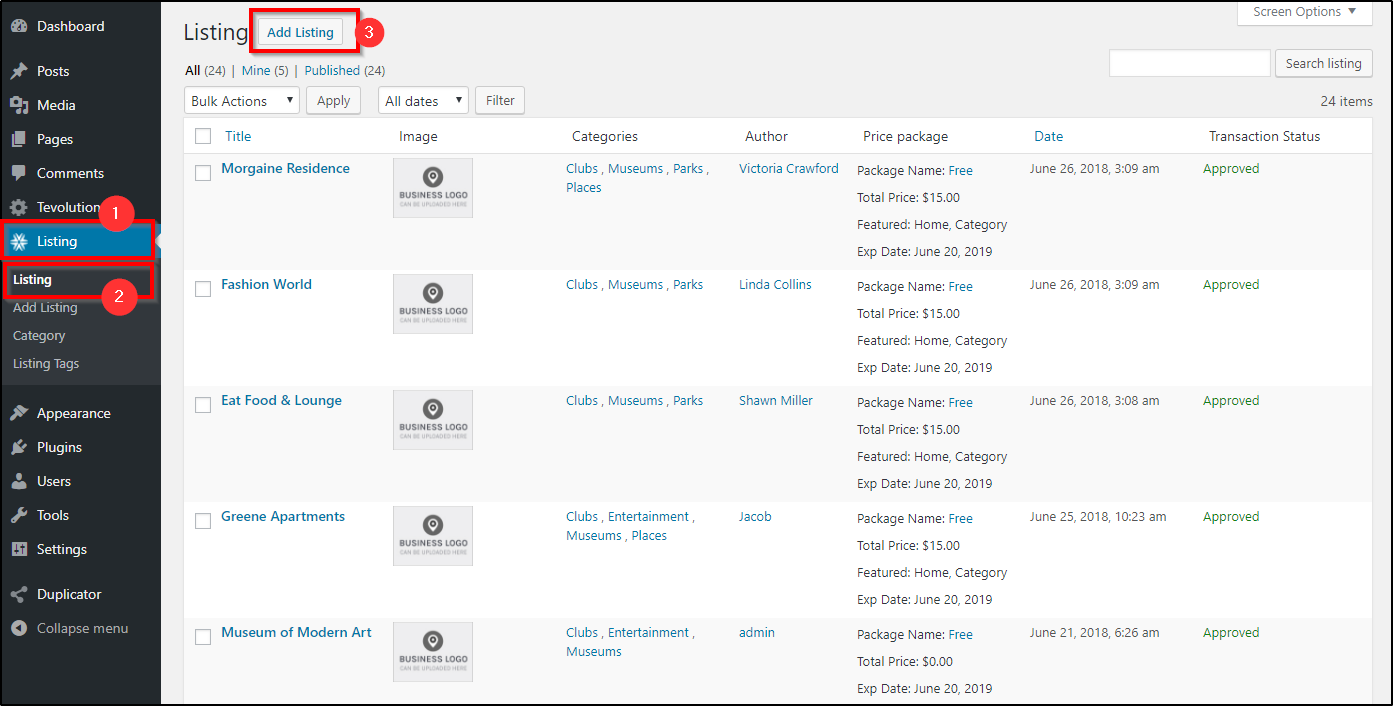
Fill the details, Upload the images, Choose the category and insert proper description as well as address. You can save the listing as a draft if you don’t want to publish it immediately or hit the publish button and make the listing live.
Front-end listing submission
The front end listing submission can be free or paid. You can learn about listing submission package in the monetization section of this guide. To allow submissions for free, you can create a free package by setting the price as 0.
The Directory WordPress theme, you get a completely functional front-end submission system. You also get ready to use submission page called “Submit listings” and also a “submit listing” button on the home page with the sample data installed.
If you delete the submission page by mistake, you can create a new page, and use the shortcode to create a front-end submission form.
[submit_form post_type=’listing’]
Replace the post type name in the shortcode to create a submission page for a different post type. For example: [submit_form post_type=’jobs’] for jobs post type, [submit_form post_type=’events’] for events category page.

The fields of the submission form can be managed from Tevolution ⇨ Custom fields ⇨ Listings. Hovering on the field name will show you the edit option.
Managing the listings submitted from the front end
After successful payment, the users will be allowed to submit their listing. You can decide if you want the user submitted listings to be automatically published, or saved as drafts. We recommend you to hold them back for moderation so you can check the submitted data.
Manage this setting at Tevolution ⇨ Settings ⇨ Submission page settings ⇨ Default status for free/paid submissions.
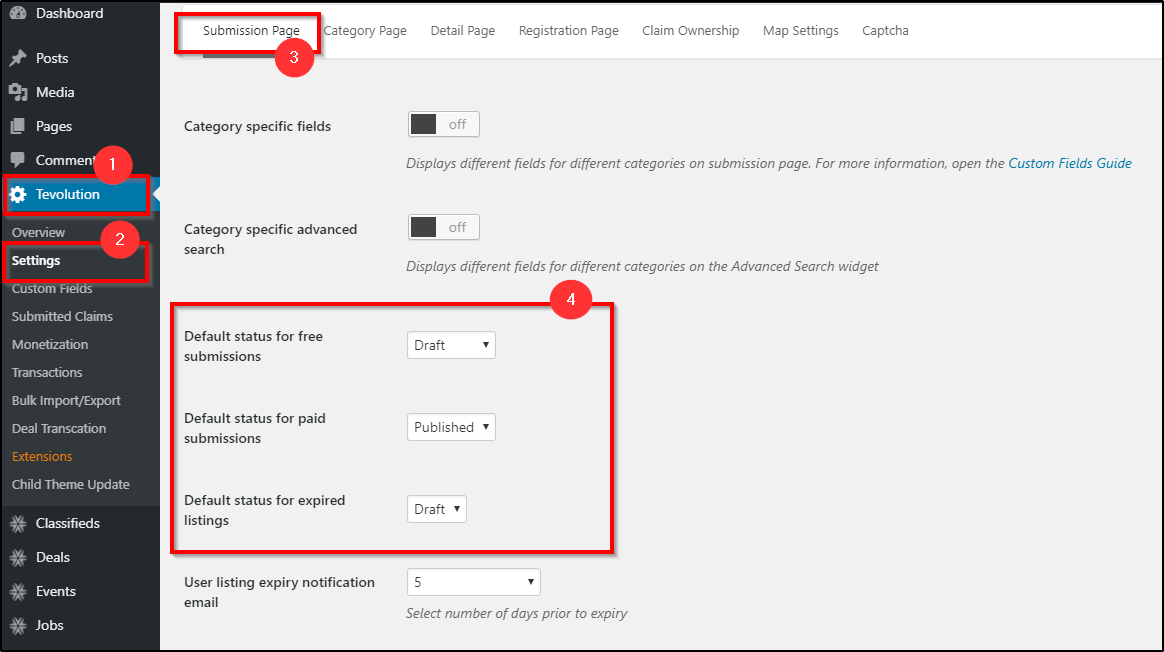
The user submitted listings can be seen at Dashboard ⇨ Listings section. From here, you can publish/unpublish or edit them.
Another place from where you can manage them is Tevolution ⇨ Transactions. Use that section to bulk confirm or bulk reject transactions/listings. For more information about Transactions click here.
![]()
Managing the Listings
All the listings, user-submitted or admin listings, can be found in the Dashboard in Listings (this page). As an admin, you have the full control over the listings on your site, you can add new, edit, update . You can also change the status of the listings in bulk using the bulk actions options.
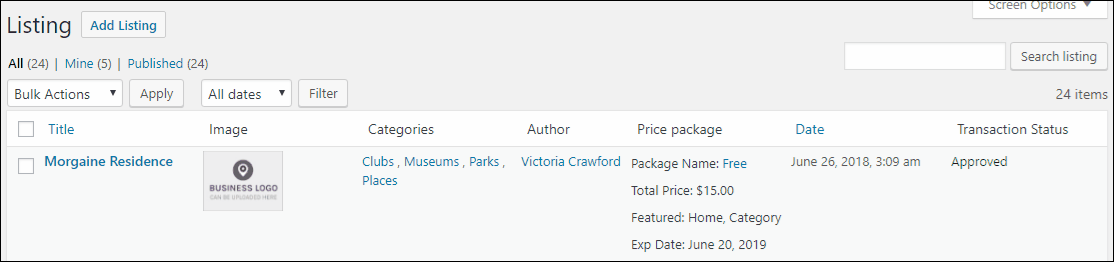
For minor changes, you can use the quick edit options too!
Custom field settings
With the custom fields and custom post types, you can create a website of your choice easily. ListingPlus allows you to create a post type of your choice with the fields you need and even start accepting front end submission for it. Here’s how you can create and manage custom post types and custom fields.
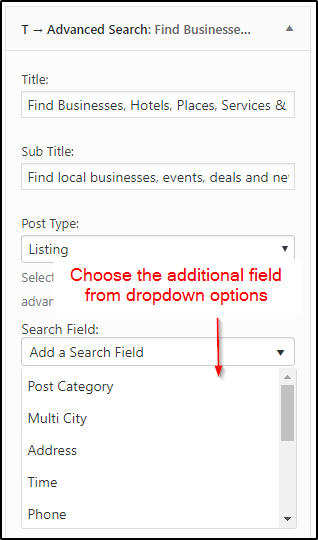
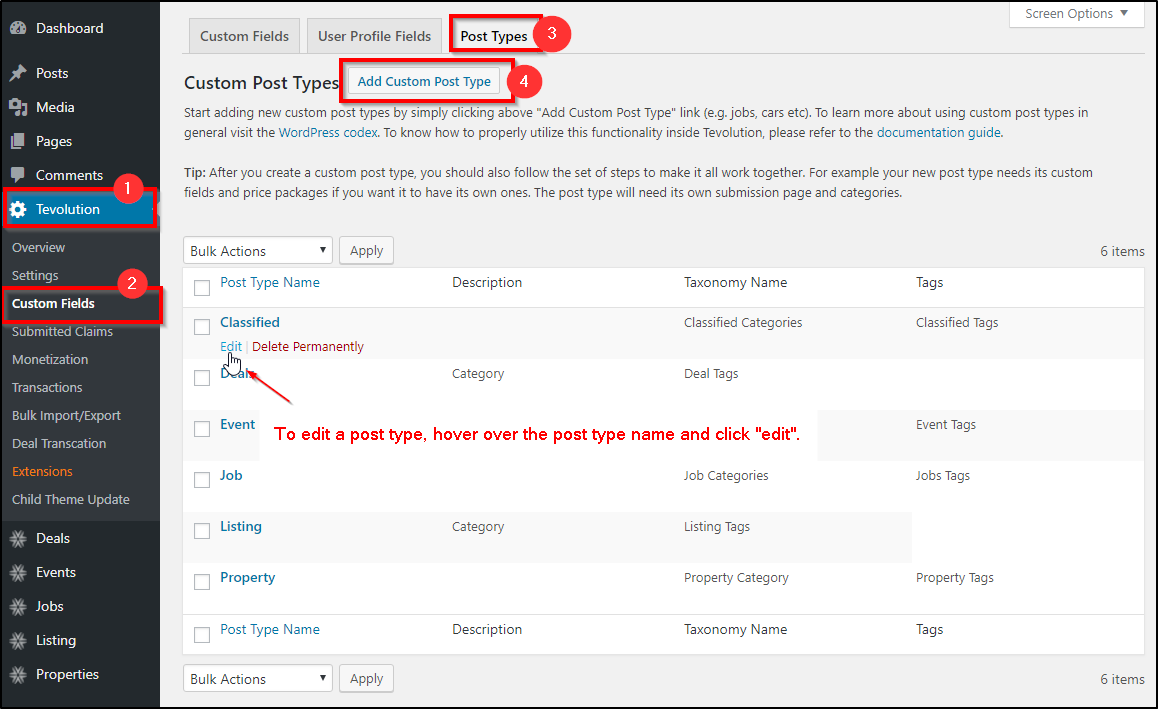
Post Type
If you want to create a new post type, you can use these options. Navigate to Tevolution ⇒ Custom fields ⇒ Post types to create a new post type. This page will list all the post types that you already exist on your site. To change the properties of each custom post type, you can choose to edit them. Hover over the post type’s name and click “edit”.
This will show all the properties for the post type. You can change the name of the post type, slug, taxonomy, description, etc. You can even upload a custom icon for your post type and a custom map marker. To add a new Custom post type click “Add Custom Post type”.
Custom fields
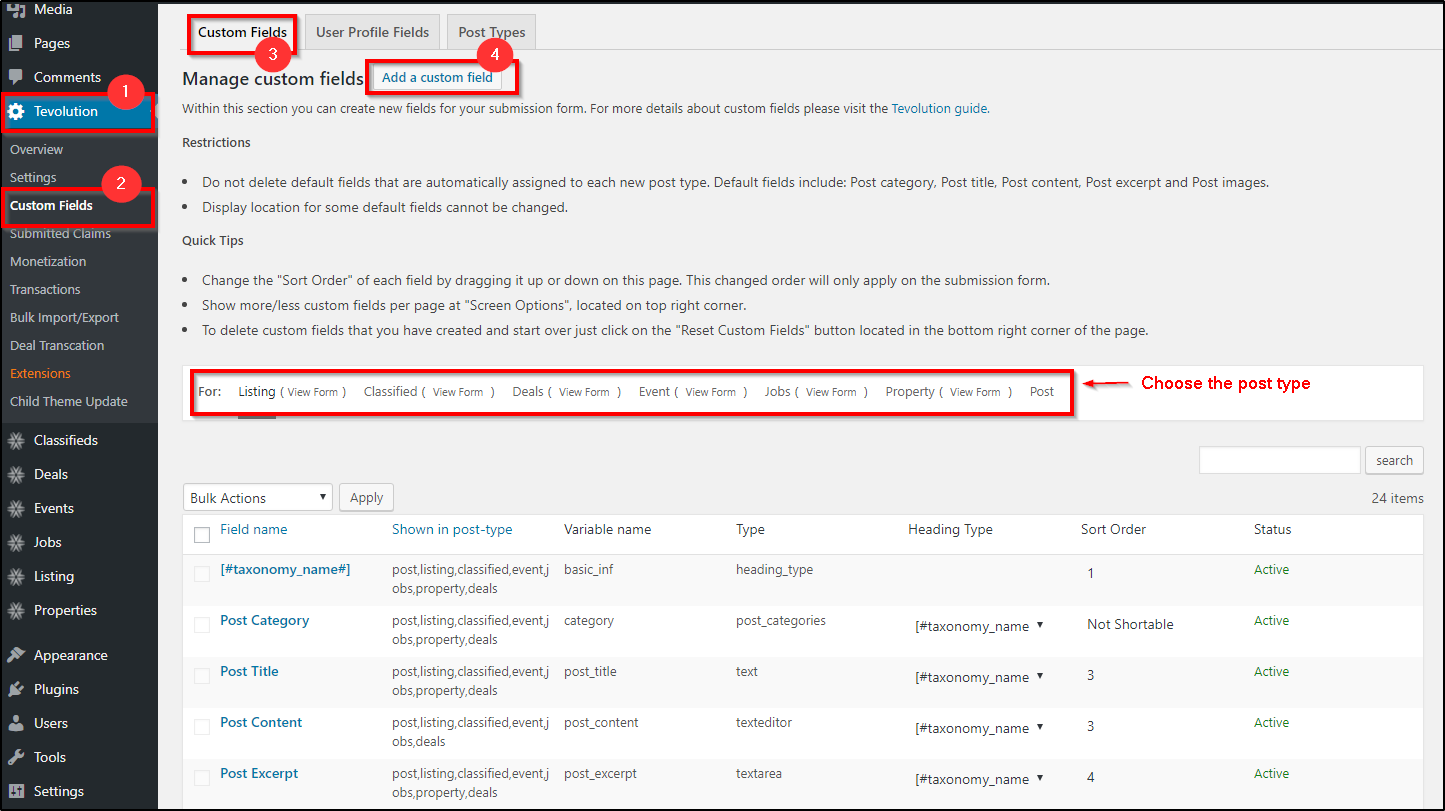
You can edit the custom fields for any of your post types by navigating to Tevolution ⇒ Custom fields. On this page, you will find the different tabs for custom fields of each type.
Hover over the custom field name that you want to edit. You can add a new custom field using the “Add Custom Field”. While adding the custom field, you can specify the post types for which you want the custom fields to appear.
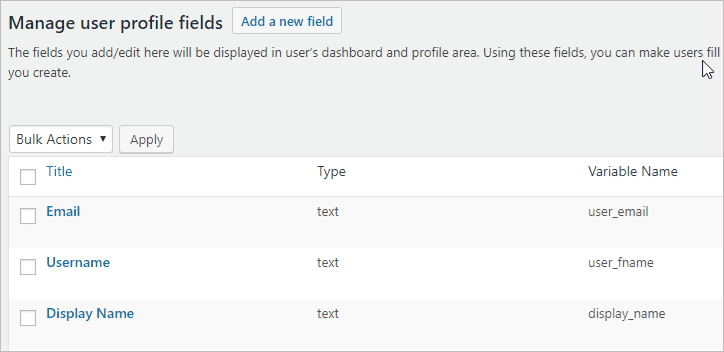
User profile fields
You can manage the user fields by navigating to Custom fields ⇒ User Profile fields. Clicking the “Add new field” button lets you add new user profile fields.
You can edit the existing user profile fields by hovering over the user profile fields and choosing “edit”.
Managing Locations
The location-based features on your WordPress directory website is available through the Tevolution – Location Manager plugin. However, with the flexible and multipurpose ListingPlus Directory theme, you can choose if you want your website to be multi-city ready or use it for a single city only.
Using the ListingPlus theme for a single city websites
The ListingPlus WordPress theme works as a single city Directory template without the location Manager plugin.
So if you want to use the theme as a single city theme, you can use it without the location manager plugin. If you have already installed the Location Manager plugin, you can deactivate/uninstall it for a single city directory website.
Adding the multi-city feature to your online Directory
If you want to add location based listings on your directory website, you need to install and activate the location manager plugin. Download the location manager plugin by logging in to your Templatic Member’s area.
Adding city, state and country to your Directory website
Location settings
For more help, you can refer to the Location Manager guide or these Location Manager FAQs.
Track city visits (city logs) – To keep the track of visits of the users in each city. This will be useful in deciding the most popular cities of the site.
The country, state and cities tab will allow you to add and manage the countries, state and cities respectively. The City logs tab will allow you to track the visits on each city of the website.
The city logs
The city log will show how many times a city is selected and its listings are viewed. The report will show the city, state and the country name with the Total Count and view details. On clicking on views – the details of the city views will be shown. This includes the IP address and number of times the city is viewed from the IP address.
To turn on or off the city logs, navigate to Tevolution ⇨ Manage locations ⇨ and enable or disable the option Track city visits (city logs).
Map Shortcode
Use the below shortcode to display content (one or most post types) within a specific city. To create a page using this shortcode navigate to Pages ⇨ Add New and paste in the code.
[TCITY-DIRECTORYMAP cityid='1' post_type='listing' height='500'][/TCITY-DIRECTORYMAP] |
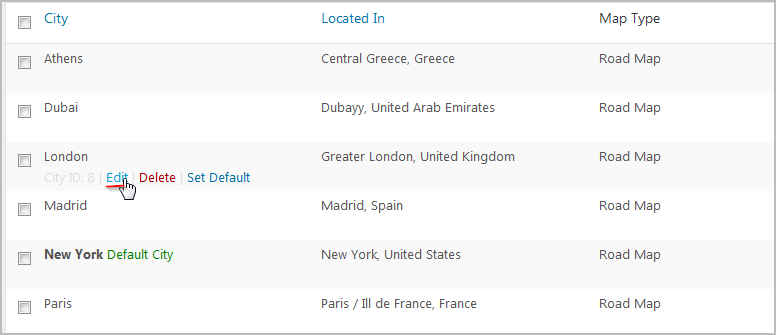
cityid – the ID of the city you want to show. The city ID is displayed when hovering over a city inside Manage Locations ⇨ Cities (tab). Screenshot.
post_type – enter the post type you want to show (e.g. events). To display multiple post types separate them with a comma. For example, to display listings and properties, enter the value like this: ‘events,posts’.
height –set map height in pixels.
Bulk upload cities
If you do not wish to add the cities one by one, use the bulk upload option. Using the bulk upload feature, you will be able to insert a number of cities together using a CSV file.
Using ListingPlus for Single Location/City guide websites
Turn off the Tevolution Location Manager Plugin to use your theme to create a single city website. Navigate to Plugins ⇒ Tevolution Location Manager ⇒ Deactivate.
Monetization Options
The online directory website created with the Listing Plus WordPress theme, lets you easily earn through it. Since the theme comes with lots of money making features, there are easy backend options to manage these features.
With these options, you can set currency, create unlimited price packages, set payment options, etc. On your dashboard, navigate to Tevolution ⇨ Monetization, to set up the pricing options in your website.
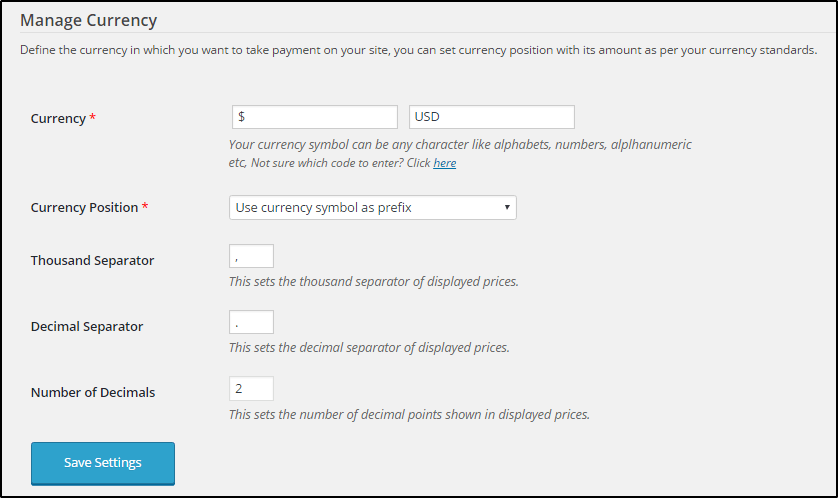
Currency
First of all, you would want to set the currency for transactions on your website. You can select a currency that you want your users to make payment in. Specify the currency symbol and currency code. Besides, the theme also allows you to specify the position of your currency symbol (prefix/suffix) as well as the separator for presenting your currency.
Price packages
For posting on your website, you can create unlimited price packages. To create a new pricing plan, navigate to
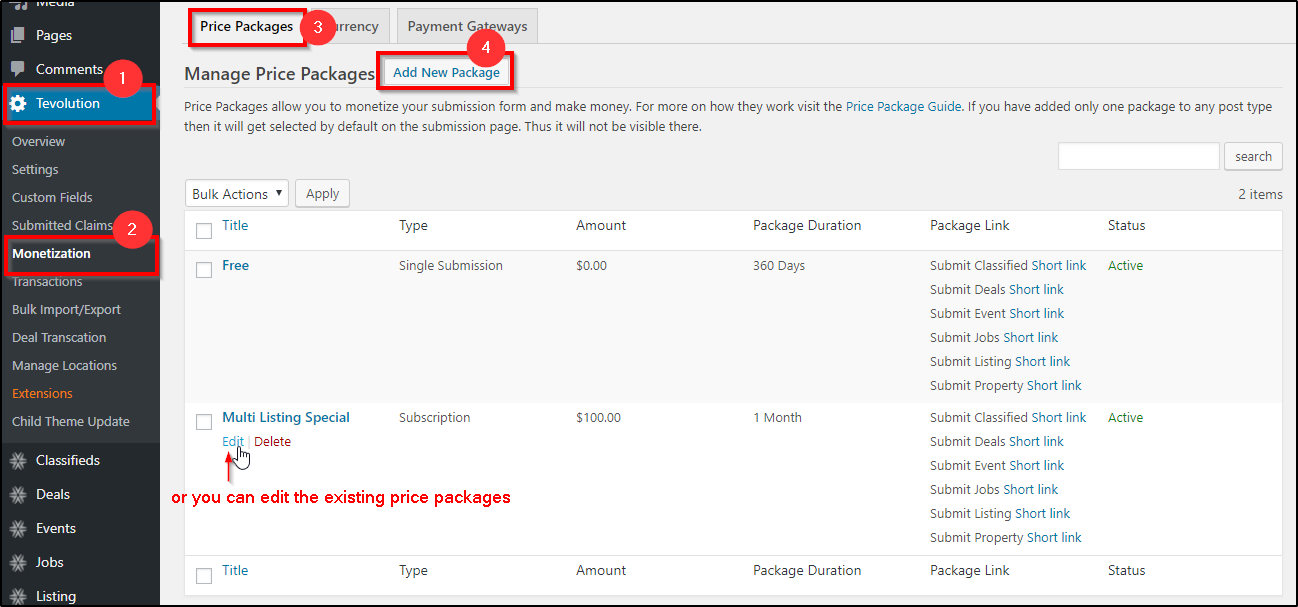
Each of these packages can have a different number of allowed listing, validity, category and prices.
The price packages you create here can be shown to the users on the front end while submitting a listing. They can select a pricing package that suits them the best.
You can even show these packages using the Pricing table.

With the sample data, Free and multi-listing price options are available pre-installed with the Tevolution plugin. Click on Add a price package to create a new price package.
Click here to learn more about how to create and manage the price package.
Payment gateways
There are multiple payment gateways that you can use to collect payments through your users. So select the payment processor at Tevolution >> Monetization >> Payment Gateways.
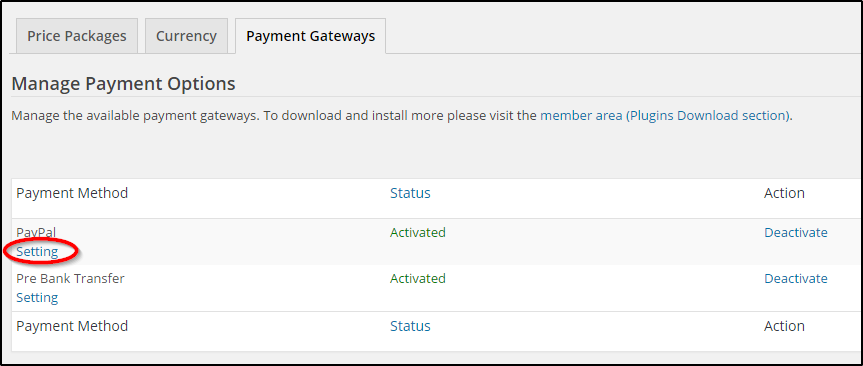
To accept payment right away through your site, you can use the PayPal and the pre-bank transfer methods that come pre-installed. Besides this, there is the number of payment gateways compatible with Directory that you can integrate and use into your ListingPlus website. All the payment gateways you integrate in your website will be listed into this page.
To accept payment from the registered users, you will need to integrate payment gateways through which they can pay and you can receive the sum. This can be configured from this page.
Clicking on the setting will open a page that allows you to configure the integrated payment option.
Managing transactions
With the user payments, it’s sure that you will have transactions in your website. These transactions can be managed at Tevolution ⇨ Transactions.It is the place where you can find the transaction reports.
Click here to know more about Directory Transactions Management.
Managing Users and User Registration
When it comes to online directory websites, user registration is one of the main features because it is the first step in front-end listing submission. With the available options in this WordPress directory theme, user registration and management is made easy. The theme comes with an inbuilt user registration system. Once registered the users can post reviews/comments, and submit their listings.
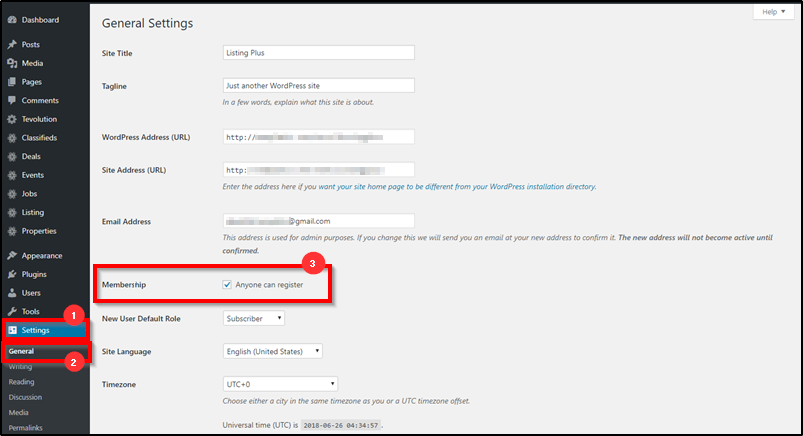
Enabling or Disabling the registration feature
If you want to use your directory theme without front-end registration system, you can disable registrations on your directory website. To do so, navigate to Wp-Admin ⇨ Settings ⇨ General settings ⇨ Membership and uncheck “Anyone can register” to disable front-end registration on your website. By default, the checkbox will be checked, which means registration is enabled on the directory site.
Adding new users through the backend
If you want to create new users for your website with different access levels, who can log in to your site, you can do so easily. Navigate to WP-admin ⇨ Users ⇨ Add user and fill the required user information.
Front-end user registration system
The WordPress Directory theme comes with a ready to use user registration form at wp-admin ⇨ Pages ⇨ Register. A user cannot proceed to post his/her listing without registration. Therefore the simple registration form is available on the submission form itself.
To register, the user just has to enter his/her username and the email address. The password to login to the account, and manage the profile, will be sent to the submitted email address. To manage the User profile custom fields, navigate to Tevolution ⇨ Custom fields ⇨ User Profile fields.
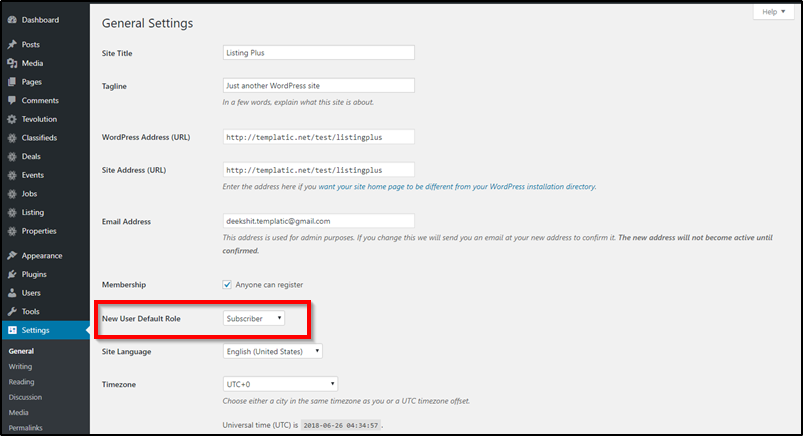
Set Default user role
You can set a default role for the users who register on your site using the front end registration process. To set the default role for registered users through the front end, go to wp-admin ⇨ Settings ⇨ General settings ⇨ New user default role.
You can change the roles of the users at a later stage, by navigating to WP-admin ⇨ Users.
Manage all users
As an admin, you can completely manage the users, view their information, change their role, or delete user accounts. To do so, navigate to WP Admin >> Users. This will show the list of all the existing users on your website, and allow you to manage them easily.

General Page Settings
Change the behavior of the most important pages of your site, you can use these options. If you want to change the structure of your existing pages, you can head to Appearance >> Widgets and adjust/add/remove/rearrange the widgets in the required widget area of the relevant page. But to change the page settings, you can use the following setting options.
Submission page settings
If you want to change the settings for your submission page, you can change it at Tevolution ⇨ Settings ⇨ General settings ⇨ Submission page. As the name suggests, the settings on this page let you control how the submissions will work on your site.

From here you can define the default status for free/paid/expired status. Set the Terms and Conditions for submission and also specify how the categories will appear on the front end submission form. Click here to know how you can use these settings.
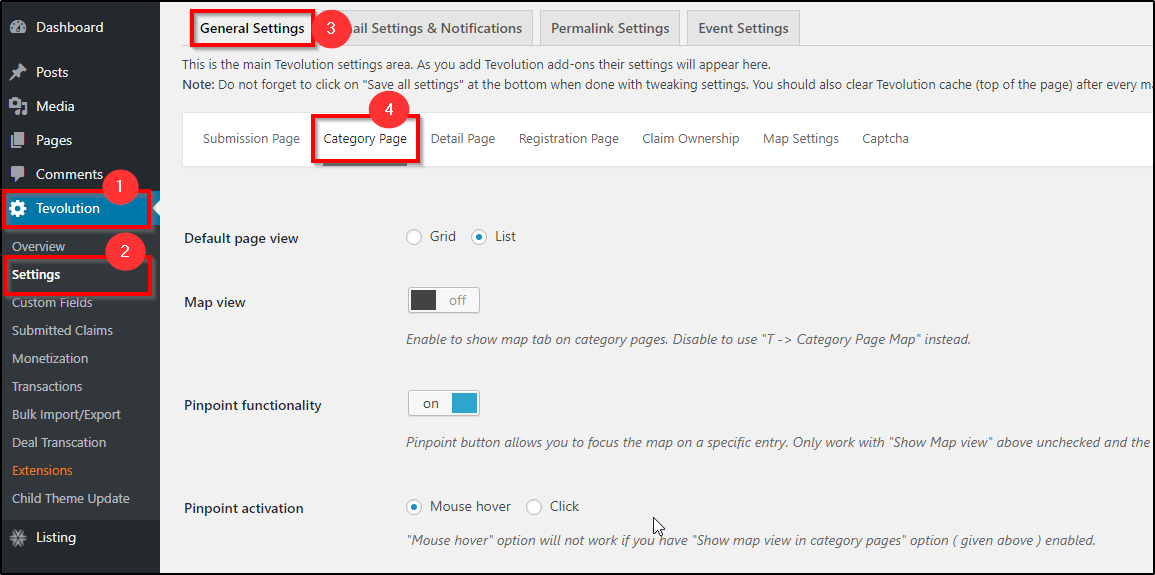
Category page settings
To change how the category page, that shows the listings of the selected category, you can navigate to Tevolution ⇨ Settings ⇨ General settings ⇨ Category page.
From here, you enable or disable the map on the category page. You can activate or deactivate the pinpoint facilities and also specify the sort options for the items shown on the category page. Click here to know how you can use the category page settings to set up your category page.
Detail page settings
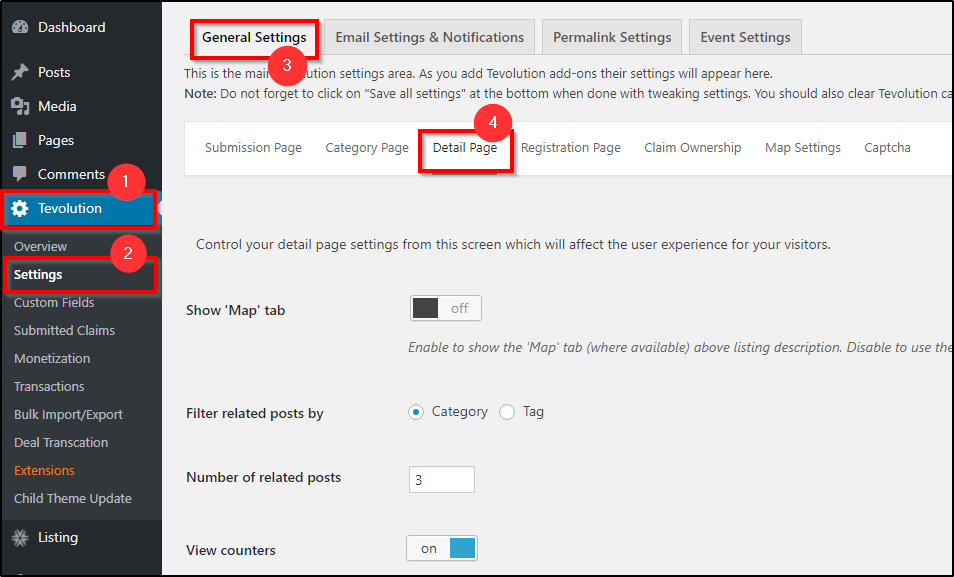
The listing detail page is indeed one of the most important pages of your website. You can change its settings at Tevolution ⇨ General Settings ⇨ Detail page settings for the detail page related settings. From here, you can enable or disable the map tab on the detail page. Moreover, it allows you to set the number of related posts to be shown on the detail page. You can also manage the social sharing, enable disable view counters, ratings on the posts from here.
 `
`
Click here to know the detail page settings in detail.
Registration page settings
To change the registration page settings, head to Tevolution ⇨ General Settings ⇨ Registration page. The Listing plus directory theme allows social logins, and you can manage it from here. To know more about the registration page settings, Click here.
Map settings
Different pages of the ListingPlus theme come with different maps. Map variants are available according to the mode in which the theme is running (Single city mode with Tevolution Location Manager deactivated or Multi-city mode with Location Manager active.)
Manage the maps on your site at Tevolution ⇨ General Settings ⇨ Map Settings.
Here is a detailed explanation on how the maps on directory website work.
Captcha
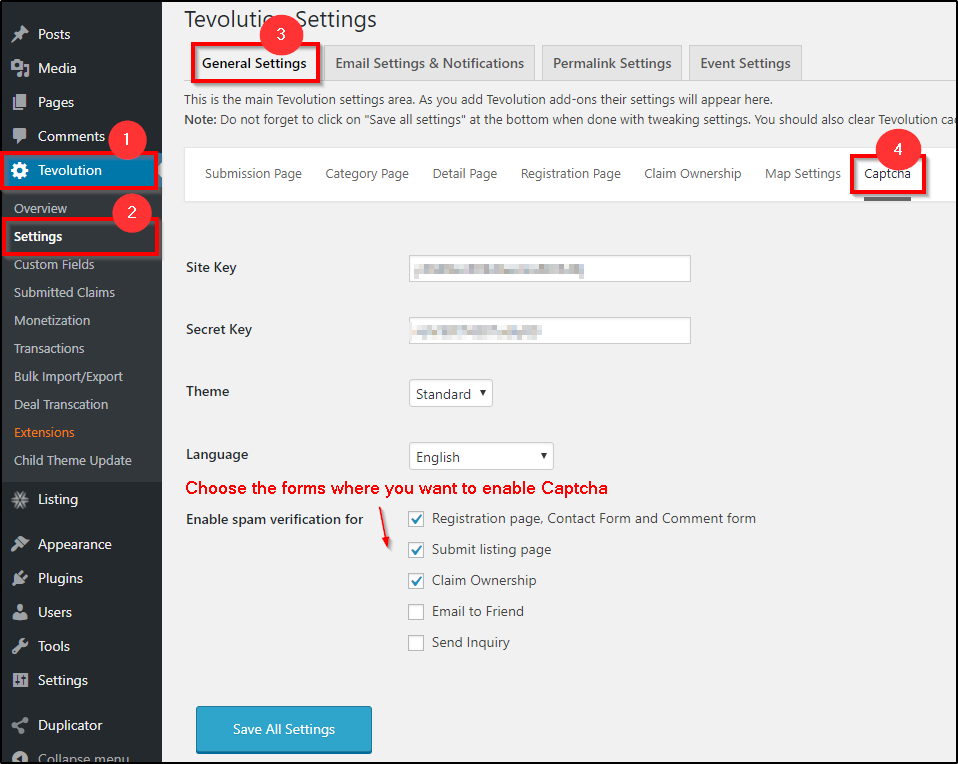
Use Captcha on your ListingPlus to protect your website from spam. To enable captcha, navigate to Tevolution ⇨ General settings ⇨ Captcha. Refer this link to register for reCaptcha. Also have a look at this guide to find out how you can configure the Captcha. You can acquire the site key and the secret key after registration.
Other Options
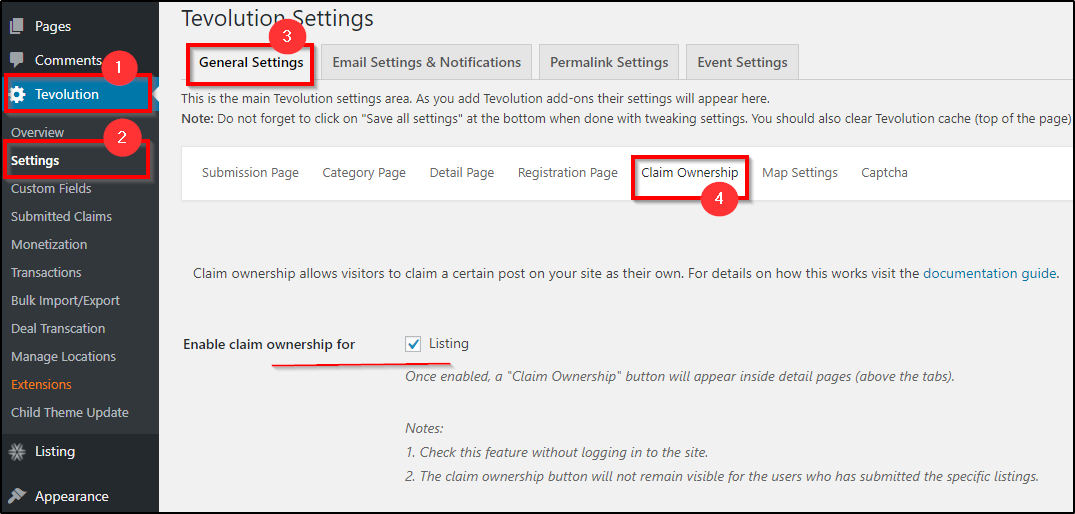
Enable Claim ownership on your directory site
ListingPlus allows free/paid claim ownership feature. It will enable the visitors to claim the ownership of the listings posted on your site.
You can enable claim ownership feature for your listings to navigate to Tevolution ⇒ Settings ⇒ General settings ⇒ Claim ownership. On enabling this feature, a “Claim Ownership” button will start appearing on your listing detail page.
Click here to know in detail how this works?
To check the submitted Claims, you can go to Tevolution ⇨ Submitted claims. You can also refer to this guide.
Email and Notifications
Email alerts will be automatically sent through the theme on specific events like listing expiration, etc. You can manage this at Tevolution ⇨ Email and notifications. This is where you can manage the emails and the noticafications templates that are sent to the users. You can also send an automated expiry notification.
Click here to know more about the emails and notifications’ settings.
Show/hide breadcrumbs
Breadcrumbs enable smooth navigation and enhanced user experience. To enable or disable the breadcrumbs, navigate to Appearance ⇨ Theme settings ⇨ General settings ⇨ Breadcrumbs.
RTL mode
You can use the ListingPlus theme to create an online directory website in RTL language. To create a website in Right to left orientation using the RTL languages like Arabic, Hebrew, you can use ListingPlus in RTL mode. You can enable the RTL mode at Appearance ⇨ Theme settings ⇨ General settings ⇨ RTL.
Sticky header
To enable the sticky header in the ListingPlus theme, that sticks to the top of the page while you scroll down through the webpage, you can go to Appearance ⇨ Theme settings ⇨ General settings ⇨ Sticky header.
Allow comments on posts
You can manage the comments related settings at wp-admin ⇨ Settings ⇨ Discussion settings. In Default article settings check the checkbox against “Allow people to post comments on new articles” .
However, this settings can be overridden by individual listings. You can enable/disable comments for individual listing. Navigate to listing page and hover over the listing name. The quick edit will show an option to allow comments. Click here to view an example.
Show/hide comments
You can easily show/hide the comments on the listings of your website using Appearance ⇨ theme settings ⇨ Comment settings ⇨ Display comments on posts.