Theme Installation
Installing WP-Deal using the WordPress dashboard
- Connect to the member area, expand the WP-Deal theme section and download the WpDeal.zip file.
- Inside your WordPress dashboard, navigate to Appearance ⇨ Themes ⇨ Add New ⇨ Upload and load the .zip file you just downloaded.
- Once the upload is finished click on “Activate”. With that done choose to “Install sample data”.
Installing with FTP
Installing via FTP is necessary on servers that aren’t optimized for WordPress and can often interrupt the installation process because of the long execution time. Good news is that this type of install isn’t particularly hard, just longer compared to installing from the back-end.
For general instructions about using FTP please open this tutorial.
- Connect to the member area and download the DailyDeal.zip file.
- Extract the file using software like 7-Zip. Use the Extract Here option.
- Assuming you read the above linked FTP tutorial, navigate to /wp-content/themes/ on your server and upload the extracted theme folder
- Login to your WordPress dashboard and go to Appearance ⇨ Themes. Activate the Daily Deal theme
- While in the Appearance ⇨ Themes section, click on the blue “Install sample data” button to populate your site with dummy data and make it look like our demo.
Manage WP-Deal pages
This section shows you how you can manage the various sections on the pages of your Daily deal website. Since the theme is completely flexible and mostly widgetized, you can completely manage the elements of your theme and change the look of your website as per your requirements.
The homepage
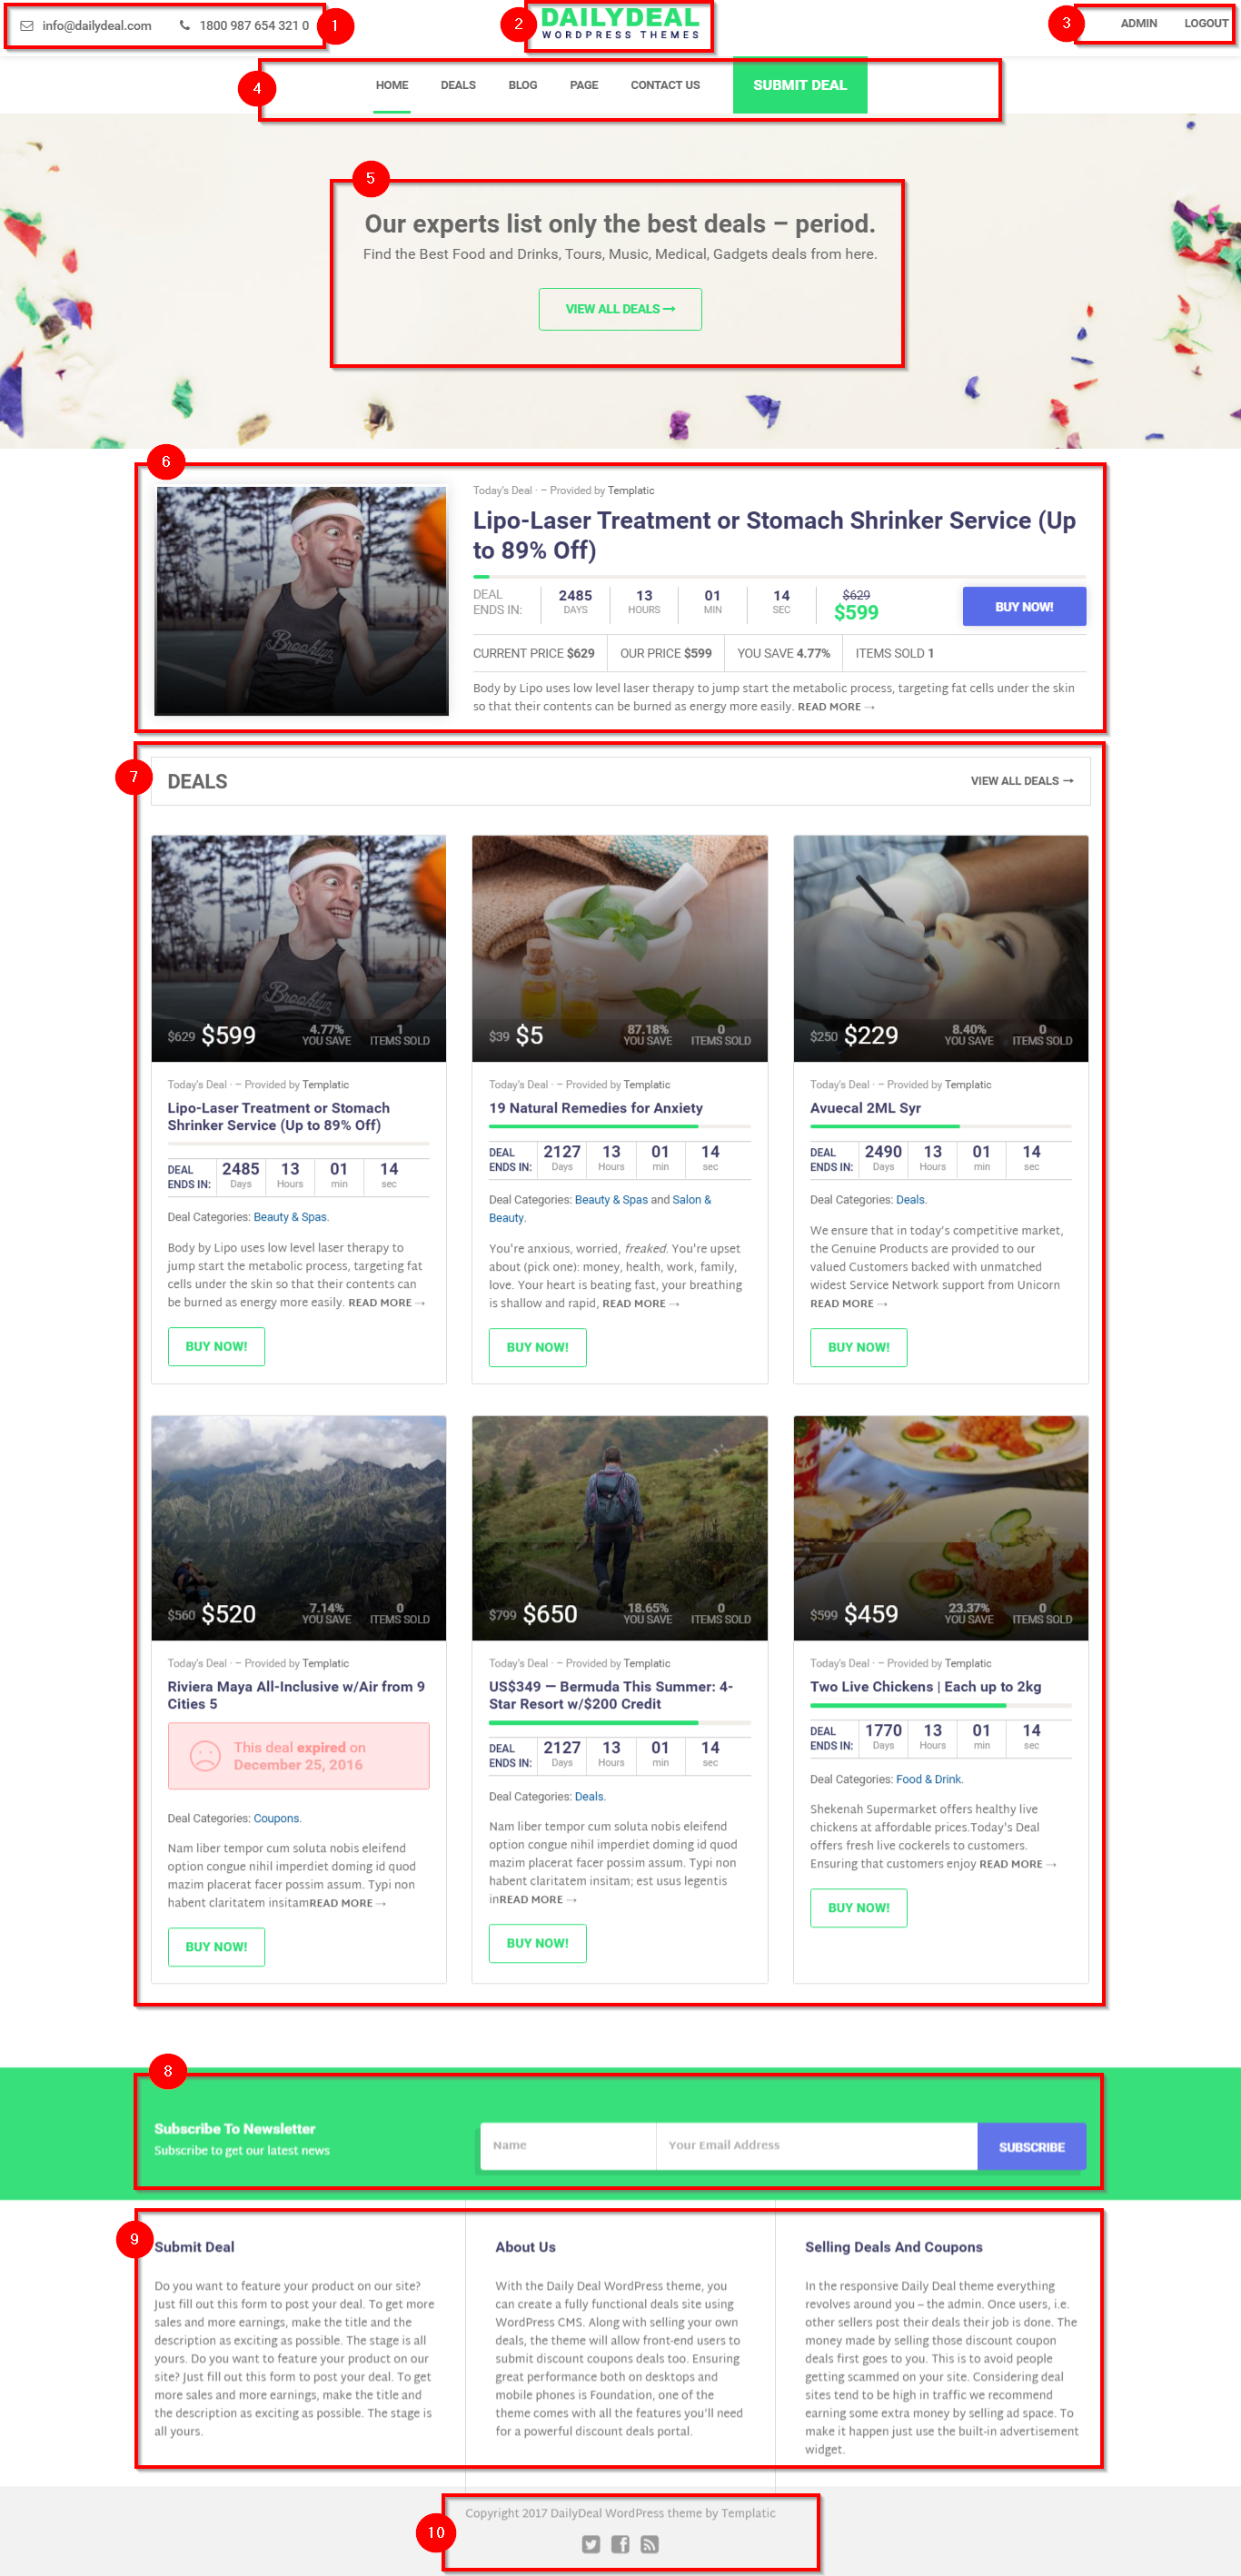
1) The header image
Navigate to Appearance ⇒ Customize ⇒ “Header left” widget area. The content here is comes from a formatted text widget placed in this widget area.
2) The logo image
![]()
Navigate to Appearance ⇒ Customize ⇒ Site Logo and Icon. You can change the site logo and the favicon from here.
3) Header right

You can navigate to Appearance ⇒ Widgets ⇒ “Header Right” widget area. The widgets placed here are T → Header Login User and search widget.
4)The menu
You can assign a menu here by going to Appearance ⇨ Menus and creating a menu. When you’re done select “Primary Menu” under Menu Settings ⇨ Theme Locations. For details on how to create custom menus watch the following video…
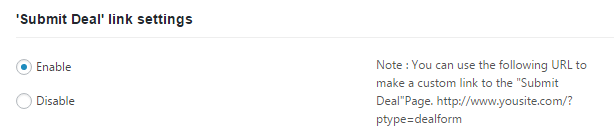
One thing worth noting is that creating a custom menu won’t remove the “Submit Deal” link. To remove that button go to Daily Deal ⇨ Daily Deal ⇨ Settings ⇒ ‘Submit Deal’ link settings and choose “Disable”.
5) Introductory Message
To edit or remove this section head over to Appearance ⇨ Widgets and expand the “Homepage: Intro” widget area. If the area is empty simply place the native WordPress “Text” widget inside the area. Wrap your message inside h1 tags in order to make it as big as on our demo. Example:
<h1>This is a welcome message</h1> |
Please, add the link in href section in View All Deals button code for redirecting View Button to your desired page.

6) Today’s deal
This is the main area of your daily deal home page where today’s deal is shown. This area displays the deal that is set as “Active” inside the “Status” option while creating/editing a deal. This option was explained earlier in the guide.
To edit the content that shows inside this box open the following file: wp-content/themes/DailyDeal/page-templates/front-page.php. The code you need to edit is wrapped inside the deal-list-wrap div.
Not sure how to open that file? Be sure to read our FTP tutorial.
7) The deals
This is displayed by the T → Categorywise deals widget placed at homepage – Below today’s deals. You can change it at Appearance ⇒ Widgets ⇒ Homepage – Below today’s deals widget area.
8) The newsletter subscription
This section asks the user to subscribe to your newsletter. This is the T → Newsletter widget placed in the Footer full-width widget area. To change this section, you can navigate to Appearance ⇒ Widgets ⇒ Footer – Full Width widget area, and change the widget over there.
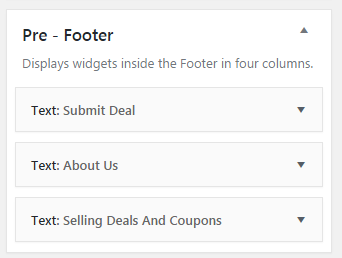
9) Pre-footer area
This pre-footer section can be used as per your convenience to display the elements you want to display in that section. In our demo image, we’ve used the section to display 3 sections of text. However, you can use any widget of your choice in this area.
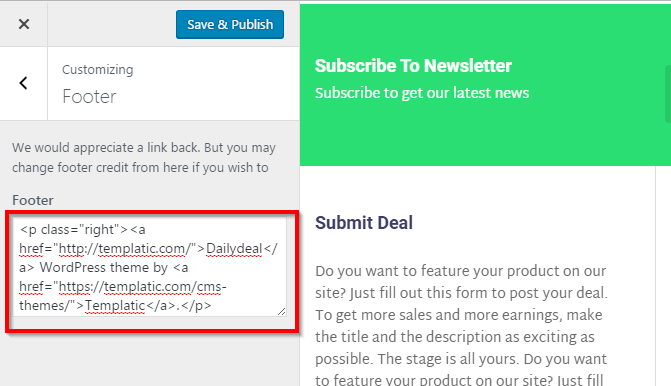
10) The footer area
The footer area consists of the copyright text and a few social media links. You can change the footer text by navigating to Appearance ⇒ Customize ⇒ Footer.
The Deal Detail page

1) The deal title
This is the deal title that you have provided while adding the deal. This makes it easy for the visitors to know what deal they’re viewing.
Make sure that the deal title is intuitive and targets proper key words.
2) The deal image
This section will show the image that will be added by the seller/admin while submitting the deal.
3) The sidebar
The detail page is a page with a right sidebar so that you can include all the important links of your website. You can do this using the various utility widgets.
The first element in the sidebar, however is not a widget. It shows the deal duration and a buy now button.
This is followed by the Newsletter widget in the image above. The next option,
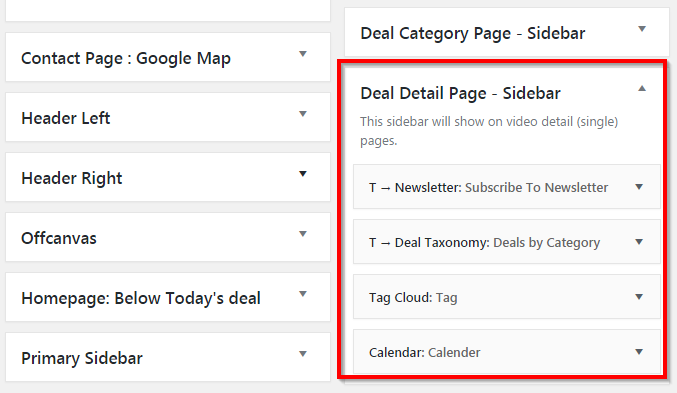
4) Deal categories
It is very important to specify the category of the deal for the user understanding. This section on the deal detail page will let the visitors know what the category of the deal is. The visitor can click on the category name to go to the category page.
5) The description
The deal description you add while creating your deal listing appears in this section. It makes the users aware of what your deal is about. Make sure that the description is totally in-depth, detailed and keyword rich.
6) The sharing buttons
You can manage the sharing button here by navigating to Daily deal ⇒ General Settings ⇒ And change choose the buttons you want to show on the Deal detail page. You can choose to show any of the below-listed buttons. Just set the radio selection to “yes” and the button will appear in this section.
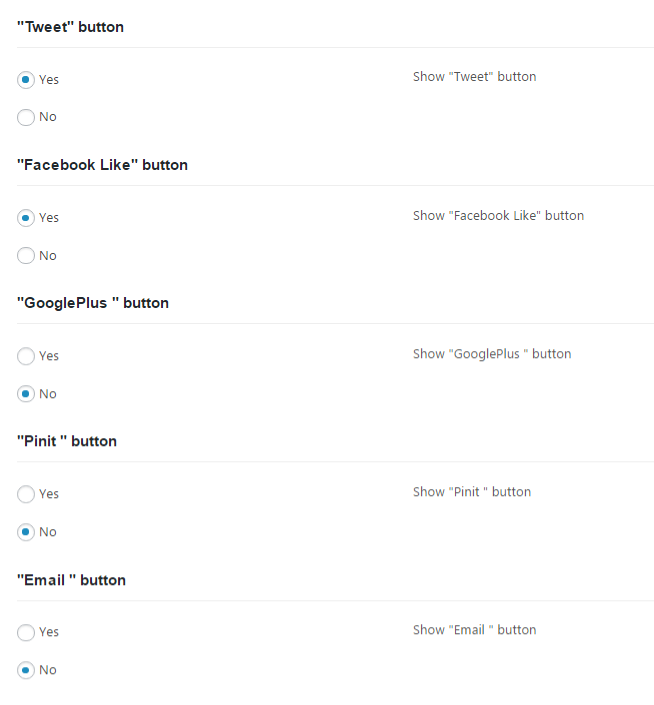
To make these buttons disappear from the deal detail page, you can go to Appearance ⇒ Custom CSS editor and paste the code below there. Don’t forget to click the Update CSS button to save the changes you make to the custom css file.
7)The next and previous button
The function of these buttons is pretty straightforward, they allow visitors to quickly move onto the next deal (they are sorted by publish date). To remove this section add this to your Custom CSS Editor
.post-navigation {
display: none;
}
8) Related deals
This section will show the deals that are closely related to the current deal. However, if you want to remove this section, you can just paste the following code in custom css editor at Appearance ⇒ Custom CSS.
.single .related-deals {
display: none;
}
7) The comments section
If you don’t want to allow visitors to comment on each other deals head over to Daily Deal ⇨ Daily Deal and hit No for the “Enable Comments on Deal detail page” option.
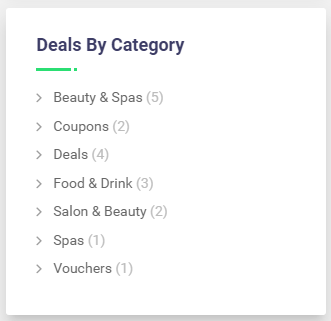
The category page
The category page on your daily deal website will be generated automatically based on the content you add. For each category that you add for your deals, the category page will show the category name, description and the deals added by you as well as other users (using the front end submission system) will be shown.
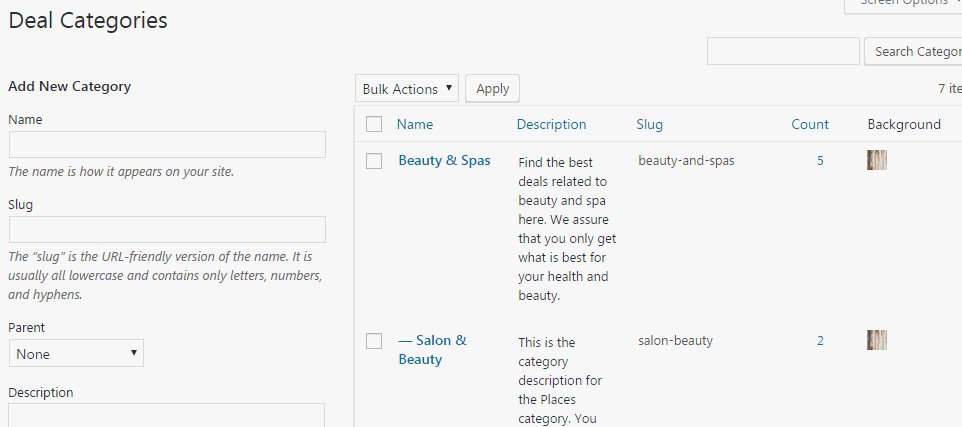
To get started head over to wp-admin ⇨ Deals ⇨ Deal Categories and use the section on the left to create a new category. Since empty categories won’t impress anyone, head over to Deals ⇨ Add New Deal and create a new deal and select the category.
The screencapture below shows how the category page looks.
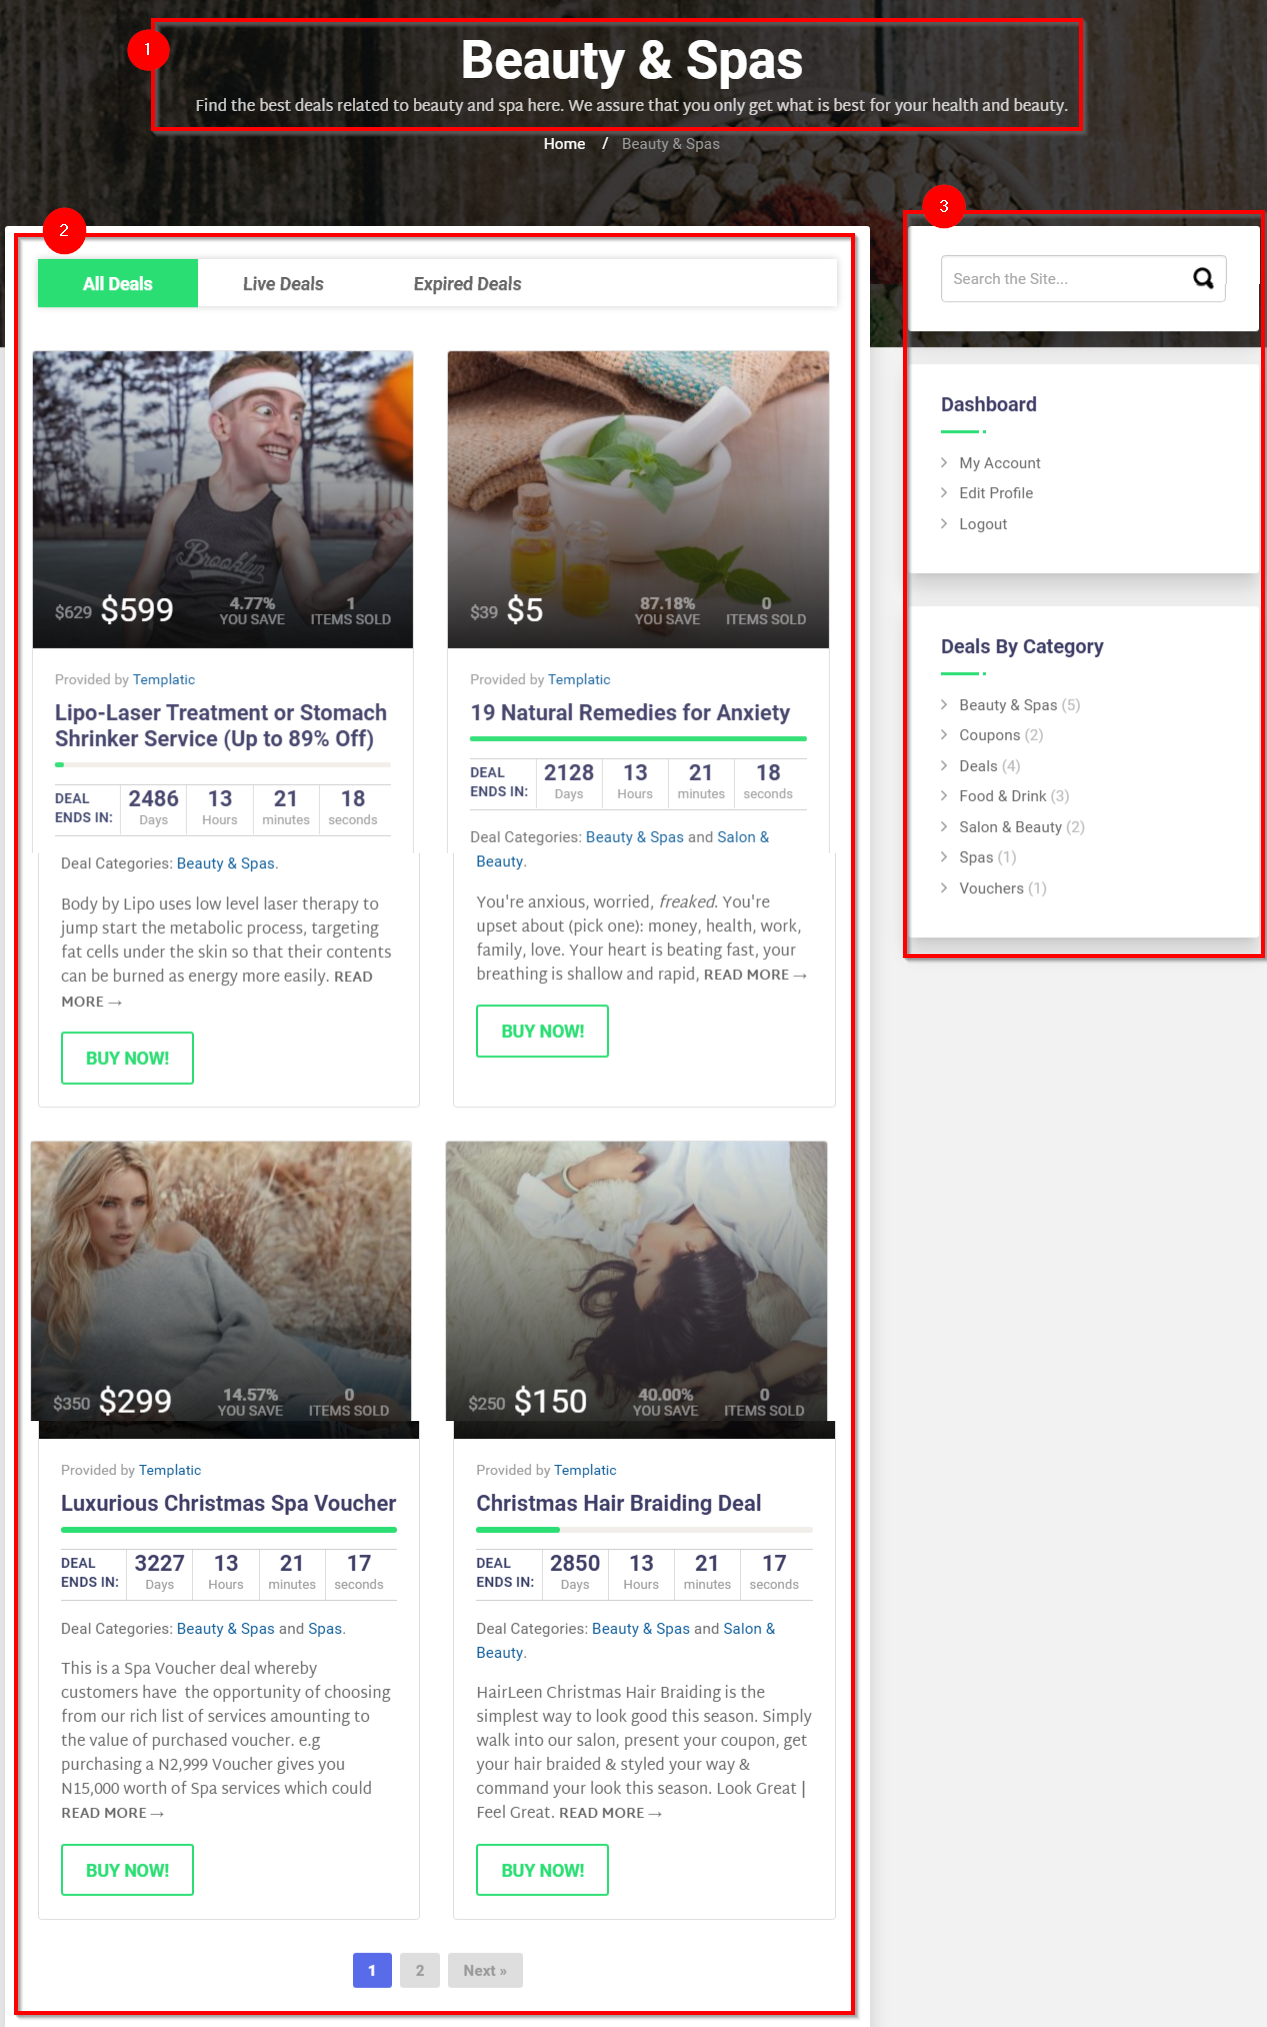
1) The Category name and title
The category page shows the category name with a bold title that indicates the category of all the deals listed on that page. Below the category name, there’s the category description. You can add the description about the category right when you are creating it. Or you can navigate to Deals ⇒ Deals Category ⇒ Hover over the category name and choose edit.
If you don’t want to display the category description, just leave the field empty.
2) The Deals
This is the main section of a category page where you will see the list of all the deals added under the category arranged in tabs.
When you open the category you’ll see three tabs: All Deals, Live Deals and Expired Deals. These tabs are populated and maintenance automatically based on the deal start and end dates. If you’re interested in removing the Expired tab connect to your server and open the following file: DailyDeal/taxonomy-seller_category.php. Comment out the following code (around line 65)
&amp;amp;lt;dd&amp;amp;gt;&amp;amp;lt;a href="&amp;amp;lt;?php echo $main_url.$expired_deal_querystr ;?&amp;amp;gt;#panel2-3"&amp;amp;gt;&amp;amp;lt;?php echo EXPIRED_DEAL; ?&amp;amp;gt;&amp;amp;lt;/a&amp;amp;gt;&amp;amp;lt;/dd&amp;amp;gt;
Deal categories can also be added to navigation menus in order to make them more accessible. While creating a menu in Appearance ⇨ Menus, click on the “Screen Options” button in the top right corner and enable “Deal Category”. You can now add deal categories to the menu by checking them on the left side and clicking “Add to menu”. For details on creating custom menus watch our Custom Menus Video.
Quick tip: To increase the number of entries available per page on category pages (default is 5), go to wp-admin ⇨ Settings ⇨ Reading and change the value associated with the “Blog pages show at most” option.
3) Category page sidebar
The category page sidebar can be used to present the useful and relevant links and elements on the category page. It’s a page with right sidebar. You can set what widgets you want to place here by navigating to Appearance ⇒ Widgets ⇒ Deals Category page sidebar.

How to access a category page?
If you want your visitors to access deals based on the category page (which is possible by showing them the list of categories linked to their respective category page), you can use the widget T → Deals Taxonomy in the sidebar of any of your page.
From the backend, you can navigate to Deals ⇒ Deal Categories. There will be a list of all the categories available for the deals. You can just hover over the category name and then click the view link.
Setting up a Blog page
Along with the ability to showcase deals, the Daily Deal theme also allows you to run and manage a blog. You can create individual posts by going to wp-admin ⇨ Posts ⇨ Add New. The Blog is essentially just a category holding those individual posts. So… follow these steps to create a Blog
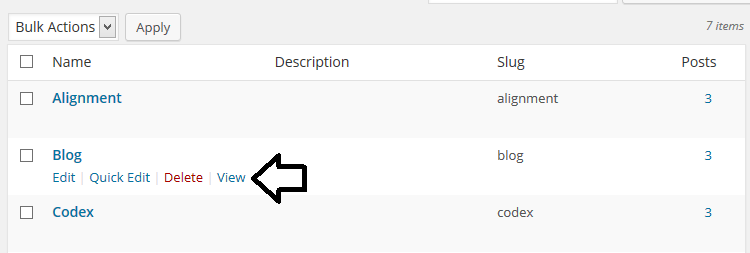
- Create a new category in Posts ⇨ Categories and name it Blog.
- Add posts to that category by going to Posts ⇨ Add New.
- By adding the posts our Blog page was automatically created. You can see it by going to Posts ⇨ Categories and clicking on the “View” link
I also recommend adding this Blog category to your navigation menu. Do that by going to Appearance ⇨ Menus and creating a new menu. Expand the categories dropdown, choose blog and hit “Add to menu”. For details on creating custom menus watch our video tutorial.
Create a deal
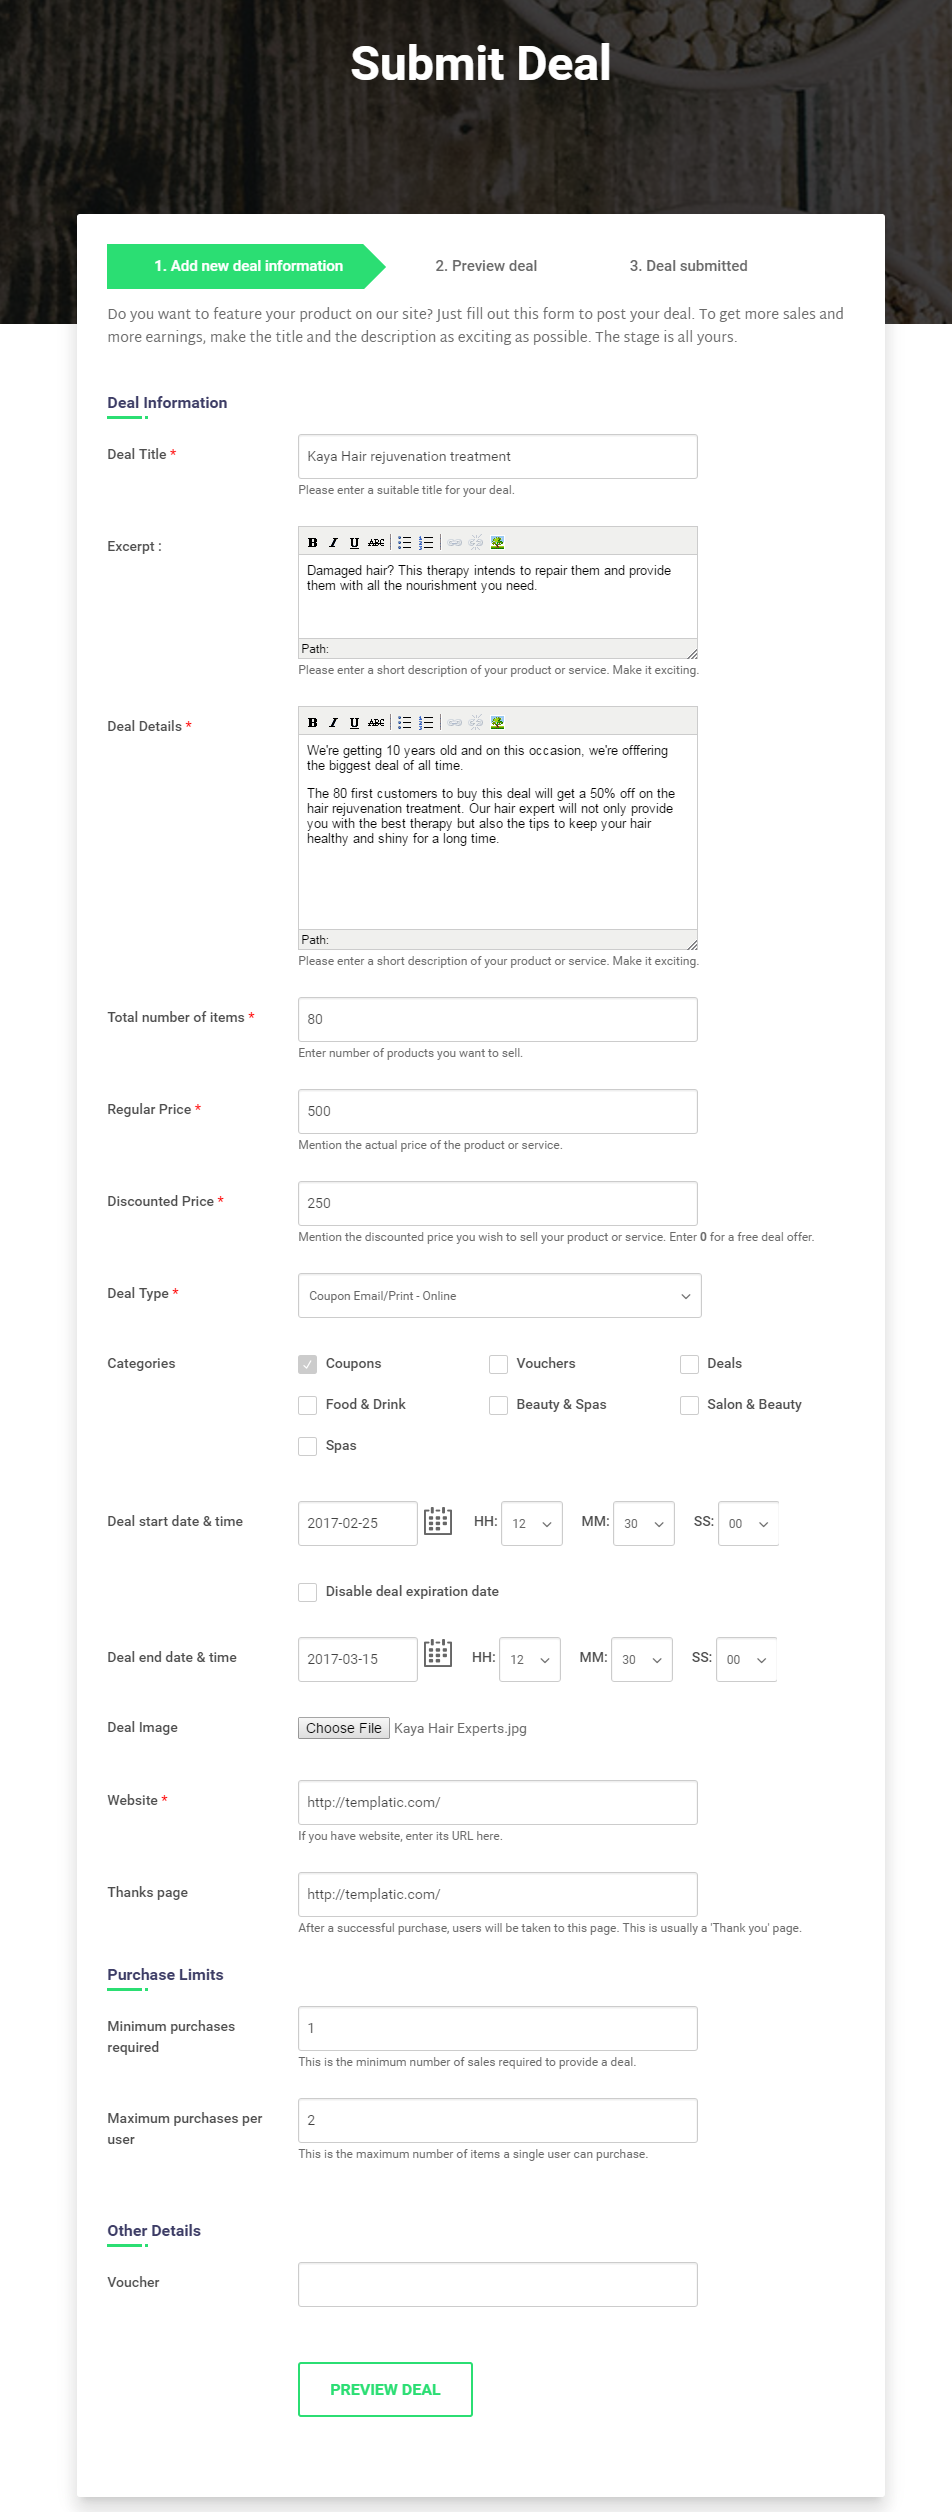
Creating deals is probably the most important thing you’ll do in Daily Deal so we’ll get that out of the way first. In Daily Deal, “deals” are a custom post type meaning they are separate from your blog posts (how to create a Blog?) and different rules apply to them. For starters we’ll focus on how to actually create a deal.
From the back-end
As the site admin you can create deals from the WordPress dashboard (i.e. the back-end) and using the deal submission form (i.e. the front-end). In comparison, regular visitors (users) can only use the front-end submission form.
To create a deal head over to wp-admin ⇨ Deal ⇨ Add New Deal. The title, description, and categories are entered/chosen the same as for any other WordPress post. Daily Deal-specific options are available below in two sections: Custom Settings and Deal Options
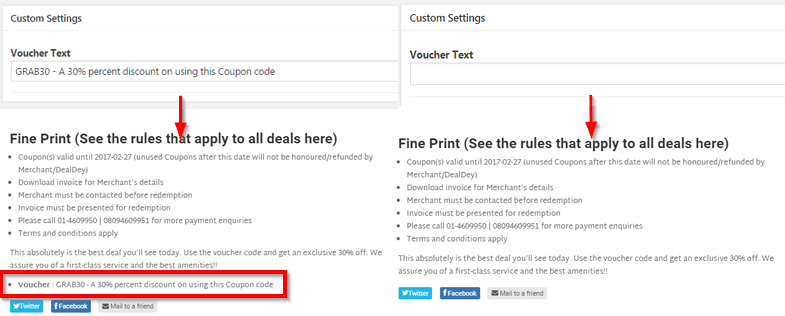
Custom Settings
This area holds custom fields created in the wp-admin ⇨ Daily Deal ⇨ Post Custom Fields section. Custom fields allow you to provide additional information about the field. For details on how to actually create those fields, click here.
By default there is just one custom field – Voucher Text. Its value (and values of other custom fields) will be shown on the deal detail page below the main deal description. If you leave this field empty, the Voucher text won’t appear.
Deal Options
The Deal Options area is where you enter most of the important information about the deal. The section features multiple fields for which you must assign values. Some fields are self-explanatory so I’ll focus on those that require further explanations.
Status
This feature controls the exposure of the deal by allowing you to select between 4 possible states:
Active – display the deal inside the big box on the homepage
Terminate – select this if you want to remove a previously “Active” deal from the homepage
Accept – makes the deal available for purchase on the site. It will show up inside category pages and the homepage “Categorywise Deals” widget.
Reject – use this to make the deal unavailable on the site. To remove the deal altogether use the “Move to Trash” option next to the Publish/Update button.
Name of the seller & Sellers website
The information you place inside these fields will form a link shown within the context of the deal. Here’s a quick screenshot of that link within a deal detail page.
Total number of items
The number of copies (of the product) available for purchasing. If you have an unlimited number at your disposal, don’t enter 0, enter a really high number instead (something that cannot be reached).
Original and discounted price
Enter only the number in these fields. Do not enter the currency symbol.
Thank you page
Enter a URL here if you want people to visit the deal owner site after making the payment. If you want them to say on your site just leave the field blank.
Deal type selected by the seller
This is an important option… it controls how the actual deal will behave. The options are:
Custom Link Deal – instead of initiating a checkout process, clicking on the “Buy Now!” button will instead redirect the visitor to the URL specified here
Digital Product Deal – upload a file (like a PDF) that people can purchase and then download directly on your site.
Coupon Email/Print – Online – create a coupon visitors can use to get a discount at the establishment mentioned inside the deal. “Single coupon” means that every buyer gets the same coupon. “Multiple coupons” forces you to enter a unique coupon code for each possible buyer. The number of entered coupons must correspond with the “Total number of items” field. To quickly generate up to 250 random codes, use randomcodegenerator.com.
Coupon Email/Print – Product – choosing this option will introduce two new fields for shipping options. Since you can only define a single shipping cost I don’t really recommend using this deal type.
The seller wants to provide
Through this field you can decide if you want to use the same single coupon code or more than one discount code. If you choose multiple coupon codes, you can enter upto 25 coupon codes, each separated by commas.
Minimum purchases required
Use this field if you want the deal to become active only after a set number of purchases have been made. For example, if you set the minimum purchases to 3 and only 2 purchases are made, the deal is cancelled and you need to manually refund those 2 purchases.
Maximum purchases per user
You can specify the maximum purchase of your deal by a single user. Suppose, you set maximum purchase as 5. Then a user won’t be able to buy under the same deal for more than 5 times. The purchase process will be terminated the 6th time the same user tries to buy it.
Start date and time
It is utterly important to specify the duration of your deal. A deal is for a limited period. So here, you can enter the start date, on which the deal will start and the exact time when it starts. For example :
End date and time
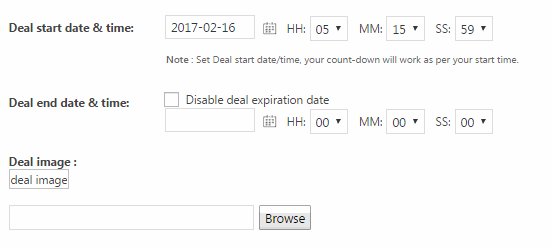
Similarly, you can set an end date, through which your deal will last. However, if you want your deal to last for an undefined period of time, you can check the “disable end date” button.
Deals image
With this option you can set a cover image for your deal’s listing. Choose a high definition image, that is relevant according to the subject of your deal.
From the front-end
Submitting deals from the front-end means using the deal submission form. By default, a link to this form is provided inside the top right corner of your site (“Submit Deal”). You can also access it by entering a URL such as this one inside your address bar: http://your-domain.com/?ptype=dealform
The fields inside this form are the same as the ones inside the back-end. As with the back-end Custom Settings section, you can add new fields by going to Daily Deal ⇨ Post Custom Fields. Fields added using that section will be shown at the bottom of the submission form.
If you’re skilled with PHP and want to edit the existing fields of the form.
The money flow in Daily Deal
In Daily Deal you (the admin) get all the money generated by the site. The funds from every deal purchase on your site will go to your account. Once the deal is finished it is your job to forward the money to the sellers. This transaction is done off-site so you can use whichever method works best for you.
Since these transactions are done off-site, you can set the commission to whatever works best for you. Commissions vary from site to site, but they are often between 30-50 percent. As the middleman you play a large role in the whole purchase process.
Advanced settings
Custom fields: Submission form
As mentioned earlier, in Daily Deal visitors can submit deals from the front-end by using the submission form. For details on how to remove existing fields from the form check out the FAQ, in this section we’ll cover how to add new fields inside the form. This is done from Daily Deal ⇨ Post Custom Fields ⇨ Add a new custom field. The options available inside that section are as follows…
Show in post-type: Since there is no front-end submission form for posts, you should choose “Deals” here
Field type: Select what kind of field this should be. If you want visitors to enter a bit of text, choose “Text”. If you want them to provide a lot of text, choose “Text Editor”. For multiple choice options focus on Multi Checkbox, Select and Radio types. Choosing one of those three field types will add a new option inside the form (Option values).
Field name (admin) | Field label (front-end) | Field name (back-end): You can enter the same name for the field inside all of these.
HTML variable name: A unique keyword that will define your field. Avoid capital letters and spaces. If your field name is “My awesome field”, the HTML var name should be my_awesome_field.
Note: There are more options within that form, but they are all self-explanatory
How to display field values?
The built-in custom fields functionality allows you to display custom fields within the deal detail page. However, what about other places; like the homepage, or category page? Custom field values can be displayed anywhere by using the get_post_meta() function. Here’s an example with using that “My awesome field” mentioned earlier
&amp;lt;?php echo get_post_meta( POST_ID, 'my_awesome_field', true); ?&amp;gt;
POST_ID is the ID of the post you’re fetching. Open this article if you’re unsure how to get the ID.
Custom fields: Register form
To add new fields to your registration form use the Daily Deal ⇨ Custom user-info section. The process of creating the field is almost identical as above. One of the differences is that you have a bit more control over where the field value is shown. You can choose between the actual register page and the profile page (i.e., the user dashboard page). The user dashboard page is the one that opens once logged in visitors click their name inside the top right corner. The URL structure is similar to this: http://your-domain.com/author/the-username/
Similar to regular custom fields, user profile fields also have a handy function for showing field values – get_user_meta().
Affiliate module
To manage your affiliates head over to Daily Deal ⇨ Manage Affiliate. Instead of explaining what each options does, I’ll just walk you through the process of setting up the affiliate system and managing members and transactions generated by it.
- Enable the affiliate module by going to Daily Deal ⇨ Manage Affiliate ⇨ Settings ⇨ Activate Affiliates. Choose Yes.
- Set the desired affiliate share amount in the next input field. To set it at 30%, enter 30 (just the number).
- Create an affiliate link by going to Manage Affiliates ⇨ Links ⇨ Add Affiliate Link. Make sure to populate the “Link URL” field with a link to one of the deals on your site.
- Go to Manage Affiliates ⇨ Settings and copy the Affiliate Registration URL. Paste it inside an incognito window (or a different browser).
- Proceed with creating an affiliate account using the affiliate registration form.
- With the account created (and you logged in as affiliate), open your user dashboard (by clicking your name in the top right corner) and then click on the “Affiliate Links” tab. Copy the affiliate link available there and paste it inside another incognito window (or the initial browser you were using).
- Proceed with checkout of the deal on your site. Choose “Pre Bank Transfer” or “Pay Cash on Delivery” to avoid actually paying.
- With the checkout completed go to Manage Affiliate ⇨ Manage Orders and approve the payment

- To view processed payments and commissions head over to Manage Affiliate ⇨ Sale Report.
- To view how much money you need to pay to each affiliate member head over to Manage Affiliate ⇨ Member. You can see individual member transactions by clicking on their username.
Transactions and reports
From Daily Deal ⇨ Report you’ll be able to manage the deal purchases made on your site. The area is divided into three sub-sections:
- Seller Report – check the performance of each seller (deal author) on your site.
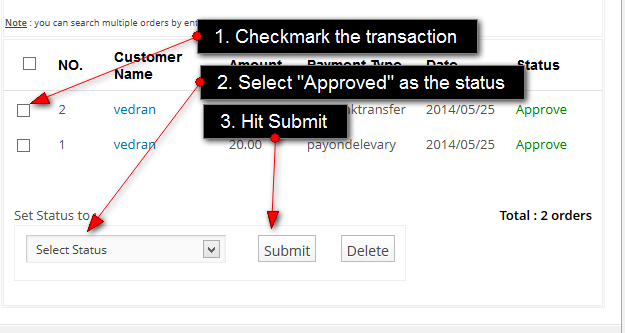
- Transaction Report – view transaction details of payments made on the site. Approve/Unapprove individual payments.
- Deal Report – view all trasnsactions for a specific deal
Approving a Pre Bank or Cash transaction
Offline payment method transactions can be approved by going to Daily Deal ⇨ Report ⇨ Transaction Report.
Payment options and gateways
Configuring payment methods in Daily Deal is fairly straightforward. It’s done in two basic steps:
- Setting the currency
- Adding personal information into payment gateways
Setting up the currency
By default, Daily Deal utilizes the US dollar. If you need to change this head over to Daily Deal ⇨ Daily Deal and focus on two options; Currency Symbol and Currency Code. Enter your countries symbol and code to proceed.
Important: The code in question is the ISO 4217 currency code. For a full list of codes open the following link.
Setting up the gateways
Managing gateways is available from Daily Deal ⇨ Payment Options. Since all gateways are active by default, you should look to deactivate those which you don’t plan on using, i.e. those for which you don’t have a merchant account.
Setting up a gateway usually involves providing just one identification key. With PayPal that’s your PayPal email address, with 2Checkut, it’s the vendor ID. The notify, cancel and other URLs you see mentioned in the options section for each gateway don’t need to be changed.
Note: Your PayPal email is the personal email used to set up the account (not something that ends with @paypal.com).
Customization options
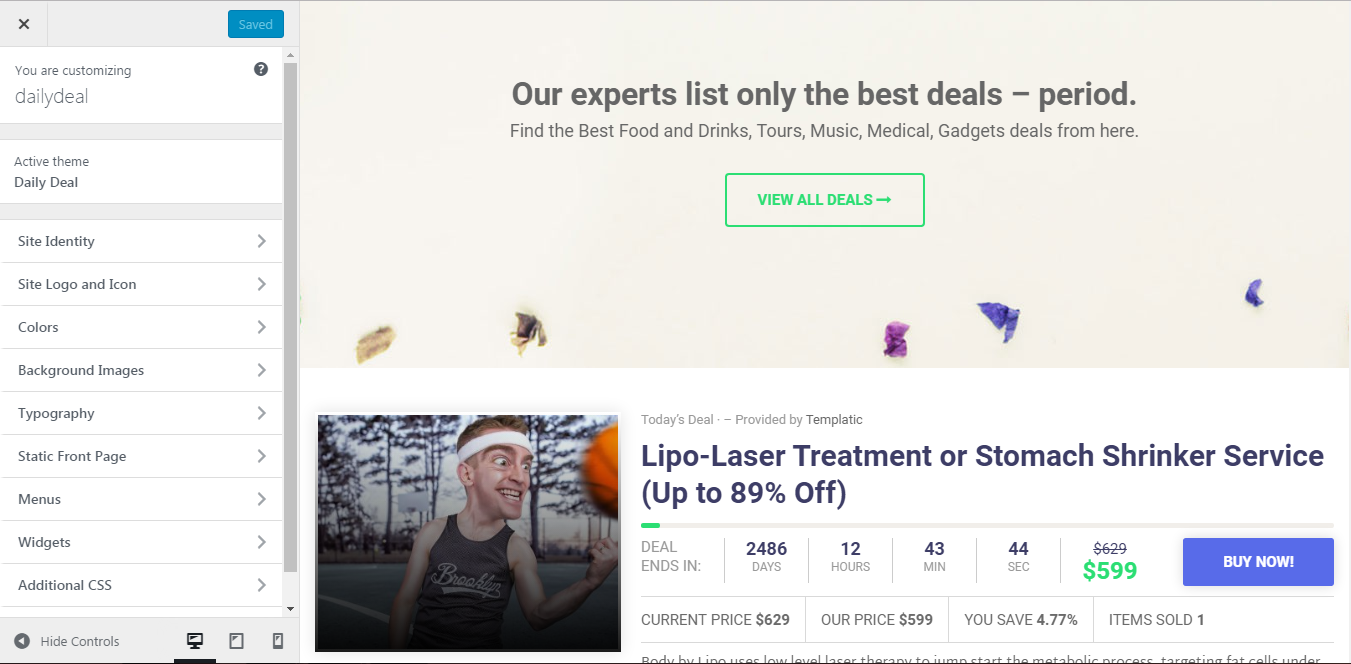
Daily deals uses native WordPress live customization options to let you change the colors and site properties. You can try out different combinations and settings and see the live effect of them on your website. What’s more, try till you find the best one and only save when you’re sure.
Changing colors
Changing colors in Daily Deal doesn’t require you to touch any code, you can do it from the Appearance ⇨ Customize ⇨ Colors section.The available options are…
- Body Background Color – Changing this will change the background of the whole theme. This includes the stuff inside and outside of the main content area (the container).
- Content Color – Tweaking this option will change the paragraph color on your site (deal description). It will also change meta descriptions, title borders (in widgets), the comments section, etc.
- Primary Color – Use this option to change the color of some links and buttons inside the theme. For example, changing this color will change the action button inside the slider.
- Secondary Color – Changes the background of your header and the color of some links (read more button).
- Title Color – Changes the title color for all pages, deals, posts, and widgets.
Setting a background image
Navigate to Appearance ⇨ Customize ⇨ Background Images to set a fancy new background for your theme. Upload either a header image or a body background image, depending on what you want to change. It’s worth noting that the header background image will be displayed on top if you set both.
When it comes to setting a custom body background image, keep these guidelines in mind:
- The image should be very large, around 1920×1080 pixels.
- The image is tiled (repeated) by default. Hide this effect by uploading large images as mentioned earlier.
- The uploaded image will affect the whole page, including the content section (i.e., the container). I recommend editing the image before uploading it and carving out the area in which the content should be displayed. The width of the content area inside Daily Deal is 1200 pixels. Here’s an example of what your background should look like.
- Using a background image increases page load and might diminish the site experience for mobile users. If you can avoid using it, then avoid it.
General customization tips
If you’re looking to drastically customize the theme then the above-mentioned options won’t be enough. In case most of your changes are design-related, check out the Appearance ⇨ Custom CSS Editor section. It allows you quickly overwrite any CSS code. You’ll find more details on how to perform these overwrites in this article.
If you’re looking to tweak the Daily Deal detail page, check out that portion of this theme guide.
Third-party plugin compatibility
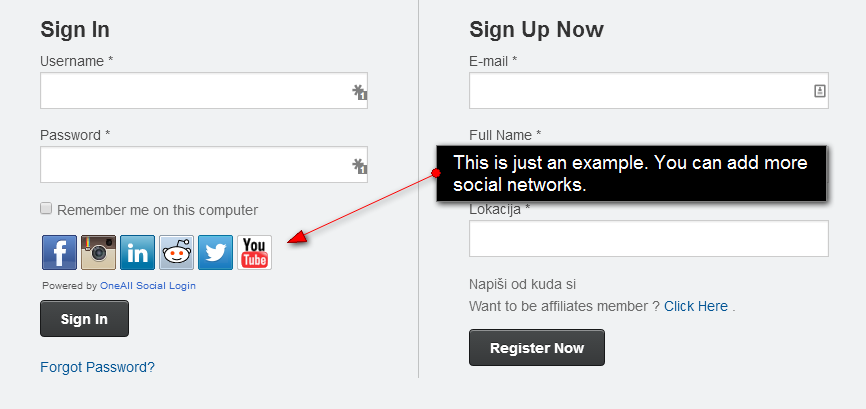
Social Login
You can enable social logins (from Facebook, Twitter, etc) on your site by installing the Social Login plugin. Follow these steps to setup the plugin (once you’ve installed it).
- With the plugin installed, go to wp-admin ⇨ Social Login ⇨ Setup.
- Under “API Settings” click on the link that will take you to the oneall website and create an account + application there. With the app created, copy the API keys and paste them inside the plugin settings. Click on “Verify API Settings” to see whether everything is ok.
- Under “Enable the social networks/identity providers of your choice ” choose the social networks you plan on using.
- Hit “Save Changes” at the bottom of the page.
- Go to Daily Deal ⇨ Daily Deal and enable the “Facebook Plugin Support” option.
That’s it… your login page should now be showing social media buttons. Once visitors click on them, they’ll be prompted to login to their social account.
SEO plugins
To optimize your content for search engines I highly recommend installing one of these two SEO plugins.
These plugins will work with Daily Deal in pretty much the same way as with other WordPress themes (there are no theme-specific features). For instructions on setting up each plugin just click on “detailed instructions” in the list above.
Contact form plugins
For setting up contact page (so visitors can get in touch) we’ve provided support for two plugins
- Contact Form 7 (free)
- Gravity Forms (premium)
Once you create the contact form (using one of the plugins) simply insert the provided shortcode inside any page, post or deal inside the theme.
Frequently Asked Questions
How to translate Daily Deal in a different language?
For details instructions on how to translate Daily Deal (or any other Templatic theme) open this translation tutorial.
How to remove fields from the deal submission form?
Since the back-end custom fields section only allows you to add new fields (not edit existing ones) you’ll have to tweak theme files in order to get this done. The submission form is generated by the following file: /DailyDeal/monetize/deal/post_deal.php
Starting with line 345 you’ll find HTML rows (fields) that look something like this
&amp;amp;amp;amp;amp;amp;amp;lt;div class="row"&amp;amp;amp;amp;amp;amp;amp;gt; THE ACTUAL FIELD &amp;amp;amp;amp;amp;amp;amp;lt;/div&amp;amp;amp;amp;amp;amp;amp;gt;
To remove the field you need to delete that whole DIV. Alternatively you can hide it by changing it to something like this
&amp;amp;amp;amp;amp;amp;amp;lt;div class="row" style="display: none;"&amp;amp;amp;amp;amp;amp;amp;gt; THE ACTUAL FIELD &amp;amp;amp;amp;amp;amp;amp;lt;/div&amp;amp;amp;amp;amp;amp;amp;gt;
Note: Beware of mandatory fields. Removing/hiding them will prevent you from submitting the deal. You can tweak validation in /DailyDeal/monetize/deal/post_deal_validation.js
How to disable the dummy data option from Appearance ⇨ Themes?
The option to disable this feature is available from Daily Deal ⇨ Daily Deal ⇨ Disable Auto Install.
How to create a Contact Us page?
Go to wp-admin ⇨ Pages ⇨ Add New and enter the page title and description as you normally would. To transform this regular page into a Contact Us page focus on the “Page Attributes” section on the right. Under “Template” choose “Page – Contact Us”.
How to manage SEO in Daily Deal?
To keep things simple Daily Deal doesn’t come with any extensive SEO functionality. Instead, we’ve provided full compatibility with these two popular SEO plugins.
How to enable captcha for submission forms?
To enable captcha first go to Daily Deal ⇨ Daily Deal and enable the “Captcha Settings” option. Now go to Plugins ⇨ Add New and search for “WP-reCAPTCHA”. Install and activate the WP-reCAPTCHA plugin.
With the plugin active, open its settings and fill in the required API keys (a link to where they can be obtained will be provided there). While in the WP-reCAPTCHA settings disable / turn off these two options:
- Enable for comments form
- Enable for registration form
If you did everything correctly, captcha should now be appearing in these forms
- Deal submission form
- Deal payment form
- Registration form
How to edit outgoing theme emails?
To manage outgoing emails and messages head over to Daily Deal ⇨ Manage Notifications. Scroll down to the bottom of the page to see all available email shortcodes.
How to setup the Twitter widget?
We’ve provided detailed instructions on how to setup that widget in the following article
https://templatic.com/docs/latest-changes-in-twitter-widget-for-all-templatic-themes/
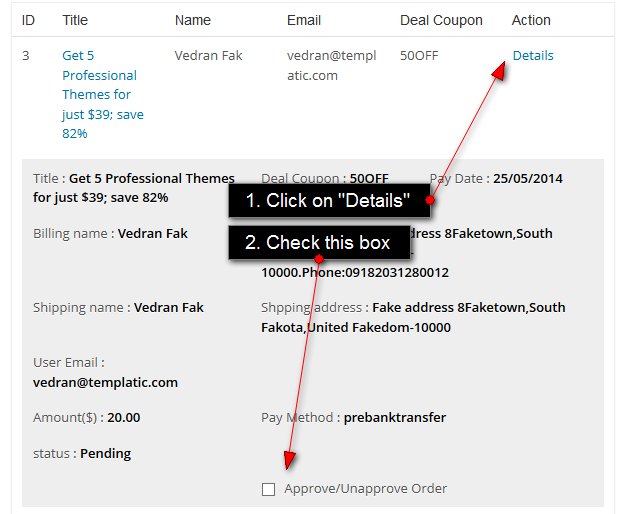
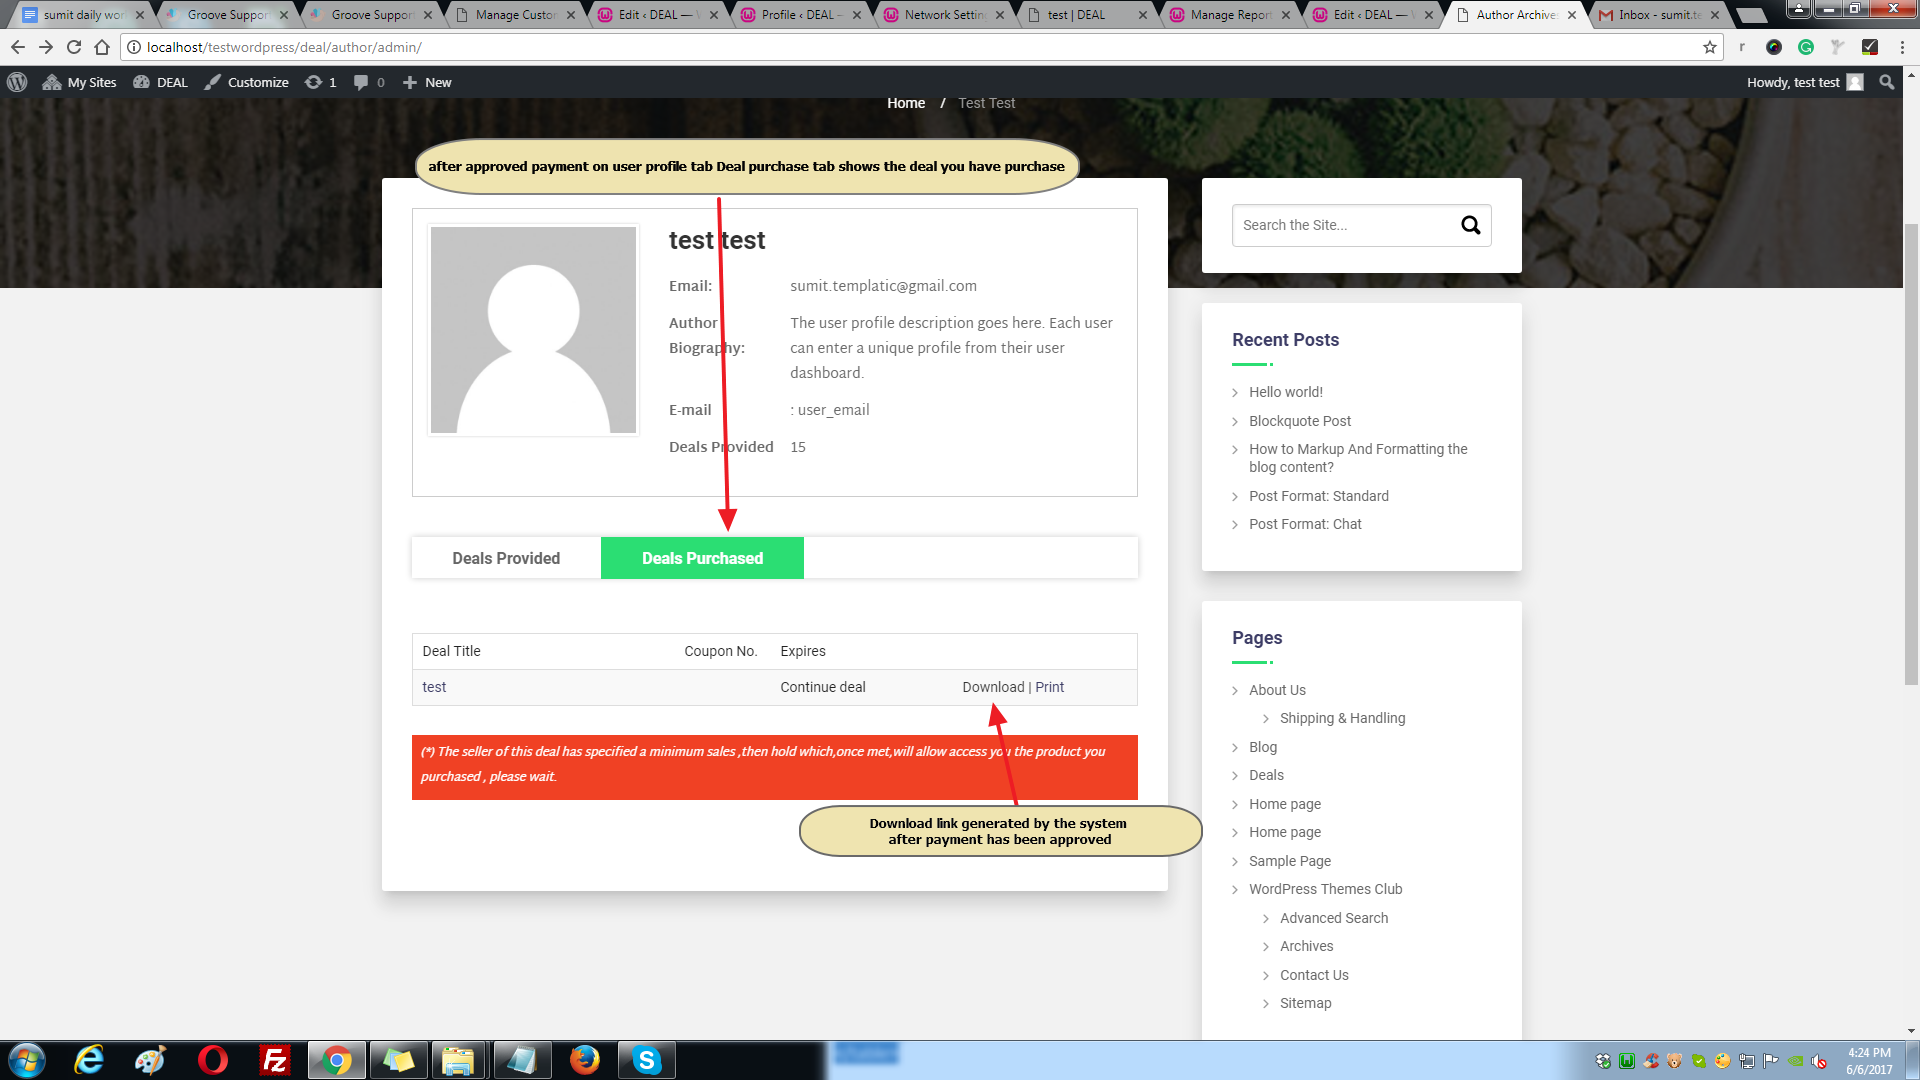
How can I add a digital product?
After submitting payment by PayPal or bank transfer in my case (bank transfer) the report will generate you can check it on Daily Deal >> Report
You have to just select checkbox approved for pre bank transfer as shown in screenshot![]()
After approved payment user can able see deal purchased tab where you can find your downloadable link is automatically generated
From Deal, purchase tab user can download the purchased product.
How can I add reCAPTCHA to contact page?
Access the file from respective path.
wp-content\themes\DailyDeal\header.php –> add code shown in image headerpage.png
wp-content\themes\DailyDeal\page-templates\tpl_contact .php –> add code shown in image tpl_contact.png