Installing the Brilliant Directory theme
Using the easy install zip folder
The easy install zip folder lets you install the theme files, required plugins, parent themes, etc. with minimum hassle. To use the easy install feature for theme install, use the following steps:
- Download the easy install zip folder from the members area. You can do this by logging into your account from here. Expand the “Brilliant Directory theme” area, and download the easy install file.
- Now, you can login to your WordPress dashboard and install the theme. On your dashboard, go to Appearance ⇒ Themes ⇒ Add New ⇒ Upload. Choose the zip file you’ve downloaded and click on the install now button.
- The theme install will take a few minutes till it uploads and prepare all the necessary theme files. Once the installation process is complete, you can click the “Activate” link to make the Brilliant theme the active theme for your site.
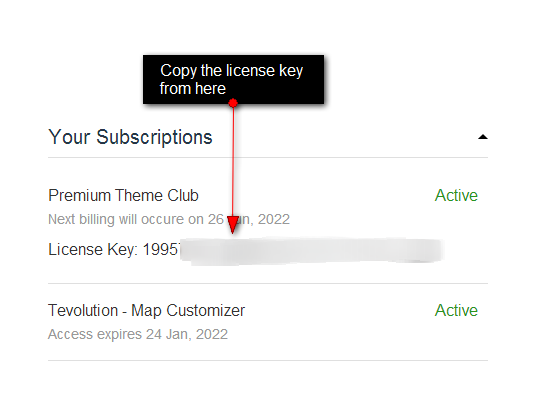
- When asked for activation key, you can provide the activation key available at the member’s area, from where you downloaded the theme.
- You website still not looking like our theme demo? Navigate to appearance and click the blue button that says “Install sample data”. This will populate your WordPress website with the example post, pages and widgets and make it look exactly like our theme demo.
Note: Installing sample data is not compulsory, but recommended.
Installing Brilliant Directory using FTP
Note: If you do not have idea about the use of FTP, Please refer this FTP guide before proceeding.
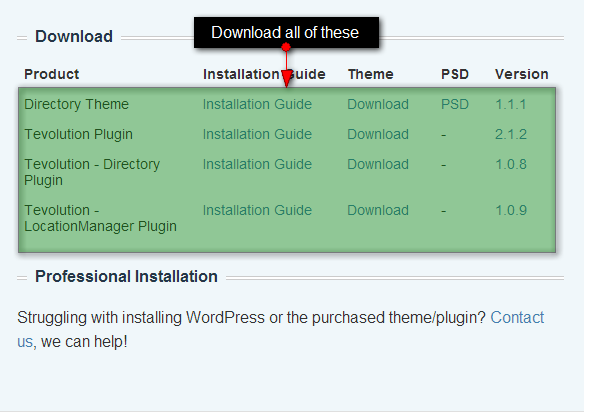
- Download all files available under “Traditional Installation” in “Brilliant directory” section by logging in to the members area and extract them using software like 7-Zip. Tip: Use the “Extract here” option, don’t extract into a new folder.
- Then navigate to /wp-content/plugins/ on your server and upload the three plugin folders (Tevolution, Tevolution-Directory and Tevolution-LocationManager)
- Navigate to /wp-content/themes/ and upload the Directory folder and Brilliant directory folder.
- Login to your WordPress dashboard and go to Plugins. Activate Tevolution and enter the license key available inside our member area.
- Go to the Plugins section again and activate Tevolution – Directory and then Tevolution – Location Manager.
- Navigate to Appearance >> Themes and activate the Business Directory theme.
- While in the Appearance >> Themes section, click on the blue “Install sample data” button to populate your site with dummy data and make it look like our demo.
Setting up the pages on your site.
The homepage settings
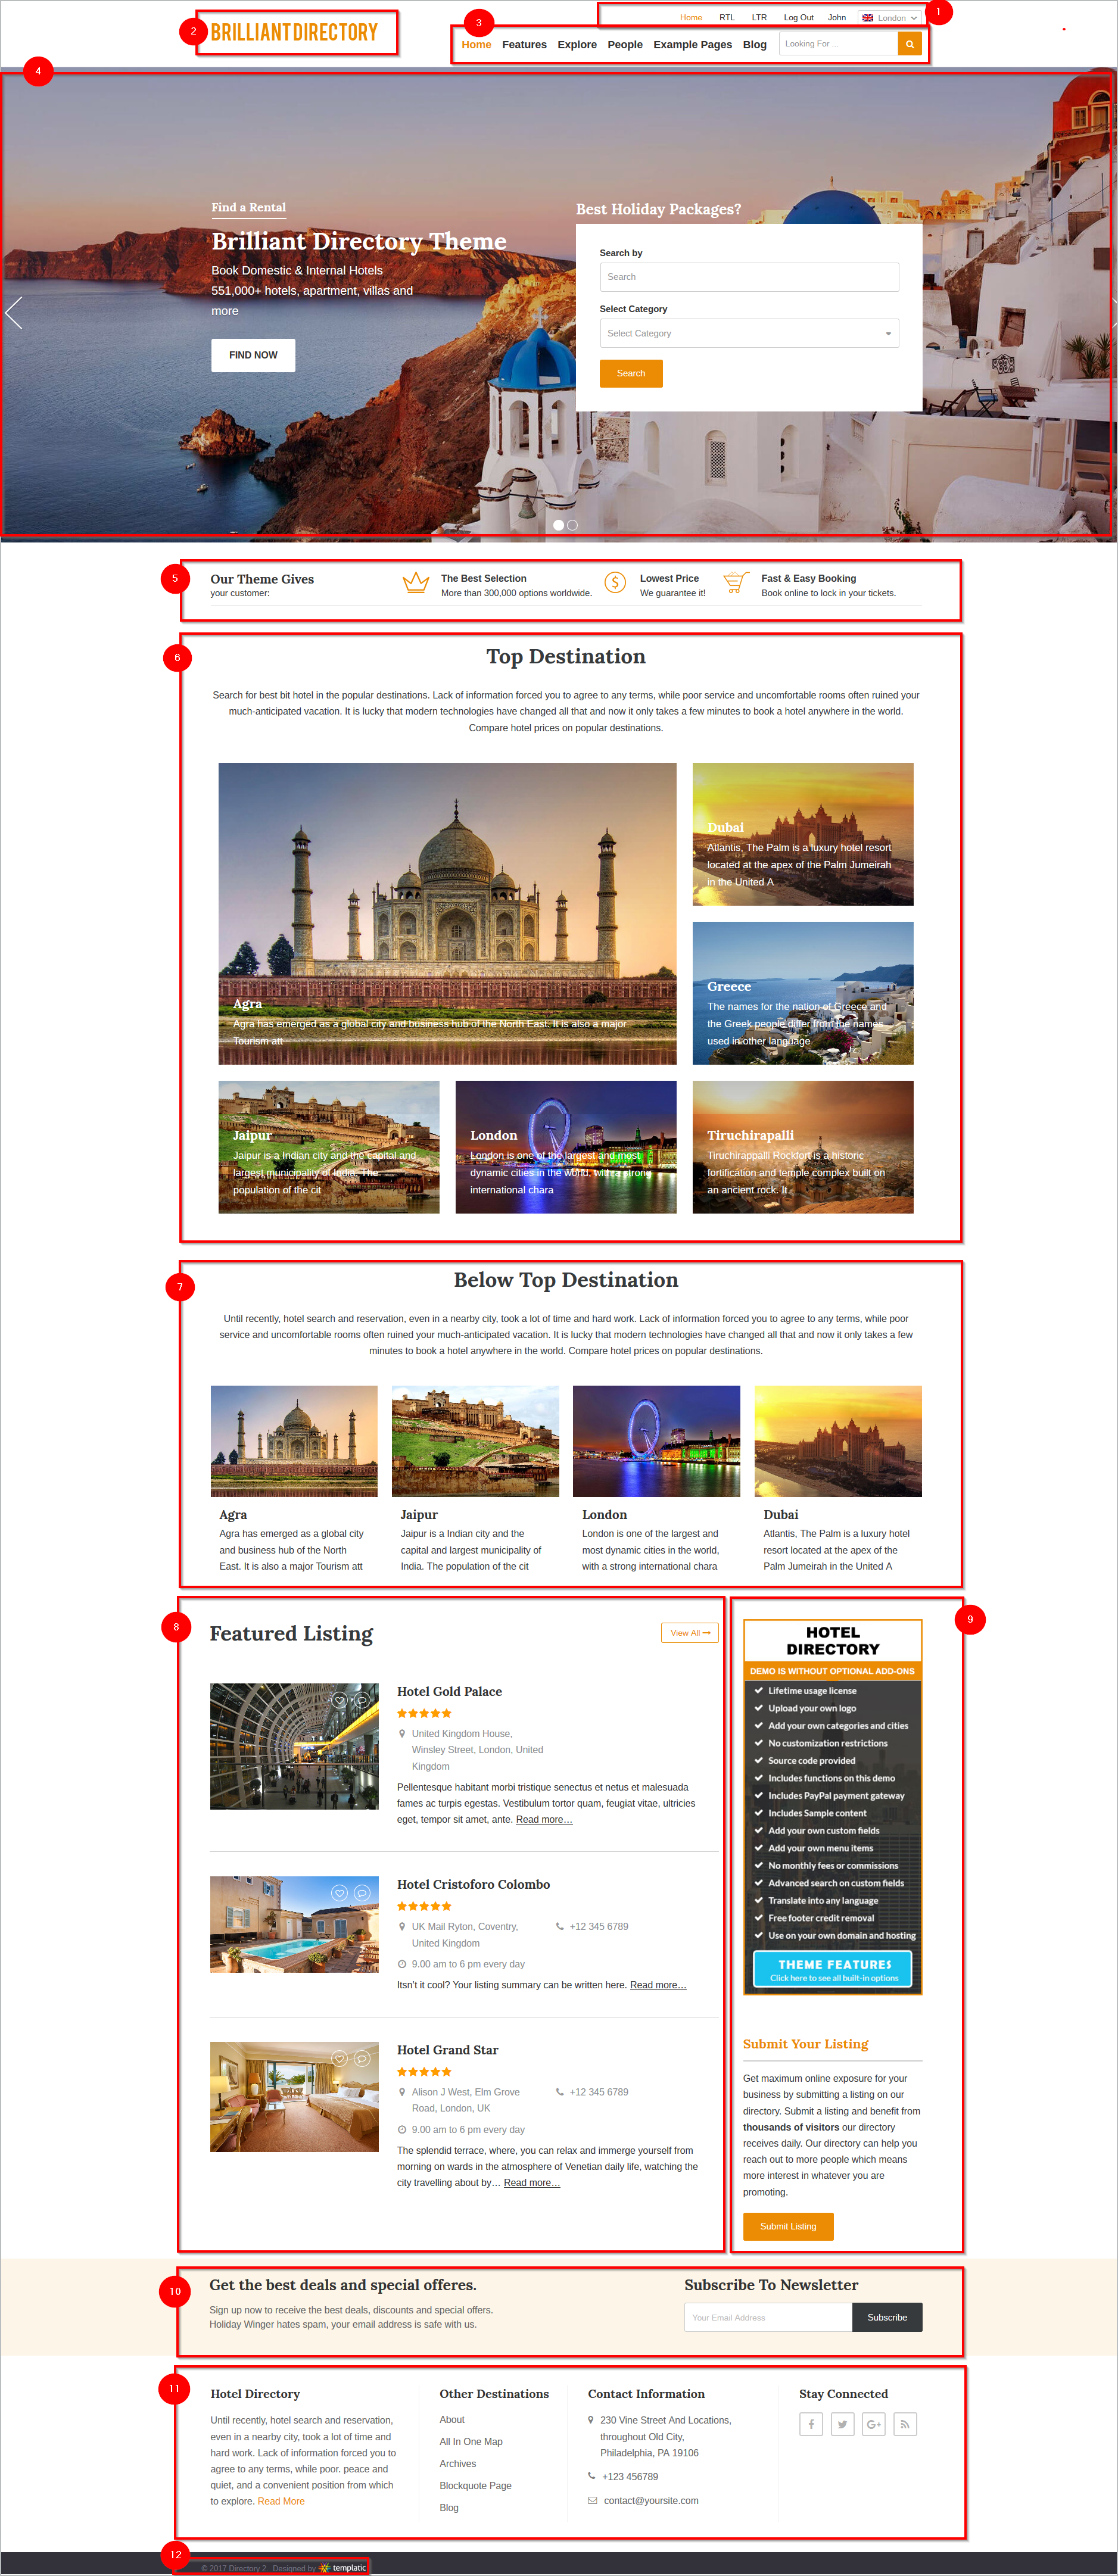
1) The primary menu strip
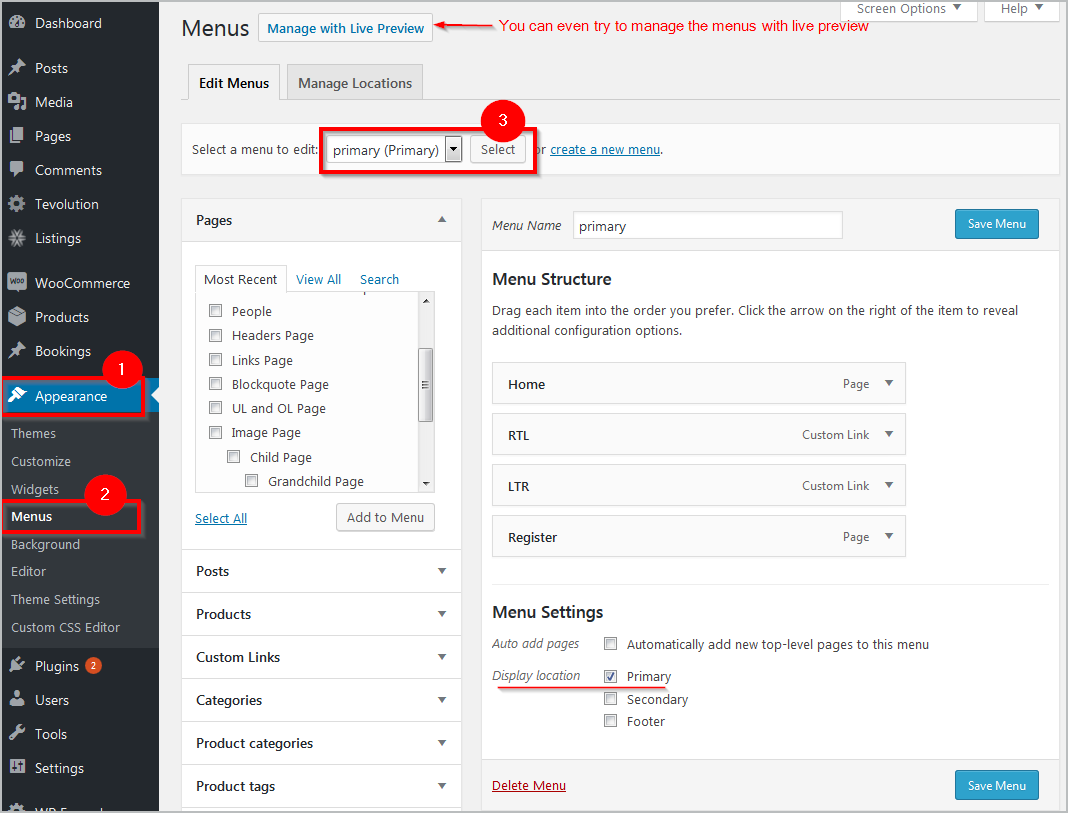
To edit the menu items available in this section, you can head to Appearance ⇒ Menus ⇒ and select the primary menu to start editing it. Here, you can add the link to any page that you want. Use this guide on how to set WordPress menus.
Next is element here is the location selector. The location selection drop down only appears when the Tevolution Location Manager plugin is active. You don’t need this city selector if you are using the theme for a single city website. But for a multi city directory, this is a very useful feature as it allows the visitors to get filtered results based on the location they choose.
You can change the behavior of this selector at Tevolution ⇒ Location Manager ⇒ City Selector Style and City Selector Level. For other settings related to multiple locations, you can refer Tevolution Location Manager‘s guide.
2) The logo/Site identity
Brilliant Directory theme allows you to setup the logo and if you don’t have a logo image, you can simply write down your name as the site title and it will be shown in a well-formatted form.
![]()
To change this, you can go to Appearance ⇒ Customize ⇒ Site Identity and key in the Site title name. You can even set the tagline for your website. Or, to change the logo, navigate to Appearance ⇒ Customize ⇒ Site Logo and upload the logo as well as favicon for your site.
3) The secondary menu and the search bar
What links you want to show on the secondary menu can be set the same way you set the primary menu. Navigate to Appearance ⇒ Menus ⇒ and select the secondary menu. Once you are done adding pages to it, you can hit save and the updated menu items will start showing up as the new menu items.

If you want to display a mega menu there, you can navigate to Appearance ⇒ widgets ⇒ ‘Mega Menu Navigation’ widget area, and place the jQuery Mega Menu widget and configure its behavior. You just have to choose the menu you want to show as the mega menu and set the number of items to be shown in each row.
The search bar that you see at the end of menu, is nothing but a simple search widget. If you want to get rid of it, you can navigate to Appearance ⇒ widgets ⇒ ‘Navigation Right’ widget area, and delete the T → Instant search widget. If you’ve removed it by mistake and want to see it again, you can just choose the T → Instant search widget and drop it to the Navigation right widget area.
4) The banner
The banner of the theme can be used for various purposes. You can use it to show the posts, listings, maps or simply images. To change the banner, you can navigate to Appearance ⇒ Widgets ⇒ ‘Homepage Banner’ widget area. The widget is T → Homepage Banner. You can use your own custom images by checking the option USE CUSTOM IMAGES and an additional fields will be displayed as you have to add the image URL path accordingly
The banner text or Call-To-Action
The text on the banner appears through a configured text widget. To edit it, you can navigate to Appearance ⇒ Widgets ⇒ ‘Homepage Below Banner’ widget area. This section appears through a text widget. This can act as an important call-to-action section for your website.

Banner search widget
The search widget on the banner is nothing but the T → Advanced search widget placed at Appearance ⇒ Widgets ⇒ ‘Homepage Below Banner’ widget area. You can configure this search area and add search fields as per your requirements.
5) Above homepage content text
This section of your brilliant directory website appears because of a formatted text widget. To edit this, you can find this at Appearance ⇒ Widgets ⇒ ‘Above homepage content ‘ widget area. To remove this section, you can press the delete that appears at the bottom of the widget options.

6) Top destinations – Widget with large images
This section can be easily changed by Appearance ⇒ Widgets ⇒ ‘Above homepage content’ widget area. The widget that shows this pretty section is “T→Interest widget with big image”. From here, you can select the cities that you want to show in the grid.
You can use this widget well if you have a multi-city directory with different cities registered. This widget uses the city information from your directory website. Therefore, you have to make sure that you have added the relevant information for the city. To be specific, with each city, you need to have the city message (which is shown as the text on the image through this widget) and the city image.
However, if you have not already added the city information, you can do so by Tevolution ⇒ Manage Locations ⇒ “Cities” tab ⇒ and choose edit city by hovering over the city name.
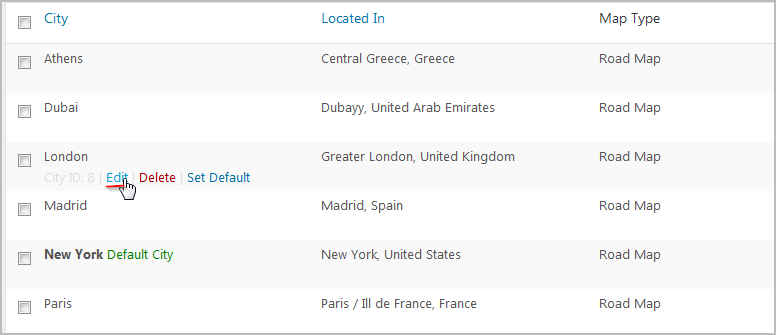 On the edit page – you can enter/update the city message and the city image.
7) Top Destination (linear)
This section too displays the top destination but in a simple, linear fashion. This section appears through the ‘T → What are you interested in?’ widget placed in the ‘Above homepage content’ widget area. You can set the title. The description as the subtitle, and choose the cities you want to choose.
8) The main content area
Then comes the homepage main content area where you can show the important listings for your website. The “Featured listings” section shown here comes from the ‘Homepage main content’ widget area, by the T → Homepage Display Post widget.

You can navigate to Appearance ⇒ Widgets ⇒ Homepage main content and edit the T → Homepage Display Post widget, Set a suitable title to the widget, set the number of posts you want to show, the post type, and even choose the category if you only want to show the posts of a specific category.
9) The sidebar
To set what you want to show on the sidebar of your homepage, you can configure the widget area “Homepage Sidebar”. Alternately, you can configure the “Primary sidebar”, which is like the general/default sidebar for the pages that don’t have their unique sidebar.
In simple words, if the homepage sidebar is empty, the widgets of primary sidebar will be shown instead. Now, the advertisement shown in the sidebar is shown through a text widget configured to show the advertisement image. The next widget in the sidebar is the “Submit the listing” section. This too is through a text widget. To change what the sidebar shows, you can head to Appearance ⇒ Widgets ⇒ Homepage sidebar widget area.
10) The section above footer

You can manage this section at Appearance ⇒ Widgets ⇒ Subsidiary 1 column widget area. The first widget in this section is just a simple text widget, with title and description. The another one is T → Newsletter widget. This widget is very important if you are looking forward to promote your business with email marketing.
To configure this widget, all you have to do is to provide the necessary title, sub title, choose the newsletter provider from the dropdown ( FeedBurner, MailChimp, FeedBlitz, Aweber) and provide the id number, and click save.
11) Managing the Footer
As you can see, the footer of the theme is divided into four sections. Each of these sections can be managed from the content are Footer 1, Footer 2, Footer 3, Footer 4 respectively. So, to change that you can head to Appearance ⇒ Widgets ⇒ Footer 1/ Footer 2/ Footer 3/ Footer 4.

In footer 1, the widget is text, and there’s some simple text entered which serves as a brief introduction to your website/business. The footer 2, has a WordPress widget called “Pages”. This widget lets you show a list of pages. The footer 3 widget area, the widget is again a text widget configured to show the contact information. You can easily edit the information and replace it with your original address, email and phone number.
Last but not the least, the footer 4 widget area, is designed to show the social media icons. This is the T → Social Media widget and you can use it to provide the link to your social media accounts. This way your visitors can easily start following you on your social media too.
12) Updating the Copyright information
To change the copyright information in the footer, simply navigate to Appearance ⇒ Customize ⇒ Footer.
Category page content
The category page will show all the listings pertaining to the selected category. Let’s see how you can setup the category page of Brilliant directory.
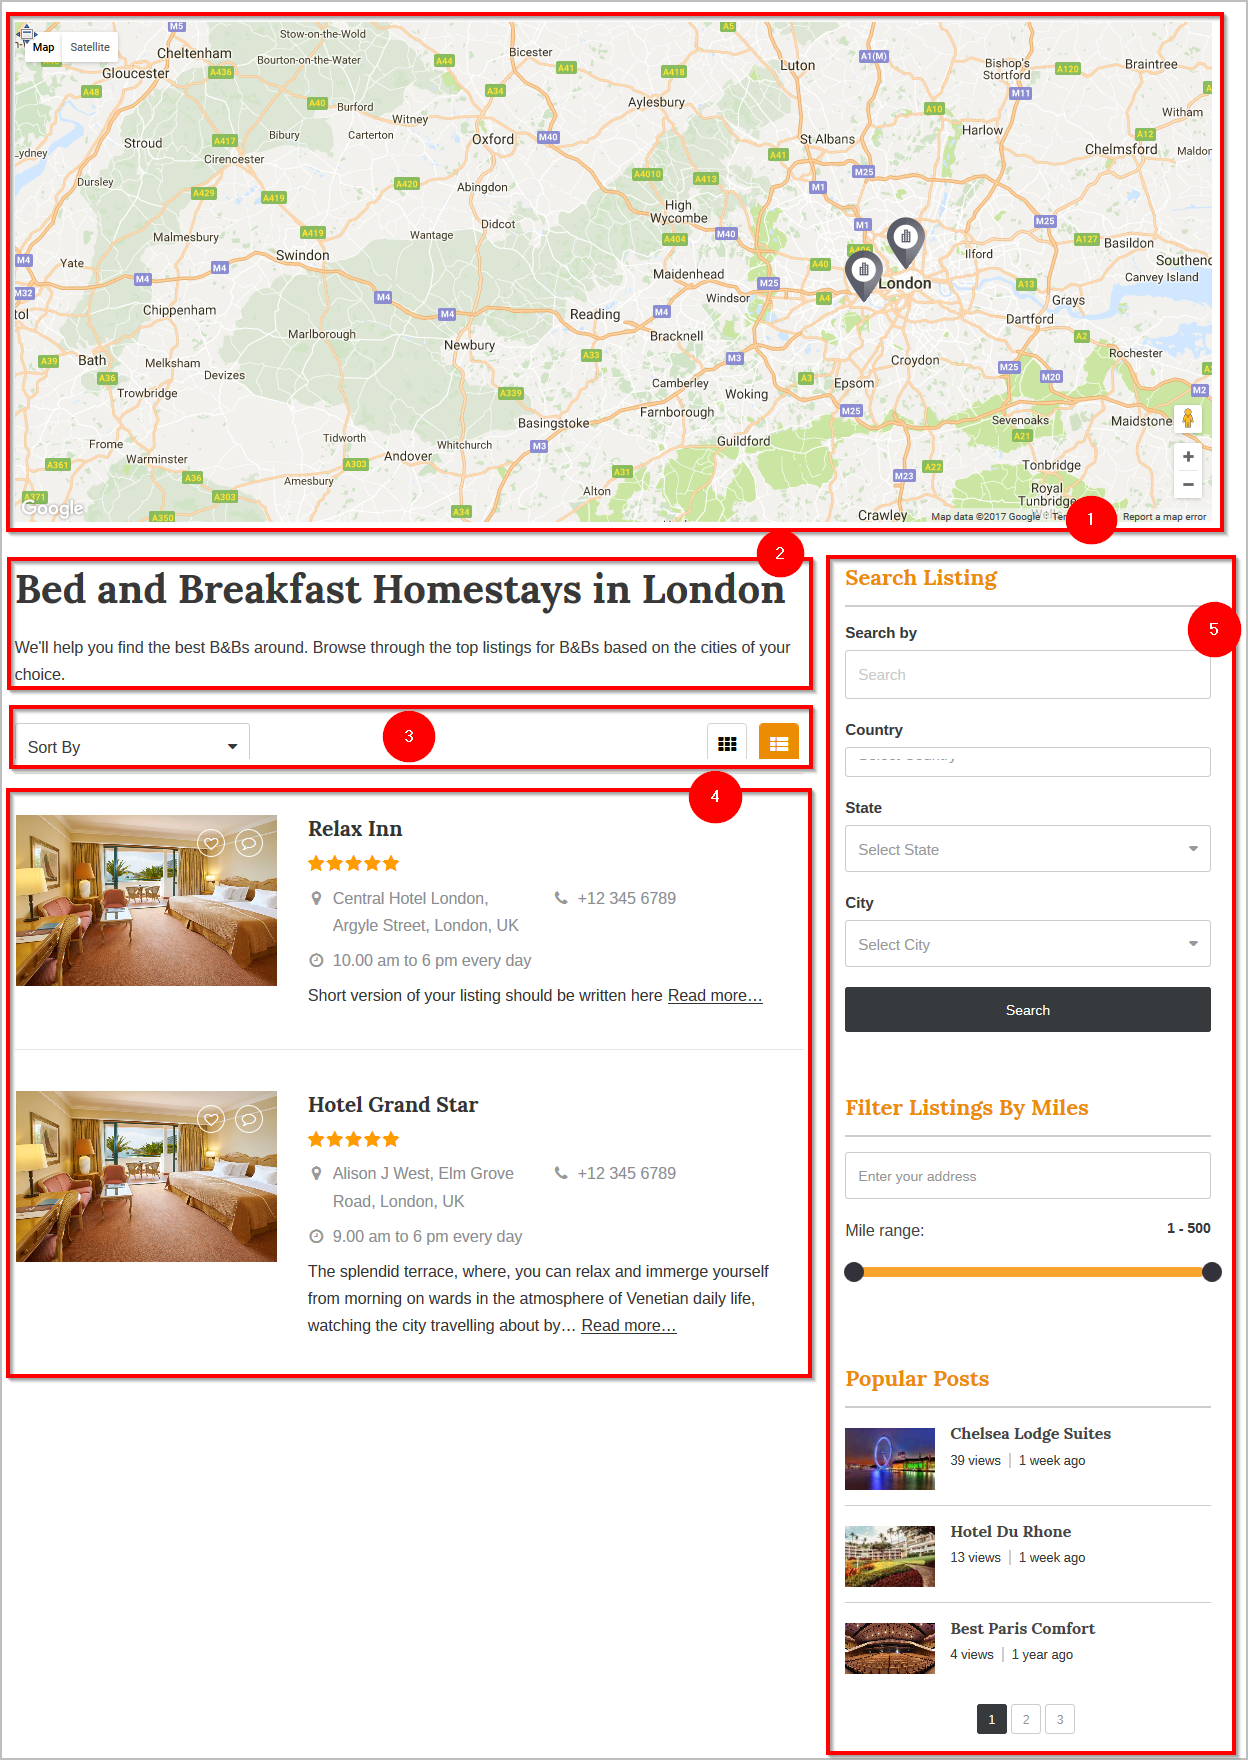
1) Category Page map
The map can be enabled disabled from Tevolution ⇒ Setting ⇒ Category page ⇒ Map View.
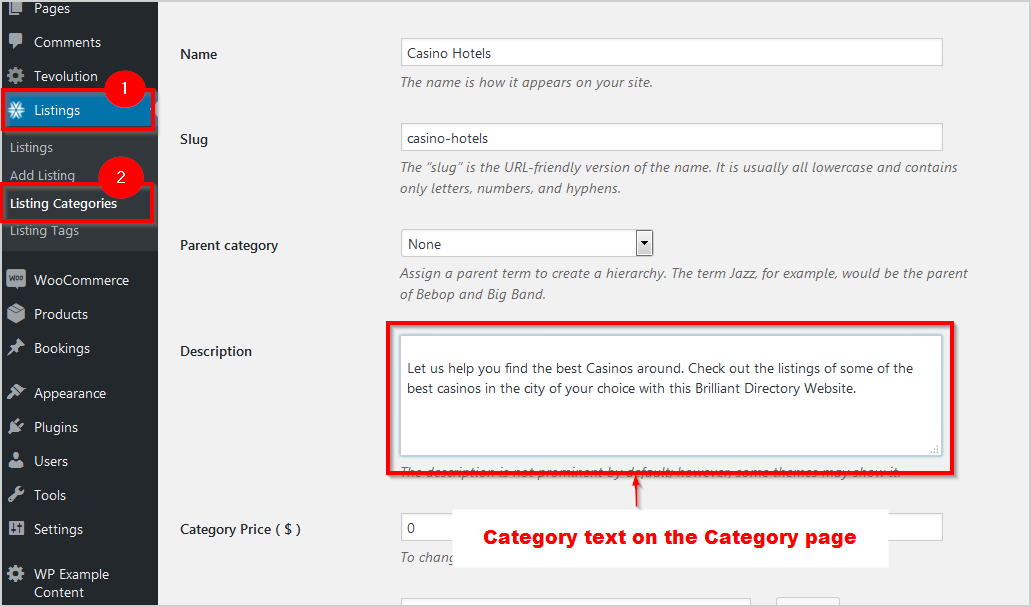
2) The category text
This is the text explanation about what the category is about. To add or update this information, you can navigate to Listings ⇒ Listing categories. Select a category name and choose to edit it. The category description is the field that is shown here on the front end.
3) Sorting options
You can change the sorting options at Tevolution ⇒ Setting ⇒ Category page ⇒ Sorting options. You can even set if you want the default page view to be grid or list.
4) The category page content
This section will show a list/grid of all the listings that fall in that category. To control what number of listings are shown at once on the category page, you can go to Setting ⇒ Reading settings ⇒ Blog page shows at most. Suppose you set ‘5’ as a value to this page, then the category page will show 5 listings on one page and the rest will be carried forward to the next page.
5) The sidebar
The sidebar of the category page can be setup by navigating to Appearance ⇒ Widgets ⇒ ‘Listing Category Page sidebar’ widget area. The widgets placed here are:
- T → Advanced search
- T → Search by Miles Range
- T → Popular posts
Other settings
To make more changes in your website, you can check out different widget areas and widgets at Appearance ⇒ Widgets. To provide maximum flexibility, we keep our themes extremely widgetized so that you have full control over which page element appears where.
Changing the colors of your website
If you want to make changes to the colors of your site or want to set an image as the site background, you can do so using the live customizer.
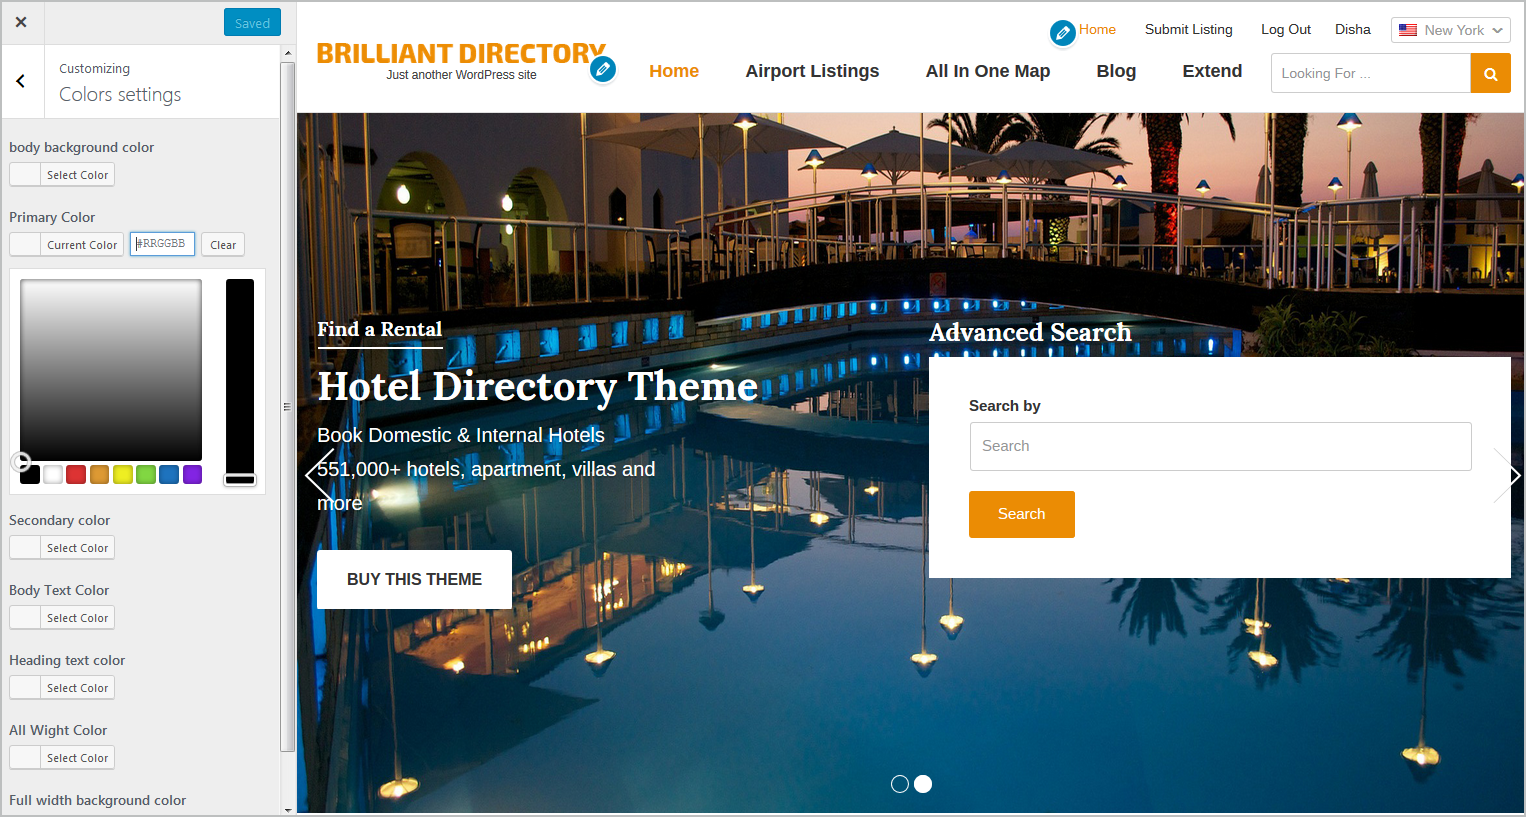
Navigate to Appearance ⇒ Customizer ⇒ Colors settings. To set an image as the background for your website, you can navigate to Appearance ⇒ Customizer ⇒ Background settings and upload the image.
For more location related settings
The location settings for your website can be managed at Tevolution ⇒ Manage Locations. This is where you can find all your location settings like cities, countries and other location related settings.
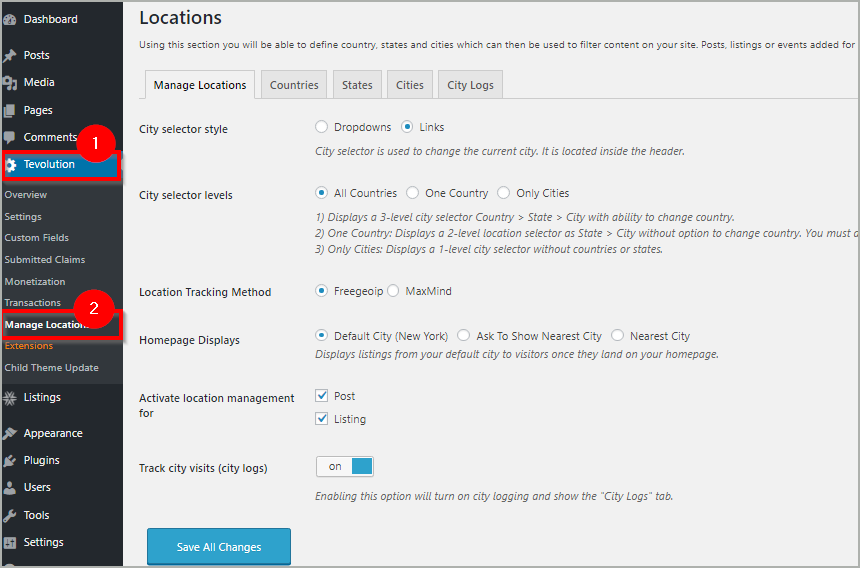
Tevolution – Location Manager guide has an in-depth depiction of how you can add cities, countries and manage theme on your directory website.
Creating and Managing Custom fields.
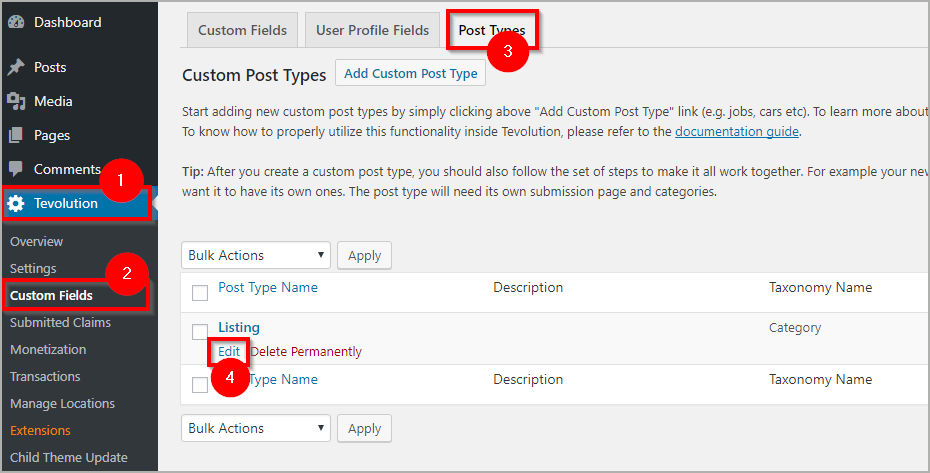
The power to create and manage your own custom post types and fields, enable you to use the Directory for any purpose you want. With the Brilliant Directory, you get a “listings” post type on installing the “Tevolution” plugin. However, if you want to manage fields of the listing post type, you can easily do it.
You can add new fields, and manage/update existing fields on your website. To update the existing post types, you can head to Tevolution ⇒ Custom fields ⇒ Post type ⇒ Choose the post type ⇒ Edit.
The Tevolution is the main plugin that supports all the Directory features. Explore more features, and make your Brilliant directory more feature rich by having a look at what Tevolution allows you to control, through this Tevolution Guide.
Monetizing your WordPress Brilliant Directory
The Brilliant Directory WordPress theme provides you ample opportunity to make money through your online Directory website. The easiest way to make money through your website is by allowing front end submission.
To use this feature on your site, you will need to create some pricing packages. Here’s how you can create the pricing packages. Navigate to Tevolution ⇒ Monetization ⇒ Price packages ⇒ Add new package.
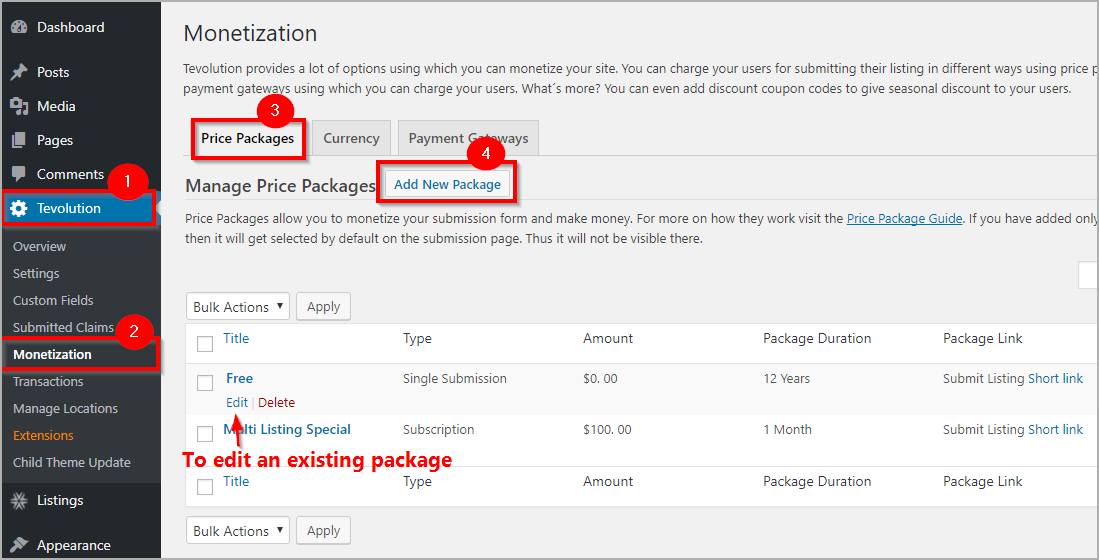
This will open a form through which you can create a new price package for your website. This will open up a form that you can use to create a new package. Refer this Tevolution guide to know how exactly each field works for your pricing package.