Note: Before installing this theme, please ensure that you are running WordPress 3.0 or higher
Uploading and Activating
Upload Photocraft theme under wp-content/themes directory and then Activate the theme from your WordPress admin panel > Appearance page. For a detailed explanation on how to install the theme, please click here.
Auto Install Dummy Content
Theme will be activated & completely installed. If you wish to install the dummy content, then click on “Yes, insert sample data please”.
If you wish to delete the dummy data that we populated in your site then you can remove it by clicking Yes Delete Please!
Note: If you entered your data by editing this dummy data, then please don’t click on “Delete sample data”, as it will delete all the data which you have entered.

Design Settings
Go to wp-admin > Appearance > Photocraft Theme Options page and take a thorough look at all the flexible options available to you. Do the settings as per your wish and then save them.
Homepage Settings

Setting up Homepage is very easy. Just follow below instructions.
- Go to wp-admin > Appearance > Photocraft Theme Options > General Settings > Logo Image –> Choose Your full logo image. Paste the full URL to your logo image here. ( Logo Width 250px ) or Choose Title over Logo – This option will overwrite your logo selection above – You can change your settings here
- Go to wp-admin > Appearance > Photocraft Theme Options > Navigation Settings > Header Navigation > Select exclude pages in main page navigation or Include Categories for Header
- Go to wp-admin > Appearance > Photocraft Theme Options > Navigation Settings > Header Navigation > Gallery Section Select Category > Select gallery categories. Press ‘control button’ to select more than one categories
- Go to wp-admin > Appearance > Photocraft Theme Options > Navigation Settings > Header Navigation > Blog Categories for Header Navigation > Select blog categories, press ‘control button’ to select more than one categories
- Go to wp-admin > Appearance > Widgets > Home Top Searcg > Search
- Go to wp-admin > Appearance > Widgets > Home Page Banner > PT – Home Banner (Home banner with right side slider section)
- Go to wp-admin > Appearance > Widgets > Footer 1 > Pages – (Your site’s WordPress Pages)
- Go to wp-admin > Appearance > Widgets > Footer 2 > Categories
- Go to wp-admin > Appearance > Widgets > Footer 3 > Text ( Arbitrary text or HTML wordpress by default widget use )(example : <p> DR. Roy M. Mackwan <br />
123, Tecumesh Road West, Windsor, <br /> on N10, 19, Newyork. </p>
<p> Phone : 111-222-3333 <br />
FAX : 111-222-0000<br />
Email : [email protected] </p> )
Adding a new Gallery and Posts
Now lets learn how to add new posts in Gallery.
Go to wp-admin > Posts > Add New Posts
First create a new Category and then start adding data.
- Post Title
- Click on Media Button to upload Gallery Images
- Description
- Add Gallery Post Tags
- Select “Gallery” Category and Publish
- Now go to Photocraft Theme Options > Gallery Section Select Category and select the Gallery category from here. Your gallery will be created.
And here’s a video tutorial to create a Photo Gallery in this theme:
Gallery Post Listing Page
You can also change Image thumbnail Width & Height from:
Appearance > Photocraft Theme Options > Gallery Page Image Settings.
Gallery Post Detail Page
You can change the Gallery Detail page image height and width also. Set it as per your wish.
Go to wp-admin > Appearance > Photocraft Theme Options > Gallery Detail Page -> Slider Main Image Settings > You can change Image Width & Height
Adding Blog Posts
Now lets learn how to add new Blog posts.
Go to wp-admin > Posts > Add New Posts
First create a new Category
- Add News Post Title
- Post Description
- Add right sidebar -> Add Post Tags
- Select right sidebar select category
- Right sidebar click “Featured thumbnail” link upload featured image, Use Featured Image & Publish Post
Blog Listing Page
Blog Detail Page
Inner Page Sidebar Setting
Preview of inner page sidebar (We have used “page right sidebar” template here):

- Go to wp-admin > Appearance > Widgets > Sidebar > PT – Latest News
- Go to wp-admin > Appearance > Widgets > Sidebar > PT – Text ( Arbitrary text or HTML wordpress by default widget use )
(example : <p> <strong> Monday to Friaday : </strong> <br /> 8am-6pm </p>
<p><strong>Saturday: 8am-12pm <br />Sunday:</strong> Closed </p>
<p><trong>Emergency hours only</strong><br />
Call at 000-111-2222</p> ) - Go to wp-admin > Appearance > Widgets > Sidebar > PT – Testimonials
Adding a new Page and using the page template
You can even add Pages to display some static content. To insert/add pages:
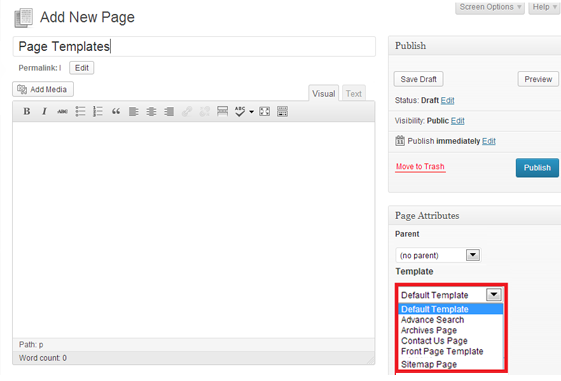
Go to wp-admin > Pages > Add New
- Add Page Title
- Add Page Description
- From the right sidebar of this page, Select “Contact Page” from Template section and publish this page.
- Note: This “contact form” template is just used as an example here. You can try using other page templates also
Contact Page
This is a preview of the “Contact Page” template which we have used in the previous step.

Any Queries? Contact us and we’ll help you out.


