Installing and activating Wedding
- Download the zip folder of “Wedding” theme from the members area of the Templatic website.
- Now, login to your WordPress dashboard and navigate to Appearance >> Themes >> Add new >> Upload theme >> browse for the zip file you have downloaded and select it >> Install now.
- This will install your theme and then you can activate it.
- On being asked for the license key, go to your Templatic members’ area from where you downloaded the zip file,under “my downloads >> Wedding”, You’ll find the licence key there. Refer this screenshot.
- Go to Appearance >> Themes >> and press ” Install Sample Data” . This will install the dummy data,making your site look like our demo. The process of installing dummy data will take 2-4 minutes. Let it complete without interruption.This will give you a precise idea of how to proceed with your own original data. Though it is optional, but we highly recommend it.
Installation using ftp
If you are new to ftp and its working please refer our ftp guide. That will help you get a better idea of how you can upload your files and organize them on the server using
FTP.
- For this also, download the zip folder of “Wedding” theme from the members area of the templatic website.
- Extract the zip file using software like 7-Zip. Extract to the same folder and be careful that you don’t create the double folder problem.
- Now,navigate to /wp-content/themes/and upload the extracted folder of Wedding.
- Then,Login to your wordpress dashboard and navigate to Appearance >> Themes >> Installed themes and you will find Wedding there. Activate it
- You can install sample data from Appearance >> Themes to make it look exactly like our demo.
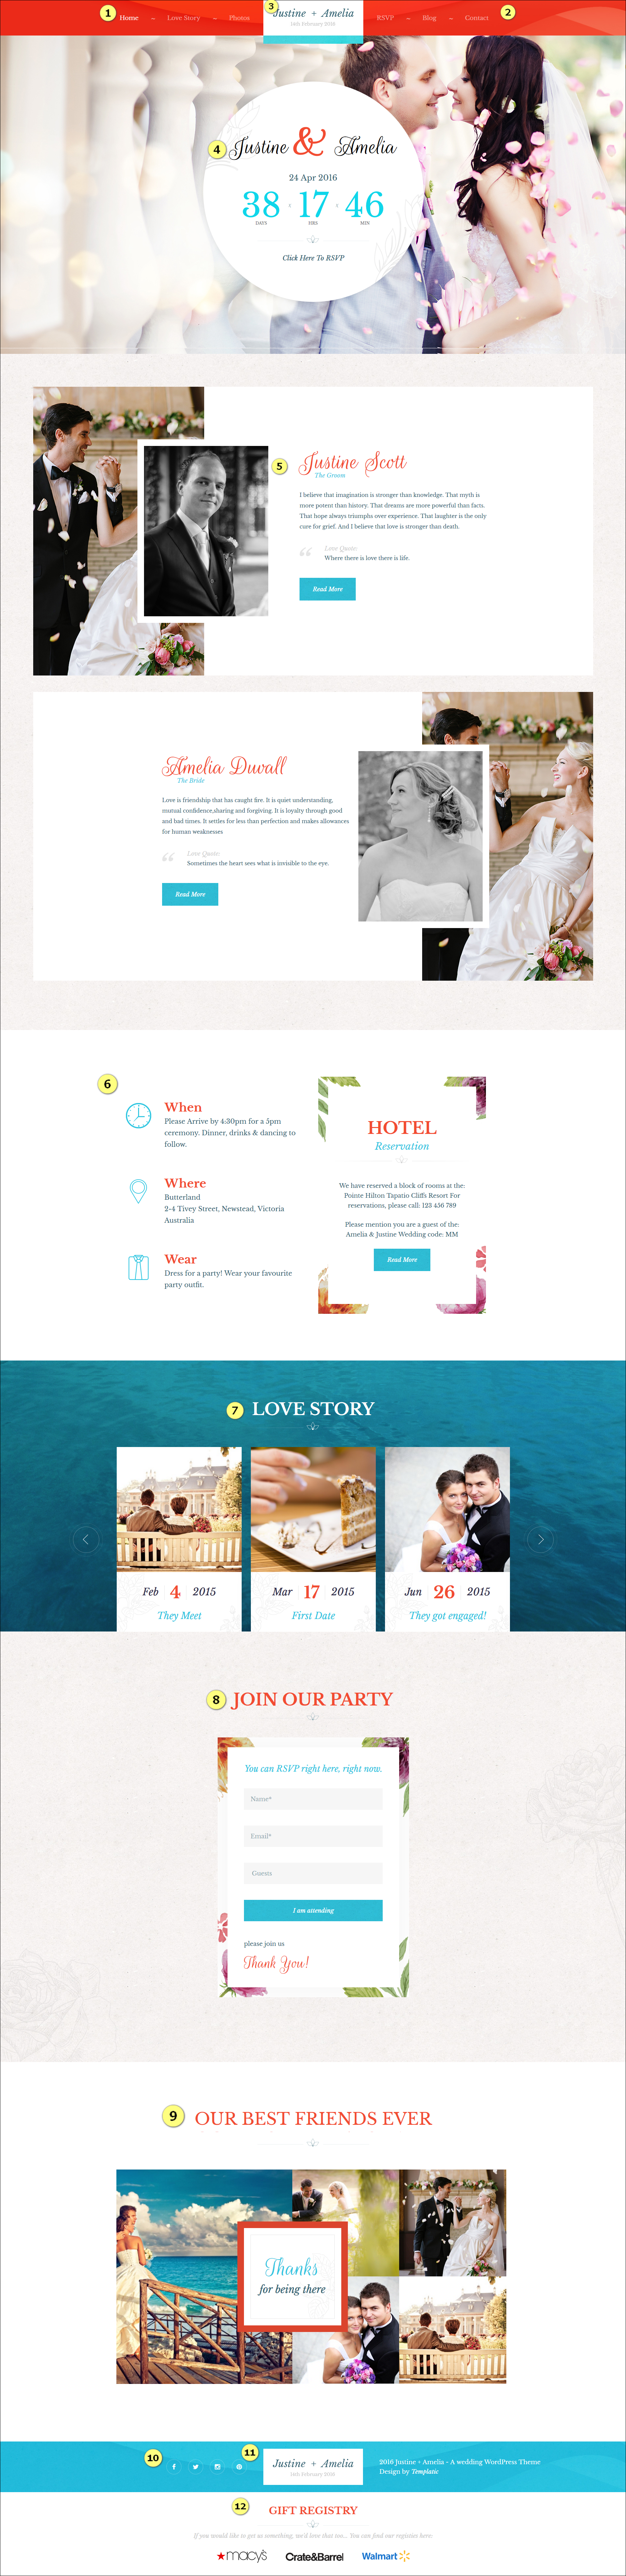
Home page setup
-
-
To set the menu:
To create the menu you can navigate to Appearance >> Menus . The menu on the left side of the logo comes from Left menu. Select the left primary menu from the drop-down and press select.This will show the menu in the Menu structure you can add, remove or edit the menu contents and even control the hierarchy from there.
-
-
The left menu:
You can manage the left menu the same way as you manage the right menu. Refer the image.
-
Logo, Tagline and Site title:
To upload the logo of a site, all you will need to do is go to the Appearance >> Customize >> Logo and upload an image for your logo. If you just want your logo to be there and no other text in header than go to Appearance >> Customize >> Site identity and uncheck the Display header text check box.If you do not want to show a logo and only want the users to see the name of the website, first remove the logo image and go to Appearance >> Customize >> Site Identity. Set the site title you want.
From here itself, you can also change the site tagline. -
The countdown:
The countdown that is visible on the banner area can be adjusted from appearance >> Widget >> widget area “Homepage below Header” >> T-Event count down.
From here you just have to select a day and the countdown will show the remaining days, hours and minutes.
From here itself the name of the bride and groom is to be set. The link and link text can also be changed from here. -
Message:
The next two parts where the groom and the bride has presented their message comes from text widget. To change this you can go to Appearance >> widgets >> widget area “Below Homepage Banner” and change the code according to your needs.
You can make changes to the fonts, colours and images in this portion. -
Post slider area
This area will show a slider of the posts. It can be managed by a widget at Appearance >> widget >> widget area “Homepage Content Area 1” >> T- carousel post slider. You can control which posts are shown here by setting up the widget. This place shows a slideshow of the posts and clicking on the post leads you to the post detail page.
-
Hotel reservation:
This area is also managed by a text widget at appearance >> widget >> widget area “Above homepage content area”. This can be used to let the visitors know the wedding time, place and the accommodation facilities.
-
RSVP now:
This is a text widget that contains the short code of the RSVP page.
-
Image gallery:
This image gallery shows a collage of images with text banner between them. The text that you place in the description will appear as the text in the banner. If you leave the description field empty the text banner will disappear.
-
Above footer (The social networks icons):
the social media icons that you see above the footer come from appearance >> widgets >> widget area “Above Footer” >> T- social media. You can make changes here that is add or remove the social media icons from this widget to make it appear or disappear from above the footer area.
-
Above footer text:
The other things that you see in this portion can be managed by changing the content of the text widget. Find it at appearance >> widget >> widget area “Above footer” >> Text widget.
-
Gift registry:
All the contents in the footer are managed in a text widget. To change it navigate to appearance >> widgets >> widget area “footer” >> Text.
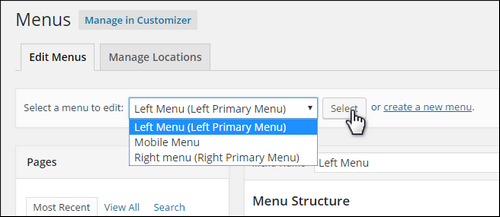
Setting up the blog page
The sidebar
All the options available in the sidebar of the blog page come from the sidebar widget area. You can manage the sidebar from Appearance >> Widgets >> Widget area “Sidebar” . You can add suitable and compatible widgets in the sidebar or use text widget in the sidebar and write html codes in it to add some more feature to the sidebar.
-
Latest posts
This is the list of the most recent posts ordered by their post date. The First one in the list is most recent. This comes from Appearance >> Widgets >> Widget area “Sidebar” >> T – Latest post. From this widget you can set the number of latest post to be displayed in the sidebar
-
Recent Comments
This widget at Appearance >> Widgets >> Widget area “Sidebar” >> recent comments, shows what the people has commented on which post. You can manage this widget and its properties from here.
-
Text
This is a text widget that can be configured to hold the code as per requirement. For sample data, we have configured it to hold the code of an image. Change it from Appearance >> Widgets >> Widget area “Sidebar” >> text, to suit your needs.
-
Categories
This widget shows the categories on the sidebar. The users can select the categories and navigate to that category page instantly.
Other settings
-
Managing the comments
You can manage the comments and change the comments related settings from Appearance >> Discussions settings.
-
To change the banner image:
To change the banner image first upload the image to theme folder i.e. wp-content >> themes >> wedding >> images. Then connect to ftp and go to wp-content >> themes >> wedding >> functions >> custom_functions.php >> and replace the following code with your image name at line 19.
$image = get_template_directory_uri().'/images/yourimagename.jpg';
Best suited dimension for the banner image is :1903 X 950. Images with other dimension will be accepted but its appearance may suffer.
-
How to add a new story?
To add a new post just go to the WordPress back end and add a new post. While adding the post you can decide what category will it belong to, i.e. Love-story, blog or uncategorized. You can also add new category if you want from dashboard >> post >> categories >> and add a new category.
-
How to add a new category to menu?
Go to appearance >> menu >>select menu and start editing. From the sidebar on the right hand side go to the categories tab, find the category you want to add to the menu. Check the checkbox against it and Click on add to menu button.
Similarly you can also add the other links to menu.
-
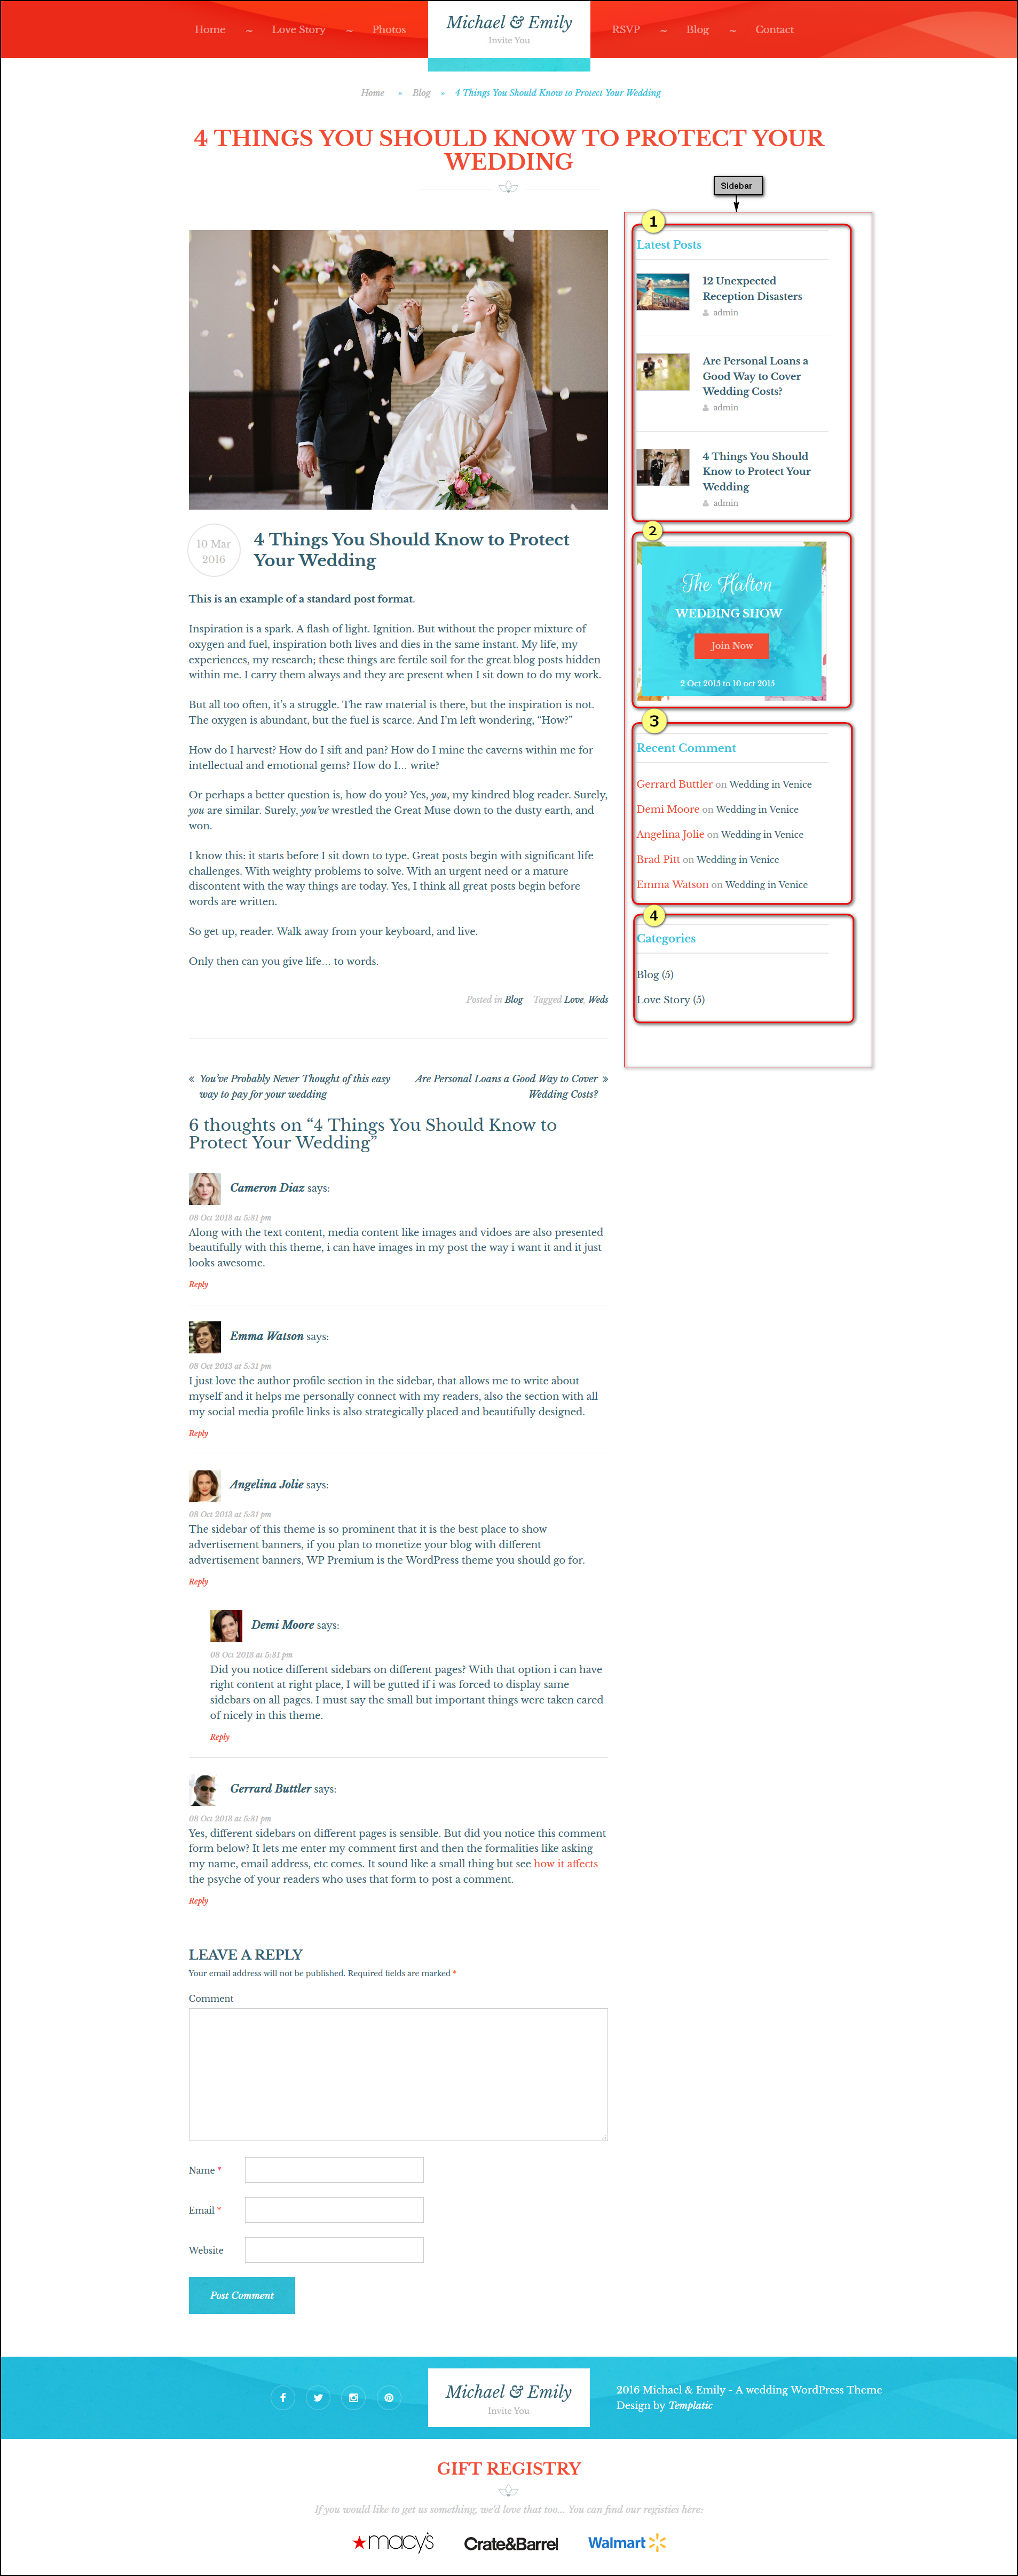
How to manage the photos on the photos page?
To edit the photos page go to dashboard >> pages >> photos >> Edit. Now here you can edit the text that shows up above the photos. On clicking the edit button shown in the figure you will be taken to a screen where you can add, edit, remove and reorder the photos in the image gallery.

-
How to change the colors of the site?
Just navigate to the dashboard >> Appearance >> customize >> colours and from there you can change the background, foreground and other colors of the site.
-
How to set a particular page as a front page?
To set a particular page as your front page go to Appearance >> Customize >> Static front page and from there you can set a page as a front page. Any page that you want a user to view first as soon as they open your site can be set as a front page from here.
-
Using the custom css editor
This editor is used to make changes in a css class..you can directly change a particuar css class that you want by simply placing css code in the custom css editor.
To know how to use custom css editor click here.
-
How to add a reCaptcha to the RSVP page?
You can, with very simple steps, add a recaptcha to the RSVP page or a widget that shows RSVP. To add the recaptcha on the page all you need to do is add – register_captcha=”1″ to the short code for RSVP before closing the brackets.
[rsvp_form subtitle="You can RSVP right here, right now." button_text="I am attending" description="please join us Thank You!" number_of_guest = "5" register_captcha="1"]
Note: The reCaptcha will not work until you have registered for google reCaptcha and entered the site key and the secret key availed from registering at Appearance >> Theme options.
-
Enabling and disabling the RSVP
To enable/disable the registration on your site, i.e. RSVP, you can go to settings >> general settings >> Membership. Now checking the check box against the “Anyone can register” will enable RSVP form. Unchecking this box will disable the RSVP.
This can be used if you don’t want the people to RSVP before a certain days. Then you can enable the registration and let the users RSVP.
-
Mobile menu
- This option lets you create a menu that will be shown in responsive view. Go to appearance >> Menu >> and select the mobile menu. Edit it and set the menu items you want to show in the mobile menu.