Theme Installation
Installing WP Premium using the WordPress dashboard
- Click here to download the WPPremium zip file.
- Inside your WordPress dashboard, navigate to Appearance ⇨ Themes ⇨ Add New ⇨ Upload ⇨ and load the .zip file you just downloaded.
- Once the upload is finished click on “Activate”. With that done choose to “Install sample data”.
Installing with FTP
Installing via FTP is necessary on servers that aren’t optimized for WordPress and can often interrupt the installation process because of the long execution time. Good news is that this type of install isn’t particularly hard, just longer compared to installing from the back-end.
For general instructions about using FTP please open this tutorial.
- Click here to download the WPPremium zip file.
- Extract the file using software like 7-Zip. Use the Extract Here option.
- Assuming you read the above linked FTP tutorial, navigate to /wp-content/themes/ on your server and upload the extracted theme folder
- Login to your WordPress dashboard and go to Appearance ⇨ Themes. Activate the WP Premium theme
- While in the Appearance ⇨ Themes section, click on the blue “Install sample data” button to populate your site with dummy data and make it look like our demo.
Manage the WP Premium homepage
Assuming you activated the dummy data from Appearance ⇨ Themes, your WP Premium homepage should show posts on the left side, with the rest being populated by widgets. Check out the image below to see how you can edit each area.
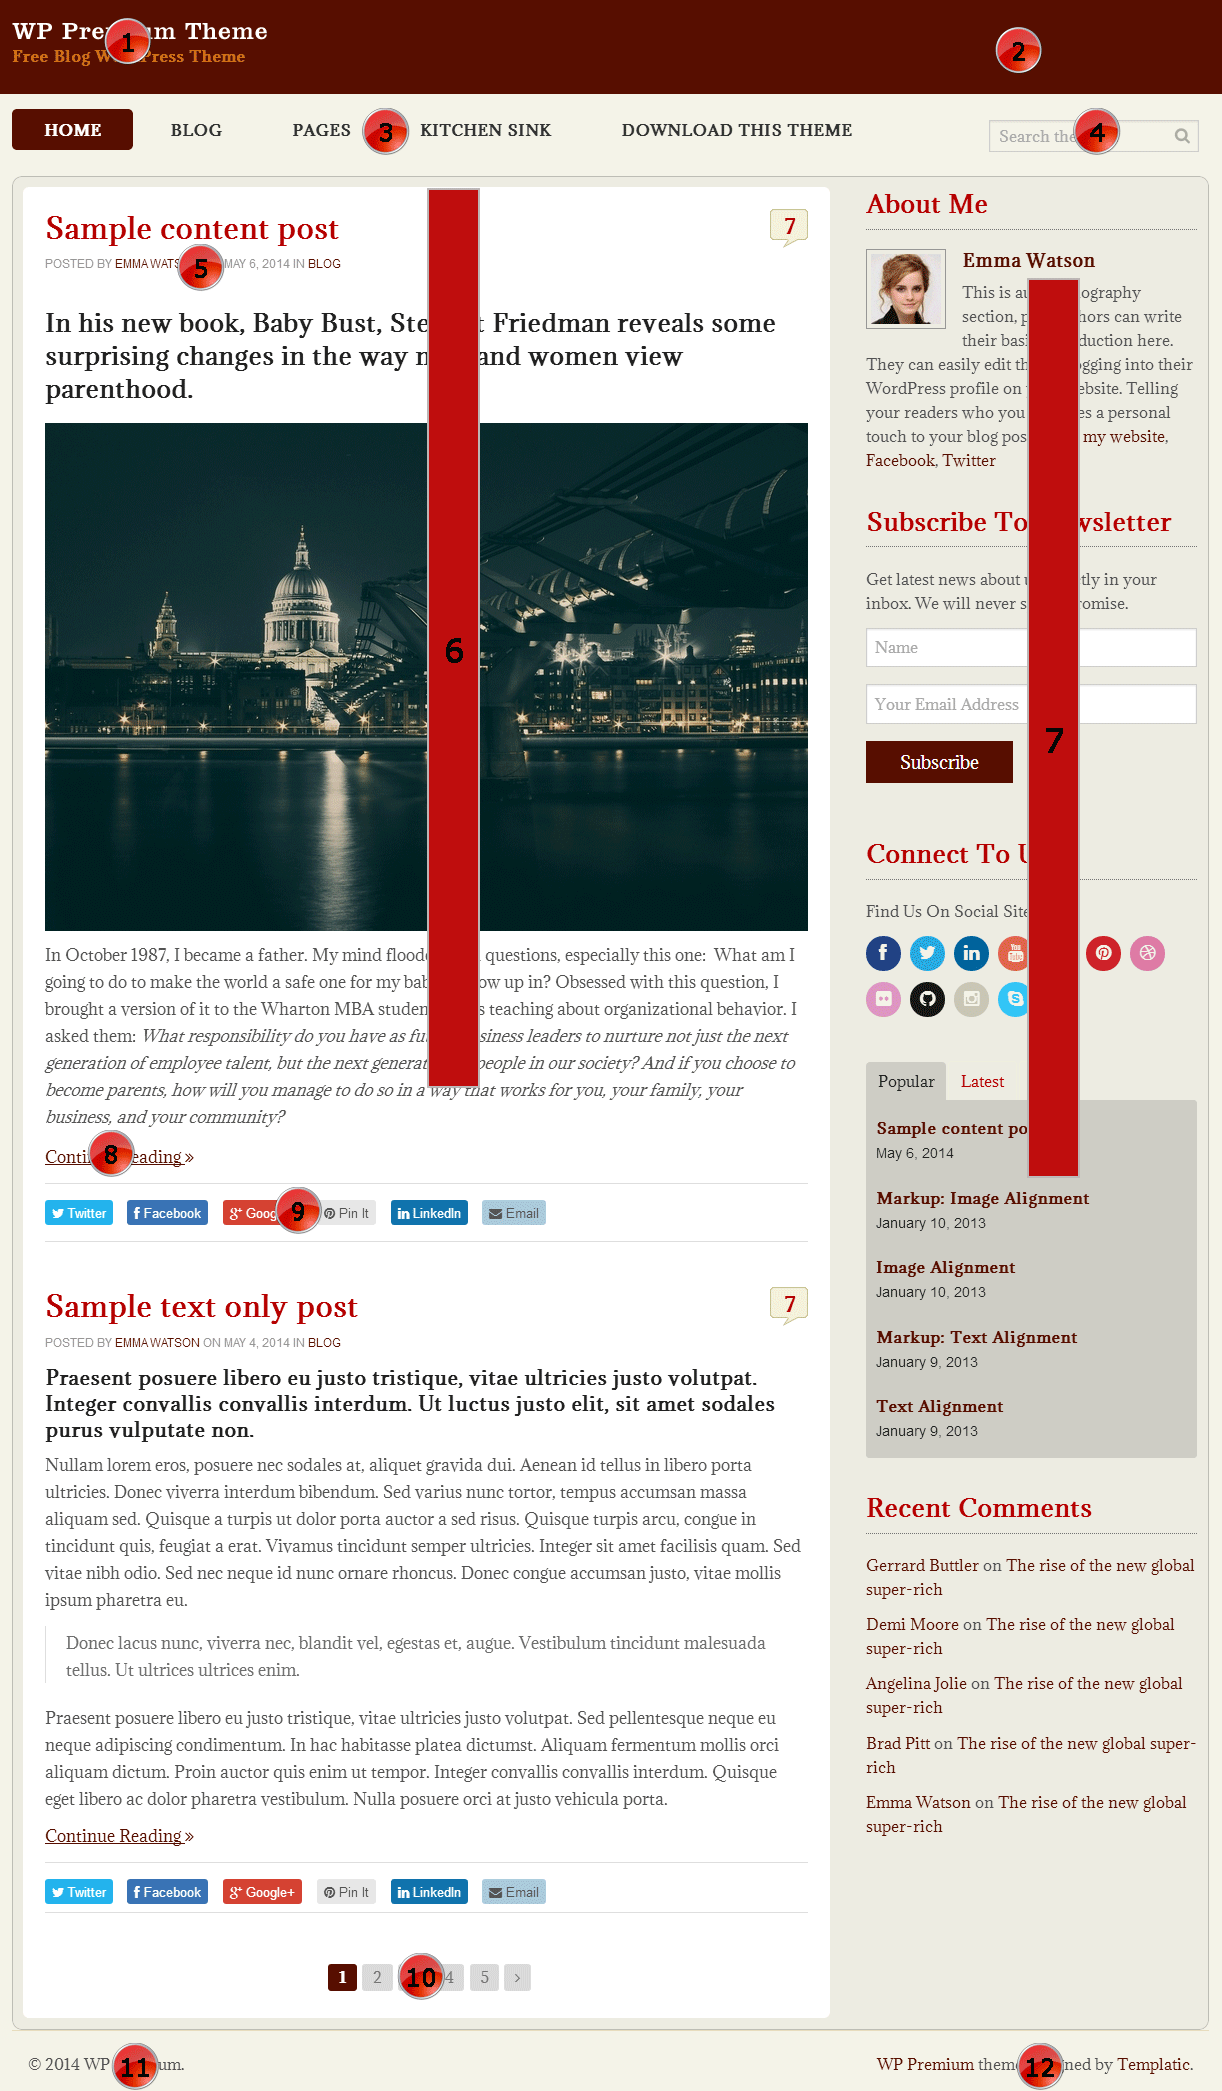
1 – The logo/blog title section
To change your logo go to Appearance ⇨ Customize ⇨ Site Logo ⇨ Upload image for logo.
To remove the tagline shown below the logo expand the “Site Title & Tagline” option (while in the Customize section). Uncheck the “Display Tagline” option. In case you want to remove the logo altogether and display your site title instead, expand the Site Logo section again and click on the current logo image. Now click on the “Remove Image” link.
2 – Header Right widget area
Even though there is nothing shown in this area in the image above, you can add a banner here. To do that go to Appearance ⇨ Widgets and place the “T – Advertisement Widget” inside the Header Right area. You can display an image by using code like this:
<a href="LINK" target="_blank"><img src="IMAGE_URL" alt="" /></a>
LINK = The URL of the place where you want the banner/image to “go”.
IMAGE URL = The URL of your image. You can upload it in Media ⇨ Add New. Make sure to copy the “File URL” field and not the attachment URL.
3 – Primary menu area
You can assign a menu here by going to Appearance ⇨ Menus and creating a menu. When you’re done select “Primary Menu” under Menu Settings ⇨ Theme Locations. For details on how to create custom menus watch the following video…
4 – Navigation Right widget area
To add content in this area go to Appearance ⇨ Widgets and place a widget inside the Navigation Right area. In the screenshot above the widget located in this area is Search (default WordPress widget). Leave the title field empty after adding the widget.
5 – Byline
This is some short meta description about the post. A lot of people often want to remove it. If you want to remove it as well, just add this to Appearance ⇨ Custom CSS Editor
.byline {
display: none;
}
6 – The Post
This area will display posts you created from wp-admin ⇨ Posts ⇨ Add New. The homepage will pull posts from all categories and sort them in chronological order (newest first).
To control how many posts are shown on the homepage head over to Settings ⇨ Reading and tweak the “Blog pages show at most” option.
Posts appearing too large on the homepage (and category pages)? Break them apart at exactly the point you want using the more tag.
7 – Homepage Sidebar
This is the main and most prominent area of the homepage. To add content in this area go to Appearance ⇨ Widgets and place widgets inside the “Home Page – Sidebar” area. Here’s the list of widgets included in the screenshot above
- T – Author Widget
- T – Newsletter
- T – Social Media
- T – Related, Popular, Latest Posts
- Recent Comments (native WP widget)
Quick tip: The Author Widget pulls content automatically from the users “Biographical Info” field. You can populate this field from wp-admin ⇨ Users ⇨ Your Profile.
8 – The read more button
If you want to change the read more button from “Continue Reading” to something else, use the language PO file included with the theme. Alterantively, you can make the change directly inside the code by opening index.php (theme root folder) and editing line 21:
<?php the_content('<span class="moretext clearfix">'.__('Continue Reading ','templatic').'<i class="fa fa-angle-double-right"></i>
9 – Share Buttons
Editing this section is only possible by editing the source code. The file that requires tweaks is index.php (theme root folder). The code is located around line 23. Search for this DIV
<div class="social-media-shareicon">
To remove specific sharing options simply delete the list element ( <li> ) for that social network. To remove them all at once add this to Appearance ⇨ Custom CSS Editor
.social-media-shareicon {
display: none;
}
10 – Pagination
This area is generated automatically if there are enough posts to show. As mentioned earlier, you can control how many posts are shown per page by editing the “Blog pages show at most” option inside Settings ⇨ Reading section.
11 – Footer left
This area is designed to show your site name and the current year. To change the info that is displayed here open footer.php (theme root folder) and edit the line number 12. This is the code
<p class="source-org copyright left">© <?php echo date('Y'); ?> <?php bloginfo('name'); ?>.</p>
12 – Footer credits
To remove or edit this section go to Appearance ⇨ Customize ⇨ Footer. Now just delete all the code inside that box (or edit it to your liking).
Customization options
Styling content
There are loads of pre-created designs you can use to style posts and pages inside WP Premium. You can see the available designs on this page.
https://templatic.com/demo/wppremium/kitchen-sink/
The designs are available as pure HTML (not as shortcodes). To get the source code for that page just click here.
Changing colors
Changing colors in WP Premium doesn’t require your to touch any code, you can do it from the Appearance ⇨ Customize ⇨ Colors section.The available options are…
- Body Background Color – Changing this will change the background of the whole theme. This includes the stuff inside and outside of the main content area (the container).
- Content Color – Tweaking this option will change the paragraph color on your site. It will also change meta descriptions, title borders (in widgets), the comments section, etc.
- Primary Color – Use this option to change the color of some links and buttons inside the theme.
- Secondary Color – Changes the background of your header and the color of some links (read more button).
- Title Color – Changes the title color for all pages, posts and widgets.
Setting a background image
Navigate to Appearance ⇨ Customize ⇨ Background Images to set a fancy new background for your theme. Upload either a header image or a body background image, depending on what you want to change. It’s worth noting that the header background image will be displayed on top if you set both.
When it comes to setting a custom body background image, keep these guidelines in mind:
- The image should be very large, around 1920×1080 pixels.
- The image is tiled (repeated) by default. Hide this effect by uploading large images as mentioned earlier.
- Using a background image increases page load and might diminish the site experience for mobile users. If you can avoid using it, then avoid it.
General customization tips
If you’re looking to drastically customize the theme then the above mentioned options won’t be enough. In case most of your changes are design-related, check out the Appearance ⇨ Custom CSS Editor section. It allows you quickly overwrite any CSS code. You’ll find more details on how to perform these overwrites in this article.
If however you plan on changing both design and functionality, consider creating a child theme. You’ll find good instructions on this subject in this WPengine post.
Third-party plugin compatibility
SEO plugins
To optimize your content for search engines I highly recommend installing one of these two SEO plugins.
These plugins will work with WP Premium in pretty much the same way as with other WordPress themes (there are no theme-specific features). For instructions on setting up each plugin just click on “detailed instructions” in the list above.
Contact form plugins
For setting up contact page (so visitors can get in touch) we’ve provided support for two plugins
- Contact Form 7 (free)
- Gravity Forms (premium)
Once you create the contact form (using one of the plugins) simply insert the provided shortcode inside any page or post inside the theme.
Frequently Asked Questions
How to translate WP Premium in a different language?
For details instructions on how to translate WP Premium (or any other Templatic theme) open this translation tutorial.
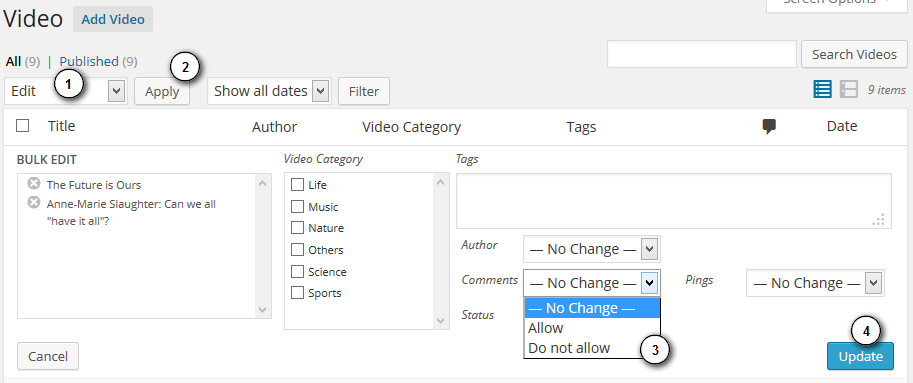
How to disable commenting in posts?
If you don’t want to enable commenting on your posts, go to Posts ⇨ All Posts and select those for which you want to disable comments. Now choose “Edit” in the Bulk Actions dropdown. In the area that opens edit the options for the Comments dropdown.
To disable comments for future posts go to Settings ⇨ Discussion and uncheck the “Allow people to post comments on new articles” option located under “Default article settings”.