Important!
Before getting started with the Classifieds add-on you should first learn as much as you can about Directory. The best place to start is the Directory theme guide.
Installation
- Download the plugin from Templatic member area. You’ll find it inside the “Directory Extensions” sub-section.
- Navigate to wp-admin ⇨ Plugins ⇨ Add New ⇨ Upload. Use the “Browse” button to load the previously downloaded .zip file. Click on “Install Now” to confirm.
- Once the plugin is finished installing click on the “Activate” button.
Load sample data
Follow these steps to load some dummy classifieds to your site.
- Download this file and extract it using software like 7-Zip.
- Go to Tools ⇨ Import and click on WordPress. Proceed with the WordPress Importer installation. Once it’s done click on the “Browse” button.
- Load the classified-dummy-data.xml you downloaded (and extracted) a few moments ago. Choose to import media files as well.
- Assuming your site is new and without real content, go to Appearance ⇨ Themes and click on the “Install sample data” button (delete and reload if it was already active). Skip this step if you’re installing the Classifieds add-on on a live site (with real content).
Basic information about the Classifieds add-on
Installing the Classifieds add-on enables the classified post type on your site. This post type is totally separate from the default (Listing) post type and comes with its own categories, tags, submission page, etc. Actually, if you don’t plan on using the default Listing post type, you can go ahead and deactivate the “Tevolution – Directory” plugin (from wp-admin ⇨ Plugins).
Along with enabling the classifieds post type, this add also adds a few important widgets that make classified management easier. Most important of which are
- T – Classifieds’s Seller Detail ⇨ Displays information about the classifieds author (seller) on classified detail pages. Add this widget to the “Classified Detail Page Sidebar”.
- T – Classified Filters ⇨ Displays options for filtering classifieds on category or search pages. Filtering options include Price, Price type and Classified status. Add this widget to the “Classified Category Page Sidebar”.
Add a classified
Add classifieds from the back-end
To add a classified go to wp-admin ⇨ Classifieds ⇨ Add Classified. Inside the “Add Classified” screen that opens you should enter the classified title, description and populate the fields listed under “Classifieds Information” section. You can control which fields show inside this area from Tevolution ⇨ Custom Fields. For more details on that section open the Tevolution guide.
Below the “Classified Information” area you should see available price packages. To create and manage your price packages navigate to Tevolution ⇨ Monetization.
For more information on classified detail pages open the “Manage Pages ⇨ Detail page” section of this guide
Add classifieds from the front-end
Front-end submission is done using the “Submit Classified” form. A page containing this form should have been created when you activated the plugin, you’ll find it from wp-admin ⇨ Pages. The URL of that page will be something like www.your-domain.com/submit-classified. In case you deleted this page (or it was never created), go to Pages ⇨ Add New, insert the below shortcode, set a title and publish the page:
[submit_form post_type='classified']
Now that the page is created, both you (the admin) and your visitors can use it to submit content. Similar to the back-end submit section, most of the input fields available inside the form can be modified from the Tevolution ⇨ Custom Fields section. You can also use that section to add new fields. To modify the “Select a package” section of the submission form, navigate to Tevolution ⇨ Monetization section.
Classified custom fields
Upon installation the Classifieds add-on will enable several new custom fields. Each of these can be modified from the Tevolution ⇨ Custom Fields section. The most important of these are…
Price (IN USD $)
This is the most important classified-specific custom field. It appears in almost all pages.
To change the currency on your site please follow these two steps:
- Go to Tevolution ⇨ Monetization ⇨ Currency (tab) and enter your currency. Click here for more information about currency settings.
- Go to Tevolution ⇨ Custom Fields and edit the Price (IN USD $) field. Change the label to reflect your own currency or just enter it as “Price”.
Price Type
The field is used to describe the classified price and inform the visitors whether the price is fixed, negotiable or something else. By default these values appear under the main classified price inside classified detail pages. Screenshot.
Classified status
The Classified status allows authors to tag their classified with specific information. Some of the default ones include Sold, No Offers, Exchange, Trade, etc. You can modify these options (or create new ones) by editing the “Classified Status” field from Tevolution ⇨ Custom Fields. Edit the Option Title and Option Values fields. Once you edit those two values, navigate to Tevolution ⇨ Settings ⇨ Category Page Settings and define the name and color of your status.
By default these statuses appear as badges embedded into thumbnails on classified category pages. Screenshot.
How and where to moderate user submitted classifieds?
Once users submit classifieds, the will show up inside the Classifieds ⇨ Classifieds section. From there you can draft, publish or edit them. Another place from where you can manage them is Tevolution ⇨ Transactions. Use that section to bulk-confirm or bulk-deny transactions/listings.
To set the default status for submitted classifieds (publish/draft) head over to Tevolution ⇨ Settings ⇨ Submission Page ⇨ Default status for free/paid submissions
Manage pages
Classified detail page
The classified detail page is what you get after opening an individual classified (created from Classifieds ⇨ Add Classified). For more info on each element within that page check out the image below.
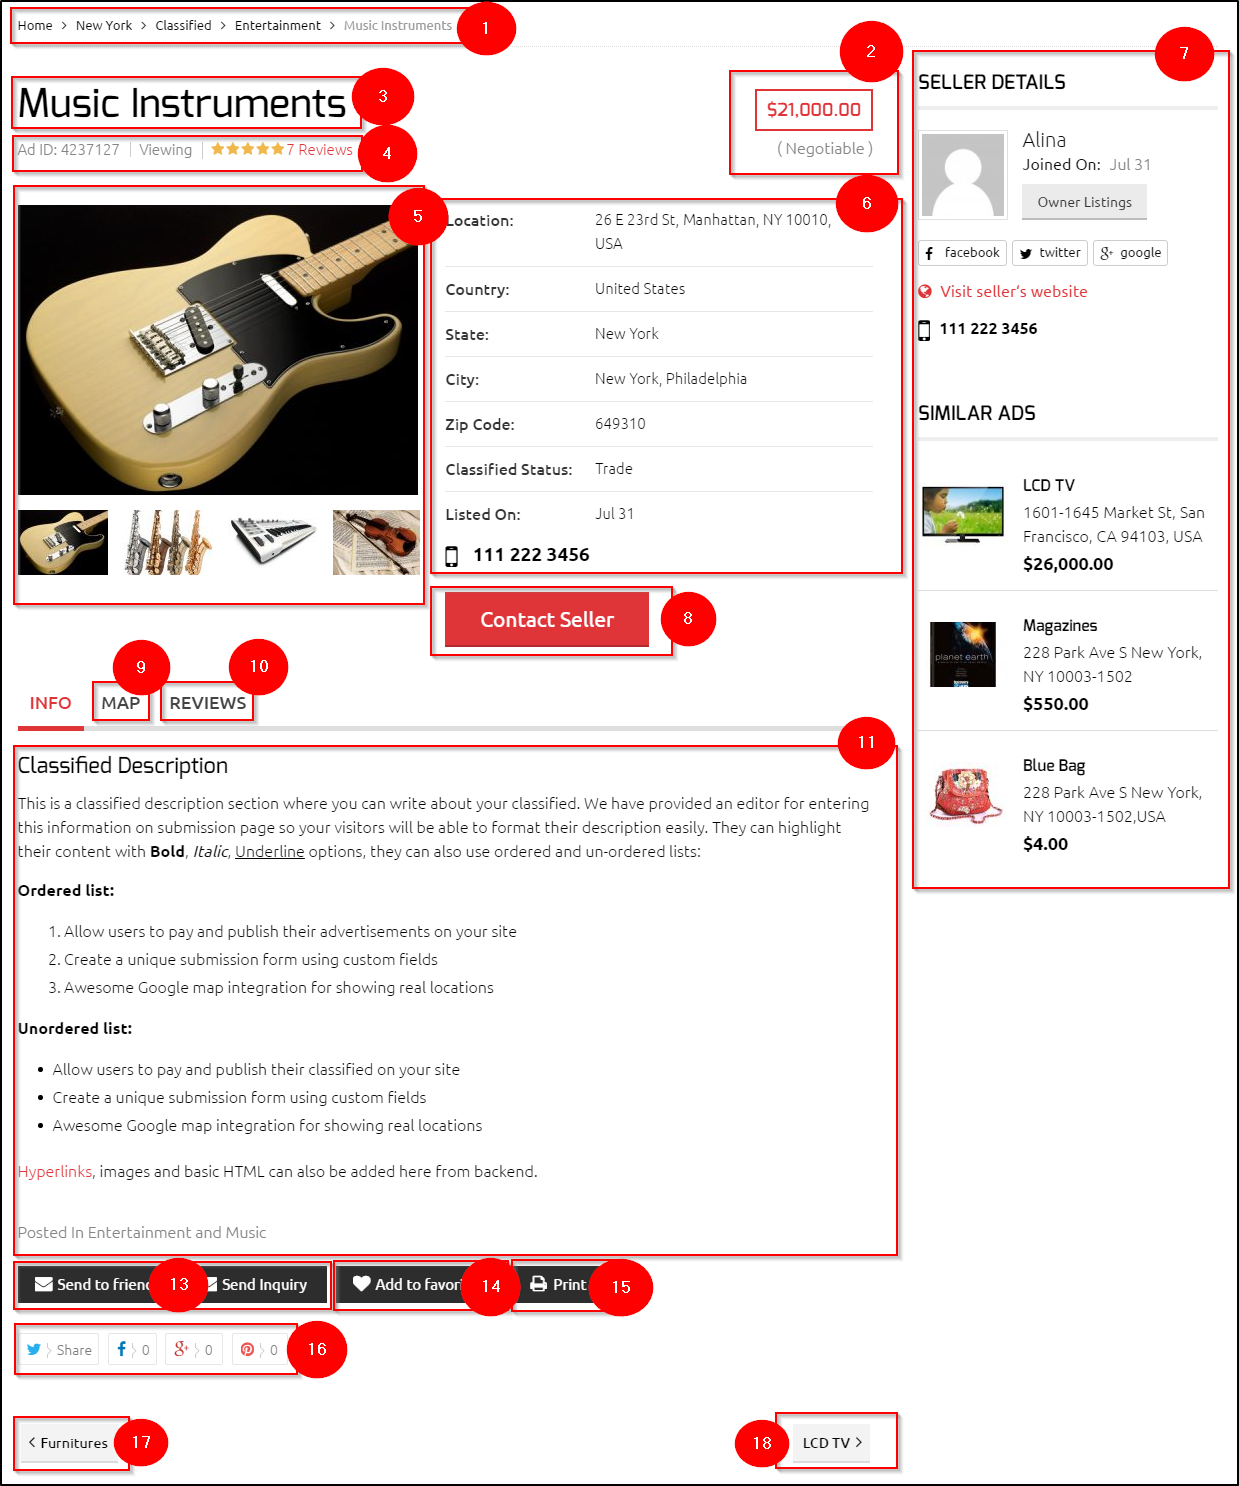
1 – Breadcrumbs
Displays a path to your current classified. Breadcrumbs can be disabled from Appearance ⇨ Theme Settings.
2 – Classified price
The information shown here corresponds with the value entered inside the “Price” field when submitting a classified. The “Fixed Price” text displayed below the price is the “Price type” value. It can be set while submitting a classified. If you don’t need this field just deactivate it from Tevolution ⇨ Custom Fields.
Remember to enter whole numbers when defining prices. The plugin will add thousand and decimal separators automatically. To change the price format navigate to Tevolution ⇨ Monetization ⇨ Currency. Click here for more details about currency settings.
3 – Classified title
This is the first bit of information you enter when creating classifieds from both the front-end and back-end.
4 – View counter
View counter shows how many times that page has been opened today and all time. If you want, you can hide this from Tevolution ⇨ Settings ⇨ Detail Page ⇨ View counters
5 – Images
Here displayed are the images assigned to the classified while submitting it. Images can be added (from the back-end) by using the “Image Gallery” section inside the right sidebar. Please note that you need to upload new images in order to add them to the gallery.
6 – Classified information
This area displays basic information about the classified. You can edit these fields from Tevolution ⇨ Custom Fields.
7 – Detail page sidebar
To edit this area go to Appearance ⇨ Widgets and place widgets inside the “Classified Detail Page Sidebar” area. The widgets used inside the image above are:
- T – Classified’s Seller Details
- T – In The Neighborhood
If you’re looking to edit the Classified’s Seller Details widget, the relevant code is located around line 1200 of this file: \wp-content\plugins\Tevolution-Classifieds\functions\widgets.php. I recommend against making edits directly inside the code. Instead, hook the entire widget (code starts around line 1160) and customize it using a widget. Open our Directory customization article for details.
8 – The contact form
Clicking on this button will open up a contact form that allows visitors to get in touch with the seller (classifieds author).
9 – Map tab
The map tab shows a map of the location entered inside the “Address” field. Below the map visitors can also get Google Maps directions to the seller’s location. The directions should be displayed inside the same language as your browser. Default language is English.
10 – Reviews tab
Reviews are basically comments with star rating. You can disable comments for new classifieds from Settings ⇨ Discussion or for individual classifieds by editing (or bulk editing) each one. Ratings can be disabled from Tevolution ⇨ Settings ⇨ Detail Page ⇨ Ratings.
11 – The content
This is the primary description (content area) of your classified. Feel free to use HTML and CSS to style the text. There are even plugins that allow you to execute PHP.
12 – Additional classifieds information (custom fields)
This is the area in which the custom field values assigned to the classified are displayed. You can create new fields by going to Tevolution ⇨ Custom Fields. Click here to learn more about custom fields functionality.
Quick note: To show a value from the detail page be sure to check the “Detail page” box inside the “Show the field in” option.
13 – Send to friend and Send inquiry forms
Send to Friend form allows the visitor to send a quick email (containing a link to the listing) to a friend.
Send Inquiry allows visitors to get in touch with the listing author, i.e. the person who submitted the listing to the site. Want to customize this form? Click here.
Both forms can be disabled from Tevolution ⇨ Settings ⇨ Email Settings & Notifications (tab). To enable captcha for these forms navigate to Tevolution ⇨ Settings ⇨ Captcha. Keep in mind that you have to install WP-reCAPTCHA first.
14 – Add to favorites button
The favorites button allows website visitors to save specific classifieds for later viewing. Once saved (favorited), the classified will become available inside the visitors front-end profile, under the “My Favorites” tab.
15 – Print button
Clicking this button will allow visitors to either quickly print out the webpage or save it as a PDF.
16 – Social sharing buttons
Website visitors will be able to use these buttons to share classifieds on Facebook, Twitter and other networks. You can enable/disable individual options from Tevolution ⇨ Settings ⇨ Detail Page ⇨ Show sharing buttons.
17 – Next/Previous buttons
These buttons allow visitors to quickly navigate to the next classified within the same category as the one being displayed. If you don’t need these, hide them by adding the following code to Appearance ⇨ Custom CSS Editor.
.singular .pos_navigation {
margin-bottom: 0px !important;
visibility: hidden;
}
Classifieds category page
Category pages (as the one screenshoted below) are generated automatically as soon as you create a category from Classifieds ⇨ Classifieds Categories. To tweak category page options navigate to Tevolution ⇨ Settings ⇨ Category page. For more details on how to edit each of the category page components check out this image.
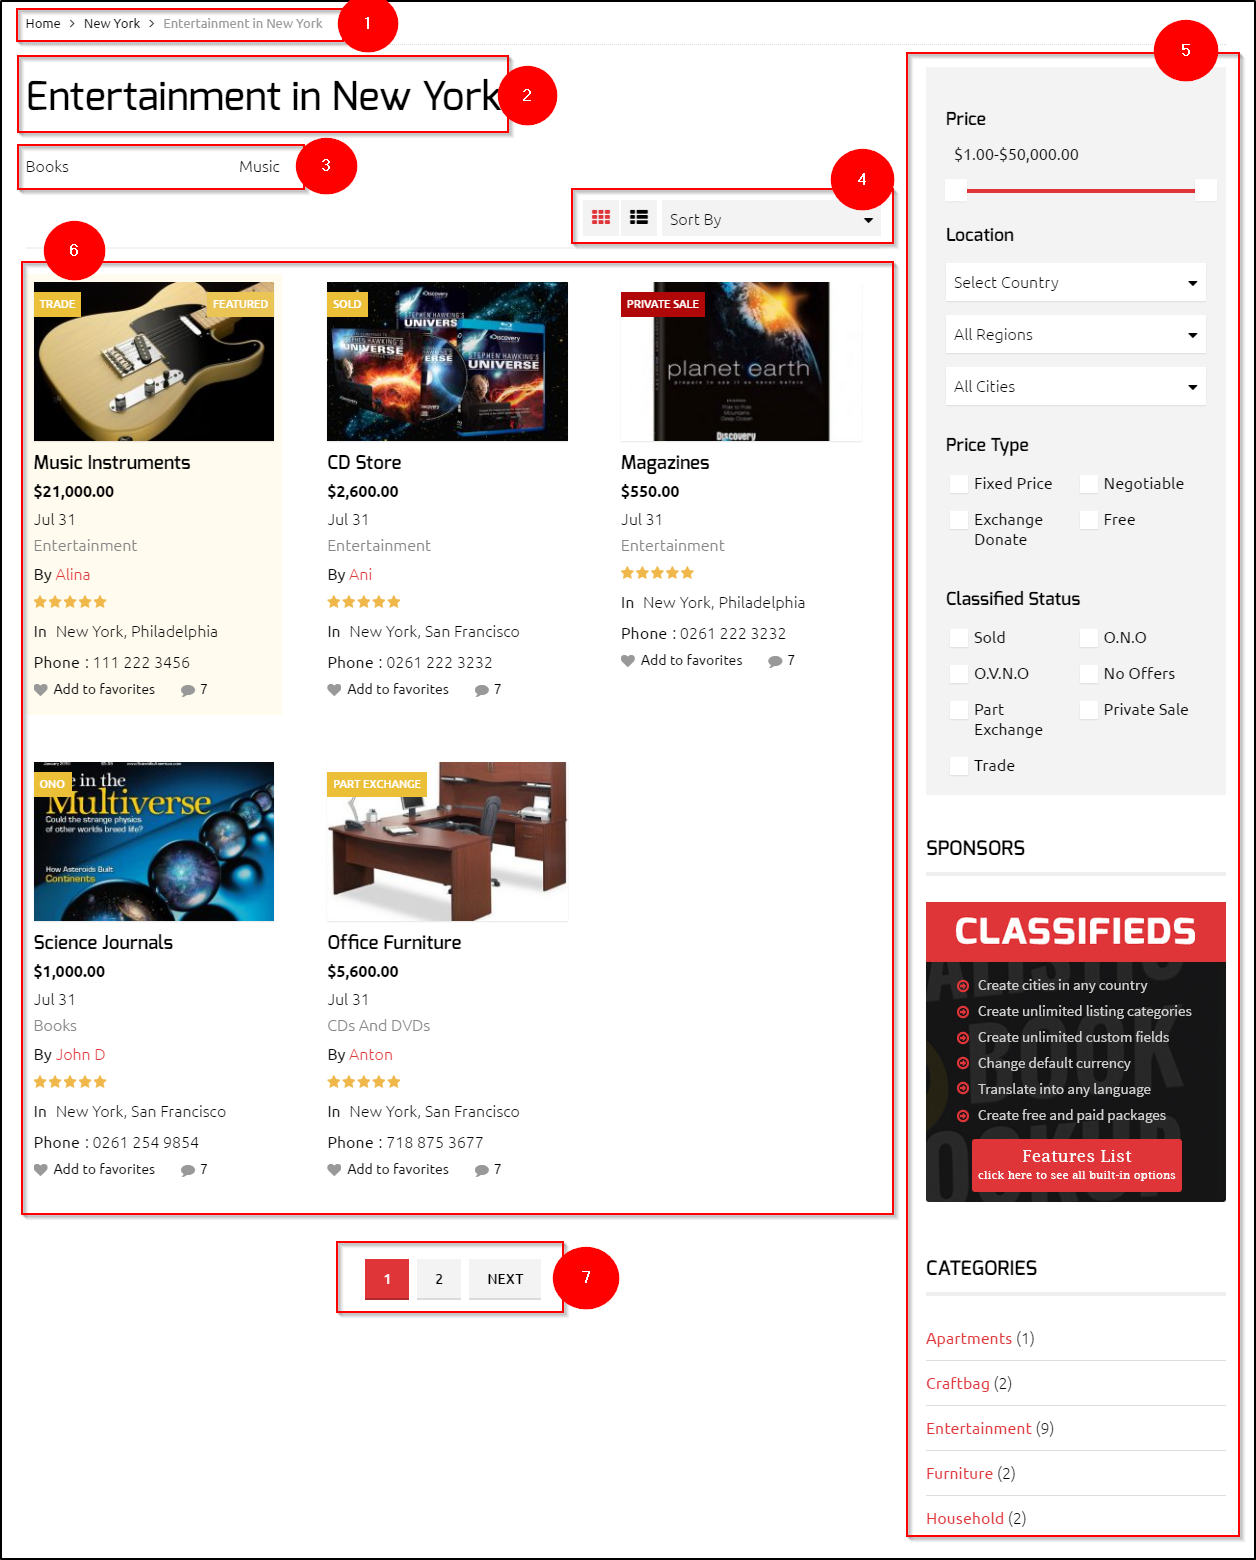
1 – Breadcrumbs
Displays a path to your current classified category. Breadcrumbs can be disabled from Appearance ⇨ Theme Settings.
2 – Category name
The name of the category currently being displayed.
3 – Sub-categories
If a parent category is being displayed, this area will contain its child categories. You can control the category hierarchy from Classifieds ⇨ Classifieds Categories.
Want to customize this area with icons? Check out our Category Icons add-on.
4 – View controls
This area contains the view controls (list / grid) and a sorting dropdown. Options within the sorting dropdown can be controlled from Tevolution ⇨ Settings ⇨ Category Page ⇨ Sorting Options.
5 – The sidebar
To add content inside this area navigate to Appearance ⇨ Widgets and place widgets inside the “Classified Category Page Sidebar” area. The widget displayed inside the image above is “T – Classified Filters”. I highly recommend using this on category pages.
6 – The actual classifieds
This area displays the classifieds within your category.
How to set a featured image?
When adding a listing from the back-end use the “Featured Image” box located inside the right sidebar. You can also do it by simply uploading an image to the listing image gallery.
7 – Pagination
By default category pages display 5 classifieds, the rest will be sorted into pages. To increase the number of classifieds displayed per page navigate to Settings ⇨ Reading and tweak the “Blog pages show at most” option.
Frequently Asked Questions
How to change the price format?
You can change the way prices are displayed by going to Tevolution ⇨ Monetization ⇨ Currency (tab) and tweaking these three fields: Thousand Separator, Decimal Separator and Number of Decimals. For more details on currency settings click here.
How to translate the plugin?
You can translate the plugin by using the language file located inside the /languages folder. For instructions on handling PO and POT files open the following article
https://templatic.com/docs/how-to-localize-templatics-wordpress-themes/
Can’t see changes made to custom fields?
By default the theme will cache custom fields. To disable caching go to Tevolution ⇨ Custom Fields Setup and click on the “Disable Cache” button at the top of the page.