Upgrading from eBook to eBook 2
Here are the steps to upgrade from eBook to eBook2:
- Download the latest theme from your members area
- Unzip the folder and connect to your server; navigate to wp-content/themes
- Rename the existing eBook folder to eBook_old
- Upload both folders (supreme + eBook) to wp-content/themes/
- Now, on your server open functions.php file from eBook theme folder
- At around line number 43 you will find this code:
function supreme_child_theme_setup() { - Directly below that line of code input this:
update_option('template','supreme'); - Visit your site and hit the refresh button. If you see an error hit refresh again – you should see your site now
- Now just undo the above change and make the file as it was earlier. Create a new ticket through Contact Us if you run into any problems
After updating the theme, all widget settings and some theme settings will be needed to do again.
Activating eBook:
- Connect to member area and expand the eBook section under My Downloads. Download all available files
- Connect to your WordPress dashboard (wp-admin) and navigate to Appearance -> Themes. Click on the Install Themes tab and then on Upload. Use the Browse option to locate the supreme zip file on your hard drive – then click on Install Now. After the installation process is finished do not activate supreme.
- Navigate again to Appearance -> Themes -> Install Themes -> Upload but this time load/install the eBook zip file. Once it’s installed activate the theme.
- To load sample data navigate to Appearance -> Themes and click on the blue “Yes, insert please” button
In case WordPress rejects the .zip files use FTP to install the theme:
- Extract supreme.zip and ebook.zip then upload to /wp-content/themes directory
- Once uploading is done connect to the WordPress dashboard and activate the eBook theme
- If you run into more problems during installation please visit our Installation Guide
For detailed instructions on using FTP please click here
Need help with installing the theme? Hire us!
Facing Problems in installing the theme? Don’t worry, we’ll do that for you, just click here!
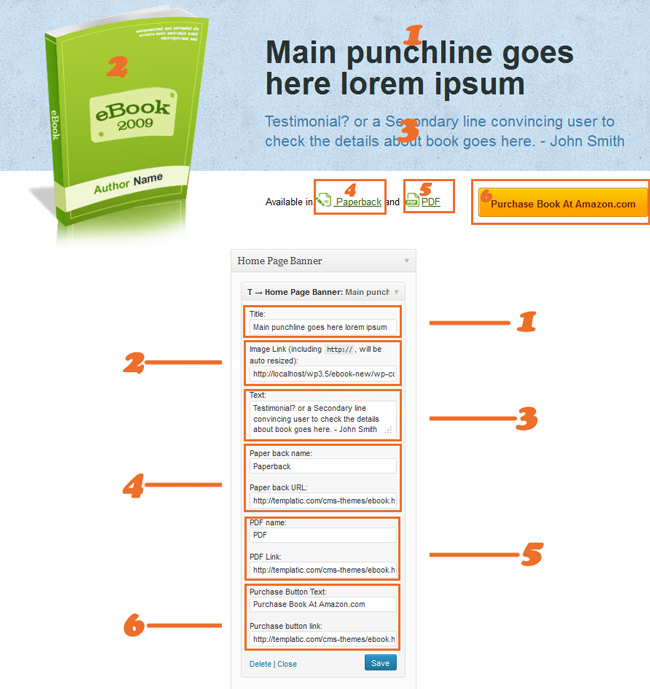
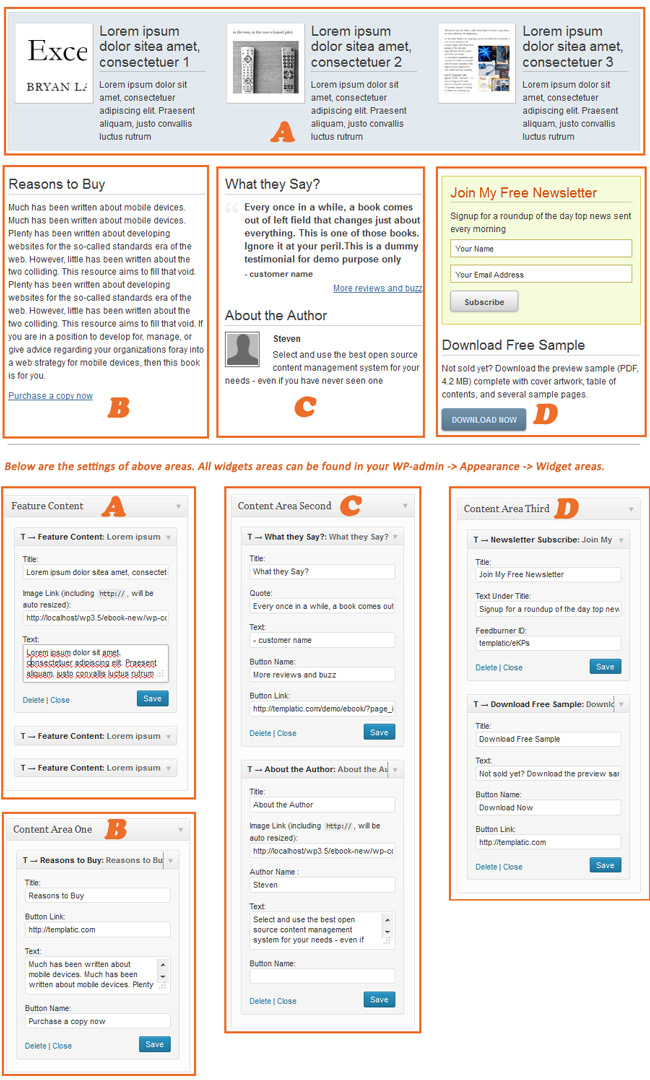
Configuring Homepage
Setting up eBook’s homepage is fairly easy and it can be set up with some widgets only. I have given two screenshots below. You can do the settings by referring the screenshots.
This one shows you to how to set up the main banner section containing book image, punch lines, download links, etc…
This one shows you how to set up other widgets below the banner section on the home page:
Menus
Menus can be created and managed in WP-admin -> Appearance -> Menus section. We have provided two menu areas in the eBook where you can place the menus:
Footer: This menu appears in the footer beside credit text.
Secondary: This menu appears in the header beside the logo image or site title. You can also use jquery mega menu here. To do so, remove the menu from Theme Locations -> Secondary area and place widget “jQuery Mega Menu” in “JQuery Mega Menu” widget.
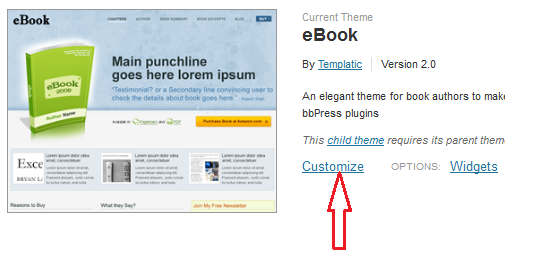
Basic CSS Options
Go to WP-admin -> Appearance -> Themes. Click on customize. Now on front page you’ll be able to see the customizer on the left hand side. Here you can change some CSS for the site without editing the code.
Change Logo/Title:
- Expand “Site Logo” by clicking on it. Here upload your logo image and click on “Save & Publish”.
- Instead of Logo image, if you want title there then it can be settled from Site Title & Tagline section. You can give description about your site in a line which will display under the logo in front end. Check mark site description field if you want to hide it.
- For best results we recommend using logos up to 200 pixels in width. Recommended height is 60 pixels.
Footer Copy Right Text:
This is more easier now. Instead of editing footer.php, this can be done from Footer Section given in customizer. You can add your own code as well.
Templatic theme Setting:
- Use Custom CSS: Enable this option if you are using custom.css file. Here is more details for custom.css file.
- Hide autoinstall: Enable this if you want to hide insert sample data option from WP-admin -> Appearance -> Themes.
- Display excerpts on archive pages: Enable this if you want to display excerpt on the category pages.
- Display excerpts on Search Result Pages: Enable this if you want to display excerpt on the search result pages.
- Show author biography on posts: Enable this if you want to display author detail and avatar on single post detail pages.
- Show author biography on pages: Enable this if you want to display author detail and avatar on single pages.
Layouts:
Your site page’s layout can be changed from Layouts Settings:
- Default Layout: This is default layout as like our demo site.
- One Column: This is a full width layout without any sidebar.
- Two Columns, Left: This is a layout with sidebar on left hand side.
- Two Columns, Right: This is a layout with sidebar on right hand side.
Blog Category & Detail page Sidebar:
The widget area where you can place widgets for sidebar of category page and detail page is “Post/List detail sidebar”.

Shortcodes
The easiest way to add buttons or columns into a post is to use shortcodes. Click here to download the Shortcodes plugin and then follow the same instructions you used to install the theme, but instead of placing the folder inside /wp-content/themes, place it inside /wp-content/plugins. For detailed FTP instructions open this article:
https://templatic.com/docs/how-to-upload-and-edit-files-on-your-server-ftp-tutorial/
To see what are the actual shortcodes available to you click on the link below:
https://templatic.com/demos/catalog/shortcodes-guide/
Activate Captcha on Contact Us Page
- We have provided compatibility with a Captcha plugins: “WP-reCaptcha”. You will need to install and activate it first.
- In The WP-admin -> Appeanrace -> Themes -> Customizer -> captcha option, select “Contact Us Captacha Setting” and click on “Save & Publish” button to make available the captchas in the Contact us page.
- Make sure to uncheck the options – Enable for comments form and Enable for registration form in the plugin’s settings.
Other Plugin’s Support:
We have also provided compatibility with some other plugins:
WooCommerce:
- You can click here to download wooCommerce.
- See the “Getting Started” Tutorial for installation and setting up WooCommerce plugin.
- WooCommerce’s Documentation/guide is available here.
bbPress:
Let’s see how this plugin works.
- First, download, install and activate bbPress just like you activate any other plugin. You can get it from here.
- When we activate the plugin, three taxonomies are added – Forums, Topics, and Replies. Replied depends on its Topic. Topic depends on its forum.
- For Example, In Templatic Forums, there are different forums: Catalog theme forums, GeoPlaces Theme Forums, etc… This Catalog theme forum is a “Forum” in bbPress.
- Now, under Catalog theme forums there will be many forums. These are treated as “Topics”.
- And a Topic can have many replies. Each of them is known as “Replies” in bbPress.
- Forums can only be added from backend. Topics & Replies can be added from Front-end & back-end.
- If you are adding a Topic from back-end, then you must select Forum for that topic from WP-admin -> Forums -> New Forum -> Forum Attributes -> Type field.
- If you are adding a Reply from back-end, then you must select its respective forum and topic from WP-admin -> Replies -> New Reply -> Reply Attributes section.
- bbPress’s other settings are placed in WP-admin -> Settings -> Forums.
Can I show the pop up for my image gallery in normal WordPress pages?
Yes you can, but the condition is, if you have activated Templatic-Shortcodes plugin.
If you have followed the whole theme guide and still you are not able set up some things then try to<a href=”#autoinstall”> insert the sample data </a>. If still having any queries then you can create a ticket in the helpdesk.
Hope you enjoyed the guide and theme and best of luck for your site!
Need help with installing the theme? Hire us!
Facing Problems in installing the theme? Don’t worry, we’ll do that for you, just click here!