Upgrading from Events v1? Before you do anything please read the section about upgrading
If you are upgrading from Events2.0 or later to Events 2.2.0, see here how to upgrade.
We have also changed/added below two features in the theme: Recurring functionality & default tab options.
Introduction
Here we are with the Events theme. The most recommended feature by users “Recurring Events” is given in this theme. Also, many other features are enhanced which were already there in Events. Let’s see how to manage the new options and features. Below you can find the guide for how to manage these features and theme options.
Getting Started
Installing & Activating Events
- Connect to member area and expand the Events section under My Downloads. Download all available files
- Connect to your WordPress dashboard (wp-admin) and navigate to Appearance -> Themes. Click on the Install Themes tab and then on Upload. Use the Browse option to locate the events zip file on your hard drive – then click on Install Now. After the installation process is finished activate the theme.
In case WordPress rejects the .zip file use FTP to install the theme:
- Extract events.zip then upload to /wp-content/themes directory
- Once uploading is done connect to the WordPress dashboard and activate the theme
- If you run into more problems during installation please visit our Installation Guide
For detailed instructions on using FTP please click here
Need help with installing the theme? Hire us!
Facing Problems in installing the theme? Don’t worry, we’ll do that for you, just click here!
Installing Sample Data
Do not edit the sample data because in case you delete it, your modifications will be lost. Always insert fresh data.
If you want to auto install the sample data then just click on “Yes insert sample data please”. Theme will be activated & completely installed with some added sample content and categories by default so you can start using it right away.
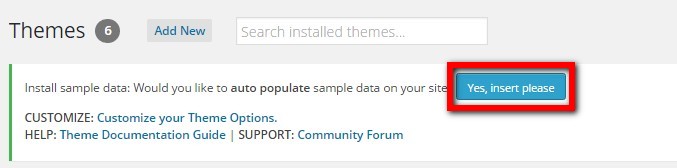
If you wish to delete the sample data that we populated in your site then you can remove it by clicking on “Yes Delete Please!”.
Different Page Configurations
How to set up Home Page?
Now let’s setup the Homepage. The Homepage is widget ready, just go to Appearance > Widgets and setup the widgets as shown in the below image, and also some settings are controlled from Event WP-admin → Theme settings → Basic Settings.
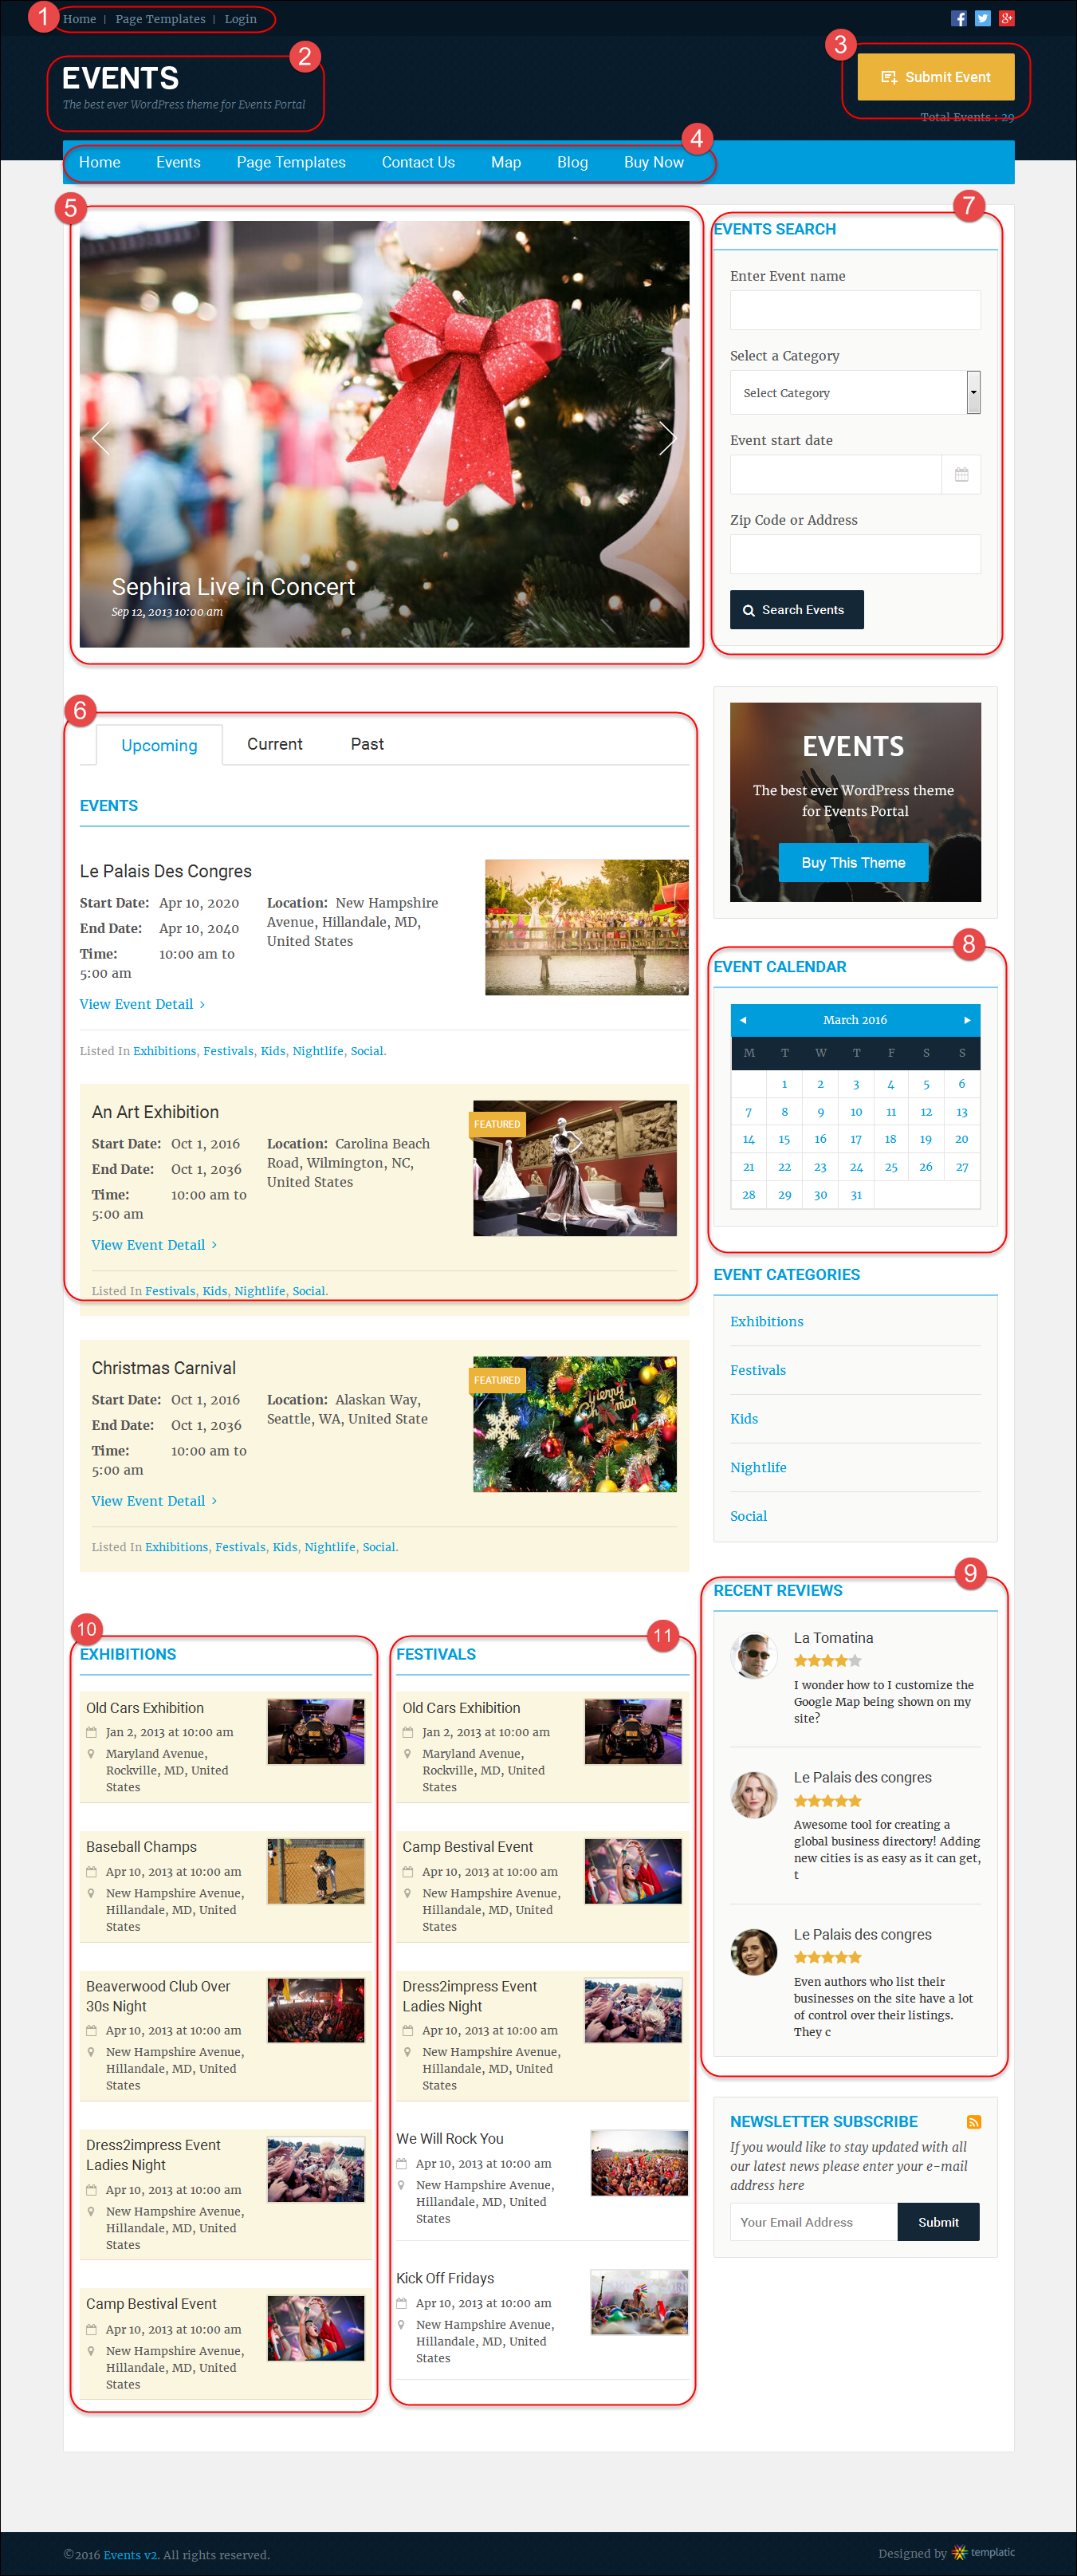
- Top Header Menu: Please check the Navigation Settings here. You can also put “T → Social media buttons” widget in “Header: Right area”.
- Go to WP-admin → Theme settings → Basic Settings → General Settings. Here you can set the logo for your site in the field named as “Custom Logo”. Hit the “Insert in to Post” button while uploading the logo image.
- Submit Event: You can disable the submit event button by selecting “No” in “Allow Users to list Events?” field. It is at WP-admin → Theme settings → Basic Settings → Submit Event Page Settings.
- Main Navigation Menu: check the Navigation Settings here.
- Go to WP-admin → Appearance → Widgets → Front Page Content and insert the “T – Featured Slider” widget here. As the name says. It will display the featured posts in the slider. The featured on home will be preferred first. You will need to give a proper category ID in this widget. It is a numeric value. Slider is not displaying any event?
- Go to WP-admin → Appearance → Widgets → Front Page Content and insert the “T – Latest Events List View” widget here. You can change the order of these posts using “Sort Events by” field.
- Go to WP-admin → Appearance → Widgets → Front Page Sidebar and insert the “T – Events Search” widget here. This widget simply searches the events. You can also add your own fields using manage custom field section of the theme. Note that advance search will not be supported with the multi-checkbox custom field.
- Go to WP-admin → Appearance → Widgets → Front Page Sidebar and insert the “T – Event Listing Calendar” widget here. It displays the events on the calendar when you hover on it.
- You can also put other widgets in the sidebar like “T – Recent Reviews”( which displays the most commented events or posts), “T – Subscribe”(using which your users can subscribe to your site to get new updates), etc…
- Go to WP-admin → Appearance → Widgets → Front Content Left and insert the “T – Latest Events” widget here. This widget lists the latest and featured one first. Also, it works on post’s publish date.
- Go to WP-admin → Appearance → Widgets → Front Content Right and insert the “T – Latest Events” widget here. This widget lists the latest and featured one first. Also, it works on post’s publish date.
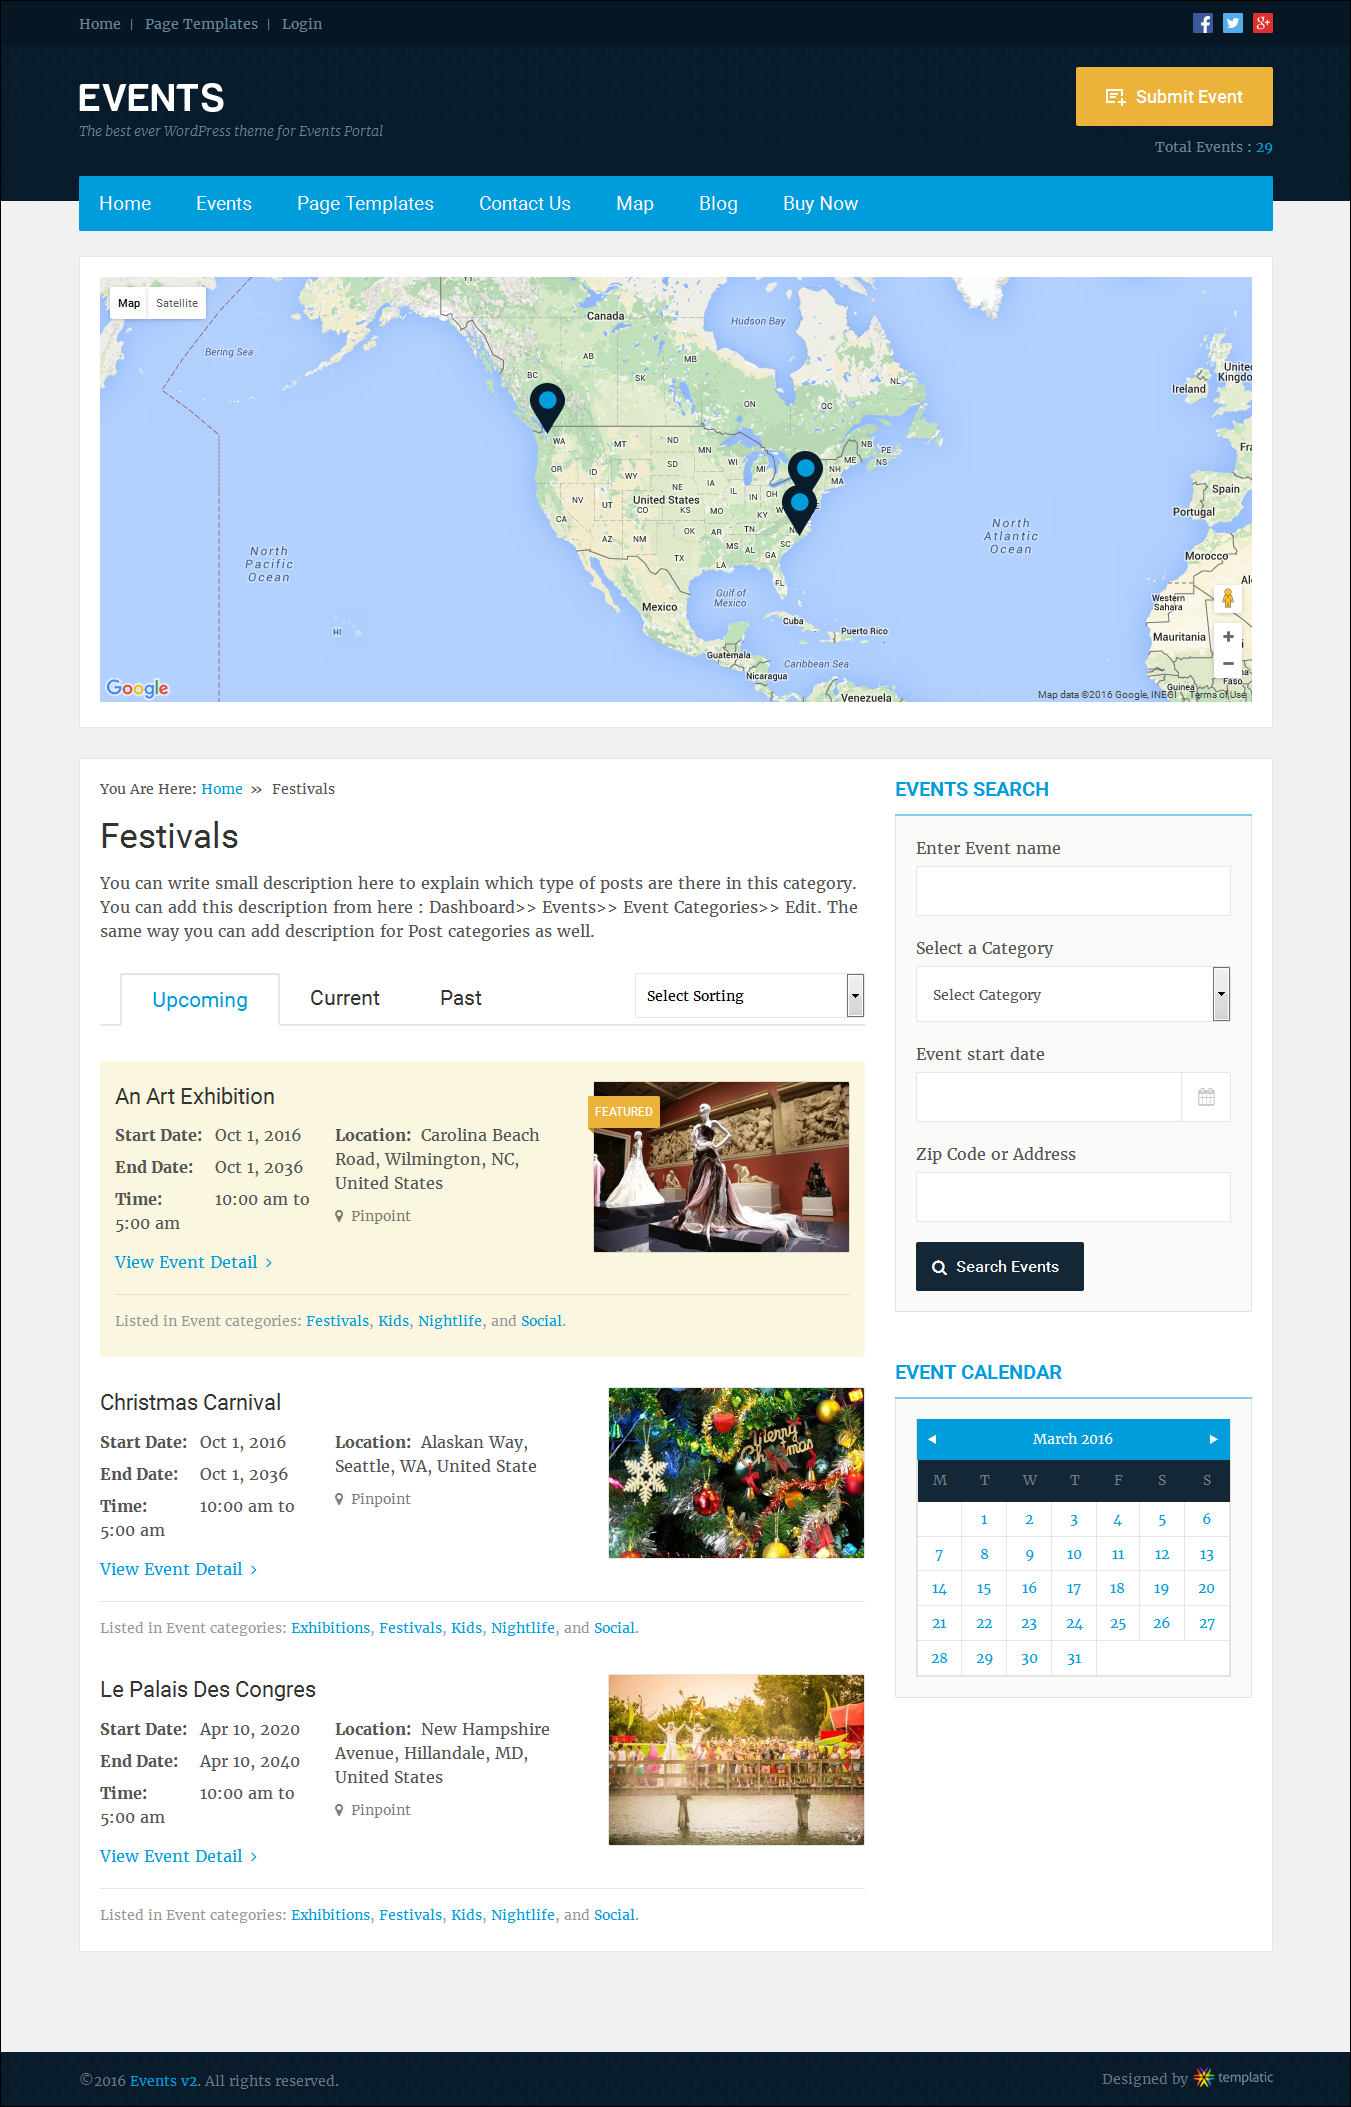
How to set up Events Category Page?
The map given on the category page can be enabled or disabled from WP-admin → Theme settings → Basic Settings → Event Listing Page Settings → Show map on event category pages? field.
Below is a preview of event listing page. Users can also change the order of the events from the drop-down given there beside Upcoming, Current & Past tabs. By default latest & featured events are displayed first.
How to set up Event Detail Page?
The detail page’s most of the settings can be done from WP-admin → Theme settings → Basic Settings → Events Detail Page Settings.
Preview of Event Detail Page:
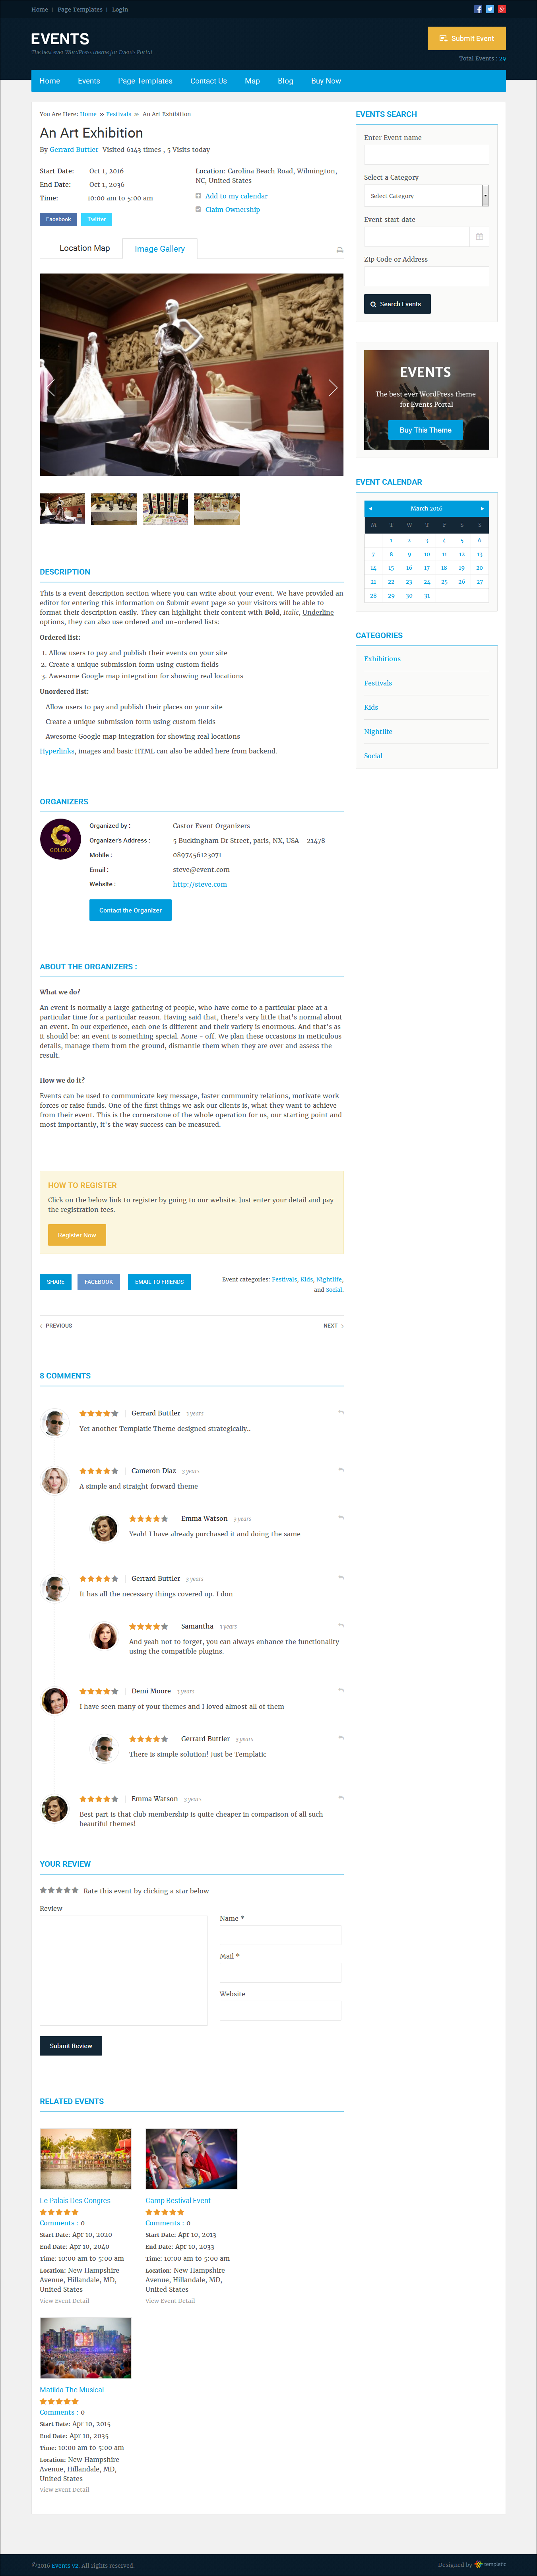
- These are the custom fields of the Events.
- You can activate the claim ownership link from Events Detail Page Settings. There is a field named as “Enable Claim Ownership” where you can activate or deactivate it.
- This area displays the event’s images and Event on Google Map. The settings for these tabs can be done from “Image and Map Settings” in Detail Page Settings.
- This is all the post details like description, custom field’s information, etc… Contact the Organizer will send an inquiry mail to the organizer’s mail ID.
- Social buttons and email to friend can be disabled or enabled from the Detail Page Settings. Different options are given there for it.
- Ratings in the comment area can be enabled or disabled from “Disable Rating” field in Detail Page Settings.
- You can place an advertisement in “Event Content – Banner” area.
- Similar events can be handled by “Number of Similar / Related Events” field in Detail Page Settings.
- Sidebar for the detail page is named as “Event Detail – Sidebar” where you can place different widgets.
Submit Event Settings
How to set up Submit Event Page?
When you click on “Set Address on MAP” the MAP only takes the value from first “Address” field. So that make sure that you have provided correct address there. It does not look for other fields like state, city, etc…
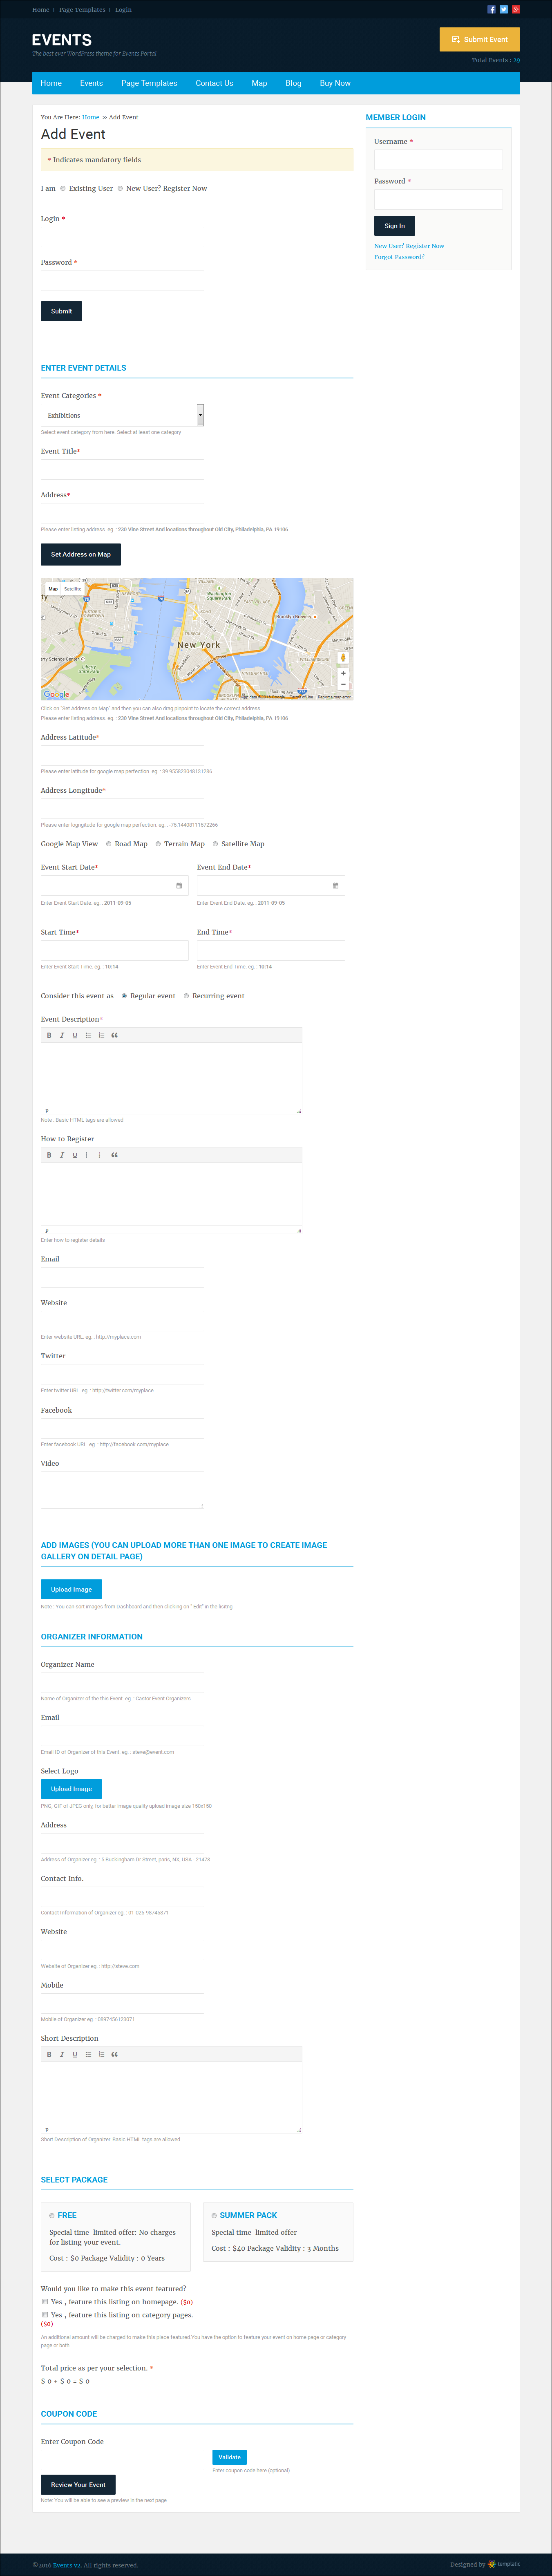
- Go to WP-admin → Theme settings → Basic Settings → Submit Event Page Settings. There are many options listed for the submit property page. I have described below use of each of them:
- Allow Users to list Events?: You can allow or deny your users for adding event from front end using this option.
- Event Default Status: Whenever a new event is added you can set its default status from this option. If you want to moderate the event first before publishing it then you can set it to Draft.
- Category Display Settings: This option is used for how you want to list your categories on submit property page. There are two options – “checkbox” and “select”.
- Price Packages Type: You can choose here either your users will pay per post or pay per subscription. If you’ll choose pay per subscription then the users will be able to post unlimited posts until their subscription ends. Make sure to select at least one option from here to activate the price packages.
- Add Currency Code: You can give here your currency code. If you are using PayPal payment options then please make sure that your currency is one of the currencies given here.
- Add Currency Symbol: As the name specifies you can simply give here your currency symbol to display on the site.
- Currency Symbol Position: This field specifies how the symbol will display around the price value.
- Maximum Image Upload Size Limit: Here you can give the maximum size of the image users can upload while submitting event. This size is in bytes.
- You can add your own fields or edit the existing fields also on submit event form page from WP-admin → Theme settings → Advanced Settings → Manage Custom Fields. I have explained this option in brief here.
- Go to WP-admin → Appearance → Widgets. You can place the widgets in “Add Event – Sidebar” area.
- You can also activate captcha there in Submit Event Page. You can activate it from WP-admin → Theme settings → Basic Settings → Captcha Settings.
Recurring Events
Recurring Event can be added by selecting “Recurring event” option in “Consider this event as” field. When you select this option there will be some fields will come below the recurring event option.
For example, you have a weekly event. It comes on every third week in month and in a week it is happening on Tuesday and Friday. Then the options in recurring event field will be needed to select this way:
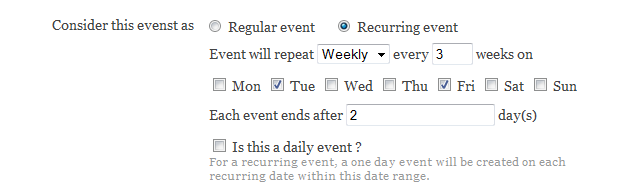
The event’s start date is: 2012-07-27. End date is 2012-09-30. Start time and End Time are 10:14 & 15:30 respectively.
So the events will be like this:
On 27th July – 2012, it is Friday. Event can be on two days, Tuesday and Friday. So on 27th there will be first event. Event is for two days and we have set end time to 15:30. So First event’s End date and time will be Sunday 29th of July 2012 3:30 pm. Now July ends. We have selected that every – 3 weeks. So in august the recurring event will be in third week on Tuesday it that is on 14th august after that on Friday its 17th august. After this it will look in to September’s third week. As we have chosen 3 in every week the event will come for one week only. If we’ll choose for every two weeks then It will create recurring events on 27th July, 7th August, 10th August, 21st August, 24th August, 4th Sep, 7th Sep, etc… for two days.
While entering a date for Recurring Event in the “Start Date Field”, please note that you have to enter any preceding date of your event occurrence start date.
In short, the start date & the recurrence date cannot be the same, start date has to come before the Event recurrence date. Likewise,enter any succeeding date of the Last recurrence Date of your event in the “End Date Field”.
For E:g – If your event’s First occurrence date is 20th of any month then you should enter 19th or 18th etc to make it work correctly!
And if your event’s last recurrence date is 27th, then enter 28th, 29th etc in your End Date Field
Manage Price Packages
Price packages are used when you want to charge your users for posting on your site. There are main two things which affect the total charge or where you can define your charges or amount:
a) Price Package Price: Go to Advanced Settings → Manage Price Packages. Here you can add/edit price packages as per your need. I have explained here the different options given to create the price package.
- Price Package Title: It is just simply defines a title for the package. It represents your package in frontend.
- Description of the price package: You can have a small description for the price package. This description will be displayed in the frontend on Submit Event page below the price package title.
- Package Cost: Simply, it indicates the cost for the package.
- Billing Period: This field indicates for how much time the post will remain published on the site.
- Status: From this option you can activate or deactivate the package. If it is in active status then only it will get displayed in front-end. This is very useful when you want to give some special offer packages for some time and after deactivating it you still need it in backend to activate in future.
- Recurring: If you have selected “Yes” here then your users will automatically charged when their billing period will get over and the post will published again. Please note that this option works only for PayPal.Also make sure that in your PayPal account – Auto Return has been set to “on”. This will allow the user to redirect to your site(Success page) after doing payment.
Note: Make sure to select any one Option in “Price Packages Type” field in “Submit Event Page Settings”.
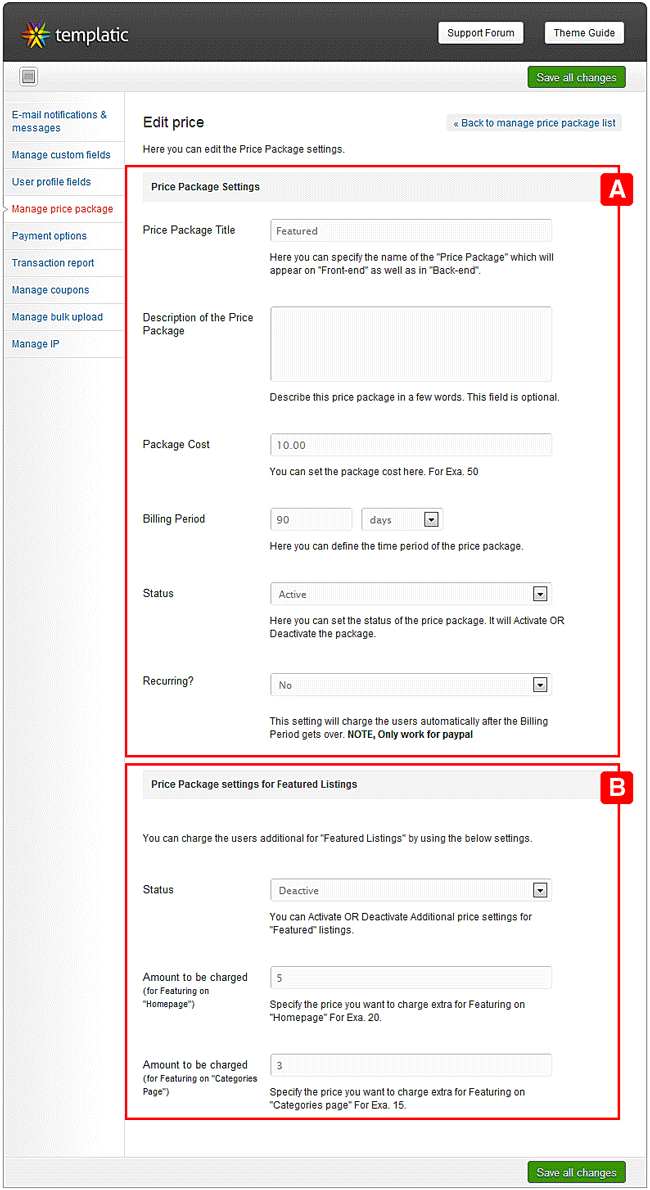
b) Featured/Non-Featured Price: You might want to charge users extra amount for featured listings within a price package. In add/edit price package, below you can find a section named “Price settings for Featured listings”. Here you can define those charges. There are three fields given:
- Status: You can activate or deactivate additional prices used for featured listings.
- Amount to be charged (For featuring on Home Page): Define your charges you want to charge your users for make their Event as featured on home page.
- Amount to be charged (For featuring on Categories Page): Define your charges you want to charge your users for make their Event as featured on category page.
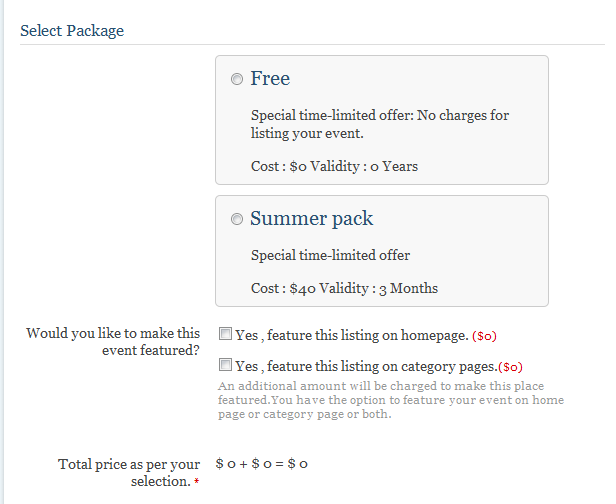
A user will be charged with total of above both things. (Total charges = a+b). This is how the pricing works in the theme.
Manage Featured Listings
If you are adding events from backend or bulk upload then please make sure that you have selected any one option for featuring posts in its custom fields section on Add/Edit Event page. Then only the ordering of the posts will be correct in front end.
Suppose if you want to display some of your posts differently or highlighted on your site then these posts are called as featured listings. In above Manage Price Packages (b) section is used for that purpose.
If a user has paid to make the listing featured on home page then his post will be displayed little highlighted on homepage and will be ordered first too. The same way it works for category page if a user has paid to make his listing featured on category page.
Note that the featured listings will be always listed first. You can also make your listings featured on both home page as well as category page.
Manage Custom Fields
Whenever you are adding a custom field or a user field make sure that “HTML variable name” field should not contain any special characters except underscores (_) and it also should not have space.
Custom fields are the fields that are displayed with your Events. It works like attributes of the event posts. These fields are displayed as an input field in Submit Event Page and as an attribute field in Event detail page. You can add new or edit the existing custom fields in WP-admin → Theme Settings → Advanced settings → Manage Custom Fields.
When you will click on Add/Edit custom field you will be able to see the below options:
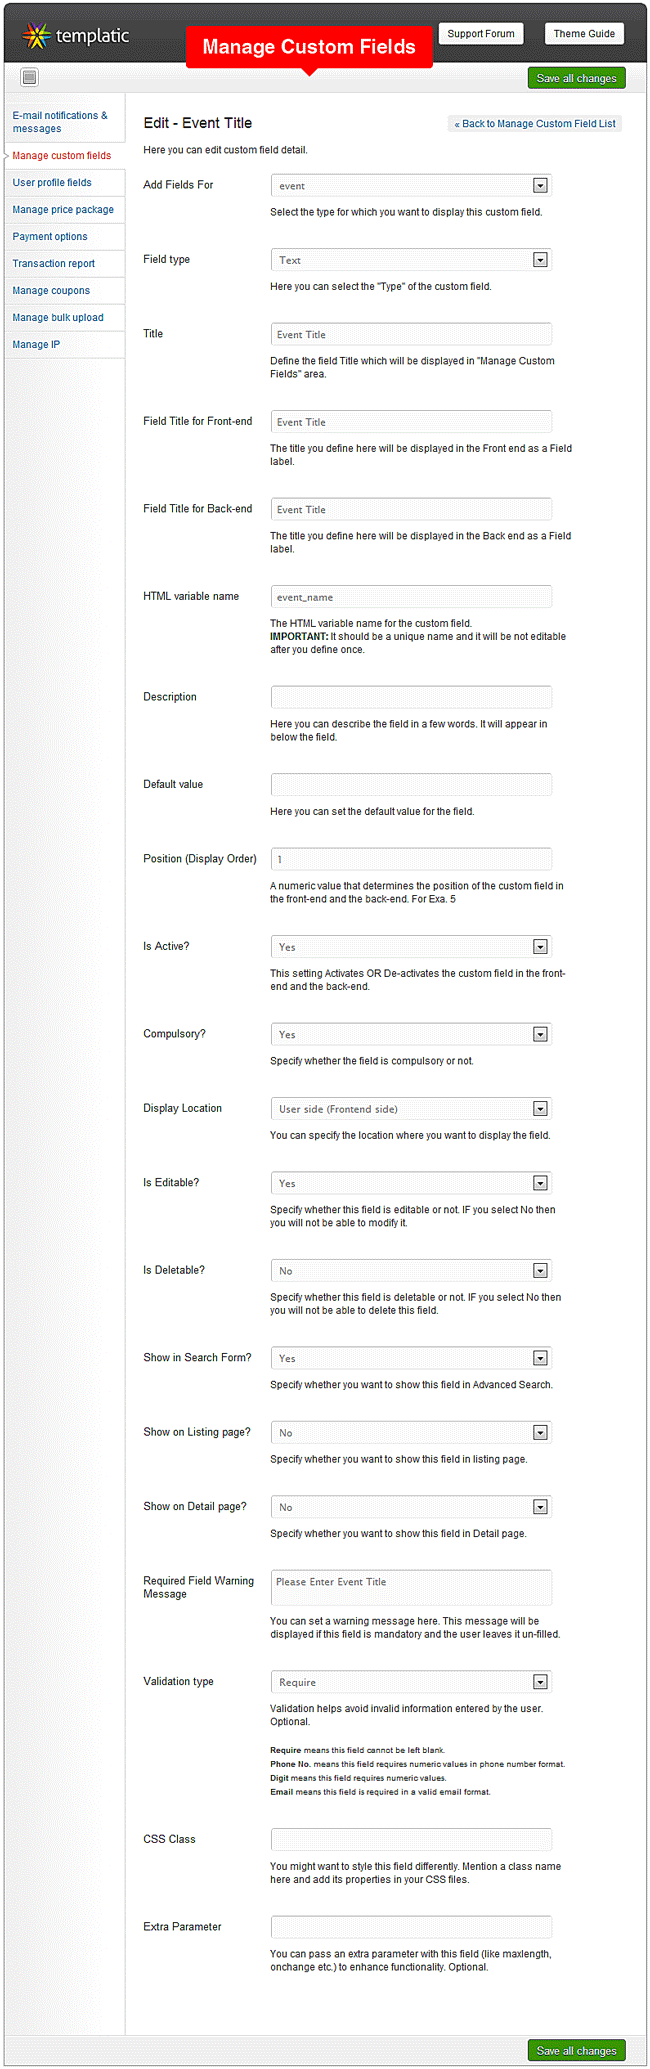
- Show for post-type: You can mention which purpose you want this field. Suppose if you want to display a field for organizer’s details then you can select “Organizer” here. For event’s detail you can select “Event”.
- Field Type: Here you can select which kind of custom field you want. We have provided options like text, date picker, Multi checkbox, Radio, Select, etc… Multicheckbox field do not work with the advance search.
- Option Values: This field is use full when you are using field type like checkbox, radio or select, etc… You can give these field’s options here. You can separate the values with comma.
- Title: The title for the field which will appear in custom field settings area.
- Field Title for Front-end: The name you provide here will be displayed as the field’s name (label) in the front-end. Here front end stands for Submit Event page, Event detail page, etc…
- Field Title for Back-end: The name you provide here will be displayed as the field’s name (label) in the back-end. Here back-end stands for WP-admin → Events → Add New/Edit Event page.
- HTML variable name: The HTML variable name for the custom field. IMPORTANT: It should be a unique name and it will be not editable after once you entered.
- Description: You can give a short description about this field. It will display below the field on the Submit Event page area.
- Default Value: In this option you can give the default value for the field.
- Position (Display order): This is a numeric value that determines the position of the custom field in the front-end and the back-end. e.g. 5
- Is Active?: This option activates or deactivates the field. It is also useful when you want to give some fields for some particular period only.
- Compulsory?: You can make the field compulsory by selecting “yes” here.
- Display location: Here you can select the location of the field whether you want to just display in front end or just in back-end or on both side.
- Is editable?: You can specify whether or not this field is editable. If you have selected “Yes” in this then when you will go to edit the custom field then some of the options from all this will not be available.
- Is deletable? : If “No” is selected in this option then you can’t delete the field from the back-end (i.e. Custom fields list). It is advisable to not to delete the fields that are by default given with the theme and which are marked as “No” in this option.
- Show in Search Form?: If you have selected “Yes” here then the field will be displayed in Advanced Search page and your users can do the search with this field too! Multi-checkbox field do not work with the advance search.
- Show in listing page?: If you have selected “Yes” then only the field will be displayed in the listing/category page.
- Show in detail page?: If you have selected “Yes” then only the field will be displayed in the detail page.
- Required Field Warning Message: If you have selected “yes” in “Compulsory?” field above then you can specify the error message for the field when user leaves it empty.
- Validation type: This field used to validate the field. You can specify which kind of data user will have to enter in this field. The options given there are:
- Require means this field cannot be left blank.
- Phone No. means this field requires numeric values in phone number format.
- Digit means this field requires numeric values.
- Email means this field is requires a valid email format.
- CSS class: If you want to apply some css to this field then you can specify the class name here.
- Extra Parameter: You can also give some parameters to the field using this option like onchange, maxlength, etc…
Custom fields section in Events is virtually identical to features available in some of our other themes.
Manage User Profile Fields
Custom fields work as an attribute for the posts. The same way user profile fields are the fields for the user’s profile. These fields work as attributes for the user’s details in the user’s dashboard. You can add, edit or delete the user fields from WP-admin → Theme Settings → Advanced Settings → User Profile Fields.
When you will click on Add/Edit user profile field you will be able to see the below options:
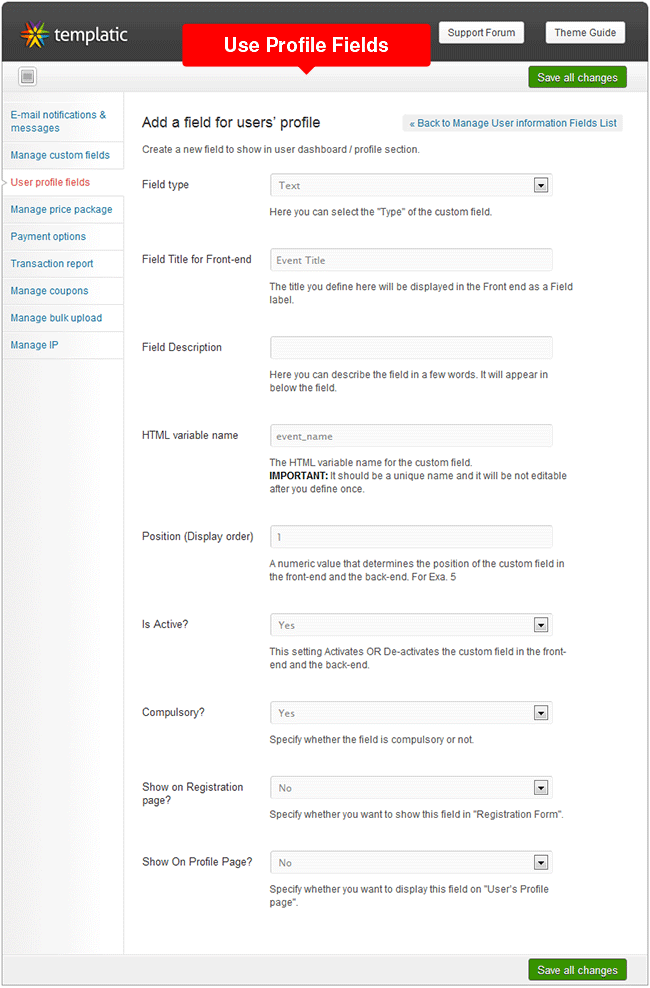
- Field Type: Here you can select the type of the user profile field. We have provided options like Text, Text editor, Multi checkbox, Radio, Select, Upload etc…
- Field Title for Front-end: The name you provide here will be displayed as the field’s name (label) in the front-end. Here front end stands for user’s dashboard or registration page.
- Field Description: You can give a short description about this field. It will display below the field.
- HTML variable name: The HTML variable name for the field. IMPORTANT: It should be a unique name and it will be not editable after once you entered.
- Position (Display order): This is a numeric value that determines the position of the custom field in the front-end and the back-end. e.g. 5
- Active?: This option activate or deactivate the field in front end and in backend.
- Compulsory?: You can make the field compulsory by selecting “yes” here.
- Show on Registration page?: If you have selected “Yes” then only the field will be displayed in the registration page.
- Show on Profile page?: If you have selected “Yes” then only the field will be displayed in the user’s profile page.
Basic Settings
Navigation Settings
Whenever you are making any changes in backend, do not forget to click on “Save All Changes” button.

a) Top Navigation:
Go to WP-admin → Basic Settings → Navigation Settings. From the field named as “Display Default Top Navigation” you can enable or disable the default top navigation menu.
If you want to use custom menu then just create a menu and select it under Theme Options → Top navigation.
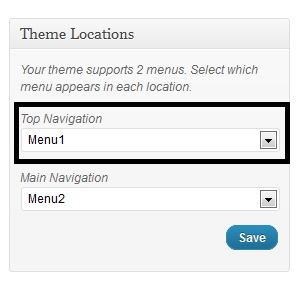
b) Main Navigation:
Go to WP-admin → Basic Settings → Navigation Settings. From the field named as “Display Default Menu” you can enable or disable the default main header menu.
If you want to use custom menu then just create a menu and select it under Theme Options → Main navigation.
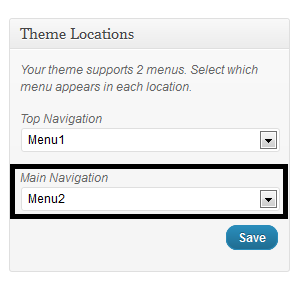
If you want to give “Add Event” link in main navigation then you can give it using “Display ‘Add Event’ Button” Field.
Blog Listing Page
In Events the WordPress posts that is WP-admin → Posts are treated as blog posts. Below is a preview of the blog’s listing page.
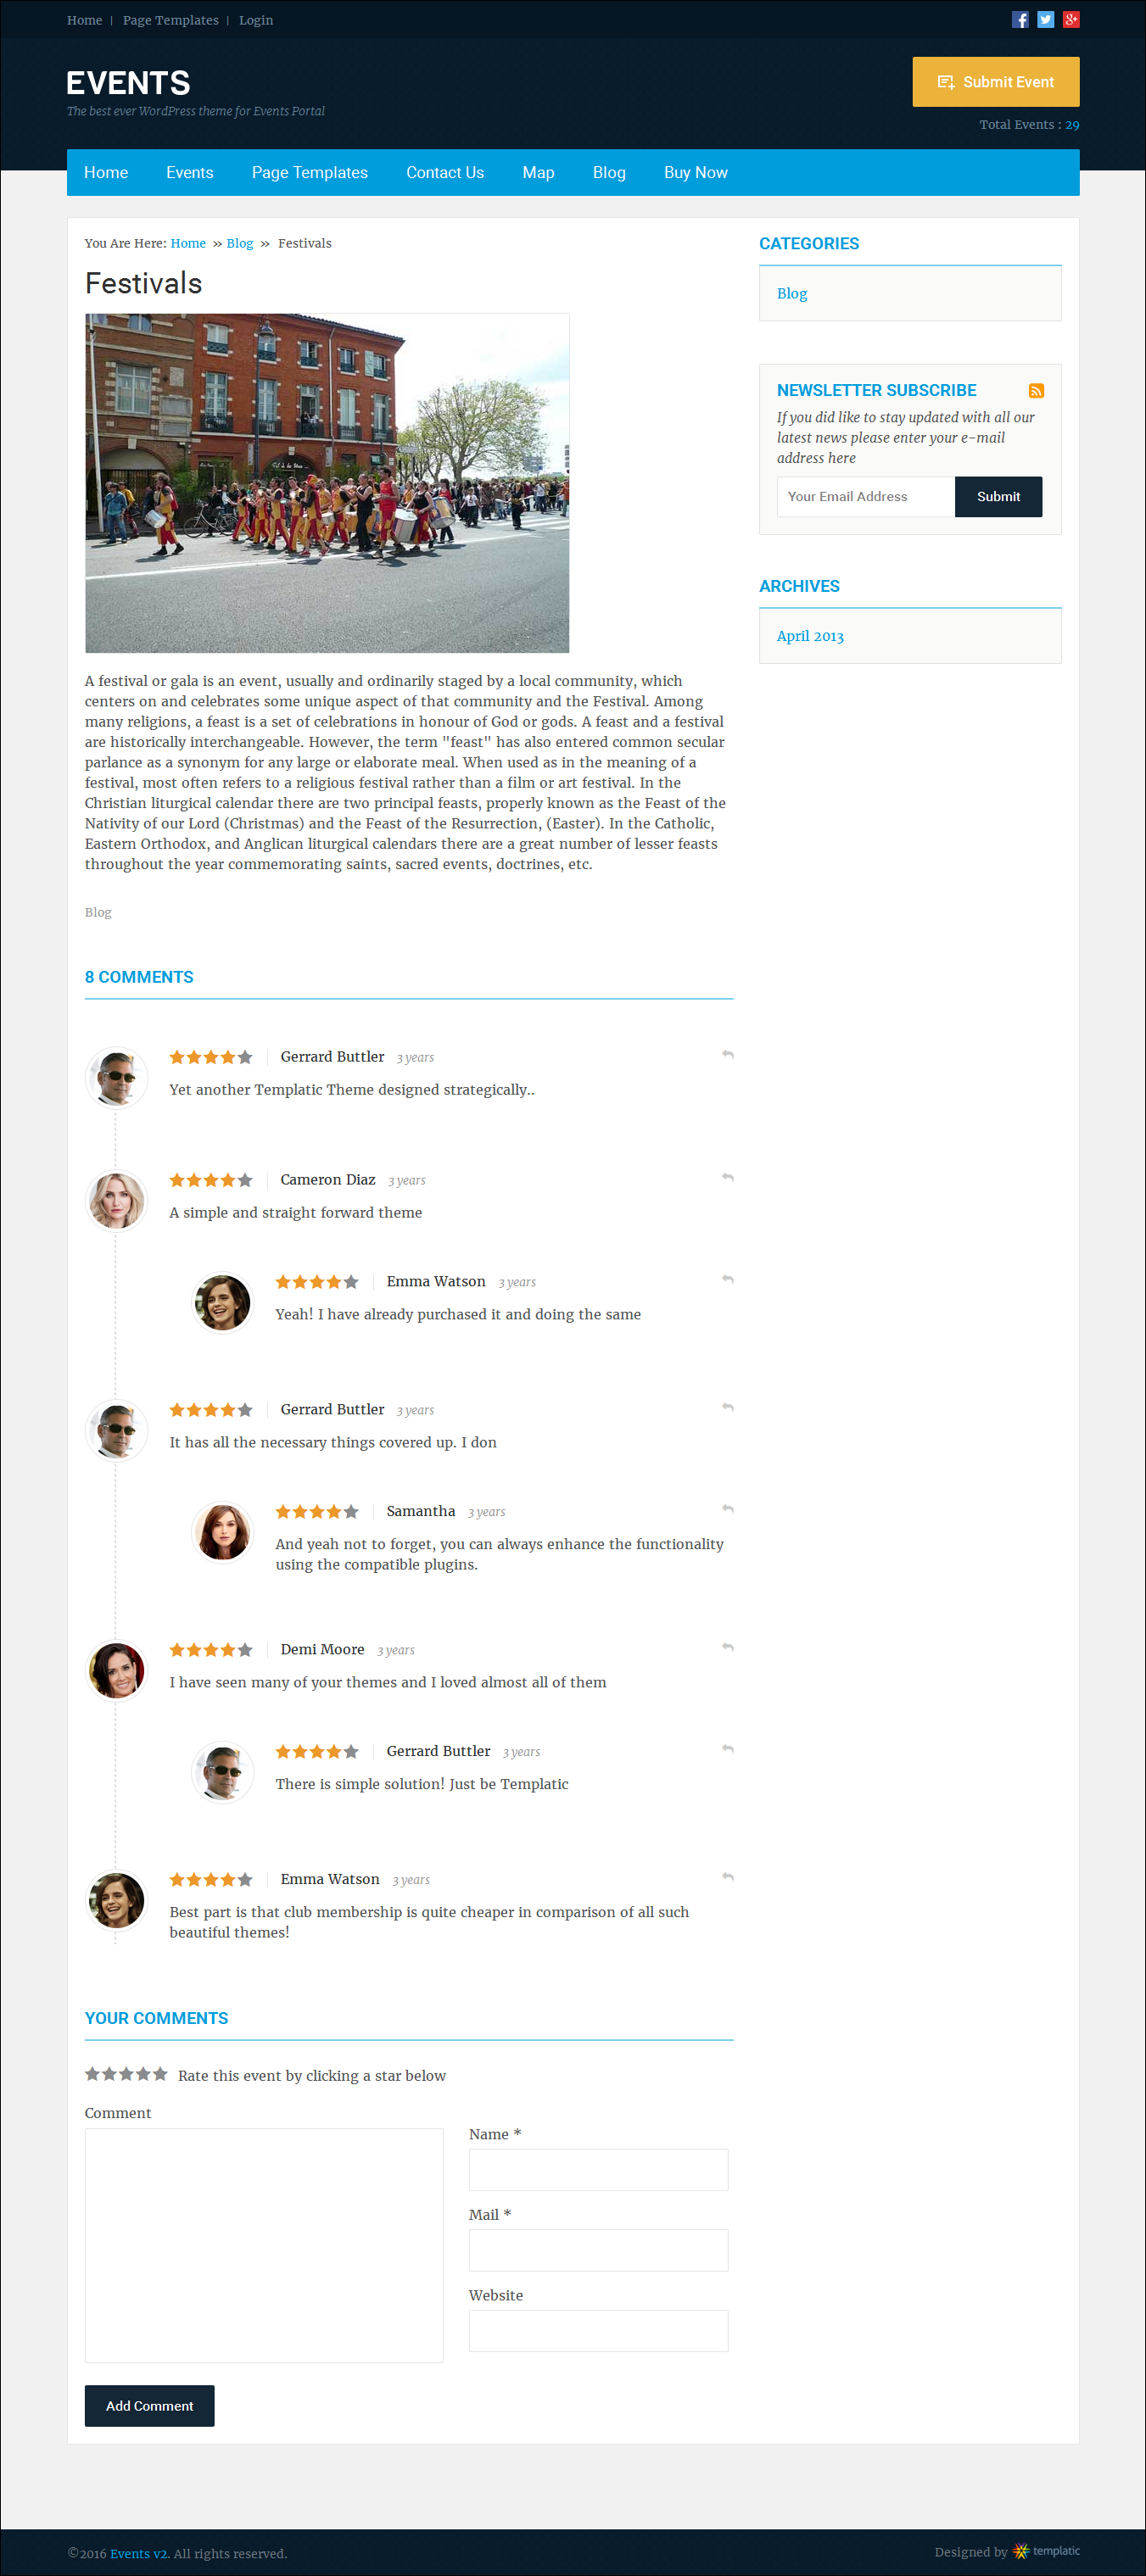
If you want to give thumbnail images in the blog listing page then you’ll need to set featured image in the post. For that click on insert image button in add/edit post and then upload the image. When the image get uploaded click on “Use as Featured Image” link.
Blog Detail Page
Preview of Blog Detail Page:
Adding a new Page
Now let’s add a new page. Go to Pages → Add New.
- Enter the page title
- Enter the page description
- And finally select the template and click on “Publish”.
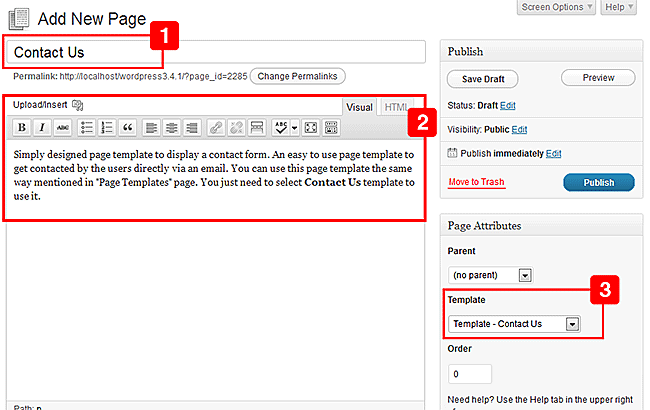
There are 8 page templates which you can use namely:
- Default: This is a default page template with a sidebar.
- Advance Search: This page template creates an advanced search page which is having a search form with multiple fields.
- Archives: This page lists all the posts of your site date wise.
- Contact Us:
- This template lets your users to contact by sending a mail from the site. You can configure your Contact Us Email address from WP-admin → Settings → General settings → Email Address.
- You can also place a widget named as “T → Contact Page Google Map” in “Contact Page: Google Map” area to display map there.
- To display your contact information you can place “T → Contact Us Information Widget” in “Contact Page Widget Area”.
- Facebook Events: This page template is used to show your site’s Facebook page’s event on your site. For more details you can see How to fetch the Facebook page events and where they display on site?
- Map: This page lists all your events on a Google Map Page. This page gives locations of your events on Google Map using pin-points. Settings of the Map given on this page can be done from WP-admin → Theme settings → Basic Settings → Google Map Settings.
- Short code: If you want to use some shortcodes on a page or some highlighted text and any else effects then you will need to select this template.
- Sitemap: This page template almost gives a whole idea to the user that which kind of data you are having on the site. Posts, categories, feeds, pages, etc…
- Event Attending User’s List: This page template displays the list of users attending the event. It will list users attending recurring events only.
Captcha Settings
Are you a human plugin’s “light box” feature will not work with the theme because we have already given pop-up like send inquiry and send to friend. We can not include one pop-up in another pop-up. So that is why in “Game Type” option while downloading the plugin you can choose “Embeded” only.
Go to WP-admin → Theme Settings → Basic Settings → Captcha Settings. Here, you can see the options to set up you captcha. We have provided compatibility with two Captcha plugins: “WP-reCaptcha” & “Are you a human“. You will need to install and activate them first. Make sure to choose the correct option in “WP-reCaptcha OR PlayThru” option.
If you have enabled Are you a human plugin make sure to uncheck the options – Registration and Lost password form. Here is a preview of different captcha’s front view and backend important settings.

Make sure that you have activated any one plugin for captcha. You can not activate both the plugins at a time. It will cause some registration related issues.
If you have multisite in your WordPress and you want to use the “Are you a human” captcha plugin then make sure that you have done the below things correctly:
- Open a file named as “settings_page.php” located at “/plugins/are-you-a-human/trunk/includes/” & “/plugins/are-you-a-human/includes/” folder. Two files with same name are located at different locations.
- At around line number 39 you will be able to find the below code:
- <form action='<?php echo($_SERVER[‘PHP_SELF’].’?’.$_SERVER[‘QUERY_STRING’])?>’ method=’POST’ id=’playthru-options’>
- Replace it with this one:
- <form action='<?php echo($_SERVER[‘REQUEST_URI’])?>’ method=’POST’ id=’playthru-options’>
- Make sure that you have edited both the files correctly.
Advanced Settings
Notification Settings
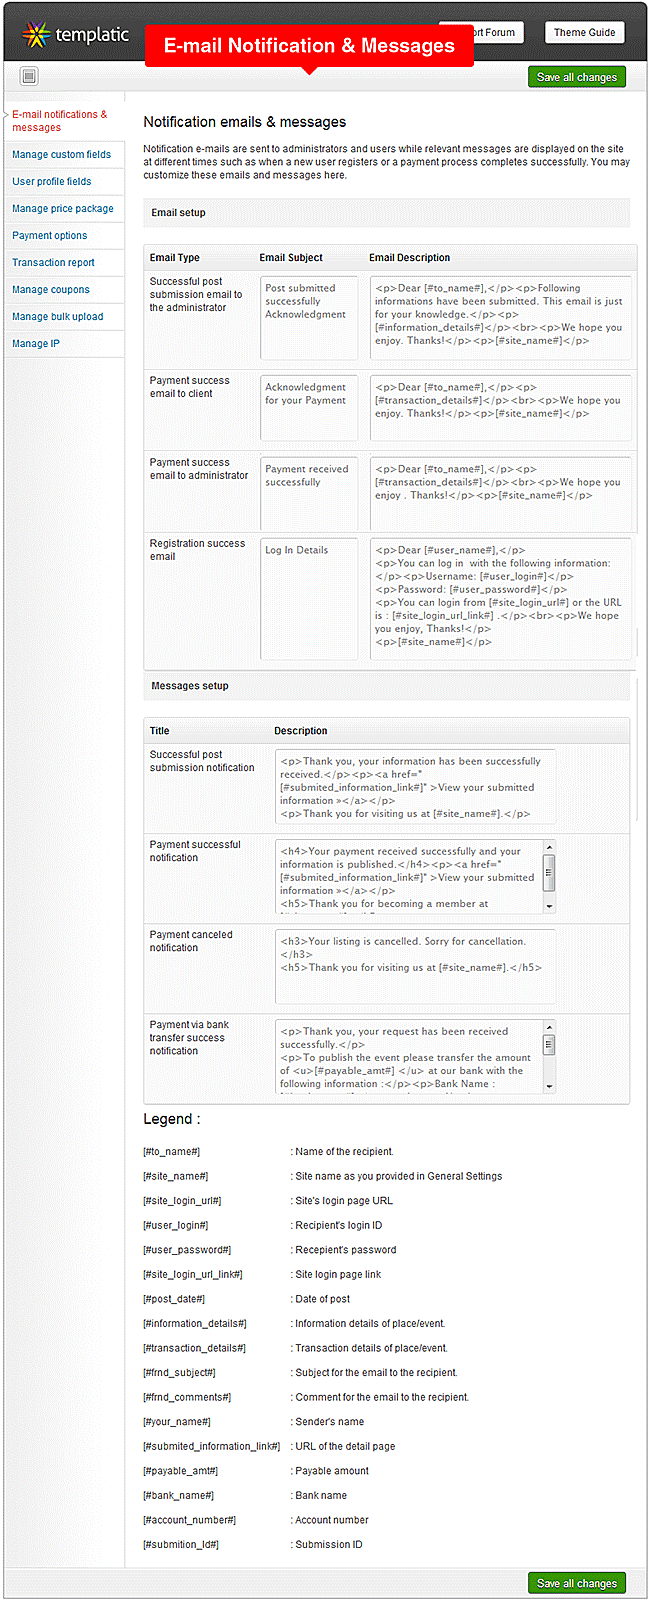
Go to WP-admin → Theme Settings → Advanced settings → Email notifications & messages. Here, you can change the content of the emails or messages that are sent to admin and users. Use the shortcode-legends specified.
Payment Settings
Go to WP-admin → Theme Settings → Advanced settings → Payment Options. You can edit/activate/de-activate the available payment options. The payment methods currently we are having in the theme are:
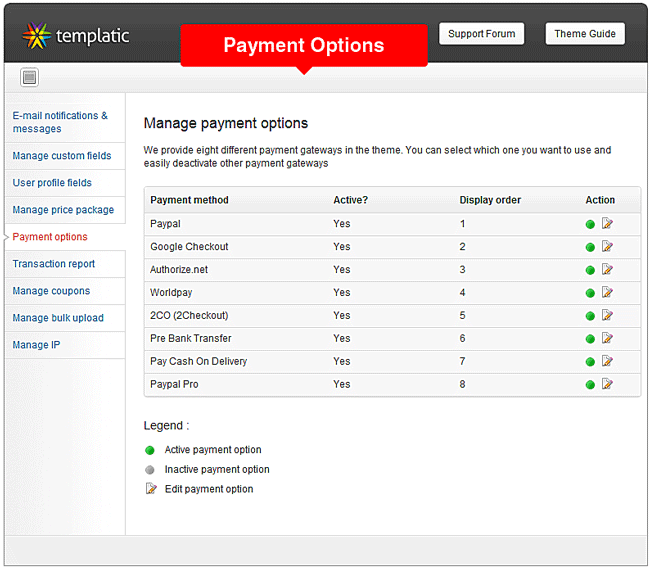
- PayPal: You can have more info about PayPal settings in PayPal Settings article.
- Google Checkout: While setting up this method please make sure that “Merchant ID” you have provided is correct.
- Authorize.net: While setting up this method please make sure that “Transaction Key” you have provided is correct.
- Worldpay: While setting up this method please make sure that “Instant ID” & “Account ID” you have provided is correct.
- 2CO (2Checkout): While setting up this method please make sure that “Vendor ID” you have provided is correct.
- Pre Bank Transfer: The users will have to manually transfer the amount in the account ID you have mentioned here. It will be displayed on the thank you page.
- Pay cash on delivery: The users will have to pay cash in this method.
- PayPal Pro: If you are activating PayPal Pro then you’ll need to select “Yes” in “show on Registration page?” field for these user fields: First Name, Last Name, Address1, Address2, City, State, Country, Zip Code.
Transaction Report
![]()
Go to WP-admin → Theme Settings → Advanced settings → Transaction Report. Here you can see the report of the transaction being held on your site.
We have also provided a search form so that you can search particular transactions efficiently.
Manage Coupons
Coupon is basically used to provide your users a discounted price. When your users will give the correct coupon code in the Submit Event page then he will get the discount. Go to WP-admin → Theme Settings → Advanced settings → Manage Coupons. Here you can add or edit coupons.
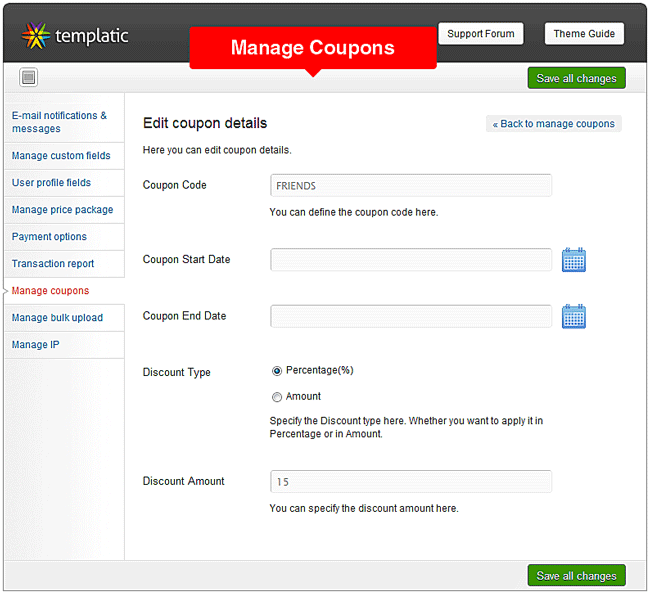
You can give the discount in either some percentage or some amount by selecting the “Discount Type”. You can also create a coupon for particular time period using start date and end date fields.
Please make sure that you have selected “Yes” in “Enable coupon option on ‘Add Event’ page”. Then only a text field to enter the coupon code on Submit Event page will be displayed.
Manage Bulk Upload/Export
Whenever you perform bulk upload make sure that you have uploaded the images in to “uploads” folder. Bulk upload will just provide the link to the images. It won’t upload the images.
Using Bulk Upload/Export feature you can upload your many events at a time or export them in a CSV file. Go to WP-admin → Theme Settings → Advanced settings → Manage Bulk Upload. Here you can upload or export your posts or properties.
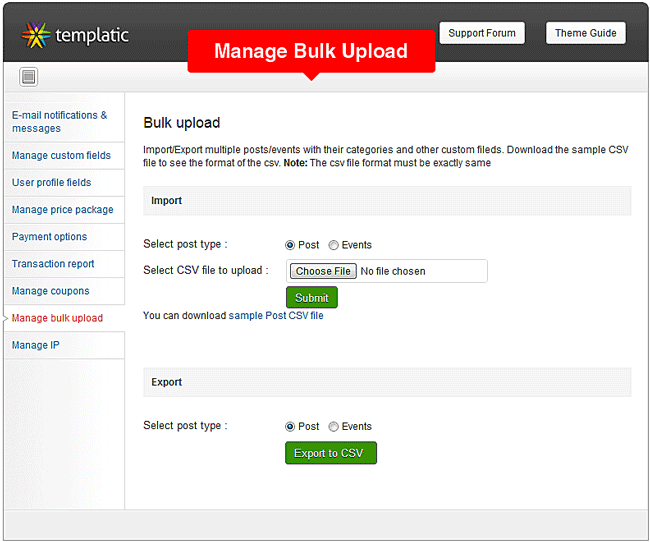
We would always recommend you to download first sample CSV make changes according to this file or in this file and then upload your events or Posts. CSV file cannot contain special characters. The column name also cannot be changed. Otherwise the data will not be imported correctly.
Manage IP
Go to WP-admin → Theme Options → Advanced settings → Manage IP. Here is the setting for managing IP addresses.
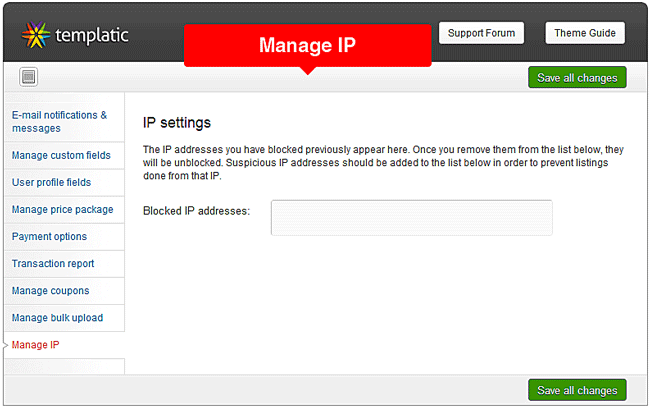
You can block or unblock the IP addresses from here. The IP addresses you have blocked previously appear here. Once you remove them from the list below, they will be unblocked. Suspicious IP addresses should be added to the list below in order to prevent listings done from that IP.
Frequently Asked Questions
What is the difference between Past, Current and Upcoming events?
Past event – end date of the event is in the past when compared to the today’s date
Current event – today’s date is between the event start and end dates
Upcoming event – events start date is ahead of the today’s date.
How to upgrade from Events v1?
Upgrading will very likely delete all your theme settings and widgets. It will also undo all customizations you might have made on your site. If you can, setup a clone site and do the upgrade there first – it’s more work but far less risky
Since both versions share roughly the same content structure upgrading from one to the other won’t be pleasant, but far from impossible. Follow these steps to upgrade your theme:
- Backup both your theme files and your database. Upgrading is risky business, do not take it likely! Your customizations will be lost with this upgrade, pay special attention to customized files
- Download the new version of Events from member area and unpack it (on your hard drive)
- Connect to your server again and rename the current theme folder to something like “Events_old”. Now upload the new Events folder to your server (wp-content/themes)
- Your site will now be completely unrecognizable, don’t worry – it’s supposed to be like this. Because settings are completely different between those two versions all your theme settings have been deleted. Connect to wp-admin and add all the necessary info in Theme Settings -> General Settings. You’ll have to re-upload your logo, select your skin, etc.
- Continue by re-initializing your homepage widgets and stuff like custom menus and sidebar areas. Instead of this step you could also delete/load dummy data but do it only if you haven’t modified that data (changed dummy posts into real ones).
- Now try re-doing your customizations and getting the site back to normal
- Read our blog post and watch the overview video to see all the new stuff that was included
In case any issues pop-up during the upgrade, community Contact Us and we’ll help you out.
How to upgrade from Events2.0 or later to Events 2.2.0 or later?
- First, back up all your theme files/folder.
- Now upload the latest one from the members area.
- After uploading latest theme, if you will go to your backend, you’ll see a red coloured strip saying that “Events has been updated with a new system for handling recurring events. To make your existing events compatible with the new system please Click Here. For more det…“
- Click on the click here link. So that your recurring events will be now compatible to the latest version of Events(i.e. 2.2.0)
- You can see here how the recurring events work in 2.2.0.
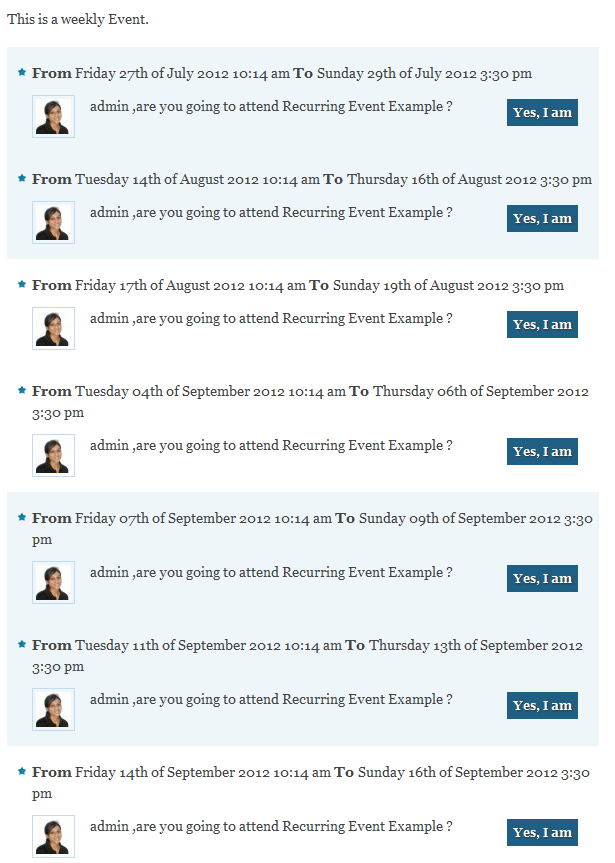
How the recurring events work in Events2?
First, I would like to explain what recurring event is.
Recurring event is an event which occurs frequently on some fixed period basis. For example, a WordPress conference in Newyork held every month. Thus it is called as a monthly recurring event.
I will explain how the events affect in front end with an example.
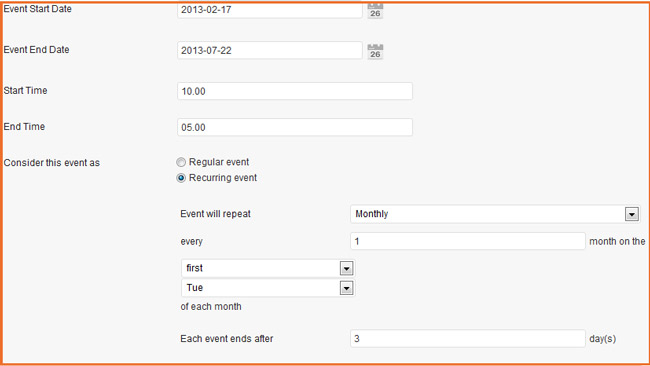
You are having monthly event, coming every first Tuesday in every month for 5 months & it is a 3 days event. Then you will need to do the settings as given in the below screenshot.
Now, once you publish the post, you will have five posts in the backend with the same name. These are the occurrence posts. You can only change the Title and description of this occurrence post.
The main event will have all the options with custom fields to edit whereas the other occurrence posts won’t have that.
Each recurrence post will have a start date and end date, even though you cannot edit it. In front end, the upcoming occurrence will be in upcoming tab, past will be in past tab and current will be in current tab depending on their start date and end date values.
When you will click on the occurrence post in front end, it will give details of that event with its start date and end date. The main event will be available only in the author page.
If two occurrence posts are there for same event which are in upcoming status, the both will be displayed in upcoming tab.
While entering a date for Recurring Event in the “Start Date Field”, please note that you have to enter any preceding date of your event occurrence start date.
In short, the start date & the recurrence date cannot be the same, start date has to come before the Event recurrence date. Likewise,enter any succeeding date of the Last recurrence Date of your event in the “End Date Field”.
For E:g – If your event’s First occurrence date is 20th of any month then you should enter 19th or 18th etc to make it work correctly!
And if your event’s last recurrence date is 27th, then enter 28th, 29th etc in your End Date Field
How does Claim Ownership work?
When a person clicks on “Own This Business” and submits the claim, a new entry is added in your admin dashboard as demonstrated in this image.

You can now accept or deny that ownership claim. If you accept you must manually create an account for that person and add that listing to his or hers account. You can create an account under WP-admin → Users → Add New. Make sure you assign a Contributor role to that person, otherwise you won’t be able to assign the listing to that person. You assign a listing by changing the post Author.
How to set Draft or Publish status for new events?
Yes, you can select whether the newly selected Events are automatically published or set to draft status. If set to Draft, then you will have to manually publish each and every event.
Go to WP-admin → Theme Settings → Basic Settings → Submit Event Page Settings → Event Default Status and simply select the status to Draft or Publish.
How to display your Facebook comments on the event Detail Page?
You can display a Facebook comment box also rather than tradition WordPress comment box. For that we have given compatibility with “Facebook Comments for WordPress” plugin.
It displays like this:

The most important is to check the option “Include Facebook Javascript SDK” given in the plugin settings and provide Application ID & Application Secret Key.
How to fetch the Facebook page events and where they display on site?
You can display your Facebook page’s events in the Events theme. They are displayed on your author dashboard page in “Facebook Events” tab and there is also a page template named as “Template – Facebook Events” where you can display them.
Past events of your Facebook page will not be fetched on the site.
You can configure the Facebook events this way:
- First generate Application ID and Application Secret ID in Facebook. For more details on getting these keys click here.
- Create a page on Facebook. Add some events to your Facebook page. Click here for more details.
- Go to WP-admin → Theme Settings → Basic Settings → Facebook Settings. Here you can specify the page ID, Application ID, etc… for your Facebook event template page.
- For single user’s dashboard Facebook events, the same above fields are given in author page in front-end.
- Make sure to fill up the below details correctly as shown in screenshot while creating or editing your app on Facebook.

Let’s see how the Facebook events actually displayed on events site:

Slider is not displaying any event?
The slider displays Current Events only. So Event should be current and featured on home/both(category & home) page. Then only it will come on slider. So make sure that you are having any one or more current event and it is also marked as featured.
If you want to have upcoming events too in to the slider, then make the below changes.
Step-1: Open the “widget_functions.php” file located at your “themes/Events/library/functions/” folder. Line no. 962 you will find the code as,
array(

'key' => 'st_date',

'value' => $today,

'compare' => '<=',

'type'=> 'text'

),
Step-2: And around line no. 1001,
array(

'key' => 'st_date',

'value' => $today,

'compare' => '<='
),
Step-3: Just comment out the codes and save the file.
Developer’s Section
Front End Files
1. Home Page :
- We have placed widgets on home page.
- There is a widget called “T > Featured Slider” to display the image slider on the home page. And below it, there is a
- widget “T > Latest Events List View”.
- There is a sidebar and the other widgets like “T > Social Media Buttons” and “T > Latest Events”.
- All these you can edit in just one file – “widgets_functions.php“.
- On top of the file, we have registered the widget areas and below it you will find all the widgets of the theme.
2. Submit Event Page :
- We will talk about Events module first. All you need is available in Monetize folder.
- We have displayed the Custom fields on these pages. You can add the custom fields from back end in Advanced Settings.
- Themes/Events/Monetize/Event folder contains all the files.
- You can edit the code for “Submit Event” page in the file – Themes/Events/Monetize/Event/Submit_event.php
- Now, after submitting event, you will here on the preview page. You can modify it by using two files, named event_preview.php and preview_buttons_event.php. Both files are located at Themes/Events/Monetize/Event/ folder.
- Now, we will talk about the detail page of event. You can see a file named single-event.php in the ROOT folder of the theme.
- This file is being called on the event detail page. There is also a file in monetize/event folder, event_detail_content.php which is used to display a map and image gallery on the detail page.
3. Event Category Listing Page :
- The tabbers “Upcoming”, “Current” and “Past” have been created in taxonomy.php file. This file is located at the theme root folder.
- You can find the code for category listing page in a file named listing_li_content.php which is located at Themes/Events/Library/Includes folder.
- You can modify the sorting of the event listing in listing_filters.php file, which is located at Themes/Events/Library/Functions folder.
4. Blog Category Listing and Detail page :
- You can modify the blog listing page code in blog_listing.php file which is located at Themes/Events/Library/Includes folder.
- You can modify the blog detail page code in blog_detail.php which is also located at the same folder.
5. Page Templates :
You can modify the page templates form the template files which are located at the theme root folder.
Here is a list of files :
- For Contact Us – template_contact.php
- For Advanced Search – template_advanced_search.php
- For Archive page – template_archives.php
- For Facebook events page – template_facebookevents.php
- For Sitemap page – template_sitemap.php
- For Short codes page – template_short_code.php
- For Map page – template_map.php
Back End Files
1. Custom Post Type :
- The custom post type has been created in custom_post_type.php file which is located at Themes/Events/Monetize/custom_post_type/ folder.
2. Basic Settings :
- Basic settings have been created by using a plugin “Option tree”. This plugin creates an xml file which we include in the theme. You can file the theme-settings.xml file in Themes/Events/Library/Functions/theme_options/ folder. You can edit the settings by using the same plugin.
- All the files located in Themes/Events/Admin/ folder are being used to integrate this plugin with the theme.
3. Advanced Settings :
- For Advanced settings, you can find all the files in Themes/Events/Monetize/Manage_settings/ folder.
- Here are the files :
- For Bulk Upload – admin_bulk_upload.php and export_to_CSV.php
- For Manage Coupons – admin_coupon.php and admin_manage_coupon.php
- For User Custom Fields – admin_custom_usermeta_edit.php and admin_custom_usermeta_list.php
- For Manage IP – admin_ip_settings.php
- For Custom Fields of Events – admin_manage_custom_fields_edit.php and admin_manage_custom_fields_list.php
- For Notifications – admin_notification.php and notification_options.php
- For Price Packages – admin_package_list.php, admin_price_add.php, ajax_list_price_package.php and ajax_manage_settings.php
- For Payment Methods – admin_paymethods_add.php and admin_paymethods_list.php
- For Transactions Report – admin_transaction_report.php and export_transaction.php
- All the functions related to Advanced Settings are included in function_manage_settings.php file.
- tab_header.php and admin_manage_settings.php are the other related files where all these options have been integrated.
- The functions to fetch Advanced Settings options have been included in basic_settings.php file.
- All the tables of the theme have been created in db_table_creation.php file.
- modules_main.php is the file which merge all the settings.
- All the main functions of the theme have been included in custom_functions.php file which is located at Themes/Events/Library/Functions/ folder.
4. Registration and Login module :
- All the files related to Registration and login module have been included in Themes/Events/Monetize/registration/ folder.
5. Facebook Events :
- All the files related to Facebook events have been included in Themes/Events2/library/facebook-platform/ folder. Also it contains a page template template_facebookevents.php which is located at the theme root folder.
Change Month Language in Calendars
- To change the month text in “T → Event Listing Calendar” widget:
- Open the file named as “ajax_calender.php” located at “Themes/Events/Library/Calendar” folder.
- At around line number 6 you can find an array like this:
- $monthNames = Array(“January”, “February”, “March”, “April”, “May”, “June”, “test”, “August”, “September”, “October”, “November”, “December”);
- Here you can change the month text.
- To change the calendar month language in add event page calendars:
- Open the file named as dhtmlgoodies_calender.js located at “Themes/Events/Library/JS” folder.
- Here at around line number 24 you can find the code like: var languageCode = ‘en’;
- Instead of ‘en’ the possible values can be en = English, ge = German, no = Norwegian, nl = Dutch, es = Spanish, pt-br = Portuguese, fr = French, da = Danish, hu = Hungarian (Use UTF-8 doctype for Hungarian).
- If your language is not one from these then just leave the above code as it is and find the below code at around line number 50:
- var monthArray = [‘January’,’February’,’March’,’April’,’May’,’June’,’July’,’August’,’September’,’October’,’November’,’December’];
- Here also you can change it.
Change Event’s order in the theme
If you want to change the order somewhere in the theme then you can look in to a file named as “listing_filters.php” located at “Themes/Events/Library/Functions” folder.
For example, If you want to change a default order in event’s category page, then you can look for a function named as “category_filter_orderby” in the file at around line number 166. In that function the last query in “else” is given for default case.
Change Default Tab in Home & Category Page
- To change the default tab in home page: Go to your WP-admin -> Appearance -> Widgets -> Front Page Content. Place “T – Latest Events List View” widget here and you can change the default tab from the option named “Default Tab”.
- To change the default tab in category Page: Go to your WP-admin -> Theme Settings -> Basic Settings -> Events Listing Page Settigns. Here from options named as “Select default tab” you can change the default tab displaying on the category pages.
I have tried to include each and every topic for which a user will have any query but though if you experience any issues while setting up the theme please Contact Us . Best Of Luck!
Need help with installing the theme? Hire us!
Facing Problems in installing the theme? Don’t worry, we’ll do that for you, just click here!