Getting Started
Installing and Activating Realtr:
- Connect to member area and expand the Realtr section under My Downloads. Download the theme to your hard drive.
- Connect to your WordPress dashboard (wp-admin) and navigate to Appearance -> Themes. Click on the Install Themes tab and then on Upload. Use the Browse option to locate the realtr zip file on your hard drive – then click on Install Now. After the installation process is finished activate the theme.
In case WordPress rejects the .zip file use FTP to install the theme:
- Extract realtr.zip then upload to /wp-content/themes directory
- Once uploading is done connect to the WordPress dashboard and activate the theme
- If you run into more problems during installation please visit our Installation Guide
For detailed instructions on using FTP please click here
Need help with installing the theme? Hire us!
Facing Problems in installing the theme? Don’t worry, we’ll do that for you, just click here!
Auto installing dummy data or deleting dummy data:
Do not edit the dummy data because in case you delete it, your modifications will be lost. Always insert fresh data.
If you want to auto install the dummy data then just click on “Yes insert sample data please”. Theme will be activated & completely installed with some added dummy content and categories by default so you can start using it right away. If you wish to delete the dummy data that we populated in your site then you can remove it by clicking on “Yes Delete Please!”.
Basic Settings
How to set up Home Page?
Here is how to set up home page:

- Logo or Site Title: Here is an area to either display your logo or a site title. Go to WP-admin -> Realtr -> Basic Settings -> General Settings -> Custom Logo. To upload your logo image:
-
- Find ‘Custom Logo’ and press the ‘Upload’ button and then ‘Select Files’ to browse to your image.
- Allow your logo to complete uploading and press on ‘File URL’ to let the uploader window save the file’s location.
- Press on the ‘Insert Into Post’ button.
If you want to display the title instead of logo then, select “Yes” in “Display Title Instead of logo” option. At the end, click on “Save All Changes”.
-
- Go to WP-admin -> Appearance -> Widgets. Place “T → Login & Add property” widget in “Header: Right Area”.
- Go to WP-admin -> Appearance -> Widgets. Place “T → Sidebar Advt 235x195px” widget in “Header: Advertise Banner” area.
- If you are using custom menu then you can place the widget in “Header Navigation” area.
- This is a banner area. You can place the widget named as “T → Home page slider – Banner widget” in “Home Page Banner Slider” area. Give the proper values in Widget Title (any title as per your wish), Number of Properties (How many properties you want to display in the banner) and Categories (Category IDs of the properties which you want to display in banner. A numerical value) fields.
- Go to WP-admin -> Appearance -> Widgets. Place “T → Hot Properties” widget in “Home Page Front Content” area.
- Go to WP-admin -> Appearance -> Widgets. Place “T → Latest Properties” widget in “Home Page Front Content” area. You can also set the list view or grid view by selecting “Type of View” in this widget.
-
- T → Search
- T → Search By ID
- T → Top Agents
- T → Finance Calculator
- T → Latest PostsThis region is sidebar. In Appearance -> Widgets section it is named as “Home Page Sidebar”. Different widgets you can place there are listed below:
- Go toWP-admin -> Appearance -> Widgets. Place “T → About us” widget in “Footer Widget: First” area
- These three widgets can be placed like this:
- “T → Browse by Categories” widget in “Footer Widget: Second” area.
- “T → Testimonials” widget in “Footer Widget: Third” area.
- “T → Social media buttons” widget in “Footer Widget: Fourth” area.
- This is a widget where your users get updates from your site by registering their mail ID on your site using this widget. You will need to give your site’s feed burner account ID there. Place “T → Subscribe” widget in “Footer: Right Sidebar Widget” area.
- T → Subscribe widget is designed to place in “Footer: Right Sidebar Widget” area only.
How to manage header navigation?
Go to Wp-admin -> Realtr -> Basic Settings -> Navigation Settings. I have given a short description for the each options given there.
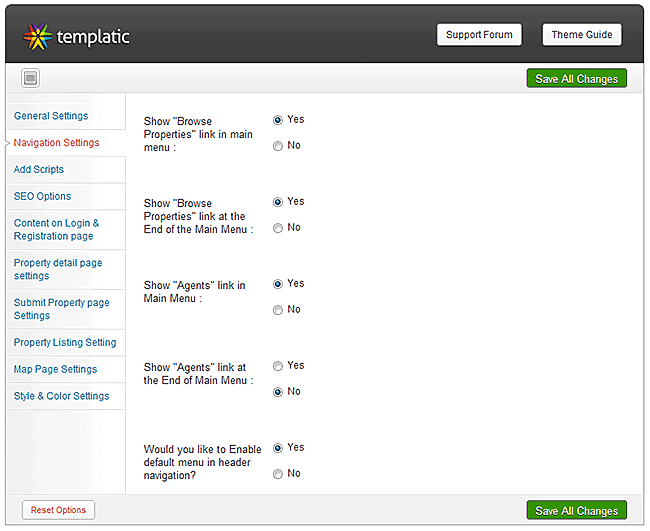
- Show “Browse Properties” link in main menu: Select yes if you want to show “browse property” link in the header navigation menu. This link lists all the properties.
- Show “Browse Properties” link at the End of the Main Menu: Select “Yes” if you want to show “browse property” link at the end.
- Show “Agents” link in Main Menu: Select “yes” if you want to show Agents link. This link will display the list of the agents on your site.
- Show “Agents” link at the End of Main Menu: Select “Yes” if you want to show Agents link at the end of the menu.
- Would you like to Enable default menu in header navigation?: If you want to use custom menu widget of wordpress by making a menu then disable this option (i.e. select “no” for this option).
Activate / Deactivate Submit Property Link:
In WP-admin -> Realtr -> Basic Settings -> General Settings, select “Yes” in “Allow users to Submit Property on your site from here.” to allow your users to submit the property else select “No”.
How to give coloured tags to Properties?
This feature is for a coloured tag on your property listings. Go to WP-admin -> Properties -> Add/Edit properties -> Custom Settings. In “Select the tag for this property : ” section you will have to give colour, text for tag, Type of Tag, etc… So that the property will have a coloured tag in front end.
You can add the drop-down options in WP-admin -> Realtr -> Basic Settings -> Property Listing Settings -> Add property Tags field.
Different Page Configurations
How to set up property detail page?
The Property detail page will have detailed information about the property. It’s location in MAP, Custom fields, description, images, etc… This all can be set in WP-admin -> Properties section. The other things on this page are described below.
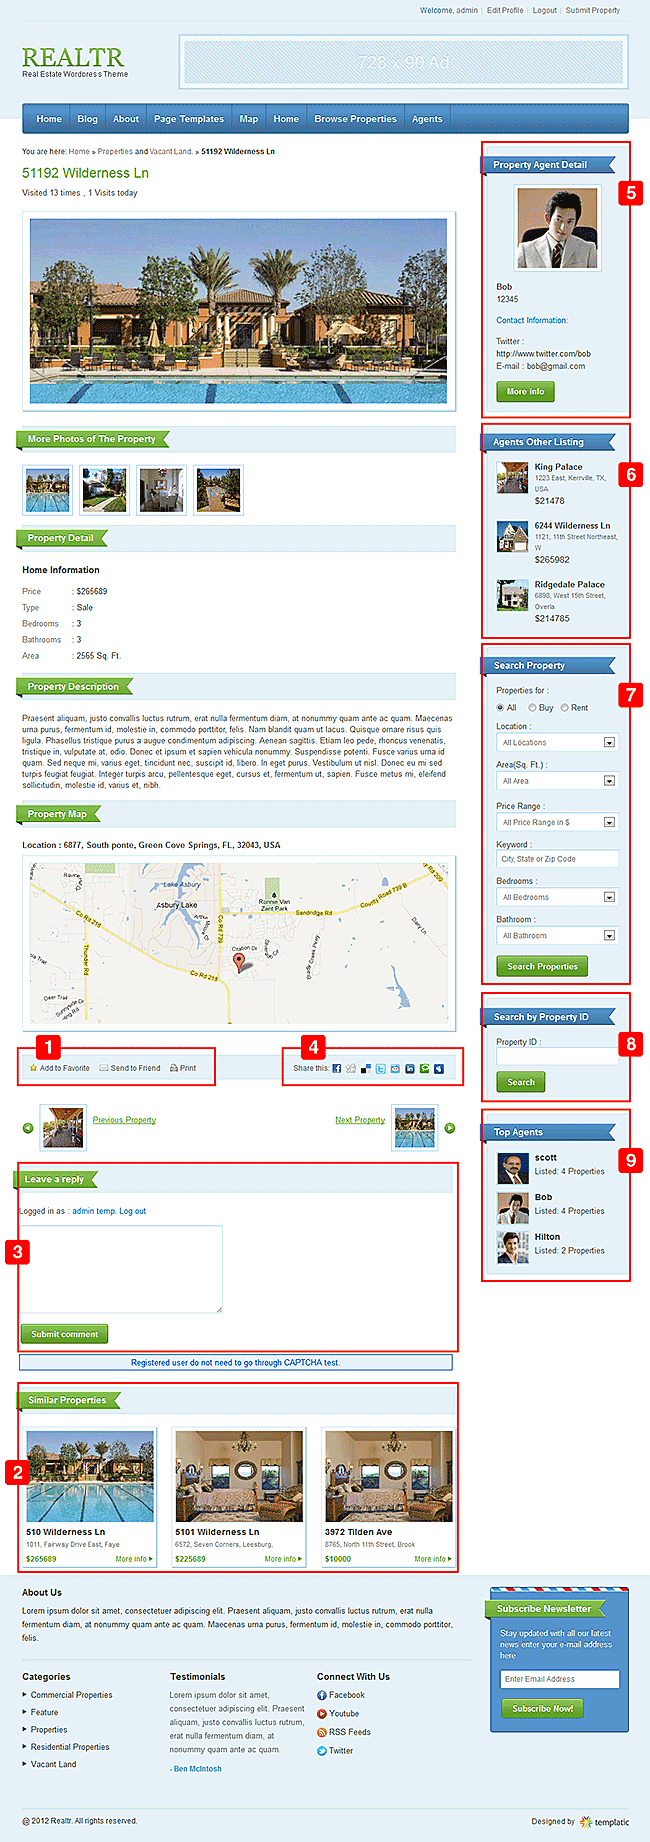
- Activate “Send to Friend”: Go to WP-admin -> Realtr -> Basic Settings -> Property Detail Page Settings. Select “Yes” in “Email to Friend Link” option. Click on “Save All Changes”.
- Similar Properties: Go to WP-admin -> Realtr -> Basic Settings -> Property Detail Page Settings. In “Number of Similar / Related Properties” field specify the number of properties you want to display in similar properties section.
- Activate Comments: Go to WP-admin -> Realtr -> Basic Settings -> Property Detail Page Settings. Select “Yes” in “Wish to Enable comments on Property Detail page?” option. Click on “Save All Changes”.
- You can also activate or deactivate the social media icons. In Wp-admin -> Realtr -> Basic Settings -> Property Detail Page Settings you can find the options to to activate or deactivate them.
- Go to WP-admin -> Appearance -> Widgets. Place “T → Property Agent Detail” widget in “Property Detail Page Sidebar” area. This widget displays the agent details who have listed the property.
- Now, there is another widget you can place there named as “T → Agent Other Listing”. This widget lists other properties listed by this agent. You can also specify number of properties you want to display in this widget’s settings.
- Another most useful widget is “T → Search” which provides you a best way to search the property by many criteria.
- There is second search widget is also available named as “T → Search By ID”. As its name defines it performs the search by property ID.
- The widget “T → Top Agents” lists the top agents who have listed more properties.
How to set up property listing page?
This page lists the properties. Let’s see how to set it up.
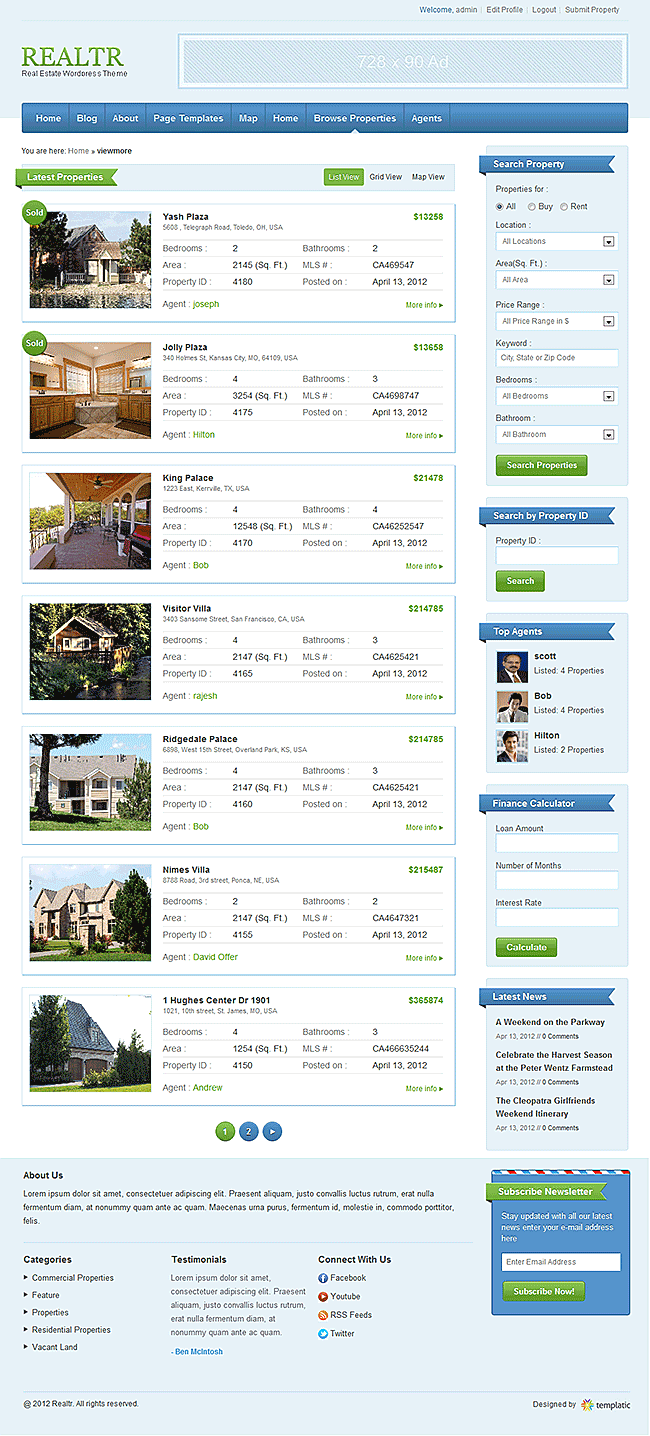
You can change the list view or grid view from WP-admin -> Realtr -> Basic Settings -> Property Listing Settings -> Property Listing view field.
Whenever you change the view from list to grid or grid to list, do not forget to clear cookies and cache of your browser to see the changes affected.
The related sidebar area for the listing page is “Property Listing Page Sidebar”. There you can place the below widgets:
- T → Search: It provides you a best way to search the property by many criteria like location, price, bedrooms, bathrooms, etc… More info about this widget is given in Search Settings section.
- T → Search By ID: As its name defines it performs the search by property ID.
- T → Top Agents: This widget lists the top agents who have listed more properties.
- T → Finance Calculator: This widget calculates the EMI amount.
- T → Latest Posts: It displays your normal latest posts. You can use it to display your blog posts.
How to Set up MAP Page?
We have provided a MAP page in the theme which can show your properties on MAP. Let’s see how to create it.
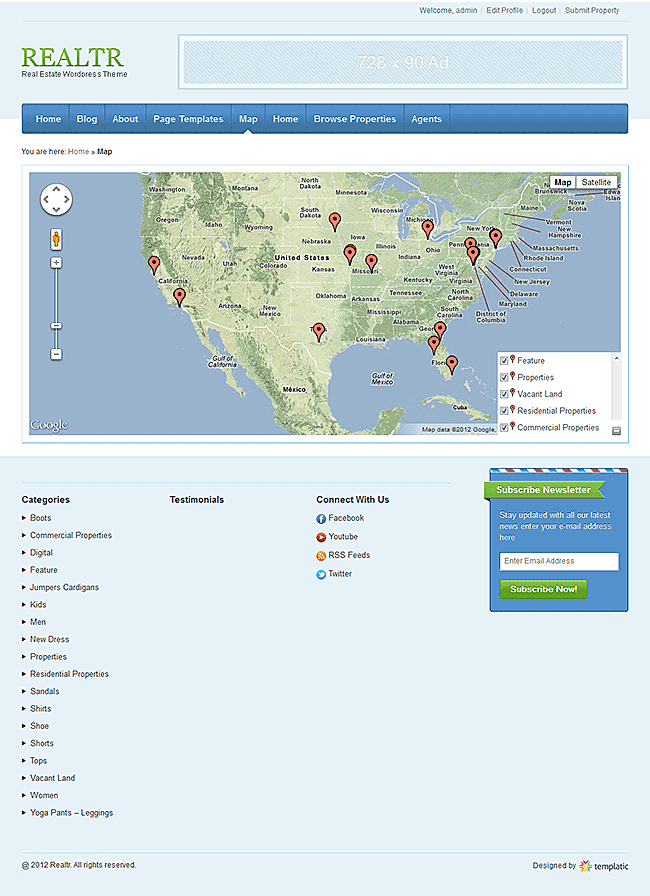
Go to WP-admin -> Pages -> Add New. Give a title and add some description as per your wish. The main thing is to select page template. Select “Page – Property Listing Map” option from “Template” dropdown of “Page Attributes” options. Click on “Publish” button.

This was how you can create a MAP page. Now, we’ll see how to set up the MAP.
Go to WP-admin -> Realtr -> Basic Settings -> Map Page Settings. Some options are given there which I have described below:
- Map Center Latitude & Map Center Longitude: These fields are used to give the latitude and longitude values to centralize the MAP.
- Map Type: This option defines which type of MAP you want to display. There are three types of MAP given: Roadmap, Terrain & Hybrid.
- MAP Display: If you have selected “As per zoom level” then the MAP will be zoomed as per the zooming level. If you have selected “Fit all available listing” then the map will automatically zoomed in or out to fit all the listings.
- Map Zoom Level: This option defines the zooming level of the MAP in case you have chosen “As per zoom level” option.
How to set up contact us page?
We have provided a contact page in the theme which can show your contact details, location, etc… It also allows your users to mail you.
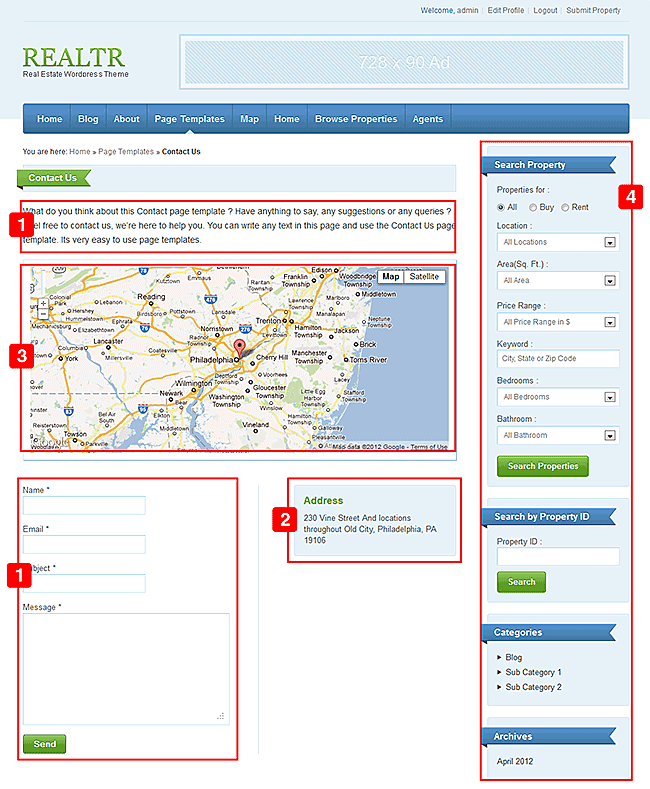
1. Go to WP-admin -> Pages -> Add New. Give a title and add some description as per your wish. The main thing is to select page template. Select “Page – Contact Us” option from “Template” dropdown of “Page Attributes” options. Click on “Publish” button.

2. Now, Go to WP-admin -> Appearance -> Widgets. Place “T → Contact Us” widget in “Contact Page Widget Area”. This widget is designed to put on your contact details. You can give details like your contact number, mail ID, address, etc…
3. As I said you can display your location also in this page. For that you will need to place “T → Google Map Location” widget in “Contact Page : Google Map” area. Do not forget to give address in this widget because depending on address field the MAP will display the location.
4. The sidebar for the pages is “Inner Page Sidebar” where you can set the widgets for the sidebar of all the pages.
Submit Property Settings
How to set up Submit Property Page?
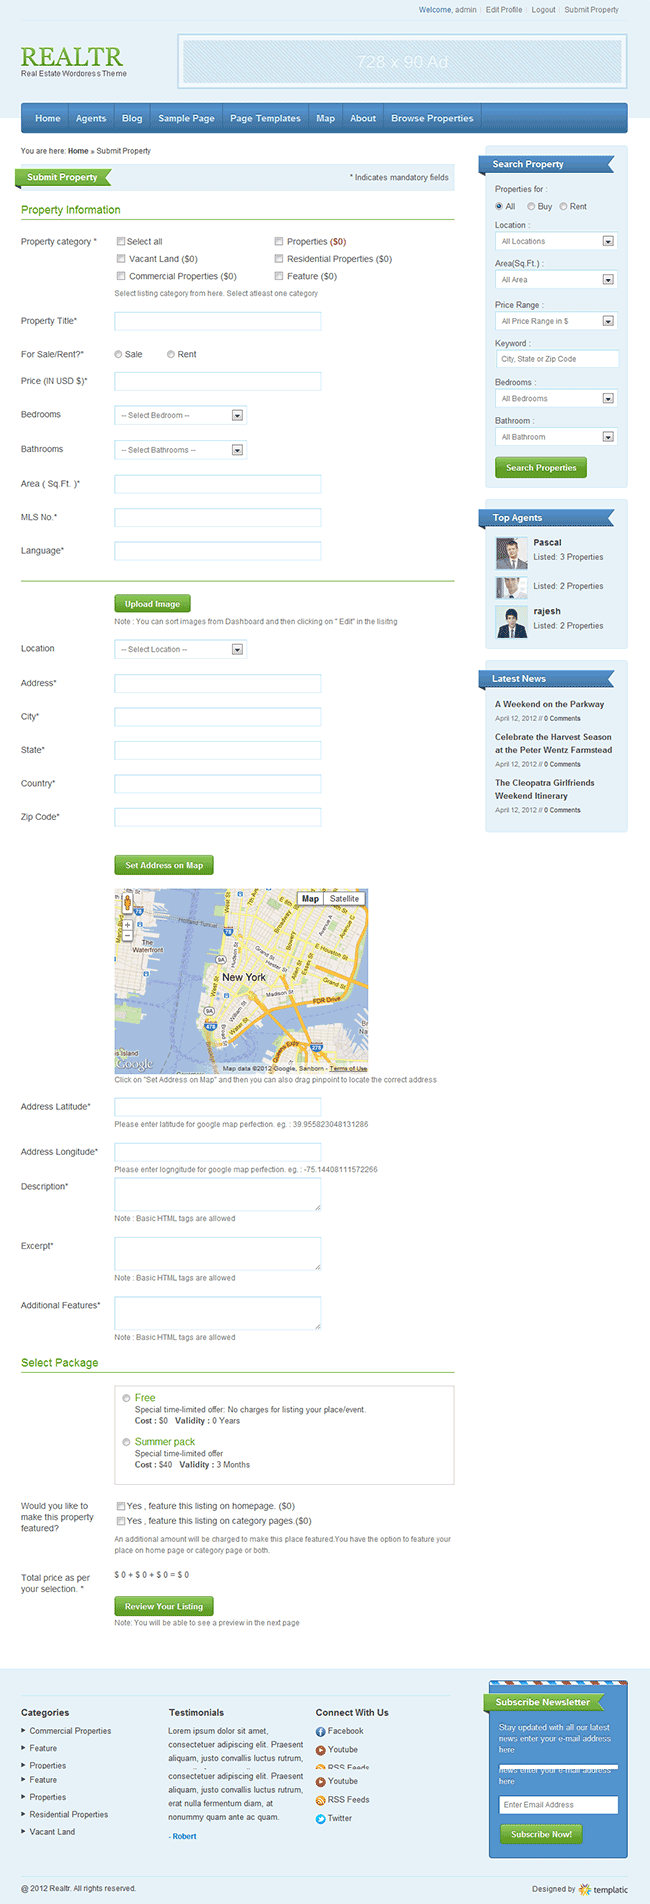
When you click on “Set Address on MAP” the MAP only takes the value from first “Address” field. So that make sure that you have provided correct address there. It does not look for other fields like state, city, etc….
- Go to WP-admin -> Realtr -> Basic Settings -> Submit Property Page Settings. There are many options listed for the submit property page. I have described below use of each of them:
- Category Display Settings: This option is used for how you want to list your categories on submit property page. There are two options – “checkbox” and “select”.
- Maximum size of Image: Here you can give the maximum size of the image users can upload while submitting property. This size is in bytes.
- Maximum Number Of Bedrooms: Bedrooms dropdown depends on this field. If you have given 5 then it will display 1 to 5 options in bedroom dropdown.
- Maximum Number of Bathrooms: Bathrooms dropdown depends on this field. If you have given 5 then it will display 1 to 5 options in bathrooms dropdown.
- Property Default Status: This field defines the status of post after adding on your site. If you have selected “Draft” then if a user adds a property successfully then his post will be available in your backend as draft. This option is useful to verify the content of the pots that users are posting. You can also select “publish”. So that the properties will directly get published on your site.
- Locations: This field specifies the options for “locations” drop-down in front end. Different options can be separated by comma (,).
- Show WP-reCAPTCHA on: This option is used to show the captcha on submit property page and registration page. To activate captcha on your site, first you will need to install WP-reCAPTCHA plugin on your site. If the plug-in is activated then only this option will show the captcha.
If you want to download WP reCaptcha click here – http://wordpress.org/extend/plugins/wp-recaptcha/
- You can add your own fields or edit the existing fields also on submit property form page from WP-admin -> Realtr -> Advanced Settings -> Manage Custom Fields. I have explained this option in brief here.
- Go to WP-admin -> Appearance -> Widgets. You can place the below widgets in “Submit Property Page Sidebar” area.
- T → Search
- T → Top Agents
- T → Latest Posts
- T → Featured Video, etc…
Manage Price Packages
When you want to charge your users for posting on your site, there are main three things which affect the total charge and where you can define your charges or amount:
a) Category Price: Your different categories can have different prices. You can set the different prices in Advanced Settings -> Category Settings. Here you can set prices for each category.

b) Price Package Price: Price package is very useful when you want to charge your users for particular duration, particular categories, etc… Go to Advanced Settings -> Manage Price Packages. Here you can add/edit price packages as per your need. I have explained here the different options given to create the price package.
- Price Package Title: It is just simply defines a title for the package . It is for front end use.
- Description of the price package: You can have a small description for the price package. This description will be displayed in the frontend submit property page below the price package title.
- Apply Packages to this Category: The package will be available to the selected categories only.
- Package Cost: Simply, it indicates the cost for the package.
- Billing Period : This field indicates for how much time the post will remain published on the site.
- Status: From this option you can activate or deactivate the package. If it is in active status then only it will get displayed in front-end. This is very useful when you want to give some special offer packages for some time and after some time you again want it.
- Recurring: If you have selected “Yes” here then your users will automatically charged when the billing period will get over and the post will published again. Please note that this option works only for PayPal.Also make sure that in your PayPal account – Auto Return has been set to “on”. This will allow the user to redirect to your site(Success page) after doing payment.

c) Feature/Non-Featured Price: You might want to charge users extra amount for featured listings within a price package. In add/edit price package, below you can find a section named “Price settings for Featured listings”. Here you can define those charges. There are three fields given:
- Status: You can activate or deactivate additional price settings for featured listings. This is very useful in case of having seasonal prices.
- Amount to be charged (For featuring on Home Page): Define your charges you want to charge your users for make their property as featured on home page.
- Amount to be charged (For featuring on Categories Page): Define your charges you want to charge your users for make their property as featured on category page.
A user will be charged with total of above three things. (Total charges = a+b+c). This is how the pricing works in Realtr.

Manage Featured Listings:
If you are adding properties from backend or bulk upload then please make sure that you have selected any one option for featuring posts in its custom fields section. Then only the ordering of the posts will be correct in front end.
Suppose if you want to display some of your posts differently or highlighted on your site then these posts are called as featured listings. In above Price Packages (c) section is used for that purpose.
If a user has paid to make the listing featured on home page then his post will be displayed as highlighted on homepage. The same way it works for category page if a user has paid to make his listing featured on category page.
Note that the featured listings will be always listed first. You can also make your listings featured on both home page as well as category page.
Manage Custom Field:
Whenever you are adding a custom field or a user field make sure that “HTML variable name” field should not contain any special characters except underscores (_) and it also should not have space.
Custom fields are the fields that are displayed with your post or properties. It works like attributes of the posts.These fields are displayed as an input field in add property page and as an attribute field in property detail page. You can add new or edit the existing custom fields in WP-admin -> Realtr -> Advanced Settings -> Manage Custom Fields.
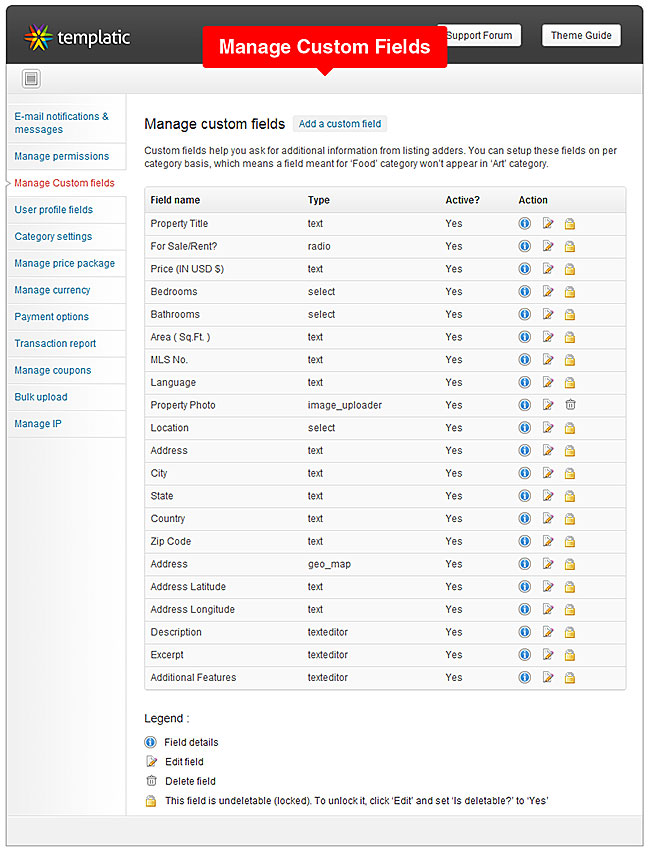
When you will click on Add/Edit custom field you will be able to see the below options:
- Show for categories: The field in add property page or property detail page will be displayed for the selected categories only. Note: this option won’t work if checkbox option selected in Basic Settings -> submit property page settings -> Category display settings.
- Field Type: Here you can select the type of the custom field. We have provided options like text, date picker, Multi checkbox, Radio, Select, etc…
- Option Values: This field is use full when you are using field type like checkbox, radio or select, etc… You can give these field’s options here. You can separate the values with comma.
- Title: The title fore the field which will appear in custom field settings area.
- Field name(Front-end):The name you provide here will be displayed as the field’s name (label) in the front-end. Here front end stands for submit property page and property detail page.
- Field label (for back-end): The name you provide here will be displayed as the field’s name (label) in the back-end. Here back-end stands for WP-admin -> Property-> Add/Edit property page.
- HTML variable name: The HTML variable name for the custom field. IMPORTANT: It should be a unique name and it will be not editable after once you entered.
- Description: you can give a short description about this field. it will display below the field on the submit property page area.
- Default Value: In this field you can give the default value for the field.
- Position (Display order): This is a numeric value that determines the position of the custom field in the front-end and the back-end. e.g. 5
- Active?: This option activate or deactivate the field in front end and in backend. It is also useful when you want to give some fields for some particular period only.
- Compulsory?: You can make the field compulsory by selecting “yes” here.
- Display location: Here you can select the location of the field whether you want to just display in front end or just in back-end or on both side. Here front end means property detail page and submit property page. Back-end means edit property page.
- Is editable?: You can specify whether or not this field is editable. If you have selected “Yes” in this then when you will go to edit the custom field then some of the options from all this will not be available.
- Is deletable? : If “No” is selected in this option then you can not delete the field from the back-end, Custom fields list.
- Is Search?: If you have selected “Yes” here then the field will be displayed in search widget and your users can do the search with this field too!
- Show on detail page?: If you have selected “Yes” then only the field will be displayed in the detail page.
- Required field warning message: If you have selected “yes” in “Compulsory?” option then you can specify the error message for the field when user leaves it empty.
- Validation type: This field used to vallidate the field. You can specify which kind of data user can enter in this field. The options given there are:
Require means this field cannot be left blank.Phone No. means this field requires numeric values in phone number format.Digit means this field requires numeric values.Email means this field is requires a valid email format. - CSS class: If you want to apply some css to this field then you can specify the class name here.
- Extra Parameter: You can also give some parameters to the field using this option like onchange, maxlength, etc…
Manage User Profile Fields:
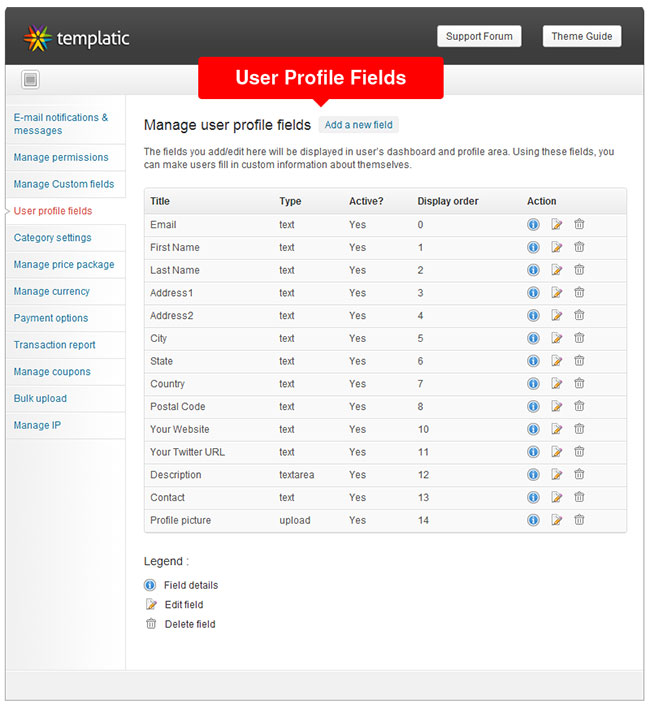
Custom fields work as an attribute for the posts. The same way user profile fields are the fields for the user’s profile. These fields work as attributes for the user’s details in the user’s dashboard. You can add, edit or delete the user fields from WP-admin -> realtr -> Advanced Settings -> User Profile Fields.
When you will click on Add/Edit user profile field you will be able to see the below options:
- Field Type: Here you can select the type of the user profile field. We have provided options like text,text editor, Multi checkbox, Radio, Select, Upload etc…
- Field name(Front-end):The name you provide here will be displayed as the field’s name (label) in the front-end. Here front end stands for user’s dashboard or registration page.
- Field Description: you can give a short description about this field. it will display below the field.
- HTML variable name: The HTML variable name for the field. IMPORTANT: It should be a unique name and it will be not editable after once you entered.
- Position (Display order): This is a numeric value that determines the position of the custom field in the front-end and the back-end. e.g. 5
- Active?: This option activate or deactivate the field in front end and in backend. It is also useful when you want to give some fields for some particular period only.
- Compulsory?: You can make the field compulsory by selecting “yes” here.
- Show on Registration page?: If you have selected “Yes” then only the field will be displayed in the registration page.
- Show on Profile page?: If you have selected “Yes” then only the field will be displayed in the user’s profile page.
Advanced Settings
Manage Notifications:

Setup email notifications:
Go to WP-admin > Realtr > Advanced settings > Email notifications & messages. Here, you can change the content of the emails that are sent to admin and users. Use the shortcode-legends specified.
Setup message notifications:
Go to WP-admin > Realtr > Advanced settings > Email notifications & messages. Here, you can modify instructional messages displayed on-site like when a payment is successful. Use the shortcode-legends specified.
Manage Permissions:

This feature is useful when you want to restrict your users to access your backend. Administrators are allowed access all the times. Mark the users for whom you do not want to access their backend.
Manage Currency:

Go to WP-admin -> Realtr -> Advanced Settings -> manage Currency. Here you can add to edit the currency. While adding the currency you will have to give currency name, Currency code, currency symbol and currency symbol position (How the symbol will display around the price value).
Manage Payment Options:
Go to Wp-admin -> Realtr -> Advanced Settings -> Payment Options. You can edit/activate/de-adtivate the available payment options. The payment methods currently we are having in the theme are:

- Paypal: While setting up this method please make sure that “Merchant ID” you have provided is correct.
- Google Checkout: While setting up this method please make sure that “Merchant ID” you have provided is correct.
- Authorize.net: While setting up this method please make sure that “Transaction Key” you have provided is correct.
- Worldpay: While setting up this method please make sure that “Instant ID” & “Account ID” you have provided is correct.
- 2CO (2Checkout): While setting up this method please make sure that “Vendor ID” you have provided is correct.
- Pre Bank Transfer: The users will have to manually transfer the amount in the account ID you have mentioned here. It will be displayed on the thank you page.
- Pay cash on delivery: The users will have to pay cash in this method.
Transaction Report:

Go to WP-admin -> Realtr -> Advanced Settings -> Transaction Report. Here you can see the report of the transaction being held on your site.
We have also provided a search form. So that you can search particular transactions efficiently.
Manage Coupons:
Coupon is basically used to provide your users a discounted price. Go to WP-admin -> Realtr -> Advanced Settings -> Manage Coupons. Here you can add or edit coupons.

You can give the discount in either some percentage or some amount by selecting the “Discount Type”.When your users will give the correct coupon code in the add property page then he will get the discount.
Please make sure that you have selected “Yes” in “Enable coupon option on ‘Add property’ page”. Then only a text field to enter the coupon code on add property page will be displayed.
Bulk Upload/Export:
Whenever you perform bulk upload make sure that you have uploaded the images in to the uploads folder. Bulk upload will just provide the link to the images. It won’t upload the images.
Go to Wp-admin -> Realtr -> Advanced Settings -> Manage Bulk Upload. Here you can upload or export your posts or properties.

We would always recommend you to download first sample csv make changes according to this file or in this file and then upload your properties or posts. The sample csv will be for properties. Csv file cannot contain special characters. The column name also cannot be changed. Otherwise the data will not be imported correctly.
Manage IP:
Go to WP-admin -> Realtr -> Advanced Settings -> Manage IP. Here is the settings for managing IP addresses.

You can block or unblock the IP addresses from here. The IP addresses you have blocked previously appear here. Once you remove them from the list below, they will be unblocked. Suspicious IP addresses should be added to the list below in order to prevent listings done from that IP.
Other Important Aspects
Manage Agents:
- In the Realtr theme we have a new user type – Agent. The users who are listing properties on your site are known as “Agents”.
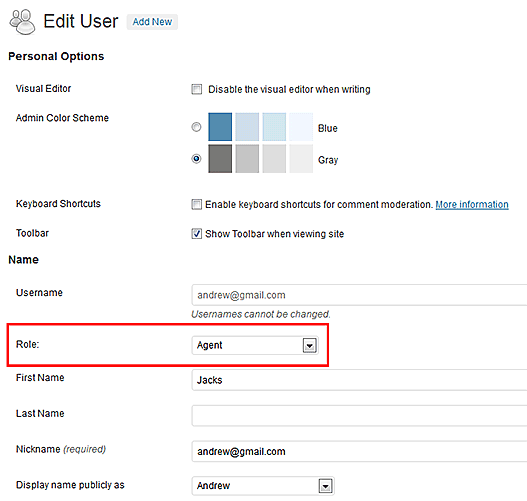
- You can make your users from Wp-admin -> Users -> Add or Edit Users. You can change the role to “Agent” here and click on “Update”.
- If you want your all new users as agents then go to WP-admin -> Settings -> General Settings. Set “New User Default Role” to “Agent”. Click on “Save Changes”.
The default role option is available to single site users not to the multi site users.
Search Settings:
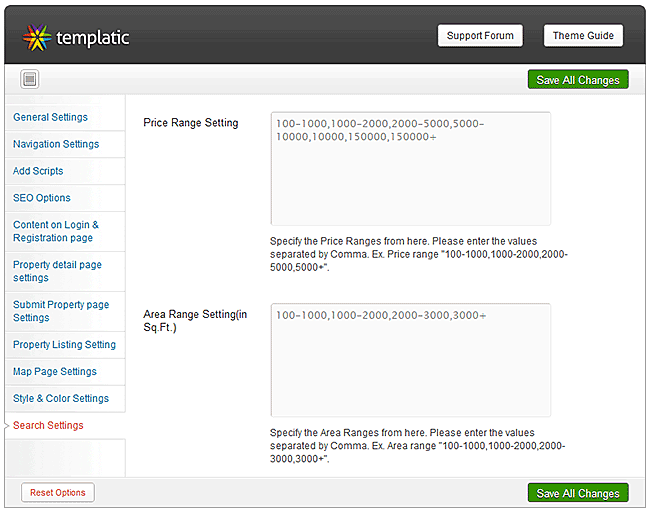
Go to WP-admin -> Realtr -> Basic Settings -> Search Settings. Here are some settings to set up fields in search widget.
Multi-Checkbox custom field do not work with the search.
a. Price Range Settings: This field defines the options of “Price Range” dropdown of search widget. Different options can be separated by comma (,).
b. Area Range Setting: This field defines the options of “Area” dropdown of search widget. Different options can be separated by comma (,).
c. You can add your own fields too. While creating or editing custom fields, you will need to select “yes” in “Is search?” field. Thus the field will be displayed in search widget and your users can do the search with this field too! (You can refer Manage Custom Field.)
Plugins Compatibility:
We have provided compatibilty of these plugins:
1. IDX-ML plugin: This plugin gives you the informations about the properties in your city or state. You can have more information here.
2. OA Social Login: This plugin is used to login with social networks like Twitter, Facebook, Paypal, LinkedIn, Instagram, OpenID, VKontakte, Google, Yahoo,etc… If you want to download it then click here.
3. WP-reCaptcha: This plugin allows you to add captcha on registration page and add property page. I have given download link already in submit property page settings.
Any Queries? Contact us and we’ll help you out.
Need help with installing the theme? Hire us!
Facing Problems in installing the theme? Don’t worry, we’ll do that for you, just click here!


