Answers theme is specially built for those who want to have a question-answer kind of website, where users can post their questions as well as answer other questions and help each other out. A forum kind of theme. Here are the systematic steps given to configure and use answers theme. Let’s go through it,[templ_msg_box type=”success”]Friendly tip: Well, you should read the whole guide but if you are in hurry then using ctrl + F will be helpful
Get Started
1. Install theme
- Connect to member area and expand the Answers section under My Downloads. Download available file.
- Connect to your WordPress dashboard (wp-admin) and navigate to Appearance -> Themes. Click on the Install Themes tab and then on Upload. Use the Browse option to locate the answers zip file on your hard drive – then click on Install Now. After the installation process is finished activate the theme.
In case WordPress rejects the .zip file use FTP to install the theme
For detailed instructions on using FTP please click here
- Extract answers.zip then upload to /wp-content/themes directory
- Once uploading is done connect to the WordPress dashboard and activate the theme
- If you run into more problems during installation please visit our Installation Guide
Struggling with installing WordPress or the purchased theme/plugin? Contact us, we can help!
2. Insert sample data
After activating theme, perform these steps to have your site loaded with sample data. Basically, it will load sample questions, pages, posts, some of the settings and widgets settings.
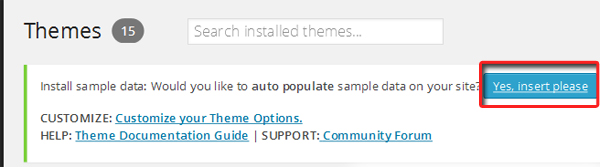
- Go to wp-admin -> Appearance -> Themes
- Click on the “Yes, insert please” button given on the top of your screen
- As soon as you click, it will load all the sample data and will change that button into “Yes, Delete pleas”.
- On clicking “Yes, delete please”, it will delete all your sample data as well as your modifications done using it. So, be cautious.
Configure various pages
1. Homepage
Setting up home page requires the combination of some settings and using widgets. Let’s see in detail
1. Header Menu
- Go to wp-admin -> Answers -> Navigation Settings
- Expand the section “Top Strip Navigation”
- And write page ids that you want to include in your header menu separated by commas
- Click “Save Changes” button and refresh your browser to the effect.
2. Advertisement
Theme provides you a special widget area to showcase advertisements (if you have any).
- Go to wp-admin -> Appearance -> Widgets
- Place the widget “PT – Header Advt” in the widget area “Header Top Advt”
- You can write html code for your advertisement in the widget. (e.g. Google ads)
- Save your widget and refresh your browser to see the effect.
3. Header Menu
To create a menu, it is important to understand few tiny things.
A) Default menu
There are some default pages (theme inserted) which will be there on your website even if you have not inserted sample data such as “Home, Ask a Question, Users and Blog”. Now to remove them follow these steps,
- You can only remove 2 of those pages manually, “Users and “Blog”. Go to wp-admin -> Answers
- Expand “Hide User Listing Link” given under the section “Navigation Settings” and check mark it
- Similarly, expand “Hide Blog Listing” option and check mark it.
- Save the settings and refresh your browser. They must be gone.
B) Create your own menu
In case you want to create totally new menu bar for your site then do the following,
- Perform above said steps if you do not want “Users and Blog” links too in the menu bar.
- Then, go to wp-admin -> Answers -> Design Settings
- Expand the option “Exclude Pages from Header Menu” given under the section “Navigation Settings”
- Check mark all the pages that you can see there. (It will display you all the pages you have at wp-admin -> Pages)
- Save your settings
- Now, create your custom menu from wp-admin -> Appearance -> Menus and save it (watch this video on custom menu creation)
- Then head over to wp-admin -> Appearance -> Widgets
- Place the widget “Custom Menu” in the widget area “Header Navigation” and save your widget
- Refresh your browser, your menu must be there now.
4. Users (listing page link)
To have users, login is compulsory which means that guests cannot post question on your site, they must register with you for that. So, you should have login and registration form prepared on your site. Let’s find out how you will place those registered users listing page link on the menu bar,
- It gets created within the theme. So, just head over to wp-admin -> Answers -> Design Settings -> Navigation Settings, expand the “Hide User Listing Link”, check mark it and save the settings
- Or you can also create it by appending
?ptype=usersalong with your site URL in your menu item (e.g. https://templatic.com/demos/answers/?ptype=users) - Save your menu and refresh your site.
5. Questions posted on your site
Because the main purpose of the theme is to show questions and answers, questions for the homepage will be shown by default. There are 4 tabs “Recent, Most Responses, Unanswered, Recently Answered” amongst which the questions will be divided. These tabs come from the coding. If you want to change the label name of these tabs then you can do that by replacing them in one of its php file as said here,
- Go to your active WordPress directory and locate your theme root folder.
- There open the file “language.php”
- Then
How do these questions are visible on the homepage?
There is an ask a question form (explained in the next section) with the help of which your users can submit their questions on your website. These questions will be stored under the WordPress Posts at your admin back-end. If you insert the sample data, there will be a post category called “Questions” where all submitted questions will be stored by default.
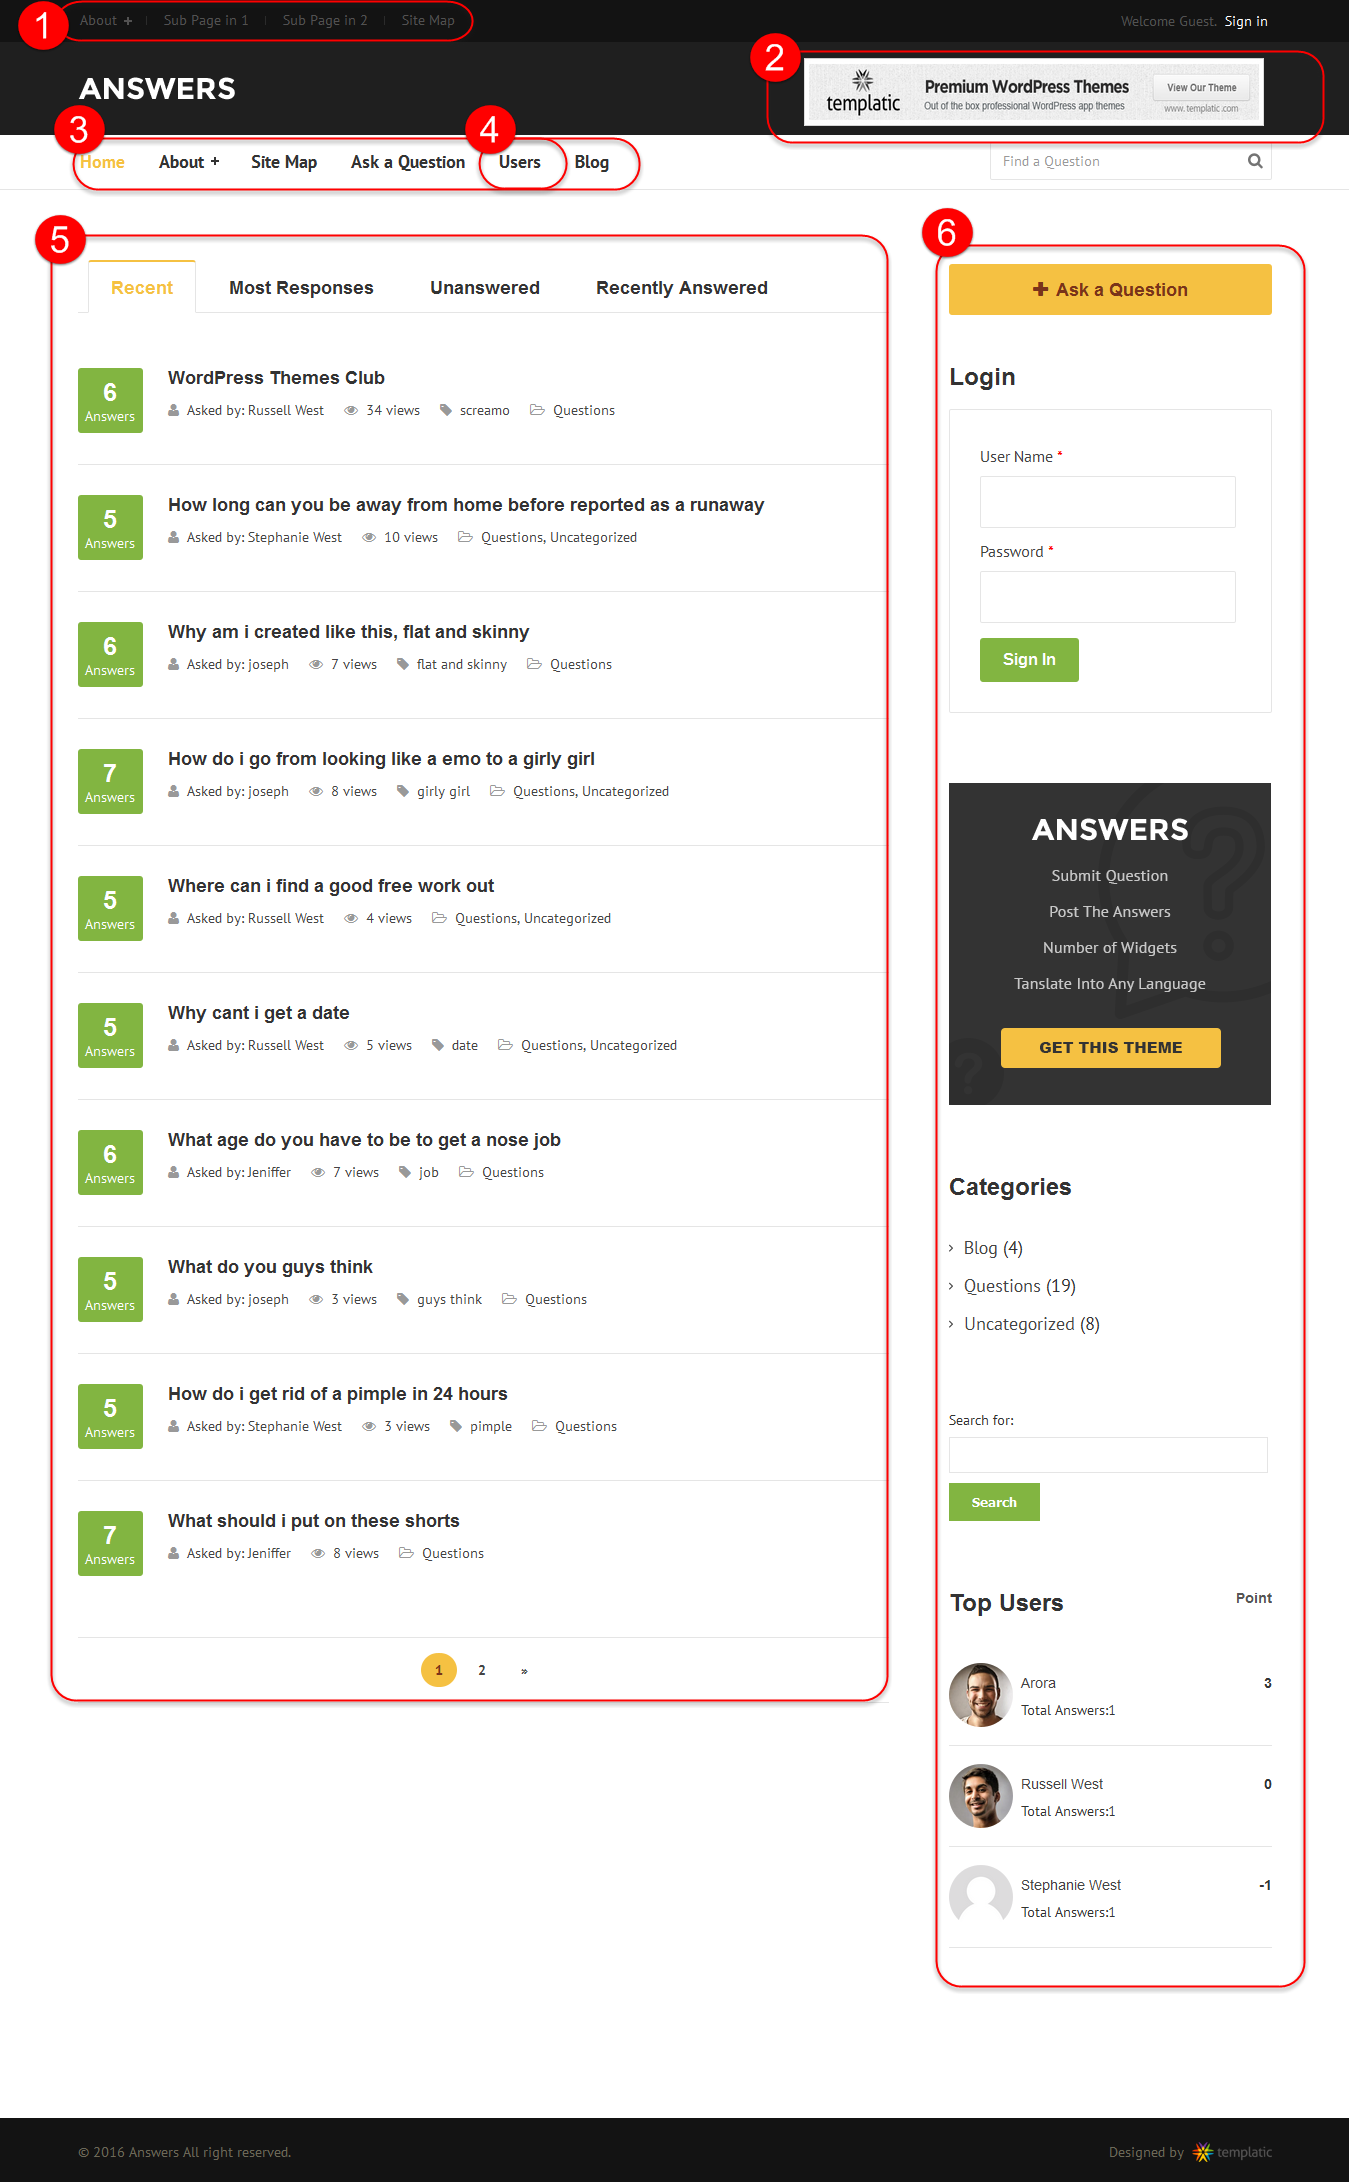
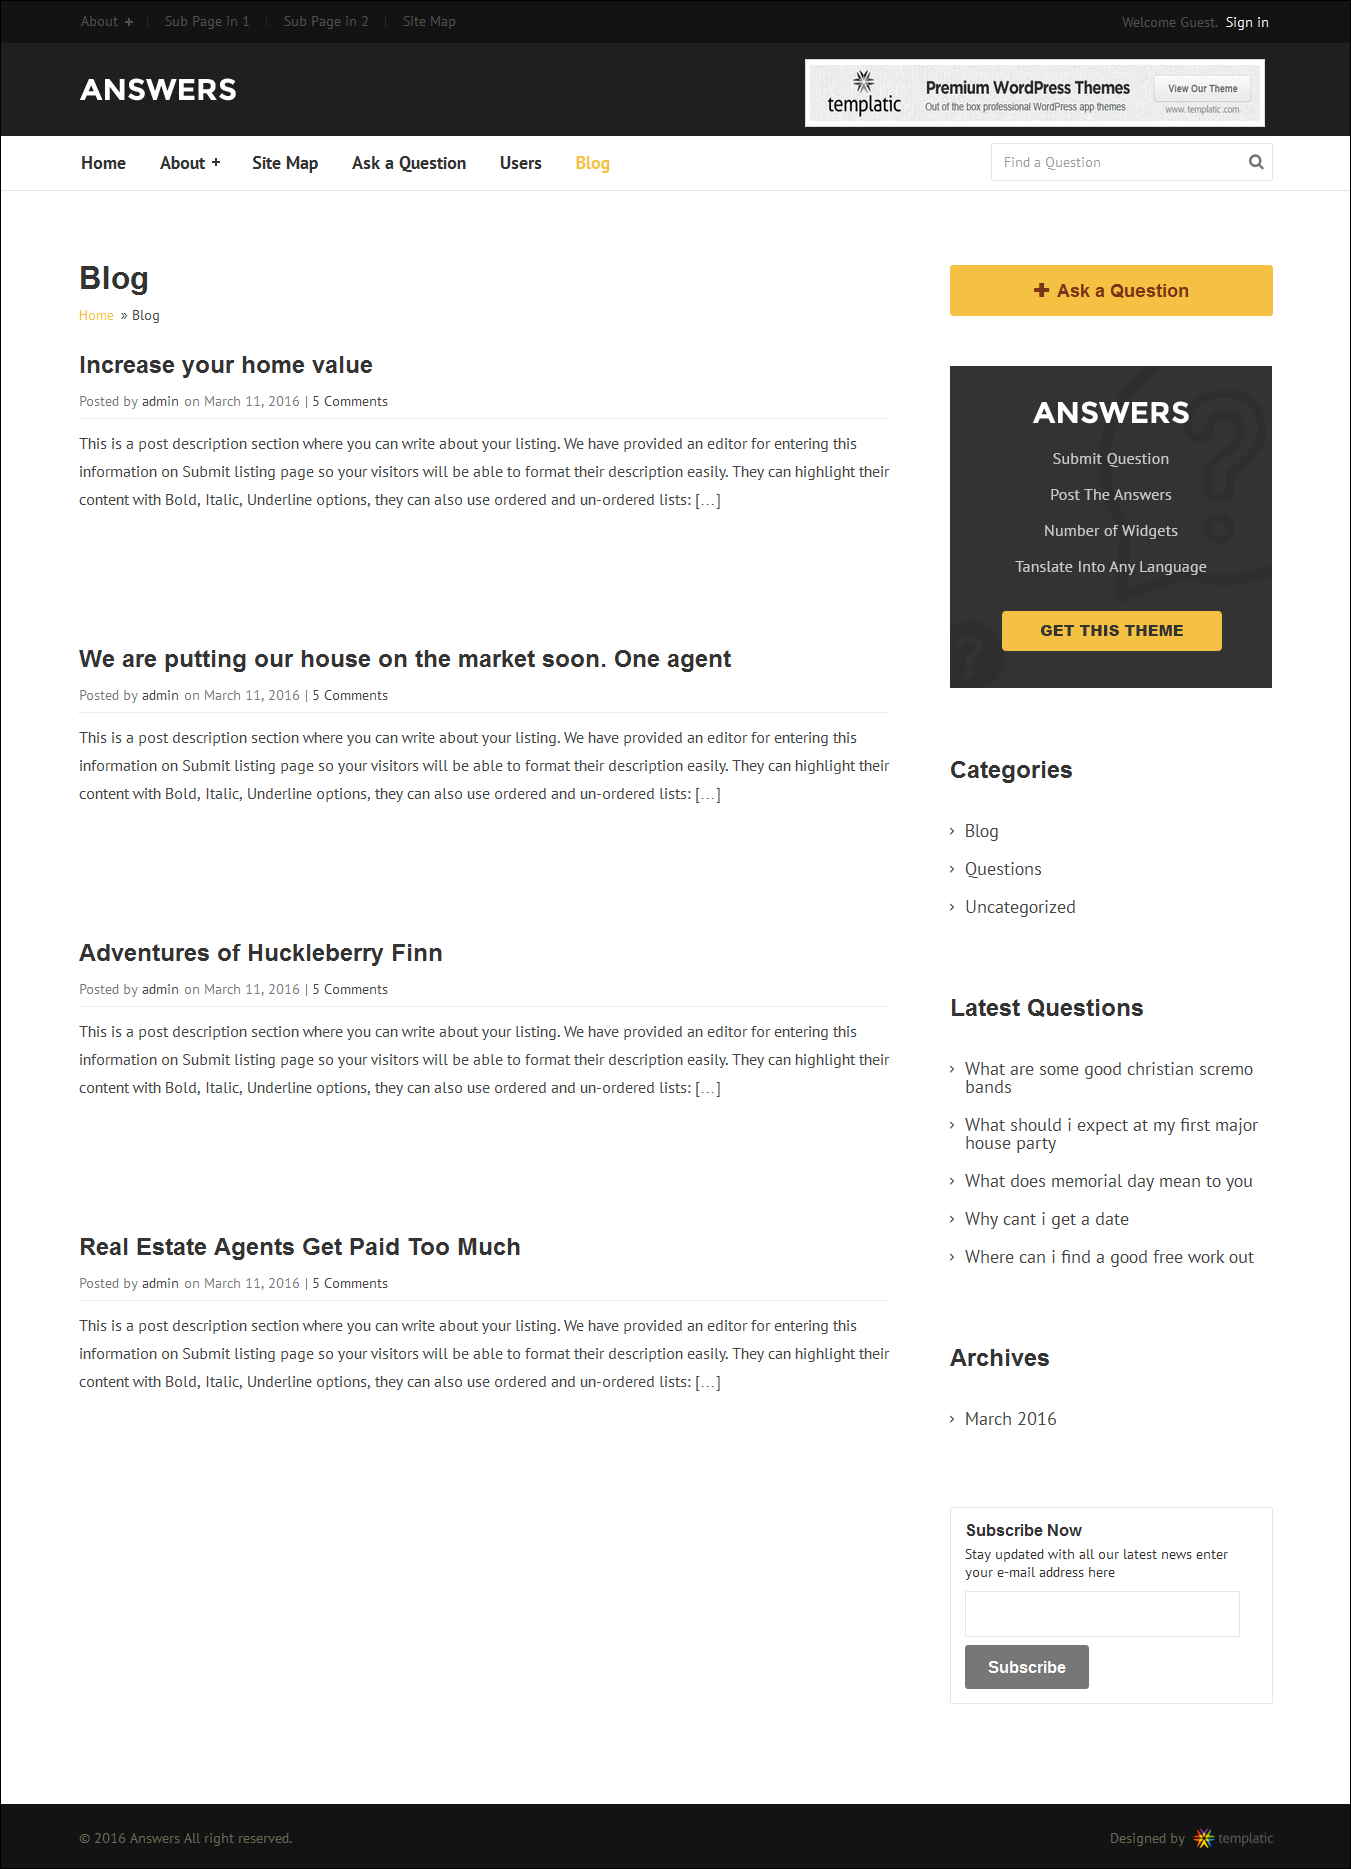
A) List of all questions on homepage by default
All these questions will be listed by default on your homepage as shown in the above screenshot (also what we have used for our demo site). Actually theme generates it but we have also provided a page template to create this page in case you do not use the default one.
B) Have page of your choice as homepage
If you want to have some other page as your homepage and not the questions list then can do that easily,
- Create the page that you want to show as your homepage from wp-admin -> Pages -> New and publish it.
- Head over to wp-admin -> Settings -> Reading
- Select the option “A Static Page” and select your created page
- Save the settings
- Now. head over to wp-admin -> Pages -> Add New, select the page template “Home ptype” and publish your page (if you also want to show questions list as one of the menu item on your site)
6. Homepage Sidebar
It is very simple to have it. Theme provides you a homepage sidebar widget area. Follow these steps for that,
- Go to wp-admin -> Appearance -> Widgets
- Place your required widgets in “Home Sidebar”
- Save them and refresh your site to see the effect
Some of the suitable widgets would be,
- PT – Loginbox – Shows a login box with the links to (logged in user’s) Dashboard, Question Asked, Answers provided, Received Vote (all with the counts)
- PT – Tag Cloud – Shows various question tags
- PT – Top Users – Lists the top users based on the votes gained by them on their answers.
- PT – Sidebar Advt – Shows your linked ad image on the sidebar
7. Footer credit line
- Go to your active WordPress directory and locate your theme root folder.
- There open the file “footer.php”
- At line number 17 replace the word like “Designed by” and enter the image path of your logo (if you want).
- Save the file and refresh your browser to see the effect.
You can also have footer navigation menu,
- Go to wp-admin -> Answers -> Design Settings
- Expand the option “Footer Navigation” given under the section “Navigation Settings”
- Write the page ids of the pages that you want to include as the footer menu items. (Watch video to get page id. It tells about category id but can get you the basic idea)
- Save the settings and refresh your browser to see the effect.
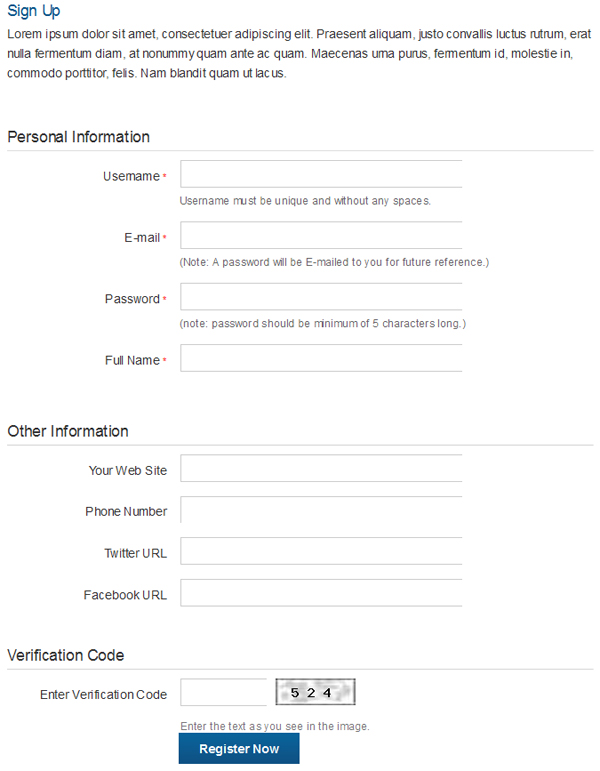
2. Ask a question form
The 2 steps related to this form are i) Creation and ii) Settings. Here is the explanation of both of them.
i) Creation
There are actually 2 ways of creating it, using the default one or create it using page template. Let’s see it how,
A) Default form
Being a soul of the theme, it gets created by default. If you notice its default URL on the front-end, it is appended with ?ptype=ask-a-question with your website link. So, you can use this URL wherever necessary. (e.g. https://templatic.com/demos/answers/?ptype=ask-a-question)
B) Using Page template
In case you do not want to use the default page, you can also create it using a page template following these steps,
- Go to wp-admin -> Pages -> Add New
- Create your page, choose the page template “Ask Question Form Page” and publish it
- Place it in your menu bar and you are done
ii) Settings
A) Choose the post categories to store the submitted question

You can select the default as well as other post categories where you want to store the questions submitted on your site. You can create it from wp-admin -> Posts -> Categories.
Go to wp-admin -> Answers -> Design Settings, you will find the section “Question Settings”, 2 options “Question Default Category” and “Select Categories As Question categories” will be there.
- Question Default Category – The basic purpose here is to save submitted questions in the here selected category.
- Select Categories As Question categories – Here selected categories will be visible on the ask a question form at the front-end to your users and your users can choose one or more category to post their question in.
B) Captcha Settings

- Go to wp-admin -> Answers -> Design Settings
- Expand the option “Captcha Settings” and check mark it, if you want to disable captcha from all the pages OR
- Expand the option “WP-reCaptcha Settings and select the page where you want to show captcha according to your requirement.
- Save the settings and refresh your browser to see the effect.
C) Write your content on the top
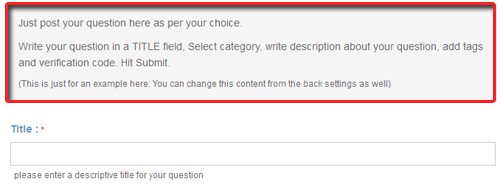
To give a personal touch to the content, do these,
- Go to wp-admin -> Answers -> Design Settings
- Expand the option “Ask a Question page top content” and write your required content
- Also you should write your desired content on its preview page. Expand the option “Ask a Question Preview page top content” and write content there.
- Save the settings and refresh your browser to see the effect.
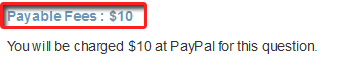
- Go to wp-admin -> Answers -> General Settings
- Select the default currency and currency symbol
- Then mention the amount that will be charged while submitting each question in the field “Question Post Fees in”
- Enter your paypal merchants account id to receive the payment.
- Submit it and refresh your browser (ask a question form) to see the effect.)
3. Login/Registration page
According to the theme code, it is compulsory to get registered on the website to submit the question. So having login and registration page becomes important. Let’s see how to create them,
A) Create registration page
- It gets created appending
?ptype=loginwith your website link (e.g. https://templatic.com/demos/answers/?ptype=login) - You can create such kind of link for your menu item.
Tip: If you face any kind of error, try deactivating captcha settings from wp-admin -> Answers -> Design Settings -> Other Settings.
B) Create login page
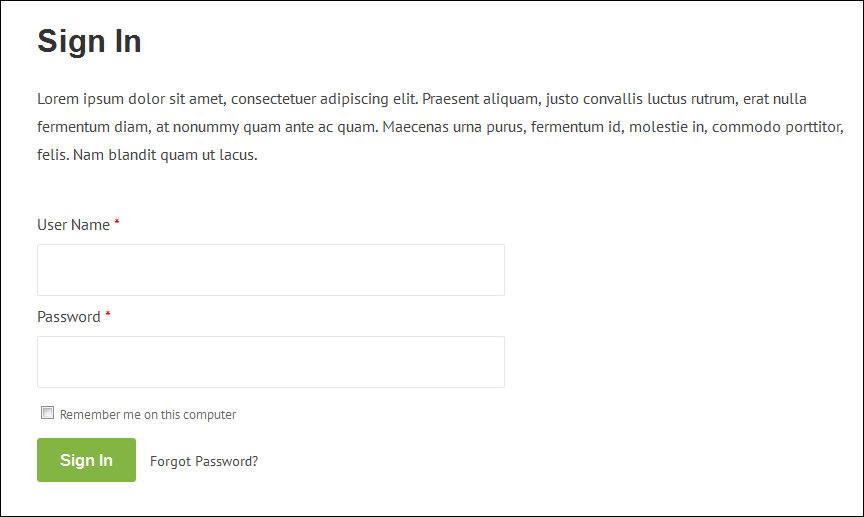
- It gets created appending
?ptype=login&page1=sign_inwith your website link (e.g. https://templatic.com/demos/answers/?ptype=login&page1=sign_in) - Usually it automatically appears at the top right side of your website. But if you don’t have, you can create such kind of link for your menu item.
C) Create user profile page
After getting registered, user needs to have profile page which gets created automatically, but let us now how,
- Append
?ptype=profilewith your website link. (e.g. https://templatic.com/demos/answers/?ptype=profile) - You can use it as a link in your menu item (if required)
- Also you can use widget PT – Loginbox wherever required.
D) Add content at the top of registration as well as login page
- Go to wp-admin -> Answers -> Design Settings
- For login page, expand the option “Login page top content” and write your required content
- For registration page, expand the option “Registration page top content” and write content there.
- Save the settings and refresh your browser to see the effect.
4. User Listing Page
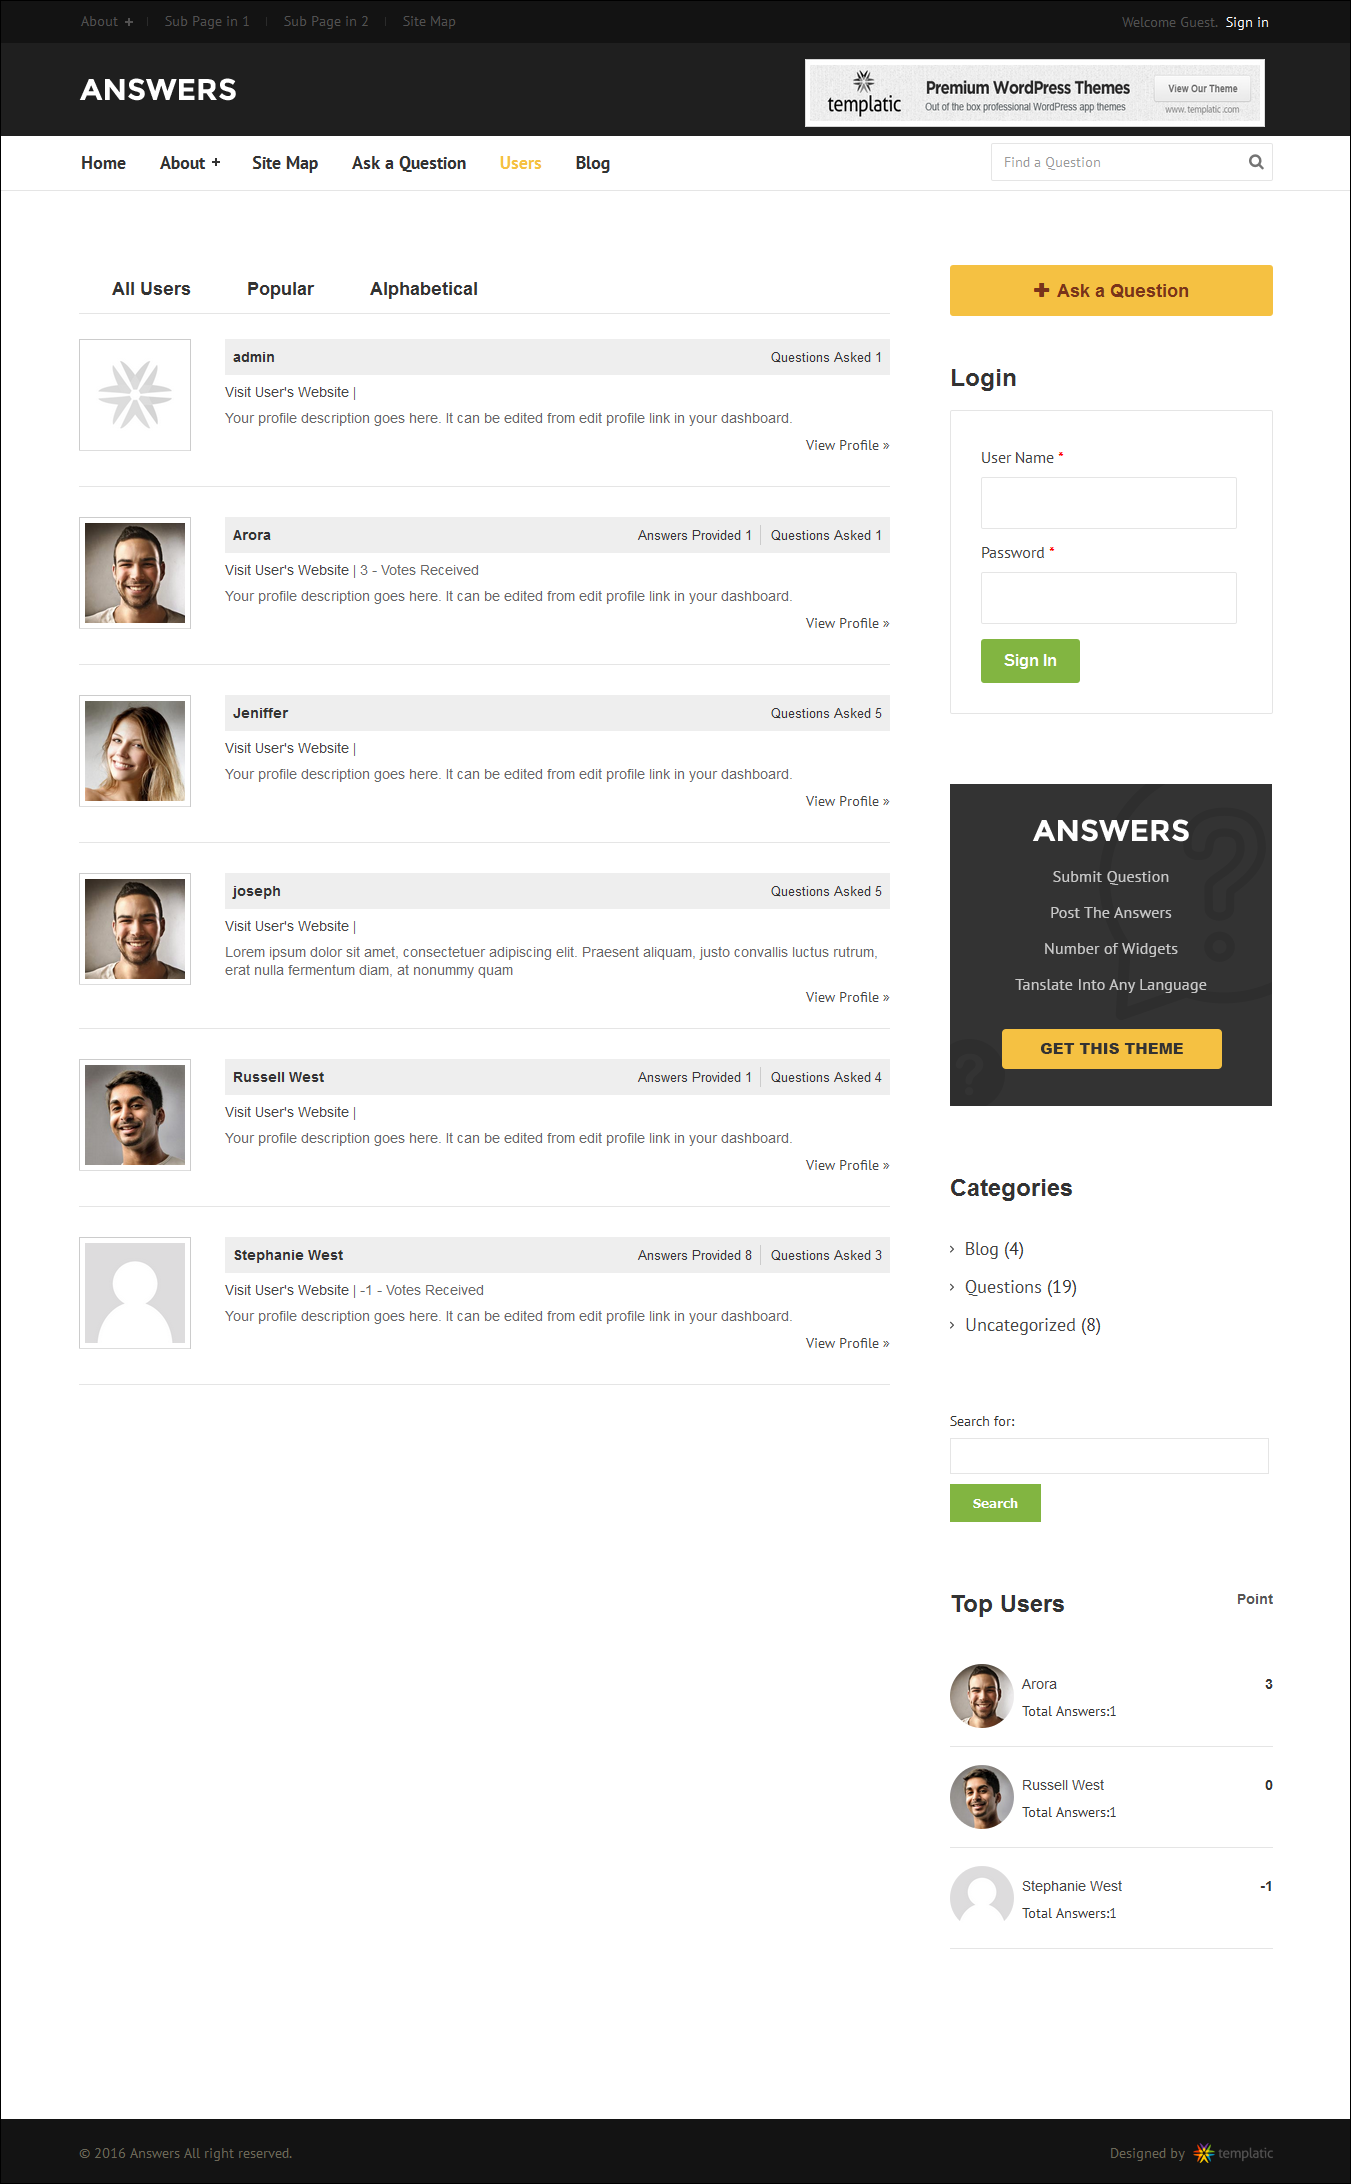
i) Creation
It gets created automatically by appending ?ptype=users to your website link. You can use it as a link in your menu item if you have created a whole new menu for your site.
ii) Settings
A) Show/Hide this list in the menu bar
- Go to wp-admin -> Answers -> Design Settings
- Expand the option “Hide Users Listing Link” and check mark it given under the section “Navigation Settings” to hide this auto generated page
- Save the settings and refresh your browser to see the effect.
If you want to show these users then DO NOT hide it.
B) Rename the tabs that come on user listing page,
If you want to rename tab name then
- Go to your active WordPress directory and locate your theme root folder.
- There open the file “language.php”
- Around line number 12, you will find the list of those 3 tabs, replace the label name written between single inverted commas <?php _e(‘Popular’);?> with your desired one
- Save the file and refresh your browser to see the effect.
So, you can just rename the tabs but cannot increase them. To add more tabs, you have to do the code customization which is out of our support policy but we can help you get started. Just add your line of code in the file and line number mentioned above.
5. Contact us page
There is a contact us page template that helps you show a contact form with required fields on your website.
- Go to wp-admin -> Pages -> Add New
- Select “Contact Us” page template given under page attributes section
- publish your page and refresh your site to see the effect.
Inquiries sent using this form will be mailed to the admin of the site on the email address written at wp-admin -> Settings -> General
6. Blog listing page
Page where the list of posts published on your website is shown is your blog listing page. Here is how you set it up,
- Go to wp-admin -> Answers -> Design Settings – > Blog Page Settings
- Select the blog category that will be shown on the listing page of your website (it will be treated as blog and not questions).
- Check mark the option “Display Full Post Content” given under the main option “Content Display”, if you want to display the whole content on the listing page itself.
How to show certain limit of content on blog listing page?
- First of all, make sure that you have NOT check marked the above said “Display Full Post Content” option.
- Then, while creating a post from wp-admin -> Posts, write some content in the Excerpt editor which will be shown on the listing page.
7. Blog detail page
Along with the blog data, this page have “Ask A Question” button and a blog page sidebar where you can place your required widgets easily. Here are the steps,
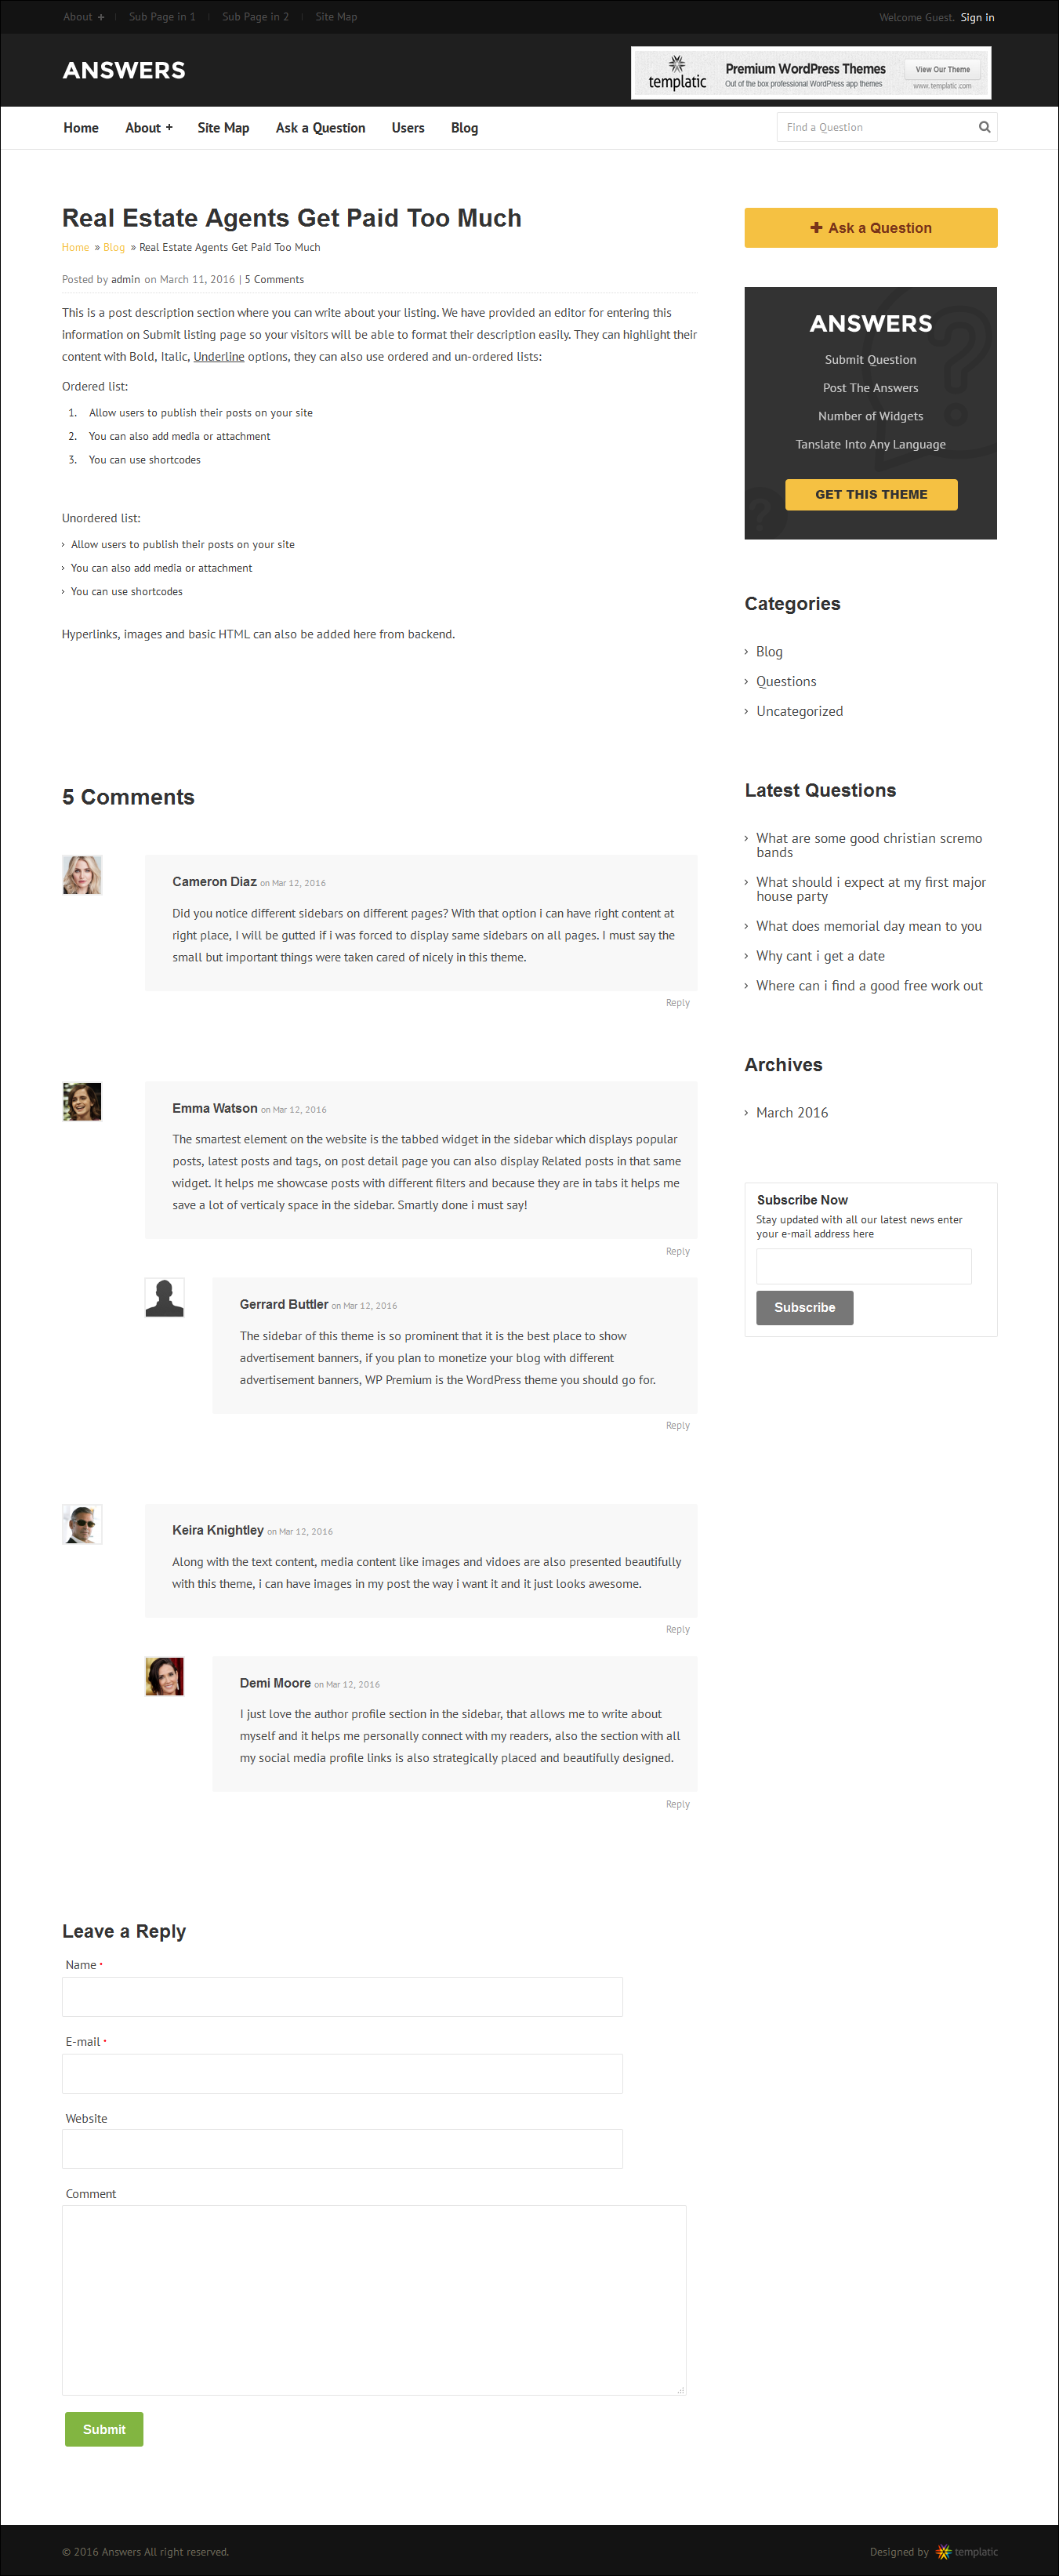
Blog Page Sidebar
- Go to wp-admin -> Appearance -> Widgets
- Place your needed widgets in “Blog Page Sidebar” widget area.
- Save them and refresh your browser to see the effect.
Ask A Question button

It is a button that appears on all the page sidebars and redirects to the “Ask a question form”. Basically the button you see here is an image including the text “Ask a Question” and then code has been applied to it to show it on various pages. You can locate it,
Locate Image
- If you are using the default skin (i.e. blue color) of the theme, you will find it in your theme root folder at ..\wp-content\themes\Answers\skins\1-default (it is folder that has some of the images used in the theme)
- If you are skin other than the default one then locate it at ..\wp-content\themes\Answers\skins, under the folder of your color.
Locate code
- Go to your active WordPress directory at ..\wp-content\themes\Answers\library\includes
- Open up the file “ask_question_button.php”. The code of 8 lines is bringing this button to your various pages (If you remove it, button will stop displaying)
- You can replace the
?ptype=ask-a-questionto?ptype=...(any page you want). For example?ptype=users
Other functionality
3. Personalize system generated email content
There are some emails which will be fired on certain actions done at your website. Content of some of them can be easily changed with your personal one right from the admin back-end, Here is how you can do it,
- Go to wp-admin -> Answers -> Notification Settings
- You will be able to see emails and notifications, just click on the “edit template” and start editing your message
- After getting done, click ‘submit’
- Refresh your browser to see the effect.
Some of the mails that you cannot edit directly from the back-end like,
- Mail on user registration – To edit the content, go to your active WordPress directory at ..\wp-content\themes\Answers, open the file language.php and replace your content at line number 153 written between <p></p> tags.
- Mail to an admin on new question submission – To edit the content, go to your active WordPress directory at ..\wp-content\themes\Answers\library\includes, open the file email_alert_question_add.php and replace your content with the one written between <p></p> tags. (Be cautious, violating php rule may result into any error)
[templ_msg_box type=”success”]Tip to locate words: Whenever, you cannot find the exact location of word, just open any of the php file and search it through out the theme folder.
4. Change theme color
Answers theme is available into 7 colors and the default one is “blue”. To change the color,
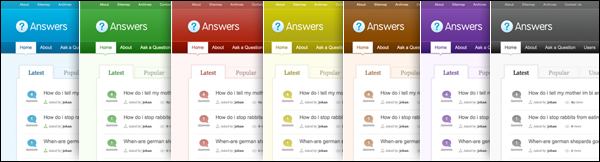
- Go to wp-admin -> Answers -> Design Settings -> General Settings
- Expand the option “Theme Colorscheme” and select your favorite one.
- Similarly you can also upload your logo as well as favicon images using the other options given there.
- Save the settings and refresh your browser to see the effect.
5. Show/Hide breadcrumbs
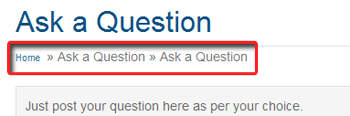
- Go to wp-admin -> Answers -> Design Settings -> Navigation Settings
- Expand the section “Breadcrumb Navigation”
- Check mark it if you want to show breadcrumbs and save it
- Refresh your site to see the effect.
6. Hide/Show user email on your website
On the user listing page, if you want to show or hide the email id of a particular users who have submitted questions at your site, do this,
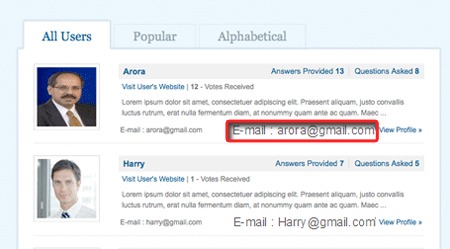
- Go to wp-admin Answers -> Design Settings -> Other Settings
- Expand the option “Hide User Email” and check mark it, if you want to hide it on your website
- Save the settings and refresh your browser to see the effect.
Any Queries? Contact us and we’ll help you out.