Theme Installation
Easy Installation
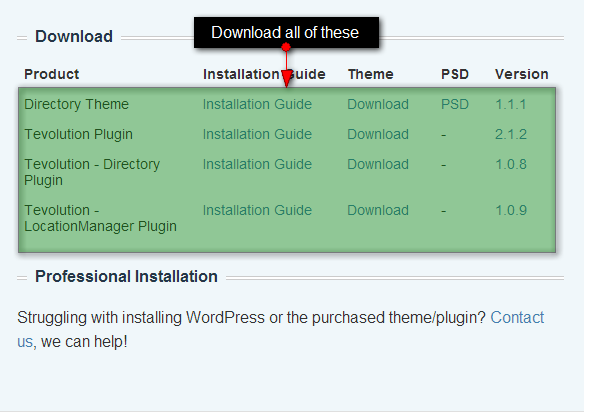
- Connect to themember area and expand the “Splendor” area by clicking on “Download” button. Download the Easy Installer .zip file.
- Login to your WordPress dashboard and navigate to Appearance ⇨ Themes ⇨ Add New ⇨ Load the .zip file you just downloaded.
- Activate the theme once the installation process is done.
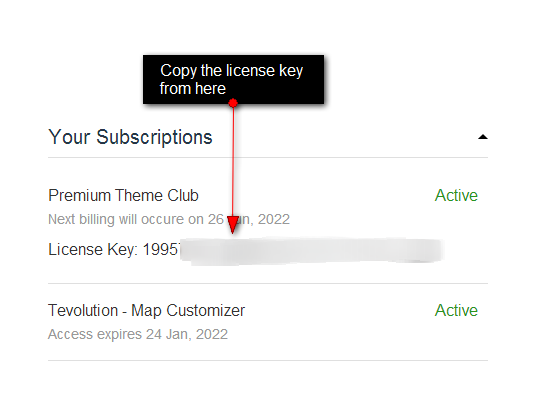
- Enter the license key. You can get it from the member area, under “My Downloads” inside Download pop up. Screenshot.
- Go to the Appearance ⇨ Themes section, click on the blue “Install sample data” button to populate your site with dummy data and make it look like our demo. The dummy data activation process can last up to 1-2 minutes. Don’t interrupt it.
Easy installation – Video Tutorial (watch in HD and full screen)
Note: Video is explaining Listings theme as Splendor and Listings theme has similar installation.
installation video from Templatic on Vimeo.
Installing via FTP is necessary on servers that aren’t optimized for WordPress and can often interrupt the installation process because of the long execution time. Good news is that this type of install isn’t particularly hard, just longer compared to installing from the back-end.
For general instructions about using FTP please open this tutorial.
- Download all filesavailable under “Download” in “Splendor” section inside member area and extract them using software like 7-Zip. Use the “Extract here” option; don’t extract into a new folder.
- Assuming you read the above linkedFTP tutorial, navigate to /wp-content/plugins/ on your server and upload the three plugin folders (Tevolution, Tevolution-Directory and Tevolution-LocationManager)
- Navigate to /wp-content/themes/ and upload the Directory folder and Splendor folder.
- Login to your WordPress dashboard and go to Plugins. Activate Tevolution and enter thelicense key available inside our member area.
- Go to the Plugins section again and activate Tevolution – Directory and then Tevolution – Location Manager.
- Navigate to Appearance ⇨ Themes and activate the Spendor theme.
- While in the Appearance ⇨ Themes section, click on the blue “Install sample data” button to populate your site with dummy data and make it look like our demo.
Home Page Configuration
See the below image for the HomePage configuration and accordingly check the points given after that to set up the widgets.
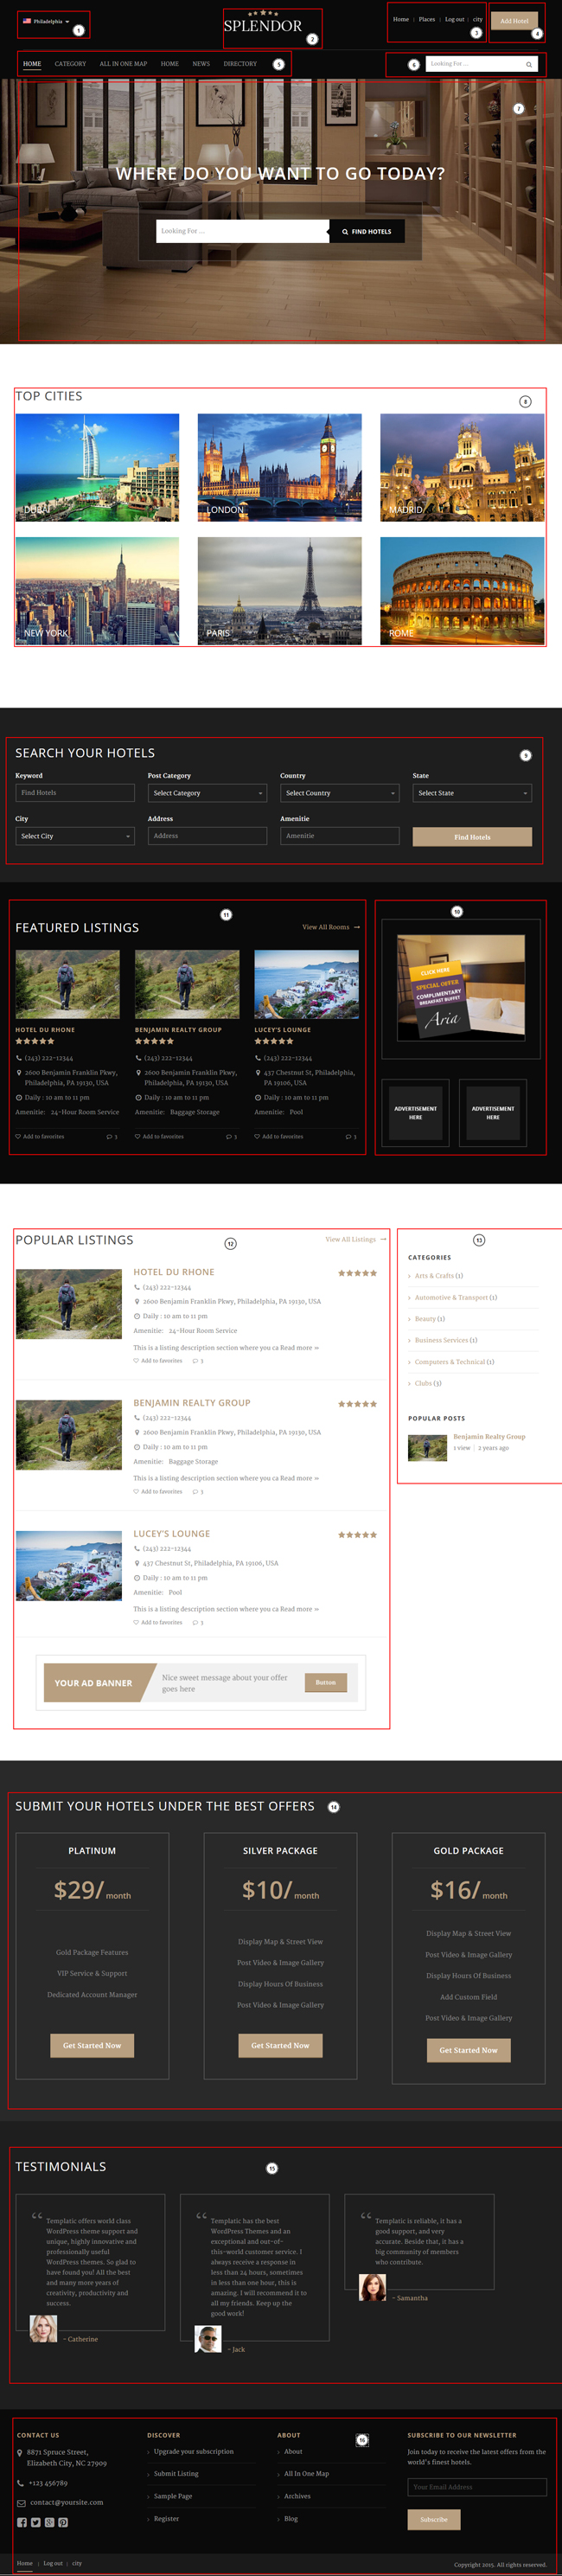
- City Selector: City Selector can be modified from Tevolution > Manage Locations settings. More details.
- Logo: Go to Wp-admin > Appearance > Customize > Logo. Here you can upload your own logo. Ideal size of the logo is: 179px x 50px
- Small Menu: To Set up primary menu, Go to Wp-admin > Appearance > Menus. Create a Menus and assign it to the location: Primary.
- Add Hotel: This button is provided in to WP-admin > Appearance > Widgets > Navigation Right. In to the text widget below code is added to show the button:
<a class="submit-small-button button" href="https://templatic.com/demos/direcotry/submit-listing>Add Hotel</a>
How to change color of this button?
Add below classes in to the Appearance > Custom CSS Editor and change the color codes as per your need:
| .primary_menu_wrapper .submit-small-button.button {
background-color: #11b6d2; border: none; margin: 0; } .primary_menu_wrapper .submit-small-button.button:hover { background-color: #73cb00; } |
- Main Navigation Menu: To Set up primary menu, Go to Wp-admin > Appearance > Menus. Create a Menus and assign it to the location: Secondary.
To create an extensive navigation menu visit our mega menu article. To get a better idea how this menu looks open the Directory 2 live demo and hover over the “Theme Features” menu item.
- Instant Search: Add “T > Instant Search” widget in to “Secondary navigation” area.
- Slider & Search: Add “T > Homepage Banner” & “T > Instant Search” widgets in to “Homepage Banner” area.
- Top Cities: Add “T > Top Cities” widget in to “Homepage – Main Content1” area.
- Search Your Hotels: Add “T > Advanced Search” widget in to “Homepage – Main Content2” area.
- Advertisements: Add “Text” widgets in to “Homepage – Above Main Content Right” area. Below is the advertisement code for the widgets:
Widget1:
 <div class="border_ad_banner">

<a href="https://templatic.com/products/wordpress-responsive-listings-directory-theme/" target="blank">

<img align="middle" src="http://localhost/city/splendor/wp-content/themes/Splendor/images/sidebar-ad-banner.jpg">

</a>

</div>
Widget2:
 <ul class="squere_ads">

<li><a href="https://templatic.com/docs/directory-theme-guide/">

<img align="middle" src="http://localhost/city/splendor/wp-content/themes/Splendor/images/ad-squar.jpg"></a></li>

<li><a href="https://templatic.com/docs/directory-theme-guide/">

<img align="middle" src="http://localhost/city/splendor/wp-content/themes/Splendor/images/ad-squar.jpg"></a></li>

</ul>
- Featured Listings: Add “T > Homepage Display Posts” widget in to “Homepage – Above Main Content Left” area.
- Popular listings: Add “T > Homepage Display Posts” widget in to “Homepage – Main Content” area.
- Sidebar with categories & Popular Posts: Add widgets like Categories, T > popular Posts in to “Homepage – Sidebar” area.
- Price Packages: Add Text widget in to the “Homepage – Below Main Content” widget area. We have used this code there to display price packages: http://snippi.com/s/mct1w9v
- Testimonials: Add “T > Testimonails” widget in to “Homepage – Above Footer” area.
- Footer:
- Widgets: For widgets, add widgets in to the “Footer” widget area.
- Footer Links: To add/edit links in to Footer, add a menu at Appearance > Menus in to the location “Footer”.
- Credit Text: Footer credit text can be changed from Wp-admin > Appearance > Customizer > Footer.
Category Page
Breadcrumbs
Displays the path to the category you’re viewing. The only breadcrumb option is available in Appearance ⇨ Theme Settings. It allows you to turn breadcrumbs On or Off.
Category title
The name of the category you’re viewing. You can change it by editing the category itself. Do that from wp-admin ⇨ Listings ⇨ Listings Categories.
View switchers
Controls how properties are displayed. You can choose from List, Grid and Map view. Settings related to this area can be found in Tevolution ⇨ Settings ⇨ Category page (tab).
Sorting dropdown
Choose the order in which the listings will be displayed. You can control which options are available from Tevolution ⇨ Settings ⇨ Category page (tab).
Category Description
Category description can be added from wp-admin ⇨ Listings ⇨ Listings Categories ⇨ Add/Edit Category ⇨ Description field. It is useful when you want to make the category pages SEO wise or when you want to give the description what that category is all about and will display which type of listings on the site.
Listings:
Listings added in to the category gets displayed here.
How to set a featured image?
When adding an property from the back-end use the “Featured Image” box located inside the right sidebar. You can also do it by simply uploading an image to the property image gallery.
6 – Category sidebar
To re-create this area navigate to Appearance ⇨ Widgets and insert the following widgets inside the “Listing Category Page Sidebar”
- Text: For Advertisement.
- T – Advanced Search: To enable search on the page
- T – Browse By Categories
This area can also have one more feature called List Filter. It will add awesome option for your readers to search the business easily by using AJAX.
Pagination
To control the number of listings displayed per each page go to Settings ⇨ Reading and edit the “Blog pages show at most” option. To make each category display all available properties just add a really high number.
Another look of Category page
Give your category page a look like below image only by doing two changes in to Wp-admin settings:
- Go to Appearance > Widgets > Listing Category Pages –Below Header. Remove the Category page map – Multi city widget from there.
- Go to WP-admin > Tevolution > General Settings > Category Page. Turn on the Option “Map view”. You can also make the map view to default view by selecting “Map” in to “Default page view” option.
[SCREENSHOT]
Manage your Submit Listing Page
How to Add/edit options on submit page?
Submit page can be created by using this shortcode:
| [submit_form post_type=’listing’] |
To add/edit/remove different options go to WP-admin > Tevolution > Custom Fields. Here you can add/edit/delete different fields. Please read more here.for this and explore the section more properly.
Specific fields on specific category. Is this possible?
Yes, off course. Go to Tevolution > General Settings > Submission Page. Enable the option “Category specific fields”.
This option is useful when you want to assign some specific fields to some specific category. Such as field like “Time Duration” to “Event” category.
Set your “Terms and Conditions”
Terms and Conditions are really helpful to define a business’s limits and the user’s limits. I would say it is a safeguard for any business. To enable go to Tevolution > General Settings > Submission Page. Enable the option “Terms and conditions”. If you want to give a link to a detailed “Terms and Conditions”, just add the link using anchor tag inside “Terms and condition text” box there.
Secure your site with Captcha
Stopping spam submissions is must. Captcha on different forms can be configured from Tevolution > General Settings > captcha. More details is available here: https://templatic.com/docs/directory-theme-guide/#generalsettings.
Different ways to Monetize
Monetization section is given at Tevolution > Monetization settings. Meanings of different options given there are very well explained in this guide – https://templatic.com/docs/directory-theme-guide/#monetization
There are different tricks and ideas you can manage the monetization section well. I am listing here some of the useful things as per I have experienced:
- Free Package: Allow users to list their business for a short period on the site for free. Here, “Amount” field will be blank.
- Get a small but regular fee: This is also a nice option to have continued revenue in coming. It will also build a user’s relationship. I would say it is small and steady. You can give pricing the way that users will pay a small amount on each fix duration to you.
To do so, enable the “Recurring package” option in to Tevolution > Monetization > Price Packages > Add/Edit price package page.
- Get paid high for more number of listings: You can also allow users to submit multiple number of listings on a single package purchase. For that package type “Subscription ” is required to be purchase.
Just a tip. I would have been given an offer like this:
Submit one listings at $10 while with “Subscription Package” you can submit up to 5 number of listings with $45. This way users can get attracted to add more business on the site.
- Specialize categories: Make some important and highlighted categories on the site which you usually highlight on Homepage, category, etc… For these categories some special price can be defined. I am sure business owners will be eager to list the business on the special category which is a plus part of the site.
To do so, go to WP-admin > Listings > Listing Categories. Add/Edit categories and there you can mention price for the category.
How to add different options to pay on the site?
By default theme provides you two systems to get paid:
- Bank Transfer
- PayPal
These systems can be configured at Tevolution > Monetization > Payment Gateways. More details on this is provided here.
Give more options to pay.
How to change currency?
Change the currency to accept payments in your currency amount from Tevolution > Monetization > Currency. Checkout more details here.
How to provide discount to your listing owners?
Hmm. This is a good way to have some more business on some special occasions or festive days. So as the other businesses do, you can also give some discounts to users to get the deal. Read more details: https://templatic.com/docs/directory-theme-guide/#managing_coupons
Where to see details of the payments?
Payment details can be seen at Tevolution > Transaction section. Entries of more than zero price only will come here. Transactions can be approve, rejected by the site owner this way.
Send expiration reminder
This is very important feature to get a re-business for existing customers. Send them reminders on particular duration before their listing expiration. So that they get some time and repay again to you by renewing the listing after it gets expired.
Reminder mail duration can be set as per your requirement at Tevolution > Settings > general Settings > Submission Page Settings > User listing expiry notification email option.
This Mail notification can be customized from Tevolution > Settings > Email Settings & Notifications > Listing expiration notification to user.
Get Users on site
How to allow visitors to register?
Go to WordPress General settings and enable the option “Anyone can register”.
Allow visitors to easily login with their social media accounts
There are many internet users like me who do not like to create new accounts on different websites. In such a case they just love to use their existing social media accounts on the new websites.
Directory also entertain such users by providing login feature through their social media accounts. To enable them, go to Tevolution > General Settings > Registration Page section. For how to get keys there, see the section named “Registration Page” in this guide.
Want some more information from users on their profile?
User specific fields can be created at Tecolution > Custom Fields > User Custom fields. These are used when you want to take some details from the listing owners and show it on the authors page. Foe example, we are taking their social media accounts. More details is provided here.
You should also visit how the author’s details are being displayed on their dashboard:https://templatic.com/docs/directory-theme-guide/#userdashboard
Add content easily as Admin
How to add different listing contents in bulk?
Until now we talked about process when listing owners will submit the listing. When site owner is thinking to add number of listings on the site, Bulk Upload is a good feature that can be used to save some time. More details on this is available here.
How can I add cities?
Go to Wp-admin > Manahe Locations > Cities > Add cities. From here cities can be added. Read this guide for how to add the cities and what is the exact feature of the the cities in to Directory.
How to add cities in bulk?
To add cities in Bulk, Bulk Import plugin is required. This section gives you more details –https://templatic.com/docs/directory-theme-guide/#bulkupload
We have some ready made CSV files of city list which might be useful to you while adding new cities. There are cities available for US, UK, Canada, Spain and more. Visit this link.
Cities
How to show nearest city’s listings to visitors?
Let the site visitors surf their nearest listings by choosing “Ask To Show Nearest City” or “Nearest City” option in to Tevolution > Manage Locations settings.
Difference between these two options is well explained in to “Location Tracking” section here.
I want to make State wise Directory. Possible?
Why not? See the “City selector levels” section in to the same Location Settings guide.
Get statistics of cities being visited on the site
Enable the option “Track city visits (city logs)” in to Manage location settings of Tevolution and then go to Tevolution > Manage Locations > City Logs. There you will see the details on which city has more visits, etc…
This can be very useful for the future site enhancement and business expansion. For example, If particular country’s visits are more than a payment gateway of that country can be added to the site.
Show “similar businesses” to visitors
It is a very good practice to give some choices when user is viewing something. So that he can find the most fit thing for him. Similar listings does the same thing. It can be configured from Tevolution > Settings > Detail Page section. Set the option “Filter related posts by” to fit your requirement of the site.
Charge extra money by “Claim Ownership”
Many directory owners users the theme to list the businesses for free initially. Once they approach the business owners, business owners can be told to claim their listings form this feature. It can be enabled from Tevlution > General Settings > Claim Ownership section.
You can also charge the users who are claiming for the listing by using “Paid Claim” add-on.
Give an attractive “Mobile App” look
Yes, you can make the site look like an App when users are surfing site on their mobile by turning option “Mobile app view (Beta)” on at Wp-admin > Appearance > Theme Settings.
Customize theme’s style by using Custom CSS Editor
Custom CSS Editor given at Wp-admin > Appearance is very useful o customize the theme’s style and though keep them when updating theme/plugins.
Want to change direction of content to RTL?
When you are usimg a RTL language, this is very essential and most time saving feature. Enable “Right-to-Left (RTL) text orientation” from Wp-admin > Appearance > Theme Settings.
List the listing owners on single page
You can list all the listing owners on a single by using below shortcode at Wp-admin > Pages.
[PHP] [tevolution_author_list role=’subscriber’ users_per_page=’8′][/tevolution_author_list][/PHP]
Get more familiar with customer by customizing the Mails & Notification
Go to Wp-admin > Tevolution > Settings > Email Settings & Notifications. Hereyou can change the content of the emails that are being sent to the site users.
Note that the shortcodes used there can not be exchanged in to the other email notifications. Shortcodes used in the particular mail can only be used there. Additional
Modify URLs of the site for SEO/user-friendly purpose
“Permalink Settings” section given at Tevolutin > Settings is really very important in terms to personalize the URLs of your site and making the SEO as per your needs.
If your tweaks start causing 404 errors in the front-end click on the “Reset all rules” button to undo your changes.
Add a new type of business listings by creating post types
Custom Post Types section at Tevolution > Custom Fields section is very helpful when you want to list different type of businesses on the same directory. Find more details here.
Create your Blog
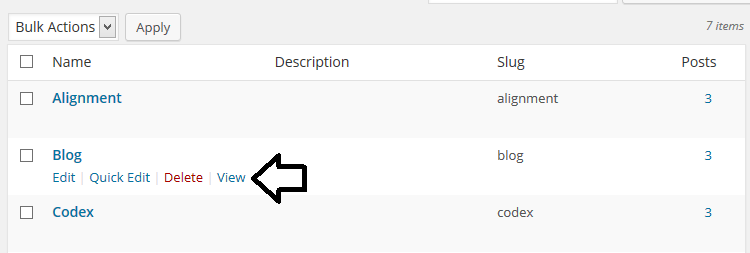
The Blog in Directory is essentially just a category holding individual posts. So… follow these steps to create a Blog
- Create a new category in Posts ⇨ Categories and name it Blog.
- Add posts to that category by going to Posts ⇨ Add New.
- By adding the posts our Blog page was automatically created. You can see it by going to Posts ⇨ Categories and clicking on the “View” link
Quick tips
- To increase the number of entries available per-page on category pages (default is 5), go to wp-admin ⇨ Settings ⇨ Reading and change the value associated with the “Blog pages show at most” option.
- I also recommend adding this Blog category to your navigation menu. Do that by going to Appearance ⇨ Menus and creating a new menu. Expand the categories dropdown, choose “Blog” and hit “Add to menu”. For details on creating custom menus watch our video tutorial.
Extend your Directory Business
Monetization Oriented
- Get some money by showing restricted content by using Access Manager
- Get some extra money showcasing more details of their business by using Fields Monetization.
- Charge users and Allow listing owners to view statistics of their business with Listings Statistics
- Turn your Directory theme into a fully fledged Real Estate portal.
- Earn money with providing various advertisements city wise by using Ad Manager.
Features Oriented
- Let your visitors submit business very easily with WYSIWYG editor.
- Allow listing owners to upload a voucher or coupon to their listings with Listing Vouchers.
- Provide various rating option to rate the listings with Multi Rating
- More cool features
Directory Resources Page
We have an “all-in-one resource page” that will assist you to set up your Splendor Directory site. This page contains all the resources and information that you will possibly need while setting up the website. Click here to go to the resources page.