
WordPress Multisite is an incredibly useful network feature that you can activate on your WordPress installation. Activating Multisite allows you to run several sites and manage them all from the same WordPress dashboard. You can choose whether you want these sites on the network to be as sub-domains or sub-directories. The beauty of using Multisite is that you don’t have to install WordPress, themes or plugins more than once.
One of the main advantages of activating Multisite is that you can use different or the same themes and plugins across several sites on the network. This wouldn’t be so awesome if you had to have a separate admin dashboard to control all sites on your network. Using WordPress Multisite lets you do just that – you can control all network sites from the very same WP admin dashboard.
Table Of Contents
1- What is multisite WordPress?
2- What is WordPress multisite used for?
3- How to install WordPress Multisite
4- How to configure network settings in WordPress Multisite
5- How to add a new website to the WordPress Multisite network
6- How to convert WordPress to Multisite
7- How to clone a site on WordPress Multisite
8- How to secure your WordPress Multisite
9- When to use and not to use WordPress Multisite
10- How to update themes in WordPress Multisite
11- How to Install themes in WordPress Multisite
12- How to Install plugins in WordPress Multisite
13- WordPress Multisite Requirements
14- How to give another admin ‘Super Admin’ role in Multisite
15- Choosing the best hosting for Multisite
16- Conclusion
Now that I have briefly explained what is WordPress Multisite, let’s delve into some more details. In this guide, I’ll walk you through all you need to know about installing WP Multisite, managing it, and a whole lot more. Installing it is actually the easiest part – it’s actually dead simple. I also aim to take you on a tour around the cool Multisite settings, updating and securing your network.
Let’s jump right into it and find out what WordPress Multisite is all about
What is WordPress Multisite?
In a nutshell, WordPress Multisite basically lets you manage multiple sites using the same dashboard. This powerful networking feature rolled out with the release of version 3.0 of WordPress back on June 17, 2010. Since then, using Multisite has made managing several sites from a single dashboard a real breeze.
In Multisite, you only ever need to install WordPress once. With this powerful site network feature activated, you can use the same theme and plugins to power more than 1 site. There is actually more practical use to this than meets the eye. Even though you can use the same theme and plugins to power different sites on the network, each theme or plugin can have its independent settings and configurations. This isn’t always the case though, some plugins have global settings. This means that the settings may not be configured independently per site.
When it comes to lite customization, adding CSS to hide an element in a theme or plugin can be added to a site’s ”Additional CSS”. You will find where to paste your modified CSS in the same place as with a single installation of WordPress – it’s in Appearance >> Customize. Adding the CSS for 1 site doesn’t make the element hidden on all network sites. Another example is if you had a plugin activated on all sites on the Multisite network. Each site that uses the plugin can have different settings/options for the plugin for each site. On the other hand, you can of course “Network Activate” a plugin or theme (if they are compatible with Multisite). Doing it this way means you would only need to activate/deactivate or tweak the settings only once. So in other words, all the sites on your network will be on the same settings that you’ve set. The good news is, all Templatic themes and plugins are WordPress Multisite compatible.
For users who need multi-section websites, WordPress Multisite really comes as a godsend. Using this type of WordPress installation allows you to easily manage and update all of your sites with a few clicks. I will cover updating themes and plugins on WP Multisite later on in this guide.
What is WordPress multisite used for?
You can use WordPress Multisite in several situations to make managing your sites plain sailing. The most common use is where you have several sections on your website. Imagine having to install WordPress, theme, and plugins for each website? This is the scenario where you’ll absolutely love the features Multisite brings you. Let’s say for example that you have a directory website with a section for business listings, a second for classified ads, and the third section for real estate listings. In a regular single WordPress installation, this will mean you’ll be installing WordPress 3 times. As well as this, you will also be needing to install important plugins like Yoast SEO or Wordfence 3 times.
The above is a classic example of when WordPress Multisite comes to the rescue. With Multisite installed and setup, you would only need to install WordPress and the 2 plugins only once. This just leaves you having to install a theme for each of your sections. In this example; you would need to install our Directory theme for the business listings, our Classifieds theme for the ads, and the HomeQuest theme for the real estate section. The beauty of using this type of network is that you can manage it all from one dashboard. Once you’ve setup your network sites, linking all sections on your website from each site’s navigation menu is the only thing left for you to do. As far as your users are aware, all sections will appear as if they are all on a single WordPress installation.
Another scenario where you would appreciate WordPress Multisite is if your site has totally unrelated sections. Let’s say for example you have a business website that’s showcasing your technical products. You can have your landing page on the top level of your domain. On a new sub-directory or sub-domain, you might want to install a new network site for your support, shop, forum, or a separate site for all of these on your network. You can see how many times you would’ve had to install WordPress and plugins. By installing Multisite, you only have to install WordPress once. Creating new network sites in Multisite is literally done in 2-3 seconds – it takes longer to type the name for your new site than it takes for it to be generated for you.
How to install WordPress Multisite
Now that we’ve covered what is WordPress Multisite and how you can use it, let’s start installing. You can follow the steps below to activate and setup Multisite. The quick guide assumes you already have WordPress installed. This can be a new WordPress installation or an existing installation.
Before we get started, please make sure to backup your database and wp-config.php and .htaccess files.
Step 1 – Connect to your website via your favorite FTP client. You can also use the file manager on your hosting cPanel if you prefer.
Step 2 – Download the wp-config.php file. This is found in the top-level directory which is basically the WordPress folder on the server.
Step 3 – Open the wp-config.php file and find the following line:
/* That's all, stop editing! Happy publishing. */
Step 4 – In the line directly above that, paste the following code:
define('WP_ALLOW_MULTISITE', true);
Step 5 – Save and close the wp-config.php file and upload it back to the server to replace the existing one.
Step 6 – Deactivate all plugins if any are active.
Step 7 – Now you need to install the network in your dashboard by going to Tools >> Network Setup.
Step 8 – Once you’ve installed the network, you need to follow the 2 steps on the next page you’ll see to activate the network. You need to copy the code you see on the page and add it to the wp-config.php and .htaccess files.
The page looks like this with the codes that you need to copy and paste
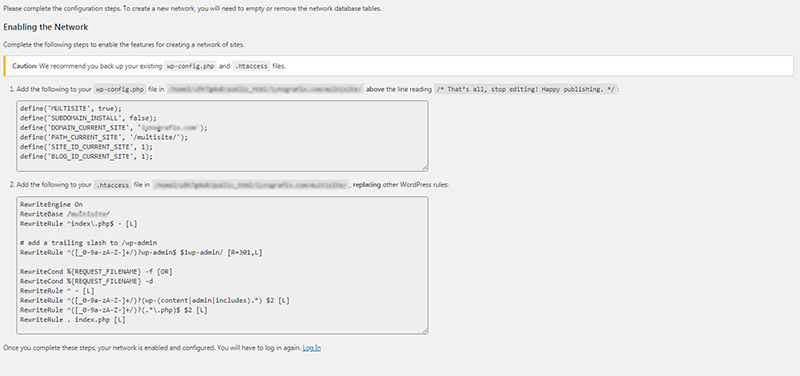 (the code in the above screenshot will be specific to your website)
Step 9 – Refresh the WP admin dashboard page that you are on.
Step 10 – Login to your WP admin dashboard again.
Congratulations… you have just completed installing your WordPress Multisite network.
How to configure network settings in WordPress Multisite
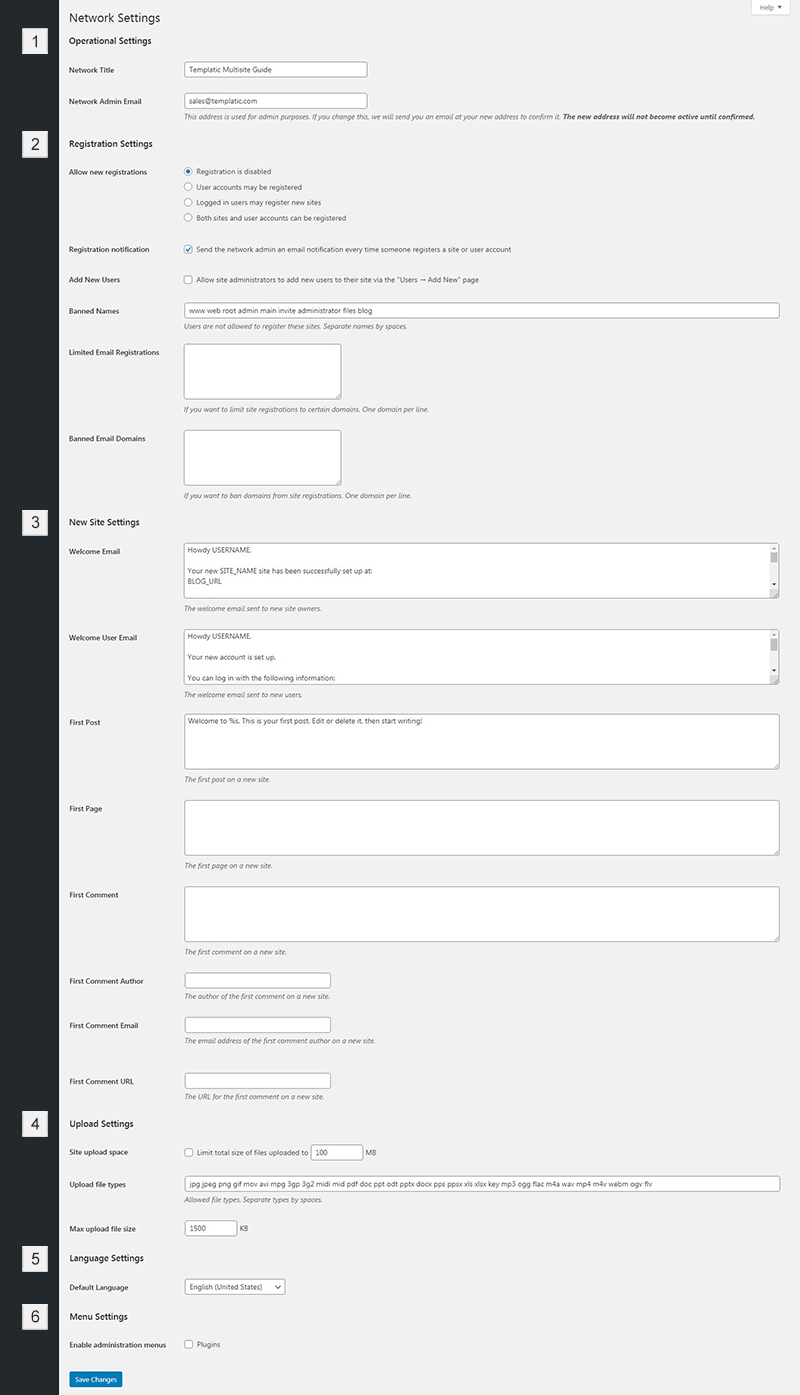
Once you have installed WordPress Multisite, your admin dashboard will have plenty of extra goodies and tweaks. You will find the network options in a new area at the top of your admin dashboard called ‘My Sites’. You can go ahead and hover-over ‘My Sites’ and drill down to Network Admin >> Settings. This is where you will find a whole set of new options you’ll really only need to set once.
Okay, all settings are pretty much self-explanatory here but I’ll guide you through each of the settings, with my recommended setting and why.
1- Network Settings
Operational Settings
Network Title = This is basically the name that you wish to give your network.
Network Admin Email = This is the email address you’ll be receiving alerts whenever someone registers an account, or a site if you’ll be allowing site registrations (see the option for this in ‘Registration Settings’ below).
This is by default, the email address you’ve entered when installing WordPress. In most cases, you wouldn’t want to enter a different email here that’s different from the super admin email address.
2- Registration Settings
Allow new registrations
Registration is disabled = Choose this if your website does not need users to be able to register. You would want to disable registrations if for example, your website is purely informational with no functions that require a user to register. You might also want this option selected if your website doesn’t even allow users to leave comments or if users don’t need to register to leave a comment. Where registrations are not necessary at all, keep them disabled, if just as another layer of security.
User accounts may be registered = Choose this option to allow frontend users on the default WordPress ‘Subscriber’ role to be able to register.
Logged in users may register new sites = Only choose this if you’ll be allowing users to create subsites on your network. Unless you’re creating a user blogging network for example, this option should never be activated.
Both sites and user accounts can be registered = Only choose this if you’ll be allowing users to register and be able to create sites on your network.
Registration notification
Send the network admin an email notification every time someone registers a site or user account = Activate this option so you receive an email alert whenever someone registers an account or a site on your multisite network.
Add New Users
Allow site administrators to add new users to their site via the “Users → Add New” page = Activate this if you wish any user on the site with an ‘Administrator’ user role to be able to add users to any site on the multisite network. You might want to activate this even if you’ll be the only person who will be creating sites on the network. Leaving this option deactivated means you’ll always need to be logged in as ‘Super Admin’ on your network so you can add users to any site.
Banned Names = Providing that you have activated the option to add sites in the above setting, you can enter the names of sites you don’t want users to be able to register. I recommend you also enter names here which sound similar to the title of your website or brand name. In other words, you would want to disallow names that someone would register to trick people into thinking that their site represents your site or brand name. There is no limit to the names you can enter here. just think of all the names anyone might choose and enter them.
Limited Email Registrations = You can enter the only email domains you wish to allow users to be able to register from. As an example, you would enter gmail.com on one line and hotmail.com on another line if you only want users to be able to register if their emails are from either of these email providers. I am not sure how many sites would want to limit the number of users. If you can think of a good reason to use this limiter, brilliant – the option is there for you. Do be aware that the limitation also applies to admin when adding users on the backend as well. The limitation does not apply to any existing users on the network.
Banned Email Domains = As the opposite to the above option, this option lets you enter email domains you don’t want users to be able to register with. You can enter the email domains here (1 domain per line) that you want to block. For example, if you don’t want any user to be able to register on your website with a Gmail, you would enter ‘gmail.com’ on one line.
You might want to use this option for offending users you wish to block from a particular spamming domain for example. To get the domain to enter, take a look at the offending users and see if you can spot a pattern to catch the domain to block. It is not always easy to simply block a whole offending domain as spammers usually use random email domains. The option is there should you wish to use it for purposes other than to just block spammers.
3- New Site Settings
This section in the multisite network settings lets you edit any of the email templates. Depending on whether or not you’ll be allowing users to register user accounts or new sites on the network, you’ll find all of the available email templates here to edit.
Welcome Email = This is the email that gets sent to someone who creates a new site on your network. You will need to allow site registrations first on the above ‘Registration Settings’ if you wish to allow users to create new sites on your network.
Welcome User Email = This is the email that gets sent to someone who registers a new user account on your site.
It’s worth mentioning that this is not the email template if ‘Super Admin’ creates a user account on the network. In this case, the user will only be receiving an email with the login details. This is also not the email template a user would receive if ‘Super Admin’ creates a user account from the dashboard of an individual site on the network if the ‘Skip email confirmation’ is checked. If the email skipped by ‘Super Admin’ while creating the user account, the user will only receive an email with the login details. This email template will be sent if ‘Super Admin’ does not select the ‘Skip email confirmation’ option. If selected, the user will receive this email template when the user clicks on the link in the confirmation email.
First Post = This template for the first post on your multisite network. The text you enter here will be the body text of the first sample post on a new site. You can consider this first post as the ‘Hello World’ post you see whenever you install WordPress for the first time. It’s advisable to enter some sample text in this template that also includes an explanation of where this sample post can be deleted.
First Page = When a user creates a site on your multisite network, there is always a sample page. By default, the sample page just comes with a title and no text. This template lets you enter any text for that sample page to carry. You can leave it blank if you like but I would put it to some good use since it’s there. As an example, you could perhaps enter the text that acts as a guide to your users. You can, for example, inform anyone who creates a site on your network how to get support, contact you, and so on. This is just an example so you can basically use this page to inform your users about anything you like. Leaving this page template blank is the best option if you are not sure what text to enter. The sample page will still be created, even without any text – it will just have its ‘Sample page’ title.
First Comment = Each new site that gets created on your network has a sample page. The sample page also comes with a sample comment which is empty. In this template, you can actually enter any text that you wish the sample comment to have. Unless you can think of something more imaginative for a comment on a page that will get deleted anyway, I suggest you put something as simple as ‘This is a sample comment on your new site’.
First Comment Author = This is where you can give a name to the author of the sample comment above. By default, the sample message is labeled as being left by ‘Anonymous’. You can enter any name here that you wish the sample comment’s author field displays.
First Comment Email = Enter any email you like to show with the author of the above sample comment. By default, if you don’t enter an email here, the comment will not show any email address.
First Comment URL = Enter any website address you would like to show with the author of the above sample comment. By default, if you don’t enter any URL here, the comment will not show any website address.
4- Upload Settings
Site upload space = As you are allowing users to create skite on your network, you might want to set some limits. In this section of the Multisite settings, you can control the maximum space each site is allowed. By activating the ‘Limit total size of files uploaded to’ option, you can enter a number of Megabytes each site on your network is allowed to have as a total space. The limit you enter here only applies to individual sites on your network. Any number of maximum allowed total Megabytes that can be uploaded shows on the admin dashboard of each site.
I strongly recommend you activate this limit on each site. You might want to do this in case your hosting has a limit on the total number of files. You will need to contact your host to know the limits set on your hosting account before you activate this option or not. It’s worth mentioning that some hosts claim they allow you unlimited space and bandwidth and so on. That being said, I have come across a couple of hosting companies that offer this but actually have a limit on the total number of files the account is allowed to have.
What can happen if your hosting account exceeds this limit?
- The host may suspend your account with all domains on it.
- The host may not be able to perform an auto backup of your sites.
- The host may not allow you to upload any more files.
- The host may apply all of the above, combined.
Please do your own research and make sure your network will not adversely affect your hosting account.
Upload file types = You might want to add or remove certain file types that are allowed to be uploaded on all sites. This field contains all the file types that are allowed to be uploaded to any site on your multisite network. Please be careful what files you add here. Adding the wrong file type here can pose a security risk. On the other hand, if you remove a file type, it may prevent users from being able to upload a harmless and required file to a site. I recommend that you leave the default file types if you are not sure what you are doing.
Max upload file size = This limit applies to any single file that a user uploads. The number is set to 1500 kilobytes by default. Enter a maximum upload file size based on what you deem as a required file size your users will need. Keep in mind that any number you enter here cannot exceed the maximum allowed file size that’s set by your hosting company on your account. The maximum upload file size varies from host to host. I recommend you contact your hosting company so you know what is the limit on your account.
Most hosting companies will let you change this limit on your account’s php.ini file. That said, it really depends on the type of hosting plan you have. In some cases, certain hosting plans on certain hosts do not even allow you to make changes to the maximum upload file size limit. I highly recommend you contact your hosting company before entering a number in this field. No number you enter here will have any effect if it exceeds the allowed limit on your hosting plan.
5- Language Settings
Default Language = You can choose the default dashboard language for any site that gets created on your network. If you allow users to create sites on your multisite network, this is the language that each new site will have its dashboard displayed in. A site admin can change this language from Settings >> General.
The user will only be able to select from the languages that are loaded on the network. As ‘Super Admin’, you can go to My Sites >> Network Admin >> Settings. Choose any language and save changes. Repeat this step for any language that you wish to make available in the dropdown to admins on their own sites on your network. In other words, unless you load a language as ‘Super Admin’, a user who is admin on a site on the network will not find this language to select in the drop-down.
6- Menu Settings
Enable administration menus = This option is where you can allow/disallow site admins to have access to the ‘Plugins’ section on each individual site’s admin dashboard. By default, this is not checked so only the networks ‘Super Admin’ can activate or deactivate plugins that have already been installed and enabled for any site on the network.
You can check the ‘Plugins’ option if you wish to allow site administrators to have access to plugins. As above, the administrator of any site on your multisite network will have access to plugins on the site they are an admin on. Activating this option will only allow a site’s admin to activate or deactivate an already installed plugin on an individual network site.
I recommend you leave this option off so site admins may not access the plugins section. You might want to disallow access to plugins if for example, deactivating a certain plugin may break the site.
Regardless of which option you choose, on multisite installations, only the ‘Super Admin’ can install or delete plugins.
How to convert WordPress to Multisite
Good news, converting an existing regular WordPress installation into Multisite is possible. A word of caution though, as you’ll be making such a big change to a live site – do make sure you perform a full backup. I won’t cover backups here but I recommend you make a backup of your database and files just in case anything goes wrong.
To convert your WordPress installation you’ll be following the same steps as above to install Multisite. You can go to the ‘How to install WordPress Multisite’ above on this guide by pressing here.
Before working on the conversion to Multisite on a live site, I recommend you install WordPress on a development site first. You can then turn that installation of WordPress into Multisite. Making such a change on a live site is not really recommended if you haven’t done this before. Seeing what gets changed on a development site first will at least let you see exactly what will change or be affected. Converting a single WordPress installation to Multisite is not all that difficult. Working on a test site will just mean there will be no surprises. I also recommend you replicate the live site on your development site. Try to add the same plugins and theme you have on your live site to your development site. Doing your conversion to Multisite on a test site first is of course an extra step but it’s always better to test first before performing such a big change rather than on a live site.
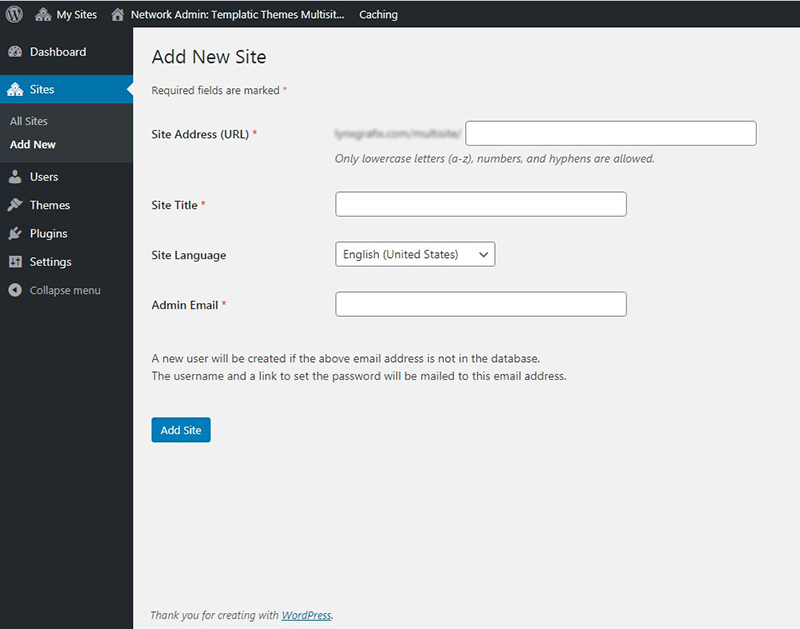
How to add a new website to the WordPress Multisite network
As being the biggest reason for using WordPress Multisite, adding a site to the network is very simple. No longer do you have to create a sub-directory or sub-domain and install WordPress and then a theme. To add a site in WordPress Multisite, all you’ll need to do go to Site >> Add New.
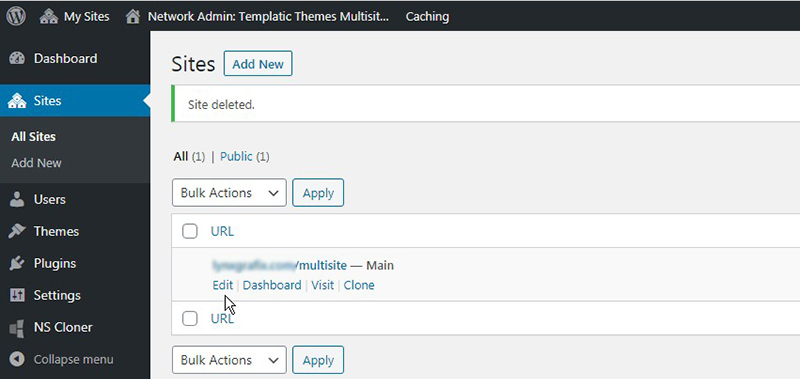
How to clone a site on WordPress Multisite
Now that you have installed a website on your network, you might need to clone it. You will find that using Multisite saves you a considerable amount of time in building websites. That being said, you would still need to go through all the settings, changing colors and so on. Imagine that you can clone any site on your network in a few seconds – sounds too good to be true right? Well, this is exactly what you can do if you install the NS Cloner plugin. Do we get a commission for recommending this plugin? The true answer is ‘No’ we don’t, we should though 🙂 I have personally used this plugin for years and it’s proven to be a priceless tool when it comes to duplicating sites on a Multisite network.
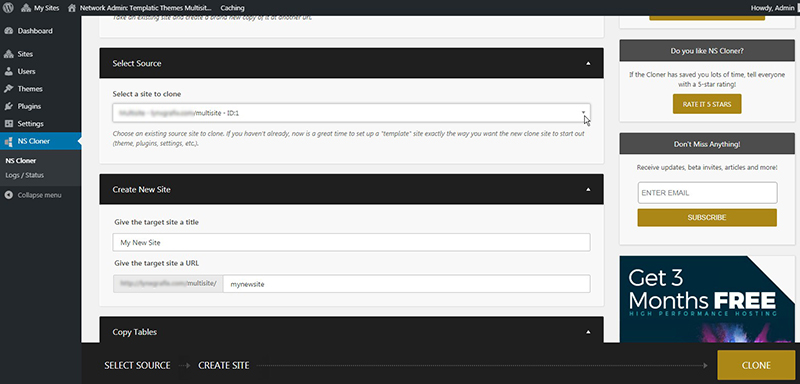
To clone any site on your network, all you have to do is to install NS Cloner plugin and within seconds, you’ve got yourself an exact clone of any site. This plugin creates a new section on the dashboard that gives you various options for cloning sites on your network. You’ll basically be able to choose any site you wish to clone from the drop-down of all sites on your network, name your new site, give the site its unique URL and press the ‘Clone’ button. That’s about it really – it’s as simple as that. The plugin is usually able to clone a site in under 10 seconds.
You will find the plugin is very easy to use and best of all, it’s a free plugin. The plugin also has a premium version. It’s up to you, but I found the free version adequately does the job and does it well.
How to secure your WordPress Multisite
Securing your Multisite installation isn’t really different than a regular WordPress installation. That being said, as you’ll be having more than one site, you’ve got more reasons to keep your network secure. Just imagine all the stress and the lost hours or days when 1 site gets hacked. Having more than one site on your network means all the stress and lost time will be multiplied by the number of sites you have. As a very basic step that many people forget to do to keep a site secure is to always make sure you’re running the latest version of WordPress, theme and all plugins.
The good news is, if you’ve installed WordPress Multisite, you won’t have to update WordPress, a theme or plugin more than once. Assuming you’re using one theme on more than one site, you will only need to update the theme once. In this case, all of the sites that are using the theme on the network will have the theme updated. The same applies to any plugins you’ve installed that are used by more than one network site.
Very importantly, don’t forget to keep every single site on your network updated. As ‘Super Admin’, make sure that there aren’t any abandoned test sites that are running on old and un-updated themes or plugins. You can bet your bottom dollar that a vulnerability on any site, “pardon the pun”, will be the red carpet to welcome any hacker through the ‘backdoor’. As most attacks on sites are automated, don’t think for a minute that a test site that doesn’t even appear on Google will leave the door wide open to hackers. Depending on the hacking attempt, cross-infection attacks will bring down or infect all sites on your network. You might also be unlucky and have all other sites on your hosting account infected or brought down. Keeping track of all plugins and themes that need updating can be quite a task if you have so many sites. One of the great options the Wordfence plugin has is that it can send you email alerts if WordPress, themes or plugins require an update.
As well as keeping WordPress, any themes or plugins up-to-date, you must really consider installing a good security plugin. Make no mistake, you should install a security plugin before you even open your site to the public.
There are a few good security plugins out there but the two that stand out are: Wordfence and Sucuri. I won’t go into which of the two you should use. A simple search on Google will bring up several comparison articles between the two security plugins. My personal favorite is Wordfence and I’ve used it for years. Both plugins are free and they also have a premium version.
When to use and not to use WordPress Multisite
Using Multisite can be a godsend in some cases and a curse in other cases. As practical and time-saving this feature in WordPress is, it’s not perfect to use in all situations. To help you decide if multisite is good for you or not, let’s go through all of the significant pros and cons of using WordPress Multisite.
Pros of using Multisite
1- Managing all your sites on the network from 1 admin dashboard.
2- Updating WordPress once applies to all sites on your network.
3- Updating a theme once applies to all sites that use the theme on your network.
4- Updating a plugin once applies to all sites that use the plugin on your network.
5- Ability to create new sites without having to reinstall WordPress.
6- Each site on the Multisite network gets its own admin dashboard.
7- You don’t need to backup each site separately. You only need to backup your Multisite installation and all sites on the network get backed up.
8- Multisite saves resources on your hosting account. You don’t need to upload WordPress, themes or plugins more than once.
9- You can easily create or add users to any site on your network.
10- Easily maintain more than 1 site from the same admin dashboard and hosting cPanel.
Cons of using Multisite
1- In case your site is attacked by a hacker, it’s very probable that all sites on your network will be hit.
2- You cannot make custom modifications to the core WordPress coding for 1 site. Any changes you make will apply to all of the sites on your network – you might not want this to happen.
3- All sites on Multisite run on 1 database. This might not be perfect for speed since an influx of traffic on 1 site could slow down all other sites. The severity of this effect will of course depend on the performance of the hosting your site is using.
4- Not all plugins are Multisite compatible. In some cases, a theme might also not perform very well in a Multisite environment.
5- As easy as Multisite has made it to only have to update a theme or plugin once, an update can also break more than 1 site. As an example, you have 10 sites that are using 1 theme and there is an update available for that theme. In a perfect world, updating that theme should not pose a problem to any site that’s using it. On some occasions, this isn’t really the case – instead of dealing with 1 broken site, you’ll be dealing with 10 broken sites.
You might think that you’ll just be dealing with 1 theme to figure out how it broke the sites, very true. You do however have to consider that you’ve got downtime on 10 of your sites, not just 1 of them. Now, this isn’t really a big deal if you’re not earning from these sites. If you have a site that’s making you money going down, it’s a problem – imagine 10 of the sites are down.
6- Any downtime will affect all of your sites on the Multisite network.
7- Your database is larger than that of a single WordPress installation. The database size also grows faster. This might push it over the maximum size limit to import it in case you need to import it in phpMyAdmin for any reason.
8- All of the sites on your network are obviously hosted on the same host and plan. Using Multisite means you won’t be able to freely change the hosting plan or host for any particular site. Changing the hosting company or plan applies to all of the sites on your network.
9- Only ‘Super Admin’ can install themes or plugins on the network. This limitation might not be ideal if you’re allowing other admins to manage some of the sites on your network.
10- Multisite is not for you if you’re planning to customize the look of each site. Since you can only install a theme or plugin once, serious customization on individual sites aren’t possible. That’s of course unless you start creating child themes to apply your customization on. If you’re happy with that, then Multisite is for you.
How to update themes in WordPress Multisite
Updating themes in Multisite is easily done but you need to do it as ‘Super Admin. It is not possible to update themes from individual sites on the network. To update a theme, go to My Sites >> Network Admin >> Themes and choose the theme you wish to update.
Since a theme might be used on more than one site on the network, I recommend you backup the theme first before updating it. After updating a theme, it might be worth checking all of the sites that are using it to check if anything was broken. If you see that all sites look fine, you’re all set. Updating a theme on the Multisite network updates it on all of the sites that are using it.
How to Install themes in WordPress Multisite
Installing new themes in Multisite is slightly different than on a single WordPress installation. As it’s a network, any theme you wish to install on a network site has to actually be installed on the network first. Installing new themes on WordPress Multisite is only possible if you are logged in as ‘Super Admin’. Once you’ve logged in, go to My Sites >> Network Admin >> Themes and choose ‘Add New’ from the top of the screen. You can now upload a theme as you normally would in a single WordPress installation.
Now you’re probably wondering how to activate a theme on a site on the Multisite network. This is done by first enabling any theme that you’ve already uploaded to the network (as in the above step).
To enable any theme for a site, go to My Sites >> Network Admin >> Sites. Choose the site to enable a theme for by hovering-over its ‘Edit’ option.
The next step is to click on the ‘Themes’ tab and click on ‘Enable’ which appears under any theme you wish to enable for the site on the network. You can also choose any number of themes by putting a check next to them and using ‘Bulk Actions’ >> Enable and Apply. The only themes you’ll be able to see here are the ones you see that have already uploaded from My Sites >> Network Admin >> Themes.
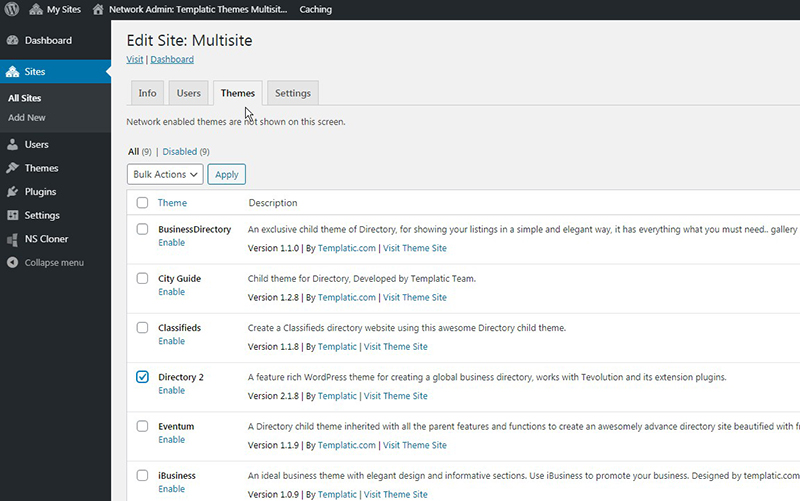
You can now go to the dashboard of the site you’ve activated a theme or more in the above steps. Once you’re on the site’s dashboard, go to Appearance >> Themes and you will see any theme you’ve enabled for the site.
How to Install plugins in WordPress Multisite
To install plugins on a Multisite installation, you need to be logged in as ‘Super Admin’. Now you need to go to My Sites >> Network Admin >> Plugins. The screen is pretty much the same as in the single WordPress installation. As in the case with themes, any plugin you wish to activate on a network site, the plugin has to be installed on the network by ‘Super Admin’ first.
After uploading any plugin on the network, you can navigate to the dashboard of any site to activate it. Once you are on a site’s dashboard, you can simply go to the ‘Plugins’ section in the left admin sidebar to activate it.
You have to bear in mind that not all WordPress plugins are Multisite compatible. In reverse to this, some plugins actually force you to ‘Network Activate’ them before they can be used. These plugins will only have the ‘Network Activate’ option. You do not later have to activate ‘Network Active’ plugins on individual sites on your network – they will be active on every single site.
You might want to first check if you would want other admins to have access to ‘Network Active’ plugins. If you do activate a plugin on the network, in most cases, each site can have its own configurations for the plugin. Please check what other admins can see before you decide that you’ll give other admins access to a plugin by network activating it.
WordPress Multisite Requirements
1- You need to have an existing regular WordPress installation. You will be converting this installation into a Multisite installation.
2- You need to have logins to a user with the ‘Administrator’ role on the WordPress installation.
3- You need to have access to the WordPress installation by FTP or via the File Manager on your hosting account’s cPanel.
How to give another admin ‘Super Admin’ role in Multisite
In a situation where running a big network of sites becomes too much of a task for you, appointing other admins can be of help. In WordPress Multisite, you can grant other users the ‘Super Admin’ role. Needless to say, you need to be very careful with this level of access granted to any other user.
Another user with the ‘Super Admin’ role can do everything you can do as ‘Super Admin’ except to delete your user on the network. That being said, be aware that the user you’ve given this role can edit your user profile and revoke its ‘Super Admin’ privileges on the network. Use this feature with extra caution.
To make another user ‘Super Admin’, go to My Sites >> Network Admin >> Users.
1- Edit the user you wish to give the ‘Super Admin’ role.
2- Select ‘Grant this user super admin privileges for the Network‘.
![]()
3- Update the user.
Choosing the best hosting for Multisite
Hosting your WordPress Multisite is possible with almost all major hosting companies. As the network features require some special server permissions, it’s best you ask your hosting company first before attempting to convert an existing WordPress installation to Multisite. In case you are looking for new hosting, you will find that Bluehost (our recommend host) is perfect for hosting Multisite. Bluehost is used by many of our customers and we have had nothing but positive feedback from our customers for using this hosting company. The host is not only great if you’re looking at hosting Multisite, the company is also great for the single WordPress powered websites.
Conclusion on using WordPress Multisite
Using WordPress Multisite is an amazingly easy and practical way of managing more than one site from a single dashboard. The powerful network settings in WordPress allow you to fully control 1, hundreds, or even thousands of sites. Multisite is built in a way that makes updating themes and plugins super-easy. No longer do you need to install WordPress, themes, or plugins more than once. Managing sites, themes, plugins, and users is all done from your network admin dashboard. By installing Multisite, you don’t need to login in and out of different dashboards to do any of the things above.
Those were the advantages of using Multisite, now the downside…
As brilliant as Multisite sounds, it’s not ideal or even a good idea to use in all situations. I have highlighted the ‘Pros and Cons’ above but in summary, the multisite setup is not the best way to go if you want to have freedom with all sites. The limitations when using Multisite are primarily if you plan to apply custom design or functions to individual sites, you’ll find it much easier if you use single WordPress installations. Another important and probably the biggest put off in using Multisite is that if anything goes wrong, like getting hacked, all sites go down. One more thing you might not really sing and dance about is that, it doesn’t matter whether you have 1 or thousands of sites, everything runs from a single MySQL database. That’s not very good news for overall performance.
I really hope you’ve enjoyed reading this guide on WordPress Multisite.