One of the best things about creating a website is that anyone in the world could potentially read your content. The problem is of course if they do not speak your language. That is why translating your website is so important.
A multilingual website is one of the most effective ways to increase your traffic without breaking the bank on ad campaigns.
Below we will take you through how to do create a multilingual website that will see you welcoming customers from all over the world. Here are the steps:
- Choosing your plugin
- Choosing your theme
- Selecting the languages to translate into
- Translate content yourself
- Assign individuals to translate content
- Assign a professional service to translate content
- Translating posts and pages
- Translating taxonomies
- Custom fields
- Images and other media
- Menus
- Widgets
- URLs
- Themes and plugins
1.Choosing your plugin
There are a number of great multilingual plugins for WordPress with their own advantages. But for this website, we will choose the most popular – WPML.
WPML is used by more than 700,000 websites and offers a number of features for your multilingual website:
- The ability to translate all elements of a website including pages, posts, strings and SEO content.
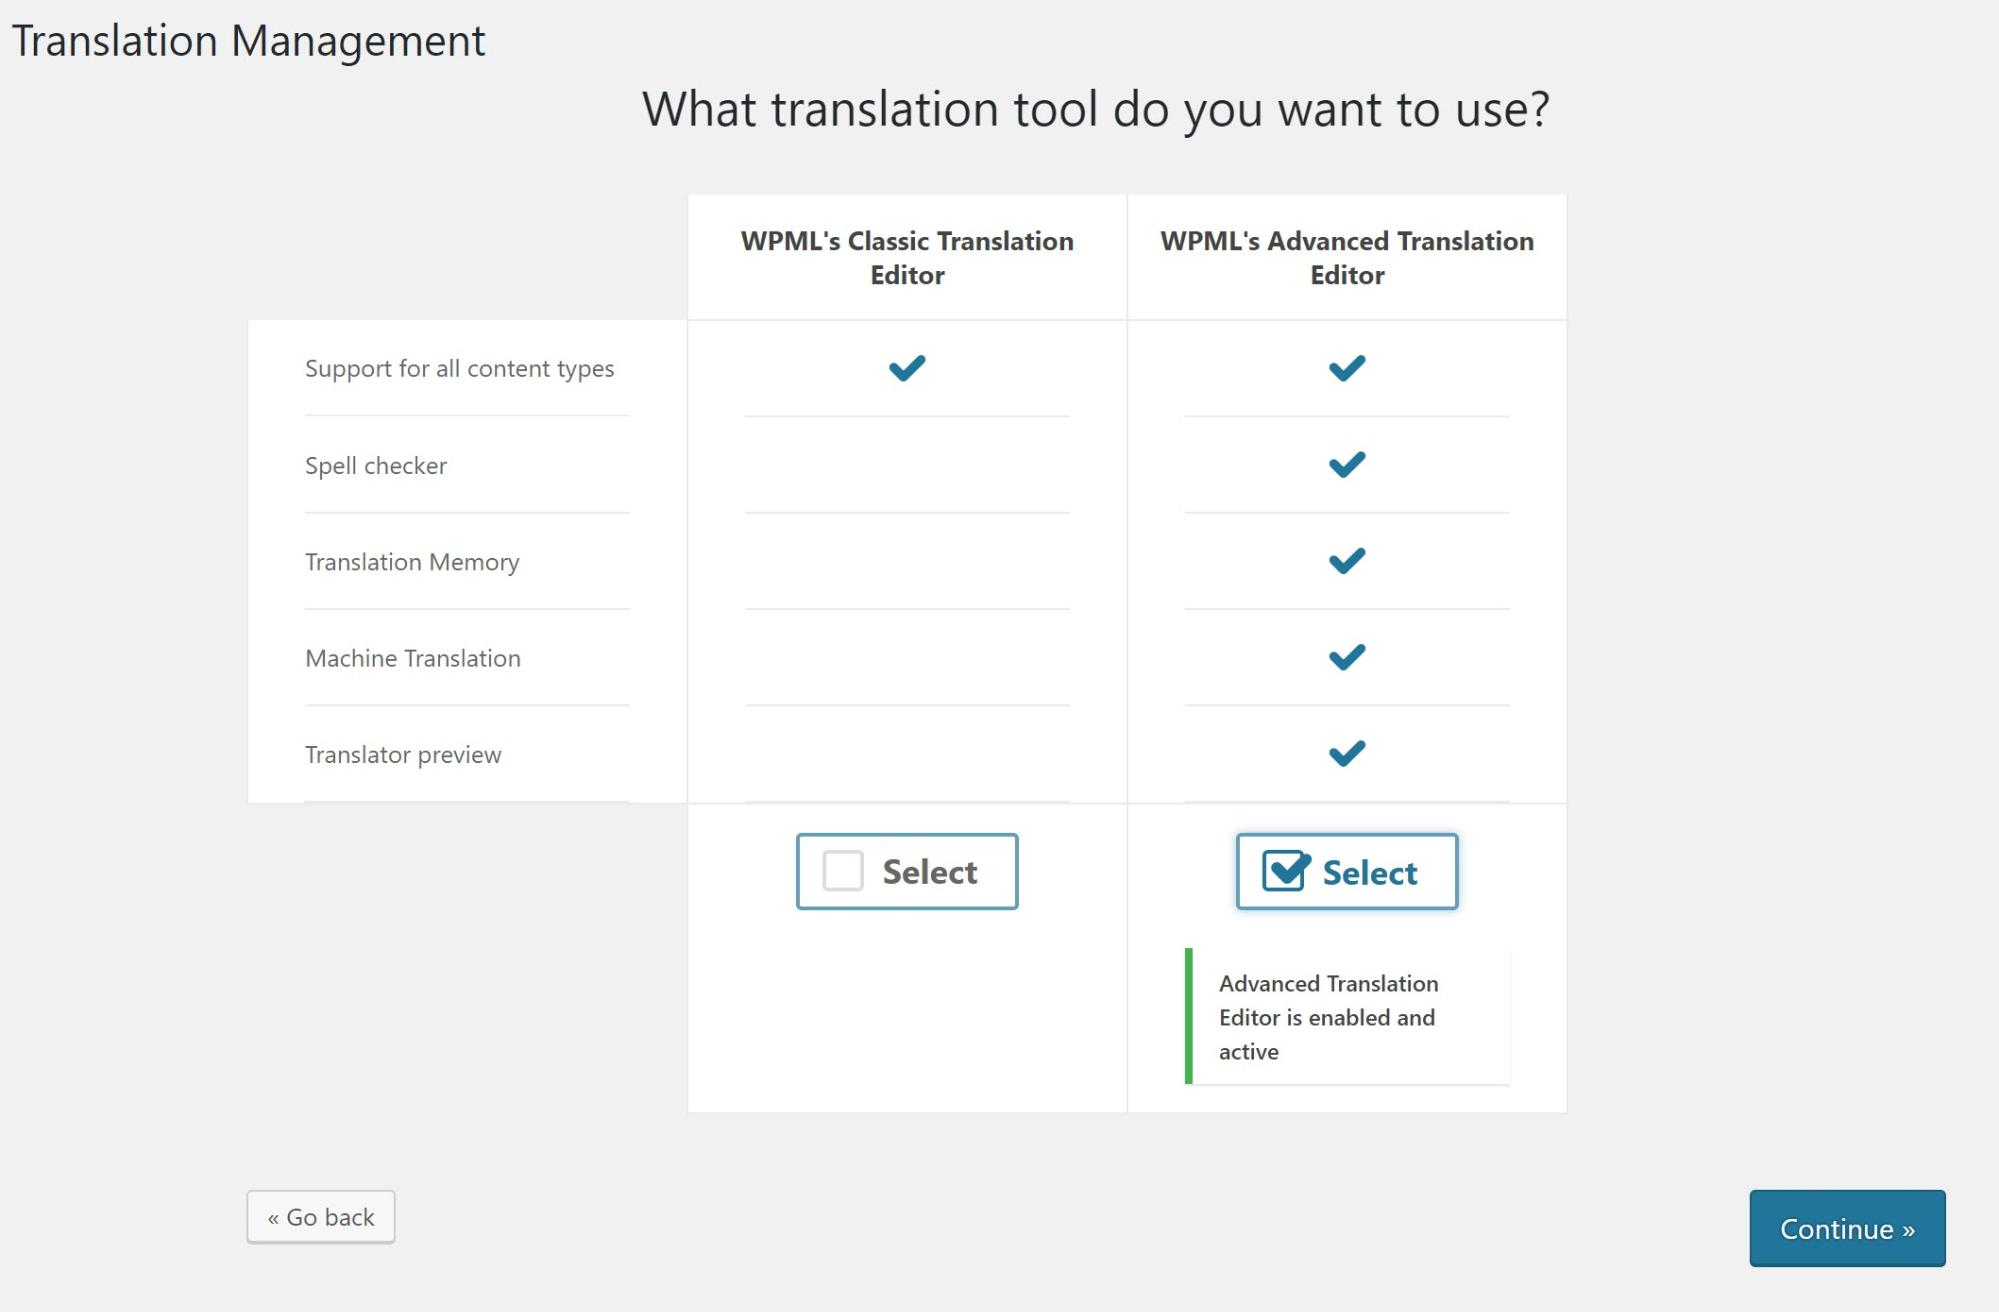
- WPML’s Advanced Translation Editor offers machine translation, a spell checker and a glossary so you can translate your content quickly and accurately.
- A revamped String Translation that reduces page load times with WPML by more than 50% meaning it will not impact your performance. Not only that, but WPML offers a 12 month guarantee of your money back if there’s any performance problem it cannot resolve.
- Compatibility with major plugins and themes.
- Works with major page builders including Elementor, Divi Builder and WPBakery.

2. Choosing your theme
Now that you have the engine for your multilingual website in WPML it is now time to choose the body. Regardless of the type of website you will want a theme that looks and works great.
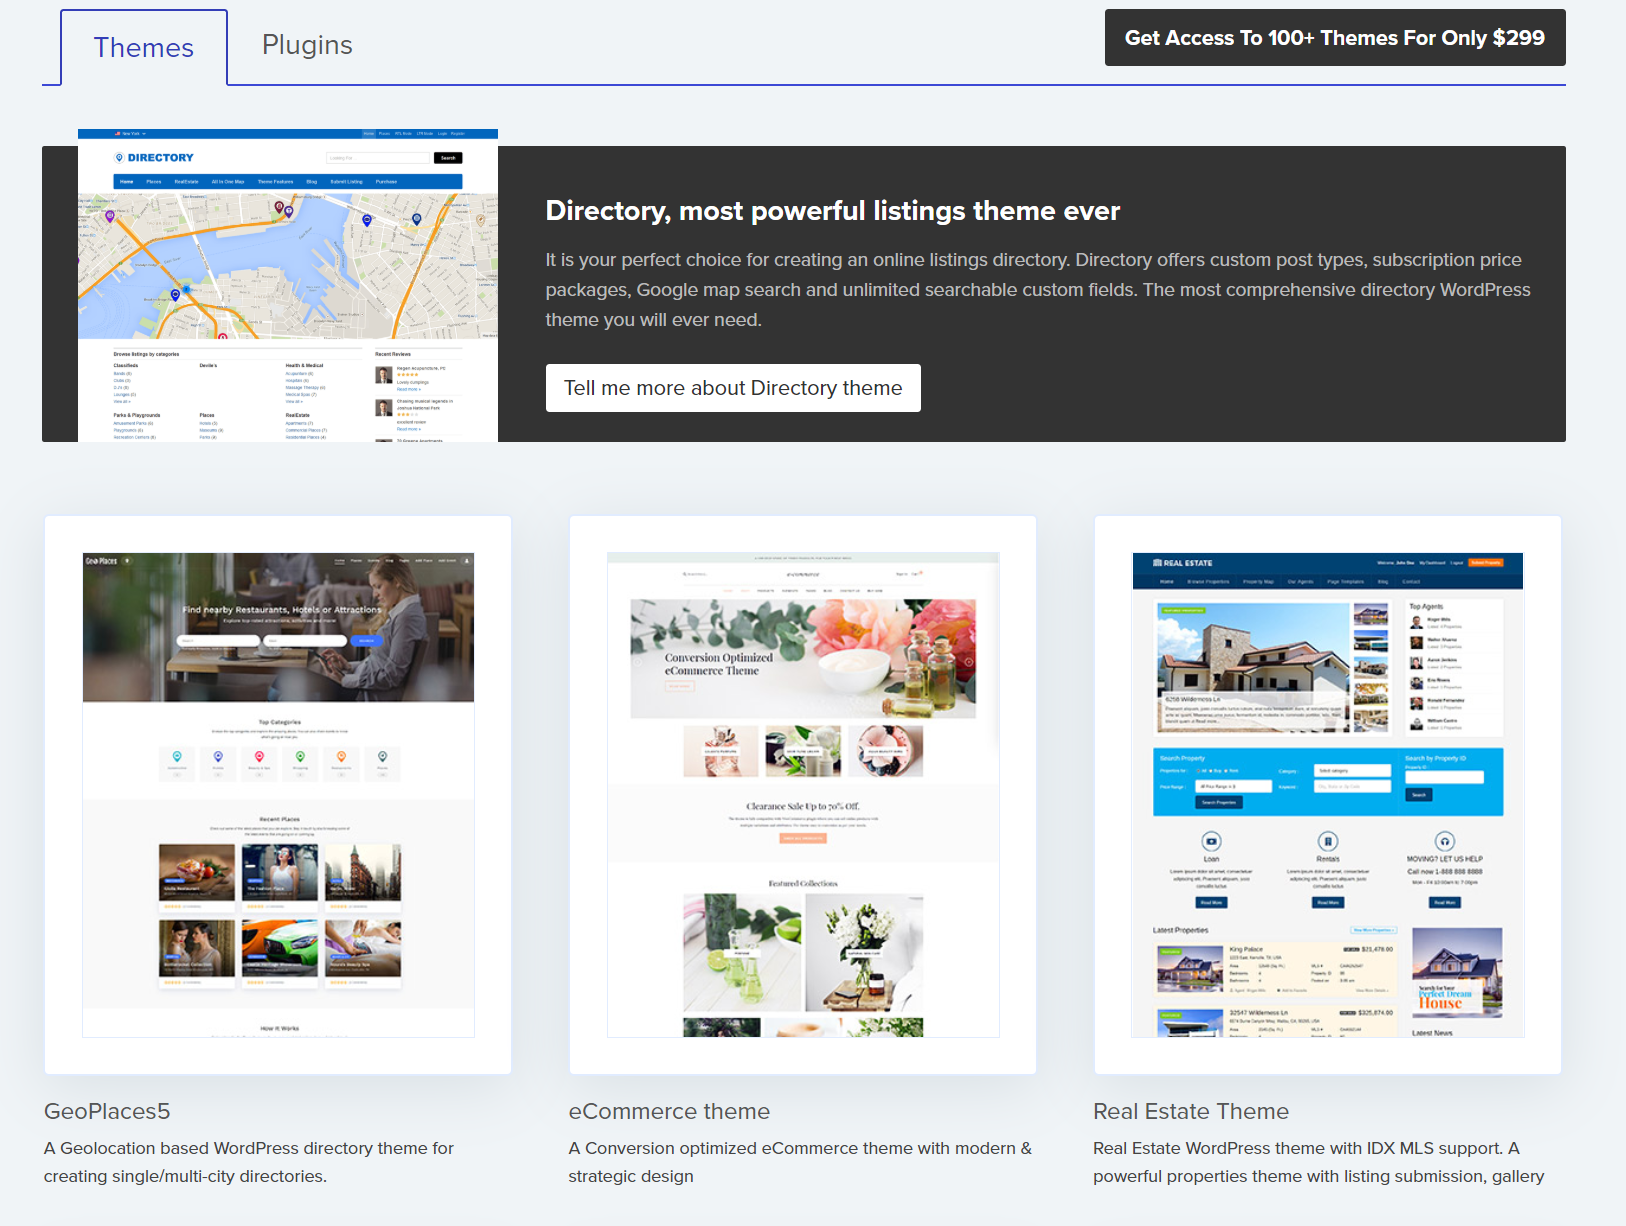
The good news is that you can find a theme to fit any website need with Templatic’s WordPress themes which are compatible with WPML.
Templatic offers robust themes whether you are building a directory, real estate, e-commerce or any other type of WordPress website.
3. Selecting the languages to translate into
Once you have installed WPML you will need to choose which languages you want to translate your content into.
All you need to do is head to WPML->Languages and under Site languages select the ones you will be using.
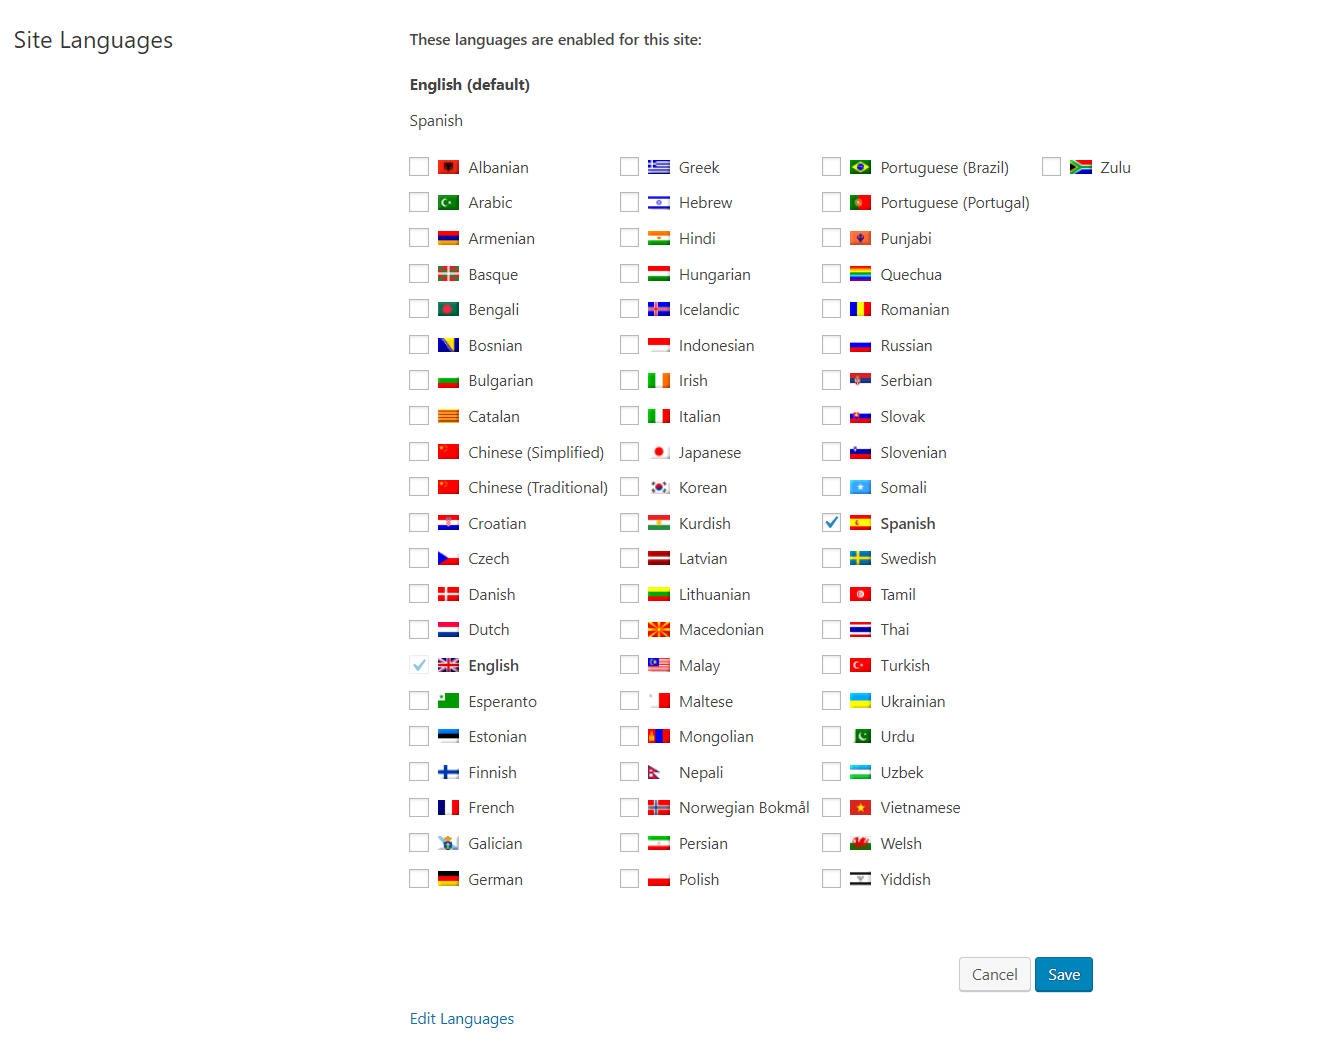
You can also add any languages that do not appear by clicking Edit languages->Add languages and filling in the details.
4. Deciding to translate your content yourself
There are three ways to translate your content: yourself, using individual translators or hiring a professional service.
In the WPML translation wizard, you will be able to choose between these options:
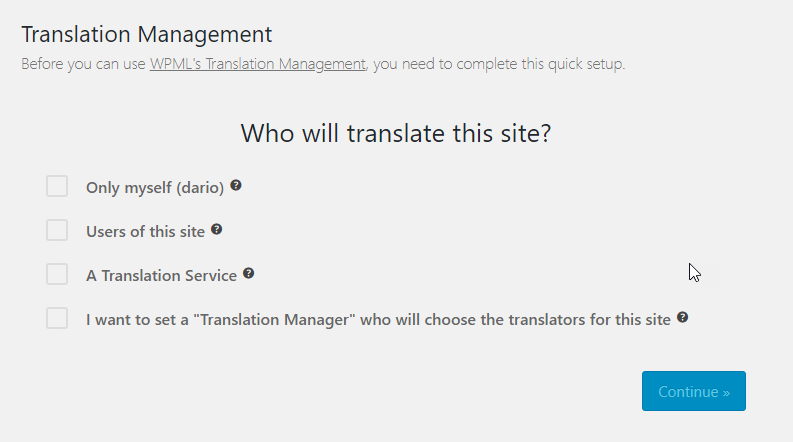
Let’s imagine that you choose to translate it yourself – later in the article we will go through the other two options. You will next want to activate the Advanced Translation Editor.
5. Translating posts and pages
Now that you have decided to translate your content yourself it is time to get started with your posts and pages.
- Head to the post or page which you want to translate and under Translate this Document select the “+” button next to the language you want to translate into.
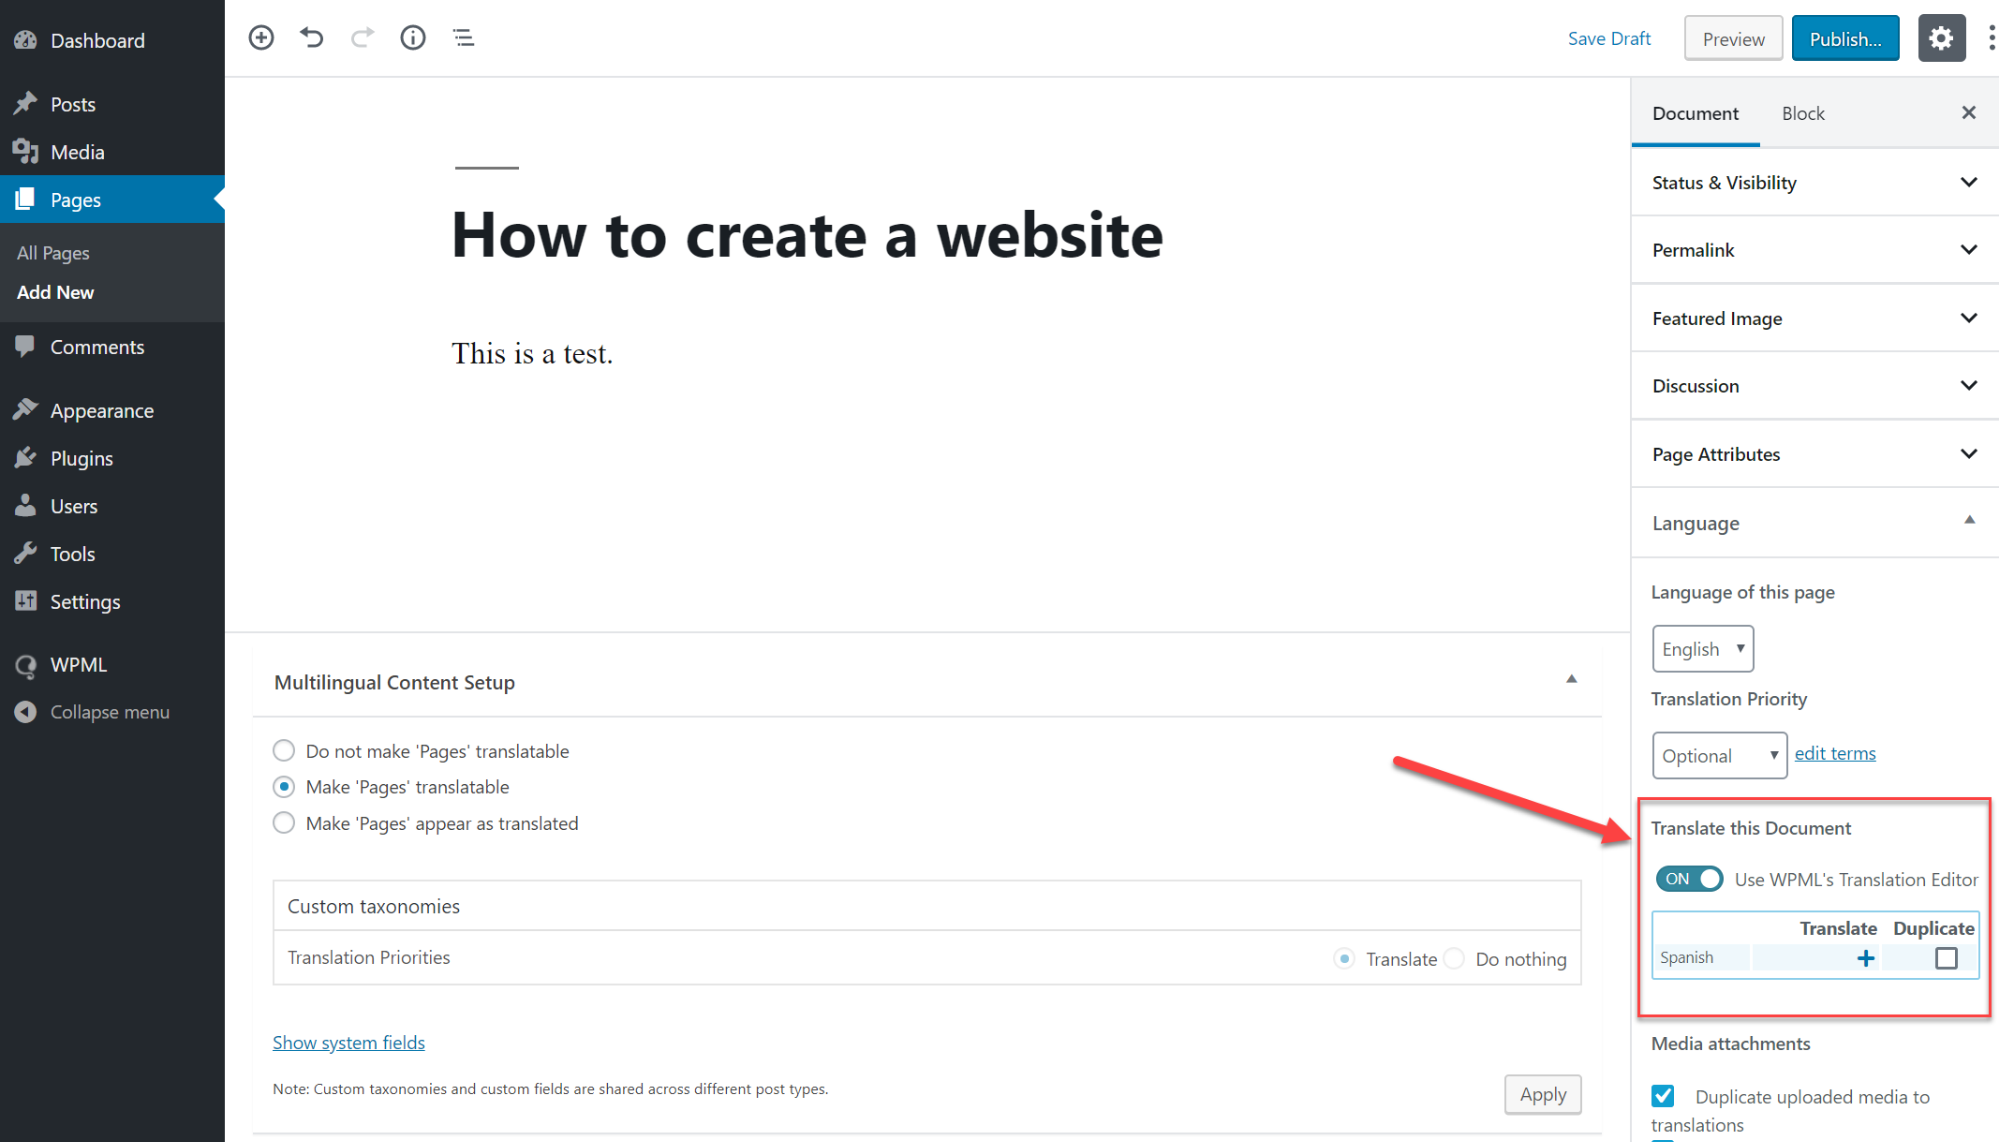
- You will now be taken to the Advanced Translation Editor where you can choose to translate all of your content automatically or do it yourself.
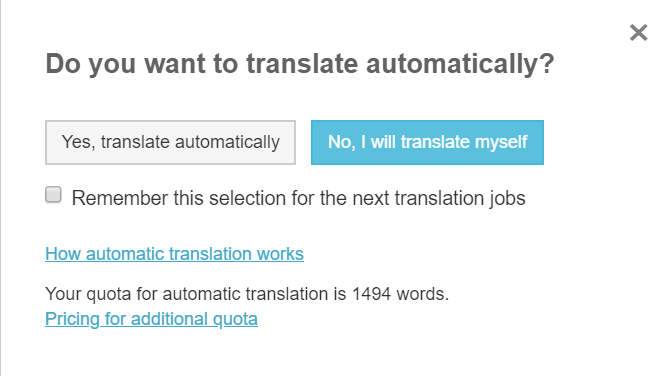
- Let’s select yes and on the next page, we can see all of our content automatically translated. All we need to do is go through each line to double-check that it is accurate.

- Once you are happy, click Finish and then Complete.
6. Translate your taxonomies
When you want to group your content under different categories you use taxonomies.
- Head to WPML->Settings->Taxonomies Translation and set your taxonomies as translatable.
- Go to WPML->Taxonomy translation and you can see a drop-down menu with a list of your taxonomies.
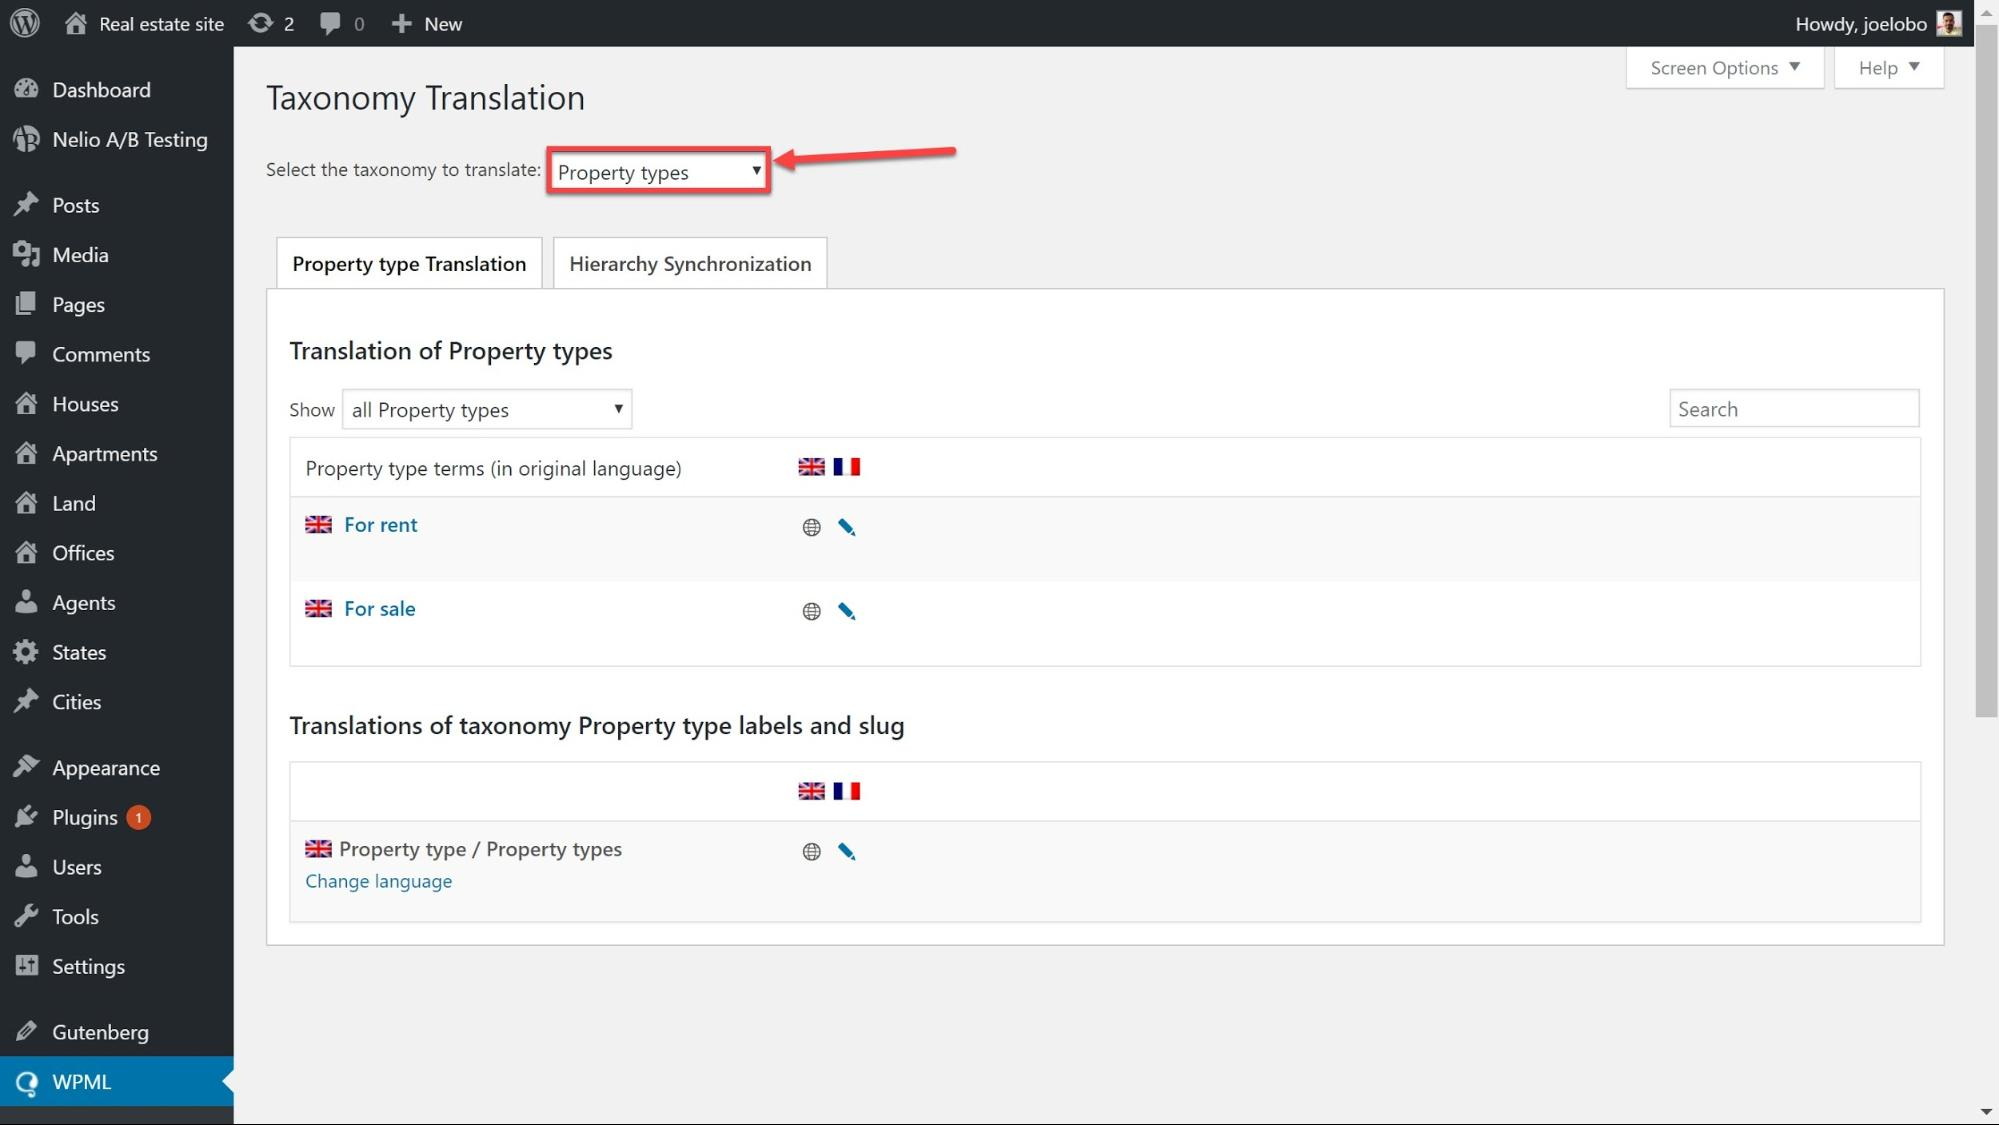
- Select the taxonomy you wish to translate and enter the Name, Slug and Description for each one.
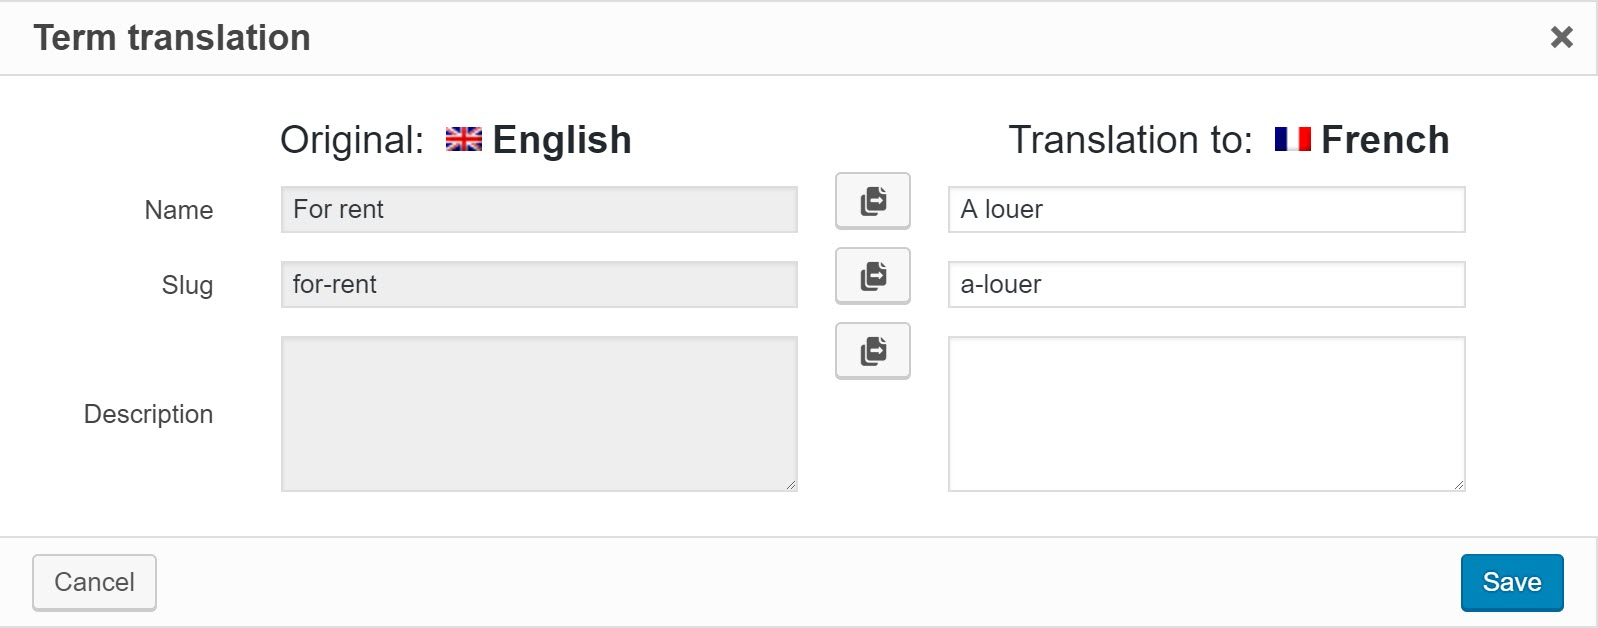
- Click Save.
7. Translate your custom fields
Custom fields provide additional information that all of the posts in that custom post type will need. For example, all posts for cars for sale will include information about the age of the car, the make, the color etc.
- Go to WPML->Settings->Custom Fields Translation. Set your custom fields to Translate.

- When you head to the Advanced Translation Editor your custom fields will now appear alongside the rest of your content.
8. Translate images and other media
WPML Media Translation will translate the meta texts of images or even replace images for different languages if there is a more suitable option.
- Head to WPML->Media Translation and filter the results until you find the images you want to translate.
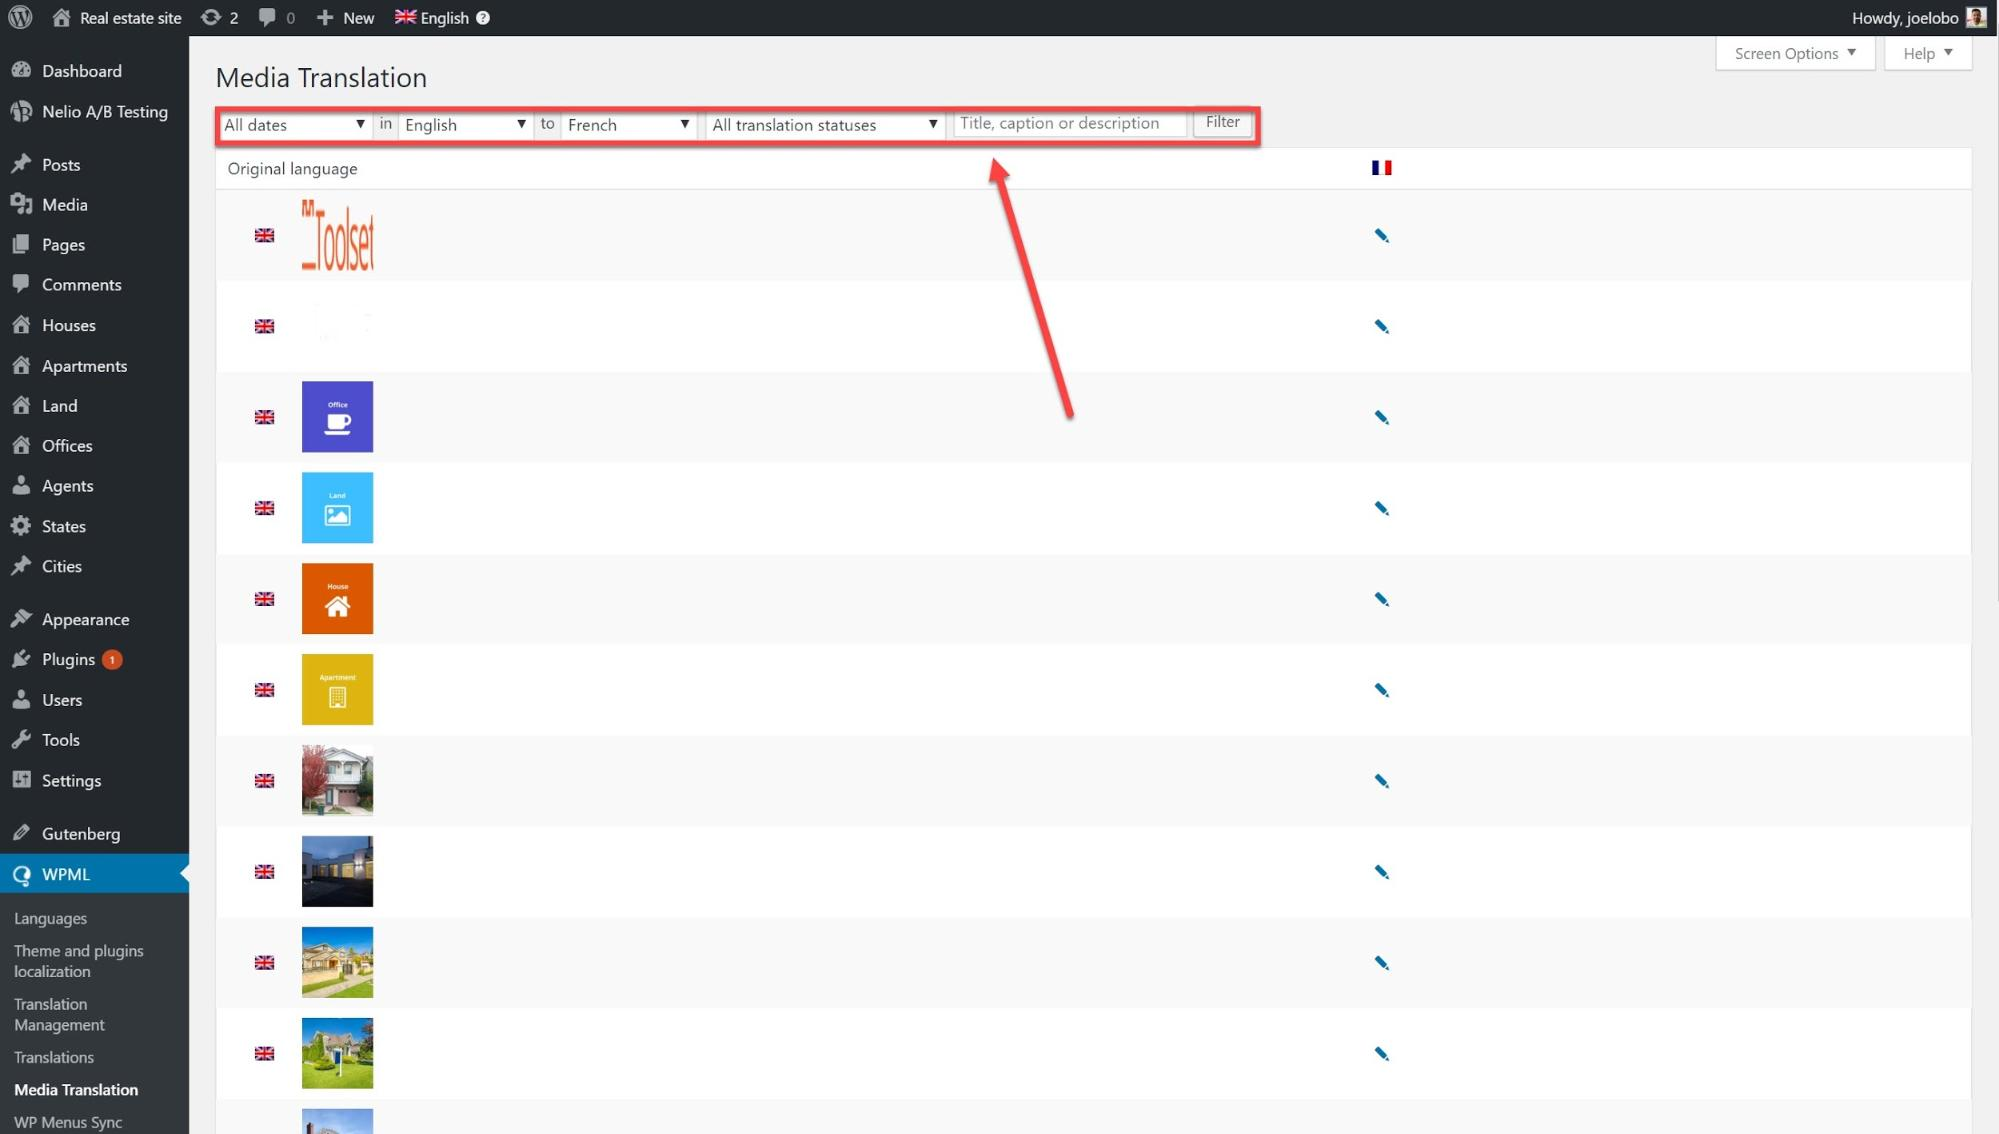
- Click on the pencil icon for the image you want to translate.
- Replace the image with a more suitable one for that language and translate the meta text.
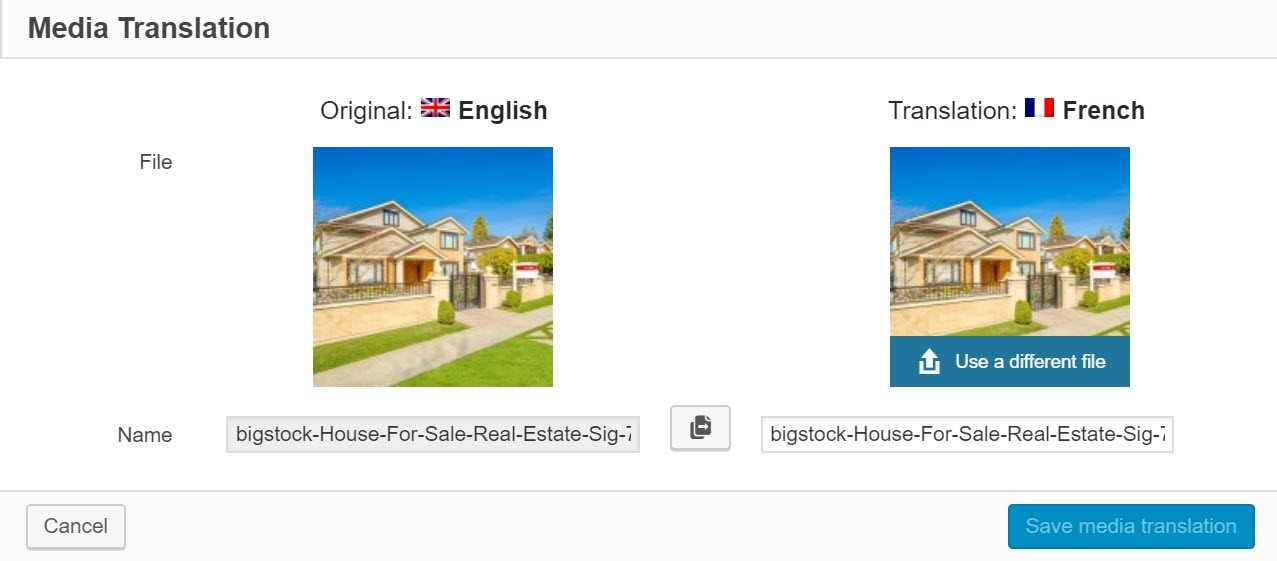
- Click Save media translation.
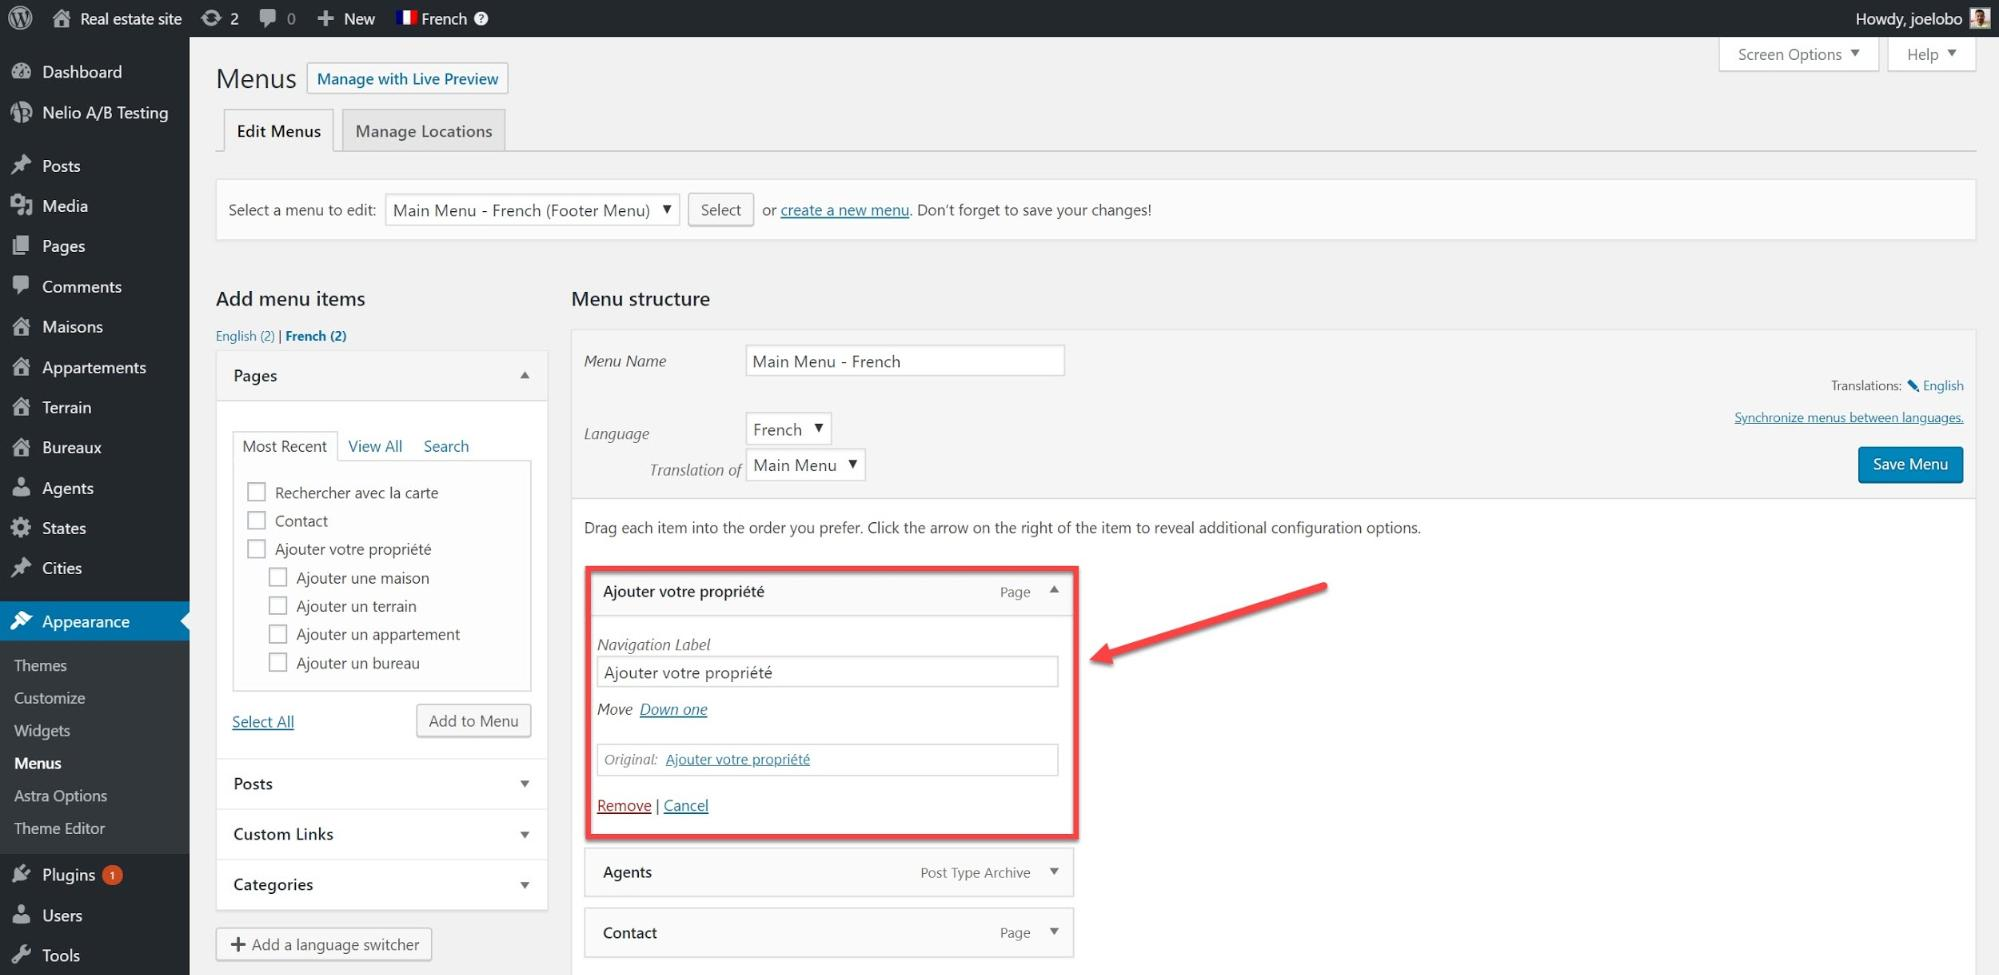
9. Translate menus
There are two ways for you to translate your menus or create completely different ones for each language.
Option 1: Translate menus automatically
- Go to Appearance->Menus and click on the “+” icon next to the language you want to translate into.
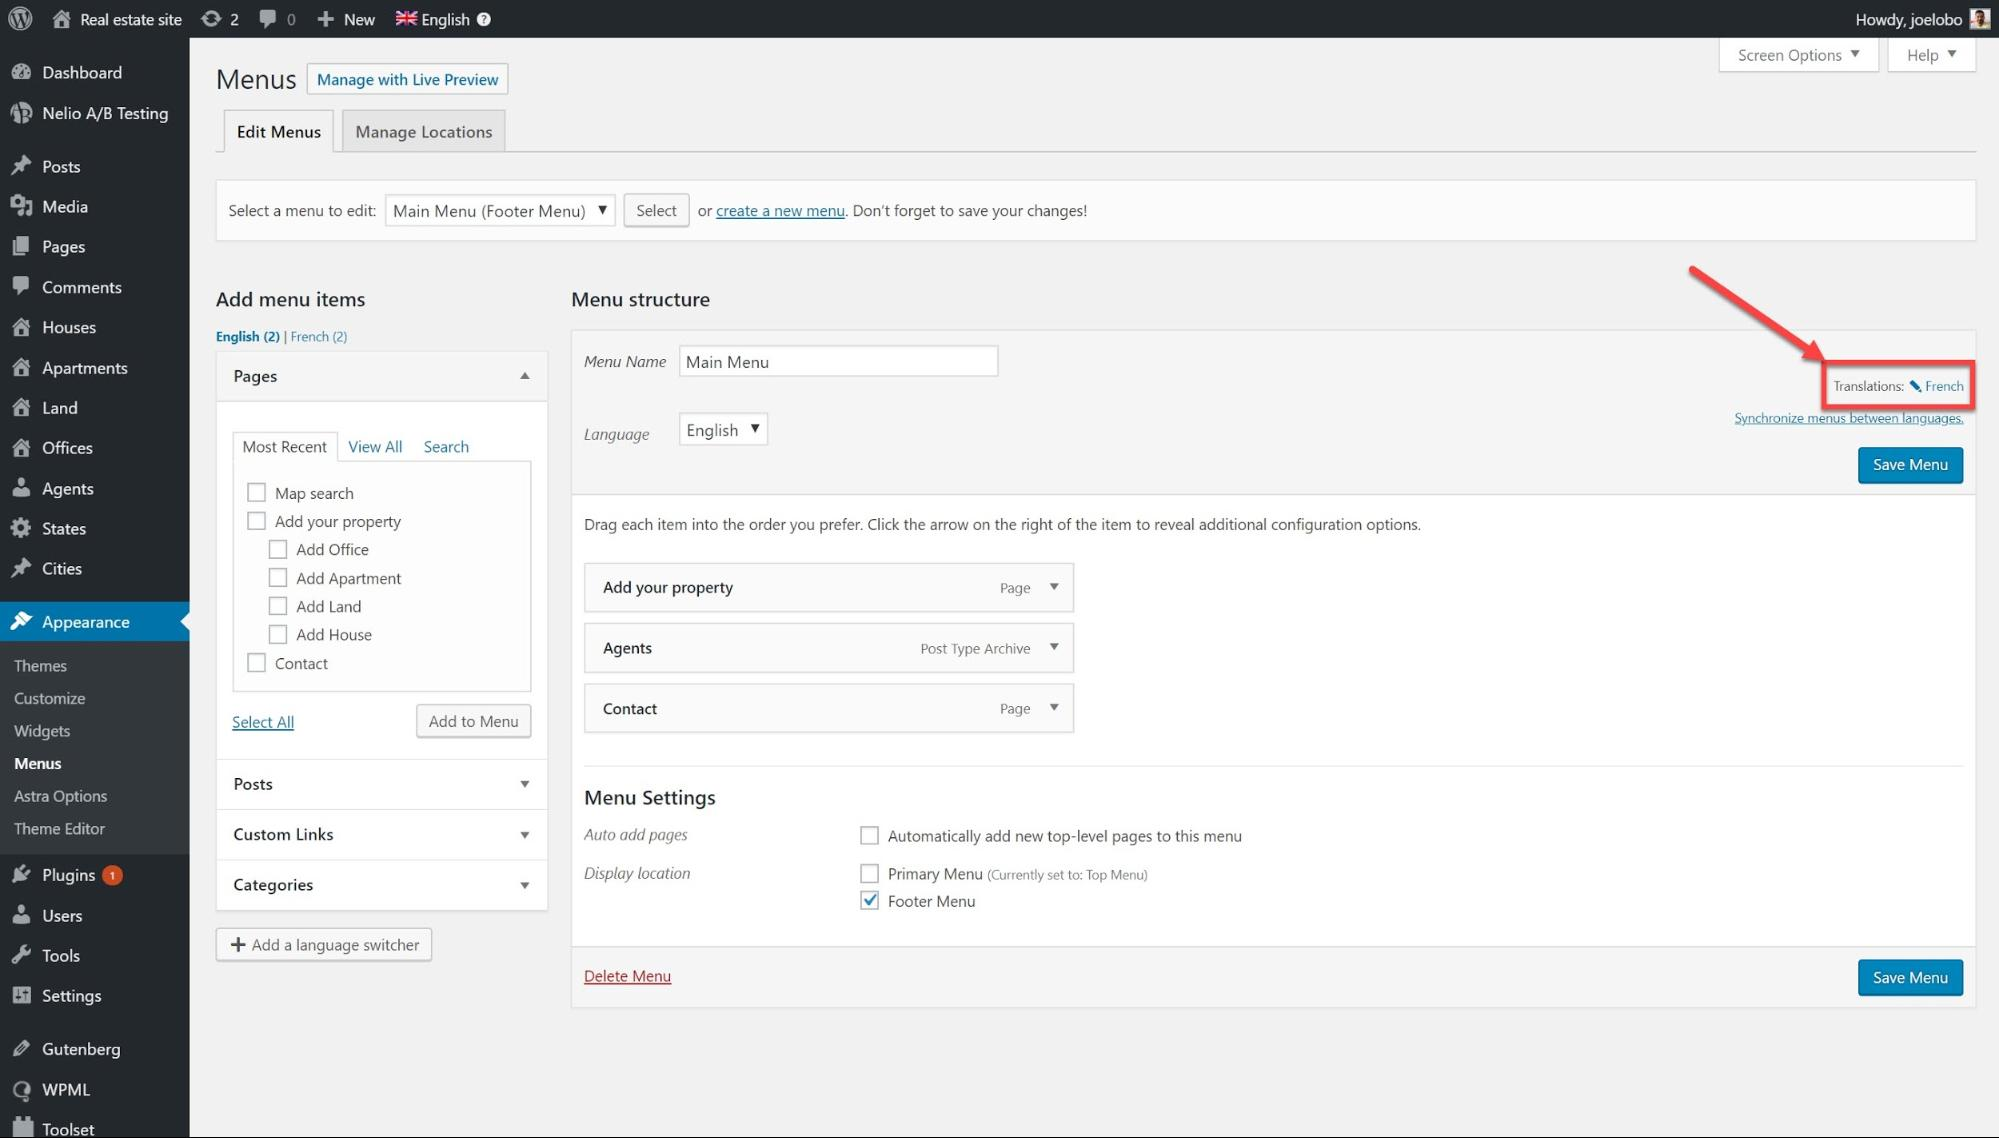
- Click on the arrow to the right of each of the menu options and add your translations to the drop-down menu.
Option 2: Sync menus automatically
You can keep your menus in different languages synchronized by using the menu sync tool.
- Go to WPML->WP Menus Sync
- Click on Synchronizer
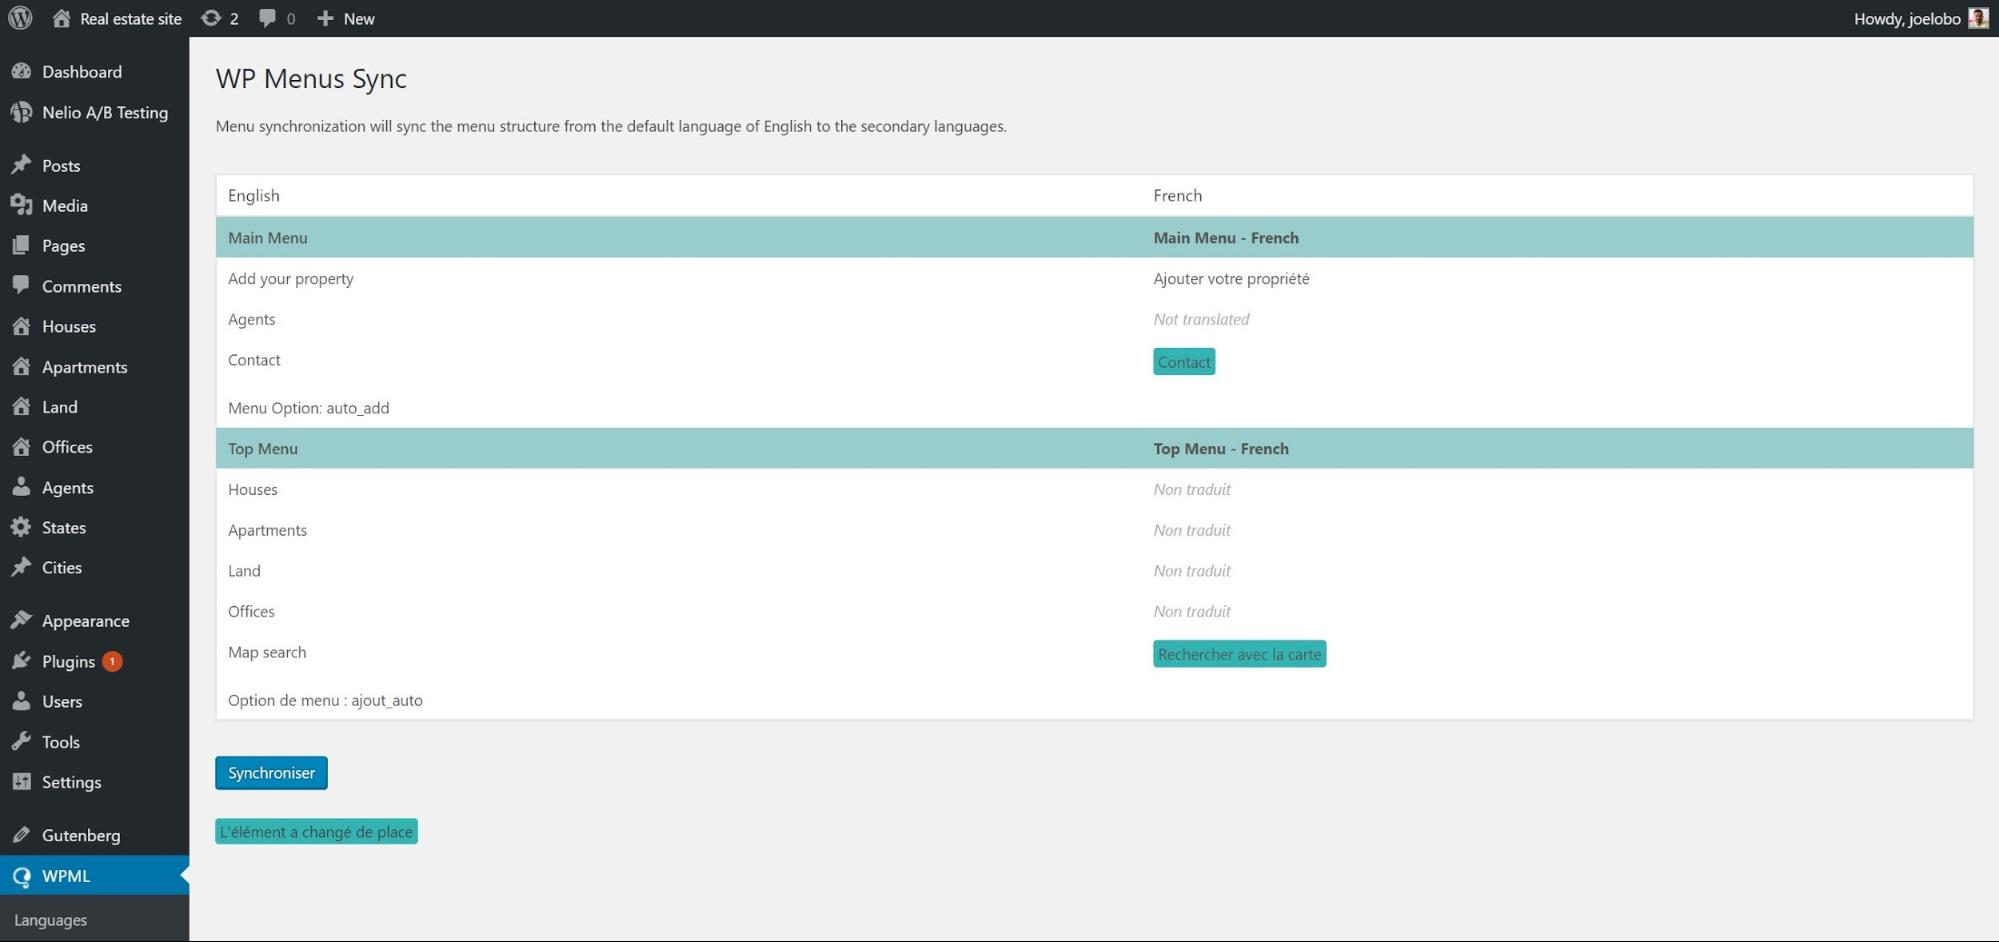
- You can now see how your menus will be affected by the synchronization. Click Apply changes once you are happy.
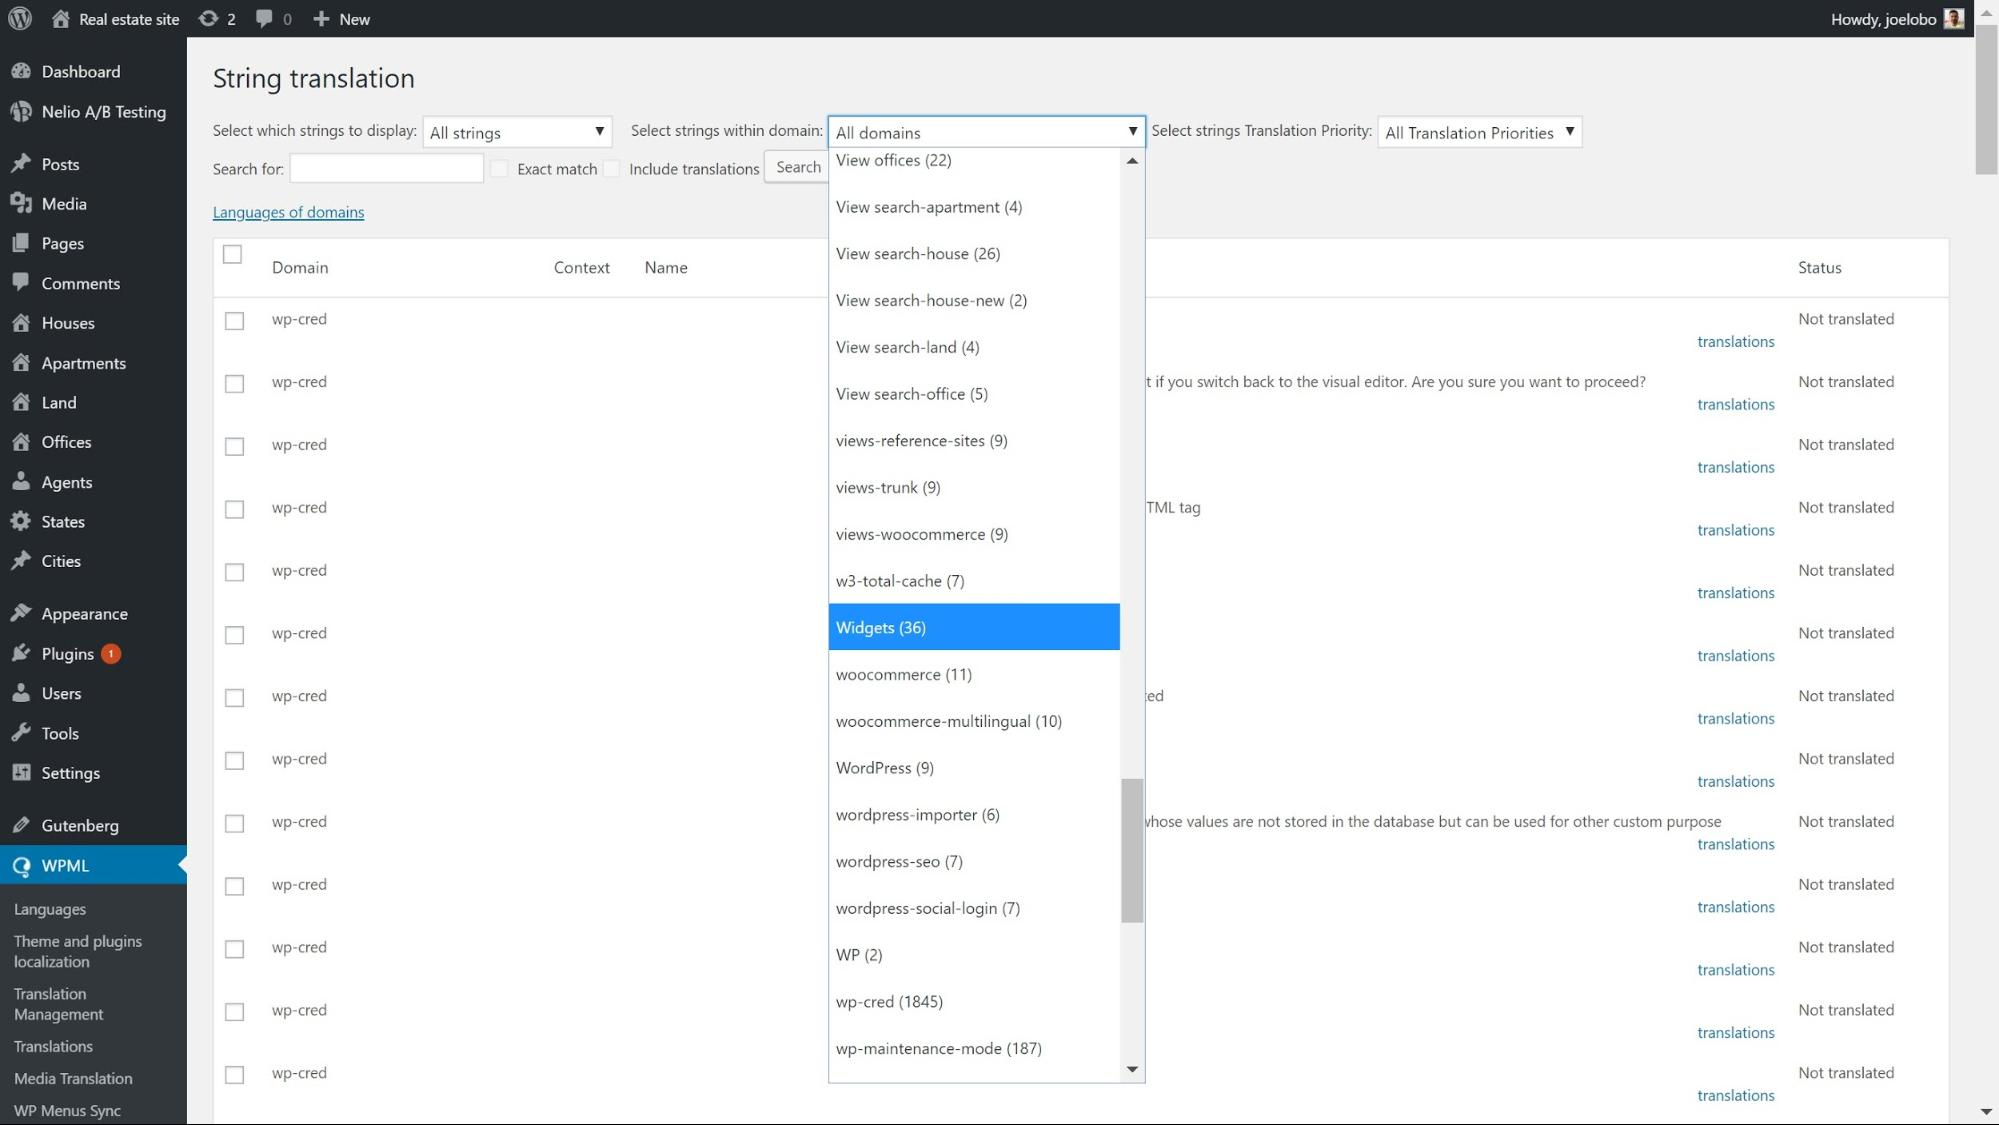
10. Translate your widgets
A widget is a straightforward to display related information on a page. The beauty of widgets is that they do not take up too much space on the page. Examples of widgets include calculators and clocks.
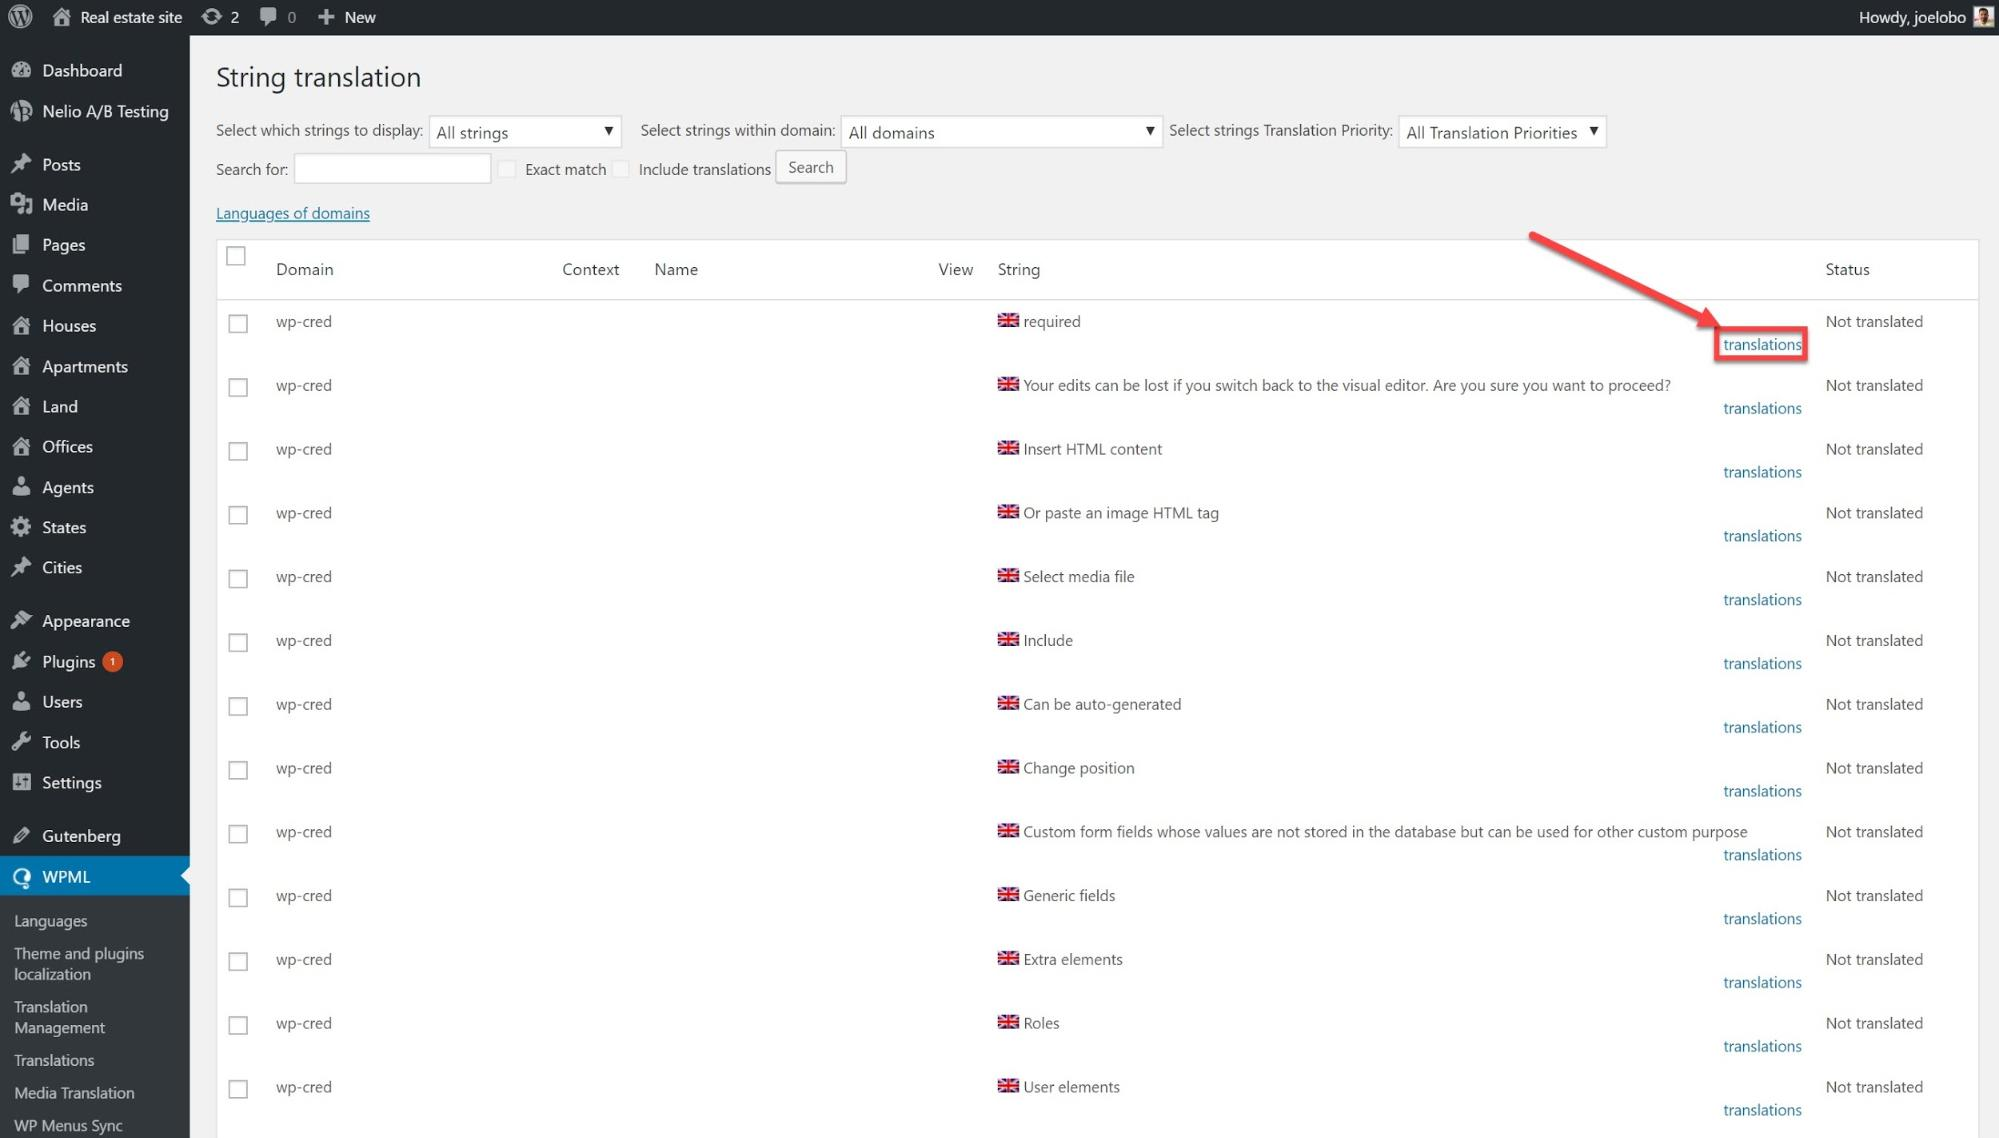
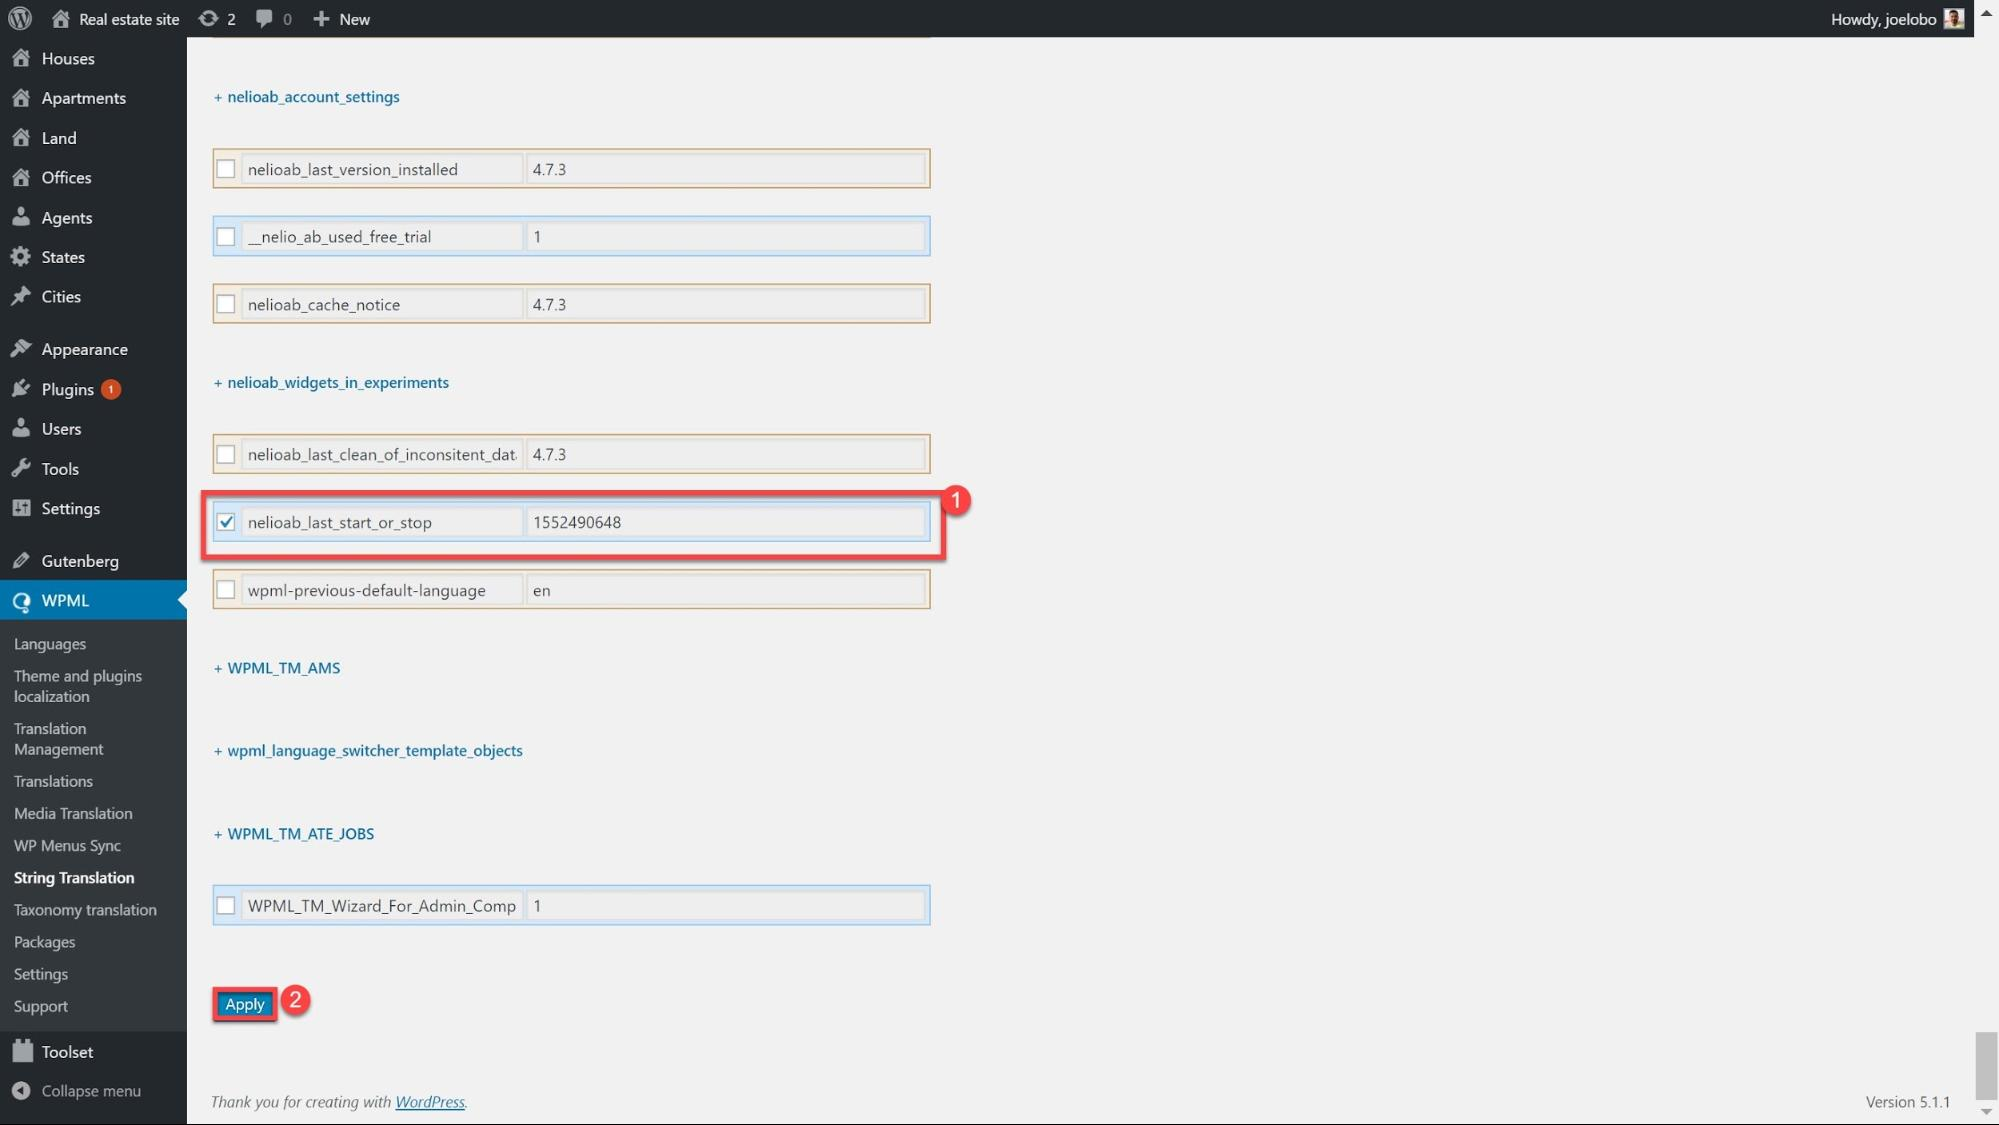
- Head to WPML->String Translation and under the Select strings within domain dropdown menu select Widgets.
- Select Translations next to the widget string you want to translate.
- Enter the translation, click Translation is complete and then Save.

There is a possibility that some of your widgets will not appear by default under String Translation but they are easy to activate.
- Head to String Translation and select Translate texts in admin screens.
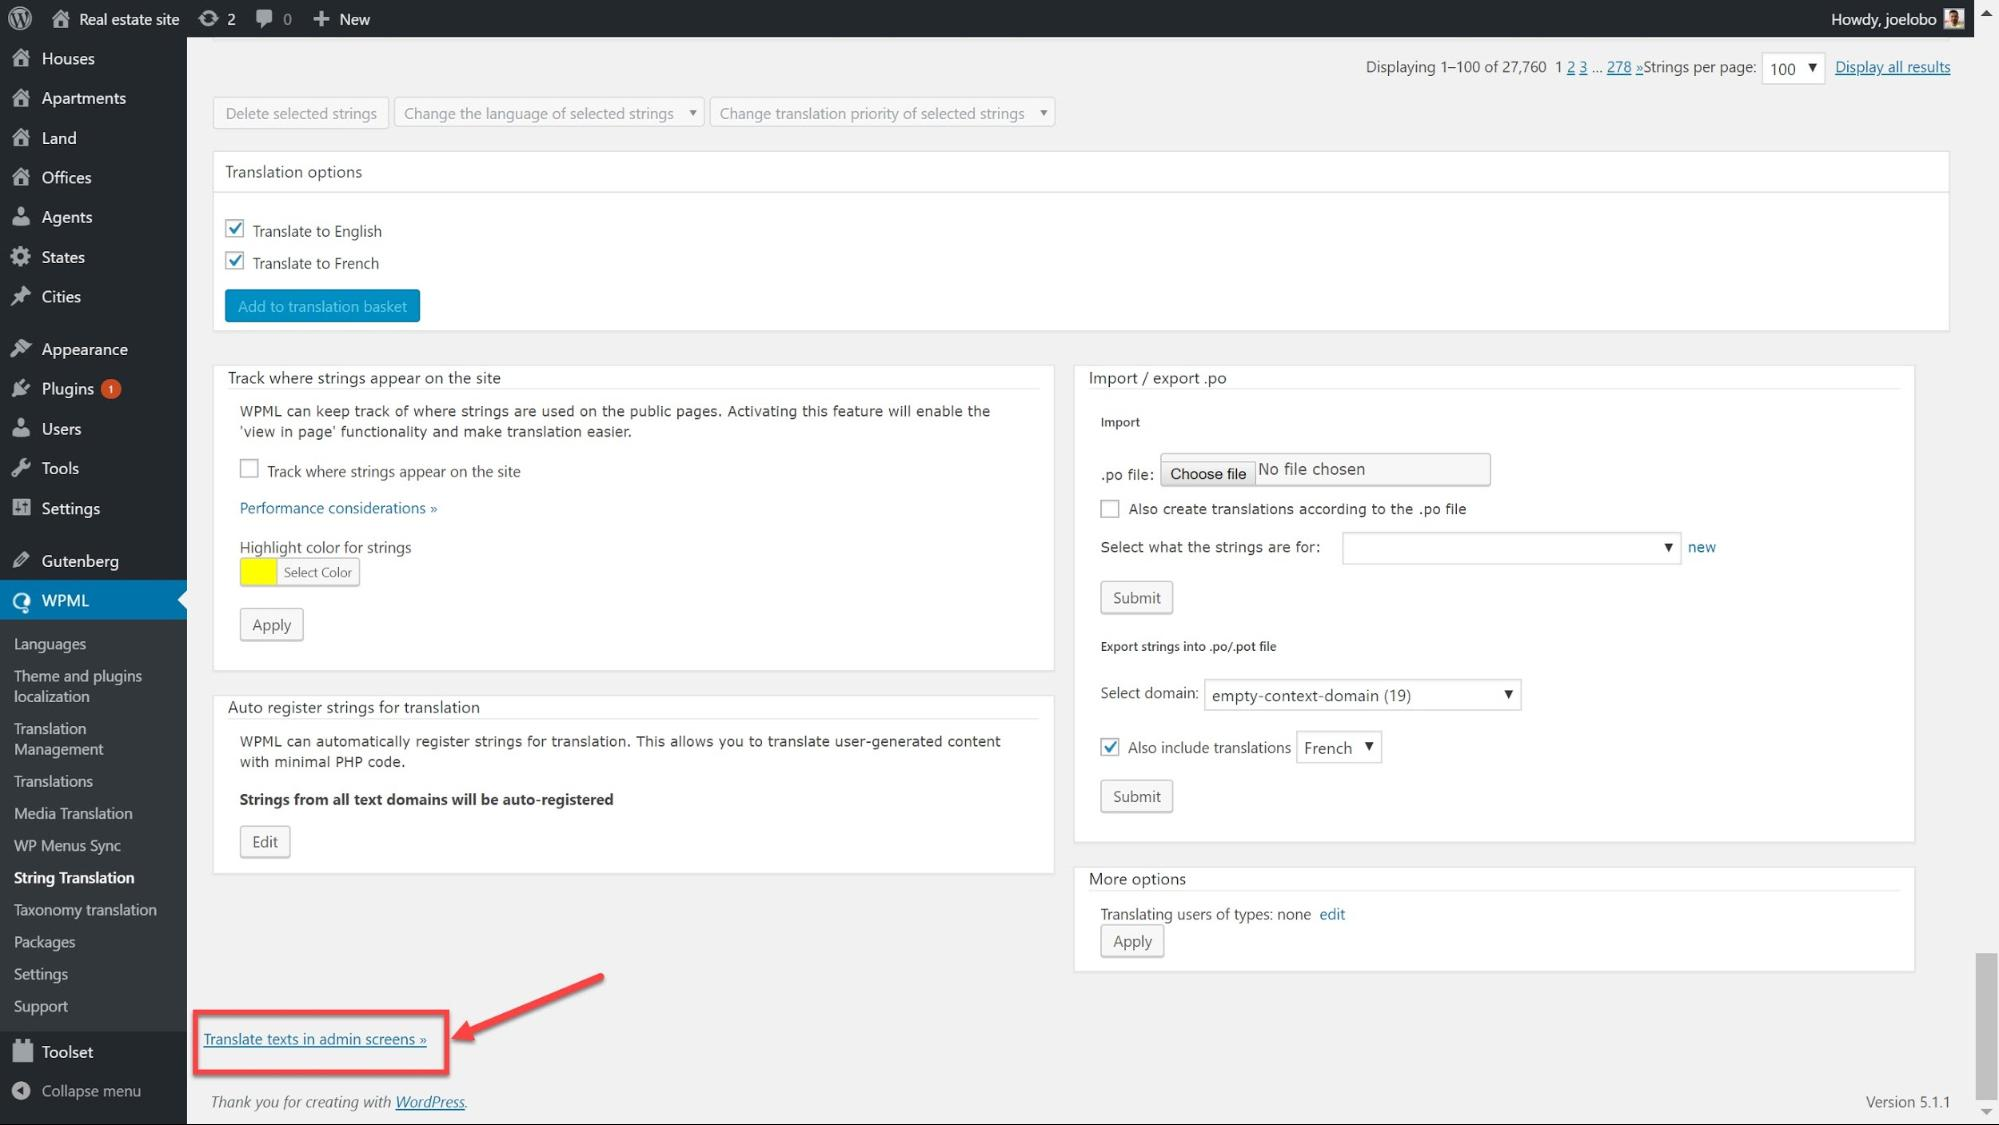
- Select all of the widgets that you want to activate and click on the boxes next to them.
- Click Apply. Now you can translate them just like your other widgets.
11. Translate URLs
Translating URLs is a crucial aspect of creating a multilingual website that is very often neglected by website owners because it does not appear on the website itself. By translating your URLs you will be improving your multilingual SEO and boosting your Google search rankings in every language.
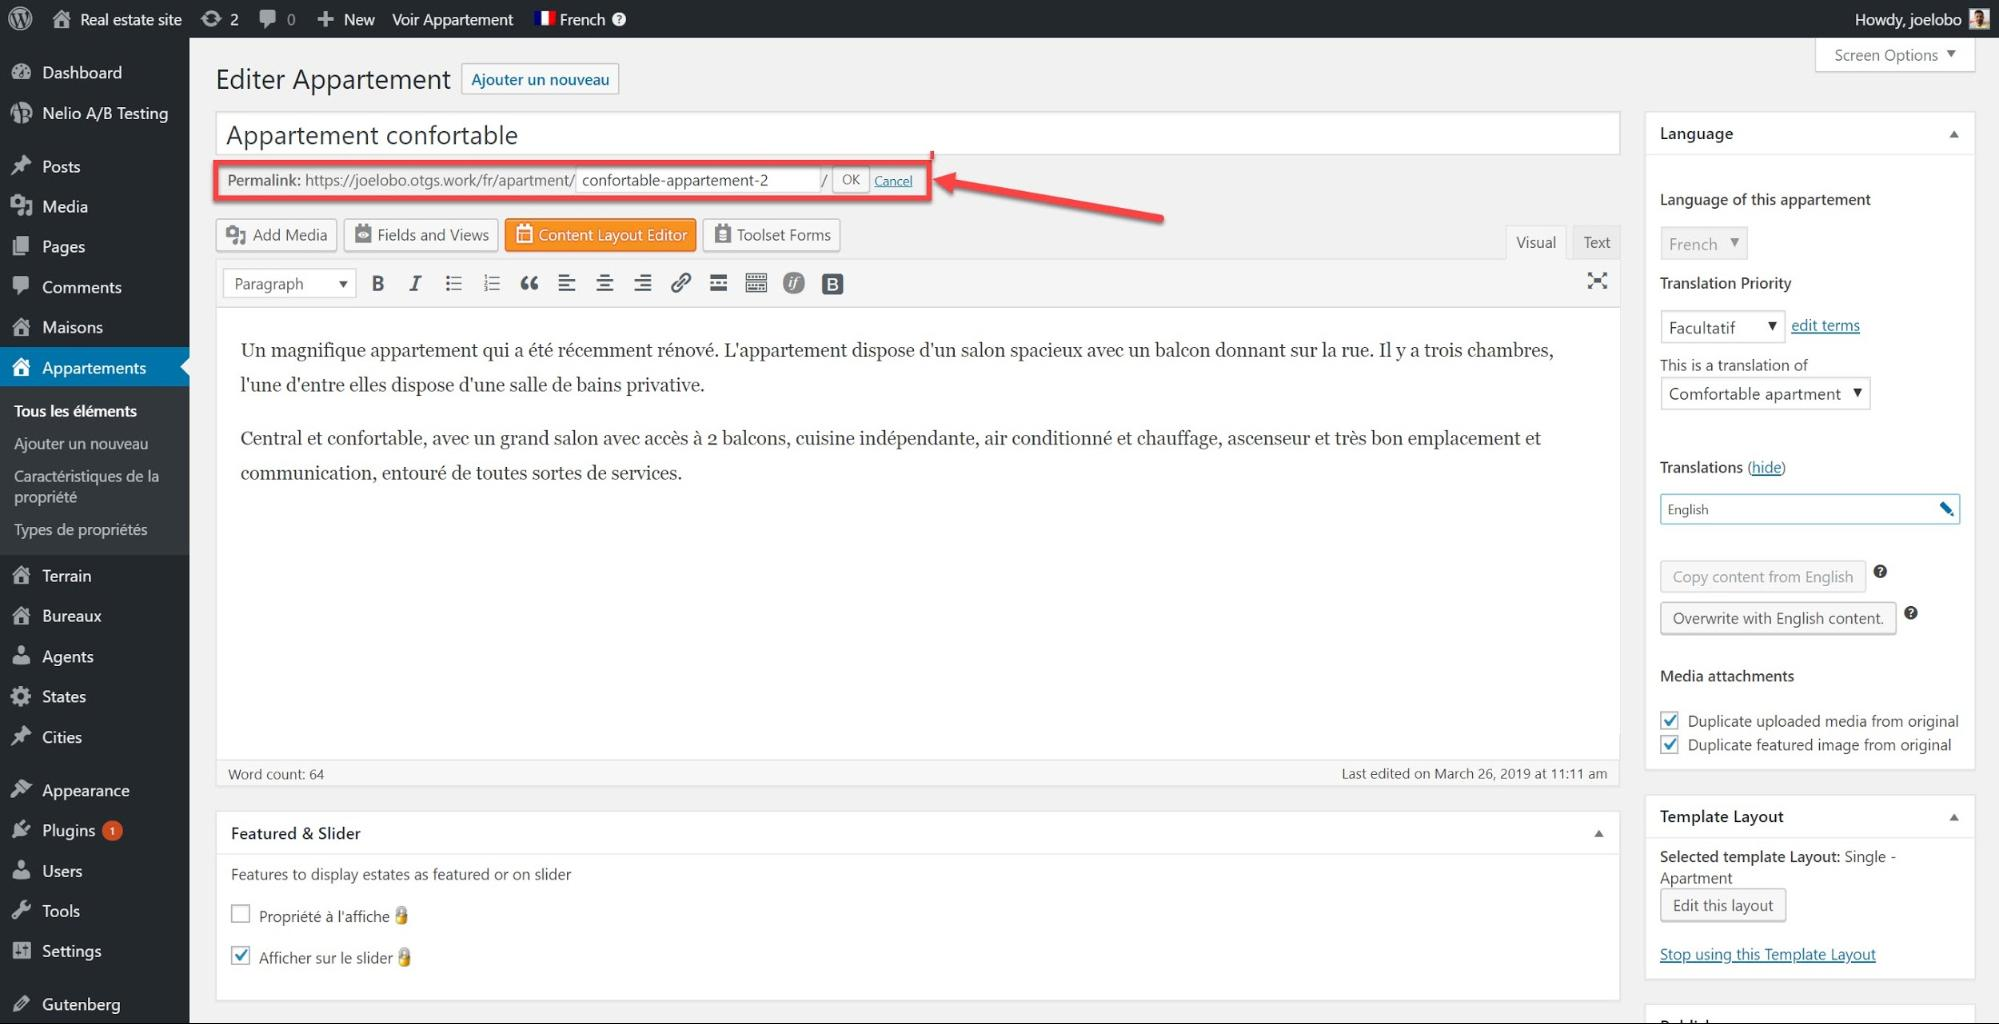
There are two steps for you to translate your website URLs. First you need to translate the page name followed by the custom post type.
Translating page names:
Under the post type or page, click Edit next to the permalink and type in the translation.
Translate your custom post type:
If you are not an experienced coder who uses PHP then you will need to use a plugin such as Toolset to build your custom post type.
- Go to WPML->Settings and head to Post types translation and select the post type(s) that you want to translate.
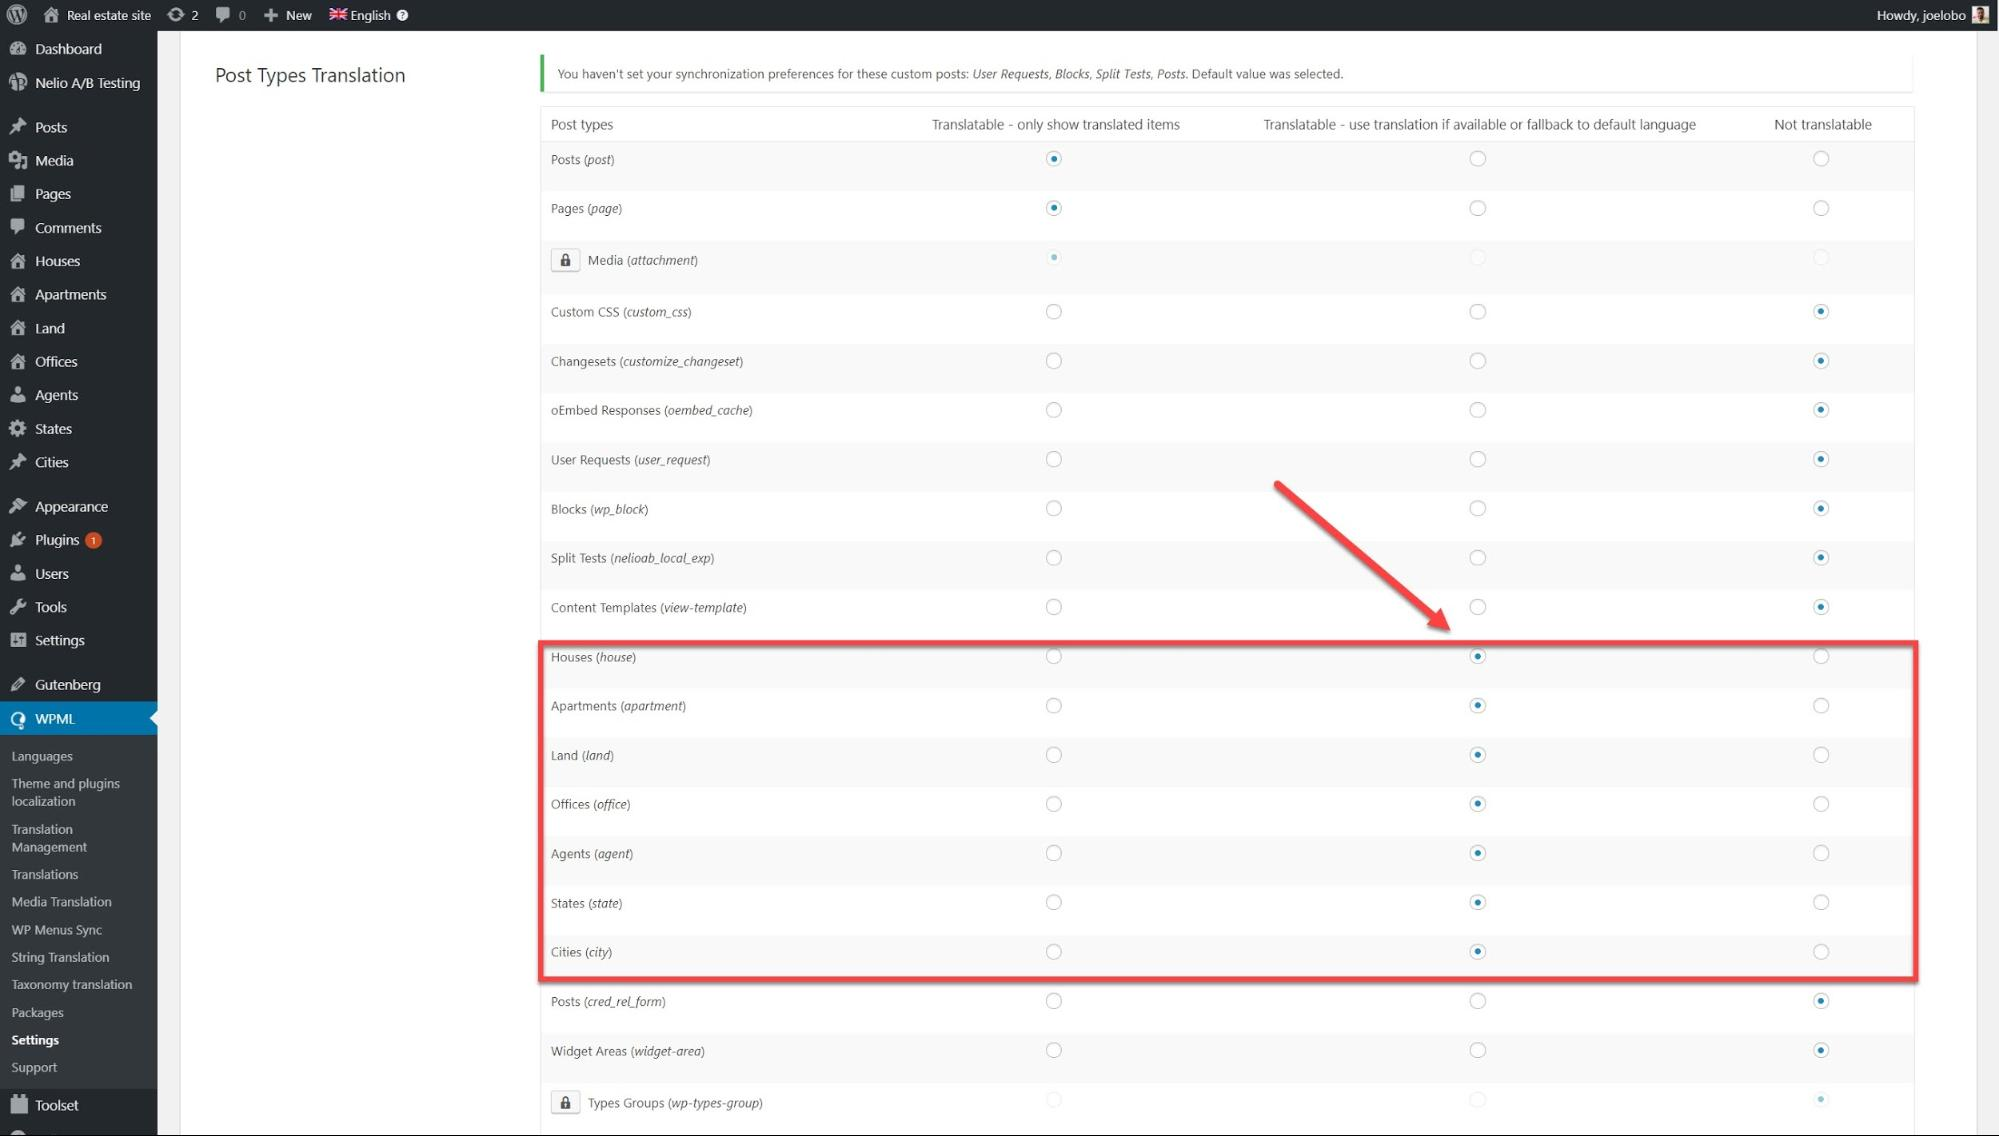
- You can now search for your post types on WPML->String Translation and translate from there.
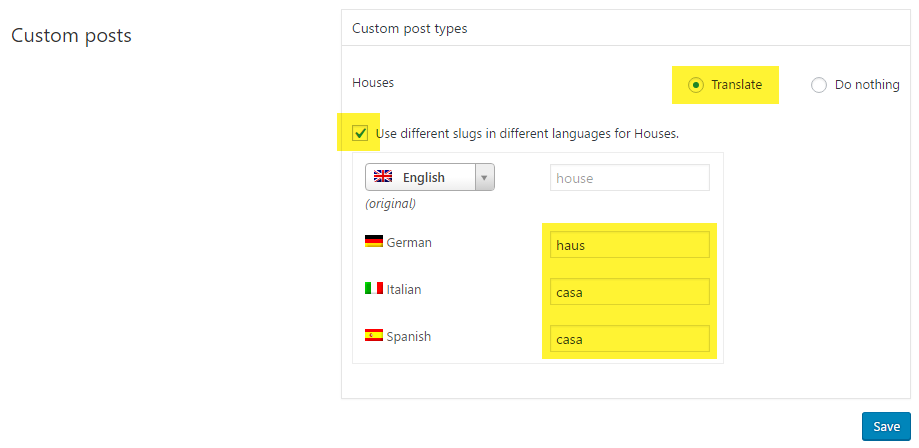
- Click Save.
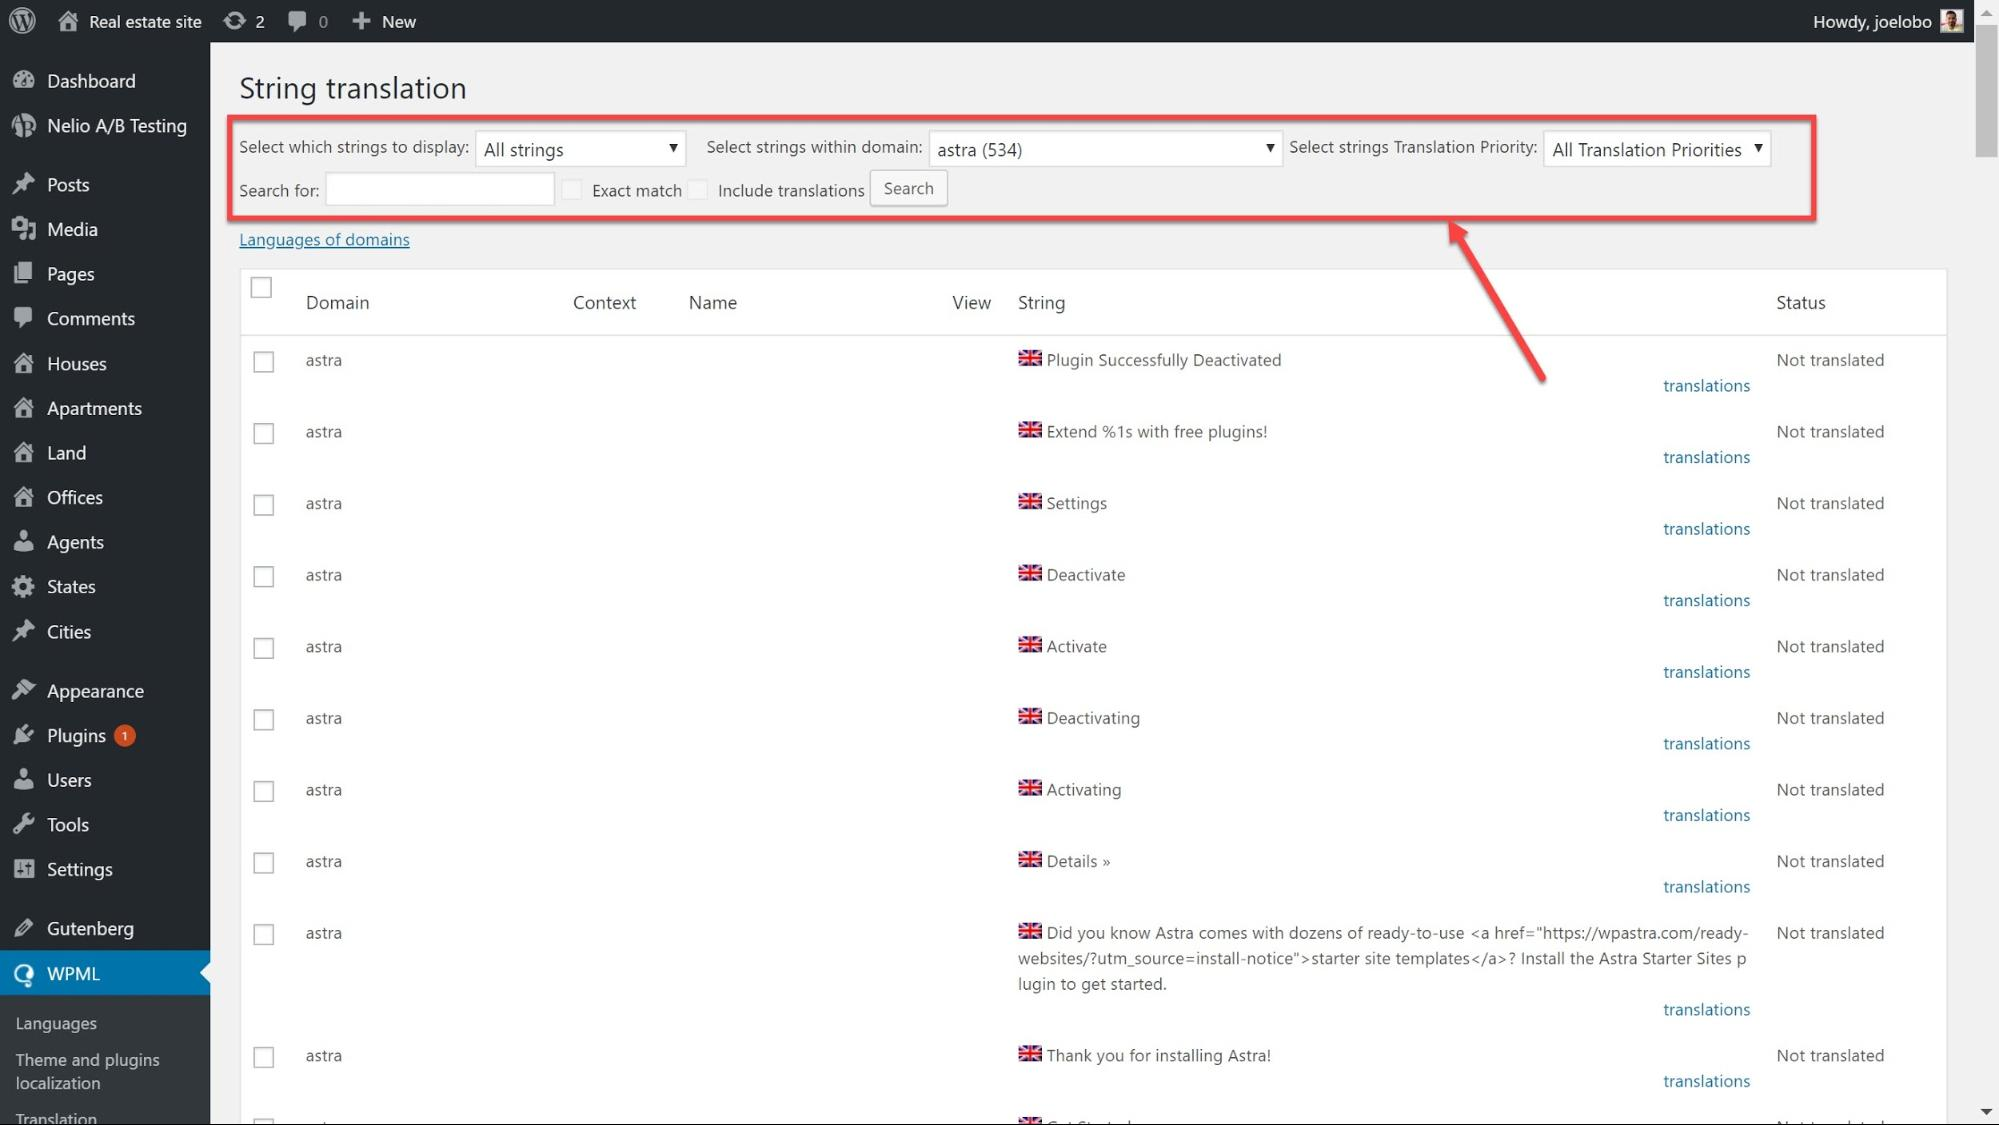
12. Translate your themes and plugins
Any themes and plugins that you install on your website will provide new texts which will need to be translated if you want a truly multilingual website.
The good news is that the major themes and plugins tend to come with their own translations for the majority of their strings. WPML’s String Translation will add those and will only translate those strings that are needed to reduce bloat and ensure your load page times are not affected.
- Go to WPML->String Translation
- Under Select which strings to display choose the Translation needed option to see all of the strings which need to be translated.
- Next to the string select translations and enter the translated text.
- Click Save and repeat the process for any of the other strings you want to translate.
Assign individuals to translate your work
If you’re not fortunate enough to be fluent in the language you want to translate into then you will need to assign either a user or a service to translate your content. First, we’ll go through how to send work to individual users.
Set up users on WordPress
First, you need to give your translators their own user accounts to work with. You can do this as part of the WPML translation management wizard. Otherwise, you can add additional users later on.
- Go to WPML->Translation Management and click on Translation Roles where you can see the roles for your users.
- To add a translator click Add a translator, fill in the user’s details and click Set language pairs.
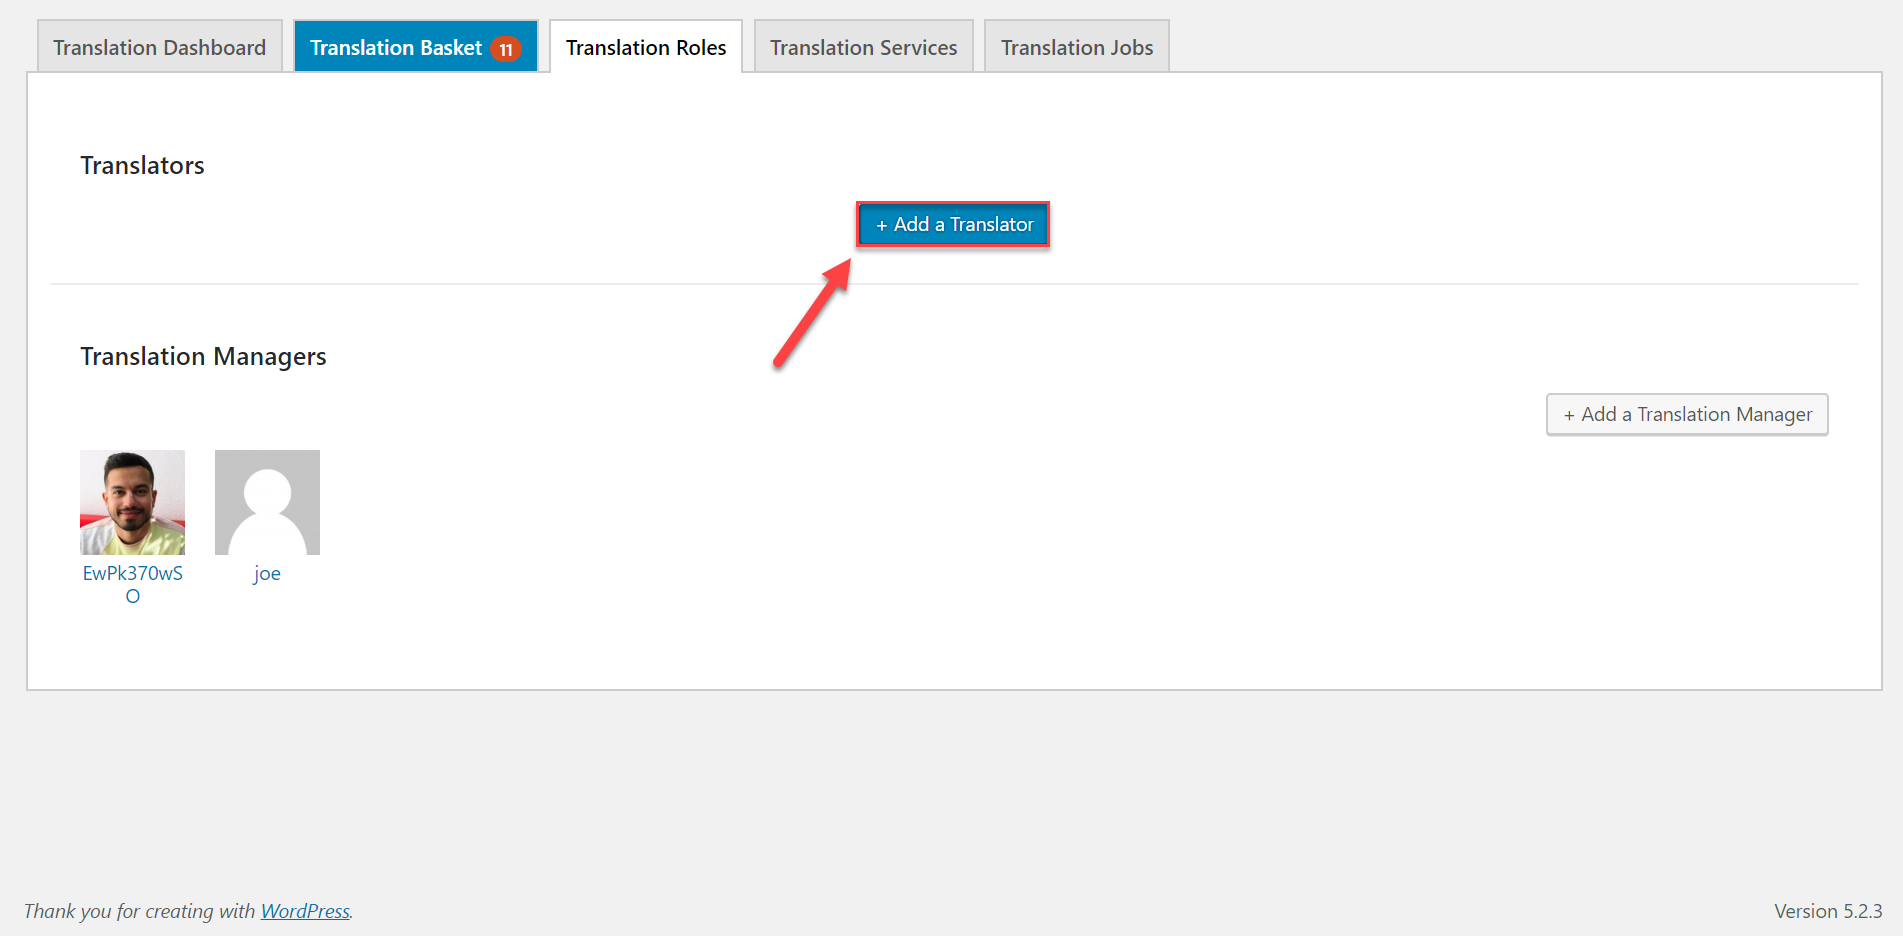
- Select the languages you want the user to work with and click Save.
Send content for translation
Now that you have set up your user you can assign them translation jobs.
- Head to WPML->Translation Management.
- Go to the Translation Dashboard and use the filters to find the content you want to translate.

- Go to the Select translation options and choose the language you want to translate into. Click Add selected content to translation basket.
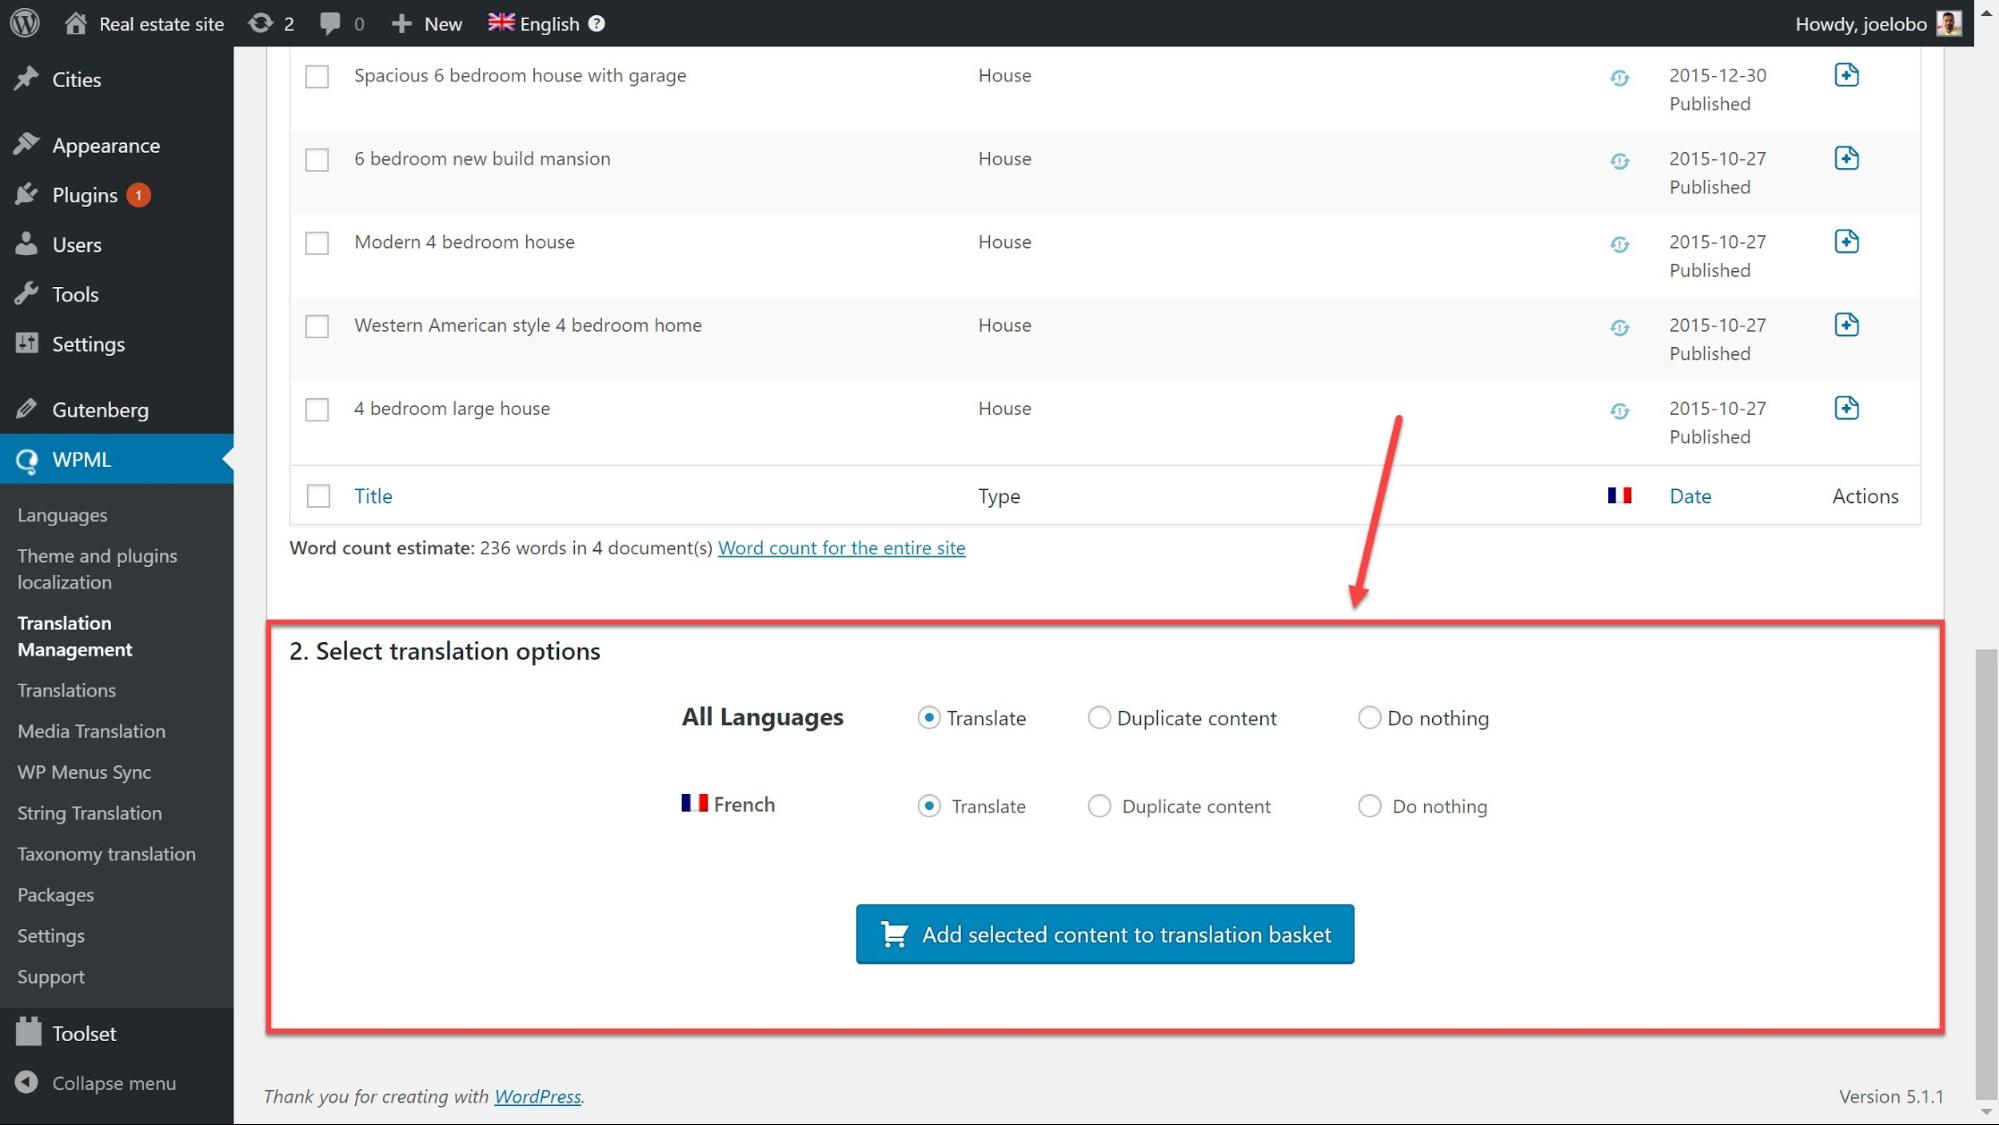
- Click on the Translation Basket at the top of the page to review the content including the number of words, the batch name and the deadline.
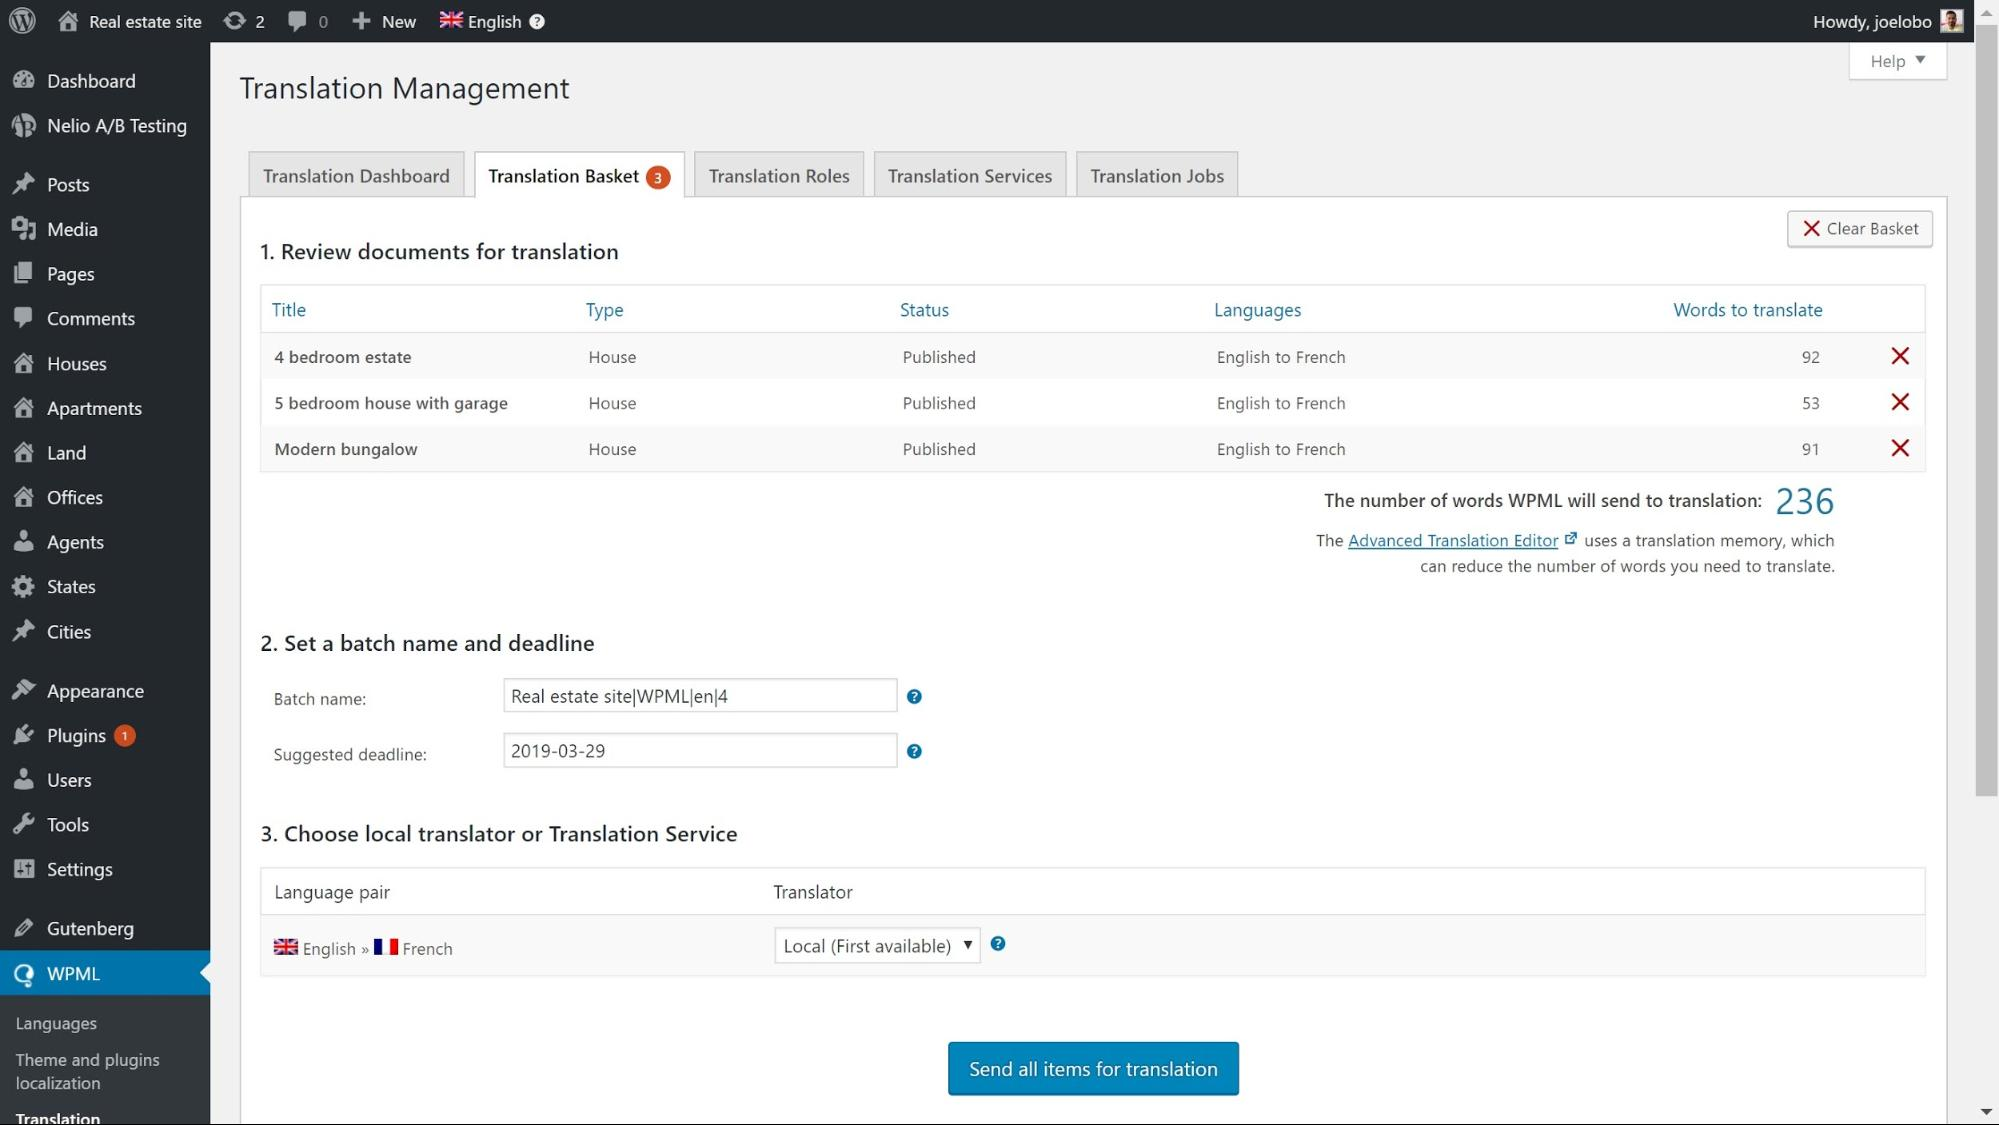
- Click Send all items for translation at the bottom to create the job. Your users will now receive an email notification with information about the job.
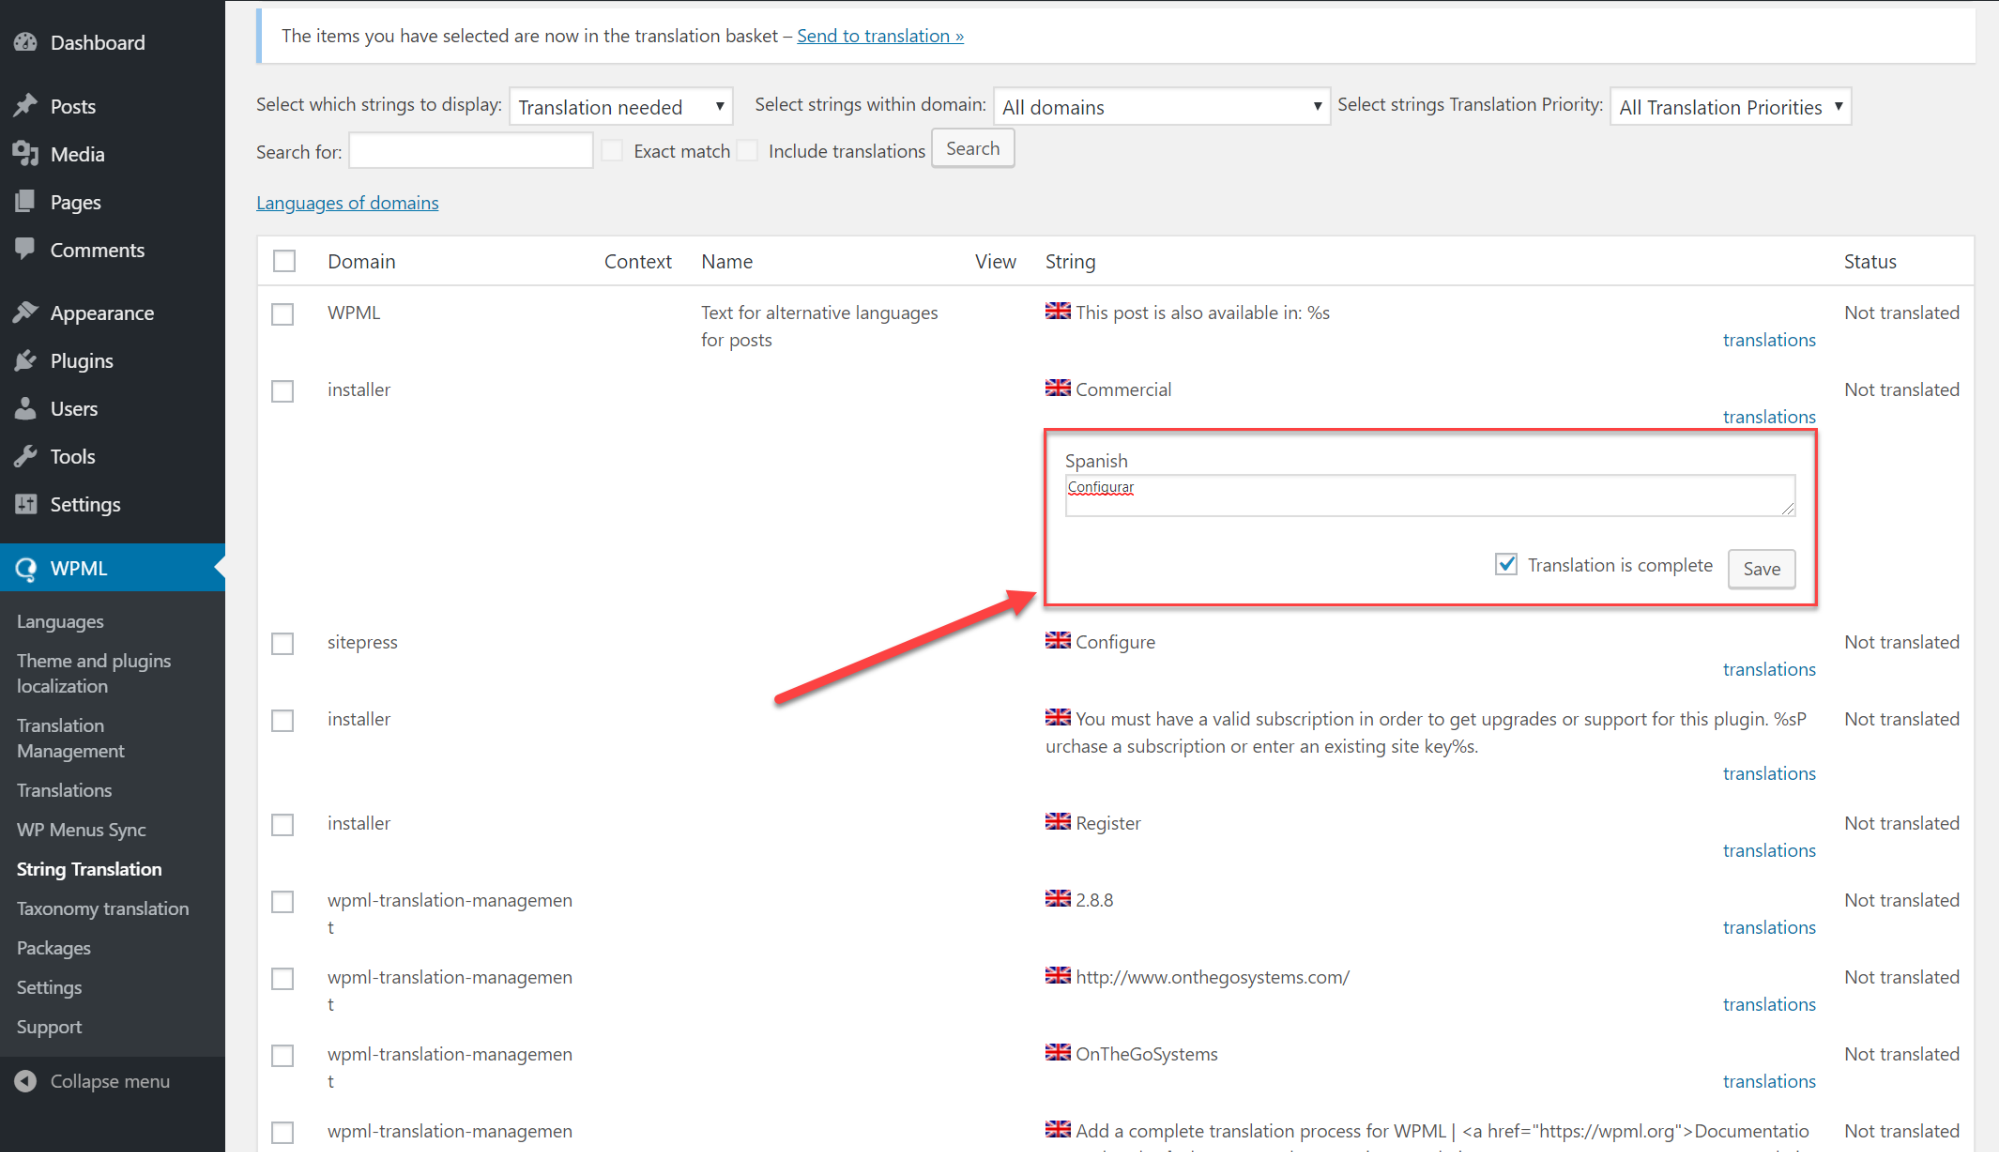
Send strings for translation
You can also send users strings that need to be translated.
- Go to WPML->String Translation to search for the strings that you want to translate by using the filter at the top of the page. Select the strings you want and click Add to translation basket.
- Go to WPML->Translation Management and click the Translation Basket tab. Once there click to send the basket for translation.

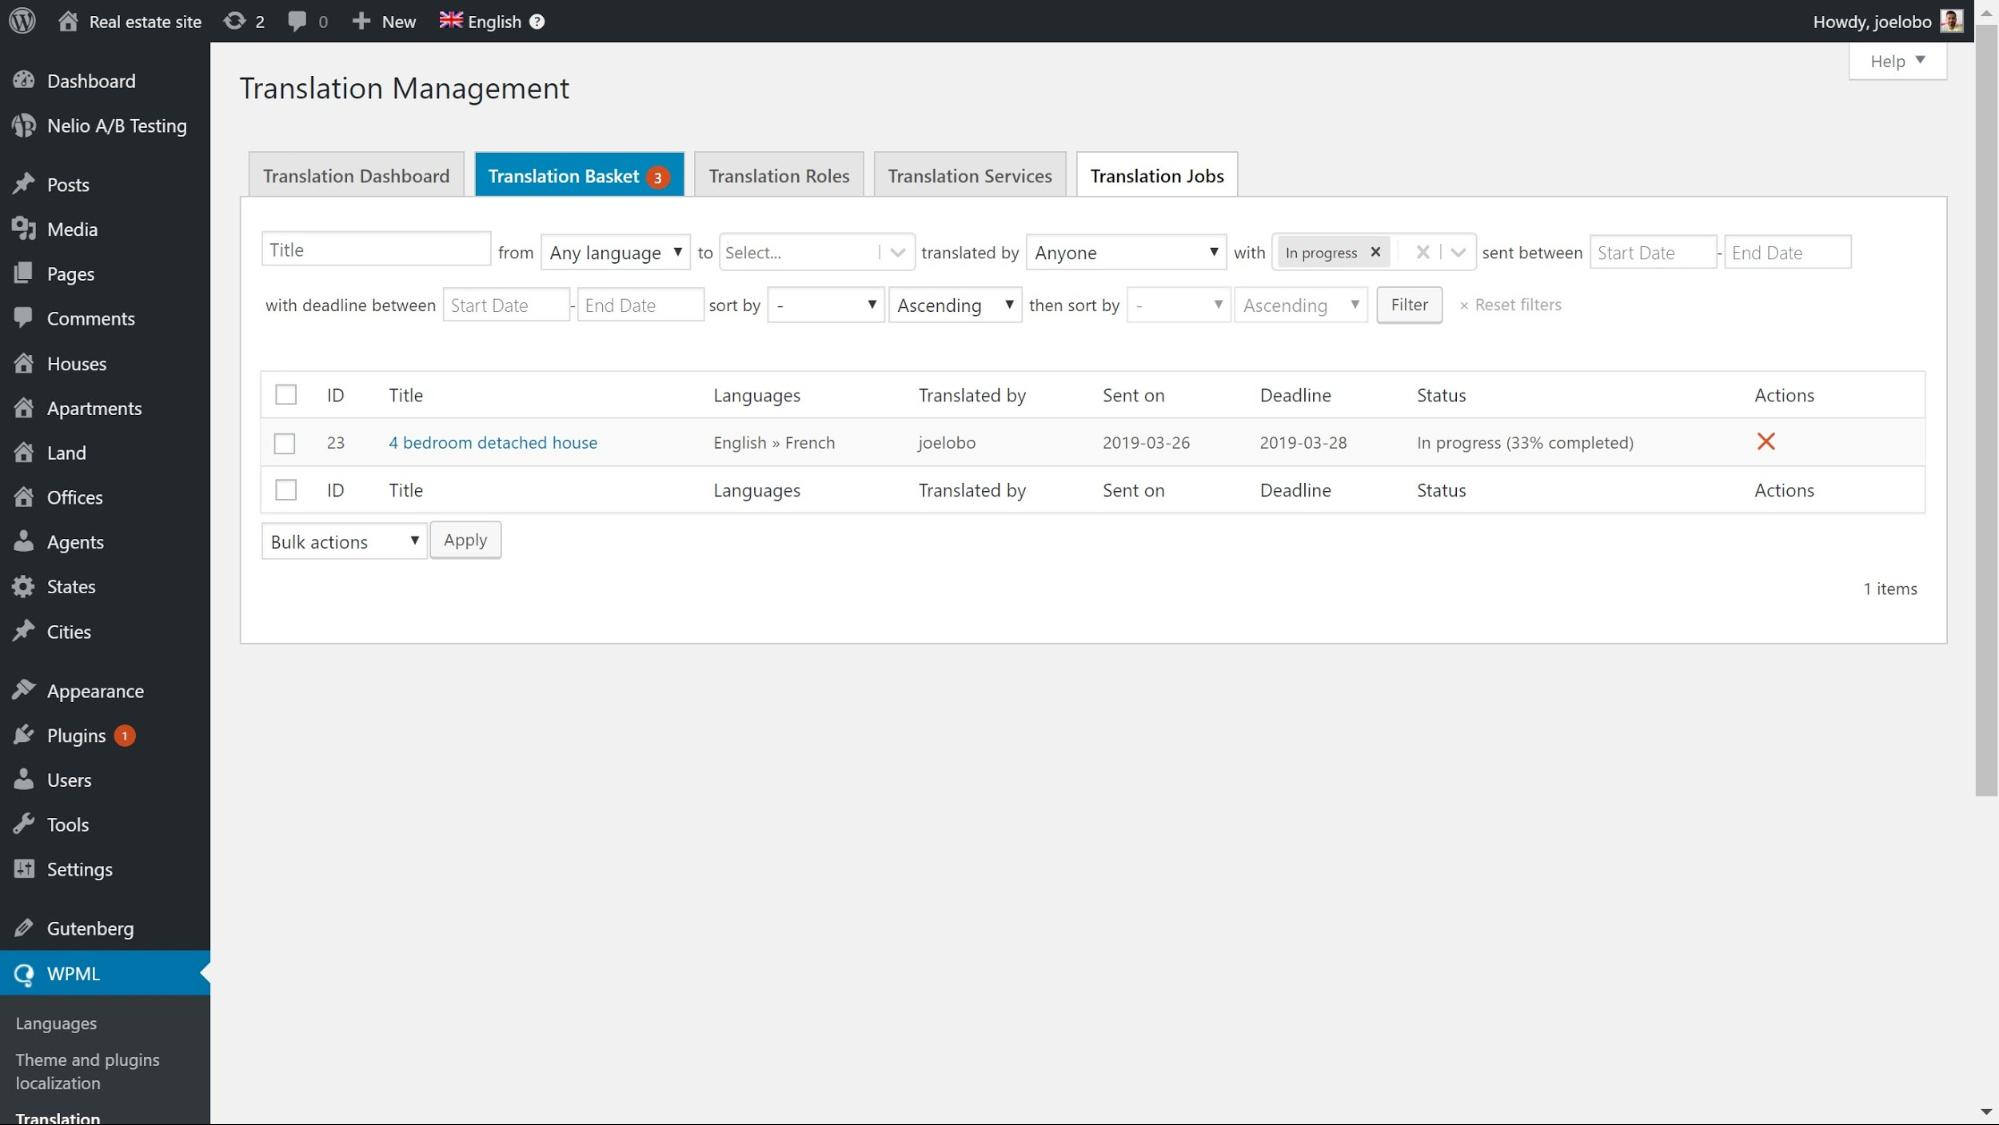
Check the status of translation jobs
Once you have submitted your job you can easily keep track of its status.
- Go to WPML->Translation Management and click on Translation jobs.
- Use the filter at the top to find the job you want to check.
Assign a translation service for your jobs
Just like with an individual, you can also hire a professional translation service to work on your content. WPML is integrated with hundreds of the biggest translation services from all over the world.
Link your website to a translation service
- Head to WPML->Translation Management and click on Translation Services.
- Scroll through the list of available translation services and click Activate.
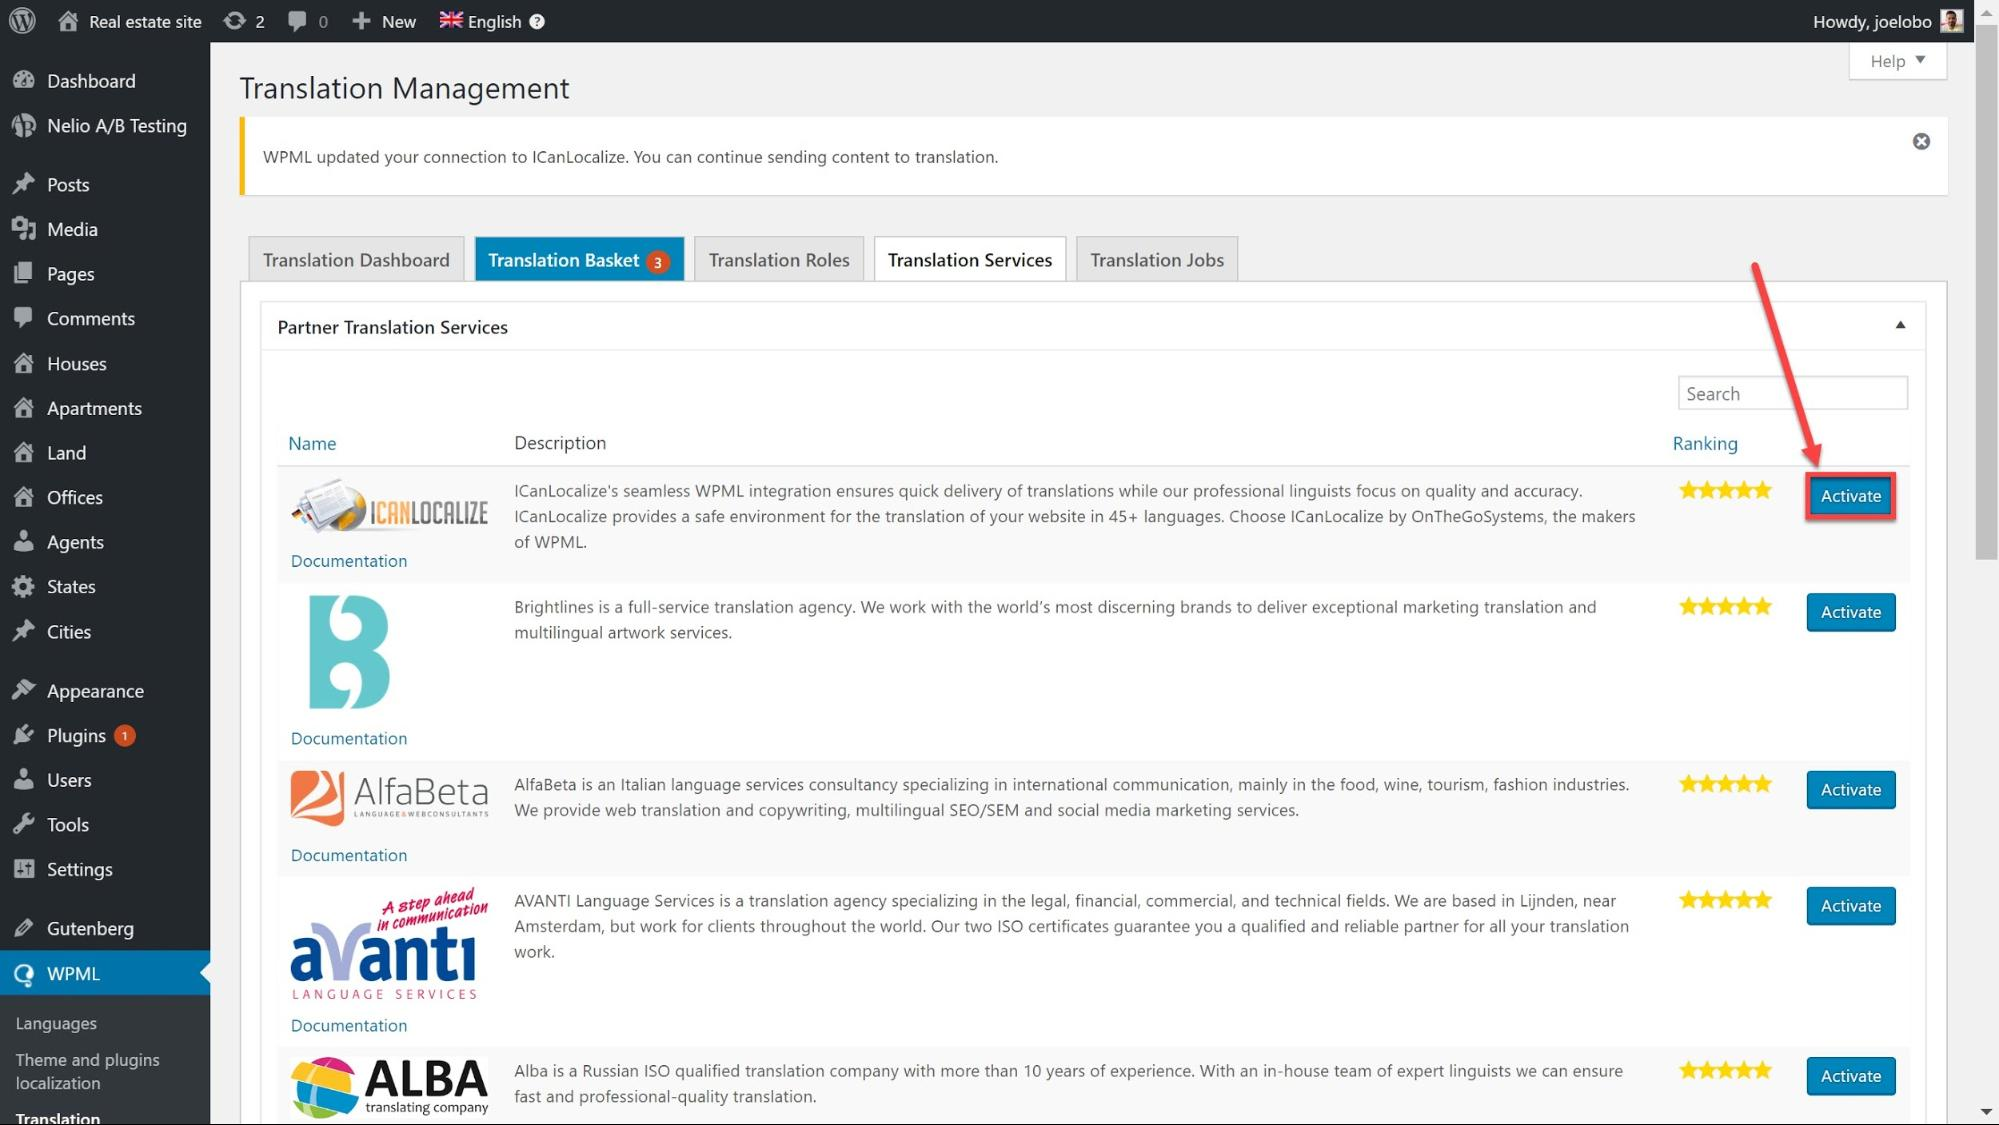
- Click Authenticate and enter the API token which you will receive when you sign up to the translation service then click Submit.
Send content for translation
Once you have authenticated a translation service you can start sending them work.
- Go to WPML->Translation Management and select the content you want to send on the Translation Dashboard.

- Scroll to the bottom of the page and under Select translation options choose the language you want to translate into. Click Add selected content to basket.

- Click on Translation Basket to review the content you have selected which includes the number of words, the batch name and the deadline.

- Click Send all items for translation at the bottom to create a job. Your translation service will now receive an email notification about the job.
- Your translation service will now provide you with a quote based on the job.
Receiving completed translations
As soon as the translation service completes the job it will be ready for the website.
Your translations will be either be delivered automatically or they will be manually fetched from your WordPress panel admin.
- Go to WPML->Settings and under the Translation pickup mode check the option you prefer.

If you select to deliver translations automatically then the completed jobs will immediately appear on your website.
- If you choose to manually fetch content then you can head to WPML->Translation Management and click on Check status to get translations at the top of the page.
Start translating your website today!
Now that you know how to do it, it’s time to start translating!
Download WPML today and follow the instructions to get your own completely multilingual website!